Leaderboard


Popular Content
Showing content with the highest reputation on 10/03/22 in all areas
-
Thought I'd do a short blog on the Polycarbonate tunnel we built. Our big field suffered with no storage, and location meant containers were very expensive to transport. so one option was to build a polytunnel, which we have planning permission for. again due to location, 500m from the coast 73M AMSL I wanted something sturdy. so looked at off the shelf packages. in the Highlands and Islands the PolyCrub is seen as the mecca. Designed in the Shetland isles, guaranteed to withstand 100MPH winds etc etc. due to the ability to get CROFT grant assistance on these, the price is, IMHO, artificially high CIRC 6K for 4M *6M.. this wasn't going to happen, so after looking at many photos I designed my own.. Basic principle is hoops of MDPE pipe secured to posts in the ground, then 3*2 timber used as horizontal support, with Polycarbonate sheets secured to this timber. the bottom sides are then clad. My design was to use 65mm Black MDPE pipe, and secure the timber with coach bolts and penny washers through the pipe. this way I get a guaranteed fixing that won't pull out , and it still allows for flex in the whole structure. 4m wide x 6M long, but this can be extended. My ground has bed rock close to the surface, 300-500mm below ground, so just knocking in post wasn't going to be secure enough to withstand the winds, also where I was sighting the tunnel its on sloping ground, so I couldn't get it level. I cleared the area to removed the top vegetation and a bit of the top soil. and dug 14 holes. then due to rock levels I then core drilled the rock to allow for the post to be deeper. We then set these in concrete, (at the same time as doing the slabs for the cabins.) The next day we had a look and I wasn't too happy with the security of the posts, so slight change of plan, we created a plinth. basically I used some 6x2 either side of the posts, with a slight angle, then filled this with concrete (again we used ready mix at the same time as back filling the treatment plant) this added about 300kg of concrete to each side, and joined all the posts together, and gave us a solid plinth at the side. No Photos of the next stage but we cut 7M lengths of 63mm pipe, this when placed over the posts gives approx. 500mm dwarf walls and a 6M polycarbonate sheet, giving a head height of around 2.3M. we used a plumb bob to get the centre line on each hoop and drilled an 8mm hole through the pipe and secured the top 3x2 treated timber to al the hoops. One thing we found was that the MDPE did not bend uniformly, this may have been due to slight errors with the posts being plumb. The resultant timber (which was not very straight), snaked from hoop to hoop. after head scratching and re thinking. I decided it was a poly tunnel and to get on with it. we used 7 lengths of timber jointed with half lap joints to extend the length to 6.5M. if using a clock analogy the timber was placed at 9,10,11,12,1,2,3 positions, with the 9 & 3 o'clock being 500mm off the ground, also ensuring the 9 & 3 o'clock timbers were approx. 5.8M apart circumferentially. Then it was a case of securing the polycarbonate sheets to the timber. each sheet is joined with some soffit H joint strip. (you can buy a clear joining strip for the sheets but for a 6M length it was around £65. the H strips proved extremely difficult to connect the two sheets together, or should I say impossible. so I cut off the back edge on one side and used some glazing sealant. this way we could attach the strip to the polycarbonate prior to bending over the tunnel. and each sheet 'H' strip basically lapped over the previously installed sheet. day 2 we had the basic structure. It was noticeable that the curve was not symmetrical, so putting the door frame header in by securing to timbers at 11 and 1 o'clock was not level. I overcome this by using a ratchet strap attached to the 11, and 3 o'clock timbers and tightening until timbers at 11&1 o'clock were level. I then put the two door jambs in (concreted at the base) and cut to the length required and secured to the header. This worked and the tunnel was now more cylindrical. I framed the rear by baring 3x2's off the horizontal timbers. Last steps were to clad the base, I used 4*1 treated timbers that were screwed into the MDPE pipe and wooden posts. then used strips of visqueen to create a more sealed dwarf wall, this will help prevent driven rain from the winds getting inside. over this I used Larch timber backs* to create a vertical cladding All in with hardware, polycarbonate, timber, concrete the project cost £1200. not cheap, but its solid as a rock. It withstood the first Autumnal storms this week with winds hitting 50MPH. Its also very warm inside, even now as the temperature is falling. Larch timber backs are the offcuts from the saw mills and are reasonably priced as scrap. we purchased a pack of timber backs, approx.40 lengths of larch timber with bark in 4.8M lengths for £100. these are not uniform and taper etc, but as i only needed 500mm lengths it was straight forward to make it work.2 points
-
Its for lazy sods like me who cant be bothered to get out of their armchair to turn on the light when it gets too dark to read the paper 🙂 LOL. But to the question: It's been said many times already in this thread but I'll repeat it once more: if you're getting your phone out to control stuff, you're completely failing at home automation. The point of automation is it automatically does stuff without manual intervention. For example in my house: - windows automatically open when it's hot or the house is in risk of overheating, and it's cool outside and the indoor lights are off (to avoid attracting bugs in), so long as it's not raining or forecast to rain imminently. - the blinds automatically close on the sunny side of the house if there's a risk of overheating. And they close at night. But if closed in the day in winter, the slats are automatically altered to maximize solar gain while preserving privacy. - the heating and hot water is automatically turned down a notch when the house is unoccupied, and the mains water stopcock turned off to avoid risk of damage should there be a leak. - the hotwater cylinder is automatically boosted to a higher temperature (more stored energy) the more guests we have staying over. - the patio lights automatically turn on when the nearby door is opened. - hallway and bathroom night lights automatically turn on as you move about at night. - the relevant towel radiators automatically warm up whenever a shower or bath is used. - the ensuite electric UFH automatically comes on and the bedroom lights slowly fade up 5mins before my wake-up alarm goes off. And 10mins after the alarm the curtains automatically open. - excess PV generation is automatically sent to immersion, towel rads, ASHP etc depending on needs Etc. Etc. Etc. Those were off the top of my head, I think it's not even halve of what I've programmed The important bit about all that is it's all easily defined in a single software stack, so I can change preferences on it with rewiring or fiddling with mechanical timers or anything. And none of this requires arsing about on a phone. And it works without any internet connection (well except forward looking weather forecast data). I really don't want to persuade a single person they need any of that unless they already know they want it. But at least try and understand the utility of it for those that do chose to persue it. This has absolutely nothing to do with "what new problem can I dream up to solve if I buy a raspberry pi" and everything to do with "how do I want my home to assist and facilitate the preferences of the occupants living in it".2 points
-
These guys can do your steel laser cut piece - up to you now you then finish it https://gboutdoorfires.co.uk2 points
-
If the raised patio causes any overlooking or loss of enjoyment to your outside amenity area, report it to the council. They often have target response times for planning enforcement and tend to be keen to meet them.2 points
-
Does it impact you? Has the house been externally visually impacted? If not I would leave him alone. If he is a total p**** then maybe fair enough, report him. Or just live and let live and don't let it bother you.2 points
-
Right ! I ain’t having that ! Use to have an original phoenix cocktail and around 50 Jamma boards . Sold them for considerable profit once mame etc. became acceptable too me . So now have this bad boy . I7 with 1tb drive . 150,000+ games and every emulator there is . SWMBO said it had to “ look cute “ , as her favourite games is bubble bobble …..
 2 points
 -
The Raspberry Pi is a brilliant little powerful computer. It’s uses are endless. I have a few around the house. During lockdown I built a cocktail arcade cabinet powered by a Pi4. I also built a small portable one for my nephew for his Christmas. I have another one that runs some software called Pi Hole which means we don’t get any internet adverts. I also have another one that has a DAC attached to it that I can stream music from my NAS or from Spotify. I have a fairly expensive Hi-Fi DAC and the Pi based one sounds as good to my old ears.
 2 points
 -
Greetings on a miserably rainy Sunday October morning. Perfect weather for catching up on some blog writing! As the title suggests this blog will be about our external coverings of the house and, by the end of it, the outside of the building will be pretty much finished allowing us to crack on internally. We started many months ago by battening the outside of the buildings. As we are having external blinds and they have a requirement for fitting the blind cassette we needed a large gap between the house walls and the outside of the cladding. This meant 50mm x 50mm timber battens and counter battens. We did this ourselves and saved many thousands and, even though it was slow going (as, it seems, everything is when you do it yourself!), it was very satisfying with the carpenter saying that it was good work and he’d seen chippies do a lot worse jobs than we did. Nice warm fuzzy feeling ensued. We are having a mixture of burnt Siberian larch (https://en.wikipedia.org/wiki/Yakisugi) and, to contrast the black, standard Siberian larch on the ‘arms’ of our property and entrance porch (all will be revealed in photos below) and I ordered all the cladding to be delivered on-site prior to the carpenter starting. The carpenter started on the garage using the standard Siberian larch which we bought from Jewson at a very reasonable price, and quite a bit cheaper than we could get from the usual timber cladding suppliers and we are very happy with the quality of the wood. He then went on to the black charred larch (which gets everywhere and he and his tools looked like they’d been in a coal mine by the end of each day!). We purchased the charred larch from Permachar (https://permachar.co.uk) who gave us a brilliant price. The wood itself was burnt and delivered from Lithuania (https://degmeda.eu) but they will only sell to the UK via Permachar. It is stunning wood, but incredibly fragile and any sort of dragging or scraping will cause the black char to flake off. While he was busy doing that and while the scaffolding was up I thought it a good time to get the guttering started. Our architect specified Zinc guttering and after a lot of thought and looking at stainless steel and zinc we also decided that zinc was the choice for us. We ordered it from Rainclear (https://www.rainclear.co.uk/guttering/copper-zinc-guttering/guttering-fittings.html?color=235) who offer next day delivery if in stock and were incredibly helpful and very well priced. It’s also a clip on system which even I managed to install without any major issues! Around the same time and while the carpenter was busy putting the cladding up our external blinds got fitted. We bought those from a local company called Powell blinds (https://powellblinds.com) who stepped in brilliantly at the last minute after we were seriously let down by Cornerstar Aluminium (long story which I won’t get in to here). The blinds are fitted up behind the cladding above the windows but externally so they will be hidden from view when lifted up. We absolutely love them and during the heatwave this summer we lowered them and this drastically reduced the temperature inside the house. There was still one large south facing window that didn’t have blinds that needed shading. We wanted and the architect designed a Brise Soleil in this area but all we had to go on was a 2D drawing. I contacted a few companies about getting one made and installed and the quotes came back at between £6k - £7k! A figure we simply could not afford. So I did research and spoke to a local forge called Horsham Forge (https://www.horshamforge.co.uk) with an idea I had. He said ‘that could be done but how about this instead?’. He suggested brackets with a pole running through them and vertical timbers slid on. Genius! On to Sketchup where I draw up the brackets and gave them to the forge to be created and spoke to my timber manager at Jewson who procured me some thermowood at the size I needed and got my carpenter to fit it and it cost me £1700 in total. So we saved around £5k by doing it ourselves and we also enjoyed the journey and got a solution that we designed (with the help of the forge of course). We think it looks fab and it does a good job of shading from the sun apart from a couple of hours when the sun is directly facing that side of the house. So we will still get some solar gain but it is definitely reduced and it’s a brilliant architectural feature. 😉 Right, while all this was going on the chippie was finishing up the cladding and now that it is all finished and I have put the downpipes on we have an almost finished external facade to our dream home. We love it and think it’s stunning. So very happy with the carpenter’s work (http://www.kmlcarpentryandroofing.co.uk). Kieran’s attention to detail at the junctions between the 2 types of wood is fabulous as it is in other areas too. He would also discuss any issues and potential solutions with us to make sure we were happy with them rather than just doing something he thought was right. Hopefully the pictures below do it all justice! (Note: please ignore the 110mm brown downpipe in the below photo! It will eventually be a rain chain but this works for now. 😉 ) Thanks for reading and we hope you like what we’ve achieved so far.1 point
-
You don’t need to work out the pitch and height unless you specifically want to. but let’s say ridge height of 3m and eaves at 2.5 and run is 2.25m (half of the 4 plus a bit for eaves overhang). Gives a pitch angle of approx 12.5 degrees1 point
-
Copper would be nice. Solders easily and you can get chemicals to give it a bronze like patina or green verdigris etc.1 point
-
It sounds like you have good level of insulation now, but you still need to do your maths homework to know how much heat input you need to balance all the losses - see Once you know the heating power needed divide over floor area to get required output per area and that will tell you if 35'C is realistic Using clips you can do whatever you want I'm not sure though if there are any on the market that are designed for hard surface. 100mm centres should increase your heat output, but there is more to the story (shape of the loop, length) that may affect it and make no better than 150mm centres No cnc, because after routing 16mm channels for pipes your floor will become as stable as cheese. If you find a way to attach pipes to the boards you could pour thin fiber reinforced screed - look at Lewis deck for inspiration1 point
-
One option might be to explore LED strip - it would give a more even light than the individual lamps in that photo which IMO would look better. And as it's extra-low voltage and cold running avoids any safety/legal issues. If you want to do it with individual lamps, from an electrical POV so long as you use off-the-shelf fittings designed to be exposed e.g. batten lampholders, and keep all wiring connections inside the fittings, there's no real legal/regs issue. It's not that different from making up a table lamp, or e.g. replacing a pendant lampholder with a new one/a different fitting, both of which are things anyone can do. If you want to get an electrician to check it over you can, or just stick to 12V e.g. halogen capsules or similar. If the frame is metal then in theory if you use enclosed lampholders you don't need to earth it but I probably would. The bigger safety thing is probably fire, multiple lamps enclosed in a box can get pretty warm, less so with low-energy but even still. It'd just be a case of having some ventilation (holes in bottom and top) and a reasonable distance between lamps and surfaces.1 point
-
Anyone can make a light fitting for themselves, frame is light wire brazed or welded at joints. Off the shelf lamp fittings/bulb holders.1 point
-
Now the dungeon you built is starting to make sense. A captive audience to play video games with you.1 point
-
Like others I am a bit confused as to whether the guy just annoys you or there is an actual issue with the work done impacting you. If if doesn't;t actually affect you then forget about it. In the next street, someone bought a listed house and started renovating it. I saw wood paneling from inside in a skip and checked, but no listed building application had been made. I simply filled out a form informing the council. They sent someone along to check if work was being done without required permissions. I got an email back saying nothing yet had been done which needed permission, but it would and they would be applying for it. I didn't believe they would have applied for permission, but the issue was dealt with. I just wanted to make sure that no work was done on a listed house without the correct permission as it would be a shame to ruin it. It is also a criminal offence, according to my architect (I haven't checked). If you think work needs permission just inform the council, simple as that. If it is all within the rules he will get permission if there is an issue he will have to change it back. I would not consider this a neighbour dispute, anyone can notify the council of work without planning permission. When we sold out last house we needed every single drawing from building control and planning for every piece of work we had ever had done. I doubt he will be able to easily sell it with obvious recent work and no permissions.1 point
-
How much of this is because you don’t like him versus it actually impacting you. If there is no impact to you then move on and forget about it. If you do complain and he finds out then it’s likely he’ll get all the necessary permissions should there be any needed and he’ll just make life more difficult for you. In life some things are worth the fight and some things not. Choose carefully what you will fight for.1 point
-
The Picade is brilliant. It was that (without the screen) I built for my nephew1 point
-
I’m the only one who can play 4 player Bomberman and gauntlet . Nothing more fun than 4 people sat round that with beer shouting at each other 😁1 point
-
Drop the council conservation officer an email asking if you need permission as the neighbour next door has just done xyz and you’re thinking of doing the same …1 point
-
The lower the water flow temperature and the larger your pipe spacing then the lower will be your heat output per square meter of floor. What will work depends on what you need. By chance, earlier today I came across this table: https://www.tradingdepot.co.uk/info/plumbing/polypipe/underfloor-heating-heat-output-tables/ It doesn't help directly because it does not go down below 40 C flow but it gives an idea of the dependencies.1 point
-
Thanks Nick. I haven't been clear. I did get a Gas Safe certificate for the recent installation. I understood a commissioning document is something different. When the boiler was first installed in 2016, the engineer filled in and signed a gas boiler system commissioning checklist in the manufacturer's "installation, commissioning and servicing instructions" booklet. The 2016 commissioning checklist contains some information about the boiler like CO levels. In May 2022, the engineer has not provided me with a commissioning document for the boiler (but did do one for unvented cylinder). There is no information about the C0 or CO2 levels when he moved the boiler. There is no sticker on it. According to the unvented cylinder commissioning document, the maximum primary flow temperature is 75 C. In 2016, the engineer who installed the boiler did not produce a Gas Safe certificate (and there is no record on Gas Safe), and he crossed out the section "domestic hot water Mode" in the commissioning checklist. At the time, we just trusted tradesmen to do the right paperwork. I will contact the unvented manufacturer and ask them which coil I should be using. I say that it takes a long time to reach the right temperature, because the boiler remains on continuously for at least 2.5 hours. Is that a correct conclusion? I am still on a journey on learning about heating, electricity, plumbing etc, so apologies if I am not clear. We found with some workmen, even the qualified ones, that we rapidly find out things that they should know but which they don't. It really is appalling.1 point
-
Render board is exactly how we did it on our dormer "cheeks" against the pitch roof. Roof slated, flashing put between slates and the wall, chased on and fixed, render board over, bead, then thin coat render system.1 point
-
It's a piss-take IMHO. Their price is based on the value of the return in your pocket hence as energy tarifs go up, so do their price. Nothing to do with the components they're made with. Typical PV divertor has little more going on inside than a fancy 'smart light dimmer' plus a £10 CT.1 point
-
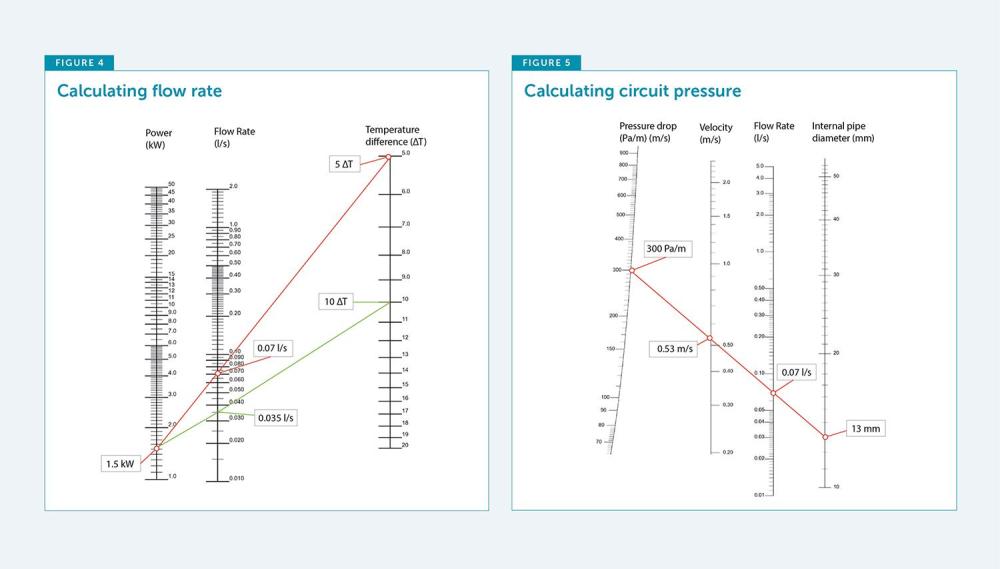
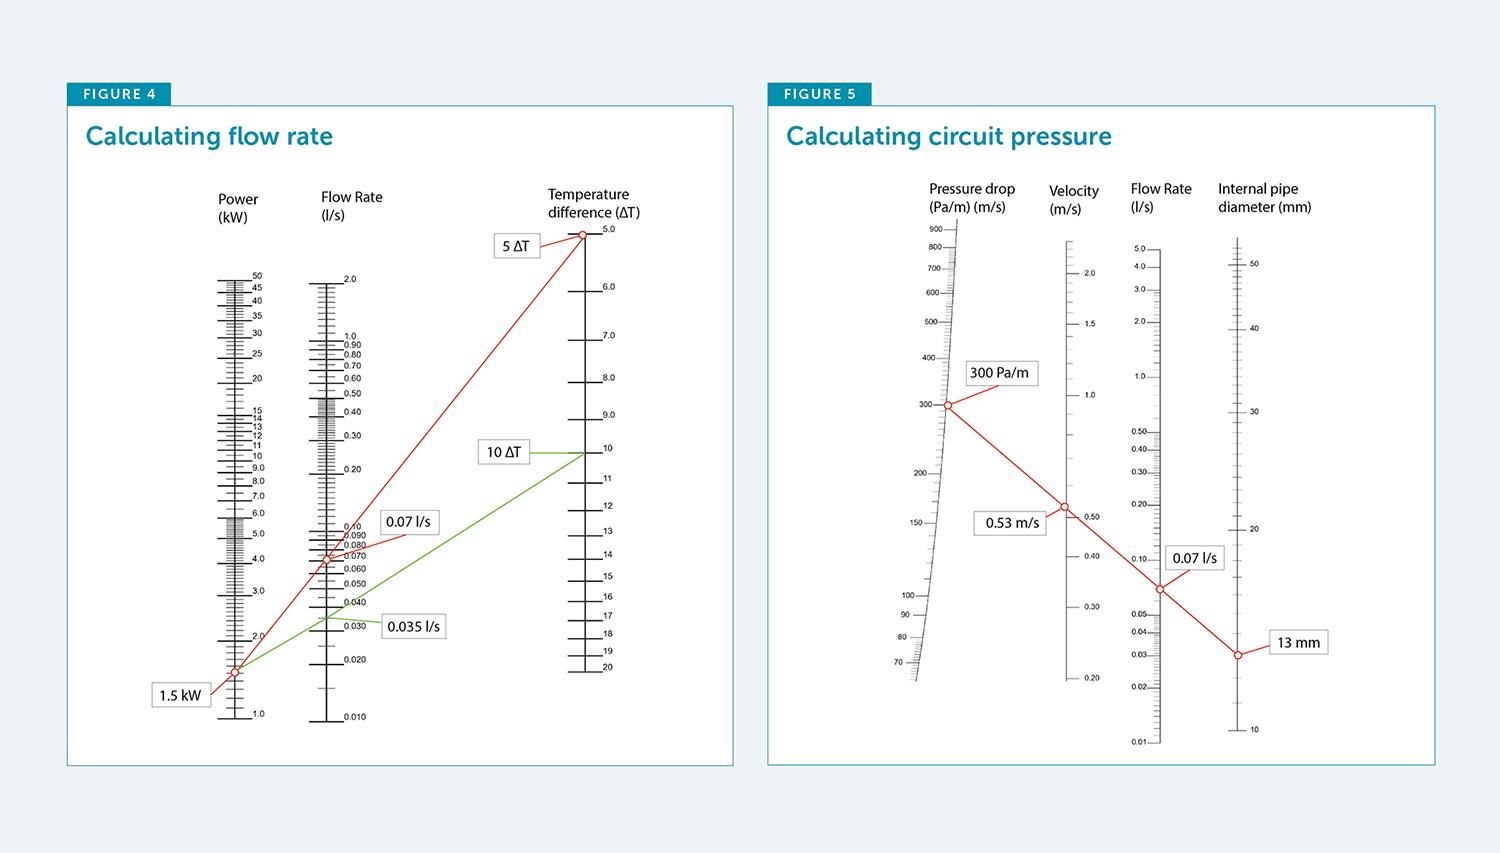
You cannot just pick a flow temperature and assume it will work. Flow temp depends on heat loss, both from the house and downwards. You really need to be looking at running weather compensation to get the best CoP. See attached, the red lines are there as examples. You need to calculate your heat loss then find W per m2. From these charts you can calculate your heat for WC. Find heat loss at -20 and +20, convert them to flow temps and plot a straight line curve. You need to consider the min flow requirements of the heat pump and let that guide you on centers. Also the centre distance affects the response time of the floor.
.thumb.jpg.e6f5b10749b0a8b28a782f83356b9791.jpg) 1 point
1 point -
150mm is fine, 100mm risks the bend radius being a real headache!1 point
-
I do 😁👍1 point
-
What sort of hedge? Yes the digger will cut through the roots and it’s unlikely to bother the hedge, but you need to be looking at root protection for the foundations1 point
-
I've been looking forward to getting to a point where I can park my car in my driveway again, and finishing my July Post with a part 2 here to mark a finish to my Driveway project finally! Took a bit longer than the two weeks I was hoping!! I just finished adding up the damage and it was @ €7.2k all in all. I think the length of time increased the costs as there were days where I couldn't get to use the compactor and I had to get it back a few times to progress the project on. Some notes observations below: The big Diesel Compactors are heavy duty brutes but also take a specialist skill to start. They are all draw cord and they pulled the arms off me for 25 minutes before I gave up. I was shown how to start it but had to return it to my embarrassment and downgrade! Drainage took a lot longer than I imagined, plumbing in the drain channels was very difficult - I replaced both gully traps and one was encased in concrete by the original builder! Just getting the right couplings and things to fit took me a while to figure out. SDS comes in different sizes, SDS Max chisel bit wouldn't fix my SDS drill so ended up buying an SDS Max drill off Screwfix! I now own 3 angle grinders, started with none! A Screwfix one that won't let me change the grinder to anything else, then a 5" DeWalt, then a 9" Makita. I prefer the cut using this to the block cutter but the dust is gruesome! Grab Hire worked out well, took away 2 x 20 ton loads to clear the site and was able to drop two loads of MoT 804 exactly where I needed them. All moved by hand / wheelbarrow at that stage, was very difficult to find anyone hiring a skid steer for one day. Lots more sand and cement than I thought, all mixed with a wheelbarrow! Using a digger is scary when it starts tipping to the side due to doing something stupid! Two injuries: #1 drilling concrete screw into wall for new side gate, it got stuck and the SDS drill spun violently out of my hand, 6 weeks sprained finger didn't help! #2 seagull poo'd above and dropped inside my goggles, put them on and got acid splash into my eye. Now store goggles between jobs closed to the sky! Broadband issue is fixed - tree roots crushed the pipe on my neighbours property, stump was still there for years. I tried to find the pipe to create a new junction to my new house hear the boundary but only ended up finding the gas pipe by accident with the digger, just the tape over the pipe, where it shouldn't be - should be out on the road according to the gas map. Went to the other end near my old house and finger traced the pipe to a point near the new boundary and created a shore there. Thankfully after two years complaining a crew came recently out to remove said stump, run new draw cord and I'll have no issue getting broadband into my new house now, 1 less worry So I've to finish the very front and put up two more concrete posts and panels. I've to grout using Rompox jointing compound and see how long that takes. Hopefully it will keep the weeds away! But at least I can relax a little bit and use the driveway again. Would I go it again?! Well, I learned valuable lessons, to pace myself, what I can do when I put my mind to it, very useful for my self build next year. My body is certainly feeling the pressure and I'm glad I'm in my 50's and not my 60's!! I overestimated how much work was involved but learnt a lot in the process, not just specifics but about groundworks and hiring plant and grab hire which was new to me. I did get a digger & driver for a day and could see how they made short work of things compared to my efforts so picking and choosing where to spend money best is a wise course of action! Full costings below if interested! I Kept all my receipts for idle curiosity! All inclusive of VAT. Best of luck to anyone out there thinking of doing same! My Driveway area is 75m2. 7265.52 Total 1984.38 Tobermore Paving 210 Paving Block Cutter (€400-sale afterwards) 200 Recessed Manhole Covers 32.69 Spade 690.78 Sand, Easypost, Cement,Gravel 100 Diesel Compactor - unable to start, returned! 32.66 32mm plastic waste pipe as screen level 300 Compactor Rental 39.92 Donegal Quartz stone 89.95 Dewalt Angle Grinder 102.57 Sand/Cement/Gully 44.95 More Gullys 35.47 Lubricant / Sealant 147.08 Donegal Quartz stone & gravel 24.48 Plastering Sand 76.65 Sewer Gullys 11.32 Sewer Pipes 19.56 Sewer Pipes 19.19 Concrete Screws 200 Hire Compactor 500 Hire Digger 19.58 Plastering Sand 86.35 Manhole Cover 292.15 Plant Rental 69.65 Cement mix & misc 45 post and line levels 93 replacement wheel for wheelbarrow & cement 17.7 side gate lock and hook 5.99 petrol can 284.55 rompox jointing compound 12.45 tape 257.31 sds max drill 82.04 kpost 7.15 coupler 38.8 drain caps 15.95 sds max drill 37.25 bits and sockets 38.95 draper cold chisel 700 Grab Hire - removal of concrete/topsoil 300 Delivery of MoT 8041 point
-
As @Nickfromwales says, it may not be optimal on paper, but realistically, I struggle to believe it makes a significant difference in most cases. We have the exhaust on the south pitch and intake on the north pitch, mainly to fit around solar panels without using loads of ducting and compromising internal roof space. I balanced the system without a problem, but accept that I have no idea which way the wind, if any, was blowing at the time. The system has continued to do it's job with no noticeable difference in performance over the last few years, regardless of weather, which is fine for me!1 point
-
@TimCx I’m using these Analox ones. No complaints so far (and the price on that site I linked is very good but no idea if it’s a good site)1 point
-
No such thing as a stupid question, stupid is not asking 👍despite what the SE says it’s the building inspector that makes the decision on ground conditions once the trenches are dug (and clean, scrapped flat and smooth). I would say dig 1100 from existing floor level, the thickness of the concrete poured should be specified by the SE but some do full fill pours (trench filled to top, saves laying blocks in a trench).1 point
-
I thought I would put a post together for those that are looking for windows, replacement or new build. As someone who deals with final order placing / final quote discussions. One of the things that crosses my desk on regular basis, is that the "other supplier" is more cost effective. Which leads me to ask myself "more cost effective against what" are you comparing apples for apples? When I ask people to compare, what we generally explain is to look at the following (see below) if they are not willing to supply a copy of the quote without prices. Product - is the product similar. For example are you comparing a Timber Aluminium cladded window with a Timber Aluminium cladded window? Glazing - Is the glazing on offer from both suppliers comparable? Is it double glazed v's triple glazed for example or is it float glass v's toughened or laminate? Check that doors have toughened/laminated glazing Check that windows within 300mm of a door have toughened/laminated glazing Check that windows below 800mm from the finish floor have toughened/laminated glazing Check that windows that are 1400mm in height or above for toughened/laminated glazing. Most suppliers will start to consider toughened / laminated from 1400mm onwards, some will still be float glass. Check triple glazed glass units. Some suppliers will only toughen the inner and outer panes and leave the middle pane as float glass, others will toughen all 3 panes (I recommend all 3 panes as toughened) when required. Why? quick example is from experience, a customer in the north west of Scotland had the middle pane as float glass in french doors, the doors are recessed with wall on either side. It effectively became a wind tunnel. What happened is during high winds, the door sashes had that much wind pressure constantnly, that the door sash was pushed away from the frame slightly and a rattle effect occurred (only thing I could think would cause this to happen). As a result the middle pane (float glass) shattered. This required the whole sash to be replaced, as the glass was glued into the frame on that particular product. Timber - Is the timber comparable, are both using spruce/larch/oak/pine etc.? Are any of the products finger jointed as standard (which is more cost effective versus fixed timber, but not as aesphetically pleasing). Is the timber cut from from one section of wood or is it individually glue laminated timber? Ug values - A 0.5Ug can be quoted by suppliers but the costs vary dramatically. One of the reasons for this can be the glass make up and the gas that is being used. Some quotes won't tell the gas being used but it's safe to assume that if it's 48mm glazing it is Argon. Pay attention to the spacer distance also, not for cost but if the spacer is above 18mm, convection can occur of the gas filling (gas moves around in the unit). Hinging - Are the hinges concealed or are they exposed? Door Hinging - Pay close attention as suppliers will have quoted standard framing on doors, others may have increased the widths of the jambs to increase the space available at the hinging for plastering behind. RAL Colours externally - are the quoted RAL colours the same? Internal colours - have they quoted the same? Some will offer the standard colours such as a clear lacquer, others will have them painted - does this have any impact on price comparison. Sizes - have any of the units been split, due to not being able to achieve the size required? Some suppliers will not be able to do large sizes, others will be. Look out for compromises. Don't always look at the end figure and immediately reject a quote as being to high, compared to the others. Most suppliers will have the supply price first, then additional items such as window cills, compriband, membrane, installation etc. which are optional to the quote and not necessarily required but may be included in the total cost at the end. Most self builders like to take on the mantra of doing the whole build, others would like to leave this to the supplier or builder and or source their own materials if supply only. What is being offered with the installation service, are the installation options / costs comparible to each other? Who takes responsibility for the windows upon arrival? Generally speaking most suppliers who are installing, should be taken responsibility from the moment the windows leave the factory, to the moment the windows/doors have been installed, sign off. If supply only, the responsibilitygenerally passes to the client once the offload commences. So it is important to document the windows before offload, during offload and once offloaded. The manufacturer will normally have documentation / pictures before departing the factory, it makes life easier on whether a claim with the haulage company or whether a claim with the supplier is required (both should go to the supplier who should deal with it). Warranty - how long is the warranty, what does it cover? Last but not least, is the quote comparible? Have the suppliers referenced things the same way or are have the drawings been scaled and then referenced by the supplier (this happens a lot when no window schedule exists)? A lot of architects don't create window schedules for some reason (one the major parts of a build and most costly aspects) and problems of missing windows can be encountered, due to the elevations not always showing "hidden" windows which can be seen on floor plans. Some suppliers can miss this, which then impacts that quote. Hopefully some people find this useful, of not apologies for the long read1 point
-
Look for the target deltaT and minimum flow in the heat pump manual. Mine wants 5-7C for example. 11C is high. (old school non condensing gas boiler high)1 point
-
I'd love the see the difference in running costs between A90 and A110.... maybe £20 a month? It's the ecofriendly top trumps... Who cares if you can't drive 220mph, it beats your 185mph....0 points
-
0 points
-
both beat me easily with my little Picade. 😞
 0 points
 -
Shows how little i know. 10 ip cameras I know what a camera is. But IP? home automation server . Well i guess you would. se battery Dont know what this is? pw battery Dont know what this is? doorbird Dont know what this is? usual tv stuff 6 raspberry pi’s ( doing a variety of things ) Dont know what this is? Just googled it and am, mostly, none the wiser. EV charger 3 macs 2 windows pc ( yuck ) 4 iPads0 points
-
I just want to congratulate Pocster on his solwelding skills. Just goes to show that with practice......... Soon, his " Iam the absolute b*llocks " may well be applicable (If only for his solweld)0 points


.jpg.87d6d75adaec59a22c40fcf0ea8d2464.jpg)