
Leaderboard


Popular Content
Showing content with the highest reputation on 10/02/22 in all areas
-
I've been looking forward to getting to a point where I can park my car in my driveway again, and finishing my July Post with a part 2 here to mark a finish to my Driveway project finally! Took a bit longer than the two weeks I was hoping!! I just finished adding up the damage and it was @ €7.2k all in all. I think the length of time increased the costs as there were days where I couldn't get to use the compactor and I had to get it back a few times to progress the project on. Some notes observations below: The big Diesel Compactors are heavy duty brutes but also take a specialist skill to start. They are all draw cord and they pulled the arms off me for 25 minutes before I gave up. I was shown how to start it but had to return it to my embarrassment and downgrade! Drainage took a lot longer than I imagined, plumbing in the drain channels was very difficult - I replaced both gully traps and one was encased in concrete by the original builder! Just getting the right couplings and things to fit took me a while to figure out. SDS comes in different sizes, SDS Max chisel bit wouldn't fix my SDS drill so ended up buying an SDS Max drill off Screwfix! I now own 3 angle grinders, started with none! A Screwfix one that won't let me change the grinder to anything else, then a 5" DeWalt, then a 9" Makita. I prefer the cut using this to the block cutter but the dust is gruesome! Grab Hire worked out well, took away 2 x 20 ton loads to clear the site and was able to drop two loads of MoT 804 exactly where I needed them. All moved by hand / wheelbarrow at that stage, was very difficult to find anyone hiring a skid steer for one day. Lots more sand and cement than I thought, all mixed with a wheelbarrow! Using a digger is scary when it starts tipping to the side due to doing something stupid! Two injuries: #1 drilling concrete screw into wall for new side gate, it got stuck and the SDS drill spun violently out of my hand, 6 weeks sprained finger didn't help! #2 seagull poo'd above and dropped inside my goggles, put them on and got acid splash into my eye. Now store goggles between jobs closed to the sky! Broadband issue is fixed - tree roots crushed the pipe on my neighbours property, stump was still there for years. I tried to find the pipe to create a new junction to my new house hear the boundary but only ended up finding the gas pipe by accident with the digger, just the tape over the pipe, where it shouldn't be - should be out on the road according to the gas map. Went to the other end near my old house and finger traced the pipe to a point near the new boundary and created a shore there. Thankfully after two years complaining a crew came recently out to remove said stump, run new draw cord and I'll have no issue getting broadband into my new house now, 1 less worry So I've to finish the very front and put up two more concrete posts and panels. I've to grout using Rompox jointing compound and see how long that takes. Hopefully it will keep the weeds away! But at least I can relax a little bit and use the driveway again. Would I go it again?! Well, I learned valuable lessons, to pace myself, what I can do when I put my mind to it, very useful for my self build next year. My body is certainly feeling the pressure and I'm glad I'm in my 50's and not my 60's!! I overestimated how much work was involved but learnt a lot in the process, not just specifics but about groundworks and hiring plant and grab hire which was new to me. I did get a digger & driver for a day and could see how they made short work of things compared to my efforts so picking and choosing where to spend money best is a wise course of action! Full costings below if interested! I Kept all my receipts for idle curiosity! All inclusive of VAT. Best of luck to anyone out there thinking of doing same! My Driveway area is 75m2. 7265.52 Total 1984.38 Tobermore Paving 210 Paving Block Cutter (€400-sale afterwards) 200 Recessed Manhole Covers 32.69 Spade 690.78 Sand, Easypost, Cement,Gravel 100 Diesel Compactor - unable to start, returned! 32.66 32mm plastic waste pipe as screen level 300 Compactor Rental 39.92 Donegal Quartz stone 89.95 Dewalt Angle Grinder 102.57 Sand/Cement/Gully 44.95 More Gullys 35.47 Lubricant / Sealant 147.08 Donegal Quartz stone & gravel 24.48 Plastering Sand 76.65 Sewer Gullys 11.32 Sewer Pipes 19.56 Sewer Pipes 19.19 Concrete Screws 200 Hire Compactor 500 Hire Digger 19.58 Plastering Sand 86.35 Manhole Cover 292.15 Plant Rental 69.65 Cement mix & misc 45 post and line levels 93 replacement wheel for wheelbarrow & cement 17.7 side gate lock and hook 5.99 petrol can 284.55 rompox jointing compound 12.45 tape 257.31 sds max drill 82.04 kpost 7.15 coupler 38.8 drain caps 15.95 sds max drill 37.25 bits and sockets 38.95 draper cold chisel 700 Grab Hire - removal of concrete/topsoil 300 Delivery of MoT 8044 points
-
Thought I'd do a short blog on the Polycarbonate tunnel we built. Our big field suffered with no storage, and location meant containers were very expensive to transport. so one option was to build a polytunnel, which we have planning permission for. again due to location, 500m from the coast 73M AMSL I wanted something sturdy. so looked at off the shelf packages. in the Highlands and Islands the PolyCrub is seen as the mecca. Designed in the Shetland isles, guaranteed to withstand 100MPH winds etc etc. due to the ability to get CROFT grant assistance on these, the price is, IMHO, artificially high CIRC 6K for 4M *6M.. this wasn't going to happen, so after looking at many photos I designed my own.. Basic principle is hoops of MDPE pipe secured to posts in the ground, then 3*2 timber used as horizontal support, with Polycarbonate sheets secured to this timber. the bottom sides are then clad. My design was to use 65mm Black MDPE pipe, and secure the timber with coach bolts and penny washers through the pipe. this way I get a guaranteed fixing that won't pull out , and it still allows for flex in the whole structure. 4m wide x 6M long, but this can be extended. My ground has bed rock close to the surface, 300-500mm below ground, so just knocking in post wasn't going to be secure enough to withstand the winds, also where I was sighting the tunnel its on sloping ground, so I couldn't get it level. I cleared the area to removed the top vegetation and a bit of the top soil. and dug 14 holes. then due to rock levels I then core drilled the rock to allow for the post to be deeper. We then set these in concrete, (at the same time as doing the slabs for the cabins.) The next day we had a look and I wasn't too happy with the security of the posts, so slight change of plan, we created a plinth. basically I used some 6x2 either side of the posts, with a slight angle, then filled this with concrete (again we used ready mix at the same time as back filling the treatment plant) this added about 300kg of concrete to each side, and joined all the posts together, and gave us a solid plinth at the side. No Photos of the next stage but we cut 7M lengths of 63mm pipe, this when placed over the posts gives approx. 500mm dwarf walls and a 6M polycarbonate sheet, giving a head height of around 2.3M. we used a plumb bob to get the centre line on each hoop and drilled an 8mm hole through the pipe and secured the top 3x2 treated timber to al the hoops. One thing we found was that the MDPE did not bend uniformly, this may have been due to slight errors with the posts being plumb. The resultant timber (which was not very straight), snaked from hoop to hoop. after head scratching and re thinking. I decided it was a poly tunnel and to get on with it. we used 7 lengths of timber jointed with half lap joints to extend the length to 6.5M. if using a clock analogy the timber was placed at 9,10,11,12,1,2,3 positions, with the 9 & 3 o'clock being 500mm off the ground, also ensuring the 9 & 3 o'clock timbers were approx. 5.8M apart circumferentially. Then it was a case of securing the polycarbonate sheets to the timber. each sheet is joined with some soffit H joint strip. (you can buy a clear joining strip for the sheets but for a 6M length it was around £65. the H strips proved extremely difficult to connect the two sheets together, or should I say impossible. so I cut off the back edge on one side and used some glazing sealant. this way we could attach the strip to the polycarbonate prior to bending over the tunnel. and each sheet 'H' strip basically lapped over the previously installed sheet. day 2 we had the basic structure. It was noticeable that the curve was not symmetrical, so putting the door frame header in by securing to timbers at 11 and 1 o'clock was not level. I overcome this by using a ratchet strap attached to the 11, and 3 o'clock timbers and tightening until timbers at 11&1 o'clock were level. I then put the two door jambs in (concreted at the base) and cut to the length required and secured to the header. This worked and the tunnel was now more cylindrical. I framed the rear by baring 3x2's off the horizontal timbers. Last steps were to clad the base, I used 4*1 treated timbers that were screwed into the MDPE pipe and wooden posts. then used strips of visqueen to create a more sealed dwarf wall, this will help prevent driven rain from the winds getting inside. over this I used Larch timber backs* to create a vertical cladding All in with hardware, polycarbonate, timber, concrete the project cost £1200. not cheap, but its solid as a rock. It withstood the first Autumnal storms this week with winds hitting 50MPH. Its also very warm inside, even now as the temperature is falling. Larch timber backs are the offcuts from the saw mills and are reasonably priced as scrap. we purchased a pack of timber backs, approx.40 lengths of larch timber with bark in 4.8M lengths for £100. these are not uniform and taper etc, but as i only needed 500mm lengths it was straight forward to make it work.3 points
-
Greetings on a miserably rainy Sunday October morning. Perfect weather for catching up on some blog writing! As the title suggests this blog will be about our external coverings of the house and, by the end of it, the outside of the building will be pretty much finished allowing us to crack on internally. We started many months ago by battening the outside of the buildings. As we are having external blinds and they have a requirement for fitting the blind cassette we needed a large gap between the house walls and the outside of the cladding. This meant 50mm x 50mm timber battens and counter battens. We did this ourselves and saved many thousands and, even though it was slow going (as, it seems, everything is when you do it yourself!), it was very satisfying with the carpenter saying that it was good work and he’d seen chippies do a lot worse jobs than we did. Nice warm fuzzy feeling ensued. We are having a mixture of burnt Siberian larch (https://en.wikipedia.org/wiki/Yakisugi) and, to contrast the black, standard Siberian larch on the ‘arms’ of our property and entrance porch (all will be revealed in photos below) and I ordered all the cladding to be delivered on-site prior to the carpenter starting. The carpenter started on the garage using the standard Siberian larch which we bought from Jewson at a very reasonable price, and quite a bit cheaper than we could get from the usual timber cladding suppliers and we are very happy with the quality of the wood. He then went on to the black charred larch (which gets everywhere and he and his tools looked like they’d been in a coal mine by the end of each day!). We purchased the charred larch from Permachar (https://permachar.co.uk) who gave us a brilliant price. The wood itself was burnt and delivered from Lithuania (https://degmeda.eu) but they will only sell to the UK via Permachar. It is stunning wood, but incredibly fragile and any sort of dragging or scraping will cause the black char to flake off. While he was busy doing that and while the scaffolding was up I thought it a good time to get the guttering started. Our architect specified Zinc guttering and after a lot of thought and looking at stainless steel and zinc we also decided that zinc was the choice for us. We ordered it from Rainclear (https://www.rainclear.co.uk/guttering/copper-zinc-guttering/guttering-fittings.html?color=235) who offer next day delivery if in stock and were incredibly helpful and very well priced. It’s also a clip on system which even I managed to install without any major issues! Around the same time and while the carpenter was busy putting the cladding up our external blinds got fitted. We bought those from a local company called Powell blinds (https://powellblinds.com) who stepped in brilliantly at the last minute after we were seriously let down by Cornerstar Aluminium (long story which I won’t get in to here). The blinds are fitted up behind the cladding above the windows but externally so they will be hidden from view when lifted up. We absolutely love them and during the heatwave this summer we lowered them and this drastically reduced the temperature inside the house. There was still one large south facing window that didn’t have blinds that needed shading. We wanted and the architect designed a Brise Soleil in this area but all we had to go on was a 2D drawing. I contacted a few companies about getting one made and installed and the quotes came back at between £6k - £7k! A figure we simply could not afford. So I did research and spoke to a local forge called Horsham Forge (https://www.horshamforge.co.uk) with an idea I had. He said ‘that could be done but how about this instead?’. He suggested brackets with a pole running through them and vertical timbers slid on. Genius! On to Sketchup where I draw up the brackets and gave them to the forge to be created and spoke to my timber manager at Jewson who procured me some thermowood at the size I needed and got my carpenter to fit it and it cost me £1700 in total. So we saved around £5k by doing it ourselves and we also enjoyed the journey and got a solution that we designed (with the help of the forge of course). We think it looks fab and it does a good job of shading from the sun apart from a couple of hours when the sun is directly facing that side of the house. So we will still get some solar gain but it is definitely reduced and it’s a brilliant architectural feature. 😉 Right, while all this was going on the chippie was finishing up the cladding and now that it is all finished and I have put the downpipes on we have an almost finished external facade to our dream home. We love it and think it’s stunning. So very happy with the carpenter’s work (http://www.kmlcarpentryandroofing.co.uk). Kieran’s attention to detail at the junctions between the 2 types of wood is fabulous as it is in other areas too. He would also discuss any issues and potential solutions with us to make sure we were happy with them rather than just doing something he thought was right. Hopefully the pictures below do it all justice! (Note: please ignore the 110mm brown downpipe in the below photo! It will eventually be a rain chain but this works for now. 😉 ) Thanks for reading and we hope you like what we’ve achieved so far.2 points
-
My wife forks with these kind of finishes as an esty side hustle and ships most of them to the USA: https://www.etsy.com/uk/shop/MetallicDesignStudio?ref=simple-shop-header-name&listing_id=672140894 - Take a sound substrate (a wooden door would work; most of her sales are aluminium composite panels as the base canvas) - Keying and priming is straightforward (and then all materials behave the same way) - Applying the metallic base is tricky (metal particles in a binder of some kind) if you want to have texture - Aging the metal particles is an absolute black art (just how rusty is rusty; which acids applied using which methods give which colours) - You then need to run over the top with an appropriate varnish/lacquer to retain the finish (which of course changes all the colours) How much do you enjoy repetition? I'd say it took about two litres over three months to work out the basics; 12 months to be able to produce a particular colour / pattern finish first time most of the time. Most of the manufacturers are Italian (venetian plaster / marble effects being their main product lines) and visiting one of the trade shows is a good way to pick up application tips. She'd probably say "No job it too big. No fee is too small." 😂 Ask how much a plain door is. The "from £4.5k" leaves plenty of room for final finish...2 points
-
Why dont you just get a vinyl wrap like the car people do. You can get them printed with anything. Lots of people doing fake "rustry" cars. Cheap as chips by comparison. Just found this too: https://www.ebay.co.uk/itm/165406795119?var=0&mkevt=1&mkcid=1&mkrid=710-53481-19255-0&campid=5338268676&toolid=10044&customid=CjwKCAjw7eSZBhB8EiwA60kCW5c0yr-uoZyw95AO0qgYWTSnlyg1MV53R74hw10CzlqW71xbzIbQOxoC7C4QAvD_BwE1 point
-
Hmmm. Ill say thanks. But really, i think thats a bit too deep for me. As per my original post, why do i want to turn something off from my phone, when i can just turn it off anyway? I dont get it. Knowing how much power im munching IS of interest, but i just want something simple that tells me my power consumption. i get that this does this, but its not simple. And if it uses a phone, its not even under consideration. I'll admit thats because, 6 years in, i still dont really know how to use it beyond the obvious making calls and sending messages. Maybe i should go back to my cave?1 point
-
Agree with @ProDave and @joe90 With all that glass, I can only guess that the house will be hot in the summer and cold in the winter. For a single contractor build, the quoted costs seemed low for such a complex bespoke house. I think Grand Designs does so much damage to self build, but I guess that a well managed build doesn't make for good entertainment.1 point
-
I used the same person. I had over 500 invoices to process and not very much time to meet the deadline. He was a lovely chap, very professional and turned everything round quickly. Highly recommended.1 point
-
That looks absolutely fantastic! Is that and anthracite grey frame? We have that colour but single side light. What colour handle did you opt for. We’re in Suffolk so I don’t think we’ll conflict 😁1 point
-
A 1m cantilever is nothing in structural terms, assuming the porch is inline with the rafters/joists then I would go with your builders suggestion. If you were in a blown high snow load area then I would be looking into the loads a bit more.1 point
-
Nope! Any fill material should be free from organic material (main reason you scrape the vegetation layer off a site before starting excavations etc.1 point
-
Wow - that solar array - the house is something like out of grand deigns and the journey is certainly impressive to read! Well Done!1 point
-
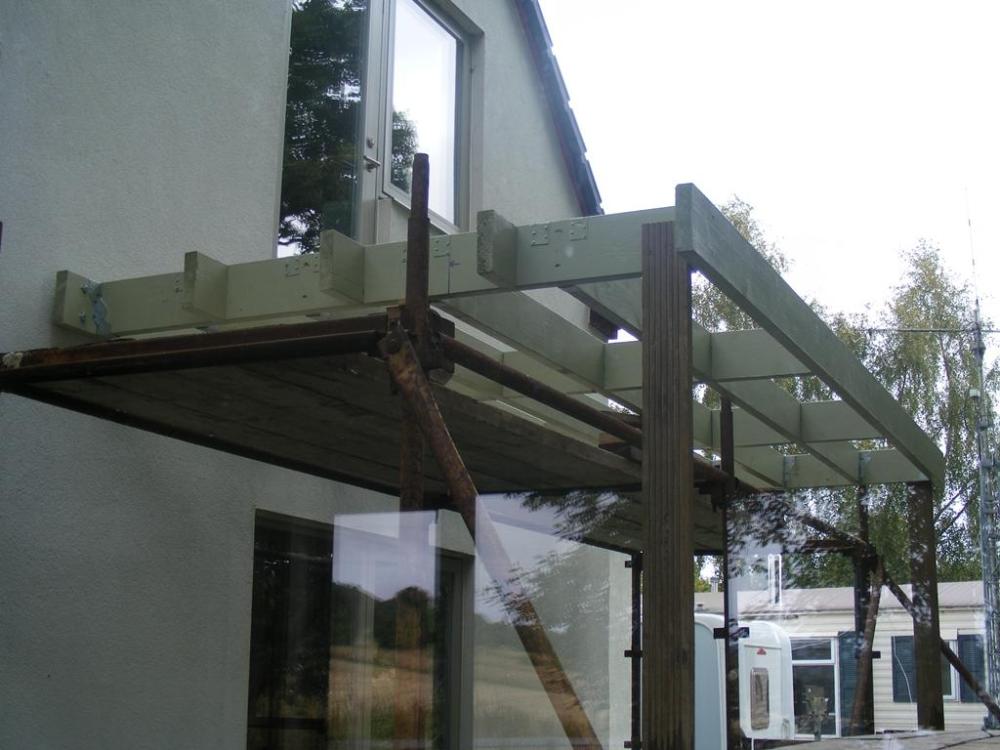
That's a bit more done. The endless painting has finished (for now) and all the pieces are assembled. Taken from inside the sun room looking up, hence the odd reflections looking through the glass. Awaiting post feet now, I am still not sure if my neighbour is making them or not, I have not heard. Once I have the post feet I can put the posts up, fit the last 2 end joists and remove all the packing and temporary props presently holdin the frame up. Now I turn my thoughts to posts for the balustrades, I think I am settled on 4" posts, which will dictate a wider handrail on top probably just a bit of painted decking board?
 1 point
 -
The name "Analox Air Quality Guardian" is just a marketing term IMHO, but CO2 monitoring is the BEST way to confirm the air quality and correct functioning of a MVHR. I have spent time with @Russdl and it was hugely beneficial to have accurate CO2 levels in all the rooms while setting up the MVHR system in his lovely home.1 point
-
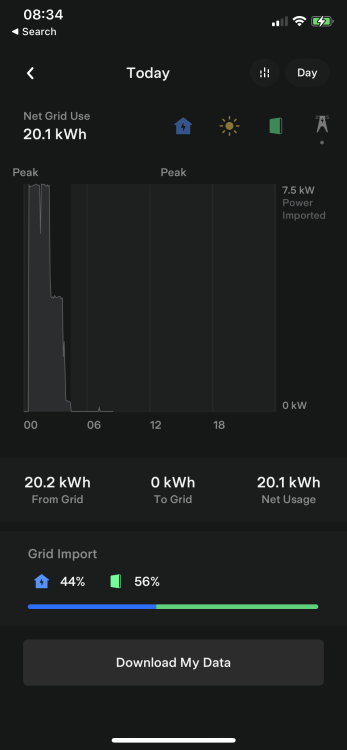
Yesterday SWMBO decided to try and use a gigawatt of lecky . Everything on including oven as she goes on a “ bake off “ bender . Reasonable Pv generation yesterday. Yet I had to set the SE to manually discharge or we’d start pulling from the grid at a zillion quid a kw . So after that I set SE to charge from the grid at off peak . Pw and SE both low going into the night . It worked ! No issues - both took from the grid simultaneously!
 1 point
 -
I just want to congratulate Pocster on his solwelding skills. Just goes to show that with practice......... Soon, his " Iam the absolute b*llocks " may well be applicable (If only for his solweld)1 point
-
Easy through a 100mm duct….1 point
-
All you have to do is imagine yourself as the mouse. Where Mickey can invade, rodent barrier. Simples. You can keep the little blighters out, but it requires effort an attention to detail. Same ethos for airtightness, where you study where a ‘molecule of air’ would travel to infiltrate your airtightness measures. It’s enough to make you lose a day just thinking about it, but try explaining this to a builder and he will have you certified. “They” just don’t get it…. I do try educating, but it’s a bloody uphill struggle.1 point
-
1 point
-
It is about 16 kWh of storage, so at 30 kW input, half an hour seems reasonable (add a bit as the hotter the cylinder is the greater the losses and the harder it gets to raise it an extra degree. So something seems wrong.1 point
-
The TP-Link one linked to above supports multiple SSID mode and vLAN. So this effectively separates it from your own internal network. It’s easy to setup. TP-Link have videos on their web-site showing you how to do it.1 point
-
I used Michael Berryman, ATTNI+1 point
-
+1 to what @ProDave says above, frankly I thought it was ugly and vastly overpriced because of its complicated shape and subsequent problems. Why should it be allowed over “housing required”? Yes the planning system is broken, we are short of housing. Locals (in rural areas) cannot afford to buy, why not give planning for a couple/few “affordable” (read sensible) houses that are afforded by young/locals .1 point
-
I just watched this weeks build, a big house on a farm in Derbyshire. Not much to mention about the build, but what I took from this is how broken the planning system is in the UK. Something like 20 failed planning applications in the past. All he wanted to do is build a farmhouse on his 16 acre small holding adjacent to all the existing farm buildings. If the present planning system will not allow that, then imho the system is broken. You would have thought this would be allowed perhaps with an agricultural tie? The only way around this was to build a section 79 "outstanding" property, which ironically probably means the site now has a much larger house built on it that would have happened if we had a sensible planning policy.1 point
-
I printed mine out, but in the end having them on my phone was way better onsite, so the prints were only used by the builders .1 point
-
Most of the high street print shops will laminate drawings now1 point
-
RED are trying to compensate for misguided desire to some a system / general inability to design / balance a space heating circuit by using a very American style pumped zone setup then speed controlling the pumps to set the deltaT. You can do pretty much exactly the same thing with any other heat pump if you swap the inbuilt pump for a spool piece and ensure that your minimum zone flow exceeds that of the heat pump. Pointless though. Just do the pipes and valves right on the space heating circuit...1 point
-
Good value at £299 and glad we bought it. Has now compacted 200m2 of sand floor base, and 150m, several passes, of trench fill. It is narrower than the similar variation at over twice the price elsewhere, but for own use that is fine, and in trenches probably preferable.1 point
-
Hi yes we did and it's fantastic. I think my local joinery mentioned that a more local firm does this also but too late now.1 point
-
I will counter the above with my positive results with a modern well insulated house and an ASHP. The annual electricity used by the ASHP to heat the house is £400 at todays high electricity price, but it would not be a lot cheaper if we had mains gas available (we don't) Factor in the gas standing charge and they would be about the same. Fuel costs of all types is rising quickly, so the best thing you can do whatever heat source you choose is insulate the building to death and make it air tight with an MVHR ventilation system. And install wet under floor heating so if you do choose a gas boiler now, you can easily swap to an ASHP at a later date. AS much PV as your roof will take or as much as your DNO will allow. Then having an ASHP makes it easier to self use more of the PV you generate. If you do choose gas, choose a system boiler with an unvented hot water tank. That will allow you to dump surplus PV not being used to hot water. The very worst thing you could choose is a combi boiler.1 point
-
Yep, just give me some cash and I shall tell you what I want to install. Seriously. You need to decide what you want automated, above and beyond what you can already do. So if you need to switch lights on when you are away, that can be fitted, if you want to turn your heating down, when you are away, that can be fitted. But have a real hard think about what is important to you. My personal view is that it is all a nonsense, technology looking for a use.1 point
-
Be about 3 tonnes of water. Storage heaters would take up less room.1 point
-
Good work. But - Not keen on your prison window. My wife would throw a wobbly if I even proposed doing that. Not that I would.0 points
-
Mice? Mice? Try our rats. Since we live next to what has recently become a pig-farm, we have some right cocky fewkers. Once they'd eaten through the rodent mesh, they were into our roof space (all 80mm of it) like , well, rats up a drain. Here's the kicker : they continued to gnaw in the roof space immediately above our bed head. Sciffle scuffle scuffle. Sleep impossible. As luck would have it, when the rats struck, I hadn't taken the scaffolding down. So - in my Jim-Jams at 10:30 of a freezing evening - flip-flops frozen to my feet, I'm up the scaff ladder like a homesick angel. Pitch black outside. Nuts somewhere in my throat Grab a spare scaff pole which was lying on the boards. Using that pole, bang really hard on the barge board - hard. Hard enough to warm me up a bit. I wuz furious. SWMBO shouts from inside - "What da Fekkety Fek's that - - - sweetheart? " ( a bit late that endearment - sweetheart) "Lesser-spotted pole-rat darlin" "Well it's still nibblin' " Bollerks; Bang very hard, start to slip on the frozen scaff boarding. From up there, I look down at the lane next to our house: pitch black except for a red-flashing set of lights and a dim haze reflected from a hi-viz jacket . - No street lights - Ooooops: my near neighbour walking her dog. It had stopped to look at the eejit up a scaff this late of an evening. "Hi Ian, howzit goin' ? Cold up there is it? " "Can you tell from down there [.... name redacted ...] . I'm amazed." Only then did I notice that my legs and withers (but not my rippling-muscled torso) were illuminated by the light from our bedroom window. Its amazing what tremendous night-vision women have. I thought it was cold enough for it to be invisible. But no, apparently . Anyway, local Rat Man came and sorted it all out. And I ordered a new night-sight for my gun. Worthy opponents, rats. Worthy opponents.0 points
-
Don't forget flying things trying to eat their way in. Had a wasps nest under the eaves this year. They buggered off recently, so went up to pull the nest out and block the hole up, to find they’er chewed through the exterior timber frame membrane and the OSB.0 points
-
last time i went down the science direct rabbit hole i ended up reading about 6 pane glazing units and the max no. teeth for a saw blade, hours of fun0 points
-
His house is definitely bad for my mental health.0 points


.thumb.jpg.bac90f3bbf6868cf2118d010d936c99d.jpg)
