
Leaderboard


Popular Content
Showing content with the highest reputation on 03/03/22 in all areas
-
I definitely would. 5 years in and it still looks like new....almost everywhere.. We were very careful with it while the build finished, covering with a thin cortex sheeting, and giving all the trades mats or similar for putting doors, cabinets etc on to to avoid any accidents. We are still careful, in a similar way you would be with a wood floor. All our furniture has felt pads, outside shoes tend not to make it beyond the boot room. Our boot room gets very heavy use, we live on an ex-farm and have 3 young boys and two 60kg dogs. The floor gets filthy, and outside boots come in with stones in the soles. Even this floor will mop up and look excellent, if not quite brand new. In the boot room there are two surface scratches, that are noticeable as the dirt catches in them and our floor is a light grey. The scratches are our fault, a metal dog crate got dragged across it without thinking, but work boots haven't made any wear marks. We found a slight oddity with getting "dull" patches where we have some rugs and mats. Only just noticeable and seems to be worse if there's a backing on the rug/mat that is dark in colour. Remove the mat and these patches seem to fade away after a while. Overall, I would definitely have it again. The groutless/seamless finish leaves no dirt traps. We can leave a robovac to take away 95% of the daily detritus from children and dogs, and just mop it perhaps once a week and it stays looking spotless. If you accept it's not as hardy as a porcelain tile, it's a fantastic floor finish. I understand that it can go down on a suspended floor, but I believe there's more prep in the way of additional layers of, I think, ply to reduce the risk of any movement.2 points
-
Here it is. https://web.archive.org/web/20200923193339/http://www.mayfly.eu/2 points
-
See, we have saved you 40 quid a week already.2 points
-
The installation company are booked to repair the system on the 6thApril. Cheers2 points
-
Really nice new CSS file: helps legibility and readability. Well done.2 points
-
Stick frame on site in that case, cut out the cost of the timber frame factory. Outside to inside. Brick or cement board. Ventilated Cavity. Breather membrane. T&G woodfiber sheathing board. Cellulose filled structural stud. OSB racking board taped as airtightness. Battened insulated service cavity. 15mm Soundblock plasterboard. Skim. BELLISIMO!!! It's a very robust way of building. No membranes for airtightness to get punctured. Excellent windtightness (Often gets forgotten). Woodfiber deals with bridging. Importantly around windows and doors. It a very tricky junction with block. Fully breathable so very low chance of rot. Negative embodied energy. Minimal wet trades. Service cavity to make follow on trades a doddle. Excellent decrement decay. Able to test and rectify airtightness as you go leading to really top ACH scores. ( almost impossible with block) Pumped insulation guarantees full fill. Permits a really chunky upstand to the floor slab. Performance of passive slab with the cost of a strip foundation. This junction is a really tough one with block. Don't underestimate the time and cost of detailing a block house to passive levels. It took me almost a week to make and fit OSB boxes around the window. Airtightness was probably another week, very sloppy and really a hope for the best affair. Cleaning the cavity ties took 2 days and mega skinned knuckles. Chasing and coring for electrics and ducts was insufferable.1 point
-
As close to the desired flow temp as possible. That will stop the thermostat clicking in / out as much. Sounds like a decent guy tbh. It's as simple as that.
 1 point
 -
I would fear that the gravel against the wall could work in reverse to your intentions and bring in water. Standard building details work, and this seems over complex to me. If water was by any means to get into thecavity then there is no means of escape other than into the floor slab.1 point
-
 Thank you to all, 13/14 it is then, cheers1 point
 -
Hi @joe90 yes will be gluing down. Thank you1 point
-
 13/14 for me glued to concrete. No issues so far. Just follow the recommendation of the manufacturer. UFH performs well. You are unlikely to sand, our last house looked great after 10 years.1 point
 -
Don't joke. "Holes" are a thing. An ex boss was apprenticed at Redpath, Brown & Co. Was sent to get some "holes" and thinking they were taking the pi$$ refused. Got docked a day's pay etc. "Holes" as they were colloquially known, were punchings where a few were saved for welding up incorrect holes.1 point
-
 You're over thinking it. Pick the board you like the look of, and set your thresholds accordingly. You'll likely never resand and treat the floor. Make sure your screed/concrete is well dry and heating on before laying.1 point
 -
Hello. What a wonderful fount of knowledge and genuine experience this forum is. I've been stalking for a while collecting ideas and information. After many many years of wanting to build our own home, including 3 failed sealed bids on plots, we have managed to secure a plot. It comes with a custom build planning passport to design and build a Potton SIPS home. We're both retired and enjoying life so we've secured the services of an experienced project manager. We are close to a design to go to planning but still struggling with the internal layout of the kitchen - dining - sitting room across the back. I'll be back for help with that shortly. I'll try not to ask too many stupid questions and I'll do my best to return with a post describing the outcome following any help I receive. I'll also contribute where I have something useful to others. Thanks Derek1 point
-
Thanks, that makes a lot of sense about the overhangs and looks well constructed.1 point
-
So come on @pocster which method are you (in your madness) going to use? I recon @redtop's is best ...1 point
-
Yeah I ain’t going down the gun route . You should see the damage I can do with a ‘harmless’ foam gun1 point
-
+1 for a nail gun. I hired this https://www.jewson.co.uk/p/nail-gun-JTH03300 from Jewsons. did the job perfectly and no injuries were sustained. was fully PPEd up with ear defenders, goggles, gloves etc. just be careful and you'll be fine and it'll do the job in a fraction of the time.1 point
-
Does it matter? I've been to pro cricket matches. People sitting reading the paper and drinking tea. Just out of the house really.1 point
-
Thanks - CoolEnergy inverter ASHP. The UFH kit is from Wunda the basic touchscreen wall units. They have a separate input connector for the remote temp sensor and you can use this remote sensor or the internal one or both (then the remote is a safety one for wood floors I guess). Model W91.713 https://www.wundatrade.co.uk/shop/home/quick-shop/wundatherm-quick-shop/controls-quickshop/touchscreen-thermostat/ ASHP https://cdn.shopify.com/s/files/1/2612/5402/files/CE-iVT18.pdf?v=16442466011 point
-
@Construction Channel has written about it.... haven't time (like you have 😝) to look it up. Loads of timber to steel screws to put in you see.1 point
-
I had loads of these to do. Well in excess of a hundred. I bought a bulk pack of mixed drill bits from screwfix. Then used the 5mm ones to make the pilot hole. 2 or 3 holes and its blunt, but they are dead cheap. Then use those self tappers and it works a treat. I just used my cordless drill and it was fine.1 point
-
I don’t see why, only a small “hole” in the inner skin filled with the hanger, steel unlike timber won’t shrink with age , the hangers don’t even go right through the blockwork 🤷♂️. Again I don’t see why, springy floors are caused by flex with the joist.
 1 point
 -
@pocster, by chance this morning I'm doing the same job as you . And by chance I remembered the guidance I downloaded from the manufacturers. Here's (the German version) the company guidance with formulae (FFS)1 point
-
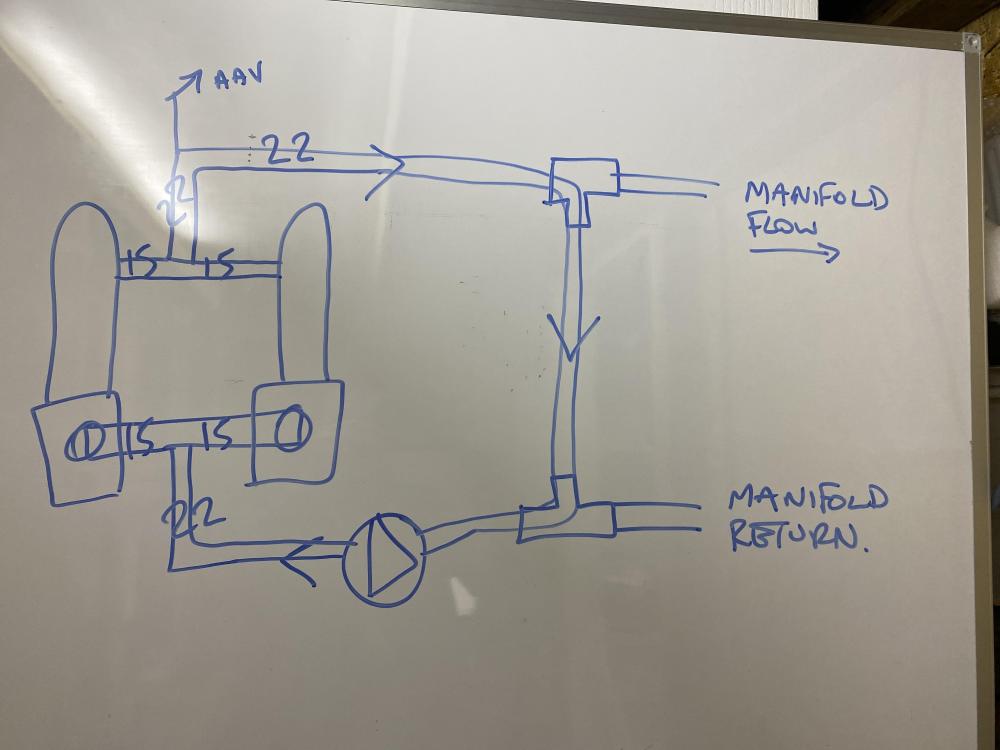
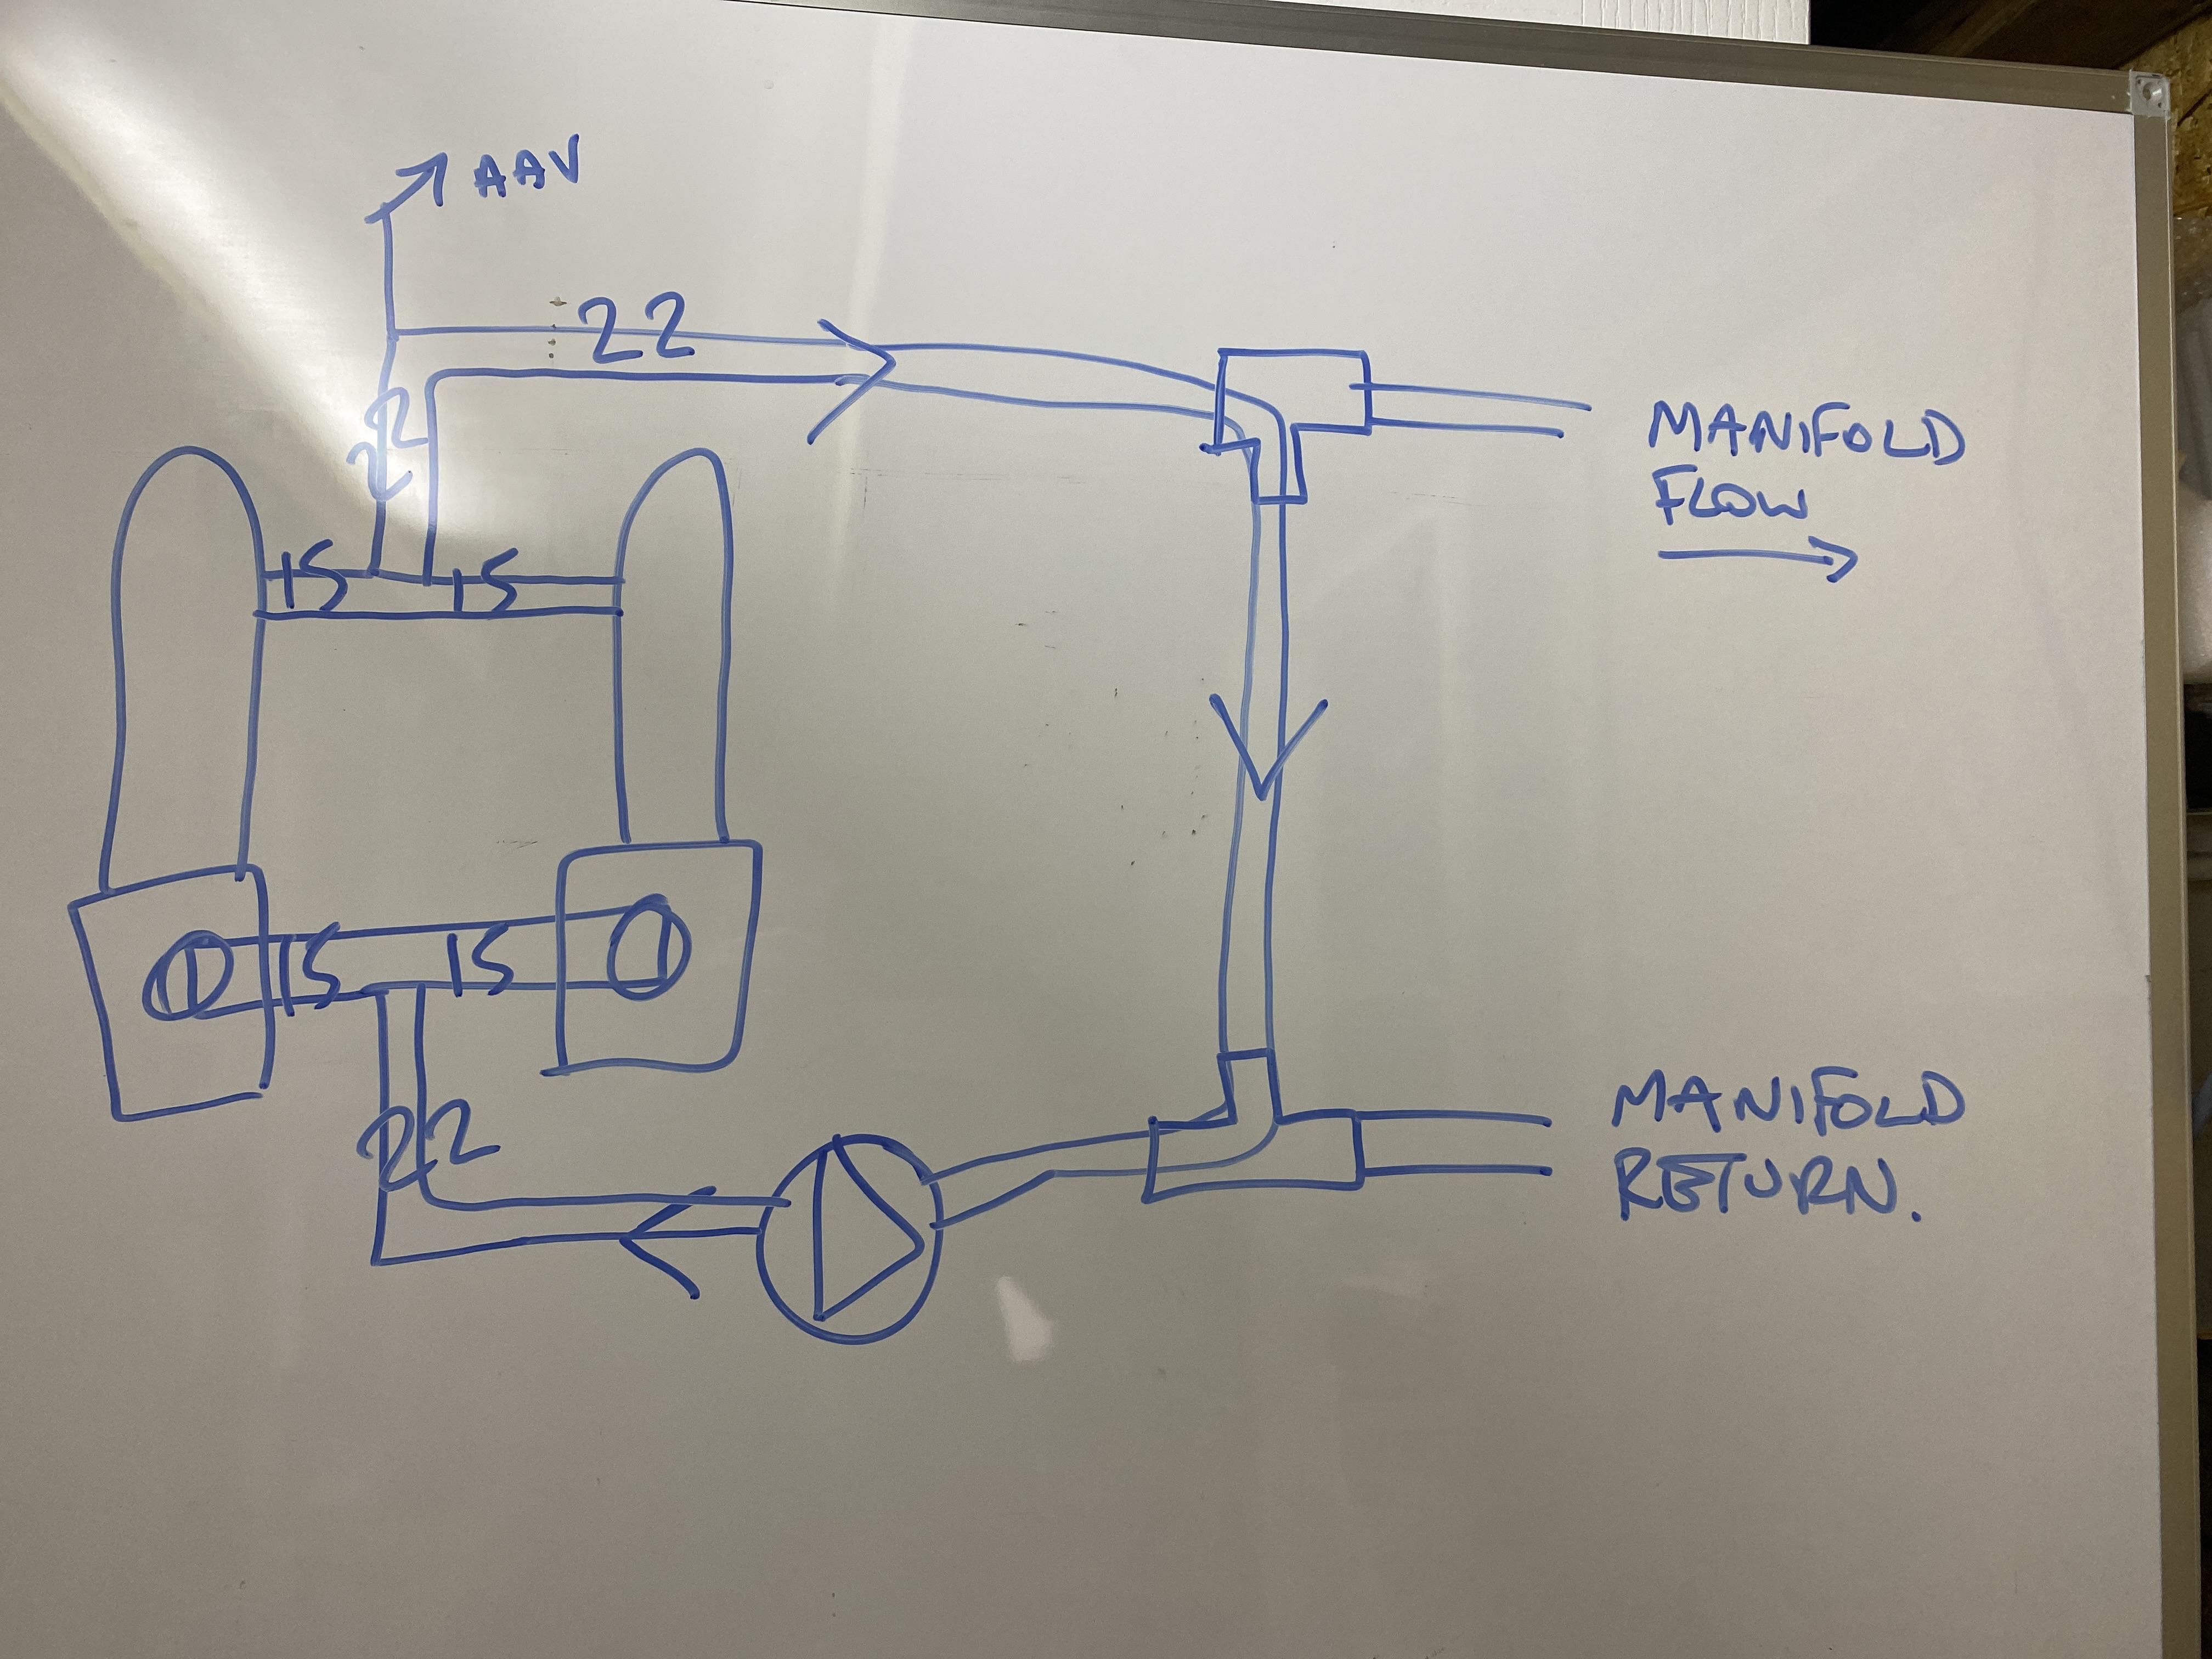
either vertical or horizontal (has to be above the outlet in any case) and has a single bracket that holds it. It is only the small central tube that gets extended so is about 50mm dia1 point
-
I think you can make anything look good or bad with lighting. I really mean more of the ‘warm/cool” and lighting a room where you focus on things like furniture or a painting or something. You can really tell if someone with thought has lit a room, and personally I’m not a fan of disco strips in coving or uplighters on stairs, but it seems to be the fashion. What I have in my house is strips of LEDs around the bath, and around the tv too, I like it because it’s functional. lighting and texture and space, that’s what I think is quality.1 point
-
Get insulating. You may be better off with a single rate tariff. Hunt around and see what is available, your night rate is doing nothing for you, except crippling your day rate.1 point
-
Plume kit can go up to within 300mm of the bottom of the eaves or has to go 300mm higher than the roofline but I would go with the former to begin with.1 point
-
I would make sure you brace roof trusses to walls well1 point
-
Can you screenshot and PM me an example ..? Ta1 point
-
Check the meter number on the bill is the same as the number writren on the meter.1 point
-
Windtightness in a sealed roof. Stop wind driven rain blowing in. It might mean less membrane flapping noise in the wind.1 point
-
Just done a quick calculation on this which works out as around £6.30 all in per day, which is similar to what I pay for a 200m2 1990's detached house. Nowhere near your £8,000 a year! Clearly your £675 to Bulb every month isn't based on actual usage so first thing I would do is talk to them as it seems like they have their figures completely wrong (assuming your usage figures are correct).1 point
-
I would take one of those shelving units out and I think you’ll be surprised as you will be able to get all the way along in the eaves I expect. First job, get PIR cut and fitted into the vertical wall panels from behind, and then work back and just roll back cheap loft insulation on the floor behind those walls and then leave it. The attic space, get up there and get 400mm of insulation up there, and then seal it and leave it. Not sure how old they are but I’m surprised that there isn’t min 250mm up there already. That will leave the skeilings which are a pain to do without stripping back but they are a small area so this should start to improve things.1 point
-
Was wondering that. What are your neighbours paying, might be useful to find out, just in case there is a wiring error, or you all want to club together and make the place better. Your usage figures seem the wrong way around. To give you an idea, on my much smaller place, this is what I have used this year (well 56 days of it). Mean Power / 0.7 kW, Percentage E7 / 89 % Total Energy 924 kWh Day Energy 106.4 kWh Night Energy 817.6 kWh That works out at 16.5 kWh/day (yours is 18.8), if I have worked it out right, that is £268.80 with meter rental and VAT. Thankfully spring is just about here, so that will go down significantly.1 point
-
I wonder if it would be possible to have some insulation blown in? Could be cellulose or mineral wool.1 point
-
A Hilti / Spit gun is not dangerous if you use it correctly.1 point
-
Building regs I believe is Height equal to no more than 16 x wall thickness so 150 block and would allow 2.4m high without pillars. At 8 x 11m I would personally build a side to side partition wall or 2 which would help stop wall spread... room for a bar etc and ready for the annex conversion as well. A friend recently bought steel frame building and Building control made him dig out padstones and make larger 1m x 1m and 600mm deep, said it was wind load on long side of building.1 point
-
Hilti gun1 point
-
That's nothing. Once worked in a design office, and a colleague returned after a site visit, where he had found the contractor was putting up the whole steel building the wrong way round. A new football stand facing the road. I know, for some teams that might be for the best.1 point
-
You thought you were on mate's rates.1 point
-
It is! But if it's any consolation to @Adsibob we're on about the same and we're on mates rates for the Architect..... I'm sure there are lots more on here that will have spent similar amounts, especially when using main contractors and/or a PM and trades to do the build, i.e. they aren't hands on themselves. Simon1 point
-
If gas and ASHP are not an option I don't think you can do this without tackling the insulation. This will probably mean biting the bullet and removing the plasterboard to access the cold areas you've identified - unless you have enough space to give up to fitting interior wall insulation over the top. But this would need re-lining anyway so it would make more sense just to investigate gaining access and fitting insulation behind existing. Also, the loft area - is it accessible? How much insulation does it actually have? How long to you intend living there?1 point
-
No, I joists calculated at 600mm centres but installed at 400mm centres cus I hate bouncy floors! My blockwork was dead accurate so not a problem with levels but even if mid block a lot simpler than building around joists! I like no3 in theory but watching the work done with brick/block hangers and I joists made me realise how easy it was.1 point
-
I've certainly seen a lot of examples, including here on BH, where the professional input is undervalued and people try skimp on it. I'd agree this is counterproductive and often has a detrimental effect on the project as a whole, especially when you aren't experienced in house construction. However, there are some of us that are aware of the benefits of this upfront investment and are willing to pay for it. One thing I did before even getting any architect involved was to pay for a topographical survey so it was already on hand when looking for an architect. Something I used to great effect in understanding costs associated with some designs as I was able to get quotes from groundworks companies based on the survey (we're on a significantly sloped site). The problem as I see it is that despite having the will to pay for these services and put the time into the design decisions, there remains what I see as a gap in the satisfactory provision of those services in construction. For example, we tendered and met with about half a dozen architects, all of whom visited our site. I paid some of them a fee to make the initial visit to talk about our plans. When receiving their proposals, not a single one of them met our brief. Both my wife and I wondered whether we had dreamed up the meetings we'd had because they were so far off. In desparation we then engaged the services of an architectural technologist based on a recommendation, but even then the design proposals that came back were underwhelming at best, totally impractical at worst, so we paid him for his time and went in search for someone else. I won't even begin to describe the atrocious service we received from the first structural engineer we appointed (introduced by the architect). He even had the gall to bill us for an incomplete scheme and when I went back with a list of what was missing, he still didn't respond and his company chased the invoice. Needless to say, I got rid of him and eventually found someone else, who did turn out to be good. I disagree with this. If you're a professional dealing with a layperson as a client, it is up to you to ask the questions to elicit and grasp the requirements from the client. It is not for you to expect the client deliver those requirement as the client cannot be expected to know how to articulate them adequately or know the extent required (or even the potential ramifications). If an architect, for example, after 7 years of training is still unable to do this, then I'd have to wonder what is missing from their education as it is clearly essential to a good design process. It is also up to those professionals involved to manage effective communication, with their client, and also everyone else involved in the project so that the necessary questions are resolved and accounted for ahead of time. The architect we chose in the end was excellent at eliciting our design requirements and at the same time was able to enhance those with his experience. It took me a while to appreciate this side of his service. However, his biggest and most unacceptable failing was that he wasn't honest about where his technical limitations lay and instead proceeded to advise us incorrectly in this regard. However, there were several other aligned professionals who also provided poor technical advice. It's this incorrect advice that has cost us significant money, not changing our minds about sockets, or other such design elements. My own experience could simply be dismissed as poor decision making or bad luck on my part but there are enough stories on here and from people I've met to suggest I'm not such an anomoly.1 point
-
You can go and build @Omnibuswoman's place. And @BotusBuild1 point
-
The installation company has contacted me again and stated they are acquiring the parts to repair the system and will return it to working order. I await a date for them to carry out the work and will let you know how it goes. Thank you for all the interest and advice. Cheers Dave1 point
-
Have you looked at this site - it has a site mitigation section that may give you some inspiration - it also has an outside box! https://www.acerecology.co.uk/swallow-nest-site-mitigation/1 point
-
Conventional deep recessed downlights are rather out dated now. There are now quite a few surface mounted or shallow recessed LED lights worth looking at. Stuff like this although not for a sloping ceiling.. https://hartingtonheath.com/product/i-lumos-led-6-watt-round-recessed-lighting-panel-ultraslim-ceiling-light/?gclid=CjwKCAjwoNuGBhA8EiwAFxomAz3-cAj4jHcGoAhA-ry4HI2EjMIkKsKUW7BRJ22doJDE3kBz7A0nVhoCPKkQAvD_BwE1 point
-
Why not introduce 3 course of coursing brick above joists and brick it back in 300mm from bottom of joist, ie around top of chipboard level.1 point


This leaderboard is set to London/GMT+01:00