Leaderboard
Popular Content
Showing content with the highest reputation on 10/14/21 in all areas
-
Basically what MBC are doing right now on a project I’m on. Just so much easier for a client who’s not familiar with building techniques and won’t know things have been missed until it’s too late. A turnkey build with written guarantees of 0.6 ACH or lower at handover is quite an attractive offering. ?.2 points
-
Can you explain how water will track in along a downward sloping plastic duct and won't along a cavity tray? A cavity tray has the potential to prevent proper insulation around the duct (with blown in insulation) leading to condensation. A cavity tray has a much higher chance of catching mortar droppings bridging the cavity completely.2 points
-
The danger is that you won’t be able to fix it if there is air infiltration after you move in1 point
-
Legal rulng, https://www.bbc.co.uk/news/technology-58911296 (Imo the chap was an idiot)1 point
-
I thought I was going to love it when I saw the plans. HIs economising changed it somewhat and not for the better in my opinion.1 point
-
1 point
-
Why are you even bothering with UFH then. Install radiators.1 point
-
Reminds me of a weld, if you wire brush if off before painting it would show up if it was, which I hope is unlikely. Condensation is the thing indoors.1 point
-
steel doesn't rust without water and oxygen. paint prevents that if it is adhering, even primer will suffice in normal indoor conditions, I would rub down the flaky bits, gently rub any flaking rust bits off, but not through to shiny metal, then put a coat of primer on the exposed steel. then intumescent away. I assume you have the intumescent base coat and also a finish coat. it is horrible to put on as thick as it is required. Sometimes best to work out the volume of paint you need, then keep recoating til all gone. then seal.1 point
-
Then cold air/wind will most likely be able to get into the void behind the plasterboard ?1 point
-
If you have any doubts, wire brush and prime, but unless this steel is going to be outside or in a humid location then you have nothing to worry about … for a few hundred years at least1 point
-
Eh? Look at the image again. The light has a projecting 4-5mm of metal tube which you skim to. The light fitting is the painted edge, just like a circular stop bead. The finish is done by the plasterer and is flawless, crisp and robust in zero time. Just a wipe clean of internal face of the ‘tube’ with a damp cloth after the skim has started to dry, roller with paint, and you’re done.1 point
-
The problem with them is leaks round them and all the other leaks between blocks etc. I would worry about plasterboard on battens becoming a ‘plasterboard tent’ cold air in the void, high air leakages I don’t use poly, usually an air tight membrane, gravity is very good at stopping things moving and once trapped weight holds everything in place if you draw a pencil line from the tray to the airtightness layer in the wall do they join?1 point
-
I looked at ground source. It would have taken up (and meant digging up) almost all our garden. It was not the hard work that put me off (I had my own digger at the time) but the additional cost. the pipe and brine to fill it would cost as much as the GSHP and then add the cost of replacing that every 5 years or so, and that would kill any savings from efficiency. The noise thing. It am always puzzled my why people detest the noise of an ASHP outside the envelope of their house but are happy to put something that makes a similar noise inside their house.1 point
-
You can get joist pockets for built in joists. I have never used them so cannot vouch.1 point
-
A few scabs are no problem for intumescent painter often erected bare or holding primer steel and it would be intumescent painted later1 point
-
Just lightly rub the area and prime. Intumescent paint can be quite tricky to apply, so it's worth getting a well prepared surface for it.1 point
-
The intumescent paints tend to go fairly mouldy unless they are covered. Best to give a quick brush of loose rust and a couple of coats of quality red oxide before you start with the intumescent.1 point
-
In real life I have always found it to be less than half that. BUT it depends on the screed having been laid with the right (low) amount of water so that there is little free water after curing. Curing in ambient temperatures takes about 28 days, but continues thereafter. The chemistry of curing takes water into the matrix and it does not register as free water/ dampness. If they have added water for ease of laying (normal I am sorry to say), or allowed it to get wet then this is different, and it needs to dry Ventilation is essential, more than extra heat. If the heater is gas then it is pointless, as the combustion creates water. A surface dampness monitor can be hired (for accurate measure) or bought quite cheaply for 'near enough' guidance. You could insist the contractor proves it before covering. Beware of carpet/vinyl contractors wanting extra to seal the slab. 1. it is better to be dry than sealed in . 2. they charge a lot and it is a good earner, often pointless...Also I have had them fiddle the readings.. or perhaps they didn't really understand.1 point
-
the difference is a tray has a weeper to allow the moisture out. All i am saying is that's what's required for regs to do the job properly, with diy you can do what you like and your pipe may be fine who knows.1 point
-
You can use a fireproof barrier like Rockwool cavity sock. Stuff it in before you get the wall plate and trusses on. Get your roof insulation to meet with it so you don't have any gaps around the eaves.1 point
-
Spoke to a fella yesterday who said ‘balloon build’ for my timber frame. Walls up, airtight layer, then a timber on the wall and fit the joists on hangers. not really relevant to this but interesting and avoiding the ‘around the joist’ hassle.1 point
-
In an ideal world you could put in a cavity tray, but where? Ducts/flues are often within a couple of inches of the ceiling or soffit so the cavity tray would go directly under the joists? That’s not good. A full course of blocks down would probably be too low so you end up splitting coursing. I’ll stick to boring the hole afterwards and sleeping it.1 point
-
In the sketch the opening trimmer would take the majority of load, the side wall supports the turn and then this takes the majority of load for the remaining flight with the top assisting, in reality the loads are minimal compared to a heavy cabinet etc.1 point
-
1 point
-
because it costs pennies to do and can save thousands. You could use the same argument for roof tyvec under the tiles, why bother if the tiles are providing the protection ?1 point
-
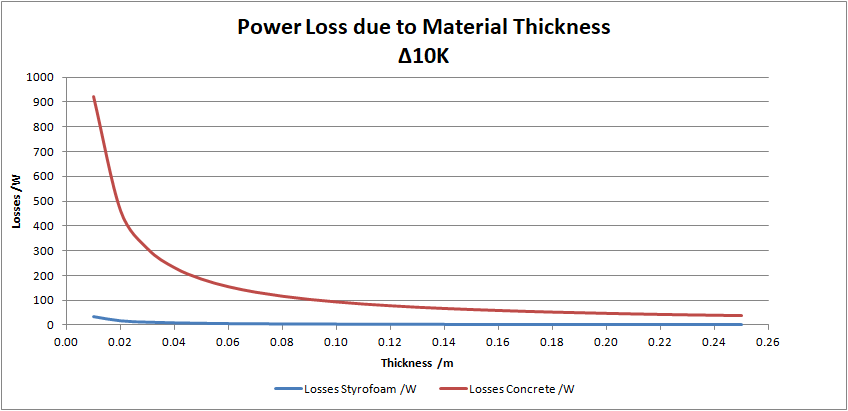
I am surprised that you have never modelled it. Plotting thermal conductivity against thickness produces an exponential decay, similar to Newtons Law of Cooling i.e. rapid decline at first, followed by slow decline as the thickness increases. The line stays the same shape, regardless of temperature differences, just that the power losses change in proportion. So taking the two extremes of Styrofoam (0.033 W.m-1.K-1) and concrete (0.92 W.m-1.K-1), you can see on the chart that even adding 0.01m (10mm) of styrofoam, will always outperform concrete. So the best value, for poorly insulated buildings is to add insulation. It is only when losses though air leakages are greater than conduction losses that the algorithm has to be changed. The trouble with solving air leakage is that many 'holes' will be in places that are hard to get at i.e. under floors, and if airtightness is significantly improved, then mechanical ventilation must be used to control humidity.1 point
-
1 point
-
Luckily they also sell through Amazon Prime here in the UK. Free returns.1 point
-
I prefer a fitting with a lamp that you can replace instead of having to change a fitting1 point
-
Have ordered these for our new build. Will fit with 45mm batten. Not fitted yet but look and feel nice. https://www.electricalcounter.co.uk/products/Lighting/Indoor+Lighting/BG+Indoor+Lighting/Luceco+Domestic+Lighting/FType+Compact+Fire+Rated+Downlights/FType+Compact+Regressed+Dim+Fire+Rated+LED+Downlight+6W+3000K+IP65/5641919021 point
-
Nice flat panel LEDs are the thing now.. https://www.google.com/search?q=flat+led+downlight&sxsrf=AOaemvIrKvuNN43dOQbWNLnaBlzEeD1KtQ:1634162334405&source=lnms&tbm=isch&sa=X&sqi=2&ved=2ahUKEwjh1MmLscjzAhV6g_0HHQYgCLsQ_AUoAnoECAEQBA&biw=1575&bih=856&dpr=11 point
-
Would these work https://www.cef.co.uk/catalogue/products/4864836-mpro-6w-led-fire-rated-dimmable-downlight-without-bezel-3000k?gclid=EAIaIQobChMIjNOzrKfI8wIVZWHmCh2TbAXvEAQYCiABEgJ3uPD_BwE&gclsrc=aw.ds1 point
-
If it was me I would clean up the area around the door with a pressure washer and then carefully point all the bits not coming out. I would then prop up the roof from the inside and then proceed to remove the stones in the door area starting at the top, when I got to a stone that was protruding I would either pop it out if possible or just use a diamond tipped stone saw to cut it out / cut it back and then continue downwards.. there is a lot of labour involved but if your wanting to preserve the stonework then it’s the least intrusive way, will cost more to knock the whole wall down, it’s very easy to start knocking stuff down as it is all so easy and quick and feels great but I have found that sometimes you need to ask - what is the minimum I can do to get the result I want - when it comes to these sort of renovations. I have a petrol stone saw and a petrol diamond core drill as I am working on similar build and they have paid for themselves and will continue to be of great use as my build continues. (I am a stone mason so I already know how to use them?) photos just internet grab.1 point
-
Take it down from the top stone by stone with acrows holding up the roof. Will mean you save a lot of the original stone for use elsewhere.1 point
-
My stonemason knocked through to create a door for me, used a kango and started in the middle. once you get one stone out the rest is easy. Wall was the original gable random rubble wall approx 700mm thick 2 masons and 1 labourer 1 day and 1 full 8 yard skip plus multiple concrete lintels added in too.1 point
-
It looks to be made of boulders, not cut stone. When I worked on a similar looking building, they propped the roof, then dismantled stone by stone the opening they needed, just a bit larger, and built back the edges using cut stone to form the corners. There was never any attempt to just cut a square hole in it. It will obviously need a new lintel above and rebuild the stone above that to the roof line.1 point
-
one of these and quite a few chains... https://www.toolstoday.co.uk/stihl-gs461-76-5cc-petrol-16-400mm-diamond-blade-concrete-chain-saw1 point
-
@joth that looks really impressive. I can’t help but feel a pang of jealousy! I’m hoping to build a carport with a completely solar roof and was rooting round the gb-sol website yesterday so it’s great to see a picture of your installation. Thanks for posting it.1 point
-
Try adding secondary glazing in one room and see if that helps? DIY kits can be very cost effective https://www.theplasticpeople.co.uk/magnetglaze-double-glazing-kit/1 point
-
I knew a freelance sound engineer who worked on the original Sarah Beeny shows. He said that if you don't eff it up they will find a way to edit the footage to make it look like you did. Participants have zero editorial control and a the end of the day these are entertainment shows so entertainment will be delivered.1 point
-
A friend of mine was doing an "eco" build in the early days of GD. The producers were very keen until they saw how organised he was. He got the impression they were only interested in something with the potential to go wrong. Drama and jepordy and being able to call people idiots makes better TV apparently.1 point
-
Some architects do yes. Our first one was insistent on having the big windows facing south because that's the convention and it's also the side people arrive at. Problem is that it's also looking across the field to the farmers industrial barns. He had only a few small windows looking at the view which was what we bought the plot for. We just could not make him understand that we wanted to sit looking out across this in the evening. Second architect was an entirely different experience.1 point
-
1 point
-
front porch is sadly already there....not the best arrangement. and the door that is how it is hung! It will be addressed just not until the back end of the house is done and or well underway! The hall area is as is really and we haven't really looked at alterations to this area. it flows better actually in the house than it looks. It is also where the current access is and how we open out what is there over redoing RSJ's and such like, ideally the wall for me would be out but that would take a chunk of budget which for me leaving the former original exterior wall for me helps to create a zone beyond the wall into the new. I had considered noise and maybe the utility could be rehomed somewhere less obtrusive, and yes we are planning in encasing it all if it remains as per drawing. If we clear this area further its part of the current kitchen how could we put the area to use? The side door will be added as I want to have a division between current building and the new being sort of indoor outdoor type thing.... The loo currently has a shower which takes up space in the L shaped kitchen , it looks like this was added after the current toilet extension, we already have two bath sowers upstairs so the shower goes.. The middle cupboard remains it is in fact the under the under the stairs which could easily have a loo in it without being cramped if one wasn't already present, this is an attempt at making good what we have over a clean slate approach and with an eye on cost. As for light we intend to have roof lanterns and or similar we have not discussed sizes or proportions as yet ( I just reused a lantern that existed and did a copy and paste more for illustration over actual!), Lighting across the 27' would be mixed in part helping set what the space is to be used for, and Id like the what would become middle room to be that bit darker anyway and. the bi folds we are looking at have minimal frame and maximum glass Ta for your comments, I hope mine go someway to answer yours1 point


