
Leaderboard


Popular Content
Showing content with the highest reputation on 03/12/24 in all areas
-
Ecology were happy with a list of line items on a bit of headed paper. We took the QS estimate, modified some things, architect checked it and put his logo on it, job done.2 points
-
Use spacers for an equal gap. Install panels level at the top, nobody (else) will notice 10mm difference at the bottom especially inset between posts.2 points
-
Those rates sound ok to me, but I don’t know the local area. Here in SE England I charge roughly £300-350 a day and mark up materials by 20%. This covers the cost of sourcing the materials, sometimes having to pay my account before I get paid by the customer and also the cost to replace or repair materials should they be faulty. I’m happy for customers to supply materials, but if they’re wrong and I’m hanging around, they’re paying for my time and if they’re faulty and I have to return to replace then, again, they’re paying for my time. It sounds like a lot of money, but after all the expense of running the business, periods of quieter times, no holiday, no sick pay and no pension it doesn’t work out to be as much as you’d think.2 points
-
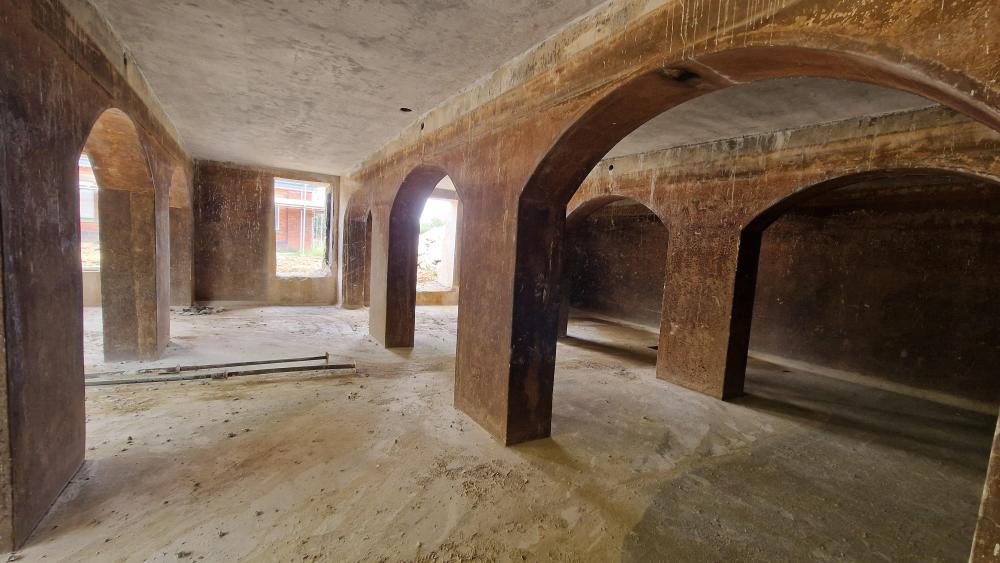
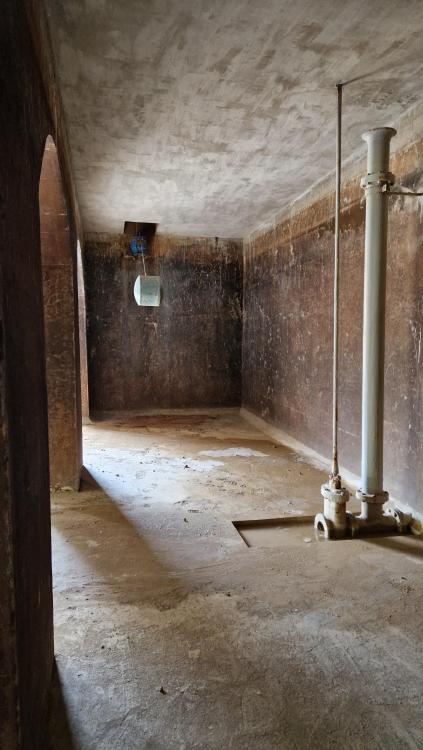
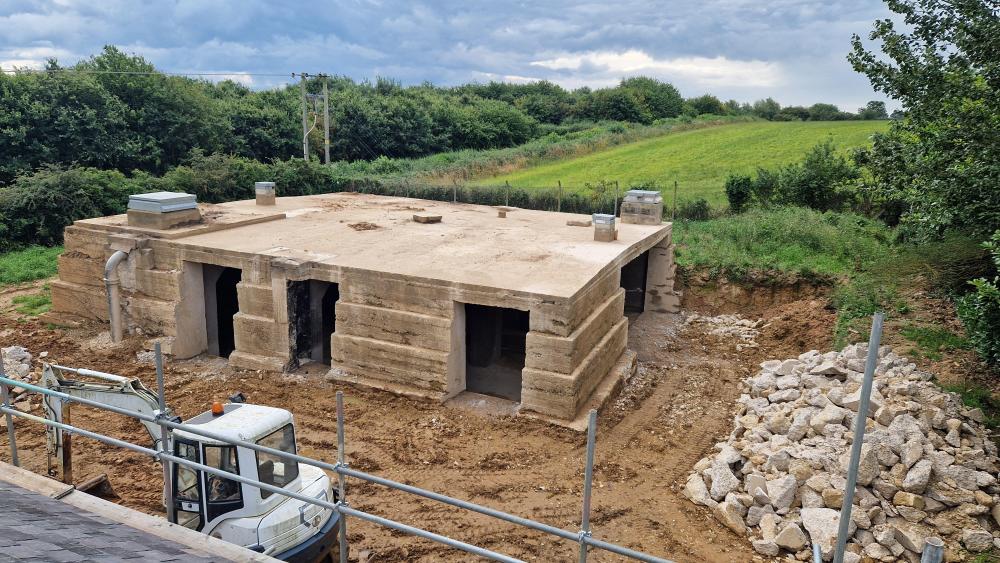
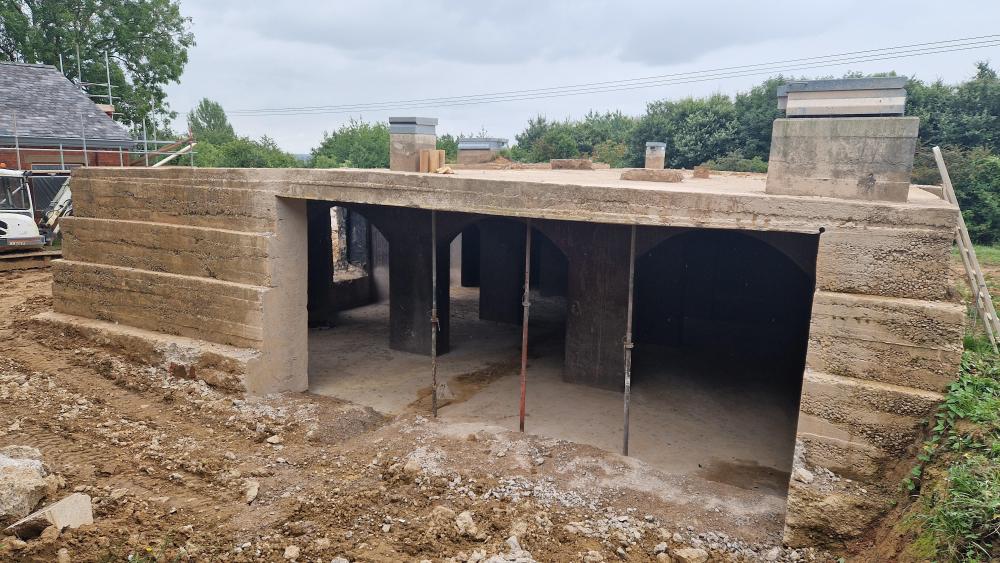
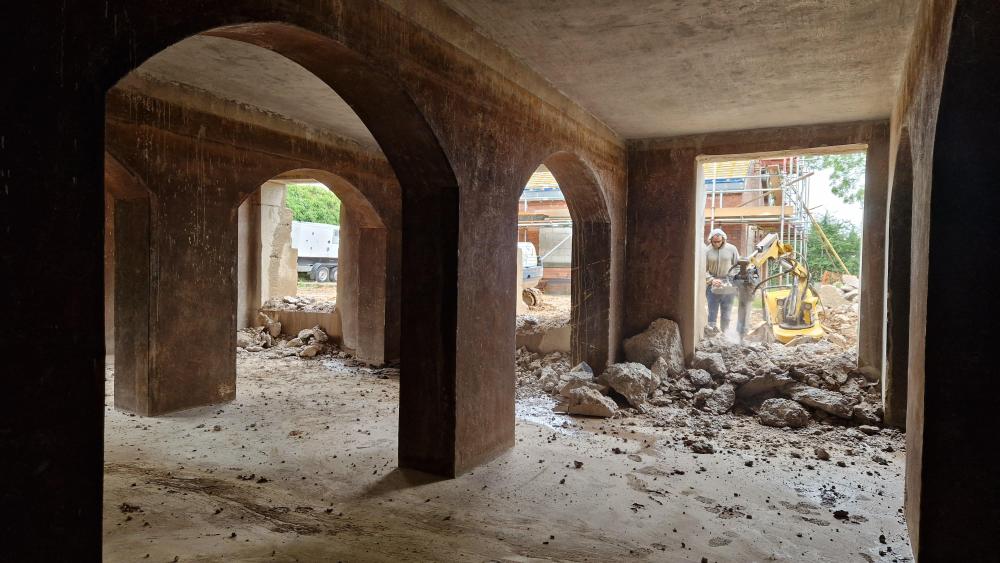
Wow, so many replies and opinions. I'll see if I can answer some of your various comments here, but I think I need to take advantage of the ability to start a blog in here. So with regard to the structure. As you can see from the various pictures of the tank, you'll have noticed a brick pumphouse in the background. Planners wanted us to build one structure, so we worked with our architect on a proposal to build one house, linking the pumphouse with the tank, with a new section in between that would also enable a new structure to be built on top of the tank, with a good half of the roof area being used for a roof terrace. The tank space will be a 3rd garage, with the removal of one of the existing arches to form a larger garage space, supported by steelwork. The remaining space will be habitable, but mainly a cinema and games room, after all, there aren't any windows. The floor in the tank slopes down to the overflow at the lowest point, which exits the tank to form a natural drain, so we're planning to take advantage of that. We'll then level the floor and insulate above. We can't insulate under the arches, but I've been told by another architect we met that 'cold bridging' will only penetrate so far up the concrete pillars. If this is the case, insulating on the outside would make better sense, as the concrete tank would then be within the envelope of the structure so the heat would be retained in the concrete... does that make sense? We cut the various openings last summer when it wasn't so wet. It took the contractors three weeks to complete and cost just over £14k, so to me, it was a real bargain, and they did an amazing job. We stockpiled the rubble, and together with the foot or so of concrete we excavated from the pumphouse floor, worked with a local farmer who owned a portable crusher driver off a PTO on his tractor and crushed the lot. We ended up with about 200t of great hardcore. The planner wouldn't let us use render because the house next to us has been pebble-dashed all over with what looks like porridge, so they weren't keen to see any more. However, I'm sure we could persuade them if we really wanted it. We want to retain the stepped exterior, but make it more presentable. A Ziggurat, I love that... and I've learnt something new. We've had a friend call it Mini-Pitchu, but that's much much better!! I'm off to explore how to create a Blog so I can keep you all up to date on the progress. Many thanks for all your comments. Dave C1 point
-
Yes, like I said before, knowing the resistance of the pipework is essential as in some cases it may mean resistance of the whole system is too much. So, like @John Carroll says, you get the press drop across the boiler HEX and then add your pressure loss across the index circuit to make sure it's all okay. Like above where your mass flow rate allows for a 10mm pipe, it's not going to take a long section to make it unsuitable for an efficient system. The index circuit is the circuit from boiler to radiator that has the highest resistance, including boiler, pipe, fittings, valves and radiators. This figure is used to size the circulator, but obviously you have your pump in the boiler so you need to know the boiler pump and HEX figures.1 point
-
The eaves of the flat roof exceed the eaves of the main roof. Well they do in that drawing. I don’t know what other eaves there may be to relate or compare to.1 point
-
I've been burnt by a mindfart when wiring up the new UVC installation -- or at least decommissioning the previous 5V switched SSRs box because the UVC pipe runs have to go along where it is mounted I've been reusing the existing dedicated redials but repurposing some of them. Unfortunately they were wired 2 + 1 onto the two sides of the consumer unit (protected by separate RCBs), so the Neutrals were wired likewise 2+1 -- except that I swapped the role of one of the cables so that a LH Live was returning to a RH Neutral. Powering it up trips both RCBs. Duurrrrhhh! Idiot. A quick shuffle fixed this. LH is LH and RH is RH now. It struck me that you could easily fall into the same bearpit with the power monitoring multi-relay boards such as the Shelley and Sonoff ones as these are wet contact.1 point
-
I quickly worked out the decisions I should stay out of and the decisions my wife didn’t care about. Therefore decisions about the house build haven’t been disagreeable.1 point
-
Just as a tip, don't wrap the thread with ptfe, you don't need it and it might make you think you've tightened the compression fitting enough when you haven't. You only need to wrap the olive. Personally I hardly ever use PTFE tape any more preferring to use a jointing compound.1 point
-
But what is the ground temperature under the slab of an unheated building? 11° perhaps?1 point
-
You could say to visitors...this used to be interesting but we hid it. Other relevant matters. How much of it will be garage or otherwise unheated space? Will it be subdivided by (insulated) walls? Are you building over the top? Or what I'm getting at is: does it need much insulation to external walls and floor?1 point
-
I think I'm now getting tempted to say that as soon as I see a mention of 'Heat Geek said this' I'm going to scoll on by! I don't understand how you're arriving at 22mm for bedrooms 1 & 2 for example. 1.1kW at dT 5 requires a flow rate of 0.19m3/h which multiplied by 0.28 becomes 0.05kg/s. This gives us a pipe diameter of 15mm with a velocity of under 0.5m/s and a pressure loss of 0.015 meters head/m copper. My calc suggests you could get away with a 10mm pipe for shorter runs at just under 1m/s for these rads. Personally, I'd delete all the bookmarks to blog posts about pipe sizing rules of thumb and just go buy a copy of the CIBSE Domestic Heating Design Guide, which has all the info you need to correctly design your system. The problem with the blog posts is that they're invariably incomplete, come with lots of caveats, and what they're really trying to do is get people to come tothem for their business! My biggest bugbear is that if a post makes claims, I want to have references so I can check out those claims - they're not given that often.1 point
-
Middle. Mrs Super-Paulie is right. boiling tap will free up more space and you can get them for under £300. Best kitchen decision we made was to get a £300 boiling tap, and second one was not to put the sink at the end of a worktop run.1 point
-
The eaves of the extension (any roof type) cannot go higher than the eaves of the original house. Prior approval is for rear extensions, but note that the 8m you quote is for detached houses only. If you need more info, I have done a whole series of Permitted Development videos that some Buildhub members have found useful (youtube/efkor)1 point
-
Put the adhesive down where it will push up into the holes and slots then it doesn’t need to stick to the metal. There won’t (shouldn’t be) any lift so any forces on the bottom track will be sliding/shearing. The adhesive squeezed up into the track holes/slots will prevent any side to side movement.1 point
-
If you can't find the HEX dP/flowrate in the boiler MIs, I would ring Baxi and request it, you may well find that its only 3.0M or so at your required flowrate, also ask what is the pump head, most now are 7.0M which should still give ~ 6.0M at 23LPM, a HEX dP of 3.0M then still leaves 3.0M to circulate through the systems which may be sufficiend.1 point
-
Many thanks to all for the comments so far. The planners wouldn't allow the existing structures, the original 1930s pumphouse and the tank to be demolished, not that we really wanted to, we love the challenge of working with what we have. Also, the arches in the tank are quite amazing... at least to us. Creating an internal structure is an option, but we didn't ideally want to lose any internal space. As large as it is, once the walls come in it could feel a bit tight. Also, the three rows of arches cross the internal structure. If we create an internal timer frame on the outside walls, wouldn't there be a cold bridging issue where the arches meet the walls, as we wouldn't be able to insulate around them very easily? I guess if we did create a timber frame, tank and insulate on the inside, we could then simply face the outer walls. I understand for a structural warranty, there's a requirement for two forms of tanking. The honeycomb structure with a drain at the bottom on the inside, behind the timber frame or plasterboard, but I guess we'll also need to tank the outside where the outer wall is below ground? I've attached some additional photos of the inside. Really appreciate your feedback. Dave C
 1 point
 -
Do some testing the pink grip is good on screed, I had to get a bit up and it actually removed chunks of the screed. your week point is the metal track to the glue, I would use a polyurethane like stixall extreme power. your second idea is ludicrous, forget that very quickly.1 point
-
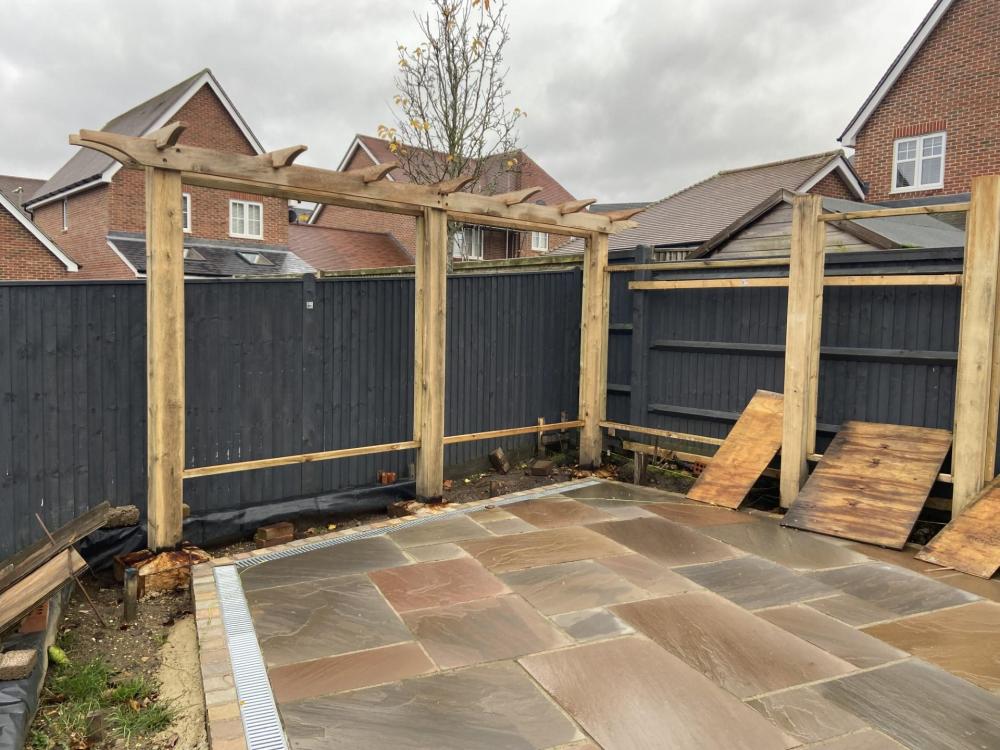
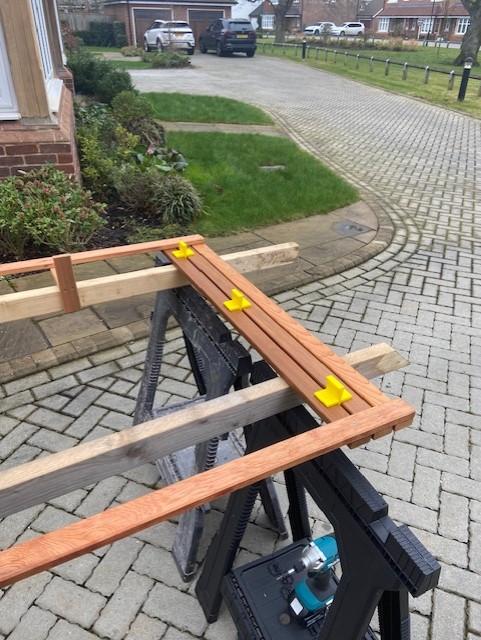
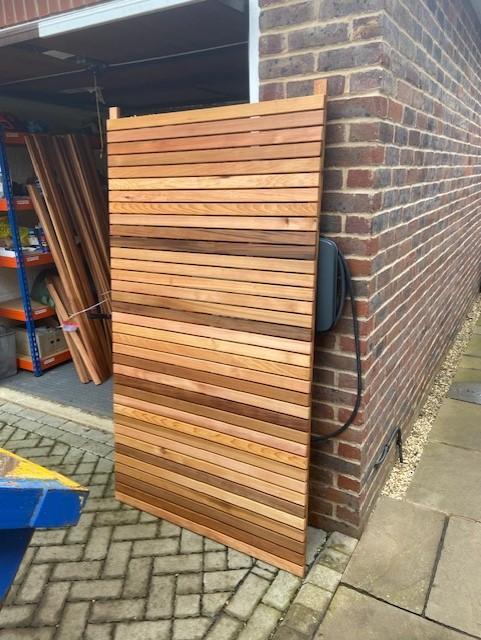
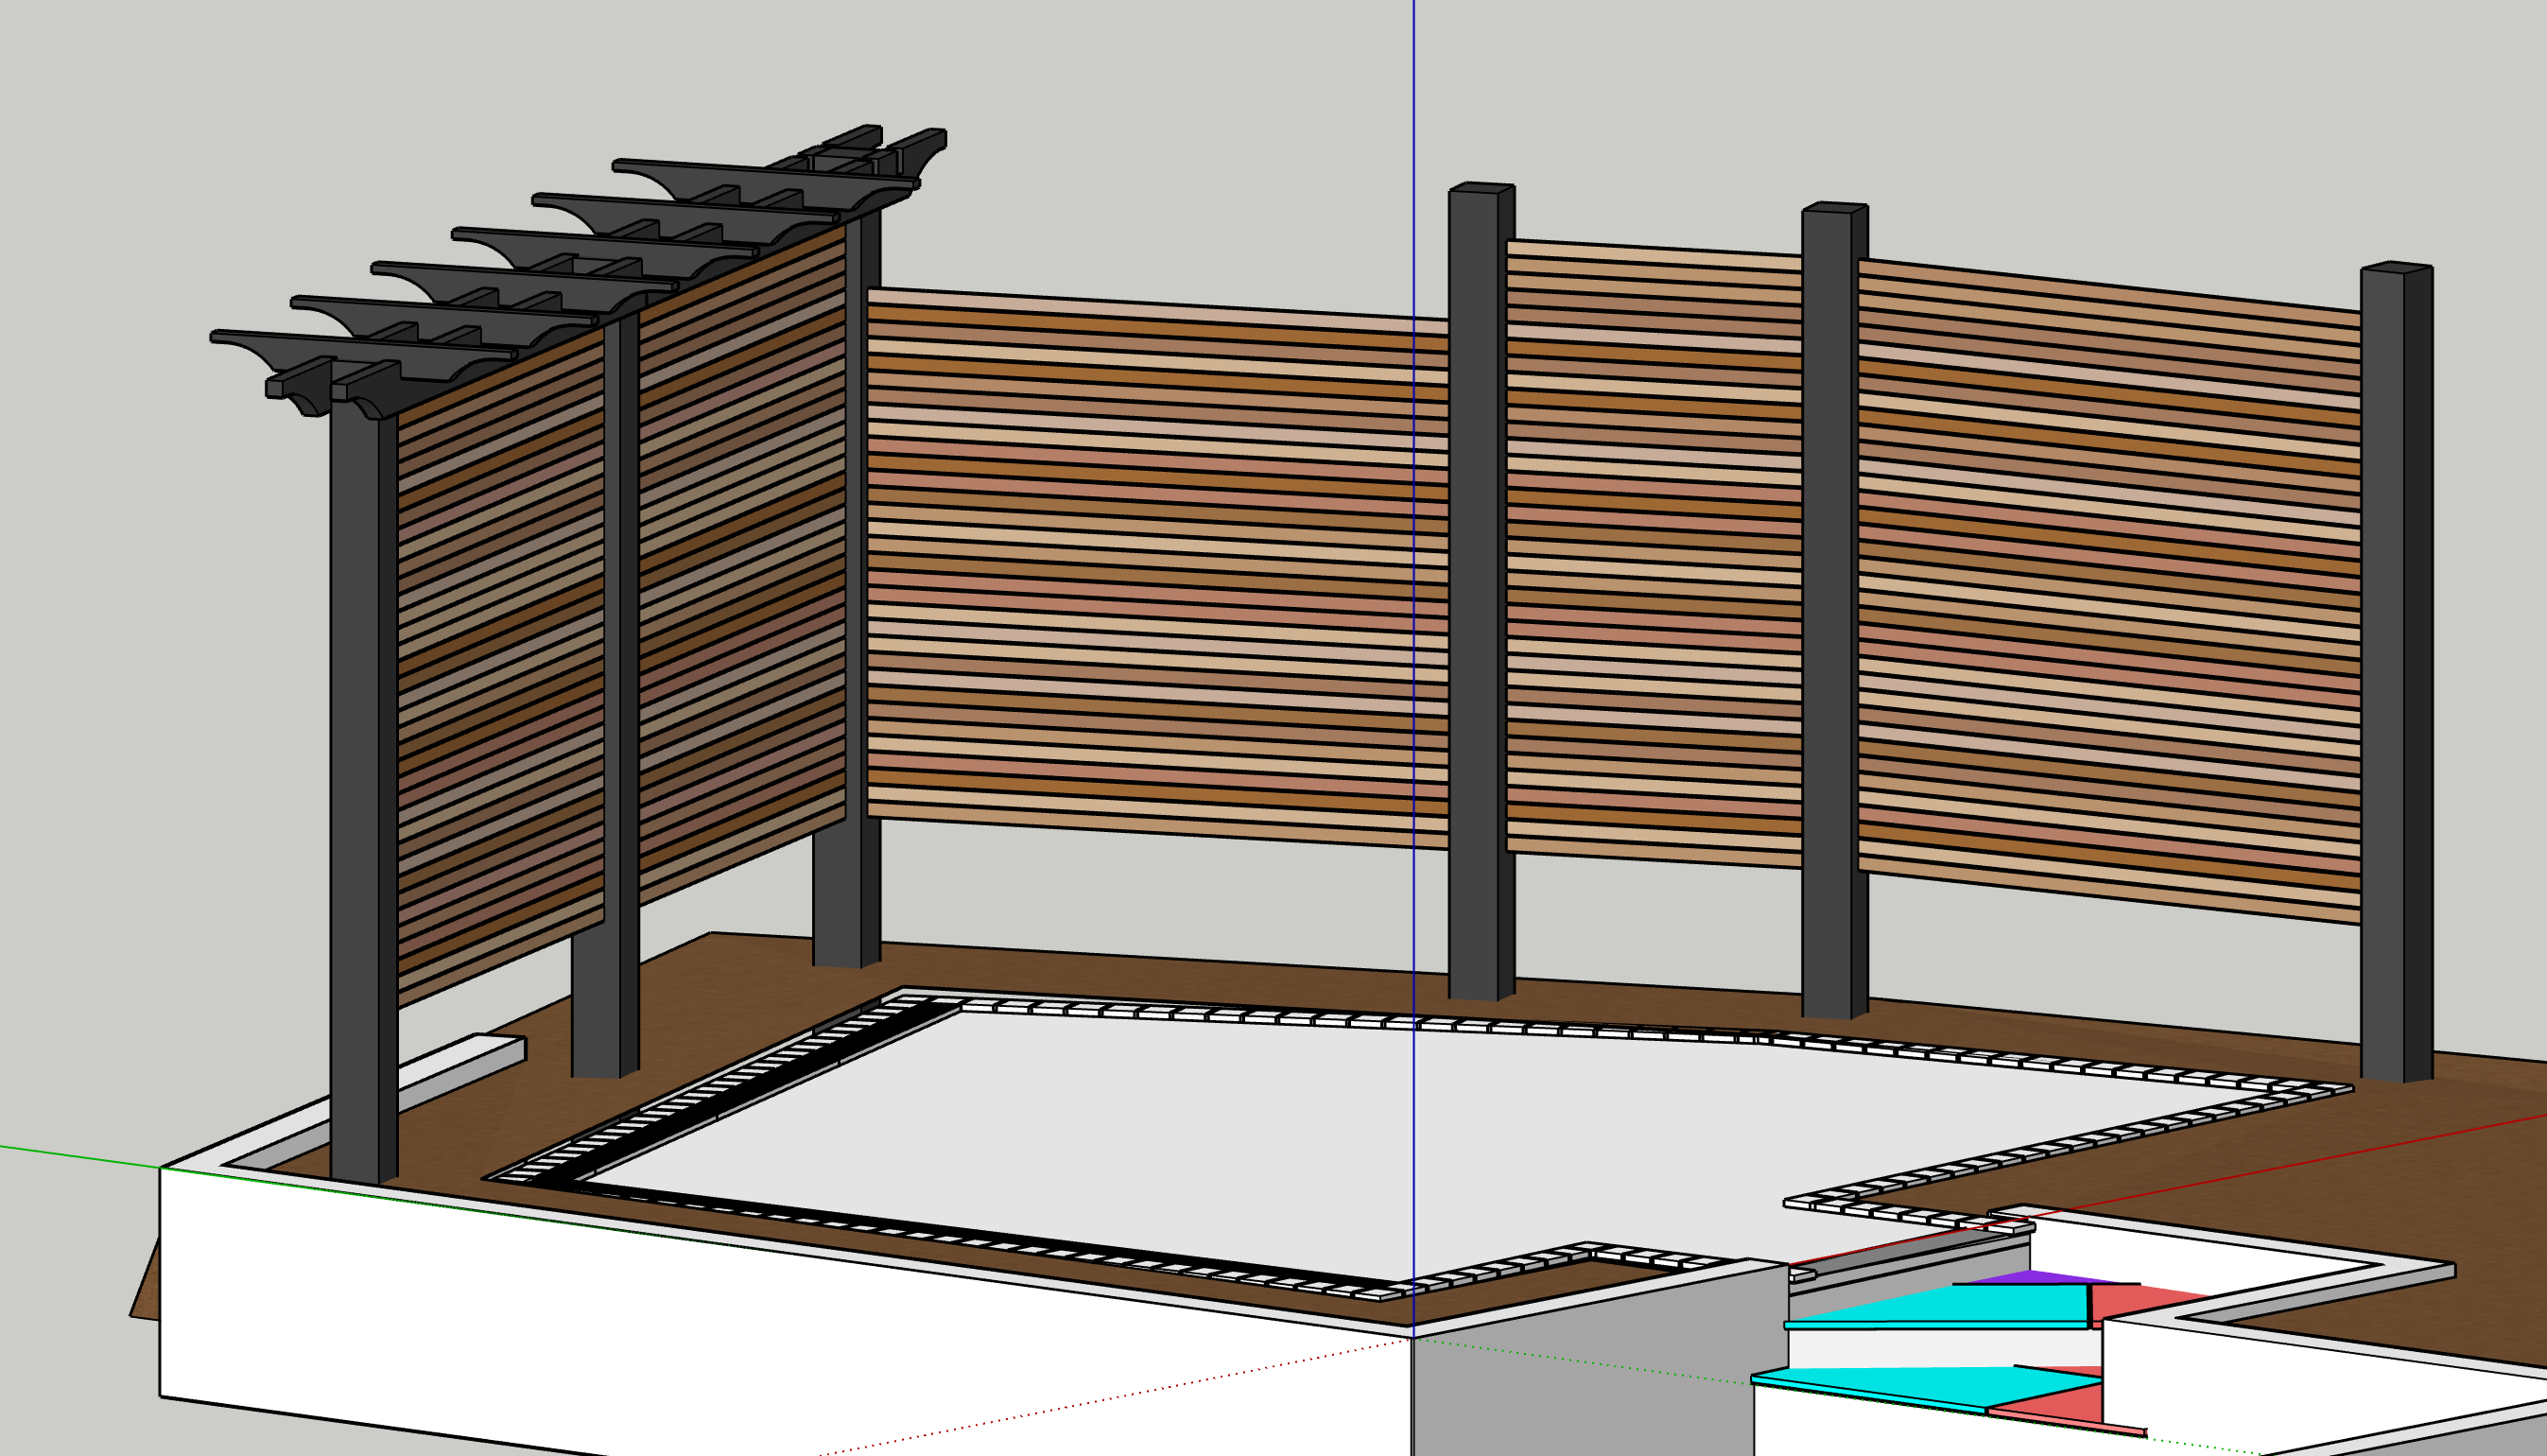
Hi everyone, I'm ticking along with the garden landscaping and now starting to make up the cedar panels for the screen/pergola thing (See sketchup image).... I used a number of 150x150mm oak posts and made a frame that sits on the insides of the posts (See photo). The cedar battens are 44mm wide and with a 6mm gap between successive battens the planned height of each screen is 1794mm. I therefore made the frame 1794mm tall. I was toying with how I would make the screens and in the end I wanted a modular design so that I could remove the panels easily if I need to do maintenance on the fence etc, otherwise I could have installed each batten directly to the frame insert. Initially I was going to make each screen like this: Option 1 - https://youtu.be/isQc31uW2_0?si=PNjtrbVbdzPNVd3I. Here the vertical battens are marked with a tape measure where each horizontal batten should go and then the battens are positioned by eye on the marks before being screwed. This would ensure that the screen was perfectly the right height at the expense of getting an absolutely identical gap size. After chatting with my wife (not blaming her!) we discussed another method: Option 2 -whereby I used a 6mm spacer to lay the battens one by one and build it up that way. I opted for this method in the end to ensure a consistent gap size. However.....due to tolerances in the batten sizes etc the final panel size has come out at 1740mm for one panel and 1750mm for another. I kind of new this was going to happen so not sure why I opted for it. Anyway, the panels look great and the gap size is consistent but they are not as designed and will potentially all be different sizes. Given that I have 150mm Oak posts between the panels I think I could still use the panels as the difference is 10mm but I would have to modify the frame insert, which is doable. This could potentially be different for every screen and something inside of me doesn't like it, it'll basically be a bodge and rely on the viewer not noticing the difference in size of panel. I'm now toying with the idea of going back to option where I measure where each batten should be then manually place them at each location which will ensure the panel is the correct size. I should be able to reuse all the battens as everything is screwed from behind so you wont see any existing holes etc. Any recommendations/comments? Ed

 1 point
 -
1 point
-
I don't work in BTUs I'm afraid, I mostly grew up and went to school in Europe and by the time I got back here, we'd moved to metric too. 😉 Your pipe sizing is going to be based on the flow velocity through the pipes and resultant pressure loss, not a rule of thumb about how much a pipe can carry. At dT 20 this is going to be based on a flow rate of approx. 11.5 lpm. Presuming you can range rate/modulate your 30kW boiler? If not, then as said, at 30kW it's approx. 21.5 lpm. Now what you need to do is draw up your pipework with lengths and calculate the flow through each section according to what heat load that section is going to carry and then look at the flow velocity according to a pipe sizing chart. Then you can size your pipework for an appropriate size to carry the heating load at a reasonable velocity. Preferrably choose a velocity just below 1m/s. Once you have this figure, you can then look at your pressure loss in the pipework and decide on the pipe diameter. I think that with your UFH, you should ideally go with some form of hydraulic separation in your system.1 point
-
Where is @craig when he is wanted. He will know right away.1 point
-
Can’t remember exactly but about 3m1 point
-
I have a 6 camera hikvision system with NVR, 4 poe hard wired, 2 wireless. Looking for a simple poe doorbell but not interested in going Hikvision for that (expense, complexity, integrations?). Going with https://reolink.com/ie/product/reolink-video-doorbell/ so it stores all images/events locally, no subscription and integrates with home assistant although I'll use the native app initially. Agree about charging, poe all the way!!1 point
-
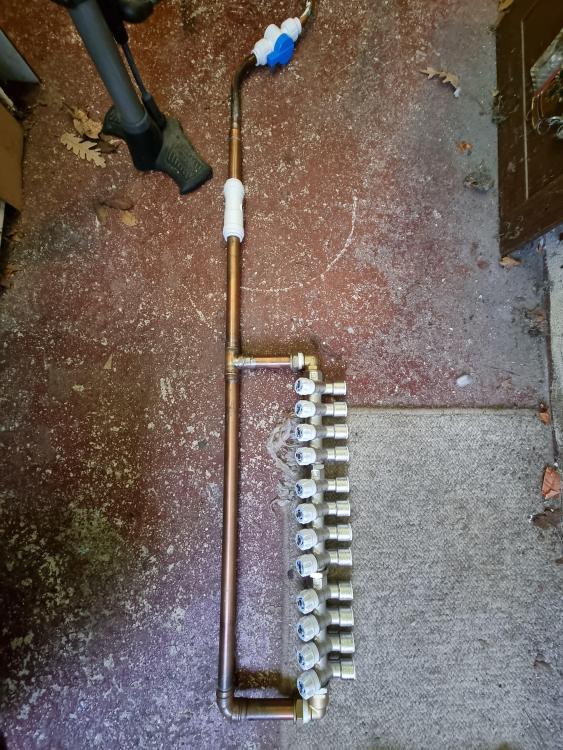
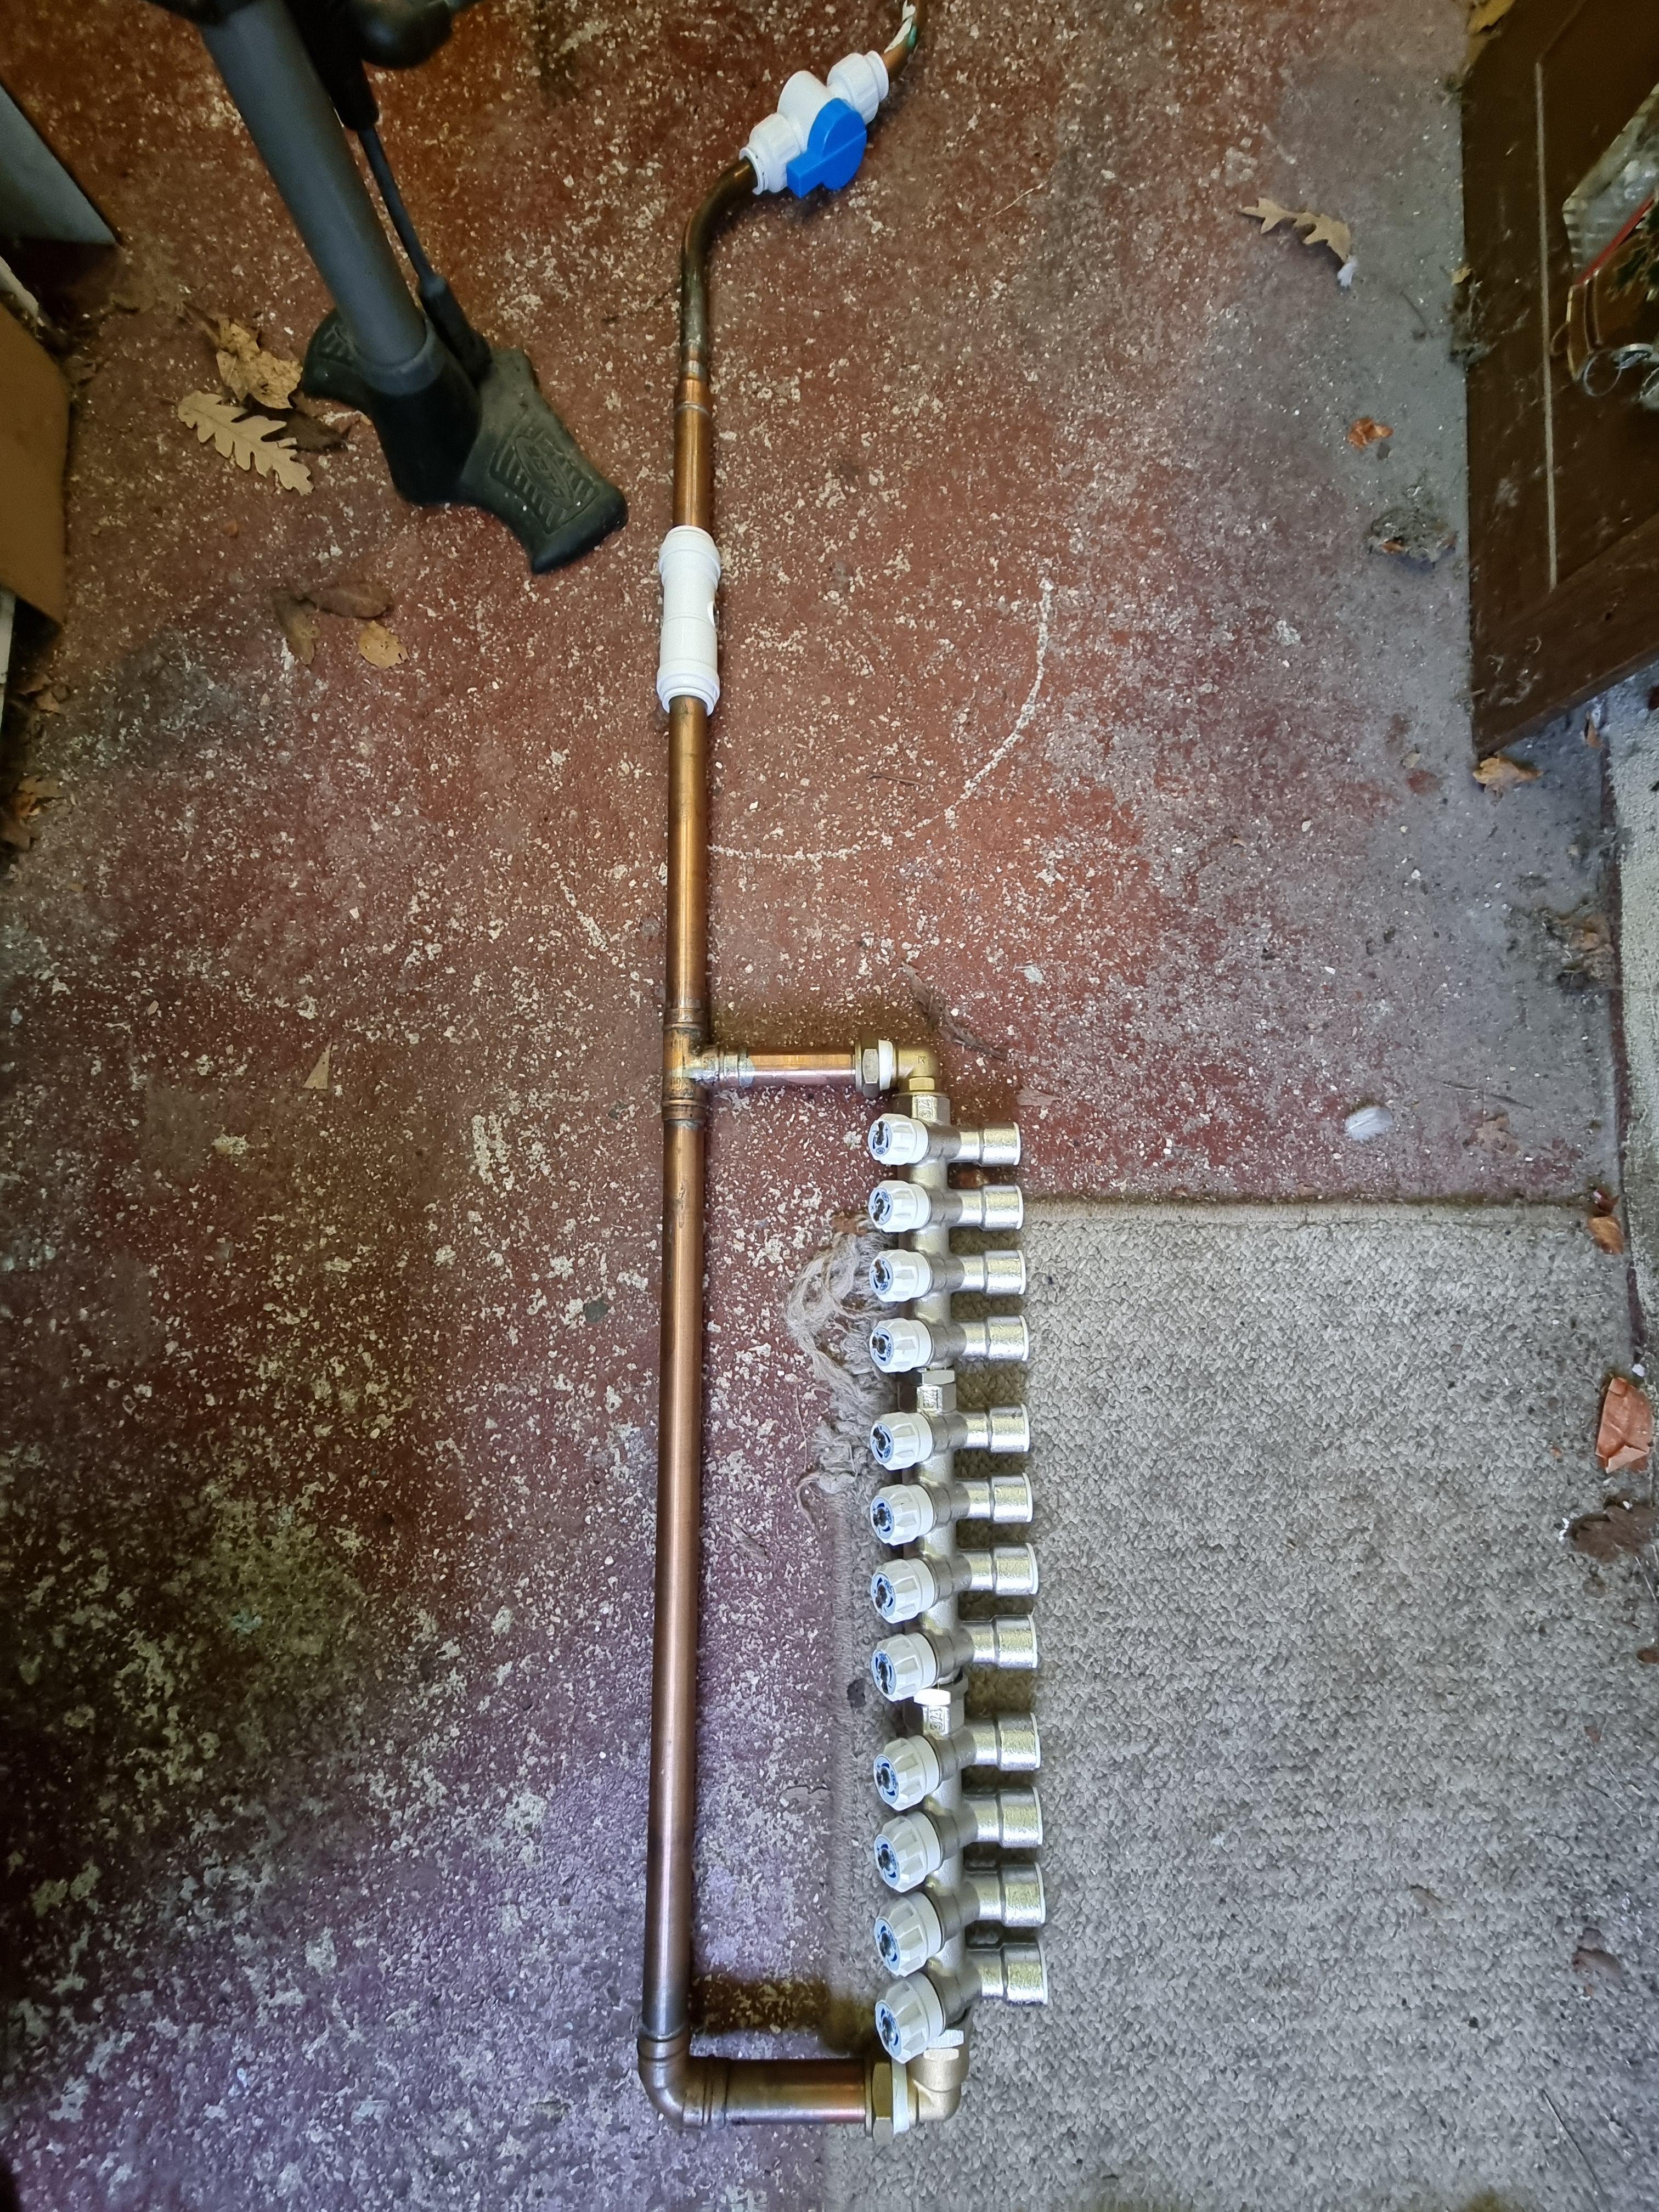
Damn. Having been filled with water for nearly 2 weeks, just hanging around at atmospheric pressure without a sign of a drip, applying the 2.5 bar showed a small weep where the brass 90 at the top connects to the manifold. Time to undo, re-PTFE and tighten up again. Will just air pressure test this time along with soapy water sprayed on the joints. Meanwhile, the other DIY manifold is on test 🙂
 1 point
 -
Be prepared that trades may not follow every detail! They tend to do what is normal practice, occasionally referring to the drawings for critical dimensions.1 point
-
It probably is to small and specific for most companies to tender for You know what you want So bring in individual companies as you go1 point
-
Given you have a detailed breakdown of what needs to be done you can pull out the individual packages of work and start getting quotes for each bit from local contractors rather than all trades builders. It’s what I did which took months itself so I’d get cracking on with it. Just work out the order things need to be done to give people rough timelines. Be prepared for these timelines to shift a lot though. It’s daunting but once you get the main trades lined up and going it gets easier. One thing for you to be mindful of going this way is that there are lots of overlapping elements which can create gaps. i.e. the joiner can’t complete 100% of a particular job because the plumber needs to do xyz. There’s a lot of back and forth. A single contractor would generally just manage this and you’d never be aware of it. As PM you will be managing this and getting trades back can be hard at times. Consequently you end up doing increasingly more yourself to keep the job moving forward.1 point
-
I run a tiling framing and render business and totally get that No sick days or holiday pay The lads that work for me earn between 250-400 per day NW England All are on price work None have done a day on our self build or our previous build The electrician I’ve used wrote a list of what he needed and I added it on my account But items where often not what he had asked for1 point
-
Just use the cost estimator as a guide to show a lender that you understand and are considering the costs in your project. Speak to a good broker (really can't fault Mayflower and we have been working them for 16 months now for a very complex project!) They should be able to guide you as to the most appropriate level of costing/detail you provide to the lender to enable them to underwrite the loan. Some lenders can get a little nervous with the idea of you taking on the work yourselves unless you are in the trade or have prior experience (so I am told). Also - what you get funding for and exactly what you end up doing or who you work with can be a little different in reality. So long as the end result is the same and you get the valuations that you are aiming for to release funding and reach completion all within the scope of approved plans and you are paying the mortgage this is the goal for everyone!1 point
-
I hate day rates Ours works for a national company doing mainly housing associations 40k plus overtime But he pays a lot of tax £300 overtime leaves him with £180 So if he can make £200 cash from us per day It’s equivalent to over 300 I got him to work out a price He’s run over by two days and two hours Saturday morning £500 in his hand I’ve bought the materials in from the wholesalers1 point
-
maybe a little high for NI but is about right for SE England. approx costs for the boss sparky for me is £300 and his underling is £250. the material uplift is normal I think. I am a nice guy and offered to uplift their daily rate by 10% to compensate for the loss with me buying materials which he accepted. tbh, I'm pretty sure it was better for me as I managed to source materials at a cheaper price than he would've (I think) as he has an account with CEF and we all know how expensive they are! by shopping around on the internet I'm sure I was quids in. at least that's how my man-maths justifies it.1 point
-
My spark charged 20%, basically wiping out the VAT saving. For labour rates, most I paid was £200 a day, £25/HR including breaks. That was knocking on the door of two years ago tho. £33 now is probably reasonable.1 point
-
Have you considered fitting air to air heat pumps (A2AHP) to warm up your parents? Probably the cheapest and most cost effective thing you can do. Insulating the floor, if you have the room, is effective as well. If no stairs to worry about it is a lot easier. I would not worry too much about the windows, and bless they are really dreadful i.e. rotted through timber. May be possible to just replace the glass.1 point
-
Welcome, I am probably one of the few people with a similar sized house on the forum. I think this is quite a general discussion and if you want advice on anything specific such as ICF then it is probably best to create a specific post referencing that. This kind of intro post is likely to become quite rambling. To some extent you are really building three houses which makes things more manageable, but I would not underestimate the costs and time require to maintain such a large building. I would maybe try and decide this within the family before going ahead. There is always something breaking, not working as expected, needing replaced etc. it takes up a lot of time and money. Think of the maintenance on 10 standard three bed houses. How will it be owned, costs apportioned etc. My house is around 1000sq metres including the integral garage. It cost around £2m to build 8-6 years ago. We just finished a smaller house for my parents last year and it cost around twice as much per square metre. I would be quite concerned that your budget is low and already seems tight. In my experience I got constant questions from the architect and builder over the course of construction. The questions always went along the lines of we can do A that costs X or B that costs 2X. 9/10 B was the right decision. It would get very stressful if the budget was tight.1 point
-
Agree, but the OP is having a basement and I thought I’d make him aware to set expectations before he went to MBC.1 point
-
Yeah the landing. We decided to cut out the floating flooring in the end and fixed straight down to the structure. It is solid!! will speak to the manufacturer tomorrow but as it’s Sunday I figured I’d ask on here in case any of the awesome members knew.1 point
-
Hire a Spit nail gun. Will make clipping / mechanical fixings a doddle. No more drill / plug / screw etc.1 point
-
I would take a blend of both. There are a lot of very well versed individuals on this forum, and I for one have zero ‘credentials’ to relate to building a certified passivhaus. However, I recently engaged with a PH certified architect, 25 years of PH design experience, and I got my design in at 88% efficient vs his 87%. He asked me a lot of questions, I gave very robust and reasonable replies, he conceded and the client then changed the MVHR design (well, the entire MEP design) and supplier on my say-so (and agreed to accept they’d lost £1k on the 1st design deposit). A PH certified home builder now builds differently, after 30 years of PH experience, after meeting me and hearing how I have approached creating homes that consider M&E etc and how we’ve integrated things on other clients previous builds. In terms of qualifications, I have a clean driver license, that’s it. But I do have bucketloads of tenacity, a passion for what I do, and an unquenchable thirst for knowledge. Most of the stuff I’ve learned has come from exchanges here, with invaluable input, argument, reason, and real-life data (there’s a HUGE amount of it here if you want to spend some time digging). One PH certified architect overlooked insulation in the foundations (😮), also didn’t have any clue about MVHR or space heating. Credentials coming out of every orifice, none that they understood or practiced well afaic. 💩 I’d rethink your confidence in ‘all that glitters’, as only a select few turn out to be gold… but I certainly do hope you have some of the best at hand. You’ll need it, as there’s a LOT to correlate and execute correctly at yours.1 point
-
Build is 157m2 internal with a detached double garage. Budgeting around 2k / m2, but hoping my Brother in Law who has just completed his 280m2 build for just over £1200/m2 can help me. I am quite fortunate that plumbing / electrics / roofing / carpentry trades are available in the family.1 point
-
Hi All We have just started our side and rear extension with foundations poured yesterday. The BC Person while approving foundation depths mentioned that if the external walls are going to be with 100mm cavity then Kingspan K106 90mm interlocking cavity wall insulation (or similar) with 10mm air gap has to be used. Or else the cavity needs to be increased to 150mm and then wool batts type insulation can be used. I checked with the Builder later and he says that it would be impractical to use rigid insulation with only 10mm gap considering the mortar dropping, wall ties etc. There are few 90 degree bends in the walls as well. He also mentioned that rigid wall insulation is very costly and it will cost me dear considering the total combined area of external walls is around 75 sqm. I am planning and designing the build myself and don't have an Architect or SE engaged. My layout plan is based on 300mm thick external walls with facing bricks + 100mm cavity+ concrete blocks. I would like to keep the cavity to 100mm as the layout design is tight in some areas and also to maximise my internal usable area. So even if I decide to pay a lot more for rigid insulation, it may still not deliver the required thermal performance in real life based on Builder's view on practicality. So wondering if there are other economic and practical options with 100mm cavity which I can take back to BC to consider. Any advice on this will be greatly appreciated.1 point
-
@Russdl That’s not a cast body - it’s a resin body by the looks of it so I would query the model number on the front as a resin body pump is suitable for potable water instead of a bronze body (and Wilo confirm this) And Hep2O can be used as a hot water return circuit. You have (incorrectly) read the guidance and don’t understand the BS/ EN definitions and I have had this confirmed by Wavin. For info the below is the definition they (Wavin) use for a hot water return circuit which you don’t meet on 2 of the 3 criteria so you have no issues.
 1 point
 -
Superglue is a right pita to get out of car / door locks. Just saying.1 point
-
Glass ; don’t talk to me about glass …0 points
-
Not that often. Maybe on a few really cold winter days. At the moment the air temperature is 13⁰C and the ground temperature is 6⁰C. The sea temperature is 10⁰C. So most of the time the ground is colder than the air, and especially the air in a building. And people wonder why I say that just adding mass to a building makes it colder.0 points
-
Ok, you win. 😉0 points
-
dedicated coffee station just out of shot 😆0 points
-
Hoorah. We can all relax. 😃0 points
-
Me neither and I am over 60, soon as saw BTU I moved to the next thread. Leave BTU to USA.0 points


This leaderboard is set to London/GMT+01:00