
Leaderboard


Popular Content
Showing content with the highest reputation on 03/03/24 in all areas
-
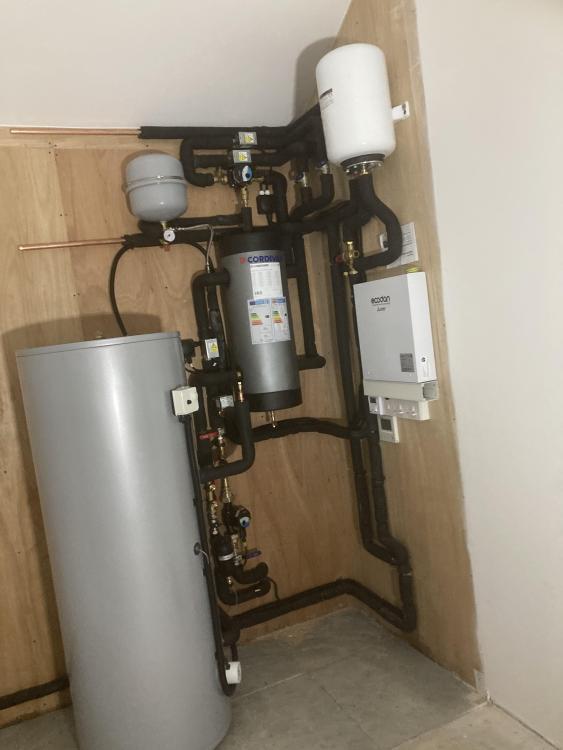
A small super cheap electric underfloor heating element, and an electric towel rail, both on a timer. For two bathrooms, underfloor electric mats were £50 each (Wickes end-of-line-sale) , heated rails £350 and £400 (the more expensive one fits in a corner), Thermostat not needed (on full for two hours at a time - or an additional two hours boost) Timer £45, sparky fitted and tested £86. Be sure to buy a continuous circuit tester if you are laying tiles over the underfloor mat. (£10) Two bathrooms £1000. SWMBO loves the fitting in her bathroom.2 points
-
1 point
-
Sounds very fishy to me. I would want to be represented, have you a trusted friend, relative or colleague you could ask to attend on your behalf? Or one of the professionals involved on yr side, planning consultant, surveyor, architect?1 point
-
Bad idea - You would have to very careful doing that. Would need to be copper or stainless and very clean, otherwise it would not be healthy to drink the water later. And certainly don't want to get carbon steel corrosion products in you unvented cylinder as you start to get pin hole corrosion in a couple of years. We had an 1830 build last, that had a cold room, thick stone floor, walls and 50mm thick stone shelves, never changed temperature year on year. A passivhaus doesn't necessarily mean exactly the same temperature everywhere. Really depends how you build the space.1 point
-
You should not be dropping 20V across the switch. I suspect a wiring / measuring error somewhere. Especially as you are getting similar volt drop with the new switch. Post some pictures of where you are taking your measurements and with what. Is it a real flow switch (I have seen some strange setups with a thermostat acting as a flow switch)1 point
-
I mean the cooling water. You're going to have to use 1000s of litres a day to get any effective cooling. Does it recirculate to a ground heat exchange? Does it go down the drain? If it's just your daily home use, it may not be enough to make much of a difference.1 point
-
How old do you believe this to be? Modern plastic pipe is blue MDPE and 20 or 25mm O/D, you need different fittings for it. I would try not to disturb the plastic pipe connection. AFAIR 1/2 inch and 15mm pipe are interchangeable for all practical purposes, but 3/4 in and 22mm are not quite and you certainly need different Yorkshire fittings for them, maybe also a special olive like you need for 3/8 to 10mm. But if the bush is marked 22 then it's a reasonable assumption that 22mm pipe would be OK in its place. I doubt it is non-removable but even if so it will probably be jammed on the pipe anyway. So at worst you would need a spare cap nut and new olive. Most compression fittings have standard BS pipe threads, but I have in the past come across some ?Pegler? with finer threads, the nuts usually have 8 flats though not the six which you have got. Dribble some easing oil around it the night before. Clean the nut and fitting with fine steel wool but don't leave any debris behind.1 point
-
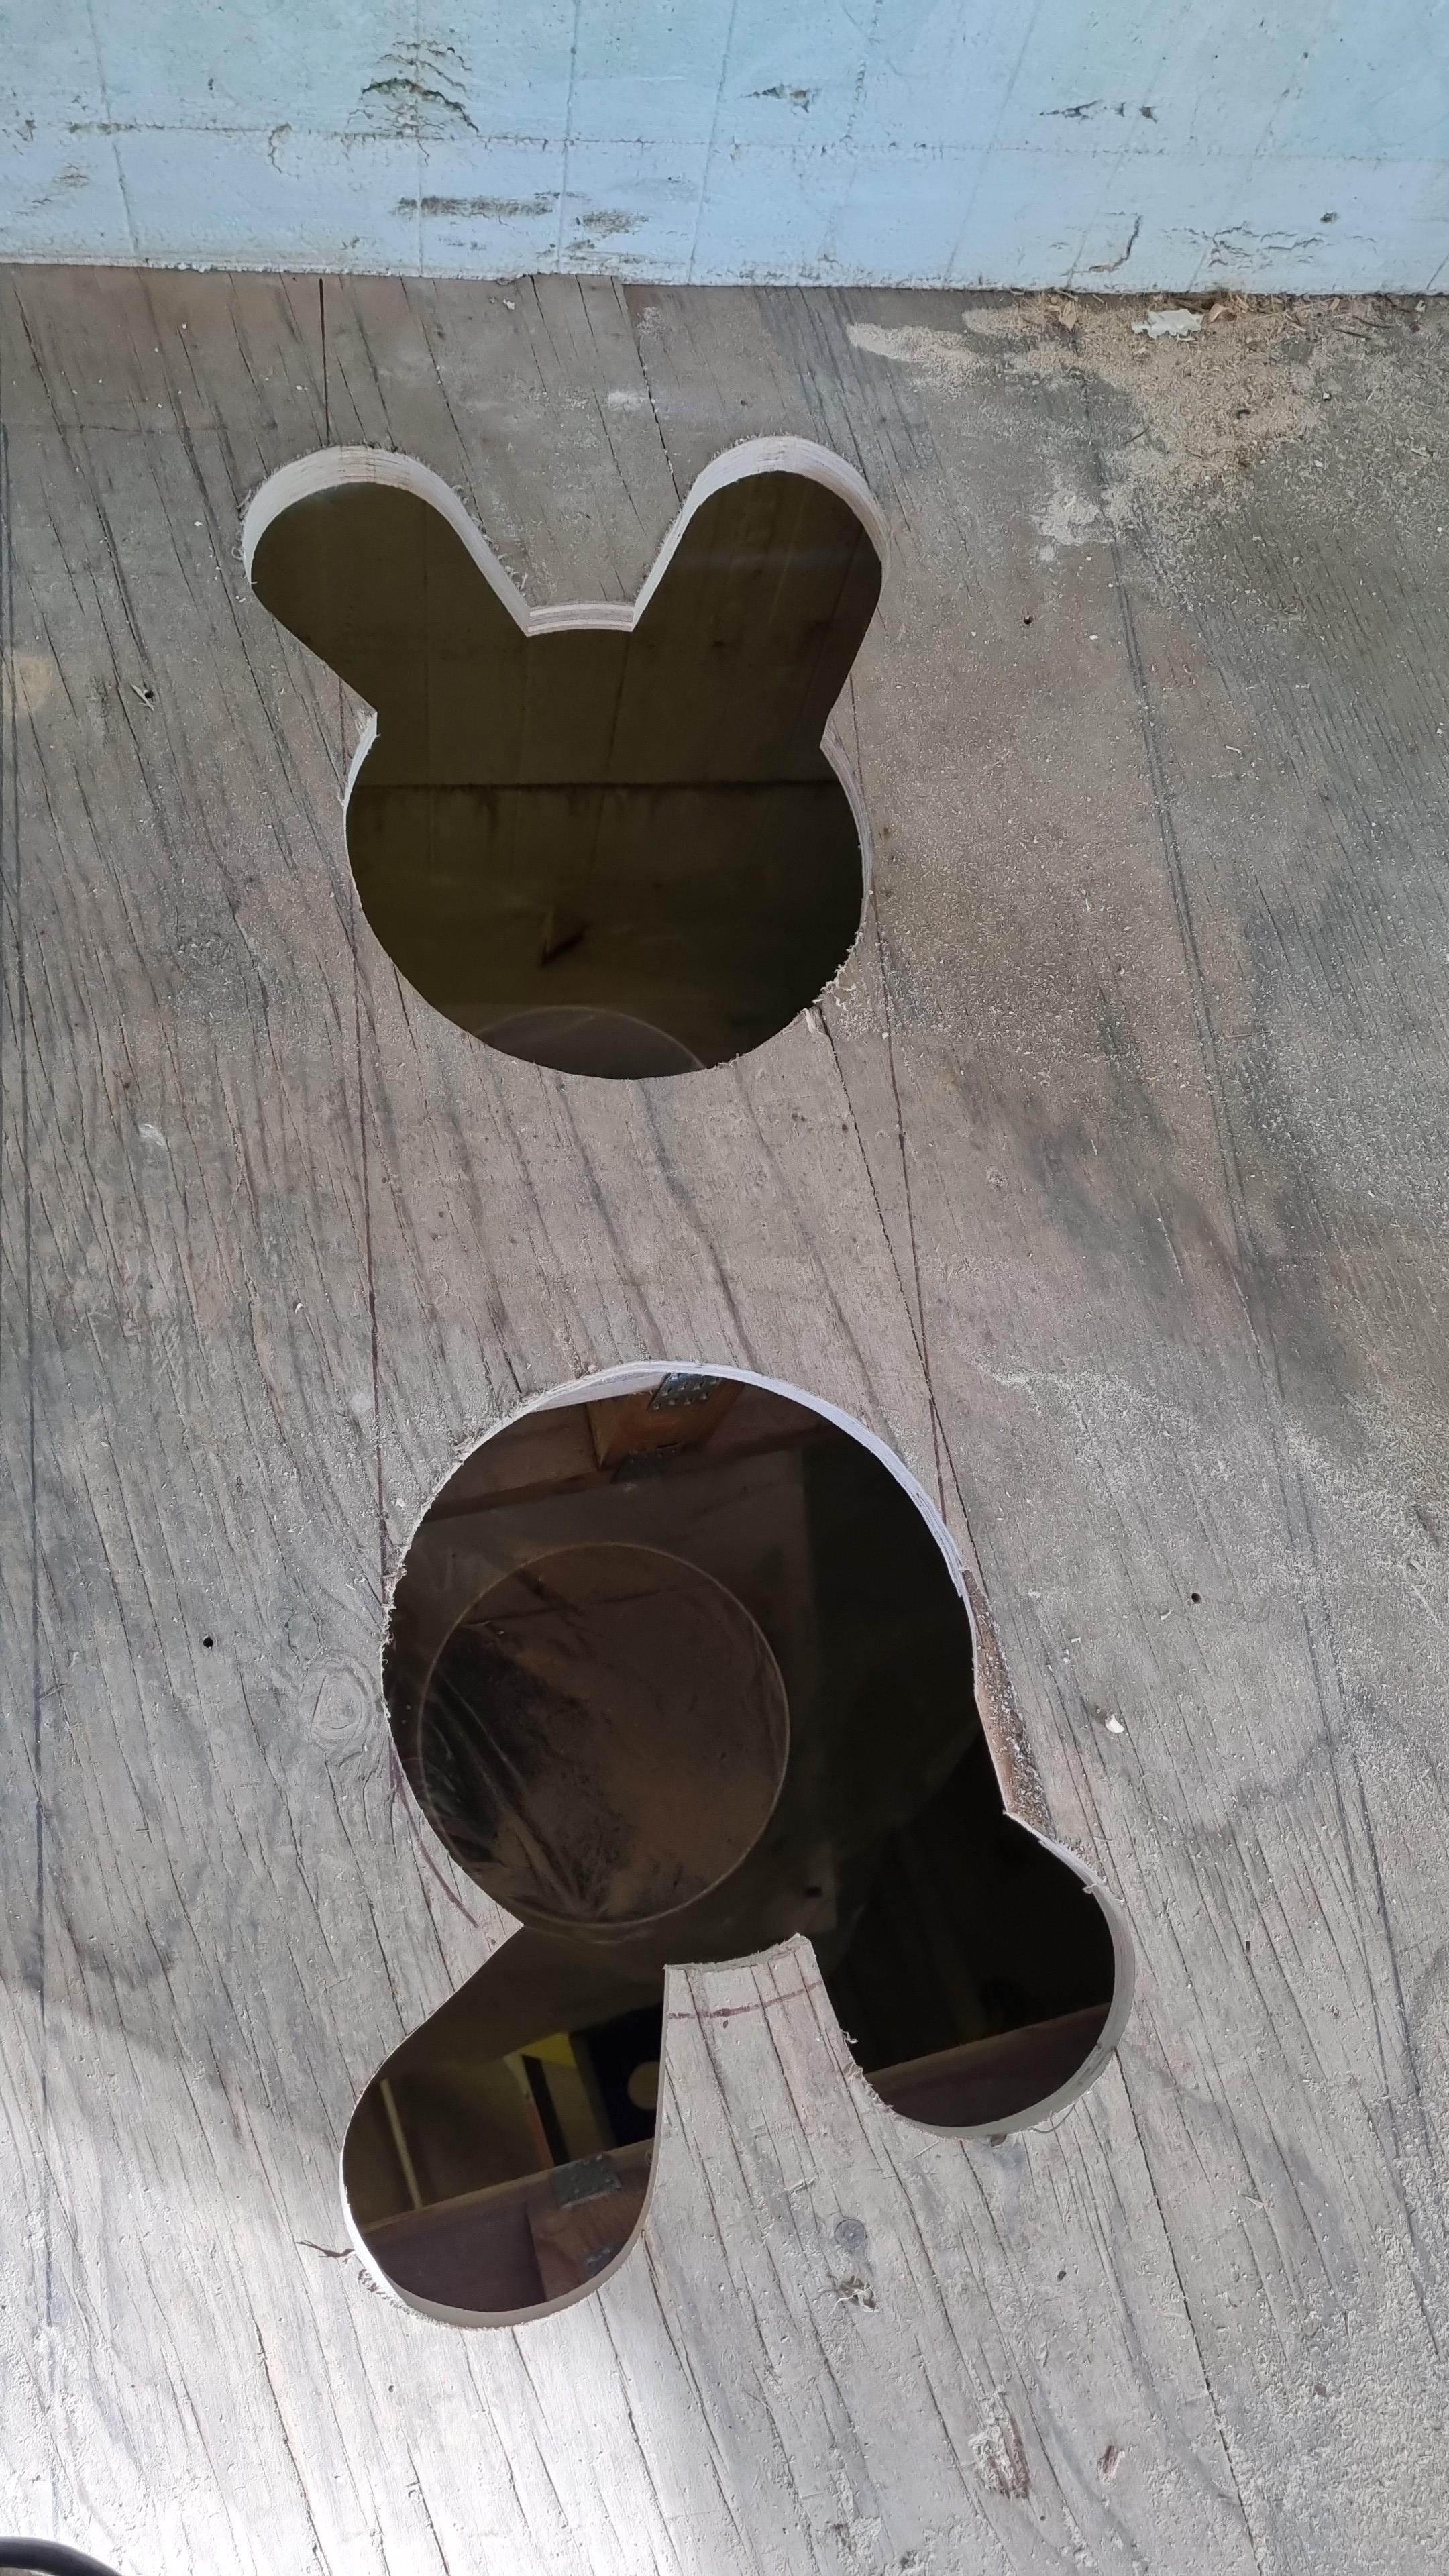
Glad to have provided some amusement on a cool Sunday. Jigsaw? Not new but doing a grand job. Which way is up? Mickey's on top Nuts dropped? A few expletives along the way today, but nuts were not in use today. Glory hole? I seem to putting holes in floor and walls for this ventilation system, right now not thinking any of them are glorious. And as for Minnie's nuts ... sorry to break the news about the transition1 point
-
No idea. Find a place you know and give it a go.1 point
-
Wonder whether his nuts cracked on the way through? Hold on - are we saying that Minnie has nuts as well? Ooooohhh er .... hmmm1 point
-
Wonder if that renovation 24 years ago was done with any sympathy to an old stone building with for example a water permeable lime mortar etc? There seems to be a rule: air tight + stone house = damp1 point
-
I use aluminium warehouse for metalwork, usually a good price. https://www.aluminiumwarehouse.co.uk/collections/aluminium-mouldings-half-round-moulding/products/2-in-x-1-4-in-aluminium-half-round-moulding-hrm1 point
-
Dragging up an old post.. So after a battle, I've finally managed to convince Open reach, and thus all the available FTTP providers, that I'm here, and that they do actually have a duct to my house. What service should I sign up for? 20Mb via 4G was fantastic but not any more see backstory below if you want 🤣 £29 / m for 100MB FTTP via Vodafone or £33 /m for 500mb both on 24M contracts what would you go for? **Backstory - to while away 10 minutes on a Sunday, all the Ducting on the road was installed before we started to build 2yrs ago , and when we moved up into the caravan 18months ago the cable and infrastructure was installed so I ordered Broadband, only to find out that they were connecting me to the copper network FTTC, this was 2 miles from the cabinet and the internet was less than 1MB so cancelled and used 4G, when we moved into the house I put two 4G aerials on the gable and the 4G speeds jumps to 20MB downloads, on a Smarty £20 monthly contract. about 2 weeks later 23rd Dec, the internet dropped and ever since the signal has been poor 4MB at best, worst at peak times, they know they have a problem but are not fixing it, or throttling the service and don't care. I looked back to getting broadband and finally my postcode was allowing for 40MB connections - so I assumed this would be FTTP, as BT's FTTC was only offering 3Mb. I ordered a 36MB service, only to find that when the guys came to install it was going to be FTTC service. FFS. after a bit of research it seemed that my house missed the check box, and the vacant / derelict croft next door could get 1000Mb but not me. Phoning / chatting / messaging BT was useless, every response was computer says no, were not installing FTTP in your area blah blah blah. I had the CBT reference for the duct box, so eventually found an open reach contact that investigated and finally after about 5 days agreed and checked the box... Now all FTTP providers are happy to supply..1 point
-
Well, they look like they're enjoying themselves. Ermmm, who's where, and which way is up? I bet @Pocster will have a view on that matter.1 point
-
My spreadsheet attached. The first sheet is my dimensions to put into the spreadsheet Heat loss calculator.ods1 point
-
You said earlier that the aga had an external air feed? If that is the case it doesn't draw air from the house. So the ground floor only has a utility fan that is light switch activated with no over run timer? And upstairs only one fan that is actually used. If you aren't replacing air and you are developing humidity your house will get damp.1 point
-
Do you actually mean aluminium, or aluminium clad timber. standard aluminium doesn’t provide a very good u value, unless you go for some expensive stuff. timberclad I believe provides the best u value for the money spent.1 point
-
best do a heat loss calculation to see how much heat is required. look at faulty down pipes rainwater goods, external ground levels for damp. consider additional ventilation in areas that generate moisture?1 point
-
We have one. Geberit. I love it. We are now building a new house and I'm looking at getting one for there. My wife thinks it's ridiculous but I'm totally sold on it. Better Bathrooms do a good value one that I'm looking at. Reviews seem good.1 point
-
If you're running cable then go for wired PoE APs instead of a wireless mesh. You will usually get better coverage, bandwidth, reliability and it can be cheaper. Run CAT6 to the ceiling voids of each major room in the house. You don't have to actually use it all at this time. Wherever you end up needing an AP, you just pop a hole in the ceiling, mount the AP, and hook it up at the other end under the stairs. If you're hoping for a fttp connection in the future, think about how you'll get the cable into the property. Some people like to try and preemptively install a duct so it can be pulled through under the walls without breaching airtightness etc (although I think ISPs can be fussy about what they allow for this).1 point
-
1 point
-
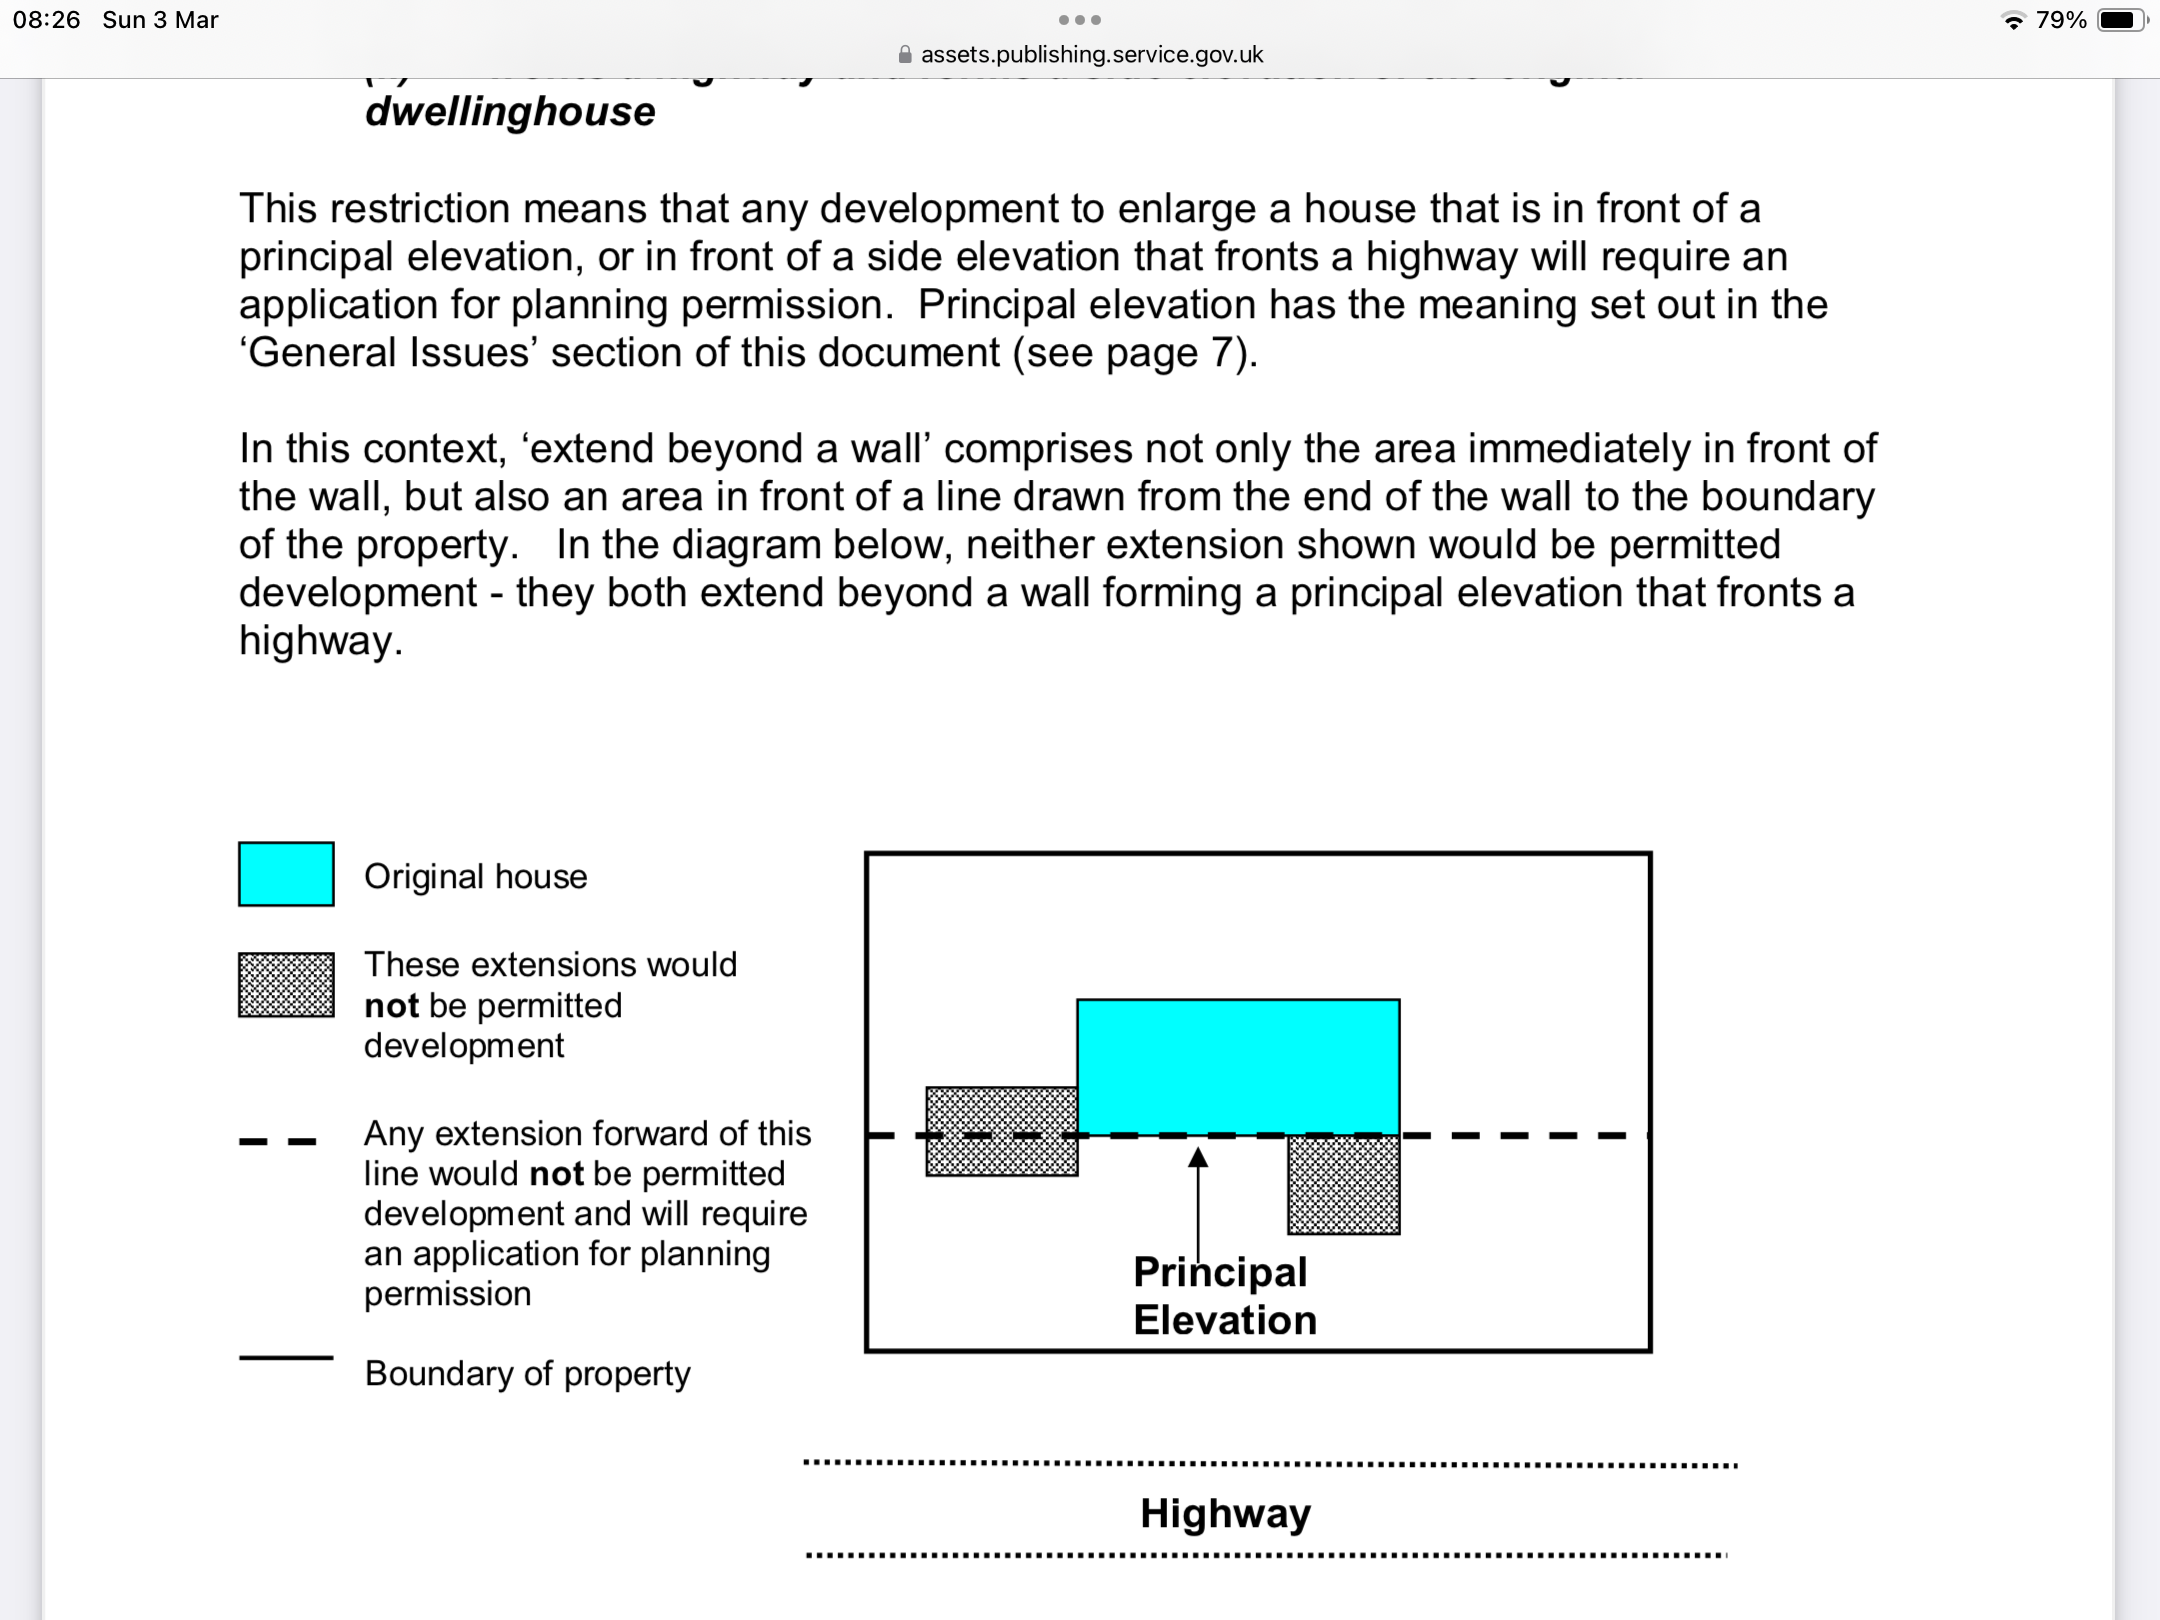
I’d check that you dont need planning if it’s on the front of the house1 point
-
I follow what’s generally done in commercial installs that there is never a single point run it’s a double data point with 2 data cables. I have 48 data cables that I run in 20 years ago, not all used but I was putting rewiring at the time, maybe 8 or 9 used but glad it was done keeps the Wi-Fi for Wi-Fi only devices. good luck1 point
-
If you are anywhere near Derby you can ask Donfabs and Consillia (I sometimes contract for them) they specialise in one off metalwork1 point
-
Self adhesive breathable tape it specifies https://www.builderdepot.co.uk/wraptite-tape-100mm-x-50m?gad_source=1&gclid=CjwKCAiAuYuvBhApEiwAzq_YifAiLwSC0NIFRUl0LYEG73Uatlf9z2-oWwS69VZb36WkUZUMfK38ixoCmOgQAvD_BwE That type stuff should be ideal, minimum 100mm wide. it seems to be their preferred product https://www.insulationshop.co/image/catalog/pdf/Kingspan/Kingspan_Kooltherm_K106.pdf1 point
-
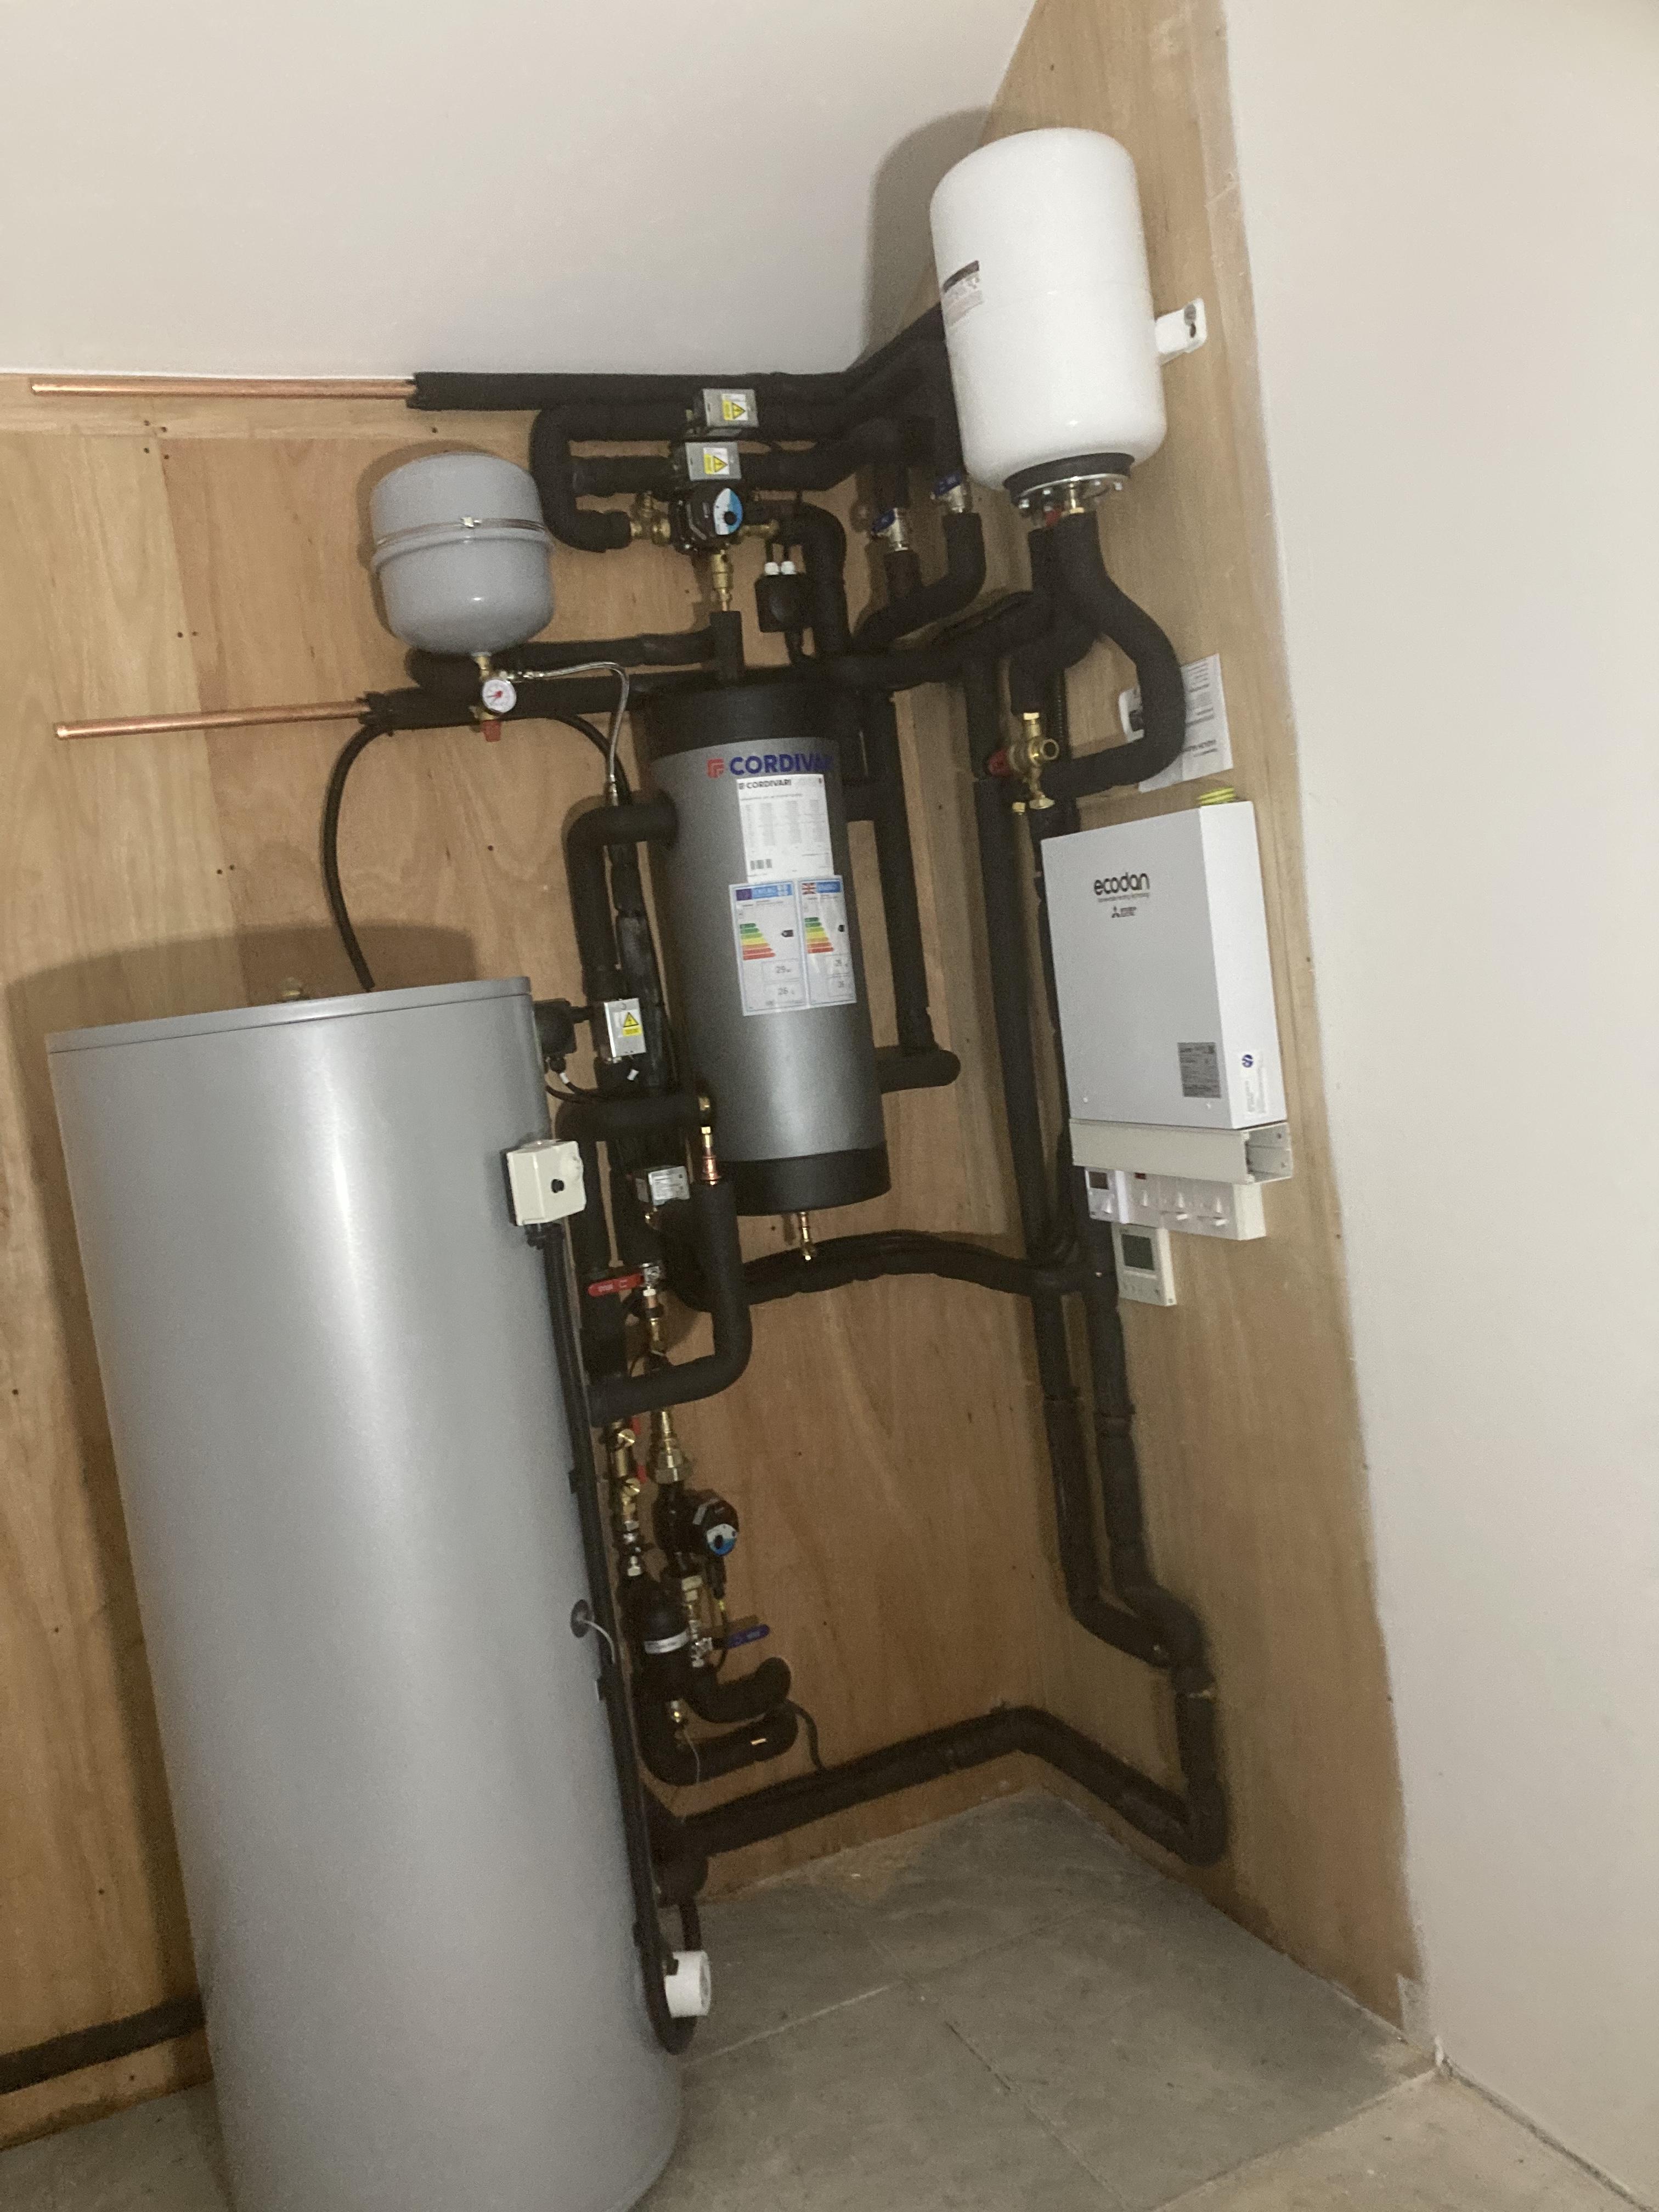
2 penetrations drilled once ASHP has been positioned to get level holes if possible to make it ‘cleaner’ outside. likewise for rotary isolator, too many installs it looks like a complete after thought with no thought to visually looking appealing1 point
-
Ours are wall sleeved and insulated upto the wall either side
 1 point
 -
My pipes are in the ground, but when researching the topic, I thought Primary Pro had a good wall sleeve solution. https://primary-pro.co.uk This Ovo Forum thread also had lots of advice and lots of pictures. https://forum.ovoenergy.com/my-smart-home-138/heat-pump-pipe-insulation-energy-efficiency-starts-with-the-pipes-94771 point
-
A simple app on the phone with measure that. You can use Google Earth to measure distance and elevation. https://support.google.com/earth/answer/148134?hl=en1 point
-
Firstly, check if you need to formally discharge any pre-commencement conditions. Secondly, check if CIL applies and if applicable, submit the relevant forms prior to commencement. Once you have sorted the above, you would need to make a material start/operation on site and that is defined as… https://www.legislation.gov.uk/ukpga/1990/8/section/56 To confirm works have commenced, you could submit a Lawful Development Certificate to the LPA. Or you could have this confirmed by Building Control. As a result of the changes to the Building Regulations in October, the definition of commencement has changed… https://www.nhbc.co.uk/builders/products-and-services/building-control/new-changes-to-building-control1 point
-
Good advice and ideas above. I'm torn. A fabricated boxing may be vulnerable to bashing and difficult to repair. However it would flex with the building if the door is bashed, and in wind. Block can be tied to the steel and will be robust, but the render may crack.... but is easy to patch. If you go the block route then use self drill, self tapping tek screws with the correct head (called a 'heavy') for hot-rolled steel (ie not for cladding or light weight steel). They are easy to find at a specialist fixings merchant, and a driving head to suit. Then you can use standard L wall ties. These screws are much easier to fix than hilti nails, using a normal drill and you can be certain they will stay put. Paint the steel with bitumen paint and it won't rust. or a fancier, coloured steel protection paint. If the base plate is exposed, then paint it and any mortar packing too. And pack the cavity with cavity insulation.1 point
-
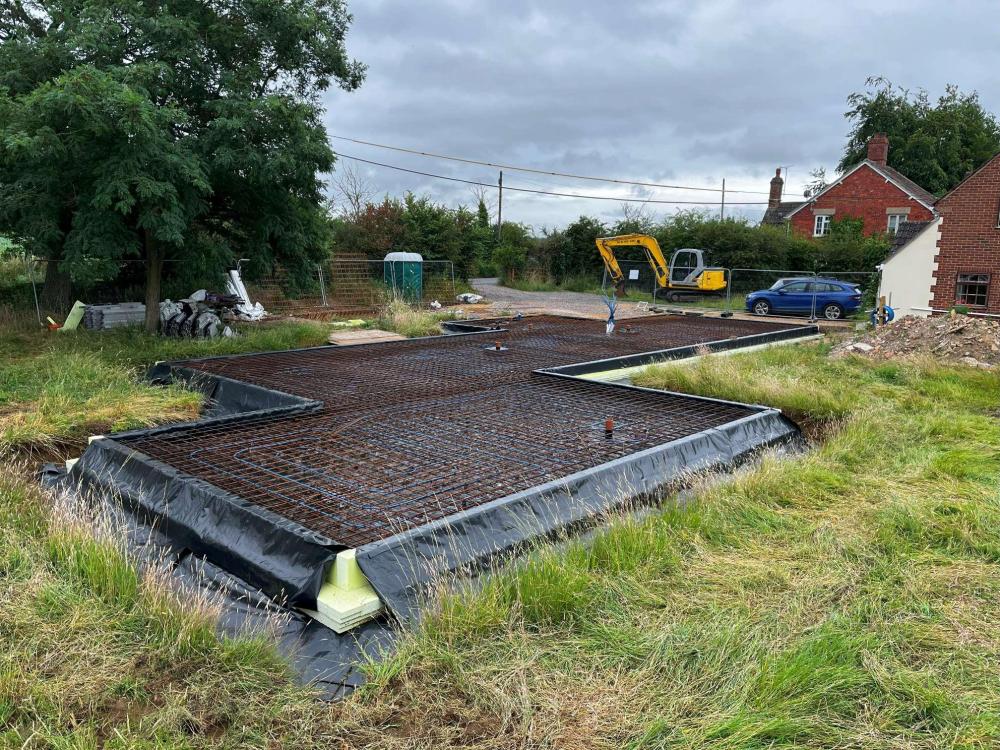
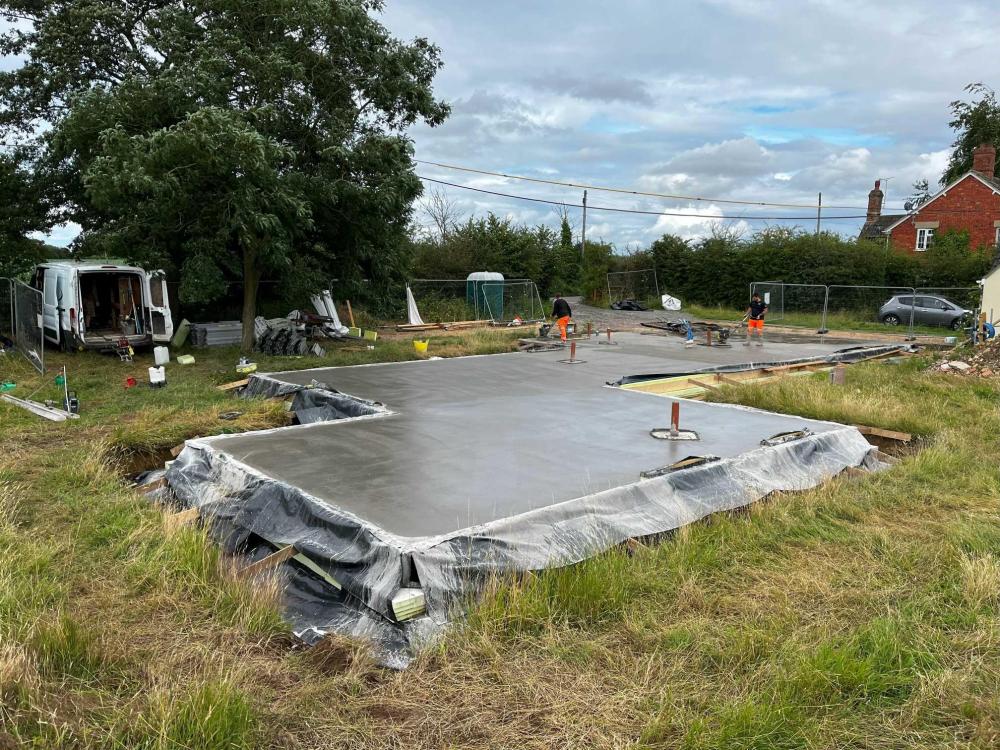
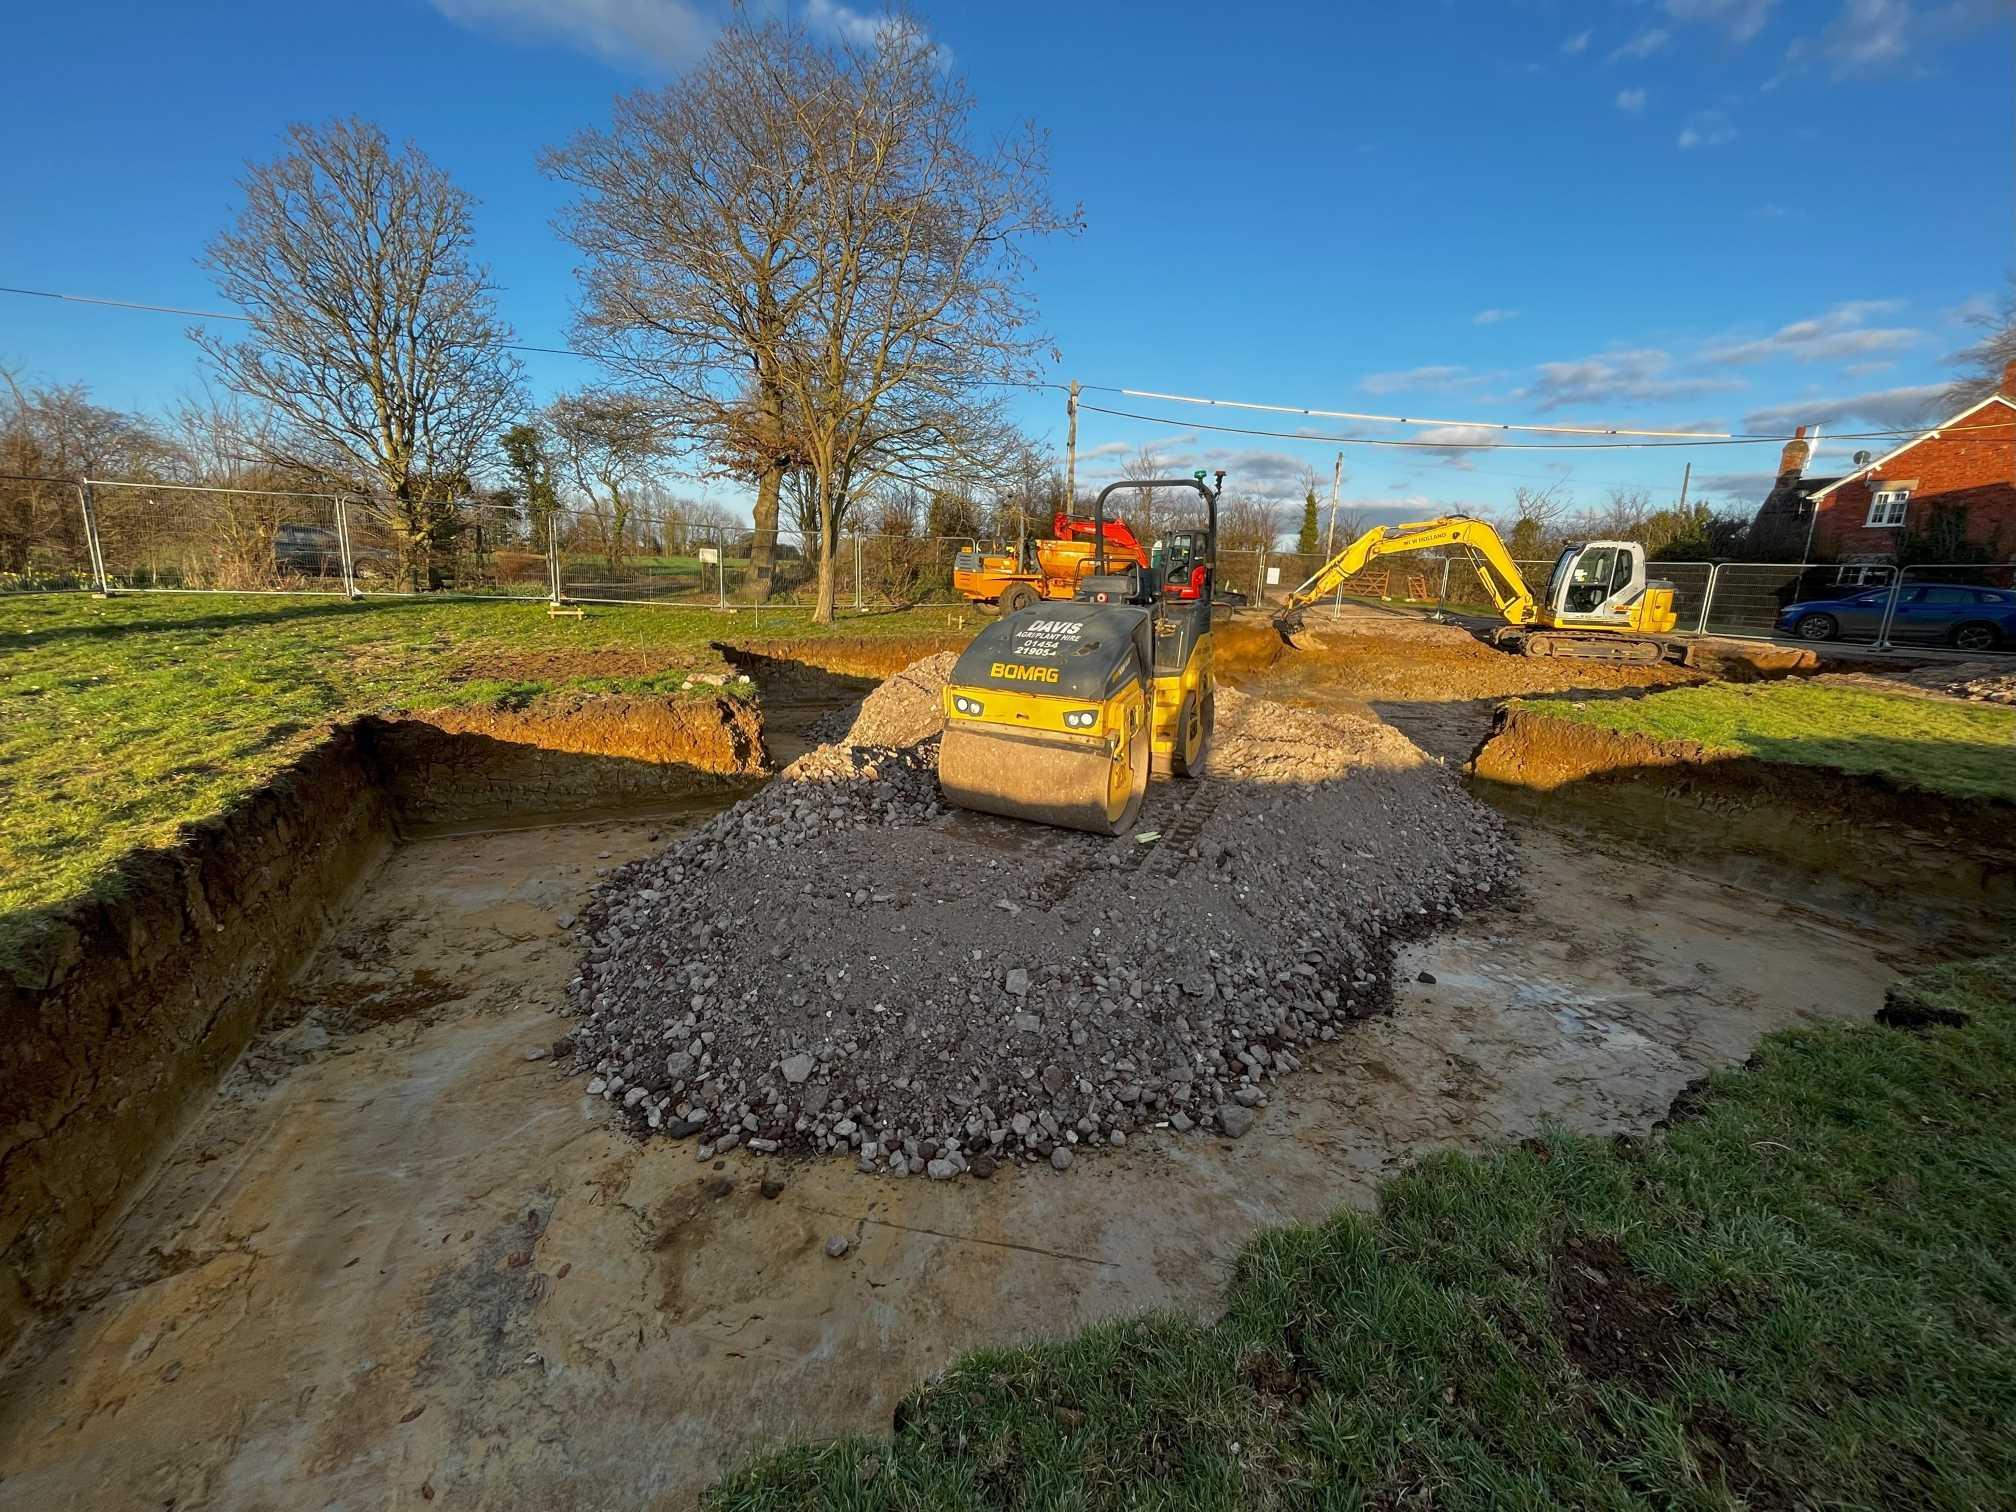
Final two photo's 8053 is the steel, sorry it was getting dark when I rembered to take this. Layer of A393 mesh in bottom and top with a further layer of A393 min 1.0 m wide around the upper perimeter (we just used the 1.4m offcuts from the main mesh). A couple of embedded beams using 16mm bars where the main load bearing walls are. 8059 is the finished raft with a muddy surface due to the state of the ground whilst the rain water drainage was being done. I'll power wash it off before the frame arrives.

 1 point
 -
That’s 2017 prices.1 point
-
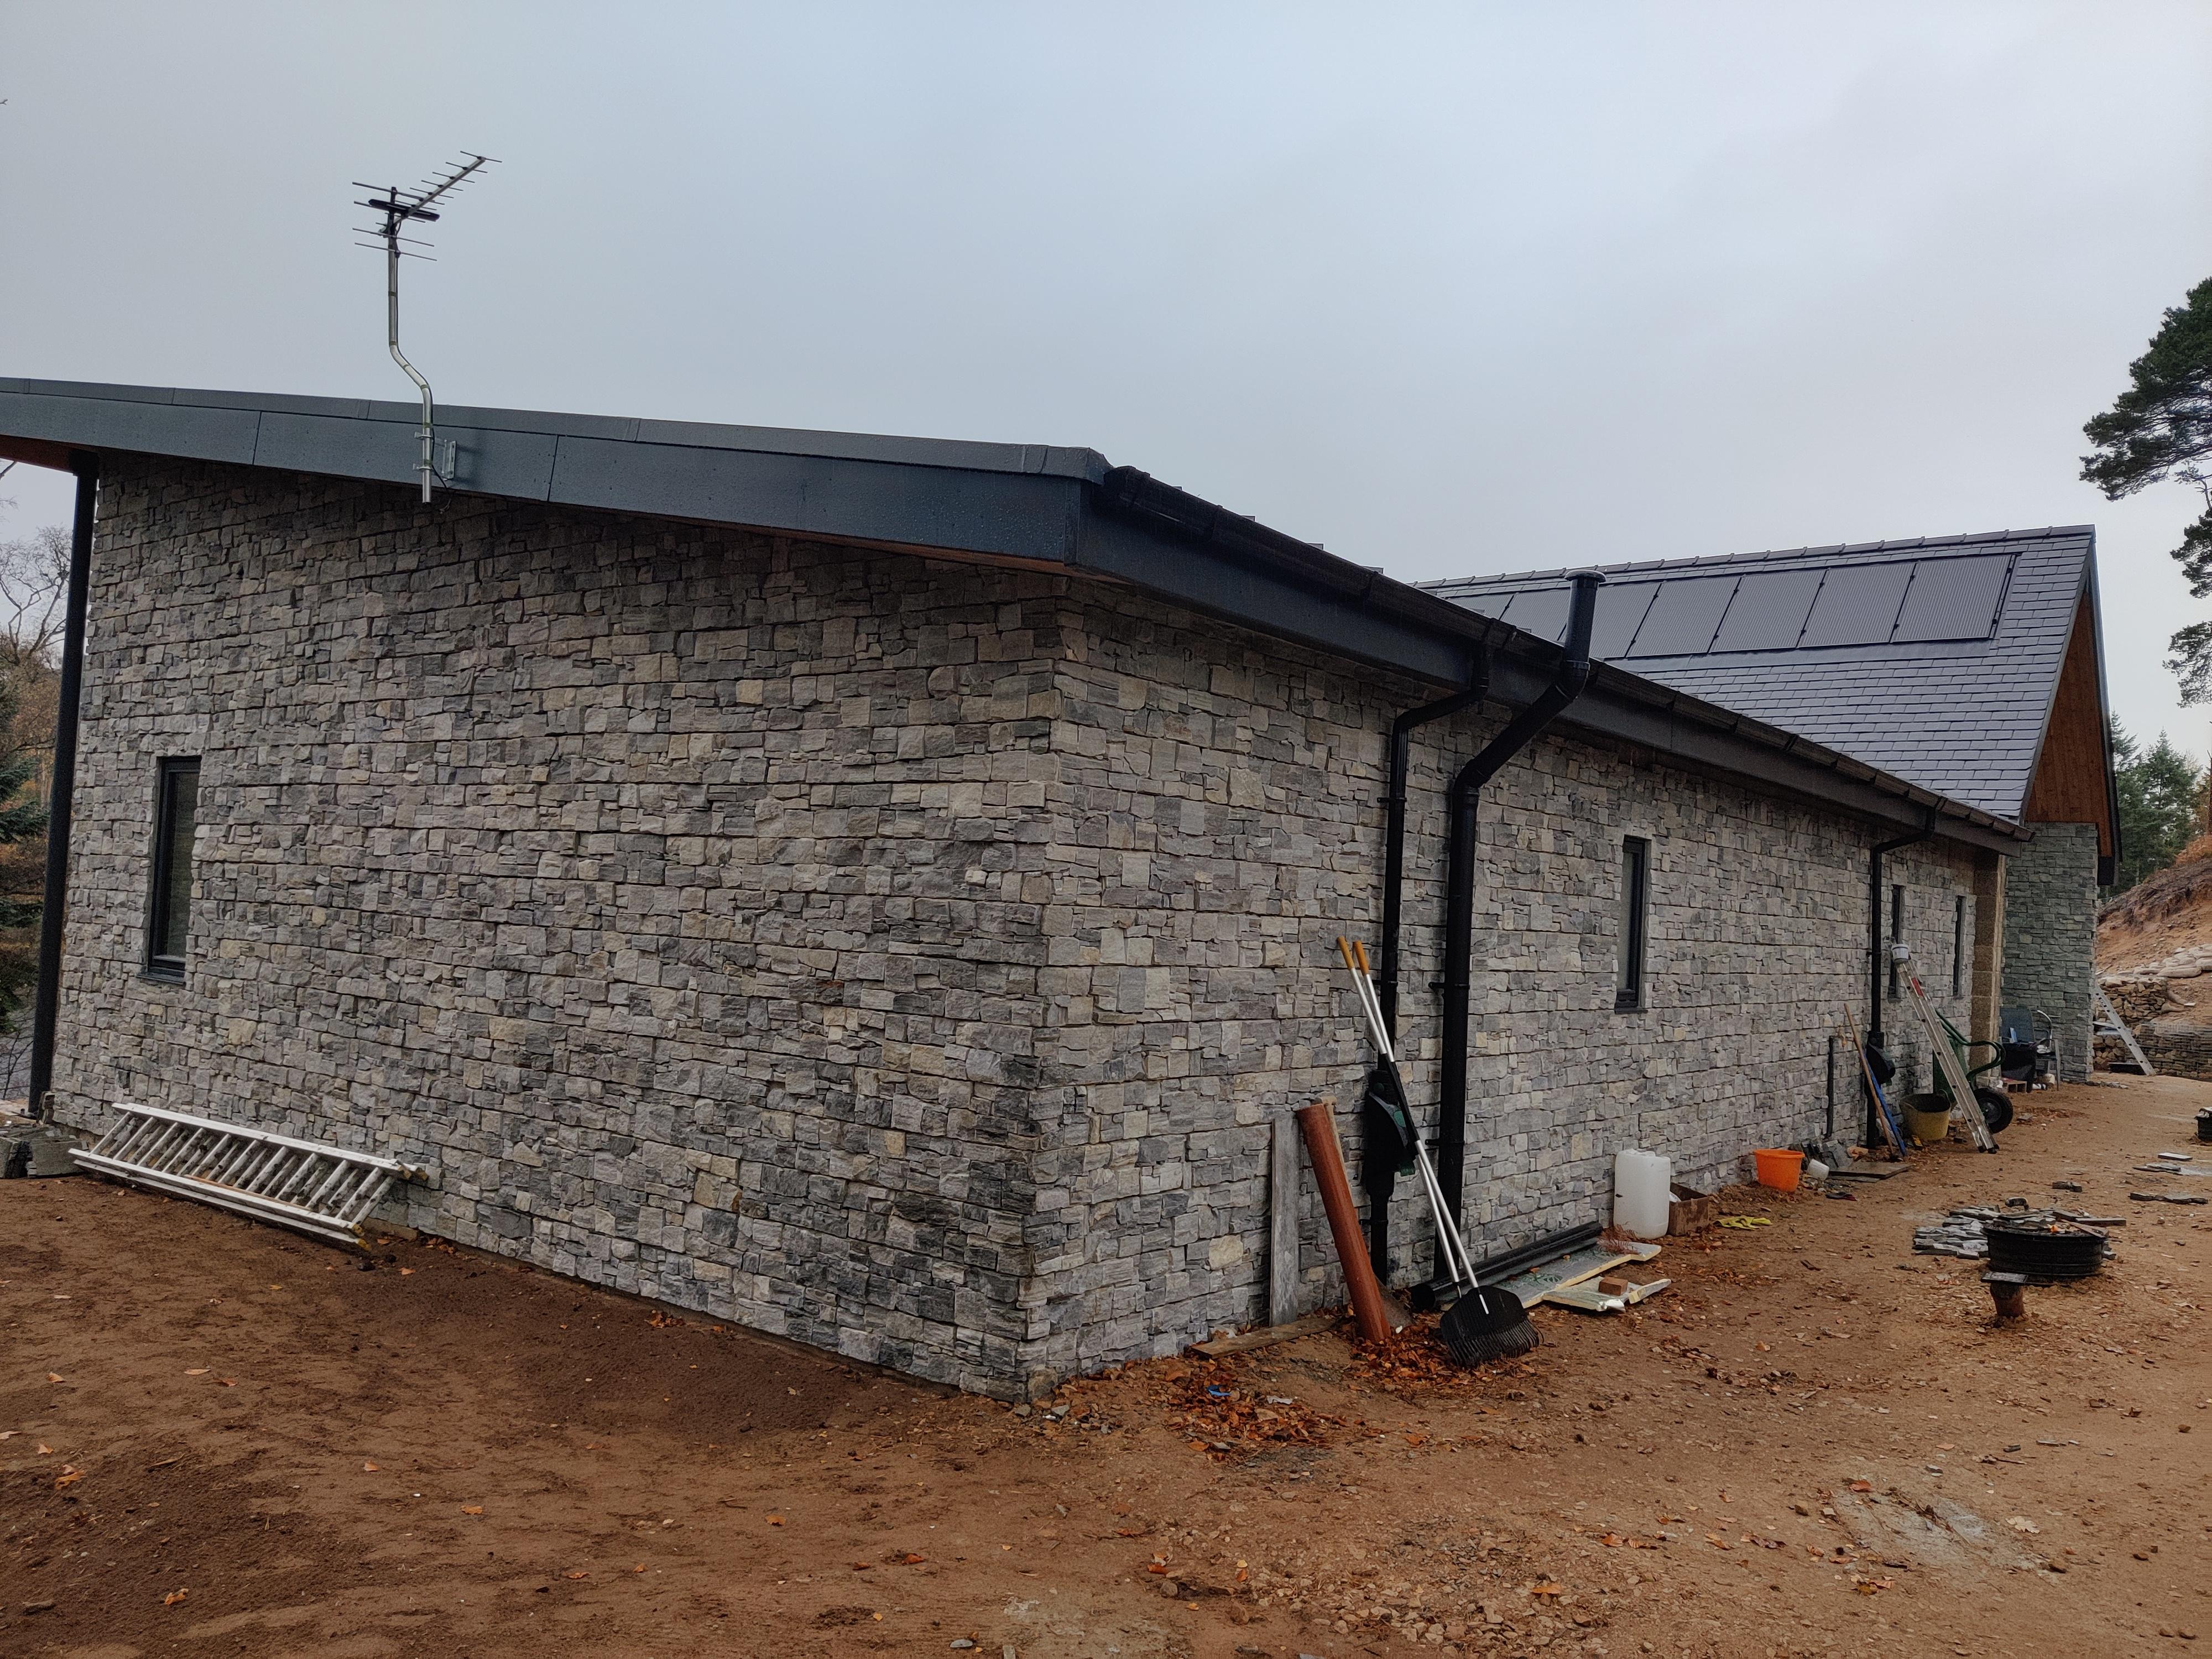
Woodcrete ICF, used exterior quality tile cement and real stone slips direct to the ICF. Photos were taken a couple of years apart.

 1 point
 -
For your application it doesn’t need to be specific reinforcing mesh, if you can get some off cuts or strips then great, A142 (6mm wire) or above will be more than sufficient to stop the pipe creating a crack line1 point
-
Not ideal but no big issue either, get your pipe runs in a sensible place - parallel to any crack inducers or joints etc. strip of mesh over and under (if possible) and you will be fine.1 point
-
use a proper rest bend with foot and a SINGLE length of pipe going to the outside and set both ends in a little concrete. Then pack in around with insulation and foam. Put the pipe in before the insulation. BTW, 150mm EPS doesn't seem like very much to me. What grade is it? In an insulated raft you'd normally have 200-300mm1 point
-
Foam isn't very controllable. You would have to position the pipe very precisely, on supports and load it down. Then squirt foam slowly so that it doesn't force the pipe up as if expands. Check the pipe all the while. And repeat. How would you prop the pipe? Not on anything hard, so gravel at intervals. There will be plenty of instances of people using crumbled pir, or expanding foam. Mostly it works, presumably. But perfection is worthwhile.1 point
-
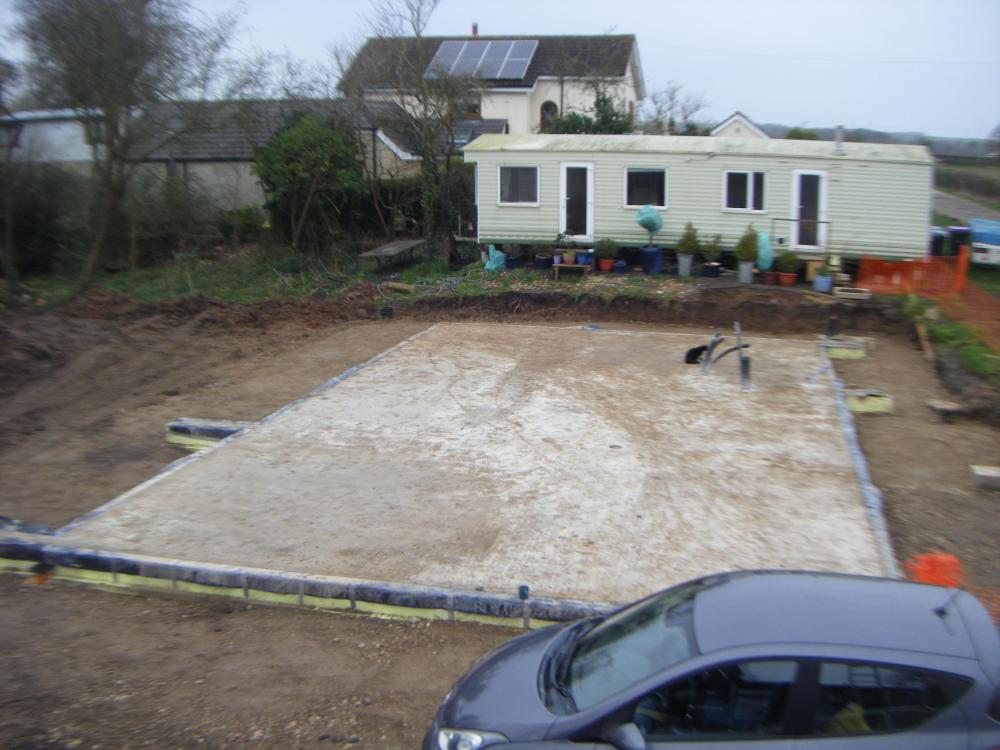
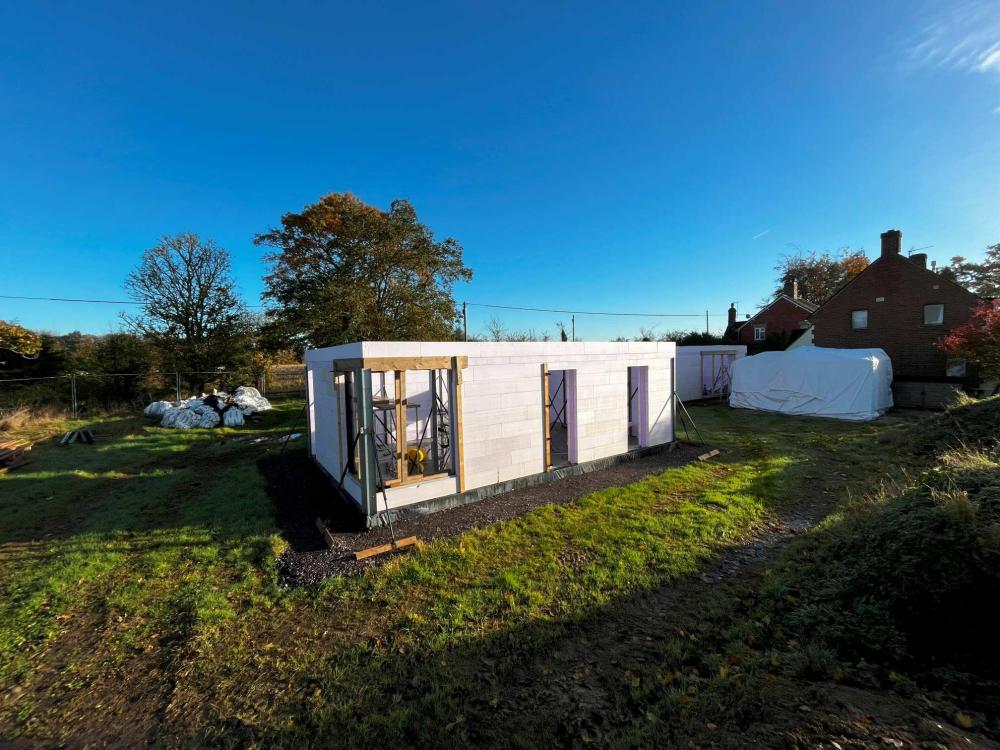
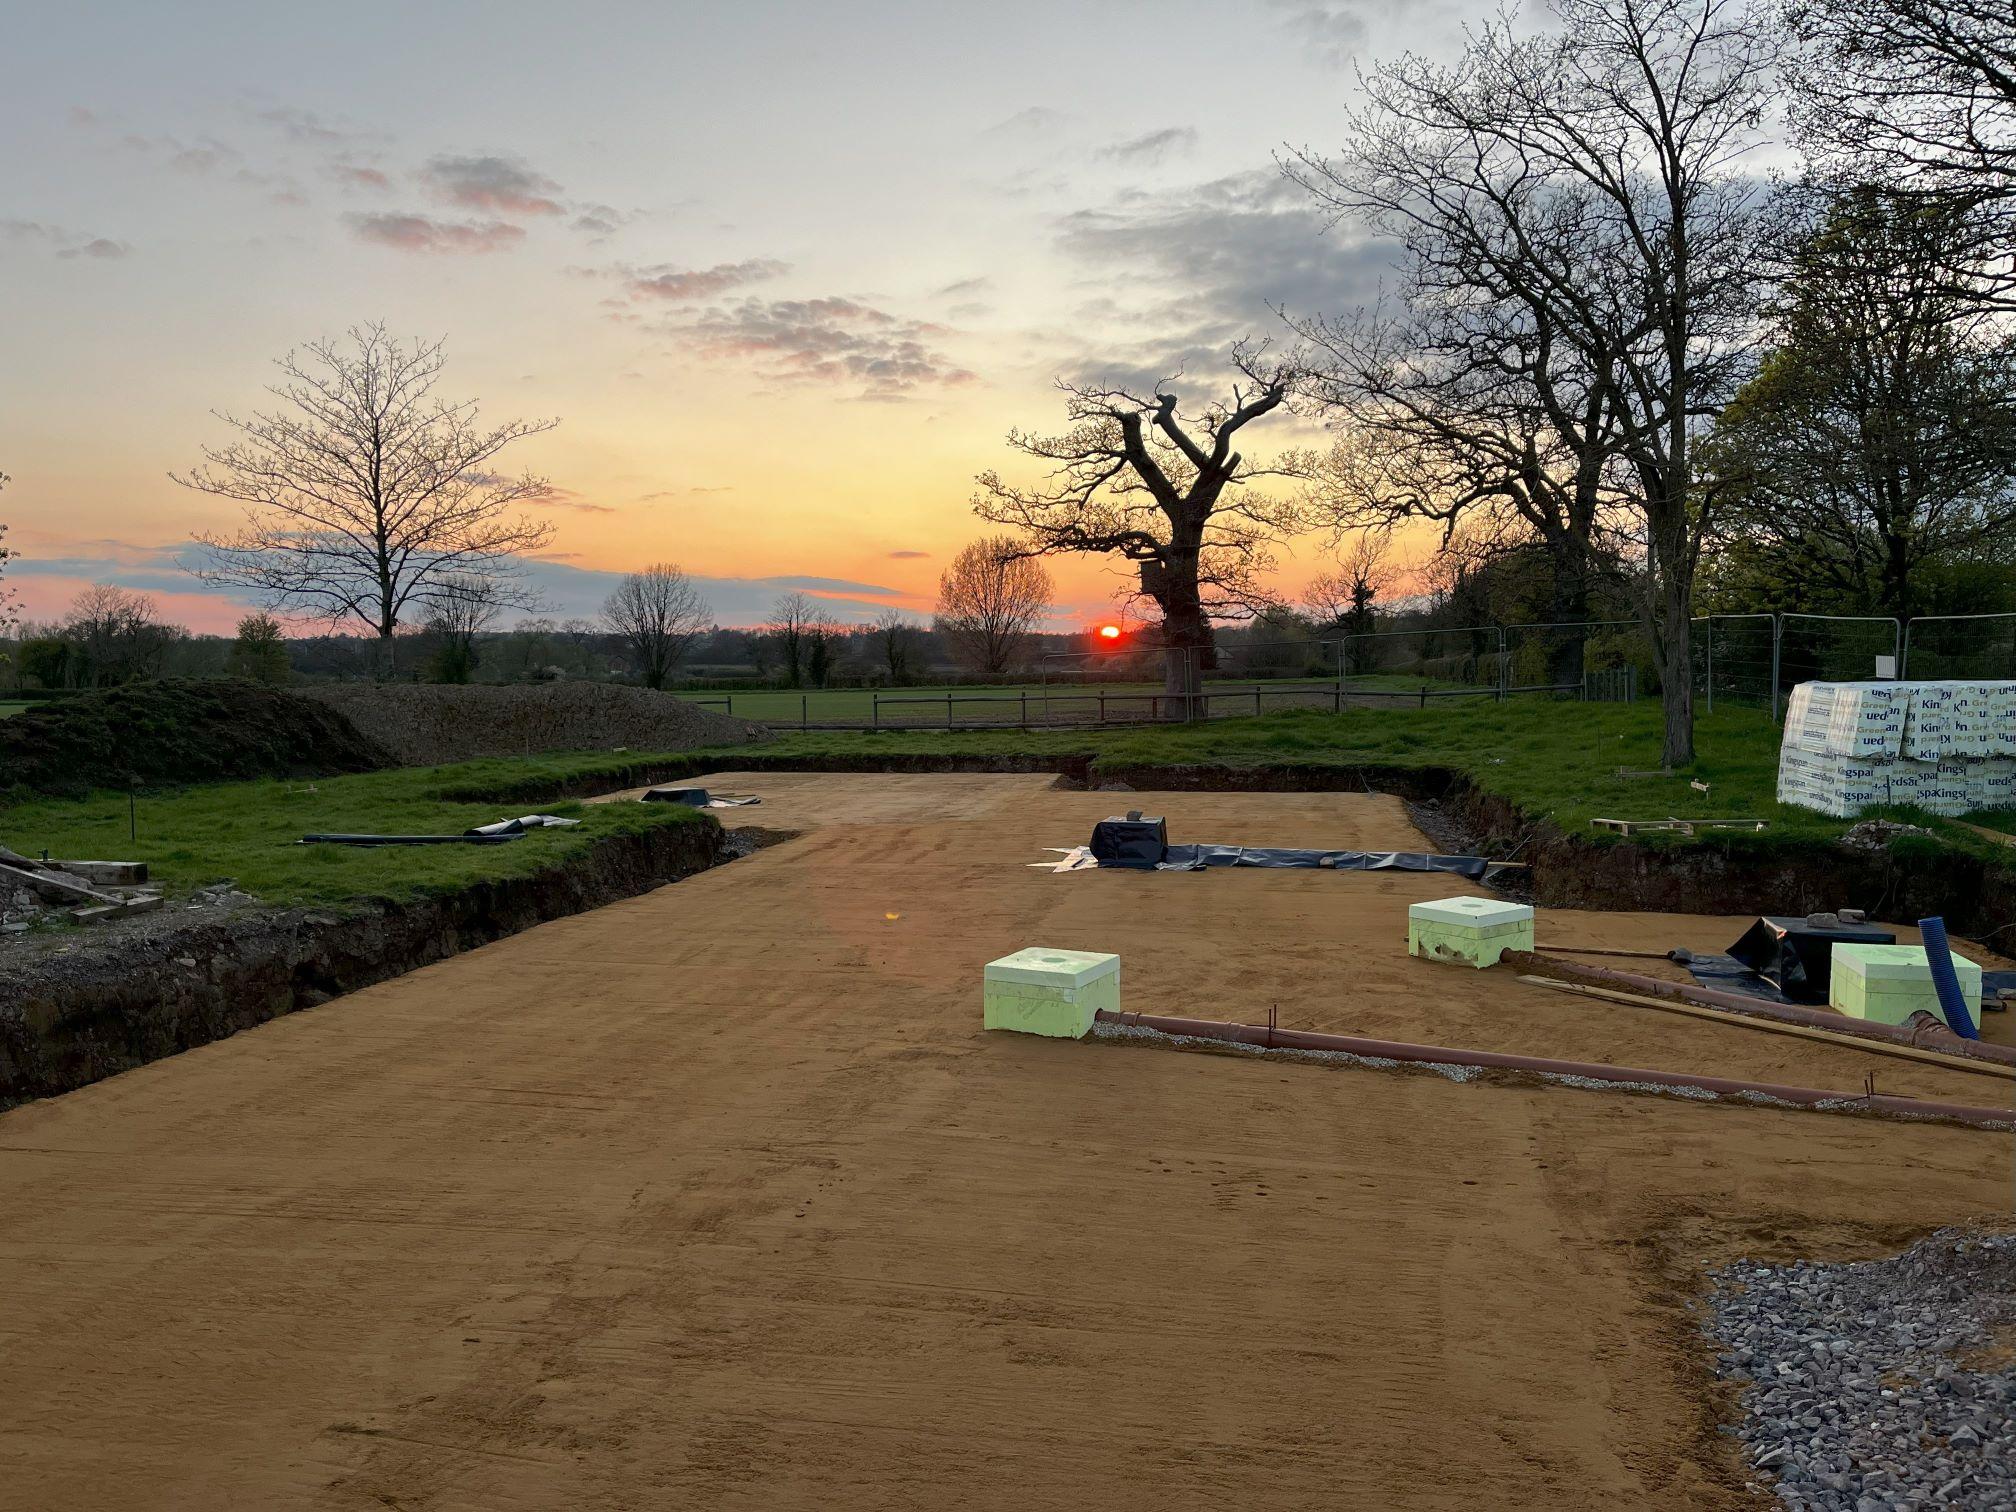
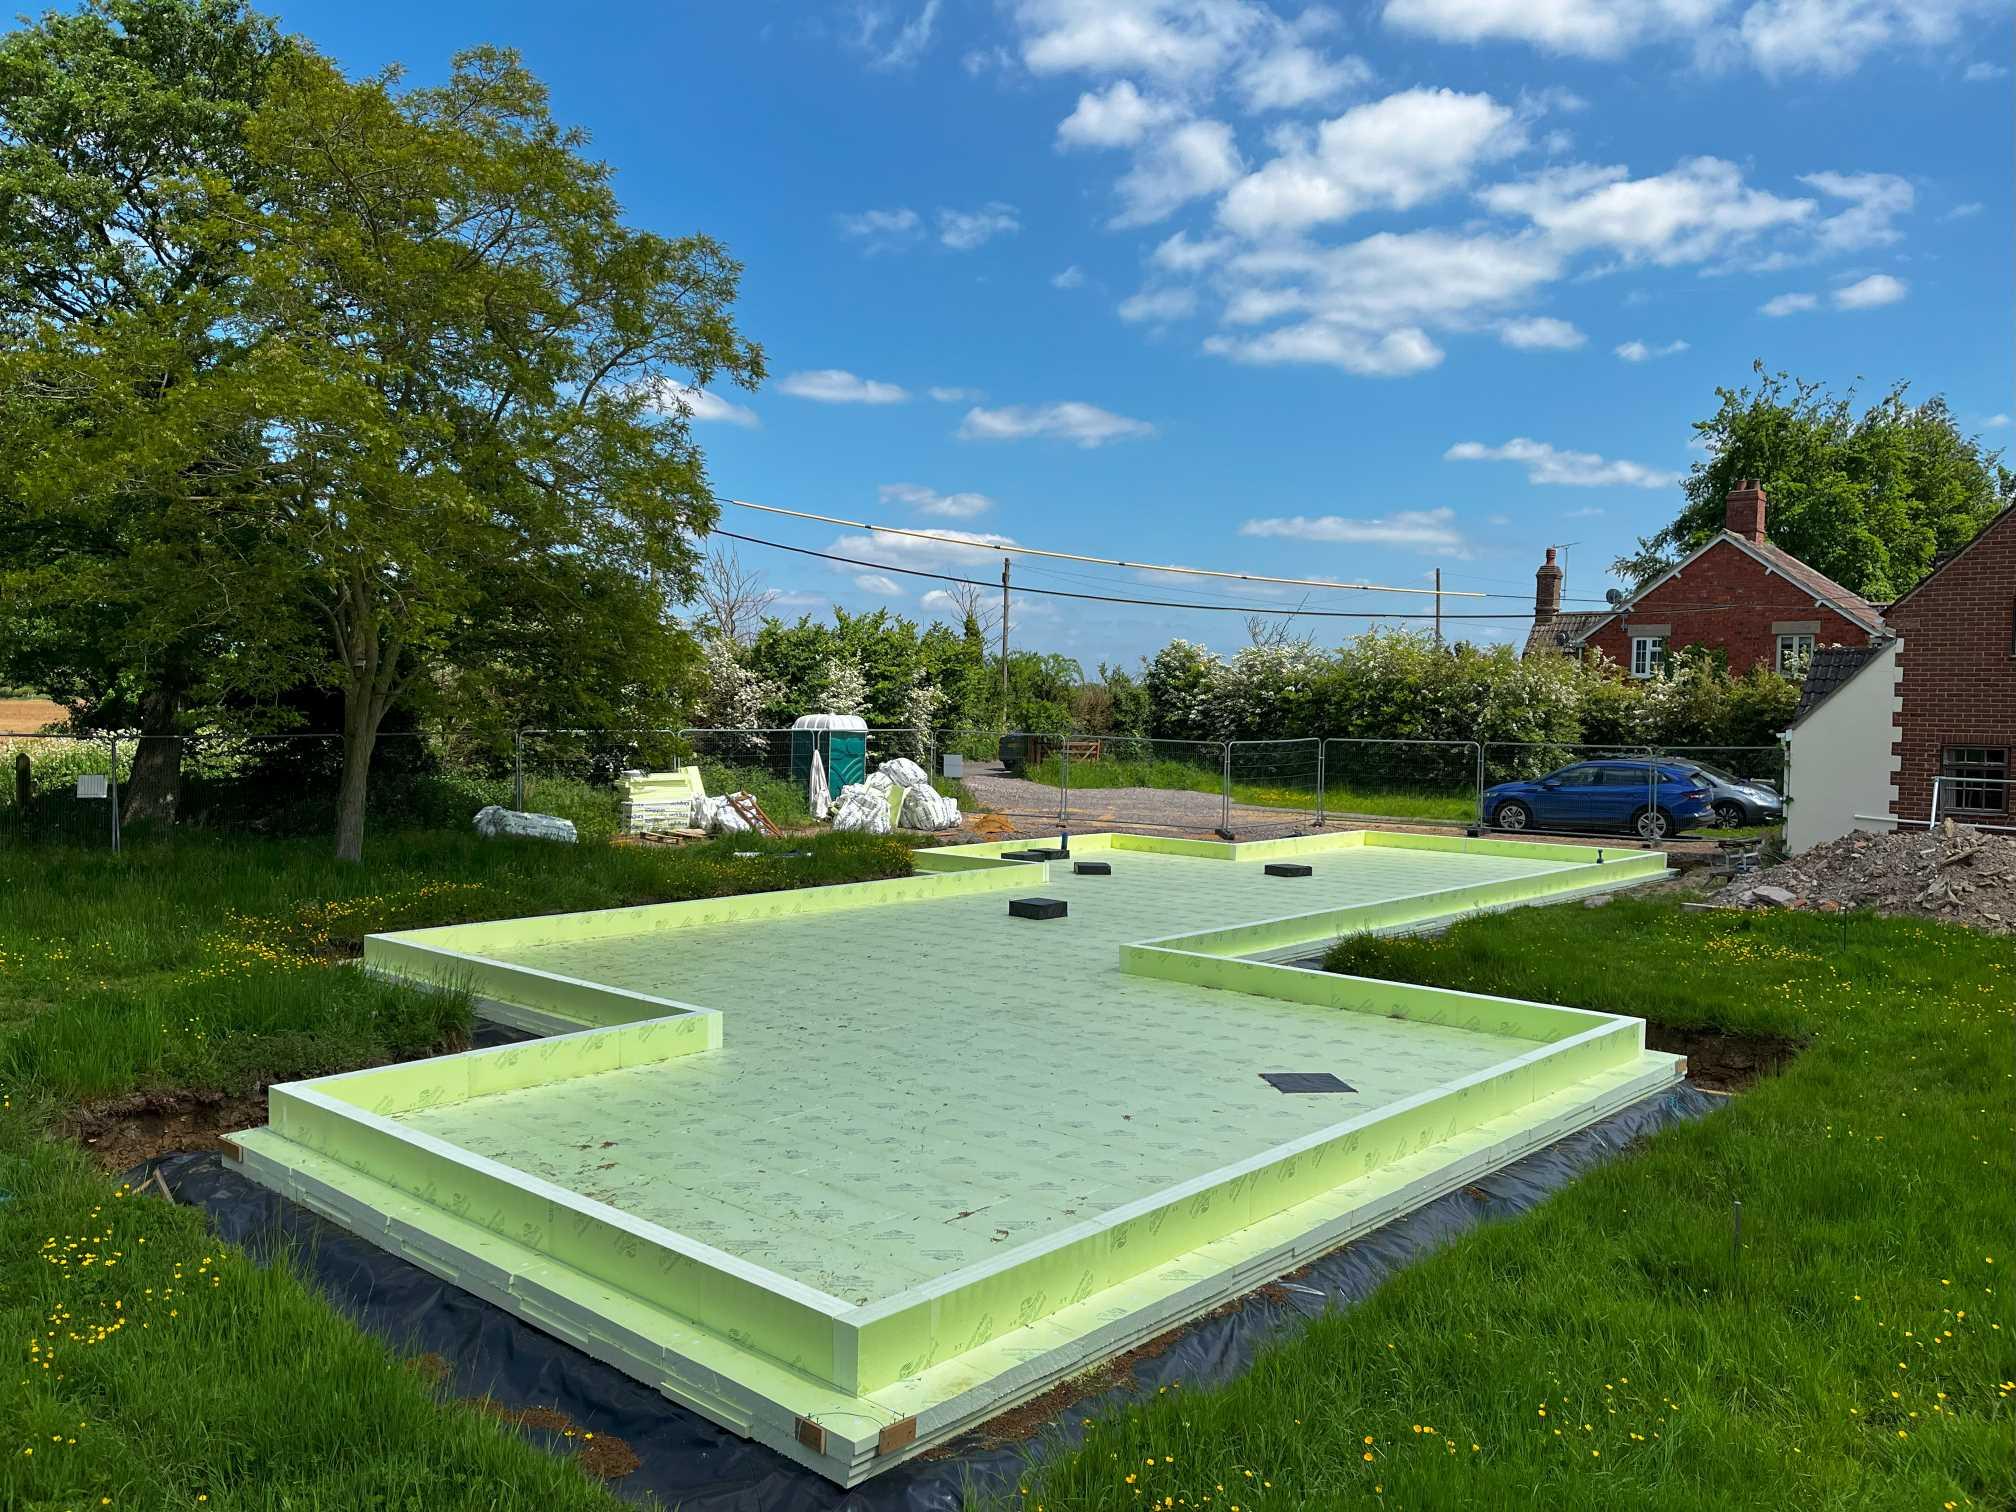
Hi, I wrote an introduction post on here back in 2021 and shared some floorplans for our planned new build in North Wiltshire. As it's been a while, I thought I'd re-introduce myself and do an update post. In early 2023 we broke ground. Since then we built the insulated raft foundation (Greenraft) and the ground floor walls in Polarwall ICF. It's slow going as I'm doing almost all the work myself. We've had a fair few issues, the biggest were our first wall supplier (Isotex) going bust after we’d paid them, and I had to fire our combined engineer/architectural technicians (probably worth a post in itself – but long story short, I can't recommend Build Collective). I’m hoping to ask around the forums for some help/advice on a few things in the coming weeks. In the meantime, enjoy some progress photos! The dig and backfilling, with roller. Sand layer with insulated drainage pop-ups Greenraft insulation for insulated slab foundation. 200mm insulation and 300mm concrete slab Mesh, rebar and underfloor heating Concrete pour And today, with ground floor walls up - ready for the pour


 1 point
 -
I am doing similar but need an extract duct hole. The floor is in place and I plan to drill through the ledger but if it is a pain I will chop a section out with cordless circular saw.1 point
-
Outside tap Door bell Outside lights, I have one hole front, one rear. Outside power socket BT line Main electric Power to outside buildings TV aerial if external MVHR X2 holes ASHP x2 holes (my outside temp sensor is on ASHP), maybe communication cable x1, cylinder thermostat if connected direct to ASHP, 3 way valve power. UVC overflow1 point
-
From memory our ASHP needs 4 penetrations (2*28mm flow and return pipes, 22mm discharge from the hot water tank and a 4mm cable to external sensor), MVHR needs 2*150mm pipes for bringing air in and out. We also gave 2*22mm pipes for hot and cold taps and 4 cables going through for exterior lighting either side of back and sliding doors (lights at front go out with our temperature sensor). You want to plan it all in early too so you can get some airtight grommets (we are using Pro Clima Roflex in appropriate sizes) fitted before your plasterboard goes on.1 point
-
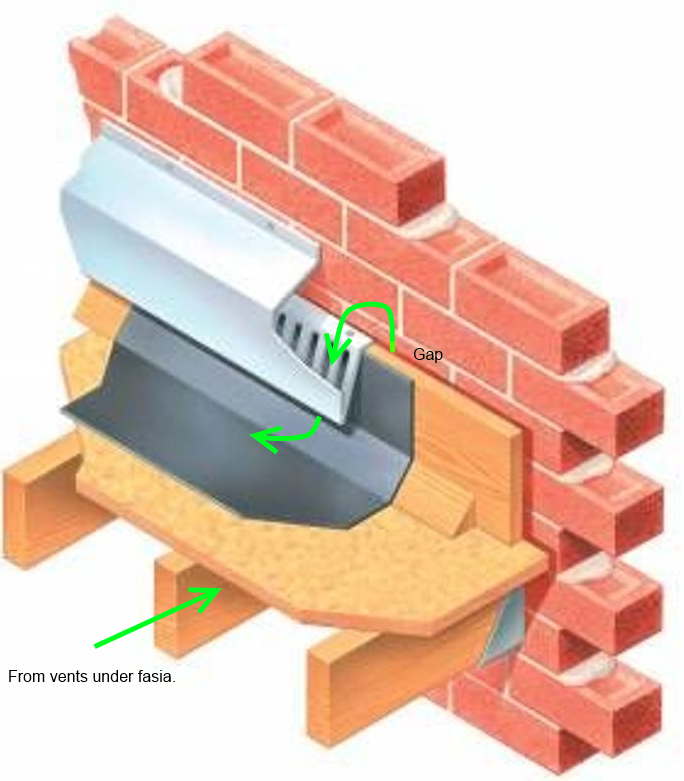
These are the sort of vents that should really be used on a cold roof construction. Note the OSB deck doesn't go right up to the wall. There is a gap for air flow.
 1 point
 -
Ours is an HPS 200 (urban colourcoat) warm roof. Three of us on the forum got together and ordered it directly from Blatcho Trapez. @Patrick did all the hard work with the manufacturers and now imports there products as a business. It worked out a heck of a lot cheaper that the TATA offering for what is essentially the same product The roof make-up is all important as already pointed out other posts. Partick's incredibly helpful and worth contacting if your still looking for a solution. I know were not meant to do anything commercial on the buildhub, but the venture started here with self build self help.1 point
-
My wife’s a theatre manager and frightened of heights But soon got into the slating
 1 point
 -
I did my own roof from scratch, got loads of old west coast slate for virtually nothing , me and my dad re cut all the edges with traditional slaters axes..... I then laid them in diminishing lengths to the top of the roof...... it took me months and months........ and months ? ..... it seemed fun at the time but All subsequent roofs on the property have been tin......
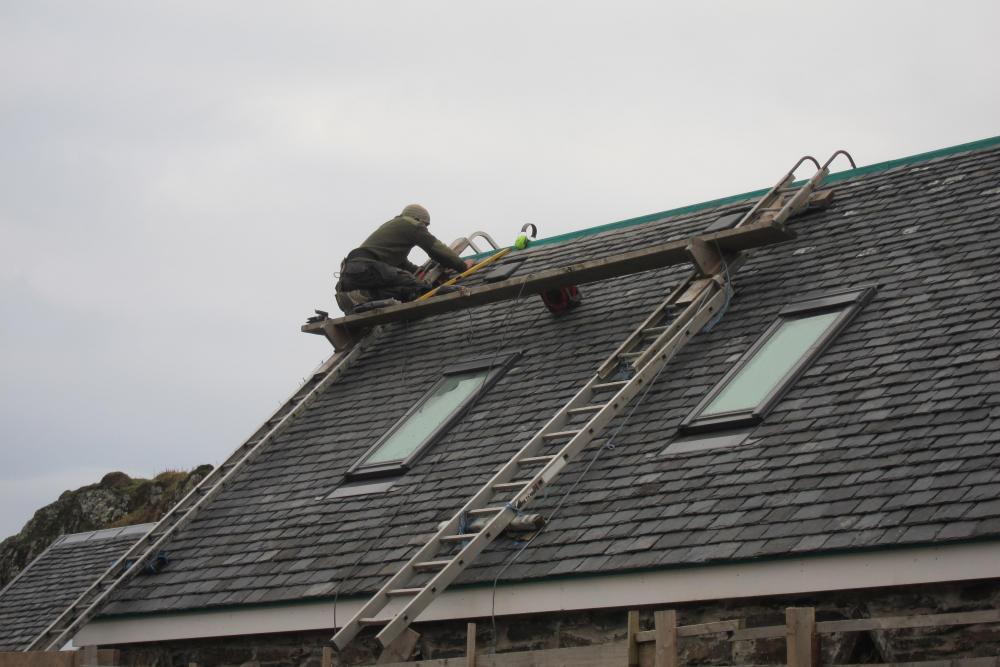 1 point
 -
I think there's some confusion here between "airtight" and "vapour tight". OSB is, to all intents and purpose, more than adequately airtight as far as a building air test is concerned. It won't let air through at a rate that would make a jot of difference to the house air tightness in practice. OSB is vapour permeable though, so will allow water vapour to move through it. As such, OSB is not suitable as a vapour control layer - for that you need to use one of the boards made specifically for vapour control, such as Spano DURÉLIS VapourBlock or SmartPly, or similar. Our build uses Spano DURÉLIS VapourBlock as the inner skin and OSB as the outer skin for this reason.1 point
-
0 points
-
3 years I think.0 points
-
0 points


This leaderboard is set to London/GMT+01:00