
Leaderboard


Popular Content
Showing content with the highest reputation on 10/05/21 in all areas
-
Meter board from CEF. Butt two together to get a bigger size. You can also get little spacers for mounting off the wall. Handy for getting cables up behind. Tbh some CEF branches are better than others. Best to order online for collection at a local store then you can check for lumps knocked off it! https://www.cef.co.uk/catalogue/products/search?q=Meter board Or from here: https://www.jointingtech.co.uk/Meter-Boards-FR-Chipboard2 points
-
Did you see that bloke unload those trees, i wanted to climb in the telly and karate chop him in the throat.2 points
-
Hi new member here. My name is Frank. I have just completed a new build home. And am dealing with BC for sign off. Interesting comments I have read about various subjects. Will comment further when I need some help or when I can give anyone else input from my experience.2 points
-
Another thing to consider Zoot the Hoot, is a cheap, battery powered, wildlife camera. I would have thought £50 including batteries and a storage card. They just record when movement is detected. Either that or a shotgun licence.2 points
-
Here is the code I use. Just change the 28-xxxxxxxxxxxx number to your sensors number. You can add more sensors by just copying and pasting in the part relating to the sensor while incrementing the number by one. Then add the sensor number to the "writes to data file" line. #!/usr/bin/python #imports necessary libaries import os, time, datetime #load drivers os.system('modprobe w1-gpio') os.system('modprobe w1-therm') while True: #Sort out the time format dt = datetime.datetime.now() runday = dt.day dt.day == runday #sensor 1 tfile = open("/sys/bus/w1/devices/28-0306979462ca/w1_slave") text1 = tfile.read() tfile.close() temperature_data1 = text1.split()[-1] temperature1 = float(temperature_data1[2:]) temperature1 = temperature1 / 1000 #sensor 2 tfile = open("/sys/bus/w1/devices/28-031097946bbc/w1_slave") text2 = tfile.read() tfile.close() temperature_data2 = text2.split()[-1] temperature2 = float(temperature_data2[2:]) temperature2 = temperature2 / 1000 #sensor 3 tfile = open("/sys/bus/w1/devices/28-030197941c13/w1_slave") text3 = tfile.read() tfile.close() temperature_data3 = text3.split()[-1] temperature3 = float(temperature_data3[2:]) temperature3 = temperature3 / 1000 #sensor 4 # tfile = open("/sys/bus/w1/devices/28-03149794263a/w1_slave") # text4 = tfile.read() # tfile.close() # temperature_data4 = text4.split()[-1] # temperature4 = float(temperature_data4[2:]) # temperature4 = temperature4 / 1000 #opens and reads the time ts = time.time() #sets time to UTC and dd/mm/yyyy hh:mm:ss format UTC = datetime.datetime.utcfromtimestamp(ts).strftime('%d/%m/%Y %H:%M:%S') logfile = '/home/pi/monitoring/data/1wire-%s-%s-%s.csv' % (dt.day, dt.month, dt.year) #creates and opens or appends data to file tfile = open(logfile, "a") #writes to data file tfile.write("%s"%UTC + ",%s"%temperature1 + ",%s"%temperature2 + ",%s"%temperature3 + '\n') #closes data file tfile.close #sleeps for (n) seconds until next reading time.sleep(25)2 points
-
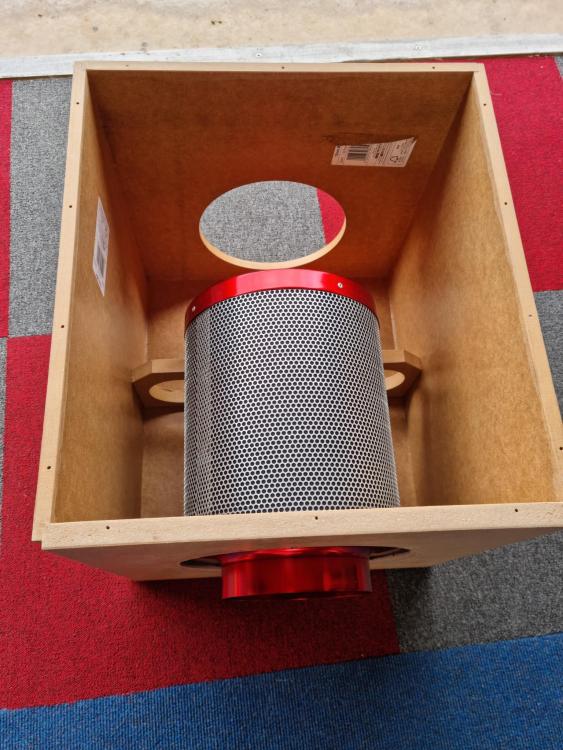
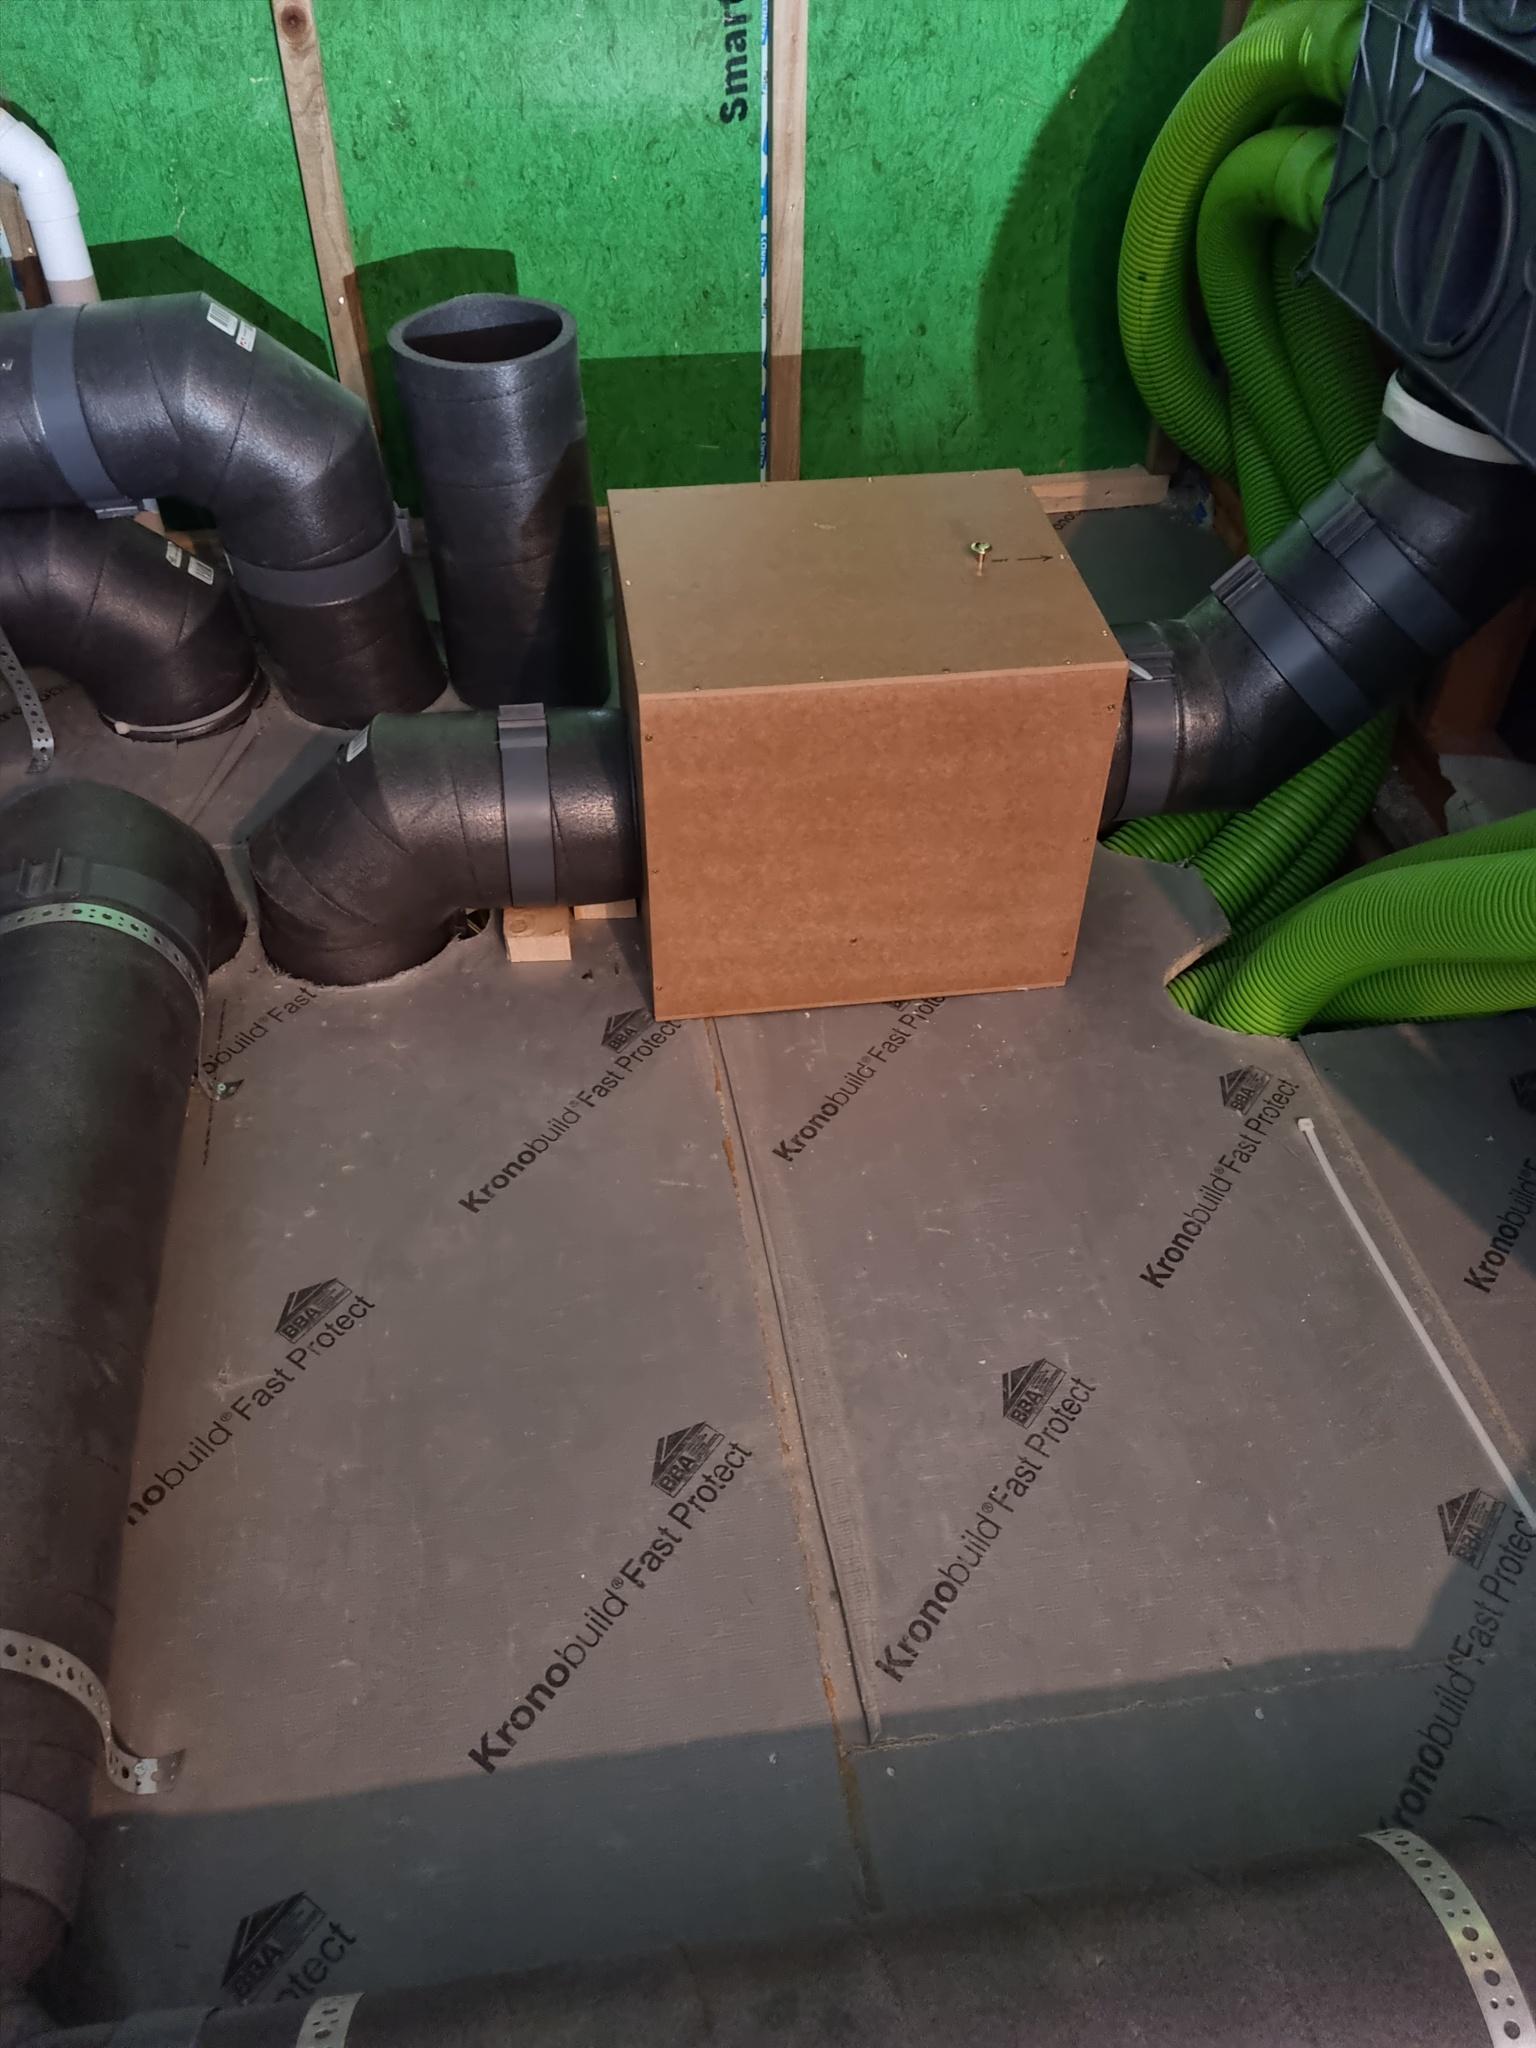
Having lived with MVHR for 9 months I have just completed a DIY active carbon filter as my neighbours just like stinky bonfires too much. Whilst you can easily shut it off when you're at home, it is a horrible surprise to come home to find your home smelling like a bonfire. So I began to research active carbon filters and found those commercially available ones were stupidly expensive and the cost of replacing the filters was also the best part of an arm too. I began therefore at the actual active carbon filter and found that these are many and varied and a huge range of costs. Looking at what I had room to install I decided to get as large a filter as possible and at reasonable cost. I chose one designed for plant nurseries as they are both compact and low cost and got one rated at 600m3/hr with an estimated 3 year life. Again I found a variety of prices but being an experiment, I decided on one costing just over £40 delivered. You can find similar for up to 3 times this. Pictures show the construction of a 450 x 400 x 400mm box in 12mm mdf mainly, just the end out with 18mm to give a greater rigidity for the filter mount/seal. Installed it today and already tested tonight as just had to shut windows due to stinking bonfire again! Running at 220m3/hr currently with no smell whatsoever. Well pleased. Total cost less than £70 for materials. Being retired I don't count my labour. Monitoring the MVHR it has given some additional load/back pressure as expected, increasing the input fan speed by between 50rpm and 500rpm depending on m3/hr selected. The higher rate when running at 330m3/hr. At 100m3/hr its around 150rpm up. MVHR is Brink Flair 400. If this continues to perform, I might go for a higher cost filter with less back pressure when I replace it or see if I could squeeze two of these in parallel into the space I have. Should be possible. Just another 30 quid for more mdf and a few more hours making it. I rebated and glued joints to keep it airtight apart from the lid which is rebated and just screwed down. Hope this might inspire others to give it a go. Filter from Future Gardens, Assasin 600m3/hr. MDF from wherever you can get it. Just two quarter sheets. Plus a few hours design and sawdust making on my cnc router table but could be done using a hand router and table saw if you have a good eye for square and straight edges... ?


 1 point
 -
Since the basement was finished at the end of June things seem to have been dragging on for ages but we are finally out of the ground and ready for the timber frame. It has taken 13 weeks and we had delays with materials that held things up but when I look back at the photos from the basement being finished to where we are now it is amazing how much has been done and we’re very excited about the timber frame going up next week. When the groundworkers came back post-basement they started by insulating the basement walls externally with 200mm of EPS 100 and then backfilling with clean crushed as per the structural engineers specifications. Then they started digging the foundations for the ‘arms’ of the building as I call them and you’ll see why from some later photos as the main building looks like the body with 2 x arms coming off it. These are a garden room (that links to the kitchen/diner) and the utility room and garage. These are designed as insulated slabs with 300mm EPS underneath which you can see in the photos. Here we see I had to put some Perinsul blocks in, thank you to @ToughButterCup for getting them to me. While that was happening the brickie was also on-site building the internal walls for the basement. We have a 3m ceiling height in the basement so we had to get scaffolding in to build them safely which was another expense I hadn’t planned for (beginners naivety) but something that had to be done. It was around this time that I purchased a DJI Mini-2 drone. It is brilliant and has given us a whole new perspective on the build. Here are a few videos from before the slab pours (please excuse the auto-added cheesy music that DJI added). And some photos of the slab pours. I also put in some VCL between the basement and ground floor as a Tony tray. Once the slabs were poured we move on to the block and beam flooring. This caused the biggest issue with getting materials as the company the groundworkers were using moved their lead times from 15 days to 6 - 8 weeks which would’ve put us stupidly behind schedule. So I sourced some beams from a local builders merchant and paid the beamers to cut them to size on site rather than waiting for the correct sizes to be fabricated and delivered. It was pretty stressful to say the least. But what made it worse is that I decided a while ago to move from precast hollow core slabs to block and beam but no one along the way told me that the beams couldn’t take the load of the walls above like the hollow core could and, by chance, during my conversations with the block and beam company designing it I found out that I had to put supporting steels on top of the basement walls to take those load bearing walls from above ground. Back to the structural engineer to get those designed and then fabricated and installed. And then the beamers tell us that they won’t do the work without a complete fall arrest system across the entire basement 600mm down from the top of the basement walls. Back to the scaffolders to come and put that up at yet another expense (although the safety of the contractors is important to us so I didn’t grumble too much!) and we were finally ready for the block and beam to be installed. So what turned out to be the decision to save a few £k by moving to block and beam has in the end cost me a lot more due to the extra work involved. Oh well, you live and you learn. Anyway, the day came for the beamers to install it and they were a smash and grab outfit but that is, apparently, what all block and beamers are like. They just turn up and smash it out and leave without any due care and attention. To say they were miffed that they couldn’t do that on our build due to the steels on the basement wall is an understatement and comments like ‘if I’d known there were steels I wouldn’t have taken the job’ and ‘I’m losing money of this job’ really filled me with confidence. And if I ever do this again I will probably do the block and beam myself as, although hard work, it’s not complicated and I would’ve done a much better job. Anyway, it was done and they left and we could get on with laying the coursing blocks for the sole plates to sit on. This is where I insisted on precision and I spent a lot of time out there with the brickie assisting with setting out to make sure everything was spot on for the sole plates and checking that the levels throughout were within 5mm - 10mm across the building. It was time consuming but I think the accuracy will pay off in the end. While that was happening and with the timber frame imminent the scaffolders came and put up the required 2 lifts around the entire building and by 5pm the Friday before the frame was due it was all finished and we were ready……or so we thought. The timber frame ended up being delayed by 4 days due to the chippies testing positive for Covid-19 (the first time we have been directly impacted (not including the material shortage etc) by Covid) and during that 4 day delay the contract manager attended site and noticed that the garage (which is 120mm below the main house) had it’s coursing blocks below the main house. After a quick email exchange it was pointed out to me that I’d misread the plans and that those blocks, and the sole plates, need to be at the same level throughout so I needed to raise the coursing blocks by 120mm in the garage by the end of the following day. The groundworkers have moved on and I couldn’t get anyone to do it so I knocked up some pug, borrowed a disc cutter, bought myself a trowel and got laying. I’ve never laid blocks before but I did spend a lot of time watching and helping the brickie so I had a good idea as to what to do. I started after work on Wednesday (sole plates due to be fitted Friday) and finished half of it well after dark and then got up early the next day to finish the rest off. And it worked! Level and straight (ish) and still standing the next day. Phew! And this is where we’re at right now. Timber frame ground floor wall panels are due next Tuesday so we should really start to see things happening rapidly now and within 4 weeks our superstructure will be up. But that will be the subject of my next blog. Here’s a time-lapse video of this part of the build. I had to speed up the footage x10 and each day is about 4s long so things happen at quite a speed but it’s amazing to look back and see what has been done these last 13 weeks. Thanks again for reading and I hope you’re enjoying this journey as much as we are. Until next time…1 point
-
Hi everyone. We are renovating an 1950 house at the moment, with stripping down a lot , new plaster, new ceiling, new rendering, new doors... a lotto do, with builders support of course, but a lot to learn too Glad that I have found this forum to get some help and advise ... Cheers Manfred1 point
-
I do this sort of stuff but in Scotland where it's a bit different. Don't have a good handle on costs in England. Looking at the guidance it might be possible to work at it yourself if you have the inclination. This will give you some good background on sequential assessment (follow the links) if you haven't already found it: https://www.gov.uk/guidance/flood-risk-assessment-in-flood-zones-2-and-31 point
-
Domestic wind turbines are generally not be to taken seriously, unless you have strong and steady winds nearby in an area controlled by you. You could do a "for but not with" in your kitchen provision ie fit the pipes for addition of a heat supply later. (See aircraft carriers and aircraft.) Fitting an electrical ufh system is questionable wrt solar panels as the heat will come in the summer when you don't need it. IMO direct electrical ufh is a bit of a red herring unless it is eg a bathroom for 1hr in the morning because the boss likes warm feet. But remember that ufh needs lots of insulation - really you want a floor u value of 0.13 or so. That is 150mm of Celotex or Kingspan. And to fit ducts where you may want to run electrical wires. For saving electricity bills perhaps a divert device to make sure you get all the solar energy, and something that can supply hot water or for another often available load. I have to think about this as I have a large solar array and no appropriate load. Cheers Ferdinand1 point
-
I think they can recover the latent heat of fusion from the excess humidity. There are some that have a porous paper element that allows some transfer of moisture, but I don't think there is enough to worry about. Have you thought of putting an extractor hood over the fishtank. Then plumb it into your existing unit.1 point
-
Welcome to the site. Shouldn't you be renovating the kitchen in your current house? ? Very kind of you, though. (Runs and hides)1 point
-
I’m referring to the positioning of the tray in terms of coursing,as you look at your drawing. The height of the lower (outer) part of the tray would usually be at DPC level (which is usually the same as FFL.) If it helps,visualise the substructure walls all built up to the height of the (as yet uninstalled) finished floor. Now,one course of blocks is laid on the inner skin, the tray is installed and lapped out & down so going from DPC plus 225mm internally to DPC height externally.1 point
-
That's crossing a line...1 point
-
Compared with ASHP, GSHP kit is more expensive to buy, much more expensive to install, is potentially more disruptive in terms of earthworks (less of an issue with vertical boreholes), and costs more in ongoing maintenance due to the need to replace a lot of glycol every few years. Some have mentioned that the pump itself is quite noisy, although I can't see why that can't be located outside in an enclose to keep the noise down. There have also been some horror stories on performance. Things like ground icing up and killing lawns/plants due to the loops not being buried deep enough, and soils with low thermal conductivity with not enough loop area causing the ground to freeze over the heating season to the point where little or no heat can be extracted any more. Most of these are installation issues that shouldn't happen in a properly designed system, but how do you as a lay-person know if a system's been designed and installed properly? For all this, you get a nominal bump in efficiency that will take decades or more to pay back in reduced energy consumption.1 point
-
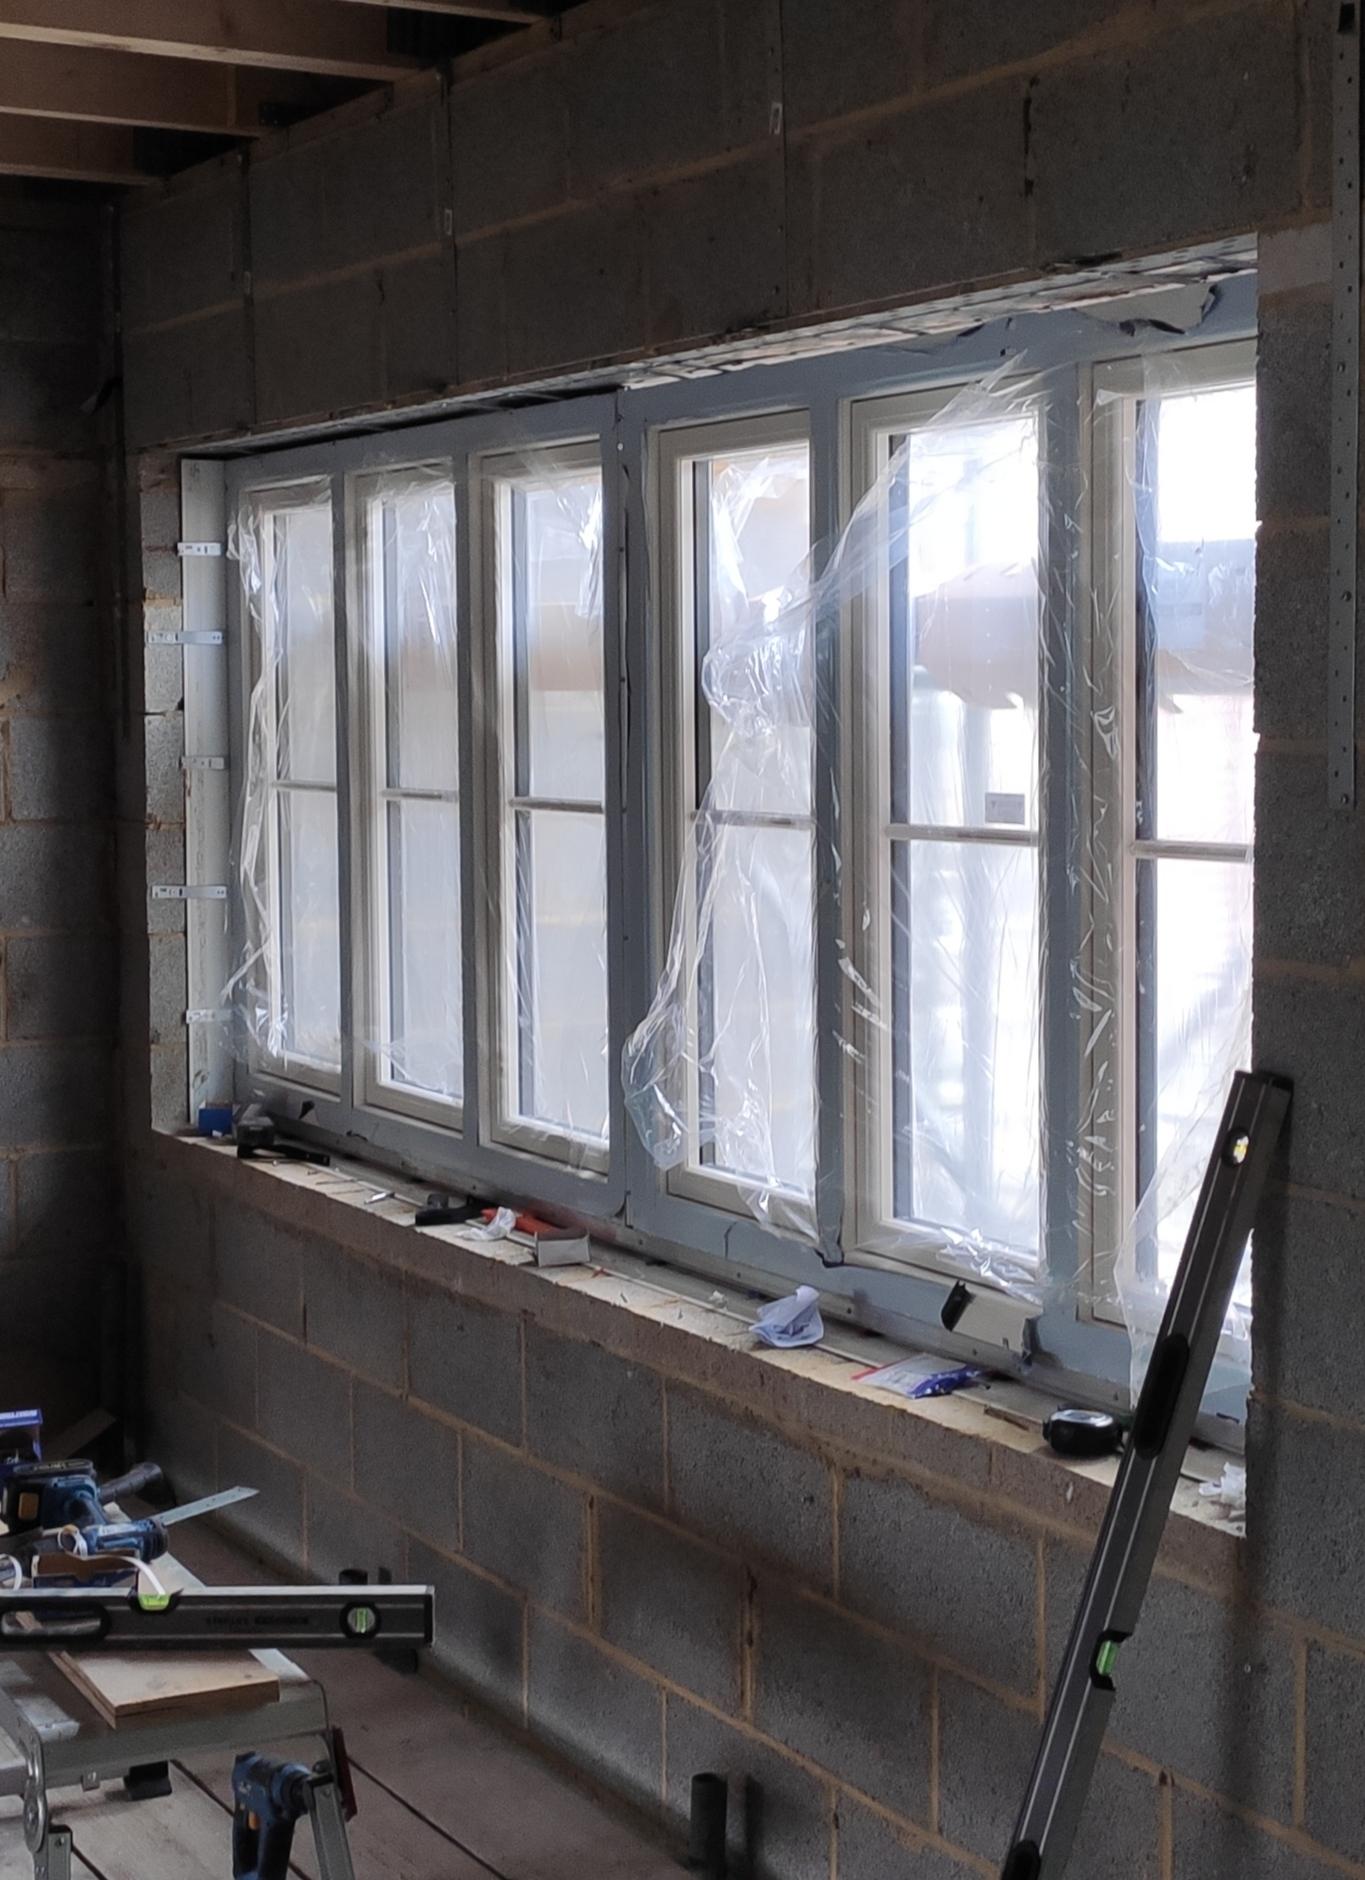
Got it in. It was a squeeze as I had made a measurement mistake but it is in and looking good ?
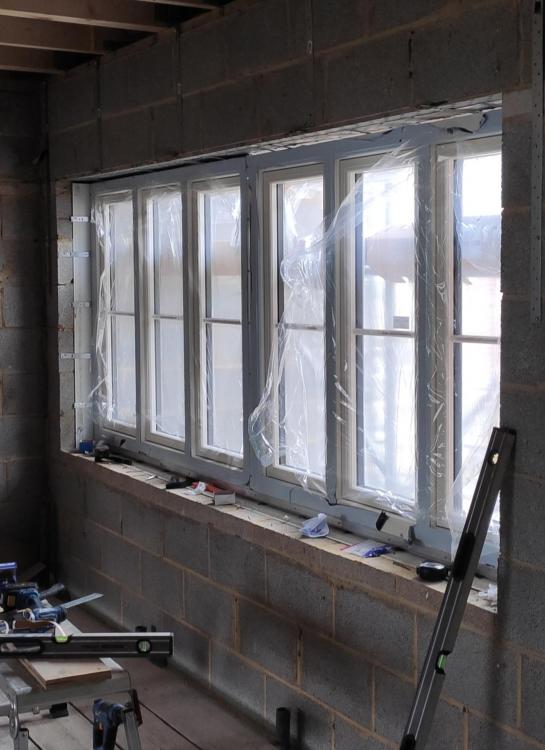 1 point
 -
From this your water heating energy use is 2598 kWh/year. Note they assume that you also use 1720kWh to top it up with the immersion, something many people on here do not do. Anyway that is 7kWh/day from the ASHP. The space heating need is 4908kWh. This is likely only over around 6 months, so 27kWh a day. Peak days would probably be around twice this, so 50-60kWh a day. Thus your maximum requirement from the ASHP is likely around 60-70kWh/day. A 5kWh pump could do this comfortably. Often the pump will be oversized to 8kWh to give more capacity for heating hot water and to help it run at a slightly better COP.1 point
-
Ahh I knew I was missing something. This (sushi school)will bring our budget back on track. Or maybe Aliexpress instead seeing as I'm short on time. Came across as a great couple and expect they'll have an amazing time living there1 point
-
Doing it for a client? No, don't take the risk. For yourself, go for it. Worst that could happen would be adhesion/colour change I reckon. Nobody dies.1 point
-
Depends on the size and extent of the holes I would say. I would be inclined to make a stiff mix of mortar or just cement with SBR/Unibond in it as suggested above. But then I suggest it is a hands and knees job with a filing trowel. That way the stuff is pressed into the holes, and you clean the surface off as you go. For bigger holes, for example when lignite is in the concrete, I have used epoxy floor repair. That could be an option for you, but if the holes are miniscule you won't want the kind with sand mixed in.1 point
-
John, you are welcome to borrow mine, I believe I am just round the corner from you, I am between Stranraer and Port Patrick and will be not far from my door next week. Not used it for a while but from memory think I just used a 12mm ish nothing fancy rope on it.
 1 point
 -
1 point
-
Yeah but he is "Going Underground" to be fair1 point
-
4 water 1 SBR1 point
-
That is a Cavity Tray,yes,though it would normally be lapped out FFL. Is this your own drawing or one you were supplied with?1 point
-
Swann is absolute bottom of the pile and it may look cheap (until an installer adds ££££) but they are not good. Self install of a wireless system with power from the nearest socket may be best for you.1 point
-
Absolutely, the sushi mats made the build viable1 point
-
Planners have a complete get out phrase of "not in keeping" or similar which basically means if they don't like the look of it they will say that1 point
-
Note that those sensors are likely to be fake - genuine Maxim sensors have four zeroes in the last 16 bits of the serial number. Genuine ones are only a few quid more at the likes of CPC etc and removes any doubt about accuracy, longevity etc.1 point
-
1 point
-
Love it when I see a post start with this ? The only time people say it is when it will not be a quick question ?1 point
-
Frost is the main problem with outdoor tiles 90% of outdoor tiles that I’m asked to quote for are Porcelain Bombproof1 point
-
Some architects do yes. Our first one was insistent on having the big windows facing south because that's the convention and it's also the side people arrive at. Problem is that it's also looking across the field to the farmers industrial barns. He had only a few small windows looking at the view which was what we bought the plot for. We just could not make him understand that we wanted to sit looking out across this in the evening. Second architect was an entirely different experience.
 1 point
 -
I'm thinking of swapping to Fibolite blocks. When I first heard of them they sounded a bit 'high tech' for my reasonably traditional approach to the superstructure. I was also wary of cracking concerns having heard of it associated with other thermally performant blocks. Whilst Fibolite blocks help with U-values, the absolute requirement in my mind for the blocks to perform their structural role and I'm not wanting to make any sacrifices there. I'm sure like all self builders, I want my house to still be standing in a couple of century's time ?. What do people think, does anyone have anything to say against Fibolite blocks?1 point
-
Right guys either this thread gets back to a cctv discussion or its getting closed.0 points
-
Not only can I not give away ; Nick ‘tiny knob ‘ Knowles won’t even take it !!0 points
-
Why not try posting something different for a change?0 points
-
Nothing's been deleted from this thread as far as I can see. You sure you hit submit? Try posting it again now we're all alert for something that probably needs deleting.0 points
-
Have you got planning permission for one. Once you have that, then we can tell you small ones are pointless.0 points
-
Cheek! There's some clever c**** on here.....and some plain c****.0 points
-
What’s the budget?0 points
-
So do we. They you would waste less time on here trying to become a Mod.0 points
-
Or part of the true cost of having pets. https://www.amazon.co.uk/Time-Eat-Dog-Sustainable-Living/dp/05002879020 points
-
Even diy sos don’t want my glazing ?0 points


.jpg.c21f3ac78c9b7efd90cbdcb312744dc5.thumb.jpg.7adcad4c0e384f5ecd7d56b0618df6e5.jpg)


This leaderboard is set to London/GMT+01:00