
Leaderboard


Popular Content
Showing content with the highest reputation on 02/01/20 in all areas
-
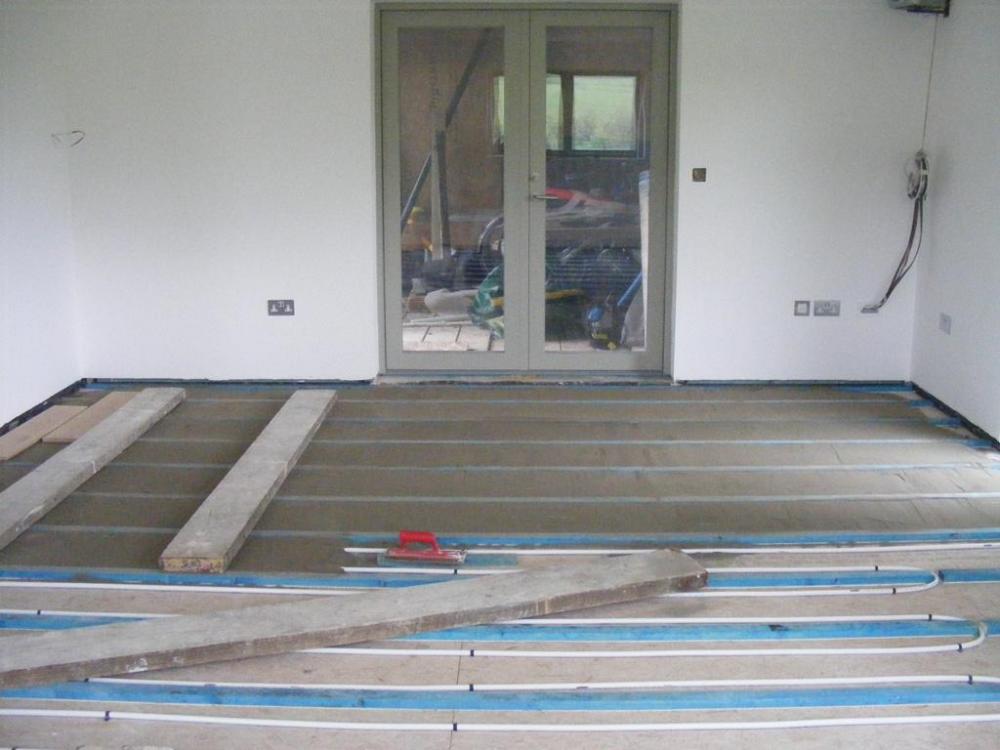
That is the floor make up I have. this shows what Peter is describing The engineered oak floor then spans across the battens.
 2 points
 -
You will have problems with depth as you’ll end up with a floor of about 360mm or more to do that span and still have a bounce. Concrete beam and block floors are not as strong as some think. Go with a JJI / Posi at 300 centres and you’ll have no bounce. It will be 245mm joists IIRC and you’ll need to insulate between and possibly above to get to BRegs levels of insulation. Bigger issue may be the bottom of the beams being exposed to damp/cold. Have you considered making some sort of cassette type floor with 300mm Posijoists and OSB and then pumping it full of cellulose ..? Add 25mm battens / timbers and UFH in sand/cement and you’ll get the best of both worlds in terms of feel under foot and insulation2 points
-
... And a susquent attempt at amputating a third ..... but the angle grinder came off worst .... And this is what's left on each hand - just 4 ... i.e. 8 in total A slightly mischevious post: I suffer from Dupuytrens Contracture 'You god it good and proper - ya got it bad, lad ' said the surgeon as he marked up my finger for amputation. Trouble was that he was marking up the wrong finger for amputation. Oh how we laughed together when I pointed the error out It (the amuptations) still occasionally hurt like buggery for a few instants ( feels like a simple stab with a sharp object) and then nothing - no after-pain, no hint of redness, nothing. Wierd.


 2 points
 -
Assuming a brick/50mm cavity/brick construction then 50mm of mineral wool batt will save about 40% and 50mm of PIR/PUR about 50%2 points
-
Over the long Xmas (much needed) break we turned the e pump off for a few days and even though it was not raining the level went up about a foot - so back to pumping to keep the water at bay. When the guys came back it was dry so they cracked on with more black tanking, external sheathing and backfill - which is what the video shows. They built a French drain around the outside which is a big black perforated pipe laid in gravel, covered with geotextile membrane which allow water through, but not the clay fines. Then lots of free flowing clean stone up towards the top of the wall. Finally we can get around the outside of the wall without walking in clay, and you begin to see where the ground level will come. Now the backfill is in place they can start to take out the sheet piles as the clay is held back by the walls and the backfill - surprisingly the clean stone doesn't seem to need compacting - but there is a lot of it! Removing the piles is more work than it was putting them in as the clay has stuck to them and even with the high frequency vibration hammer and the big digger its a slow process. They get really hot and steam as they come out - and I am told that they can friction weld to each other if you dont have lots of wet clay to cool them down. You can see just how tall they are with Ian stood next to one as it comes out. So on that front good progress - but in other areas less so - the bad news is that some of the concrete wall is too high by about 220mm. The contractors missed it, and so did we, that there is a step down in the back wall where the small house sits. We have been focused on a recovery plan as cutting the top off the wall is not an option!!!! Luckily its not as bad as it seems - after a very productive meeting with the Contractor, the SE and the Architect it seems as simple as building an additional blockwork wall inside the rear wall so the Beam and Block floor sits on this and luckily it at just the same height as the intended wall should have been. There is a lot of blockwork to do so a bit extra should be no big deal. In hindsight there should have been some really simple drawings of each RC wall - rather than the really complex drawings where its hard to spot! We have signed off the windows and are waiting for a delivery date - but it seems unlikely they will arrive too soon. Sadly we have still not signed off the Timber Frame for a number of reasons that come down to making absolutely sure that the interface between the concrete sub-structure and the Timber Frame will fit exactly. Its a really frustrating pain - but something that really does need to be right, and the above issue might have had a huge impact. So onwards and upwards - blockwork and beam and block next - and still lots of complex details that seem to need a huge amount of handholding.2 points
-
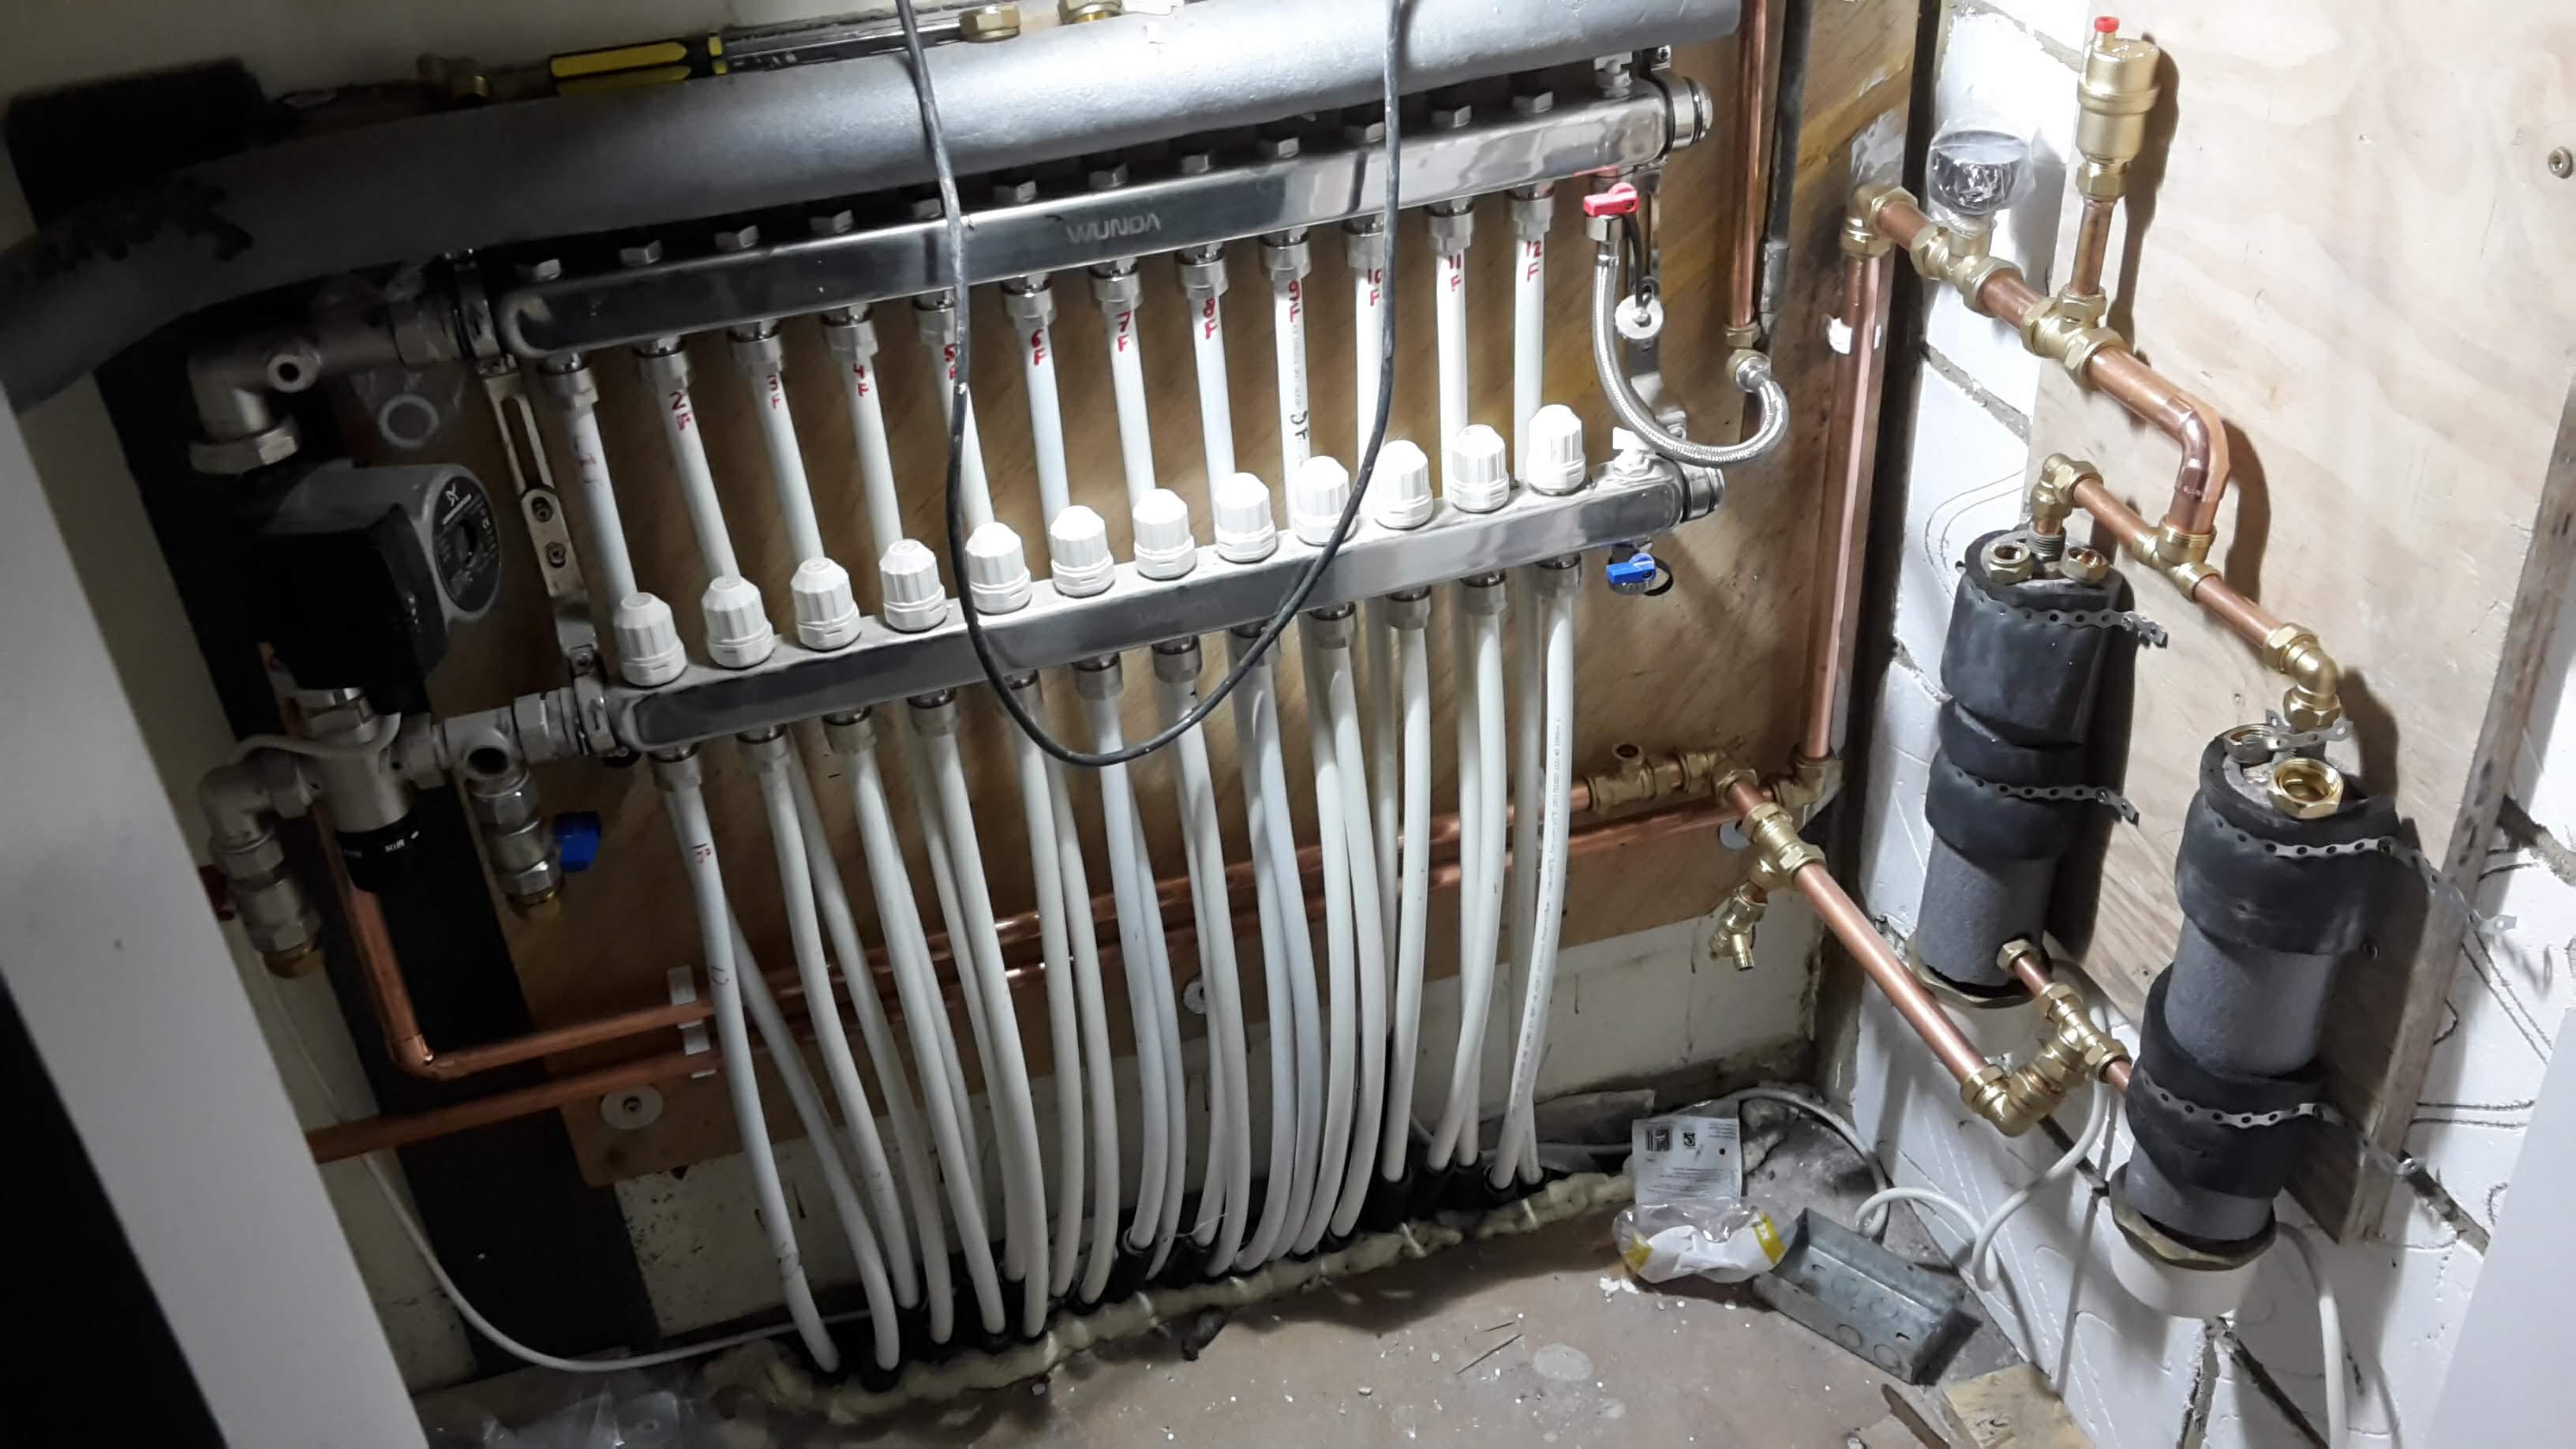
There are at least 6 people on here that have done it the 'Willis way' - see users' list here in intro section. Here's my attempt from the other week. Not plumbed into manifold yet, but was going to leave the blending valve in situ. Pipe still to be connected to expansion vessel. As for controls, I may just have it in on/off mode for now and then use the willis thermostat that can heat up to 60c. Not sure how low it goes.
 2 points
 -
Sorry meant Cement fibre board. Solid spruce joists, oversized and at close spacing so very solid. Yep VCL. Insulation will be a 'soft' breathable type. The stuff you stuff between joists. Didn't fancy foil insulation as want to make sure floor can get rid of condensation1 point
-
There are a few apps like Wifi Signal Strength Monitor you can get for your Android device.1 point
-
Garlic would grow in those little pods Ferdinand.1 point
-
Devolo stuff has saved me many times . Pretty reliable. Suggest buying the latest models1 point
-
I would suggest have a good friend or two in reserve willing to put you up for a night or two at short notice, either apart or together ... just as an occasional safety valve for when you need a break. At some point you will just want to do that. 220sqft is quite small. Ferdinand1 point
-
We have a 3 module option from BT which gives me wifi in the workshop up in the hillside works a dream. It they are wifi homespot 9s they also dupe the domain so common login across them and our in house system.1 point
-
Hard to answer until you know when. If it's summer, staying cool might be your problem. Your shed is insulated to near passive house standards compared to the 1" thick walls of the static caravan we survived in 2 winters ago. (I will never forget the beast from the east) which we kept warm with a 5kW wood burning stove running most of the time and electric heaters. As this is a one off, is it really worth the time and expense kitting it out with all the showers and stuff? A cheap second hand touring caravan will give you all that and treat the shed as a space to stretch out and relax as well as storing stuff?1 point
-
I am not a fan of powerline stuff, that's a recipe for RF interference particularly of your radio reception is poor to start with. When we were living in the caravan but the phone line was connected to the house, I used a wired ethernet between the two and set up an old redundant BT router as a wifi access point. I wonder what is blocking the wifi in your house? Ours is a similar size to yours and not very dissimilar layout. Our BT router lives in the cupboard under the stairs which is pretty central to the house and we get good wifi in all rooms, even the loft space above the garage. It was only the static caravan another 30 feet away that was borderline so I connected the spare router to fill in coverage for that.1 point
-
I used another router to extend my network to the side of the house it was poor. I connected it via an ethernet cable to my network so it's not using more WiFi. It's a pretty easy thing to do. Mine was an old sky router and it had the option to use it as an access point in the settings. Just had to change the IP address to one in the range of the main router and it works away.1 point
-
most herbs like lots of light, if you can put a light source in there you will get better results I know lots more about gardening than building ? https://www.amazon.co.uk/ROOT-Spectrum-Growing-Kitchens-Propagation/dp/B078WJMLL1/ref=asc_df_B078WJMLL1/?tag=googshopuk-21&linkCode=df0&hvadid=230204386967&hvpos=1o2&hvnetw=g&hvrand=1704992636428449924&hvpone=&hvptwo=&hvqmt=&hvdev=c&hvdvcmdl=&hvlocint=&hvlocphy=1007247&hvtargid=pla-421648809808&psc=1&th=1&psc=11 point
-
You'll find there will be a negligible price difference. We started out with a partial basement, but when I looked in to it in more detail, doing a full basement made so much more sense. Doing a partial basement makes the foundation and ground works for the ground floor so much harder. You'll end up the massive, deep foundations for the rest of the ground floor as you'll be working with disturbed ground and inevitable differential movement issues. We're doing a full basement, but will only have one habitable room as we don't have the money to fit it out. But the construction, foundations, tanking, insulation will be so much easier and faster. Yes, I'll have a few more loads of earth to get rid of, but worth it.1 point
-
I think @nod meant "vertical". For example a vertical beam under the middle of the green beam would allow the green beam to be smaller in depth.1 point
-
You can also use an old pallet. https://www.cbc.ca/life/video/diy-wood-pallet-herb-garden-1.42085321 point
-
Yes it needs to be structural. The pug mix is only supported on thin OSB sheeting. For LVT lay a chipboard floor first. At 400mm centres 18mm would do.1 point
-
Ah I see. Thanks @ProDave. Would the final floor covering need to be structural? LVT would not work?1 point
-
Ah, I'm slow on the uptake. So a 1:8-biscuit-mix screed does not form the final floor surface. It is battened out and a final floor surface (e.g. Egger Protect) is added above it. [Bottom] Deck 1 → Joists (filled with insulation) → Deck 2→ Battens, biscuit screed & UFH pipes → Deck 3 [Top] Is that right?1 point
-
Opposite problem to you. Sloping site. Ground floor level determined by garage floor level plus step up into the house. This meant at the far corner, FFL is over a metre above finished ground level and that is after raising the ground level at that side of the site. Then add it we already had to dig off a lot of soft organic top soil, it would have been a LOT if inert fill to bring onto site to build it up that much to make a solid floor. I actually "made it worse" by specifying to the SE that I did not want sleeper walls (I was trying to simplify the ground works and foundations) The floors have turned out very well. Yes they do bounce, like any timber floor but not excessively. Mostly engineered oak with some slate downstairs.1 point
-
Would a beam and block floor if possible, not be better than timber?1 point
-
It's not all bad here either. At the local music festival several years ago when my daughter was just a toddler, we had a backpack with the camera, video camera and SWMBO's phone in it. At some point it fell off the buggy. While we were frantically looking for it, my phone rang. The finder had been going through all the numbers in the phones address book trying to find the owner of the phone and the backpack and we met up and they gave it back to us, all completely intact. I gave them a cash gift to reward their honesty. That would not be so easy now with a modern smart phone locked to the owners fingerprint.1 point
-
The thought did cross my mind, but extra work so haven't tried yet. EDIT: Have now tried. I get the same rapid flashing, so have to assume that is the correct behaviour. This gives me the feeling that the issue is not the wiring centre.1 point
-
My prefered method is a 2 gang switch, one for the light and one for the fan. Then it becomes a whole lot simpler. And when you go for a night pee, you don't have to turn the fan on.1 point
-
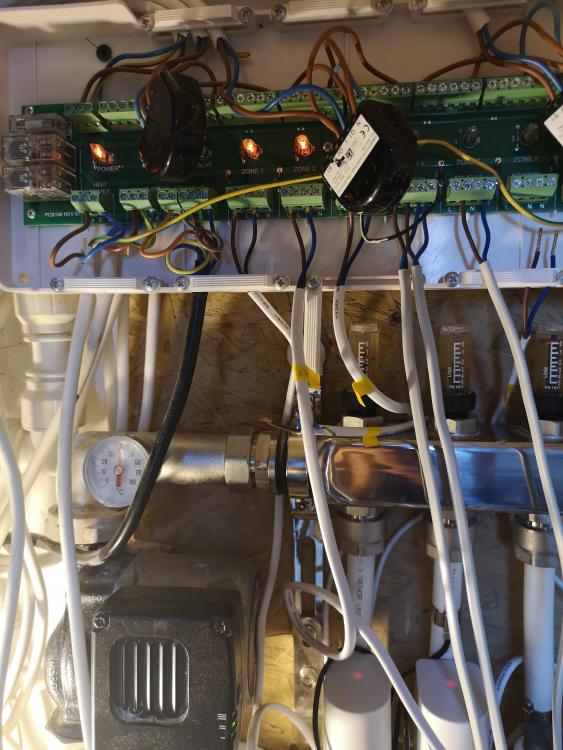
No, as i said before, i don't have standard thermostats. Instead, i use an automation system to monitor the temp in each zone and switch the wiring-centre zones on and off as required. However, for calibration/testing, i have disabled the automation and am manually switching on the relevant zones in the wiring centre. So, when i switch on a zone in the wiring centre, it powers the relevant actuator, generates boiler enable, calls for heat and switches on the pump.
 1 point
 -
To clarify ( for others ) it's the brown wire that feeds the motorised valve actuator head that I'm referring to. That will be a 5-wire arrangement; Brown = Call for heat / demand - which when energised spins the stepper motor and actuates the valve body Blue = Neutral Green / Yellow = Earth Orange = Common Grey = Switched live back to the heating system ( activated by the valve getting to 100% open and the actuator arm striking a micro-switch in the head thus completing the circuit ) 4&5 can be wired either way around without affecting operation.1 point
-
Basically what we need to know is, if, when the heating is turned on / off, does the brown wire get energised / de-energised ? If it does then the controls that are giving the signal are fine and the motorised head is duff.1 point
-
When you consider that the supply prices include SE, a £2k saving would be nowhere near enough to tempt me to diy.1 point
-
The rooms won’t get too hot because ( assumes ) the room / zone stats will close the actuators when the rooms / zones become satisfied. The problem will be that the primary pump and heat source will see the valve as open and keep trying to pump against a zero demand manifold. Boiler will short cycle through this but it won’t do it any serious harm. Get the valve changed, and el-pronto1 point
-
Doesn't "on their side with the side pipe upwards" cure all criticisms of either vertical mounting?1 point
-
be very careful with your insulation we have had £6k in insulation stolen over the weekend from an office block All was loaded between three floors They simply tossed it out of the widow opens We have a partial number plate Police have been really helpful and asked us to try and get the rest of the reg Get it onsite and use it as quickly as you can0 points
-
My dad is hopeless when it comes to DIY. About 20 years ago he was helping me put up a curtain rail in my granny’s new flat I put the brackets up then we were at each end of the rail to lift it up. Dad went to kneel on the chair he was going to stand on but knelt right on to a screwdriver. As he fell off the chair in agony it flew the other way gouging the wall. So a half hour job ended with me having to fill and paint the wall which took much longer than actually putting up the curtain rail.0 points
-
I whacked my little finger with a hammer, x ray showed the end bone in 9 pieces, they wanted to refer me to a specialist, but what could he do.? (Never went back and end of finger slightly bigger than the other one.) worst one was using an angle grinder with a wood carving blade (circular saw blade), unlike circular saws they don’t have a retracting blade guard so I took it easy, did my cut using both hands and went to put it down with my left hand and I have arthritis in my left thumb, thumb let go, flex around my wrist so when it fell it turned back on my thumb nearly severing it from my hand. I cut through loads of neves and two tendons, they managed to sew it back on but I have almost constant pain and reduced mobility. Lesson learnt, let blade stop before putting power tools down. (I have another photo of them trying to find the ends of the tendons but resisted as its lunch time)
 0 points
 -
Not a lot, if my experience in Manama, Bahrain, years ago is any indication. Being young and foolish I had too much to drink at the sailing club and on the walk back to my apartment I must have just crashed out. I came to in a doorway being looked after by two local guys, who helped me to my feet and saw me home. I was pretty amazed to discover the next morning that my wallet was intact, and still had around 50 dinars in it (at the time worth a bit more than £50 IIRC). Theft seemed to be pretty much unheard of there, and generally it seemed a pretty safe place, as long as you accepted that, being non-Arab, you would always carry the blame for any incident.0 points


This leaderboard is set to London/GMT+01:00