
Leaderboard


Popular Content
Showing content with the highest reputation on 11/23/18 in all areas
-
Yesterday was air tightness test day and MBC's final day on site getting everything prepped for the final test and then finishing off a few details. For those not so familiar with this kind of thing, a few details of the process follow. Our house isn't a passive house as it hasn't been designed with that in mind - it was the design first and then build to passive standards, so no accreditation or anything like that. That said, I wanted a low energy house and hence the choice of the passive system offered by MBC. Part of this system is that as well as the building and foundation being highly insulated, it also leaks very little air, as this is one of the major sources of heat loss in buildings and houses. The leakiness of a house is measured in terms of the number of times the volume of air contained by the building passes out of all the various gaps in one hour. As mentioned on this forum elsewhere, a modern well-built house without any special air tight measures would probably change its volume of air between 3 and 5 times per hour. The final part of MBC's construction method is to tape over anywhere there is likely to be a gap and make the building as air tight as possible; the target is to have 0.6 or less air changes per hour. One exterior door into the house is chosen as the point of measurement and this is where all the kit goes. Note that the air tight test is testing the quality of MBC's work and whilst it will highlight gaps elsewhere, it's not MBC's remit to correct leaks caused by others, only themselves. The point of measurement for my house is the door between the garage and the utility room, where the FD30 rated door was recently installed. The door is sealed up with a membrane that's supported and held in place by an adjustable frame: The hands are those of Steve, of Melin Consultants, who carry out most of MBC's air tests. This is the frame/shield being put in place in the doorway. I really did try and get a photo without builder's/air tester's bum, but to no avail. Those with delicate sensibilities should look away now and skip the next photo. After the frame, the fan is put into the hole in the shield, drawn tight and any gaps between the frame and door frame are temporarily sealed up. The rate of air flow into and out of the building is altered by both the speed of the fan and the number of vents that are opened up on the fan. The building is de-pressurised first, then re-pressurised and the readings taken. Because of environmental factors such as wind, this is done 10 times to get a data set and the average is taken for the final result. When this test was done yesterday, it was a windy day with the wind coming from the north east, the direction that the garage door faces. As the test progressed, it became clear that the house is well sealed and so it needed a smaller fan. The red shield was swapped over and the smaller fan put in place. The rest of the readings were taken and we got our final reading. Darren and his MBC crew aced it - with a target of 0.6 ac/h it came in at 0.25. Brilliant. Darren is a calm chap under all sorts of pressures but the air test was about the only time I've seen him display (slight) signs of nerves. He was equally understated in his satisfaction with the result even though it turns out that this is one of the lowest numbers they've had in 7 years. Well done, Darren and crew. If you're wondering what all that foam is doing on the floor, that's left over from work on the foul wastes over the weekend and foaming them in before putting air tight tape around them to make sure it wasn't detrimental to the air test result. We have a few very minor leaks, mostly gaps between the panels in the windows that have several sections. No surprise and these are due to be siliconed once we've finished most of the pretty stuff. There is also a bit of air flow through the keyholes but I've been advised that a good coating of vaseline on the key and in and out of the lock a few times should seal it up well enough. I daresay that would seal most things. The gaps were temporarily sealed up with a bit of low tack plastic for the air test, so the result assumes this has been done. All the battens are in now and the downstairs was finished off yesterday, and concrete was put into the remaining recess that had been formed for the lift and slide doors to get a level threshold. I am, of course, delighted with the air tight result and really pleased for MBC as well, as they have worked really hard and whenever there has been a problem, come up with solutions. I know that others have had varied experiences but for my own, I have found MBC to be a pleasure to work with right from the start. At the design stage, David worked his socks off liaising with my architect to get all the details right and to work out how to build the design using their system, and this has been the case with any third parties I've asked them to speak with directly. The communication from Trish has been great - I've always know what was going to happen and when and been kept informed when timings have had to change. The guys on the ground have worked like machines; I'm astonished at how hard they work, to be frank, and throughout the whole time I've never heard any rows or arguments. That's not to say that there haven't been any, but if there have, they didn't take place in front of me. For me, this has been a really good experience. What next? There's still plenty to do but the next main contractor is largely doing all of the internal systems, plumbing and wiring (note - I'm no longer giving details of this as I can't recommend due to unfinished work). The MVHR ducting and manifolds have been worked on but will kick off in earnest on 3rd December once the cellulose has been blown in upstairs. The cellulose is arriving on Friday 30th, along with Gordon, who will put it into the walls and ceiling. All 520 bags of it! Before then, my Ryterna garage door is due to be installed next week so I'll report back on that. That's being supplied and installed by Joe from Dorset Garage Doors Ltd, just up the road from me in Lydlinch. There's a lot of work to be done outside, too, but I'll be thinking through that today and get my plan of action together. Whatever else happens, some gentle heat will be put into the slab this week, using a couple of Willis heaters. It's getting pretty chilly on site now and it will be nice to get the house drying out properly and check that side of things is working properly. A good week and, hopefully, more to come.2 points
-
I wish my other half felt the same, because she can’t rack up the stat and feel radiant heat from a source she thinks it’s cold in here (despite friends visiting for a long weekend and saying how warm the house felt). Also despite the MVHR (and my waxing lyrical about @JSHarris doing an analysis on it and opening windows) she still insists on opening a window and complaining it’s cold. I’m going out to the garage (man shed) ?2 points
-
I am more shocked at the plumber or kitchen fitter that hacked half the back of the cabinet out, rather than drill a hole for the waste pipe., or the "plumber" that used that flexi waste because it was quicker than doing a proper job. The right hand waste will need a plug in the unused overflow port and whichever washing machine hose point you do not use will need a blanking plug.2 points
-
Right, apart from trimming, my system is up and running ??. For those that are interested this is how I set mine up. The ASHP via a diverter valve heats either the 90litre buffer tank for the UFH or the DHW tank. There are timers on both in case we use E7 or E10 in the future but for now both permenantly on. The DHW tank has a stat to call for heat when required. The heating is set to a water temp of 40’ (programming in the command unit). The buffer tank also has a stat to call for heat when the tank cools. The room stat controls the UFH manifold pump. During the winter the buffer tank will always be charged and when the heating is required we don’t have to wait for the ASHP to heat the buffer then the slab which could take some time. P.S. I had to modify the room stat back to its original power output and not dry contacts for this configuration.? all comments welcome.2 points
-
Just run ASHP and top up the DHW using immersion’s on E7. It’s a 300 litre UVC an 165sqm 3 bed 2 bath property with a 9kw ASHP2 points
-
Having got all my water issues out into the last post, it's time to move on to happier things and talk about other progress. Actually, that's a little unfair because there is a lot of work in all the flat roof stuff, far more than the pitched roof, and aside from the wet stuff it's going well. At the end of the penultimate post, the solar PV panels were just going on and the pitched roof was also still a work in progress. The building was still a shell with no power and plenty of work left for MBC to do, and outside was largely untouched apart from the buried mains cable that was terminating in the garage, into the meter moved by the meter fairies. Let's start at the top and work our way down. The solar panels are all in now and all the slates around them are done. All the velux windows are in and the ridges were done last week. We have a dry ridge system. I had to ask what this was and was told 'that means there's no gunk underneath the ridge tiles'. So technical that even I could understand it! Here's the stuff that they line it with. When they roll it out, it has a corrugated wave shape to it and each side is sticky - one for the roof ridge surface, the other for the ridge tiles. This is Mike, one of the roofers, bringing the final tiles right up to the ridge before putting the dry ridge stuff over it. And here's a view of the ridge tiles in situ, fixed to the sticky stuff and clipped together. We have 3 ridge lines on the roof, all meeting somewhere over the north east bedroom. A plate of good old school lead was shaped to cover the meeting point of the 3 ridges, creating a neat flashing for the centre. Here's Terence welding the lead to create the flaps going down each gully. Here's Terence putting it into position on the roof: And here's a close-up of the same thing. You can see the fixing for the dry ridge system unrolled next to it. Staying with jobs going on outside, there were some groundworks that week, too. I needed to get the electricity supply cable trench back-filled and whilst we had the plant on site I decided to get a few other jobs done. The Openreach guys turned up that week and the old redundant BT cable was removed, so that old electricity pole is all clear now. My neighbour has already bagsied it, so there's no problem with disposal. One of the groundworks jobs was to open up the ground between the garage and the lane. I'm not getting the driveway done quite yet but I did need to get it clear because my sunamps will live in the garage and it will be a lot easier to get them forklifted straight into the garage from the lane rather than trying to drag them all through the house. Keith got onto it, clearing around the side of the garage a little, too. There is an area of concrete there that used to have a shed on top of it. For the time being, I'm keeping that there as it's nice to have a surface that isn't clay. And then this is the view from the lane up to the garage. This is, in fact, where the pedestrian entrance to the old bungalow was, hence the gate that is still there. Once we've got rid of the scaffolding, we can clear the remaining few feet of the entrance and make the proper driveway. Keith will be doing most of the work on this, but I need to get someone with a ticket to do the dropped kerb between the lane and the verge. It's outrageously expensive for what it is - just for the 6m stretch of opening and 2m back, tarmac surface, that will be the princely sum of £1,200 plus £285 for the licence from the council. And that's the cheapest quote out of 3!!!! I will be continuing the tarmac for the driveway, and also around to the side of the garage so that there's hardstanding for a couple of vehicles next to it. And Keith's final job for that week whilst the plant was still on hire was to scrape the grass from what will be Paul's pond. I marked out the original perimeter and he took out the line for this but then I did that typically female thing and told him it was no good and I wanted it to be bigger. Naturally, he obliged. Not that we had much doubt, but for the sake of interest, Keith dug out a small trial pit within the pond perimeter, about 1m deep. It has filled up nicely with the subsequent rain and shows no sign of draining any time soon. I may have cursed our clay for its giving the need for piles, but we certainly won't need a pond liner. That's most of the outdoor stuff for the time being, so let's step inside and see what MBC have been up to this week as they've starting on the prep work prior to the airtight test. This is scheduled for next Tuesday, 20th November. The velux windows have all been boxed out and they've been drawing the airtight membrane up around the web joists forming the roof/ceiling. This will be the main/shared bathroom and it's only natural light source is the velux. It's rather nice to think I can lay in the bath looking at the stars. Assuming it's not raining. The green tubes on the far wall are for the MVHR. A close up of some of the MVHR tubes to show the careful taping around them where they come through the membrane. This is the main bedroom that has been battened out now. I've wedged some bits of timber under the membrane that's underneath the window to dry out the water that came in at the weekend after the tanked balcony incident. All the battens have been screwed on, much to the chagrin of Darren. It's probably not so necessary somewhere like a bedroom, but in bathrooms and the like where the weight of tiles and mirrors can be considerable, I wanted the peace of mind that the battens weren't going to move for anything and so requested screws rather than nails. This is the north east bedroom, below where the three ridges meet. The guy putting up the plasterboard will be cursing me here. Heading downstairs, the insulation changes a bit here. Instead of being all blown cellulose held behind the membrane, there is celotex in certain places. This is beneath the parapets and the balconies and it's been used here because less depth is required than for the cellulose, allowing the ceiling to be level throughout the ground floor. If blown cellulose had been used, the entire outer edge of the ground floor rooms would have had a step down to allow for this. That's pretty much it for now, but the next lot of work has been scheduled. The vertical slate cladding is booked in to start on 3rd December and this is being done by my roofers as it seemed logical given that they're using the same materials as on the roof. I'm nagging and cajoling them to see if they will do the stone board cladding on the stairwell walls as well; they may say no eventually, but I'm working on it as that will be pretty much all the stuff at height done other than rainwater goods. It would also protect the south west corner of the building nicely, as that's the direction for the prevailing weather. I'm aiming to get some more groundworks done in early December; at some point I need to get the sewage treatment system set in and also the rainwater storage tank. There is, of course, the rest of the pond to be dug out and that will need some muckaway. I'd rather get it done this side of the winter as we can then let it fill up with rainwater and see how it settles. Internally, there's some work on soil pipes and the MVHR, but no sign of the MVHR unit itself. Once MBC have completed their air test next week, we can really go at it with first fix, so I need to make decisions on external electrics. On order is the big brise soleil for the floor to roof window in front of the stairwell. The plans for this look great but I'm waiting on a production date at the moment as the framework is a first fix item. The wooden fins can go on any time after that. Similarly, I have a guy coming to measure up for the external motorised roller blinds for the other large south facing windows. As long as sufficient clearance is left with the cladding, these don't need to be installed as part of first fix so we're not so reliant on a production date for these. They have a lead time of 3 to 4 weeks. There's plenty that I've omitted, I'm sure, but it will all follow in due course. It will be great to get past the air test and make some good progress in doors. No aviation buzz this week, but the hunt was out today. I stood on the top lift of the scaffolding late this afternoon watching the horses and riders galloping over the distant fields down near the river and could hear the hounds baying and the horn being blown. I'm not sure what they were hunting but it all seemed very evocative on a late autumn afternoon and really brought home just how rural our place is.1 point
-
Hello I'm very pleased to have found this site. I have pp on a small barn just 80 sq m. I have about £120k for the conversion, which the architect (who was going to project manage) has warned me isn't enough and that I might need double.. so I want to investigate the self build route as they are encouraging me to borrow more, which I will struggle to do as i'm semi retired. I'm not able to do more than decorating myself, but live cheaply near the site and am reasonably intelligent and so from reading on here, it doesn't seem impossible. I'm not willing to do any of the drawings myself. I'll give you some background and welcome your advice, please. The barn is about 30 years old, wood cladding over block (Bat licence applied for, just common pipistrelles, main stipulation seems to be to remove the cladding by hand) It has trees at the back and subsidence in one corner, I haven't yet had a soil analysis or a structural survey, but I am assuming this will be so that the structural engineer can calculate how to make the building support the intended alterations. I also have to create a new entrance and get my own services in (although can use existing electricity and water from the main house for the build). The highways have stipulated that I use one of their contractors to create the dropped kerb, however, there is no actual footpath or kerb on that side of the road, so I guess I can query this with them? There is a sewer across the paddock which I assume I can join. The floor is solid concrete, the roof tiles are sound, but the roof is supported by unattractive trusses. However, there is insufficient height for another floor or a mezzanine (except for storage, perhaps). I am considering an amendment to change the windows/patio doors in one corner of the building, it won't radically change the appearance, so hopefully will be acceptable. There is to be a large south west window cantilevering over the corner of the building, does anyone have advice about these? They look great, but people have discussed excessive solar gain, so I will have to think of some mitigation. I am a bit of a hippy and would love to make the house as sustainable as possible, but think any plans of ground source heat pumps, reed bed sewage system, water bore, passive haus etc are out of reach and I'll have to content myself with keeping everything as affordable as possible (unless you have better ideas, of course!). I would also love to insulate with 'heathy' materials like sheeps wool as I'm asthmatic and can't handle dusty stuff at all... The building is a square box, so hopefully I can use this to my advantage. I have plenty of time to research this and try not to make mistakes as I can see how expensive this could be. Thank you in advance1 point
-
Hi all, I'm considering whether to spend time and money with the architect and draw up detailed plans and then pay a QS to do a form of bill of quantities, so that I can try and take all the risk out of the project in terms of cost. My thinking is if we go down this route then we should know what the build will cost before actually spending any large sums and being too late to change things. It will delay the start of the project a little, as they are saying it would take them about 4 months to do vs 2 months for building regs plans. Has anyone else gone down this route? What was your experience? Thanks1 point
-
I've been asked to complete an online online water usage report Can anyone point me in the right direction1 point
-
Yup. I didn’t say it looked nice, but I don’t like ikea kitchens either. The reason for all the exposed pipe work is because they don’t give plinth space or service voids Thats crap.1 point
-
Ikea. Plug n play is their ethos, and that knockout looks very factory to me1 point
-
It's the nominal room temp that we want to maintain. If we can a target of 23°C, say, and this requires 30kW input then the slab surface on average needs to be (30/10) above this or at an average of 26°C. Thanks for the sign cock-up. Just check my git history and did a crap edit about 5 days ago. The temp has been steadily falling since then and the error in catch-up so has always been slightly +ve since -- hence my not picking this up.1 point
-
Jeremy, perhaps that's the most important point: you are now in, and theory gets replaced by practice. congrats1 point
-
Don't make it to comfy she will want to stop!!1 point
-
Without wishing to derail the thread, I can add an interesting data point. On Wednesday we had a removal van here, shifting the rest of our furniture over from our old house, plus both our cars were filled with stuff that we had to carry indoors. It was damned cold here on Wednesday, around 2 deg C and snowing in the morning, dropping through the day and evening to well below zero. During all the unloading, the front door was wide open for a couple of hours, and this leads directly into the entrance hall where the room stat is located, even though that is ~5m from the front door, so not in the direct influence of it being open. However, the temperature in the hall did drop to around 18 deg C, and the room stat is set to come on at 20.5 deg C, so the ASHP was on, heating the UFH for a lot of the time on Wednesday. I expected that we would get a big temperature overshoot in the evening, as we'd effectively over-charged the slab with heat. However, because the slab temperature is limited to about 23 to 24 deg C max, this didn't happen, much to my relief. We got a small overshoot, up to about 21.8 deg C, early in the evening, but that settled back to the normal 21.5 deg C or so later, and things were very comfortable, with the bedroom temperature at around 20 deg C. All told I was impressed with the way this simple control system behaved. I think the key is controlling the maximum flow temperature into the slab, as well as using room temperature sensing with a low hysteresis (+/-0.1 deg C). Limiting the UFH flow temperature sets a limit on the amount of heat the slab can be charged with, which in turn seems to limit the overshoot from the mismatch in response time between the fairly rapid air temperature sensing and the fairly slow response of the slab. The most important point is that Wednesday was the first night that SWMBO had spent here, and she was very impressed with the comfort level, so much so she keeps going on about it. I have a feeling she wasn't convinced by any of my arguments about the virtues of a passive house, but is now very much a convert, especially when it comes to MVHR and the very much better air quality than we had in our old house.1 point
-
Yes, the ASHP must be filled with combined antifreeze/inhibitor, to deal with the case when the ASHP is turned off and the outside temperature drops below freezing point, which may risk freezing the water inside the ASHP secondary heat exchanger. It's why I was glad that Newark screwed up and supplied a buffer tank with a coil, as it meant I didn't have to shell out an arm and a leg for around 25 to 30 litres of antifreeze inhibitor, but could get away with just using a bit less than one 5 litre can of the stuff.1 point
-
Thanks @TerryE, getting there but I'm finding the code a bit puzzling. I take it t15 is the nominal 3pm temperature derived from today's measurements? So what's TARGET_T, the set target temperature which is only adjusted very occasionally? But the temperature of what? Some sort of nominal temperature of the slab after a day's heat delivery to the room? Should onTime1 += 0.5; be onTime1 += sign * 0.5;1 point
-
its been so fxxxd up the only answer now is to get out--how can you sign up to something that says you can never ever get out+ don,t even have a vote !!! . its like the maastricht treaty that stopped us ever having a vote on captiol punishment--the point is we should allowed to at least have the choice. If not we are slaves --that,s not what i voted for when we joined the "common market " It might be hard to start with --but the future will only be better --this way it just keeps getting worse. just think if we could have only taken quotes from uk companies for all these wind turbines --employment and the subsidies would at least go to UK companies--and as WE are paying them from our electric bills thats only fair. rant over LOL1 point
-
Yes, it is, but [pedant_mode_on] the evaporator becomes the condenser during the defrost cycle [/pedant_mode_off].1 point
-
Actually isn't it the evaporator that freezes? ?1 point
-
From a meeting with my architect today there is a word of caution I'd like to pass on. Our situation is we have planning permission for a rebuild which will increase m2 by about 40m2 so only an incremental potential CIL liability and that for a self build can be removed if forms filled correctly. BUT, we're planning a few changes which will likely mean a new planning application gets submitted - considering risk for approval as v low. We're keen to get moving by starting demolition before new planning is approved and this may be an issue. When the new planning is assessed if there is no existing house then there may be no incremental element so all considered as new construction with a high CIL charge - which, should be OK for self build but any mistake made in that could result in a big CIL bill. Will look into this more to fully understand the risk of starting early.1 point
-
Looks like an Ikea sink ..??1 point
-
Hi Joe90 Point taken as your UFH system is different design to mine. Yours then is much easier to bleed using a mains water flush. I'll get back to my troubled system1 point
-
It's got a blank in1 point
-
We also have a woodburner for chilly evenings and despite being told we would overheat if we used it we have not (so far).1 point
-
Open up the flow rate for the 2 loops to this room (don't unwind the flow meters more than about 3 turns in total or it all gets very wet!!!) If you can't achieve higher flow to those loops that way, then slow down the flow to the other rooms instead.1 point
-
As you say, he uses a room (hall) stat so he's not controlling the slab temperature alone. @TerryE could you say how your system currently works? AFAIKS in this thread you've said a couple of times various ways it doesn't work but not actually spelled out how it does other than saying it measures the slab temperature and uses that to adjust the amount of heating overnight (and in the afternoon). Is it that it looks at the drop in slab temperature or what?1 point
-
As @JSHarris and others have found, it's rarely the LED that goes; almost always the electronics in the back. Out of curiosity, were many of those in recessed fittings? I have a strong suspicion that many LED failures are a result of being in fittings which cause them to overheat.1 point
-
... or you need both a flow and return......1 point
-
That's what I hate about these LED units. They may only need a small % of power that halogen units needed, but what a waste to scrap the ENTIRE unit when just the LED goes (for those units where the LED is not a separate bulb). So you then think, that 20-50,000 hrs will last quite a few years....obviously not. Will all retailers give you some kind of warranty? Will they honour it? I can imagine lots of cases where the wouldn't, ie, if you bought off ebay or Amazon. And then you will have a scenario where you need to have 2 spots replaced in kitchen only for that range to be non-existent. Replace the lot or try and mix and match with another brand/model. I'm sticking to these: Might darken the ceilings a bit and mess up my MVHR filters.1 point
-
What has happened to the installers? Why are they not sorting it for you? Time for a visit from a certain Welsh Plumber?1 point
-
It's not a cottage, it's a 1970s bunglaow on a half acre plot and as planning is for an extension above and out so the roof will be coming off and the whole thing needs rewiring, replastering, new windows, doors etc, etc, it's not a solid 2 brick, nor an old canal cottage, it's a rather strange mid 1970s bungalow and has cavity wall insulation already, but yes of course everything will need building regs. We can't get gas over a canal bridge, if we had gas I wouldn't be looking at any of this at all, but we don't. We have oil. ASHP is our backup option. Either way we'd be paying someone to do it so it's always going to cost more than people who have installed it themselves, when the equipment they have quoted is just over £10k, its not going to be any less. That said we will be getting more quotes and doing some ongoing research into both and now have two people who have the blade technology installed that I can visit.1 point
-
Like @joe90 I almost shit a brick at that. OK, I have a passive-class house, but £21½K would pay for my heating system and all of our energy needs for least the next 12 years at current prices. And my house is about the same size as yours post extension. If Canal-side means (as it does near us) that you've got a solid 2 brick (as in 9") wall profile and absolutely appalling U-values that you can do little about, then this is just a price of living in a picturesque canal-side cottage. However, as you are doubling your area from 100 to 200 m² then you must be building the extra footprint to at least current BRegs and converting current external wall to internal, as well as insulation the entire roof void to BRegs? It just seems crazy to me to consider paying £50K over the next 10 years for your heating needs. OK RHI makes a dent, but what happens when this canned like many other incentive schemes or if you have key equipment failure? I would really do some reasonable energy estimates and how to mitigate your costs. As Peter says ASHP will almost certainly work out a lot cheaper and simpler. Ditto a conventional Gas boiler, if you can get gas.1 point
-
- A few under the basin - Inside the cupboard - Window reveal - top & sides - 2 pockets - sides - Over the door & cupboard though want to get the door frame in before doing that and inside the cupboard. - The bath pocket - Bath deck and tapered sides Starting to think about heat now, getting the UFH loop and towel rad jumped in to the ancient downstairs single pipe CH. That's tomorrow night sorted then!1 point
-
A bit more done. I actually had to break the ice in the clean water bucket I'm using for the tile saw! Maybe last two pockets and window reveal next. As an odd aside it's been pretty cold in the as yet unheated bathroom. About 13degC. Lots of heat loss at the mo through the ceiling and wall conduits etc. What I found helped was tipping a jug of water down the wall drain to fill the trap. At the moment the waste just exits outside and is temporarily capped with an old aerosol lid duct taped on! Went up 3-4deg by the time I'd finished in there.1 point
-
@GHDirect have you seen my thread about my heat pump not working?, similar in that only low water temps were reached. Also we had problems with the “diverter” valve (not three way) In that the valve instructions show DHW when parked and heating when actuated, however my ASHP powers the valve when DHW is required so we had to turn it round. In all this, because of mis information from my room stat supplier I blew the main processor board and had to replace it. Problems setting the programmes followed. I concentrated on heating only at first and found a lot of air in the system so powered the pump directly and left it on full chat for an hour which released a lot of air. I then forced the DHW to be heated and did the same. Mine now works (subject to trimming ) and got nearly 60’ tonight and believe programming and air both contributed to my problems.1 point
-
Has the system been purged? eg has cold mains been used to force all the air through the loops. Next, are all the isolation vales open? Follow the pipes from the thermal store all the way to the manifold and see whats in the path. Confirm that they're all open / functioning etc. Hopefully you'll have a 2-port zone valve between the TS and the manifold to stave off unwanted heat loss during the non heating season. Still be interested in that slotted valve to the right of the head.1 point
-
Was in one of the Homebase stores that is closing down...... crazy prices on many things. Spent £100 but made aprox £500 saving. up to 90% of door furniture and other hardware. Some real bargains to be had if your lucky.1 point
-
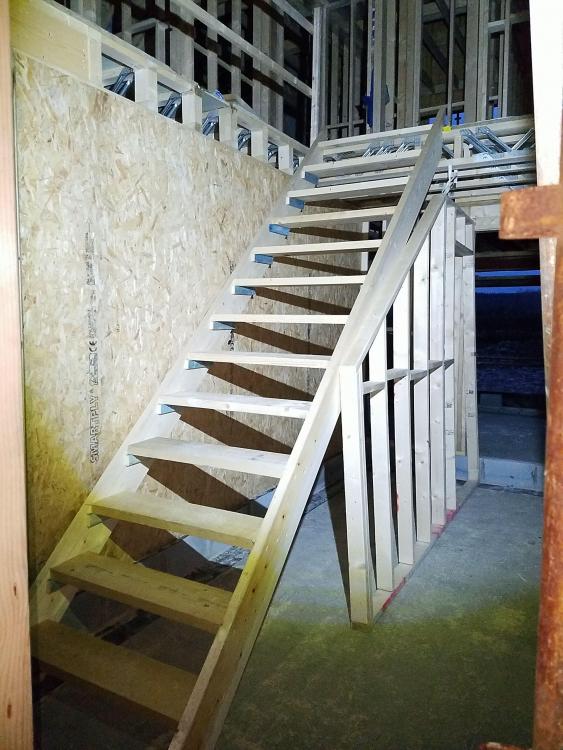
Had a surprise visit from the BCO on Tuesday, and I was glad to be there and to meet him. Finally. So far so good, no structural hitches or queries and a general air of impressed-ness with the quality of the build. I hope I can keep it up. A milestone passed today. TF erectors are finished, with the roof weathertight all internal structures complete and, I'm grateful that the lads had time to knock up a temp staircase on my request. Next? Waiting for the window installers to come back. Just need to sort the scaffolding to suit them, but it'll no doubt be a week or two before there's an install slot again.

 1 point
 -
https://www.nuenta.com/viewproduct.asp?pid=109. Metal heat exchanger about £3k. Is the canal used?, I know canal boats don’t use anchors but I would be worried about it being dredged up!, if like @PeterW said above you used pipe, you could bury it in the mud at the bottom of the canal (with or without permission ?) and it would be safer I would have thought! https://www.ebay.co.uk/itm/Green-Nylon-Chest-Waders-100-Waterproof-Fly-Coarse-Fishing-Muck-Wader/191685714599?_trkparms=aid%3D555017%26algo%3DPL.CASSINI%26ao%3D1%26asc%3D55148%26meid%3Ddfc8b5f9c9bf4442a59b5d16469d9a6e%26pid%3D100505%26rk%3D1%26rkt%3D1%26%26itm%3D191685714599&_trksid=p2045573.c100505.m3226. Just a thought ?1 point
-
Many of us on here have concluded that the RHI benefits the installer who charges an inflated price because "they can" as they are MCS or whatever) registered. Like others I have a self install sub £1000 (by a long way) ASHP and no RHI. Do some searching on the net and find some prices for those components. Then price say 5 man days to install it. You might end up shocked a how much extra they have quoted.1 point
-
So this all works financially, if a) the hardware keeps going for 7 years and doesn't need any expensive replacements and b) the RHI keeps going at this ridiculous rate for 7 years as well? That could happen, I suppose.1 point
-
Thats not a typo is it???, I paid £850 for my ASHP ?1 point
-
Thanks for the comments so far. A lot are in relation to ASHP and GSHP, this is a water source heat pump so I guess trying to find anyone who has had this may be limited. I'm just reviewing dates of the quote and what this includes and details. The system output is 11.50kw and details of quotation are as follows: 1 x Nuenta Energy Blade Vaillant FlexoTherm 11kw Vaillant 250L Hot Water Cylinder Vaillant 250L Buffer Tank The quote is £21525 but obviously we'd get RHI. This doesn't include controls, pipework, underfloor heating etc.....1 point
-
Brilliant result, IIRC we were 0.43, so you're way better! As encouragement, I can say that it was snowing today, then cold, sleety, rain, and we're sat in our beautifully warm and cosy MBC home, walking around in bare feet and just enjoying the superb level of comfort that a super-insulated, airtight, house gives. For the keyholes, if they are deep ones, then get some motorcycle chain lube. It comes in an aerosol with a thin pipe on the nozzle, like WD40. Shake the can really, really well, then spray the chain grease as deeply into the keyhole as you can get. It will set nearly solid in the middle, as it's designed to be really thick so that it doesn't fling off motorcycle chains, and will last years as an air block in the centre of the keyhole. If you get the white stuff then a bit of spillage into the key mechanism doesn't make too much of a mess. I tried a silicon grease spray initially, but found it tended to melt out in hot weather. The motorcycle chain grease stays solid, even in fairly hot weather.1 point
-
Control theory 101 great explanation. Need to mull it over I do.1 point
-
We also have a RK door and it's very plain (by choice) - just a flat slab of cherry wood foil effect aluminium with a single vertical bar handle and a fingerprint reader with a narrow vertical window to side. We got the passive version as the rest of the build was to that spec. Ditto on the pricey but was best we could find and we looked at a lot, inc. Gaulhoffer (who did our windows) and Internorm etc. We bought through a RK reseller who also did our Hormann garage doors and installed both - not much difference on price but better customer service as at that time RK seemed very busy and were not that responsive. Had it now for a few years now and still really happy with it.1 point
-
2.4 m back and 70 m along back of footpath. Try this: https://www.homebuilding.co.uk/visibility-splays/ But I would have thought this was fo ran adoptable access road and not a domestic driveway.1 point
-
If only we could get something other than O2 or vodaphone 2G here........0 points


This leaderboard is set to London/GMT+01:00