Leaderboard


Popular Content
Showing content with the highest reputation on 10/06/23 in all areas
-
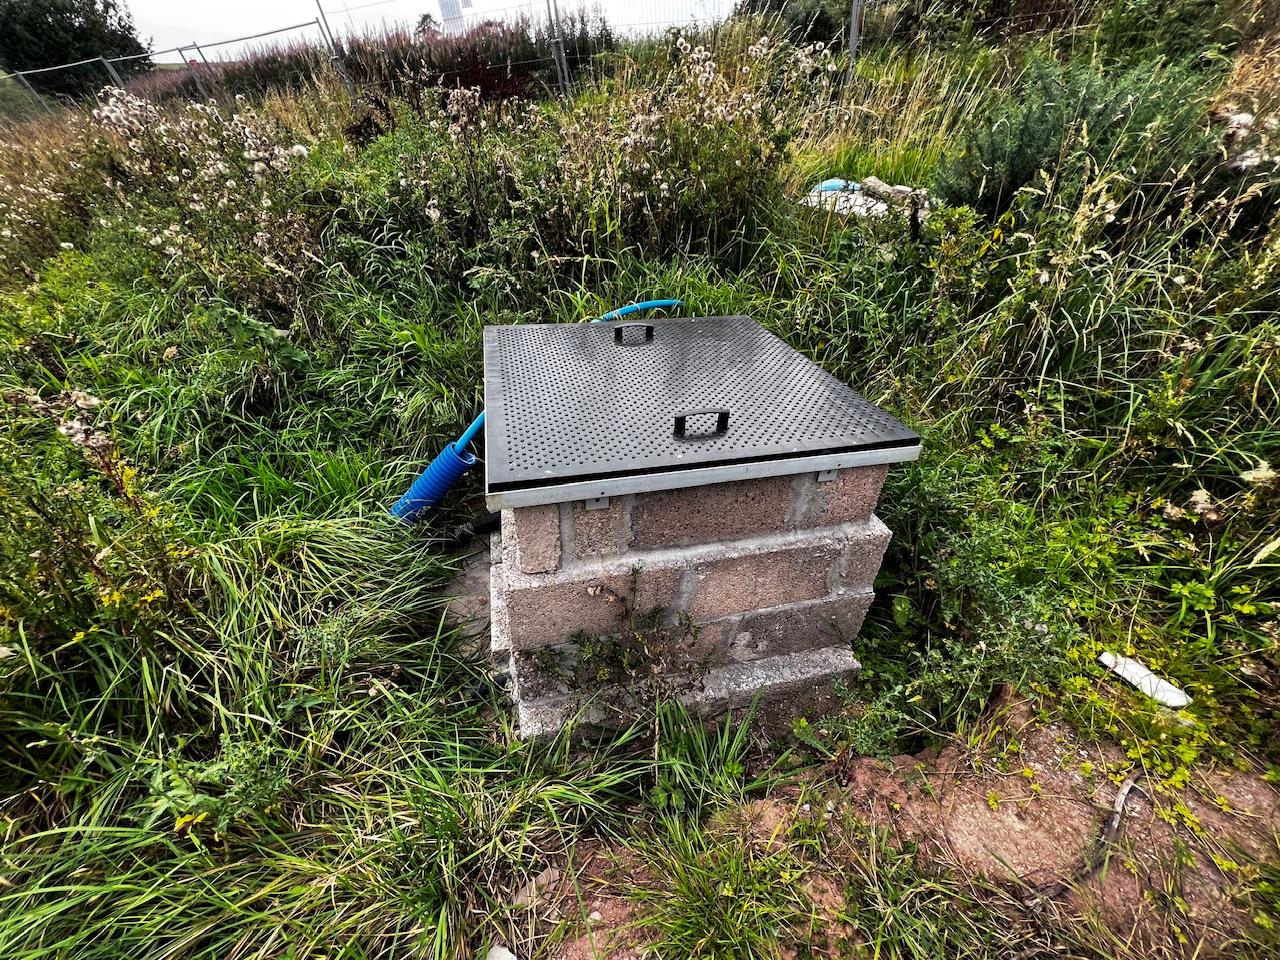
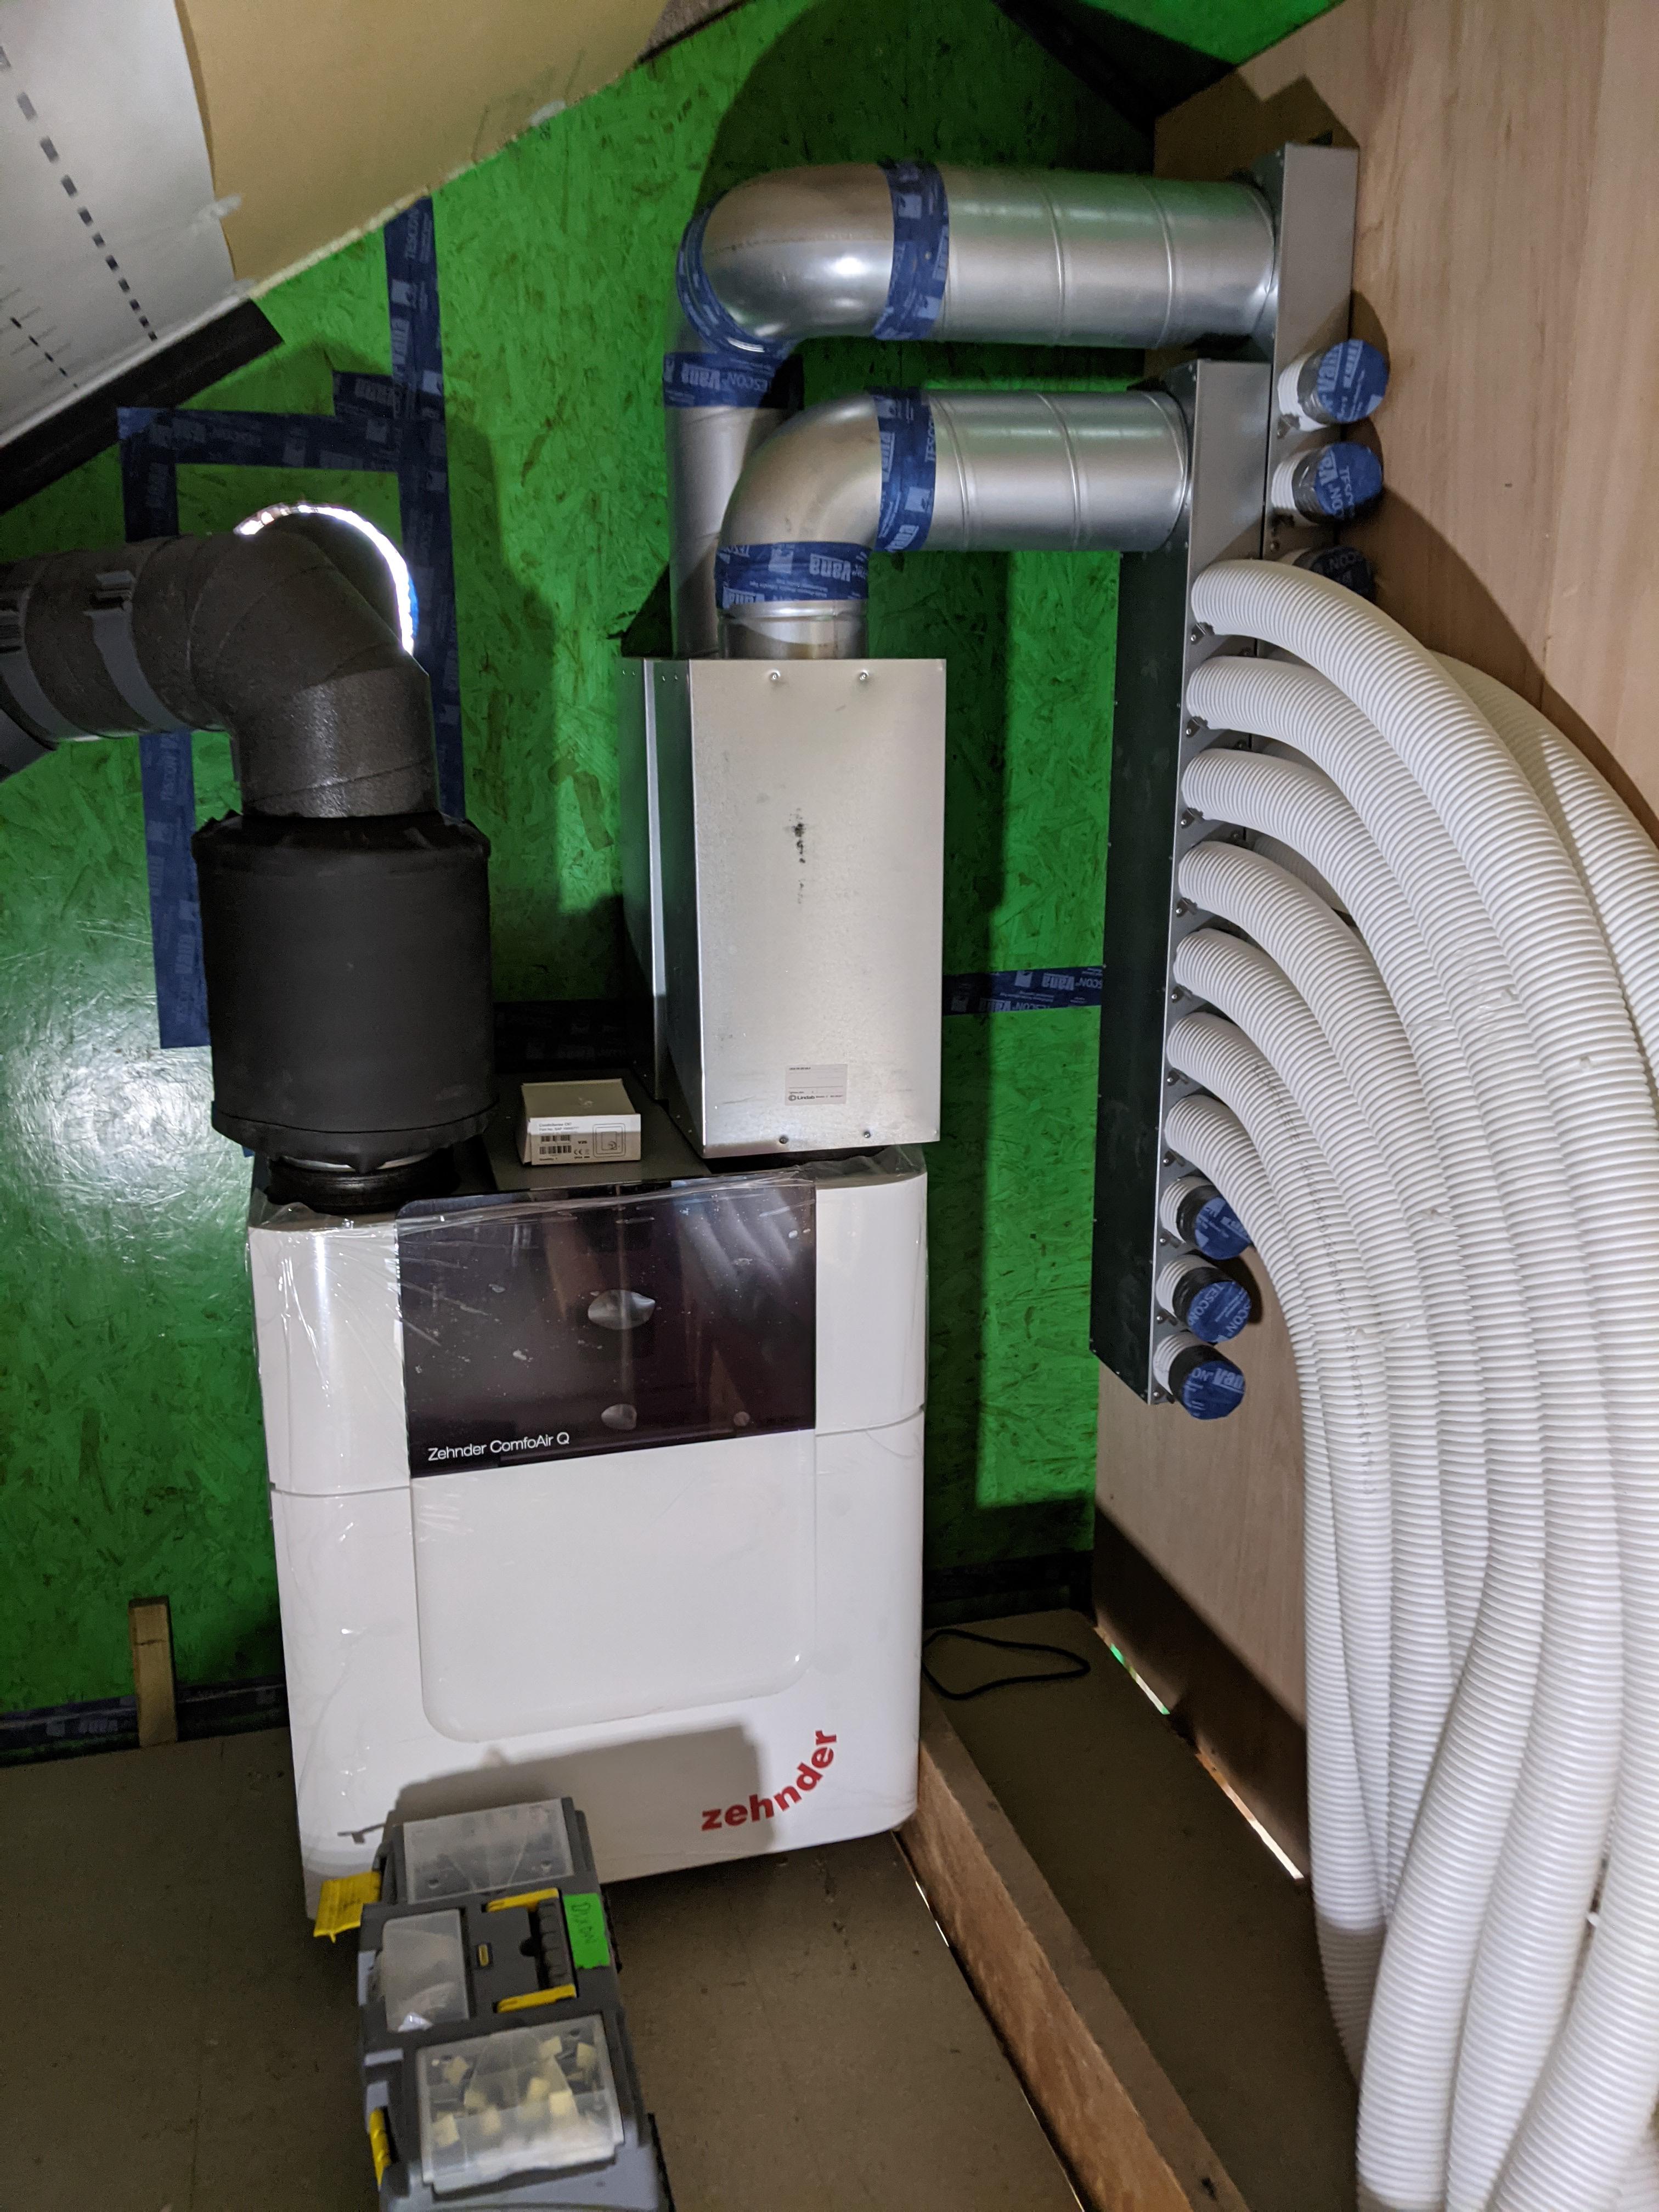
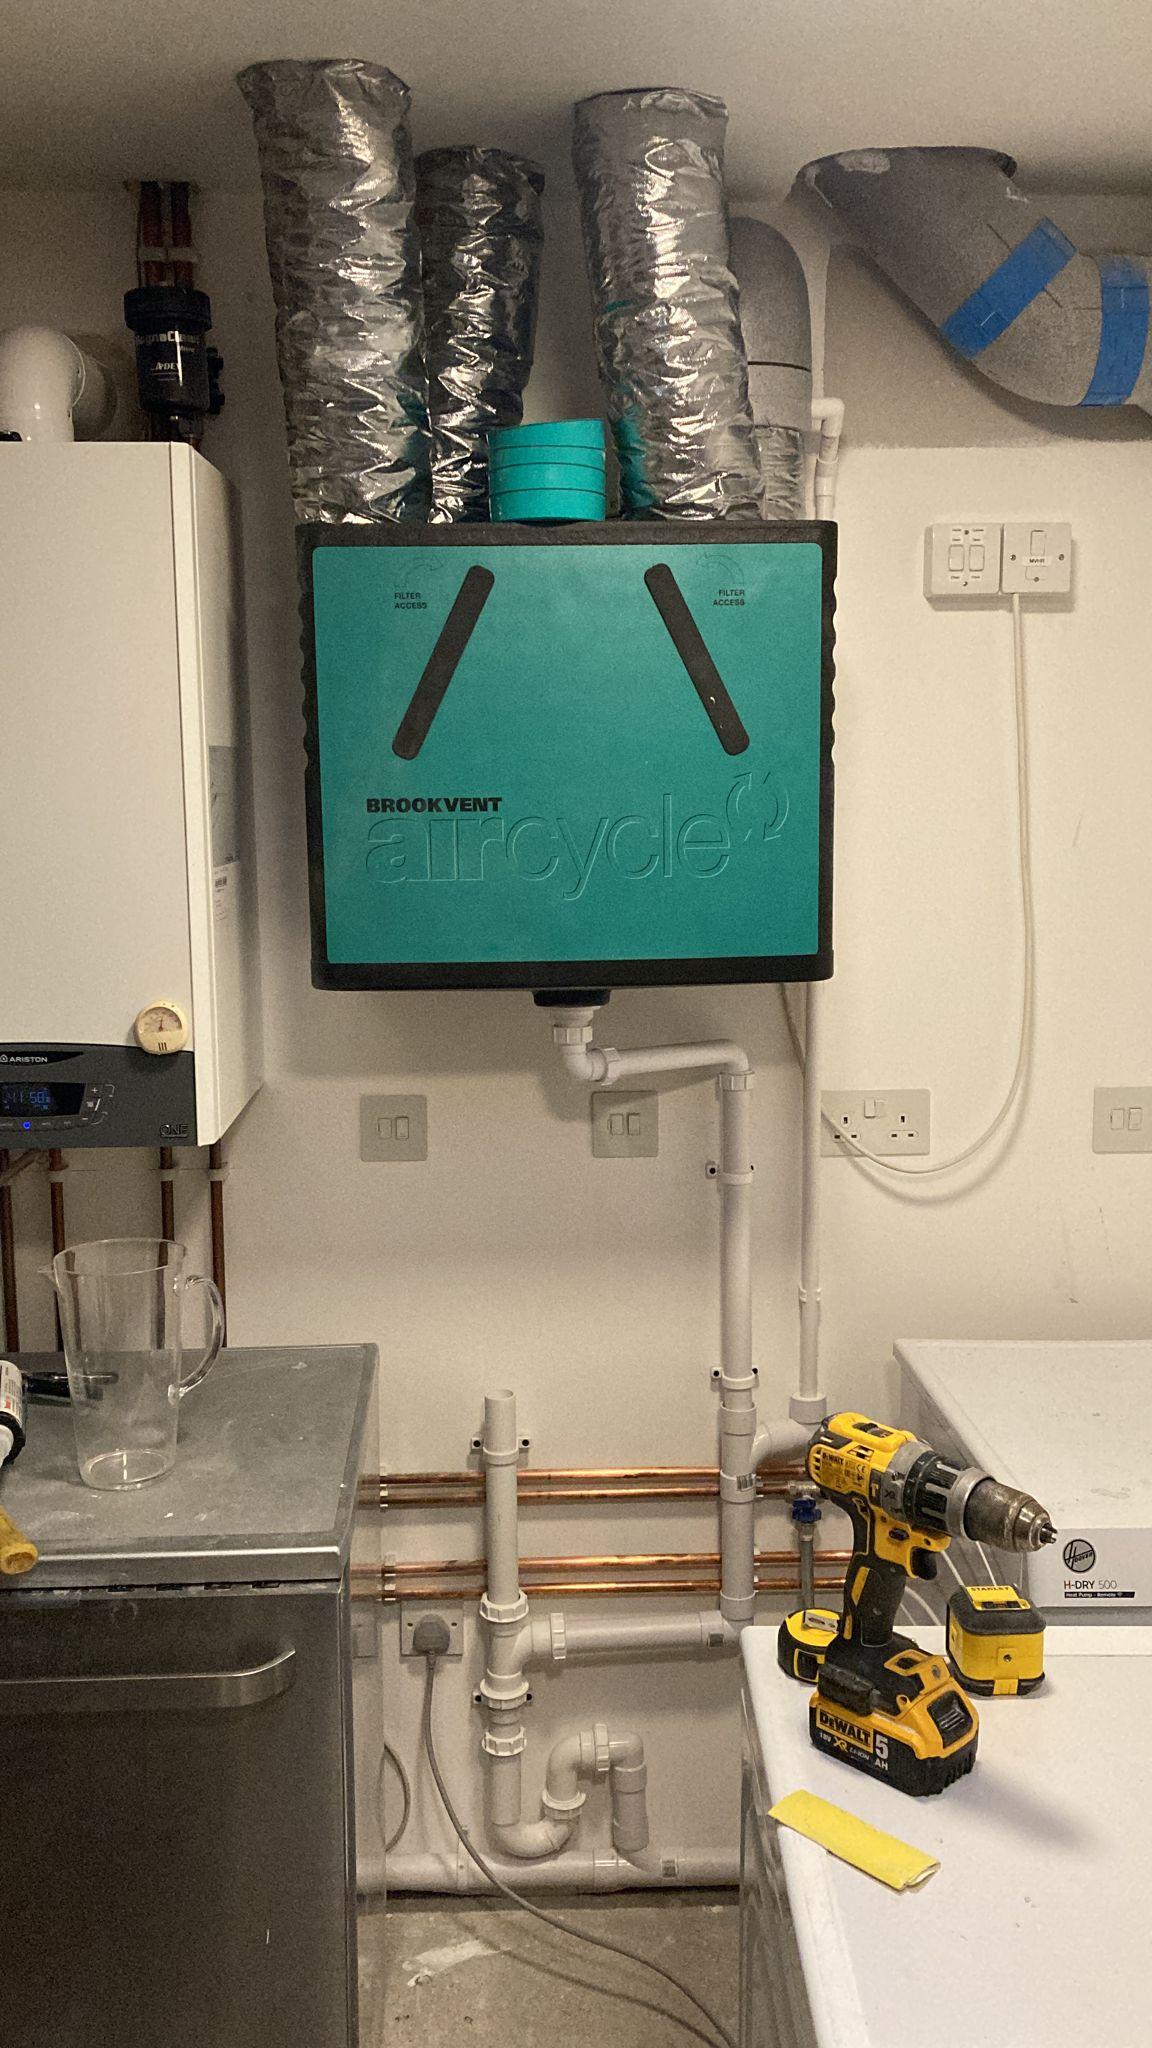
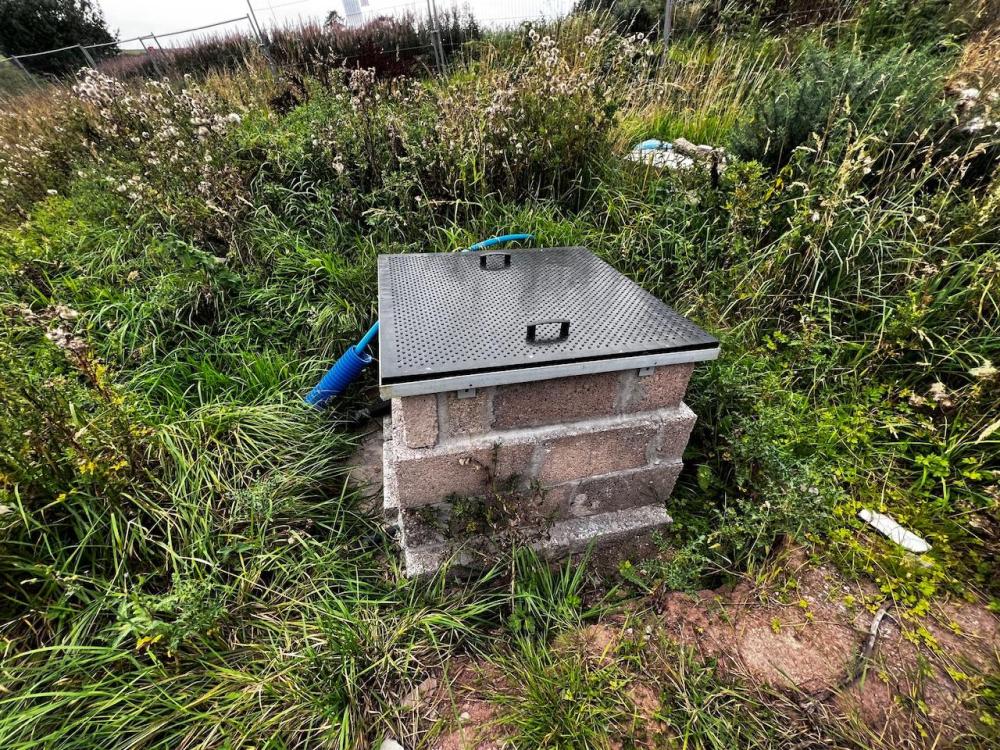
I thought I’d do a longer write up about my water supply as it wasn’t that straightforward to get where we are now, a plentiful supply of potable water, and I’ve learnt a few things along the way. As we all know, no water no house so it’s an important part of the self-builders due diligence when buying the plot. While there is mains water nearby our plot it’s insufficient for the existing few houses. The few houses get their water via various sources, mains, boreholes, a well, and out of the burn. I made it a condition of the sale of the plot that the farmer had to find a water supply on the land which, in our case, was going to be via a borehole. There are lots of people out there that can drill holes in the ground but the lesson here was definitely if you buy cheap you buy twice as the first guy the farmer used failed to find water and made a right mess of the neighbouring house. I recommended he use the same company that drilled the other boreholes in the area which he did and they eventually found water at 147m. Most boreholes are mapped by the British Geological Survey and generally a scan of the drilling report is attached to the map location. This isn’t going to tell you if you’ll find water on your plot of course but it is useful to know. https://mapapps2.bgs.ac.uk/geoindex/home.html?layer=BGSBoreholes&_ga=2.140231729.386343147.1696503272-1218241145.1696503272 When a borehole is drilled you need to make sure you also get the drilling report and the water analysis. This will confirm if the supply is viable as it will tell you the yield and what treatment may be necessary, if any. This is important to know as the difference in cost can be many thousands of pounds and might dictate how and where you put all the necessary equipment. For example, if the yield is significant and no treatment is required then you need minimal equipment therefore less space and cost. Typically the drilling company will pump the borehole for a while. In our case this was two weeks. It’s worth noting that drilling a hole in the ground is a messy process. There’s a lot of material comes out of the hole. If they don’t damp the drill with water this sandy material will go everywhere. In our case it covered the neighbour’s house in red sandstone dust. Not a great start with our only neighbour. Our drilling report showed there was enough water for 60 people assuming a daily water use per person of 150 litres/day. Our borehole yield is 380 litres per hour. It sounds a lot but it isn’t in reality and one company I spoke with described it as technically dry. They look for at least 500 litres/hr as a minimum. The water analysis showed that it was moderately hard and borderline for a water softener. It also showed very slightly elevated nitrite levels in the water. Nitrites can be treated in the same way as nitrates and removed via reverse osmosis or ion exchange. Two companies I spoke with reckoned the nitrite levels would probably reduce over time such that no treatment would be necessary. After a bit of research I decided to install both the water softener and the nitrite treatment filter anyway. However, I wanted to have non-softened drinking water in the house as well as the softened water. This complicates the plumbing of it all slightly which I’ll talk through later. The borehole comes up to a wellhead and into a headworks chamber. For very simple installs, that requires no treatment or intermediary storage tanks, the chamber could be a large kiosk that houses all of the equipment for your water supply to your house. These kiosks are quite large and stand 1.2m tall typically. That’s not an issue if you are able to site it all at your boundary or at the bottom of the garden hidden out of view. If your install isn’t as straightforward then you might need a separate shed or space to house all the equipment in. In this case the headworks chamber just makes safe the borehole and associated control electronics for the borehole pump. It might also include a heating element. I found it quite hard to get specific information on how to build the headworks chamber. All of the companies I spoke with said this is to be supplied by others. The only thing they stipulated was it had to have at least 300mm of space above the borehole and ideally 400mm of space around it. They can be above ground or below ground but if below ground you need to make sure that excessive ground water can’t contaminate your water supply. A friend has a poorly installed borehole chamber that floods when there’s heavy rain and contaminates his water with groundwater. SEPA handily provide a guide on best practice for building your headworks chamber which I mostly followed. http://www.groundwateruk.org/downloads/SEPA_borehole_construction.pdf I also considered using concrete well rings with a secure cover but this became expensive and logistically hard to achieve given the weight of them but worth considering if you have the space and means to do it. I spent an inordinate amount of time deciding on the chamber dimensions. It needed to be big enough for ease of access without being too big that it dominated that part of the garden. To some extent this was determined by the manhole cover dimensions. I decided on 750mm x 750mm and ordered a Clark Drains cover from the drainage superstore. I built the headworks chamber out of concrete blocks as I already had the materials on-site with a dimension of 800mm x 800mm. This turned out to be a poor decision for a few reasons. It seems 750mm square manhole covers aren’t that common so the choice was limited. They are also really heavy so aren’t very accessible if they aren’t at ground level which mine isn’t. The Clark Drains cover I bought was poorly made as the frame is very flimsy and the lid quite heavy which only fitted if I hammered it into place. Concreting the frame in place didn’t work as the concrete fell apart as soon as I tried to remove the lid. Ideally I really wanted a plastic lid for ease of access but they don’t seem to exist other than specialist lids that cost a fortune. I then happened across this company: https://www.forecourtsolutionsltd.com They make bespoke plastic covers among other things. I sketched out what I wanted and they turned that into a workable metal frame and plastic cover. I’m really happy with the final chamber. The lid is watertight and easy to access. I have included a drain at the bottom protected with rodent mesh at either end. The electrics and MDPE water pipe enter through a sealed hole. I’ll backfill around it to reduce the height of it a bit and eventually plant around it to hide it. I’ve included the electrics for a heater but haven’t installed a heater yet. I’ll insulate it for this winter and see how it goes. The borehole is 147m deep with the pump at 80m. It has water level sensors at 10m then every 20m. It’s designed to pump the water from 50m to 80m then stop to let the borehole recharge. This is controlled by a control unit in the garage. Our borehole recharges quite slowly, too slowly to use the water directly without an intermediary tank. The picture below shows the layout. From right to left we have a 30 litre pressure vessel which takes the incoming borehole water. This goes through a 50 micron filter, then into the water softener. From here it goes through the nitrite reduction treatment then into the 1000 litre storage tank. It comes out of this tank into the Dab Esybox mini 3 (which is very quiet) then into the 5 micron filter and finally through the UV disinfectant system. From here it then goes out to the house. In addition there's an outlet to an outside stand pipe. We also have ‘raw’ water outlet to the house for a single drinking water tap. It goes through the 50 micron filter and the nitrite treatment then into the house. I’ll have to add another 5 micron filter and another small UV disinfectant system in the plant room in the house. It’s also not pumped so will just rely on the pressure vessel to get it to the house. The total cost for the plant equipment, installation, and commissioning including a type B water analysis and 4 bags of salt was £9909 ex VAT. The borehole cost was separate and very expensive (£18,000) but I didn’t pay for that. I looked at a number of companies to supply and install the equipment as follows: Highwater - they drilled my borehole and did a neighbour’s install. I found them difficult to get a quote from and when I did it was extortionate at £18,000 not including the nitrite treatment and estimated £24,000 including it. They are known to be expensive. Rayburn - couldn’t get them to return my calls GRC - spoke to them a couple of times but didn’t get a quote from them The Water Man - really helpful, estimate was around £8000 but he’s a one man band and extremely busy so decided not to use him. He has a good reputation though. Filpumps - The company that I went with. I attended a webinar on private water supplies hosted by The Scottish Self Build team which Filpumps presented. I’ve found them great to deal with throughout. Very flexible and quick to respond. The installation guys were great, neat, tidy, and helpful. A long post but hopefully of some use to anyone that might need to install private water supply.
 5 points
 -
In my topic Modelling the "Chunk" Heating of a Passive Slab, I discussed how I used a heat flow model to predict how my MBC WarmSlab heated by UFH + Willis heater would perform. What I wanted to do in this post is to provide a “6 years on” retrospective of how the house and slab have performed as built based on actual data that I’ve logged during this period, and to provide some general conclusions. In this, I assumed 15 mm UFH pipework, but we actually used 16mm PEX-Al-PEX pipework with an internal diameter of ~13mm. At a nominal flow rate of 1 m/s, say, my three pipe loops in parallel have an aggregate flow rate of 0.4l/s or 1.4 m³/hr. At this flow, a 3kW (2.88 kW measured) heater will raise this stream temperature by 1.7 °C. However, when I commissioned the system, I found setting the Gunfoss manifold pump at a high setting (roughly equivalent to this flow rate) gave a very noticeable circulation noise in the adjacent toilet, so I tried the pump on its lower settings and found that the flow was almost inaudible on lowest one with in to return delta at the manifold still only about 5°C, so I stayed with this. The actual as measured delta for two loops of 4.9°C and the third slightly shorter loop of 4.1°C (close enough not to bother balancing the flows out). This corresponds to an actual flow nearer to 0.4 m/s or 0.56 m³/hr by volume. When scaled to adjust for this lower flow rate, the actual measured temperature profiles are pretty close to those modelled. I measured the actual Willis heater’s heat input as 2.88kW. In analysing the actual slab heating rates, I found that this raises the overall slab temperature by some 0.45 °C / hour after the initial start up. Plugging typical specific heat and density figures for the concrete, this is empirically equivalent to heating 25 tonne of concrete (Cmass = Ewillis/ΔT/SIconcrete = 2.88*3600/0.45/0.9 kg), or 10.6 m³ concrete by volume (23000/2400 m³). In the case where the Willis provides heating for the full 7 hour off-peak window (just over 20 kWh), at the end of this heating period the flow input to the slab is +9 °C above the initial slab temperature and the flow return is +4.4 °C. The temperature of the concrete immediately in contact with the pipe will follow this same gradient, with this temperature excess decaying radially away from the pipe centres. By the end of this heating window at the slab surface, there is barely a noticeable difference in the measured temperature of the floor above the out and return UFH pipe runs (perhaps 1°C). These temperatures and gradients are also comfortably within the reinforced concrete’s design parameters. As soon as the Willis is turned off, the internal temperature gradients start to flatten and any unevenness redistributed across the slab; the rebar reinforcing has a thermal conductivity 60 × that of concrete and this accelerates this, so that within an hour or so of the heating turning off, the overall slab is left about 3.1 °C warmer than at the heating start time (actually about 10% less than this, as the slab has already started to dump heat into airspace). In my original modelling topic, I mentioned that my passive slab has ~73m² of concrete 0.1m thick (~ 17½ tonne of concrete with another ~10 tonne of perimeter beams, cross bracing and steel rebar, with the UFH runs laid in 3 × ~100m long standard “doubled back” spirals (common to most UFH designs) on ~150mm centres and roughly 50 mm below the slab surface. (Actually only 75% of the slab is covered by the UFH runs, because of the need to avoid proximity to ring beams, partition walls, areas under fitted cupboard areas, etc..) Nonetheless, this empirical 25 tonne figure is still consistent with the total volumetric 27½ total estimate if we assume that the rebar is effective at spreading heat through the wider slab over this multiple hour timescale. In conclusion, based on this modelling and observation: First recall our context: our house is near passive in class with a lot of internal specific heat capacity. We only need about 1kW overall heater input in the coldest winter months to maintain overall heat balance, e.g. either by a resistive heater such as a Willis or an ASHP. IMO, there are two extreme approaches to house heating: (i) “agile” tracking of occupancy patterns so the living spaces are only heated when and where occupied; (ii) a 24×7 constant comfortable temperature everywhere within the living space. Our warm slab design is very much optimised for this second case, and our slab supplier did a good job in designing an UFH layout to match the slab characteristics to this The slab is covered in “doubled back” spirals with each loop using up a full 100m roll spaced on roughly 150 - 200 centres (and avoiding partition walls and cupboarded areas) so that each heats roughly 15 - 20 m² slab. In our case three loops were enough, and there was no advantage in trying to squeeze in a fourth. Our 3 loops will happily take up 3 kW heat input. Circulation speeds between ⅓ - 1 m/s seem to work well, with the only real difference being the slower the flow speed, the higher the delta between in and return temperatures. The slab does just as its trade name suggests: it can be treated as a huge low temperature thermal store, but because of its extremely high thermal inertia, one that is not rapidly responsive to heat input. In our case, a heat input of 3 kW input will only raise the slab temperature by 1°C over a couple of hours, and radiating 1kW will drop the slab by only 1°C over roughly six hours. In a true passive class house, one key to heating economy is the high level of thermal insulation coupled with a substantial internal heat capacity. Trying to drive such a house in an agile manner is a fruitless exercise, so forget the traditional having room-specific thermostat control; forget having traditional time-of-day heat profiles. It is far easier to treat all ground-floor rooms as a single thermal zone to be kept at a roughly constant temperature. In my view, using a resistive heating approach (such as a Wills heater) as well as an ASHP can both work well. In this second case something like the 5kW Panasonic Aquarea ASHP would be a good fit as it uses a modulated inverter compressor so it can heat the slab directly without needing a buffer tank. The choice is a trade-off between running costs vs. installation costs. In our case, switching from a Willis to this type of ASHP would save me about £600 p.a, in electricity cost, so I would really need to do the install for a net £ 3-4K to make the investment case feasible. However I would like to defer this discussion to a separate thread because there are other issues that such an approach would need to address.4 points
-
well after a year of notdoingverymuchreally this week marked a milestone- final stairs.
 3 points
 -
I've used full fill as my preferred option on several cavity wall projects. I much prefer it because it is idiot proof, doesn't need a gap, and prevents spots falling in the gap. No problems anywhere. Were they exposed? I can't recall if any seaside jobs had it but I wouldn't hesitate to use it. Even if damp got through a brick, it would have to be sucked into the insulation. Full fill won't do that. If still in doubt, phone BG or Knauff, who I find very helpful.2 points
-
I said it was OK, I'd do it. In reality it was really handy as I wood treated all the joists. Some boards were broken but back then I was getting them milled up to size by the local wood yard.1 point
-
Sadly, there are quite a lot of them and we don't know them very well - only moved here recently. They'd only have the road level as a point of reference themselves, but my feeling is better safe than sorry. Although my backup plan if I ran out of room for a roof was to just apply for the planning anyway - can't see any reason why it wouldn't be granted, but I'd rather avoid the admin if possible. A certificate of lawful development seems easy by comparison. We were told that spraying render onto straw - certainly the first coat - is inferior to getting it on by hand, to the point where sometimes they spray it on but have a team of people going along behind the sprayer to really rub it into the straw. Our practical was with clay slip, but we were (engloved, to protect fingernail beds) pulling the straw fibres apart and really rubbing it in, in a way I couldn't see a spray gun matching. It was messy enough that I was thinking about toothed rollers to emulate the action though. Really need to get on with pre-rendering / french dipping the ones that're going up against the brick wall; today I cut more OSB and got it nailed down, so ~¾ of the box beam is complete, giving me a platform for those bales to stand while they dry. I mixed up some lime putty from hydrated lime last week. It's really meant to age for months and months, but a good session with a paddle mixer apparently replicates some of the chemical process of ageing (more complete hydration and smaller, flatter Ca(OH)₂ crystals result in a stickier putty that forms a superior render). I just need the sand, now I've got a place for the bales to sit. 2:1 sand:lime for this coat, apparently; the other coats are more usually 3:1. Bit busy over the weekend but I'm hoping to get the posts up and doors installed Sunday or Monday. The windows are going to be a fair bit more work - I've just got the glazed panels with half the hinges (the lift-off type), so I need to build a square frame for them to sit in and either replace the hinges or find something whose pin will fit the existing barrel. Hopefully the mitre saw will make short work of it all ^^. The HDPE window is so light it won't need any posts, I've decided. Time will tell whether that's a good decision or not. The windows in question: (Didn't pay £120 for them though)
 1 point
 -
I think the wall units looks dreadful. Reminds me of cheap motels.1 point
-
I'd not fix into the external wall but use butterflies behind the plasterboard. Either the spring ones or those that open out when screwing BUT with the special tool like a rivet gun or it just spins around. I've had school toilet cubicles fixed with them. As below. Gripits look good but I haven't tried them.
 1 point
 -
@joe90 I’ve probably not explained it as well I’d hoped, essentially I’m looking for full fill to stop the air movement, make it easier to build and more cost effective. My issue isn’t that I could pass building regs with 150mm cavity of full filled mineral wool batt insulation. The issue I have is that if I built it to this spec it would mean that I couldn’t get a structural warranty through NHBC due to them not allowing full fill insulation on fair faced masonry in an area of very severe driven rain. Im trying to work out how I should compromise, whether that means changing my plans and use another form of insulation or slightly change my plans in that part of the building to a different cavity setup. This will be my first self build so it’s all a learning curve to me. could the block work behind the stone be wrapped in a membrane like timber frames are done? That way it wouldn’t be classed as fair face masonry as there’s a water barrier (I presume)1 point
-
The big stumbling block is the low specific heat of air. If you assume an inlet temp of 40C (ie 20C above room) you need about 200m3/hr to provide 1kw. In context that's roughly the flow from a fairly powerful 125mm bathroom extractor. You could have hotter air (as I believe the Americans do as their air heating systems are gas powered) which drops the flow, or huge ducts....
 1 point
 -
I should really pull my storage heaters apart, find out the mass of the bricks, and the thermal properties, rig up some individual monitoring, and see what they are actually doing. Trouble is, they keep the house warm, and that is what I care about.1 point
-
I hadn't originally planned to, but I'm certainly going to put one in now yes.1 point
-
Charlie DIYte did a decent review of plasterboard fixings. Insulated plasterboard at about 25 mins in.1 point
-
They aren't £8 each. Maybe that is a bag of them. I prefer plastic wheel spacers as they snap on easily and done weaken the concrete much.1 point
-
Erm...I do.1 point
-
The first layer you could do with blocks but you won't have 50mm. You can get concrete block spacers. Second layer metal deck chairs tied down. Shop around for prices.1 point
-
Hot dipped zinc coating is better for weather protection but they can be sharp, a bit rough looking. BZP is bright zinc plated and done by electrolysis so the coating is thinner and more even (and usually shiny) but not as hard wearing.1 point
-
Snap.. we used the same set-up I saw a youtube video on this that I cannot find now, but it is best to use an average, by setting to average and going across the whole cross section. Also we cut a small hole in the outside inlet and outlet, and tested so we could ensure the whole system was balanced.1 point
-
Yes, normal speed for the unit you have.1 point
-
Oh no chance of that. 10cm diameter.1 point
-
Thanks for the additional valuable comments 🙂 Yes @Pocster one day the room will exist, complete with lovely contents, maybe if in time also an iberico leg for crimbo - iris recognition, if you're too drink maybe you'll get blocked 🙂1 point
-
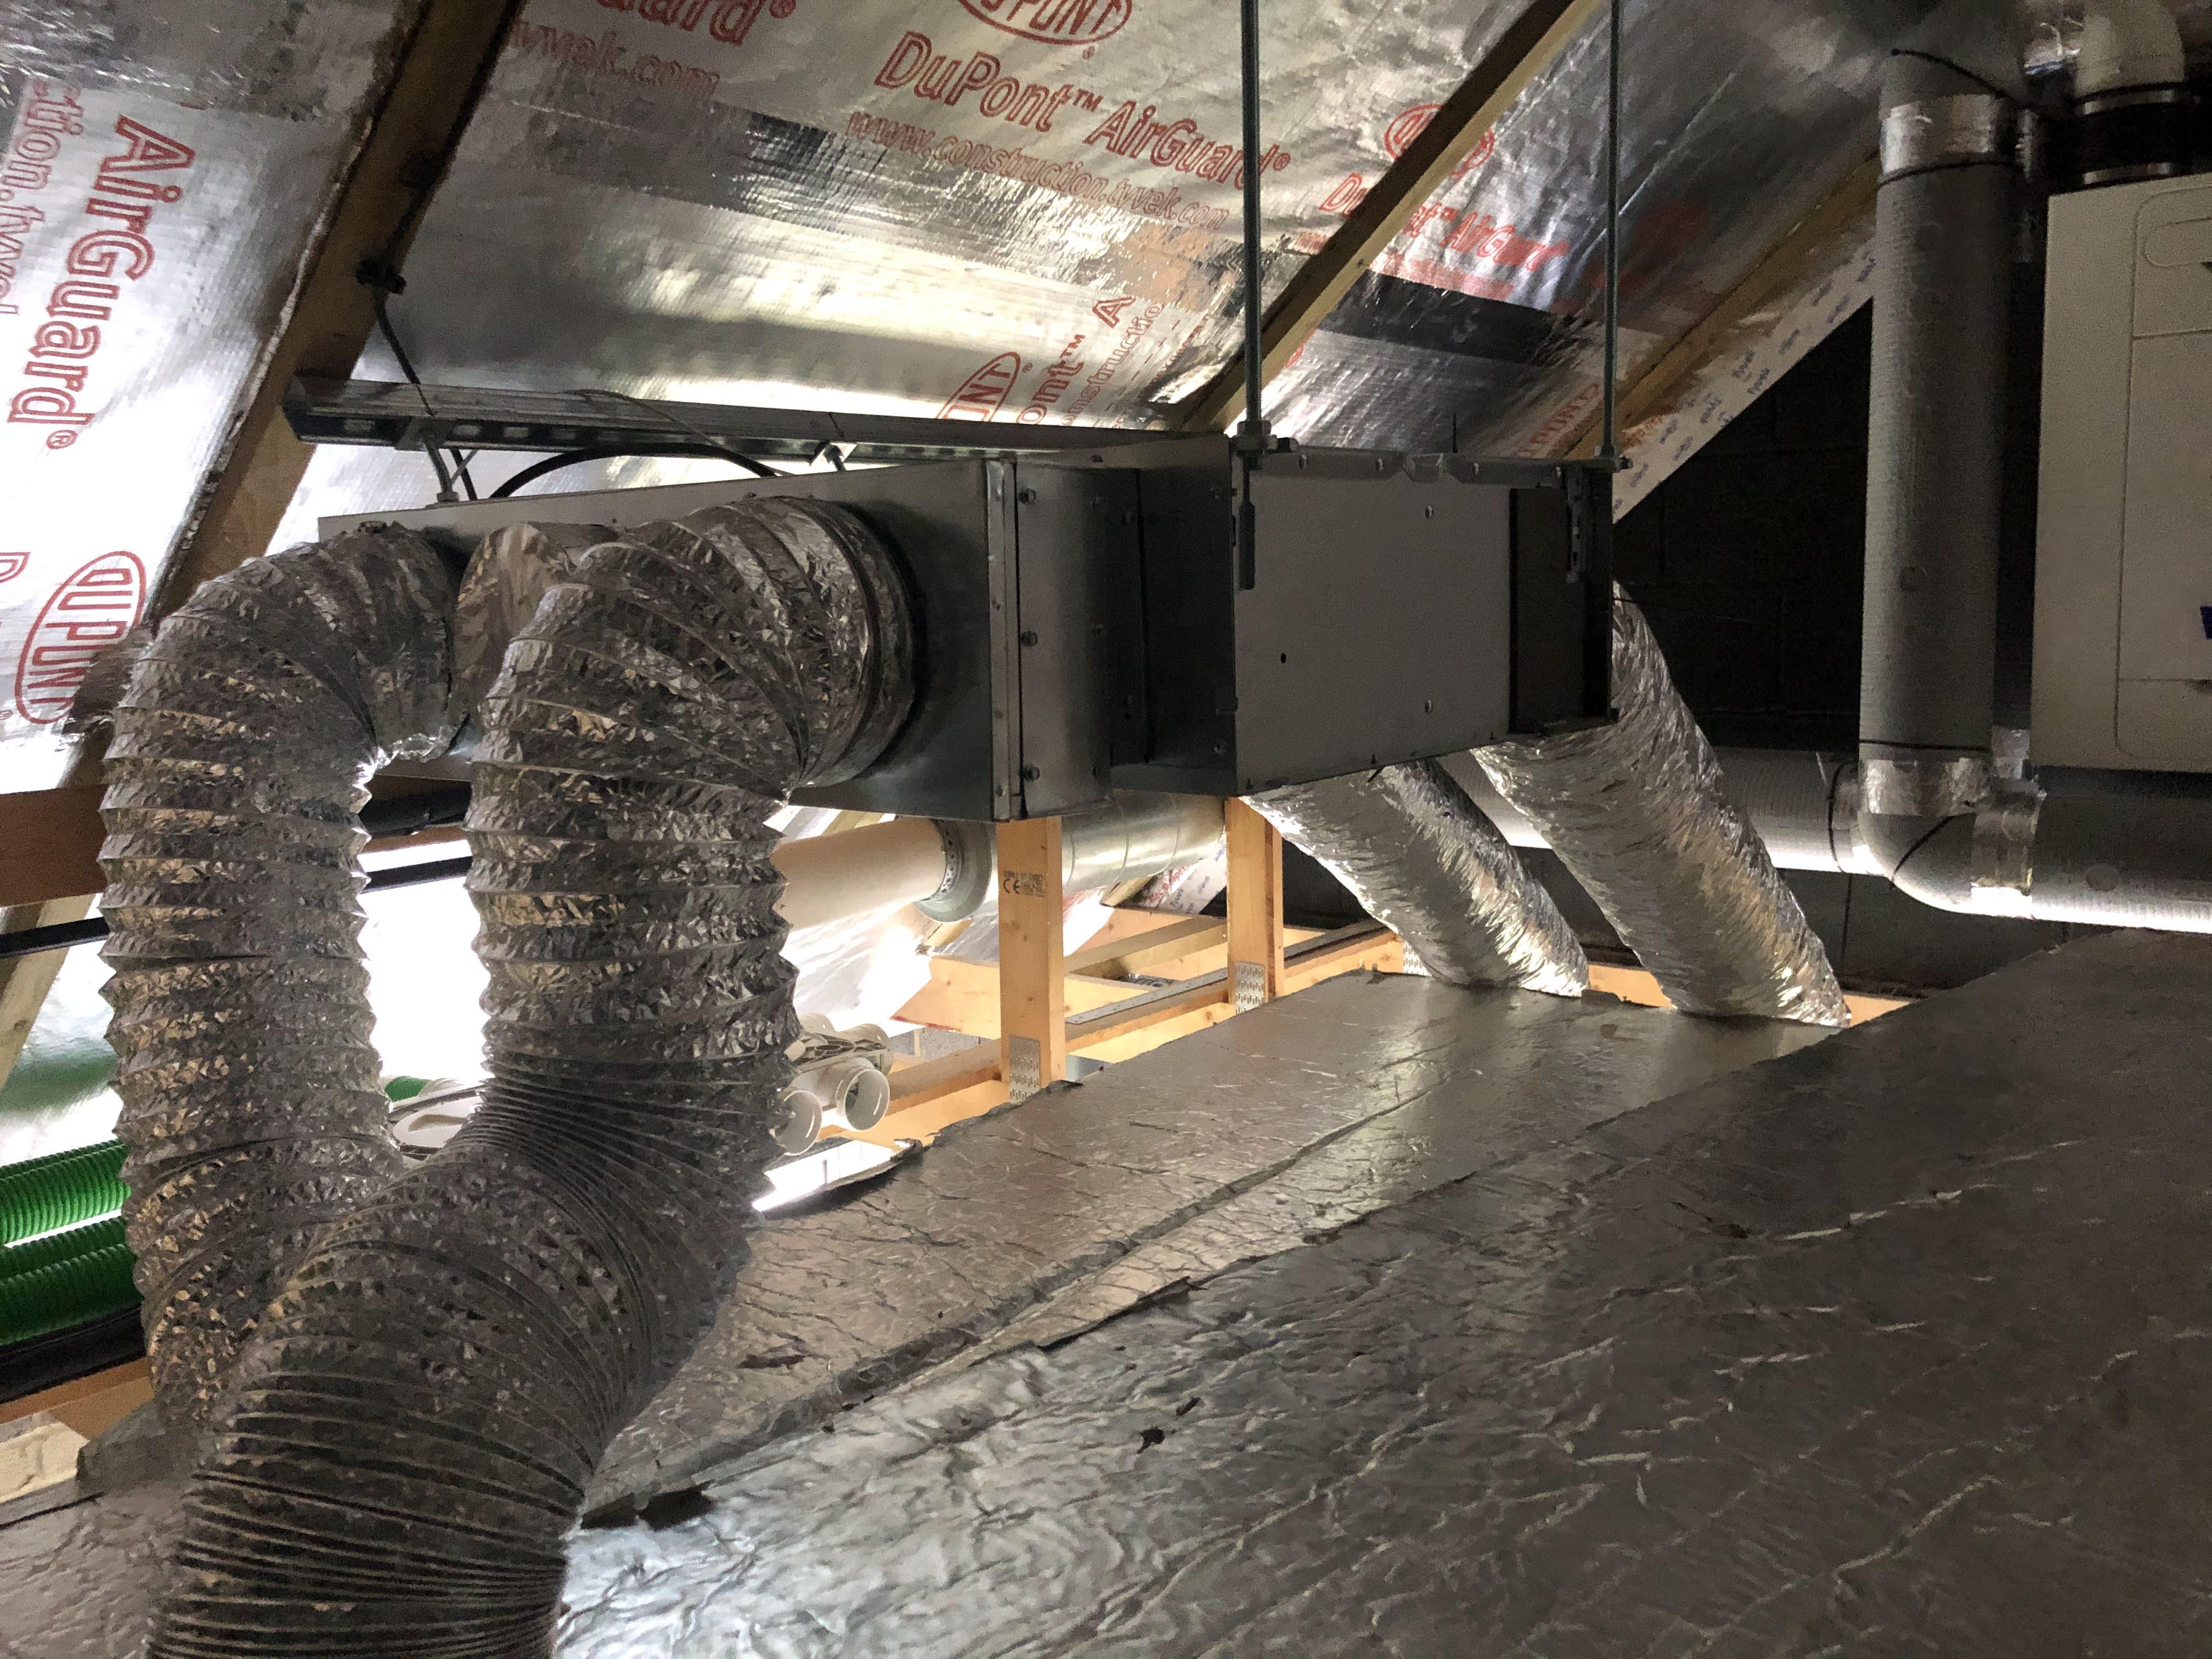
Those attenuators are 600's, used 90's as that's what I could get at the time of install, if I could get a nice sweeping bends then I'd probably spend a morning and reconfigure it tbh, it's not commissioned yet so cant really answer if those have caused too much pressure drop at the normal running setting.1 point
-
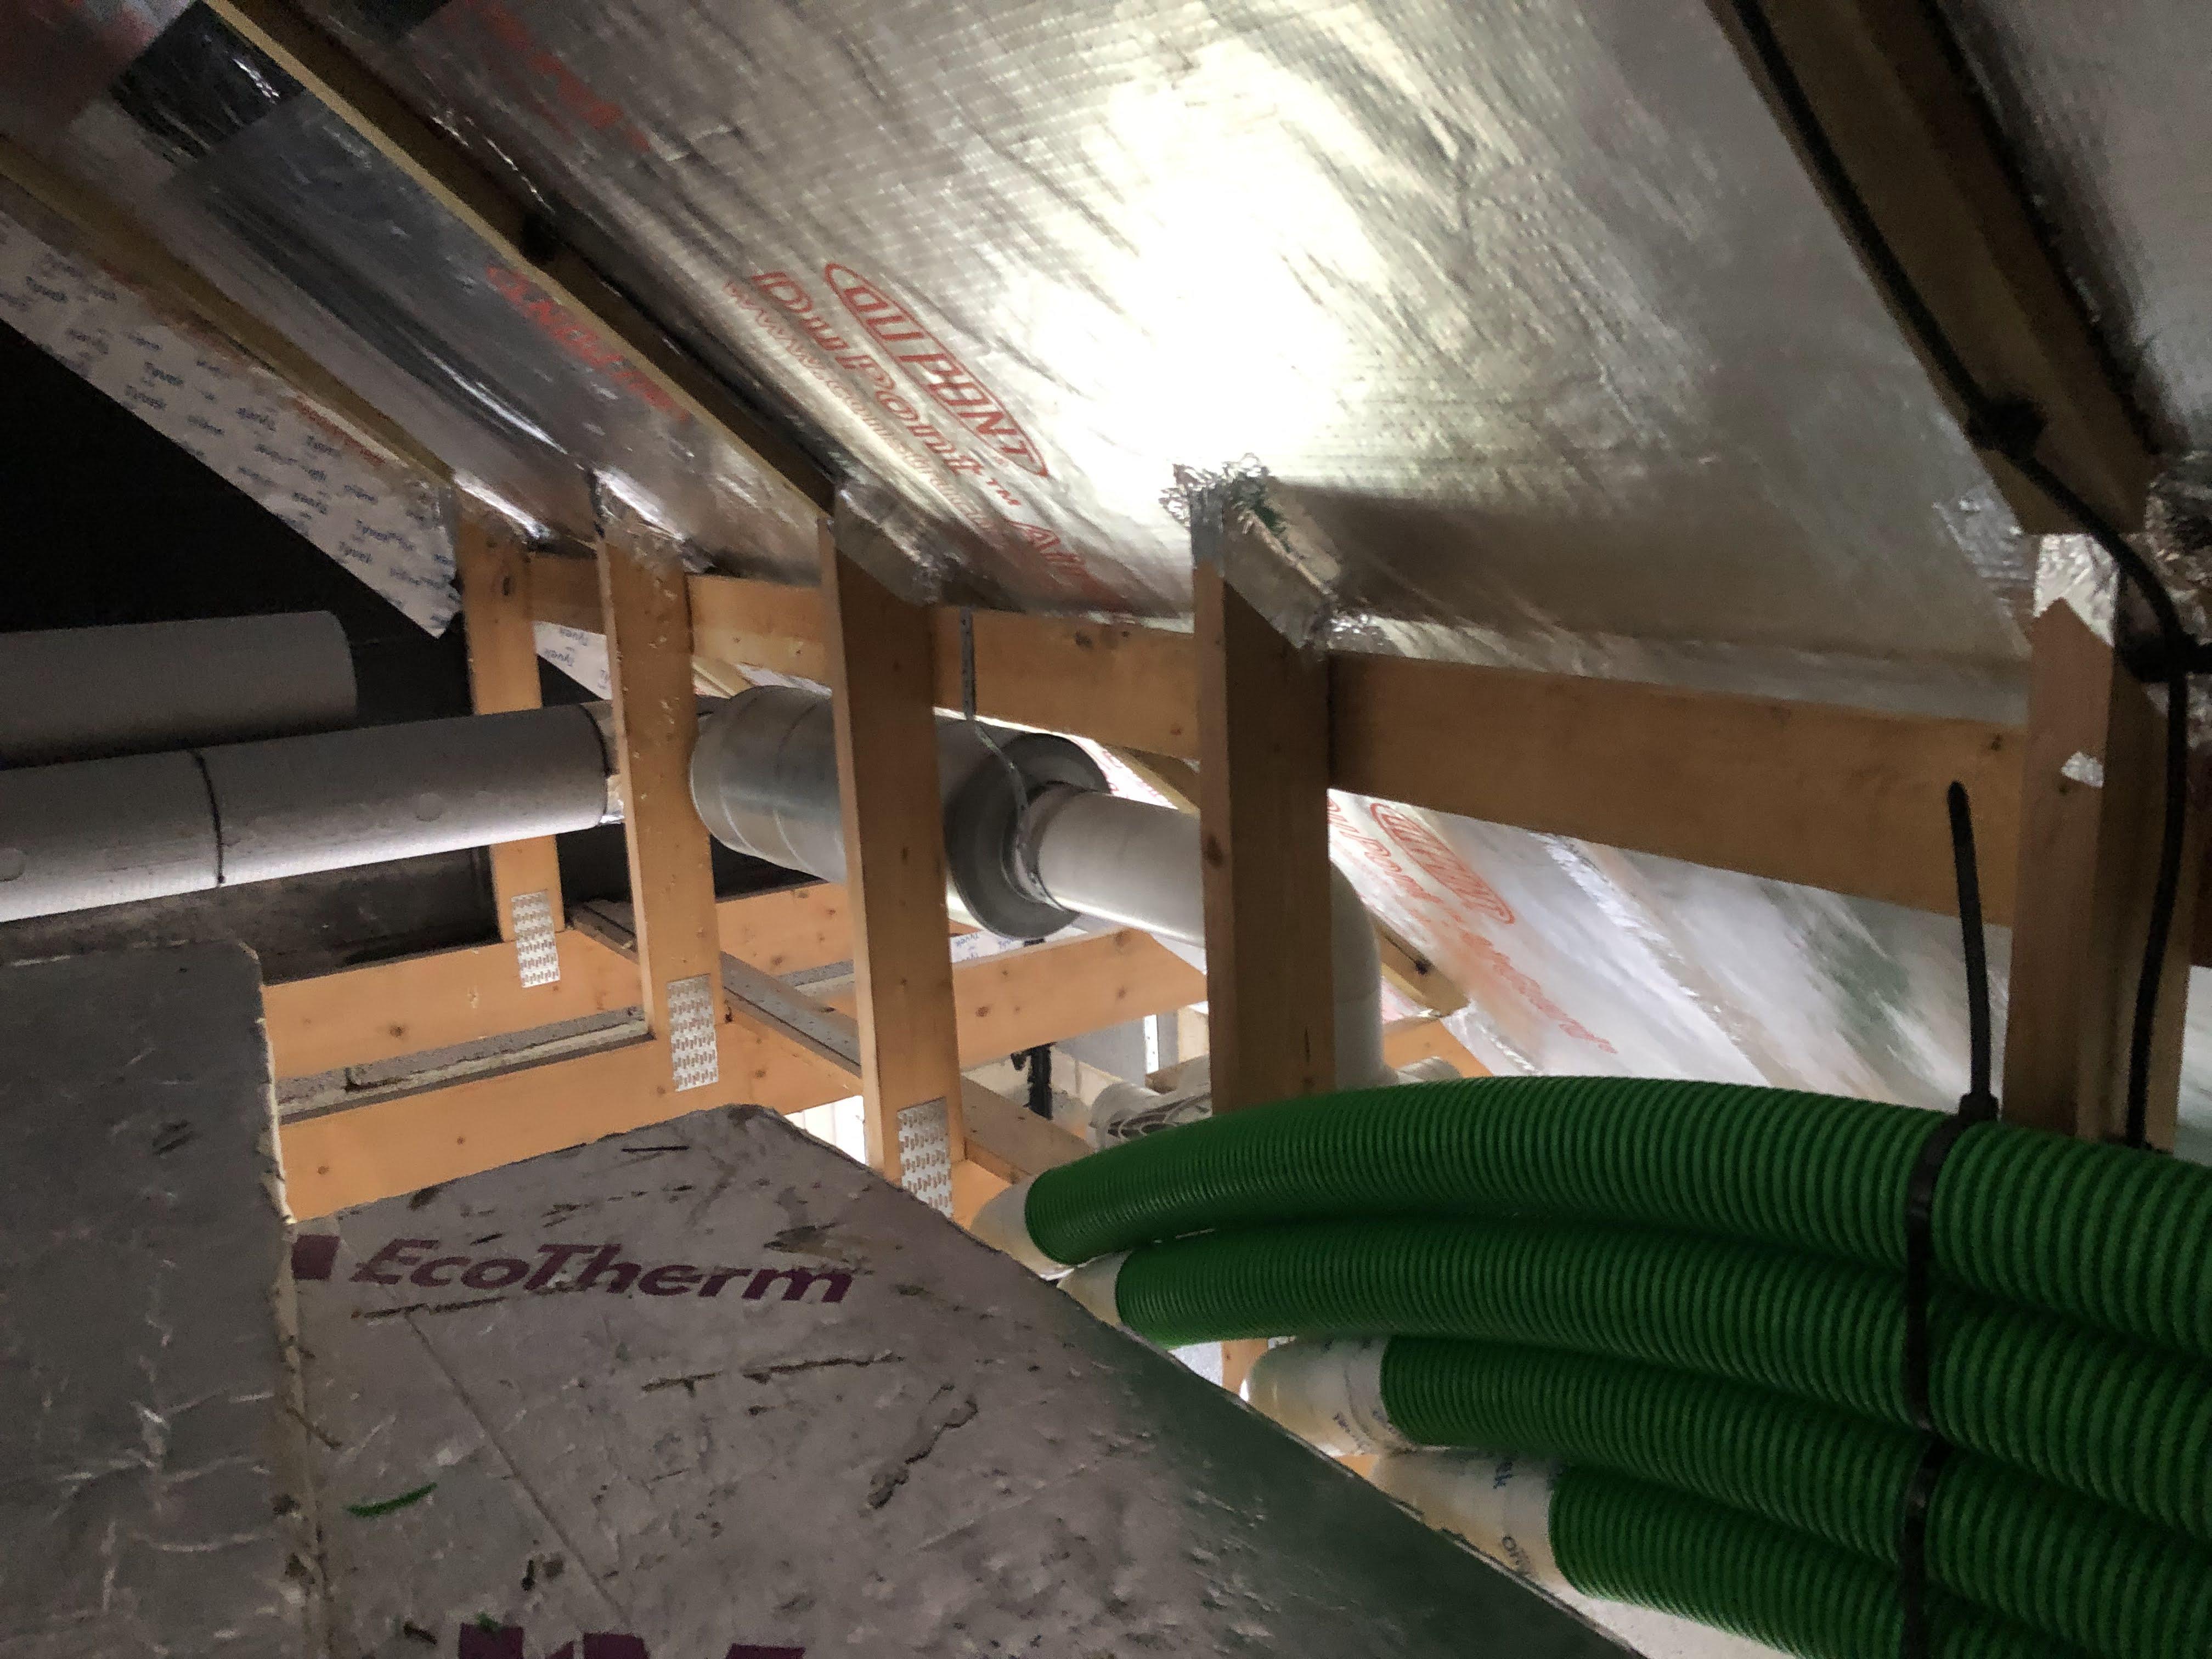
This might be of use. I used plastic pipe for what it's worth. Plenums mounted to either side of the attic out the way! Strap banding used to hold/support the attenuators, last photo you'll have to look past the AC unit!


 1 point
 -
Possibly something like this? If you get room diffuser plenums with a side entry port, the pipe comes out horizontally so can run between joists under the loft board and come up in a more convenient location
 1 point
 -
I hear you @Canski -I don’t currently employ anyone (&have only ever had max two on for me) but the lack of engagement with the task in hand is par for the course. Got a lovely fella working with me (not for me) but Jeez-can’t lay to the line,puts ties in the wrong course,forgets tray damp,overall has no concept of problem solving. Just have to keep telling myself ‘he doesn’t work for me,he doesn’t work for me.’1 point
-
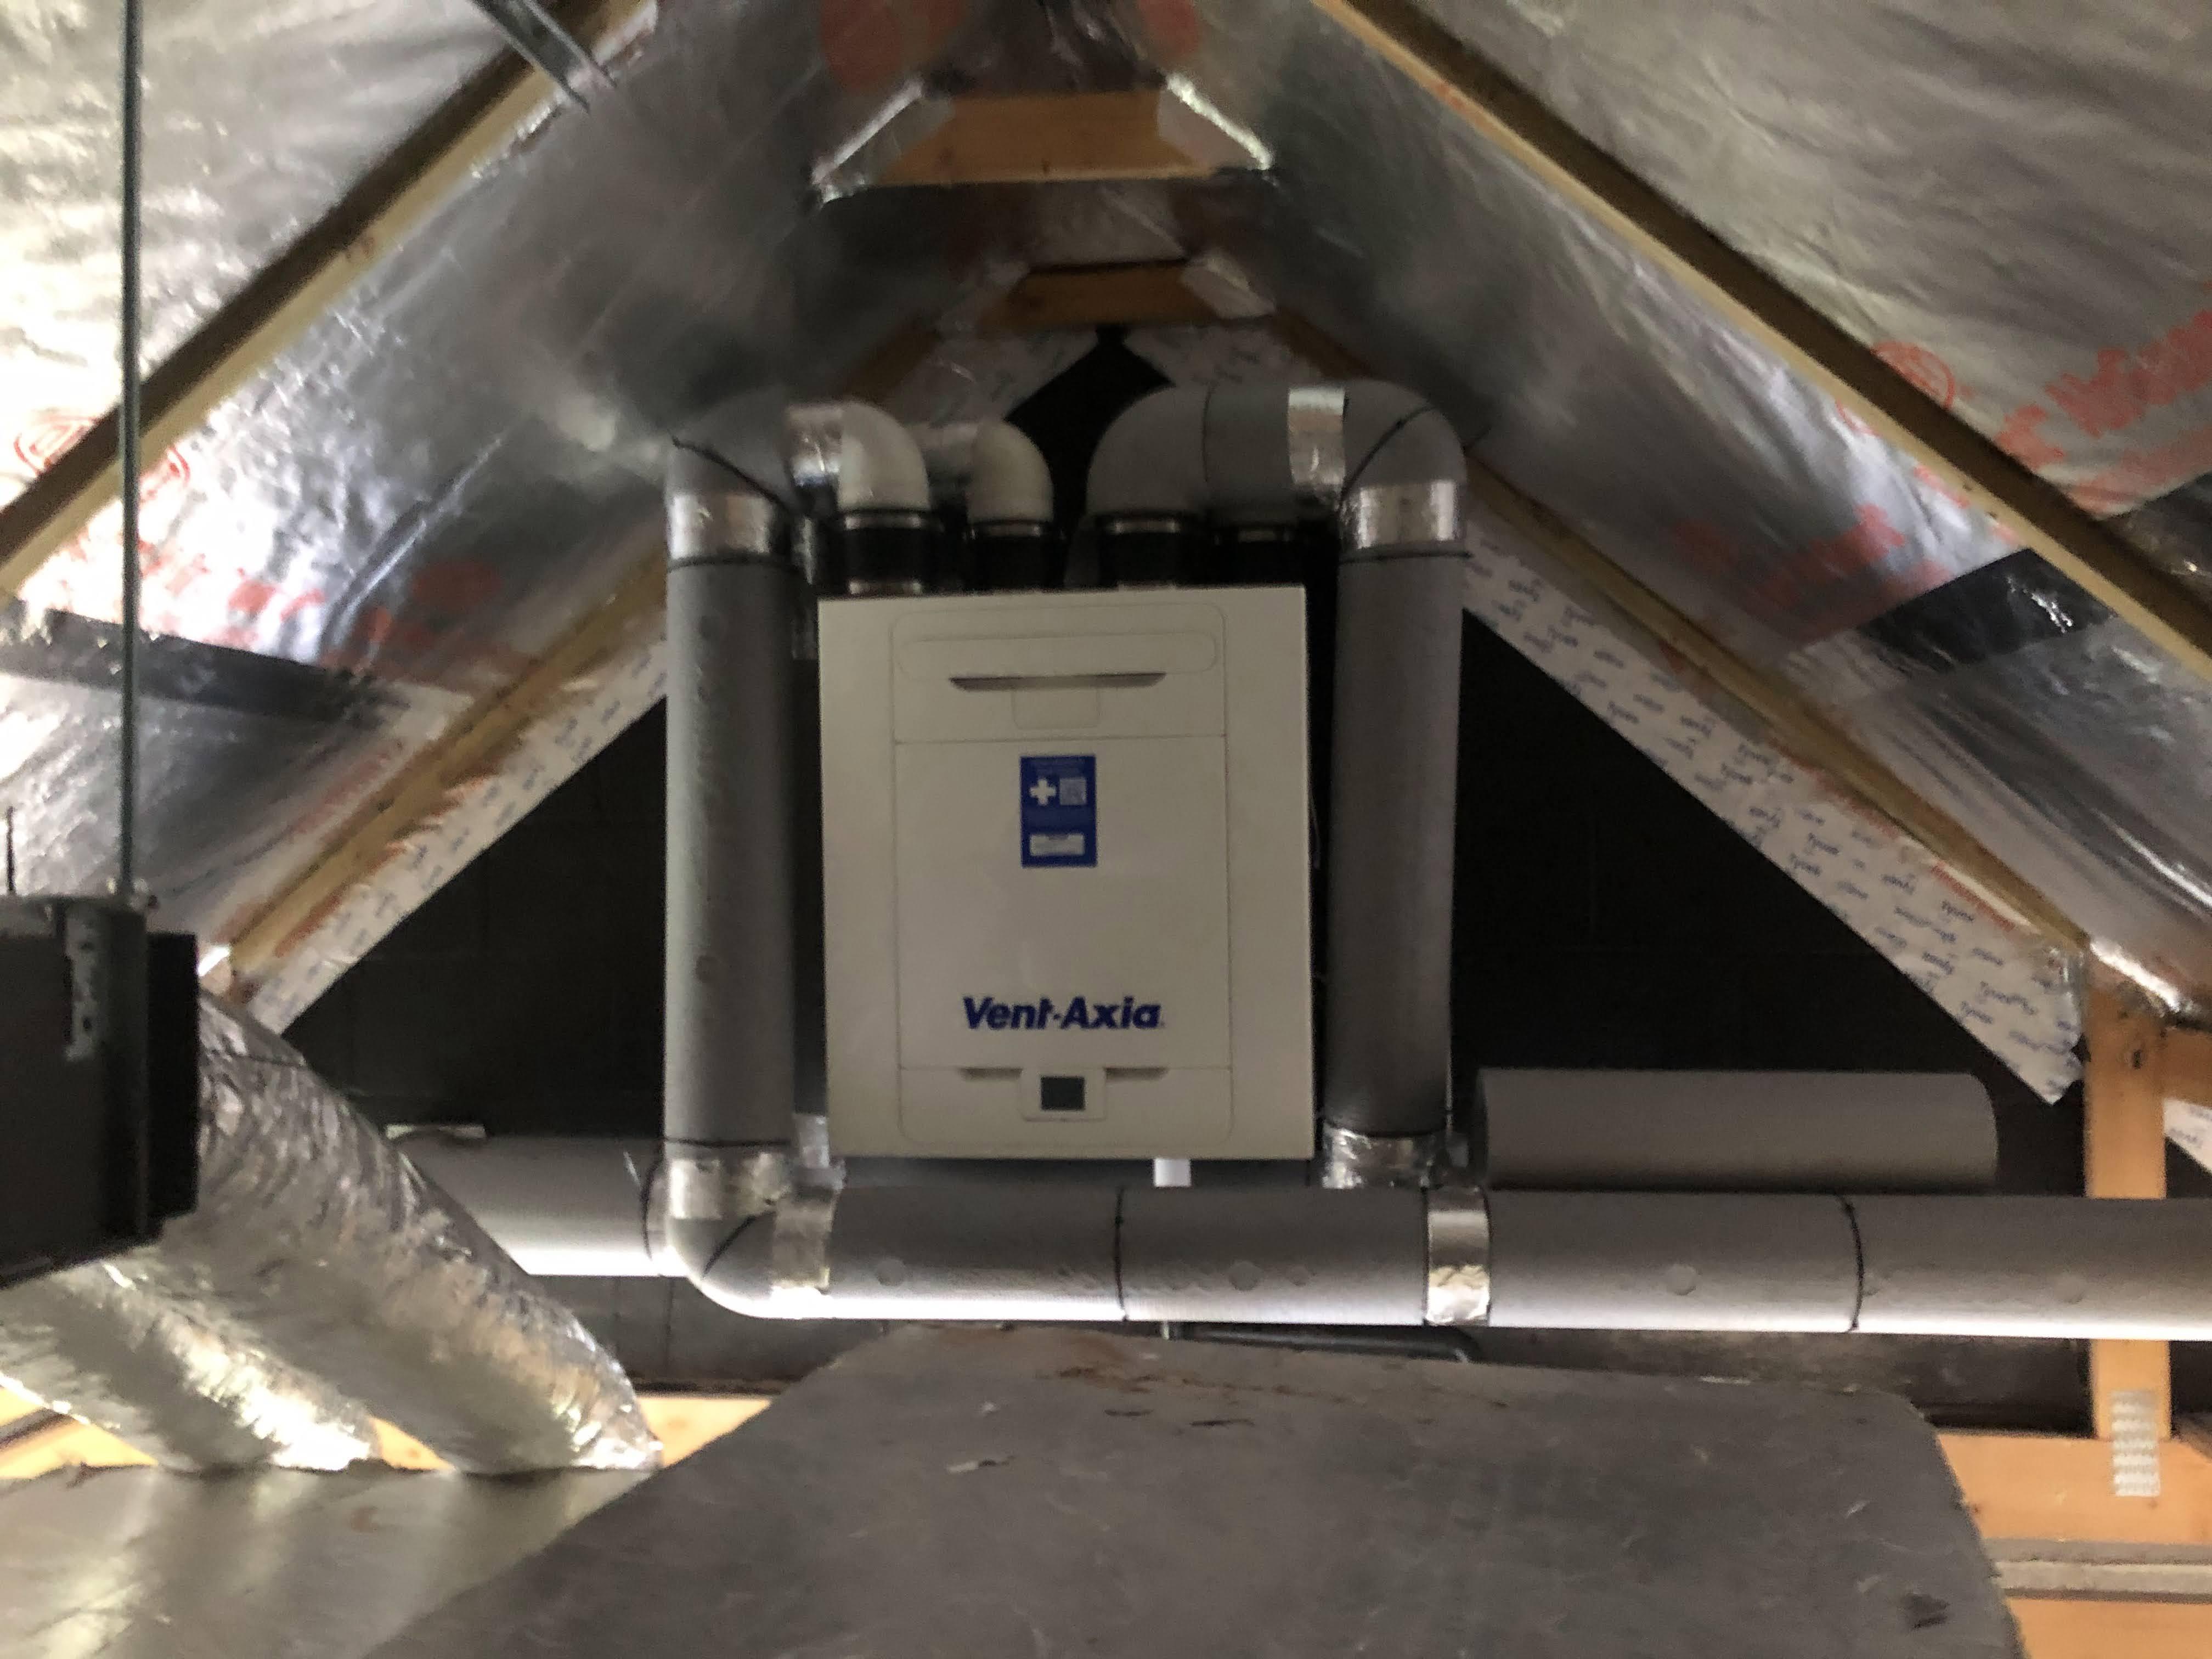
Originally it was going to be loft mount but then changing filters would do my head in and the in and out would be close to chimneys and smoke, and the condensate was an issue as I knew the upstairs bathroom was getting moved downstairs, so yeah I didn’t have motivation to complete it, but new extension out the back made us gain a utility room between new extension and the house , it made sense for the in and out through the wall, makes sense for condensate, made sense for filter changes, just made the ductwork about a million times harder getting it up to the loft but hey Ho I’m sure I’ll get there in the end! All ducts were taped up when left and the unit had protective caps on it
 1 point
 -
Call me particular, but things like rice like that, are solid waste as far as I am concerned. That is what sink strainer baskets are for, so the solid wast goes in the dustbin. That's me trying to be kind to me treatment plant. I also try to avoid cooking oil going down the plughole. I will send the consultancy invoice by email.1 point
-
Would you not be better off (expletive deleted)ing of those gash saniflow and gravity feed to a proper twin pump station, that can handle pumping turds without blending it up into a poopie smoothie. 💩🥤1 point
-
You would really need do some calculations, but I have the following comments Flow from AC will exceed that of the MVHR by a considerable margin. Could the flow from the MVHR actually break in to the flow of the AC? To understand this you need to understand the pressure drop over the AC system and where on the curve your MVHR fans are when AC is running and when it's off. Once set up to work with AC your MVHR would most likely be completely out of calibration if the AC fan wasn't running or any speed changes occur. Nice idea, but think it would be difficult (impossible) to set up to run correctly all the time. Run them as separate systems.1 point
-
I used mineral batts in a full fill 200mm cavity, brick outer skin, the west wall facing the sea did get wet and whilst core drilling for the ASHP the brick was wet right through but the mineral wool had not absorbed any wet. The batts had a bba cert for full fill but as a preventative measure I treated the wall with water proofer and rain ran off it like glass afterwards. Rendering should negate the need to waterproof like I did.1 point
-
@Sparrowhawk Distaster strikes at my end. Thanks for pointing out my error and the heads up @Nick Thomas Can you all for give me please. I just use my own name.. not forgotton that yet.. but time may tell as I age .. further.1 point
-
I remember trying to convince people that double glazing was worthwhile.1 point
-
I would recommend using the fully bonded closed cell type of pipe (Calpex from Brugge or Rehau Rauthermex rather than the "onion" layer types such as Uponor (in the event of the latter, any damage to the outer casing can lead to water ingress along the pipe).1 point
-
Ham Smith!
 0 points
 -
Torch your (expletive deleted)ing house with suggestions like that .0 points
-
I’ll wait patiently for my invite0 points
-
Nah, it will just bounce off. When I started my build I had to remove a fairly large tree and stump, even with a 7.5 ton JCB I was amazed at how hard it was to remove it from the ground.0 points
-
Yeah I was thinking about that . Any recommendations ? . Will chop up human remains ? ( asking for a friend )0 points
-
Isn't that what the Romans did? Just saying!0 points
-
I thought you were going to tell us about a new source of satellite tv with a "certain type of content"0 points
-
The bones? Bit creepy0 points
-
The Police lifted the floorboard for me in my first house when I found bones under the suspended floor. Did a lovely neat job. Must have been proud of their work as they took loads of photographs.0 points