Leaderboard
Popular Content
Showing content with the highest reputation on 05/25/23 in all areas
-
I raised my out building on two courses of bricks but ran the cladding battens and cladding down over them to about 25mm above the gravel that surrounds the slab.2 points
-
2 points
-
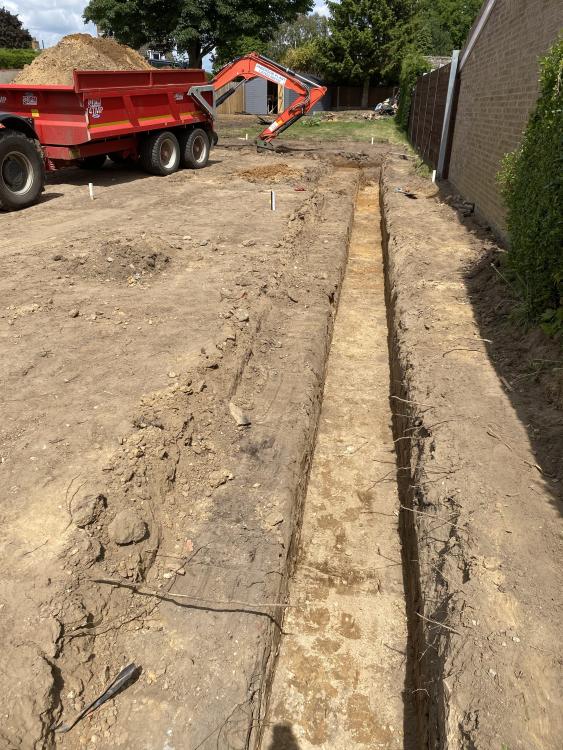
I agree with @Dave Jones. I was going to borrow a digger and do my own, but found a local guy who had all the equipment, I marked out the site and levels. Using an 8 ton digger with myself holding the lazer level he dug perfect trenches, they were straight as an arrow and within 10mm of required depth all round. It didn’t take him very long and he took 200 ton of muck away at a very reasonable cost. I then arranged for a local company to pour the 300mm strip footings then did the blockwork up to DPC myself. So with a mixture of DIY and Trades I got very accurate trenches and level, square foundations for a much reduced outlay2 points
-
Just to say I have massive respect for what you're doing - you've taken a risk and are pushing outside your comfort zone with the simple aim of providing a better home for your son that isn't otherwise available. Some of your friends and family might not get that, but its the real essence of self-building so people on here do. Now is the time to take a breath and focus on what is the best way forward for your project. Worry less about how you into this situation. As others have said the truth is some responsibility likely sits with yourself based on the way you've structured the project. You might not have realised it and that's fine, but based on what you're saying here I think you're more than capable. From the input on this thread nobody is saying the beam calculations are wrong. So if it was me, I'd stop worrying it was over-specified and now be finding the best way of raising it as high a possible. Your SE sounds like they're looking for solutions, perhaps because they recognise their part in this mistake, so work with them and don't sour the relationship as it's likely to cost you more if you need to go elsewhere. Negotiate with the builders and find the most cost-effective way forward. Unfortunately it's going to cost you something but use the leverage you've got. They don't sound blameless here either. Your SE's instructions on the padstones were in the drawings, so if they were having trouble because they couldn't find the right size padstones or whatever then they should be coming back to you for clarification and not just doing something different. Good luck! I recommend you post up a new thread to get thoughts on the planned solution, it will get lost if you put it on this long one!2 points
-
I had an old international digger with 3 into1 front bucket on my first build in the 80's, this time I've got a small Volvo 360° with 3 buckets but I've purchased a ripper which is great for removing tree stumps x26 and redundant footings and concrete piles. I've hired in diggers over the year's for various projects, so I consider myself a skilled operator. It's handy to own your own so you can use it when you get a dry spell. I never use it when the ground is wet because in a short period of time you can turn the site into a quagmire and end up making more work for yourself. If your confident in operating one, buy one but be careful you can cause some expensive mistakes. Never trust a CAT Scan for pipes and cables, a tooth on the bucket will find them for you. Wear a seat belt when pulling out as it is easy to get the machine on its side and also when tracking backyards when you find yourself in a hole you dug out earlier. In the right hands it's a precision machine, in the wrong hands it's an extra 6 cubic meters of concrete in the footings. Insure it, they get stolen daily. You can't get your VAT back on one. Buy from a dealer if you don't know what your looking for. Resale weekly site has most of the dealers advertising on there.1 point
-
You'll get 30; 50; or more years of our a boggo basic wooden shed with 12 mm tongue and groove if it's kept dry. Could you lift these up on a course or two of blocks; and get a sectional garage door that you can adjust the height of the horizontals on relative to the roof?1 point
-
Have you looked at fibre reinforced concrete, it’s cheaper and easier than rebar mesh and very strong. The company that did my slab used the same stuff in their yard at 150mm and they park artics on it, 100mm is ok for fork lifts so should be plenty for your car1 point
-
This is NI so a touch different to GB. You'll need a connection card filled in for NIE, and the BCO should be happy to get a copy of the EIC from him.1 point
-
Ah yes, sorry i didn’t read the OP properly. I would just go with the 6mm ply then.1 point
-
1 point
-
The calculator cited was this one I think, but it is designed for shelves: https://woodbin.com/calcs/sagulator/ but I guess if you have support from above every 400mm, it’s perhaps similar in principle to a 400mm depth shelf. Either way, I think 6mm would just about be okay, as long as you added additional bracing for any pendants. But why are you using plywood as your ceiling? You can’t plaster plywood.1 point
-
I look at CO2, which basically manitory in Scotland unless your house is declared to leak like sieve, for the master bedroom. I installed a duplicate in the lounge also. They are mains wired, gives instantaneous CO2 ppm, average over 8 hrs, 24 hrs and peak over 24 hrs. Mine is made by Deta.1 point
-
1 point
-
Hi Jake. I'm not sure whether this thread is monitored much by the people who've posted in it. Best thing you can do is to send a private message to one of the people who mentioned the Facebook and WhatsApp groups earlier in the thread and ask them how to join. If you're on a PC, you can just hover over their icon and a popup will give you the option to send a message. Alternatively, click on their icon and the option will be on the next page. Good luck.1 point
-
Update: Archeology conducted tuesday and wednesday this week. Nothing found all signed off. Backfilled ! Had the digger driver do the trial pits to 2 metres depth at the same time and send the soil samples from said pits off for analysis. Fingers crossed only standard footings will be needed.1 point
-
1 point
-
1 point
-
I'm sure for best efficiency installers like the two to be close, however, as long as pipework is properly insulated, and depending on distance the install may need a second pump to help push the water along...1 point
-
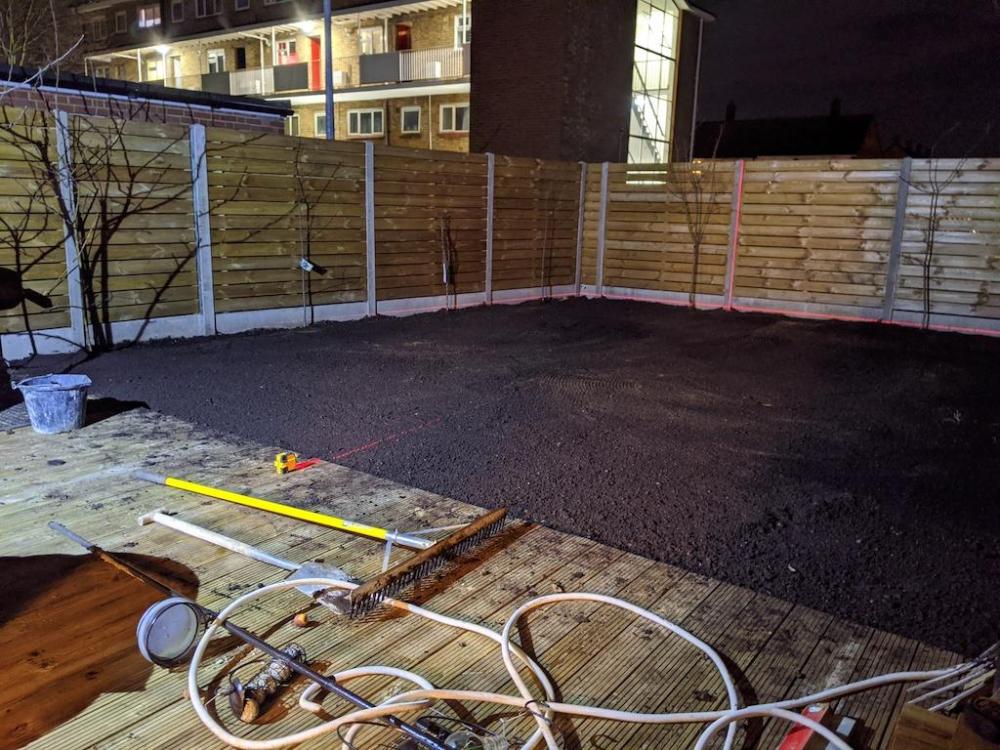
It really is up to you. Depending how much the ground has been built up, it may settle later. I just got it as good as I could and if it settled and dips formed I just filled those in again later.1 point
-
I did a seperate hep run off 1 manifold for all outlets ; so washer , dishwasher, wc , sink , freezer etc . Much easier to isolate - only 2place’s ( in theory ) for a leak - at appliance or at manifold . Overkill maybe - but peace of mind .1 point
-
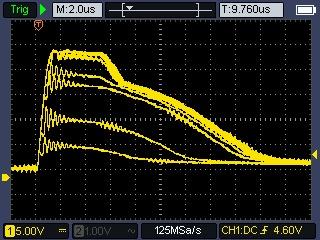
I'm talking about this one. I can see that there are sampling issues at 125kSa/s, but how can you tell that the smaller peaks here are phantom and that signal only has 24v peaks? If I switch from "auto" to "once" and re-trigger multiples times, each time it triggers I see different peaks, which match this plot.1 point
-
So the chances are then that the original studwork forming the front of the house was built off the outermost floor joist (although there could be a support beam within the studwork above the floor). Odds are the pier does help prop that joist so that it only has to span the window as the greatest opening which a 7" x 2" obviously does. In reality the loads from the studwork are quite low due to the large upper floor window. However, there are a couple of solutions; coach screw a steel plate to the back of that outermost joist to stiffen it up or have a simple steel box frame made to both act as your new wider door frame and support to the joist. Once upon a time a small local structural engineer would charge you a few quid for an A4 sheet of calcs to prove either the joist without the pier or what plate/box frame would be needed. You'd toddle off to building control, pay a fee for a building notice and hand over the calcs. They'd make one visit when it was done and that would be it. Now that engineer is a "multi-disciplinary" practice that will sell you the entire package including site visits at vast expense. Your local Building control has amalgamated with the rest in the county, relocated to posh offices miles away and no longer has time to deal with a small job like this. " please submit your application on line and our staff will respond the next time Jupiter aligns with Mars". And they wonder why someone like you will speak to the local steel fabricator buy a piece of steel say 8mm thick, 150mm deep, long enough to span past the outer piers, has it drilled and coach screws it to the joist with the pier out of the way and the joist supported by an acrow. But like a good citizen you wouldn't.1 point
-
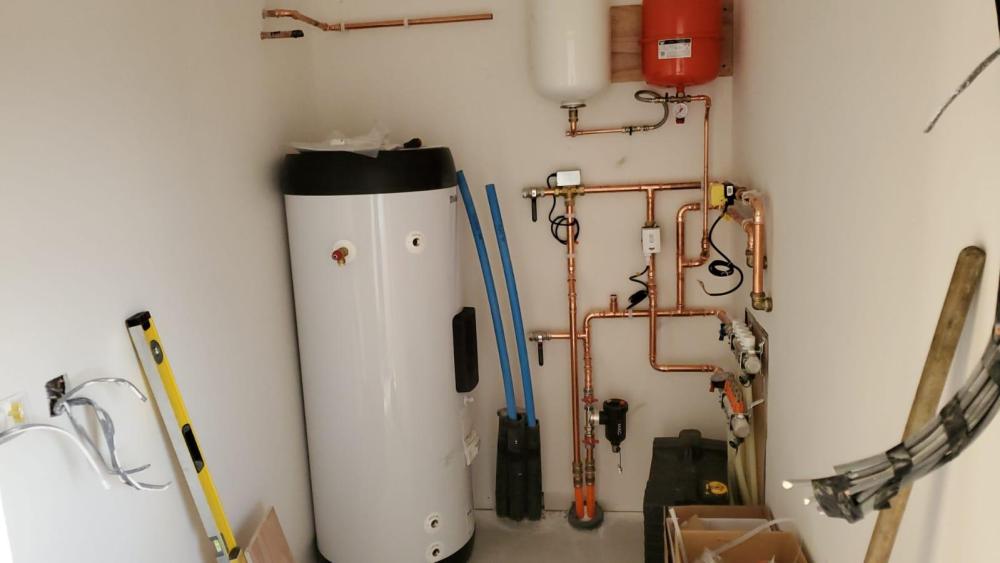
I think you need to define gubbins in a bit more detail to work out how much room you may need. My plant room (cupboard) is 1.2*1.2, will house the cylinder which is about 600mm diameter. Expansion vessels will be wall mounted, and the hot and cold water manifolds will be wall mounted high up too. Pipework will run round the perimeter. The UFH manifold are located under the stairs (centrally in the house) so just a supply and return pipe to this. MVHR is in the insulated attic space. there will be 1 Consumer unit too. The challenge is placing everything so that access and maintenance isn't too much of a challenge.1 point
-
Don't forget that you can hang a lot of stuff on the walls. Was listening to Costing the Earth yesterday, Steve Backshall Goes Off Grid. Apart from getting his sensible and latent heat mixed up, and not giving a cash price on what he spent, he said one interesting thing about his plant room. 'it is hot in here' Sounds like he has not insulated enough. So make sure you have enough room to add extra insulation to everything. Manufacturers of cylinders and tanks may boast about how great the levels are, but if a room gets hot, it isn't good enough.1 point
-
Have you looked at the Michael de Podesta YouTube video? It seems at least as accurate a method for heat pump sizing as those used by commercial specifiers. The heat punk calculator is a fairly simple interactive calculator that will give you heat pump size from building dimensions and construction and lets you play with emitter sizing and flow temperatures to see the effect on performance. You have to set up an account but it's free. Fairly time consuming initially but very informative. https://heatpunk.co.uk/home1 point
-
With 6mm that may be ok. Still out some cross bracing though. There was a calculator link posted up about ply sagging, think it was in one of the shelves posts, @Adsibob one I think.1 point
-
Just to follow up (better late than never!) Gus Potter was spot on, It's a solid wall construction with a small gap and then a timber stud frame with insulation. Apparently this is very common in this area. All moved in and enjoying the new home. Thanks to everyone who pitched in with their thoughts.1 point
-
Rise times are both well under 5us EldoLED is the slower at around 1us and the Meanwell is probably around 100ns so both would shoot-through the mosfet. So both will be unregulated for a brief period. I don't see any great inconsistency in the EldoLED 24V. What does differ is the voltage decay when the driver transistors are off. The LED's will stop conducting when the voltage falls below their forward voltage (looks to be around 15V) so the Meanwell output staying high for around 200us suggests some additional driver output capacitance above the (apparently non-existent) EldoLED. Not sure why this would result in a visible difference becuase the LEDs are fully off in this period anyway, Very puzzling.1 point
-
For Temp/humidity I use SensorPush via Bluetooth (you can buy an internet gateway for extra) in the attic, will be useful for my new build / screed drying etc. For Air Quality I bought a Foobot a few years ago left over from a science project, not available anymore as far as I know but it does CO2 (the main one you'll want) but also VoCs, Particulate Matter, temp, humidity also. Currently PM is 26.0 uG/m3, 154ppb VoCs, 557 ppm CO2 as an example with MVHR in play. Android app. There are a few smart home products that do air quality testing, not tried any but others will have more ideas I'm sure....1 point
-
This appears to be still unanswered. In the hope that it helps you set this aside as a matter to accept and stop worrying about, here is an explanation. Each line is the weight of a material bearing onto the beam. The known weight per m2 or skin or m , as appropriate, is multiplied by the area, length etc. This provides the weight that the steel has to support, then the correct section of beam can be specified. There is then a choice from a selection of standard beam sections. Tall and narrow beams are more structurally efficient (less steel) but take more height. Chunky beams take up less height but use a lot more steel so are more expensive. Pad stones are standard. They cost about £25 each. They are high strength concrete blocks from any builders merchant and replace wall blocks where the beam sits. They spread the very concentrated load from the ends of the beam so that the normal (weaker) blocks can take the load without breaking. Builders, architects , engineers, bco all should know this. A solution to the height issue is often to build the joists into the side of the beam instead of on top. Most of the beam is then lost in the ceiling space. I suggest simply telling whoever is responsible to find a solution. Then post it here. I agree that a new thread, with a simpler challenge, may help.1 point
-
When I last had a "proper job" earning enough to pay higher rate tax, the hourly rate if you worked it out was a mere £15 per hour. But that was 20 years ago. I've been a sole trader for 20 years now, and now charge £30 per hour which some will say is high others will say it's low depending where you are . I only ever did a little sub contract work on sites, not for me. I just work direct for my clients far simpler. I don't see why companies not employing sole traders should make a shortage of sole traders for self builders to hire?1 point
-
The two firms I have had in came from the "find an installer" service from Vaillant and Daikin. You could contact Lana.Mills.ext@vaillant-group.com direct to see if she can help. Don't have a contact at Daikin and their installer was indirect via a distributor I went to visit, took a lot of chasing as you have found too.1 point
-
1 point
-
I have taken to using a mix of garden soil, last years compost and some added fertiliser for all my pots. Yes weed seedlings grow from it. So on top of it I dress with westland or dobbies compost, as nothing seems to grow well in that.1 point
-
I think you put too much emphasis on being 'neurodiverse' you have written it in almost every post of yours. There are plenty of self builders with autism and adhd and a host of other things, you shouldn't let that define you and hold you back and it's not as big of a deal as you think. Neurodiverse people will have advantages when it comes to some things the others do not.1 point
-
Thought it might be a nice touch to have a sheltered area just outside the dining area.1 point
-
Writing in case our experience is useful to others and appropriate for this thread. We have bought an uninhabitable house in Scotland as deemed by sellers surveyor. Empty for 7 months, owner was in hospital before passing and had built the house himself in 1961. Single skin brick with timber frame, water damage and floor covered in mould and bowing. jackdaws in roof and covered in ferns, 2 storage heaters and single glazing. The poor chap would have been freezing. We have an existing home in London which we have turned into a buy to let due to 3 purchases pulling out due to the hope house prices would come down. We plan to sell when the market is stable so we have some hope of a sale going to completion but presently happy with tenants. So we should pay the extra Stamp duty surcharge on house purchase but because it has been deemed uninhabitable by the surveyor and council we have been able to purchase without surcharge. We were advised to keep the surcharge amount available in case HMRC question the decision and take lots of photos and documents to back up our case. We will be demolishing the house and aim to building a passive house same shape and size and footprint as existing house, basement with ground floor and 2 bedrooms in roof. Our solicitor did not know about the uninhabitable exception and we only found out through own research and he later sort advice to confirm. I should also add planners are happy we are replacing house so this has not effected a proposed development.1 point
-
How far apart are the joist. If 600mm, then yes it will sag. Can you put in some lightweight 'noggins' every 300mm?1 point
-
If I've understood the note correctly... if the rise time is too fast the first few uS (?) of each pulse will be full current (eg not regulated). At max brightness those few uS would be an insignificant percentage of the ON time, but when dimmed they will be a much greater percentage of the ON time and therefore much more noticeable. Try increasing the brightness very slowly in small steps. If its as I think I would expect them to gradually become the same brightness. If there is an obvious/sudden point where they switch from different to the same then its probably something else.1 point
-
Good example of ASHP and plumbing internal gubbins. Solar PV won't add much onto that, but ideally goes somewhere that stays cool in summer. (indoors may well be the best you can do there. Ours is in garage) If you add a house battery that's a lot more space. Ideally indoors, ours is in garage - does not perform well in winter. The MVHR takes a about half as much as the HW tank shown there. Best Location depends on the routing of all the ducts to every room - ours is on the loft.1 point
-
I’d say so. Do that shopping around and find someone who at least knows something about one of the disciplines, preferably both.1 point
-
1 point
-
We found you need very little "plant room" space, and it all ended up distributed around the house. A Monoblock Air source Heat Pump, most of the works are outside. You might need some pumps, valves and expansion vessels etc inside somewhere. Hot water tank wants to be positioned central to points of hot water use to minimise delivery time. Ours is in an airing cupboard partitioned off a bedroom. MVHR is best in a warm part of the house, but can be put in a loft id the ducting is properly insulated.1 point
-
there will be a local man with a digger, 3-400 a day with machine. They will be 5x faster and neater than trying to do it yourself. They will also have contacts for muckaways etc1 point
-
1 point
-
What makes you think they may be copies? There is a lot of badge engineering.1 point
-
You need to look at Building Regulation Requirement H3. This sets out a hierachy of disposal with first choice soakaway or other infiltration, the second is to a watercourse and finally the third is to a sewer. The Building Regs application should describe the method that is approved and the location of a soakaway is not critical just positioned so as not to damage the foundations of the subject building or others (usually 5m away). The downside to connecting to a sewer, especially a foul sewer is that in a heavy rain scenario all that sudden surge of water ends up in the local sewerage works which isn't designed for it and hey presto there's that discharge Fergal Sharky gets annoyed about (quite rightly)1 point
-
We did three months of research prior to getting ASHP installers to come to our property. In the end, we invited six installers from boutique, small installers to large multinationals. There were so many "cowboys" despite us doing our best efforts to prescreen them. It was an incredibly tough decision to select an installer, and we finally selected a boutique installer that we fired on the first morning because they had no idea what they were doing and they sent one guy, yes, one guy, to install the system which included him getting a 150Kg ASHP out of the van by himself. We then opted for a new installer, a British manufacturer of ASHP - the installation of out 18kW ASHP was outsourced to their preferred installers who were reliable and very professional. We have an overview video which we think is very useful.1 point
-
As per @JSHarris above, the only thing I have heard about is the control units, ours (a carrier badged kingspan) have a complicated command unit and @ProDave seams to have a more controllable command unit, I may be wrong but will let them respond. Perhaps get one with a command init that does what you want it to do.1 point
-
I think one issue is that there really isn't very much to choose between any of the big-name inverter controlled ASHP manufacturers in terms of performance. They will all probably perform pretty much exactly the same, so any differences are likely to be related to things like how easy their controls are to install/use. There's a massive amount of badge-engineering, plus the use of a limited range of key components used by several manufacturers, which also makes comparisons challenging. For example, Carrier (the company that invented the things originally) supply major parts, or sell badge-engineered versions of their products, to loads of different companies. Our Glowworm ASHP is really a Carrier with a Glowworm badge on the front, and the same goes for Kingspan units, and others. The small Toshiba unit I've just bought is really a Carrier too, I've just found out. Likewise, Panasonic sell their inverter controlled compressors to loads of other manufacturers, including some no-name Chinese stuff. Pretty much any of the big name brands, Mitsubishi, Daikin, LG, Carrier, Panasonic, Toshiba, Samsung, Hitachi etc, are likely to be pretty much of a muchness, I think. Best bet might be to look to see if you can find any information about which brands have good support locally, as it seems that many suppliers stick to one or two brands, on the basis that they've built up a relationship with them.1 point




.jpg.c21f3ac78c9b7efd90cbdcb312744dc5.thumb.jpg.7adcad4c0e384f5ecd7d56b0618df6e5.jpg)


