Leaderboard


Popular Content
Showing content with the highest reputation on 04/05/23 in all areas
-
Better to cut that cold if its coated in paint zinc or plastic . Make a piece of wood that fits inside as a support and cut with a TCT chop saw or table saw. Hacksaw if its sharp but again a support block really helps.2 points
-
https://www.dan-wood.co.uk/en/projects/point-158a-e If this company can build this (longhouse ish simple shape and 164sqm) as a turnkey, allowing for founds, kitchen etc etc this house would cost you around £300k to build, so £1800 ish per sqm. Thats a turnkey imported house. So you can spend less than that if you sub contract etc. More than that if you put in higher end products & spec. A kitchen can cost £6k to £60k for example. I was just away to say therefore allow £2k per m2. That would be reasonable. As I was typing this @Conor just posted exactly the same estimation. And I was just away to also say all the estimates are correct. It’s like saying how much to buy a new car. The answer is anything from £13k to £millions. if £2k-£2.5k per sqm is your build budget, you’ll be ok for a “normal” self build.2 points
-
All of the numbers are "correct"... all depends on your spec of finish. I'd be budgeting £2k/m2 for a basic/modest finish with simplified heating system.2 points
-
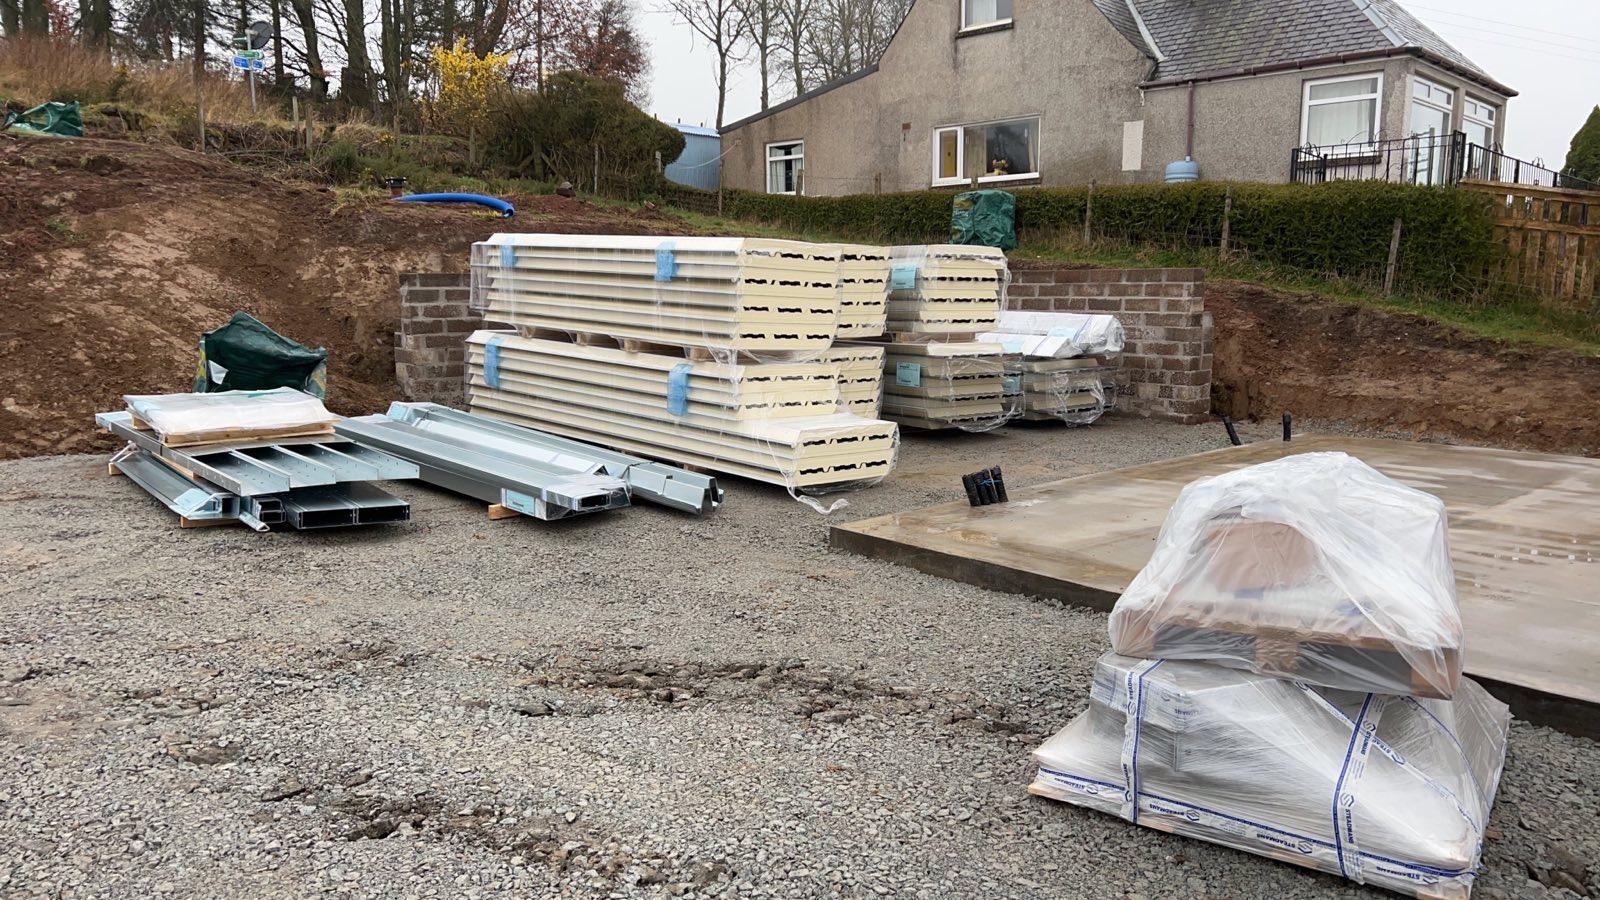
Exciting day today. Garage has been delivered.
 2 points
 -
Hi all, We are renovating a house we have bought in London (NW5). At the time, we thought we paid a respectable price for it (£600,000), but renovation costs are taking us WAY over our worst case scenario (£1,200,000). We have also paid architects to draw up the designs (£50,000 including VAT), so that is a significant additional cost (I realise that a mistake was probably made here in how premium we went). The house is 1300 square foot, or 122 square metres. We estimate the house would be worth around £1,300,000 once renovated. I have attached a Rightmove link to showcase the condition it is in (bad): https://www.rightmove.co.uk/properties/114544205#/?channel=RES_BUY My sense is this quote is outrageously high (even with the current inflationary trend in mind), but I am interested to hear where in particular the costs are outrageously high. Any insights would be massively appreciated. According to this quote, we would end up spending around £1,350,000-£1,400,000 on the house, which given the amount of effort and the starting price (which seems very fair), means we must have f***** up badly somewhere along the way. In addition, we are subject to the 5% VAT rule, which we initially thought gave us further mitigation with financial risk (alongside the starting price). The context also adds an additional layer as the building company is run by a friend of mine, who has assured me that he will take a lower profit margin that usual (i.e. mates rates). His company is premium, but he has worked on a number of friends' houses and I know he would do an amazing job. However, the pricing is so far above where I would expect it to be, that I am having doubts about if it is feasible to continue with them. If anyone has any insights into the quote (attached), it would be incredibly valuable. Thank you so much for any wisdom / guidance 🙏 James 1Modbury Gardens - Cost Plan R0.pdf1 point
-
Am also looking for solution to electric DHW. Think I've landed on 300L UVC with dual immersion. Use a timer for overnight heating on cheaper rates. When PV is added, use an eddi to divert excess to immersion where possible.1 point
-
https://www.toolstation.com/scheppach-mbs1100-1100w-127mm-metal-cutting-bandsaw-stand/p151891 point
-
Snips if you have them. Otherwise I'd put a cutting diskc in my small dremmel. If you have to hand saw it you need a really fine tooth blade and plenty of support. I would find a block of wood to fit in the U channel and wrap it up in tape to stop bits vibrating.1 point
-
BTW you can get little noddy stands for angle grinders that turn them into chop saws. Also cheap metal cutoff saws e.g. Evolution series. If using power, be very gentle, clamp up very securely (the wood support idea above is good), and wear every bit of PPE you have .1 point
-
I find you can get a cleaner/neater job with this type especially for what your cutting
 1 point
 -
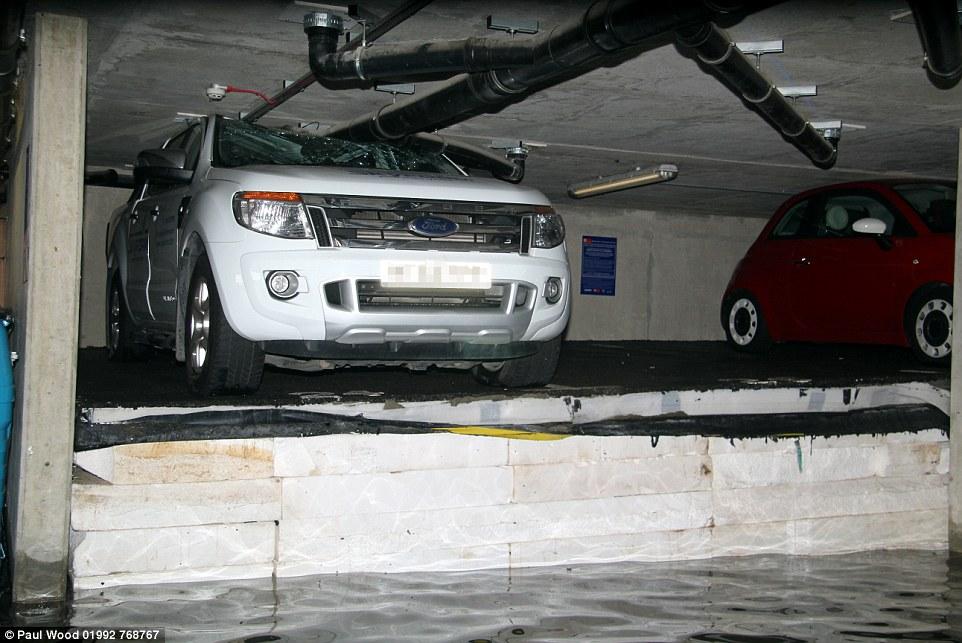
Insulation can be pretty strong.... https://www.dailymail.co.uk/news/article-3829379/Vehicles-CRUSHED-against-roof-burst-water-main-causes-polystyrene-insulation-beneath-car-park-float-raises-floor-four-feet.html
 1 point
 -
Just above (~10mm) the cill. They will move in the wind, so will make a noise and rub either blinds or cill, or both, if they are allowed to contact, They seem very close to the glazing. What sort of gap are you leaving.1 point
-
Not usually done on domestic scale works. Check the KORE slab specifications, it may be a requirement of the warranty. A plate load test puts a known plate size with a known load and measures the deflection. This can give good, site specific information on the ground bearing capacity.1 point
-
All the sites I do are two layers of Fire line Crazy to skrimp on something like that1 point
-
While clamping the metal very tightly. A pro metal worker (or tiler for trims) uses RH, LH and straight snips. It is still a skill with the right kit.1 point
-
What they say. It is also possible that the architects have varying knowledge or skills in cost levels. You could ask for references for similar projects they have gone. Virtual reality, as they are calling it, does not necessarily cost much more. If they design from the outset using a 3D suite, then any view is available, and then gets used for detailed construction drawings. But a few sketches for planning (with another go at detail later will) cost much less than detailed 3D design from the outset..but not that much difference.1 point
-
fine 1mm INOX blade in a small grinder, low RPM.1 point
-
Hi, I looked at ducted - but in the end an IR panel (Herschel) + electric towel rail on low in the bathroom was a more practicable install. The shower room only needs to heat in the early morning really, then just take the edge off all day. Re your plan: Try A2A, then extend, + you can get combined Cylinders with ASHPs (Vaillant:Arostor Dimplex:Edel etc do them) is exactly what I'm in the middle of. I'd advise planning up front the outside units required and which rooms they will service so you don't end up with too many. Research control too - the usual standard 1x remote per inside unit is great for flexibility but not a good fit for whole house control. My project eventually will be: - Outside 10kW unit to 3x inside rooms on the ground floor. - Outside 5.4kW unit to a bedroom + one other room the other side of the house. - Combined tank+integrated ASHP for hot water. Control they'll be linked logically to a controller for downstairs, one for upstairs and back to the standard time-clock for the house. Removing radiators as I go, and eventually the oil burner and its tank!1 point
-
Thanks. I didn't realise you could have it in bathrooms, if you had it ducted I was thinking perhaps I could : Get A2A Use it for a bit Remove almost all my radiators except the two for the bathrooms Then get a much smaller air to water ASHP to heat up a water cylinder, and those two radiators. I'd have to upgrade the piping and radiators for the bathrooms but they'd be the only two things I'd need to realistically consider. Either that, or: Get ducted A2A and have it in the bathroom as well Remove all radiators Still get a small ASHP just for water Would that perhaps be a good enough plan?1 point
-
Presumably you are thinking of the Daikin-specific Sunamp this one. I think they tweak the phase-change mix to suit the attainable flow temp of the HP so you need to be sure your particular Daikin is compatible and find out what DHW temp you would get. AFAIR they all have 22mm tappings so concurrent showers would be no worse that with a cylinder. The water circuit in it is not large so would not serve as a buffer for the HP ir you need one. I looked at these 2 yrs ago when Sunamp were also offering their phase-change products as a thermal store for the heating side. They discontinued them for this application and were unhelpful when I enquired if the DHW products could also be used in this way. There have been some horror stories about bursting units and subsequent warranty claims. I would avoid unless you are desperate for the space saving.1 point
-
Just to add for those that don't know, with staggered joints between the two layers of fireline.1 point
-
200 mil of wool and two layers of 15 mil fire line plasterboard is standard across all new builds1 point
-
No air gap needed. Full fill rockwool batts would be good. What kind of flooring do you have upstairs? It's important to seal any holes in this as drafts will negate the effect of any insulation.1 point
-
if you contact Rockwool (or whatever manufacturer's insulation you choose to use) they can perform a condensation analysis for you. this should give you peace of mind that you're not making any mistakes!1 point
-
Without knowing more about the iBoost and its 3kW dimmer module I don't know whether a) applying 240V AC to the output when the dimmer is telling it to be OFF would cause any internal damage b) the iBoost control circuitry seeing 240V on the output when it is expecting to see 0V would register as a faulty dimmer module and it would cause an error condition or shut down until reset. Ditto putting the chopped waveform from the dimmer back onto the HPs immersion heater terminals, do we know what the internal circuitry is? The wiring to the HP will also act as an aerial for any interference from the iBoost. OTOH it might all be nothing to worry about. Personally I would spend a tenner on the relay as 0.1% of the system cost and sleep more soundly.1 point
-
Travis Perkins, Selco etc are nationwide builders merchants as opposed to say B&Q, Homebase that are diy stores. You'll likely have an independent merchant near you.1 point
-
To echo the above, A2A is good and you can dip your toe in to phase it before removing radiators if you need to. Its in its element when outisde is >0ºC, still works when its below freezing but needs to work harder. Generally you can get away without having an inside unit in every room - depending on house layout - the warm air moves around so pick some key places - perhaps a landing upstairs or the master befroom than all bedrooms for example. In my example upstairs we will put a unit in the master bedroom and infrared panels in the 2x less used rooms just to take the chill off rather than permanent heat. You can't really put a2a in a bathroom either unless you go ducted. In my case I'm putting infrared panels in the shower room & bathroom. A challenge, with the system I have anyway, is control. The default mechanism is a remote for each inside unit, each remote with a clock/timer, rather than a central timeclock. There are solutions including cloud based and cable based (I don't use cloud for my house utilities) - just need to be aware its different. The system moves air - its very quiet inside and out but not silent - every now and again it may reverse the flow to stop the outside unit freezing and you may hear a swooosh when it does so. If you don't like the idea of warm air circulating, rather than oldschool radiator convection it may not be right for you. Bonus right now is the solar kicked in last month with the sun higher in the sky so the a2a is run more and more from sunshine than off peak power stored in batteries. I'm not an expert - just now in phase II of expanding A2A to my whole house (first install last september as an over winter test) to slowly replace oil heating.1 point
-
Building Merchant.1 point
-
I can't see how it's possible to spec or quote a system *without* having done the calculations tbh.1 point
-
Hi, that is correct with detached properties. We are semi-detached, and used the same builder so next door had the option of "using" our air tightness score, but they would have to take a lower score than our house, which they did. We got an actual test result of 2.5 and they used a result of 4.6 (given to them automatically by our SAP assessor).1 point
-
Definitely line all three up so as you walk in the front door you see all the way through the house (so the centre of the front door, centre of the glazed doors and centre of french doors is all lined up). I would leave the internal glazed doors as they are (because it works practically for you) and shift the french doors and front door slightly so all three line up. One thing possibly to bear in mind is if you shift the position of the french doors or front door, I would try and ensure any first floor windows directly above them are also shifted so they remain centred directly above the french doors / front door (as long as it remains practical inside). That's my opinion. I'm no architect though.1 point
-
Yes. Some fabric fails in light (obv not fit for purpose), and creates a dreadful, unclearable mess of plastic in the ground. Any fabric that is uv stable will say so on the wrapping and the manufacturer's website. You would expect any known brand or stocked by BM to be OK, but ask. The unwoven ones are generally better at weed resistance as the roots of seedlings can't wriggle down between the weaves. On the mess. The similar looking fabric used for big bags of aggregate tend to fall apart too, so check them occasionally.1 point
-
Dunno, I'd search "heavy duty UV stabilised weed fabric / membrane" or similar.1 point
-
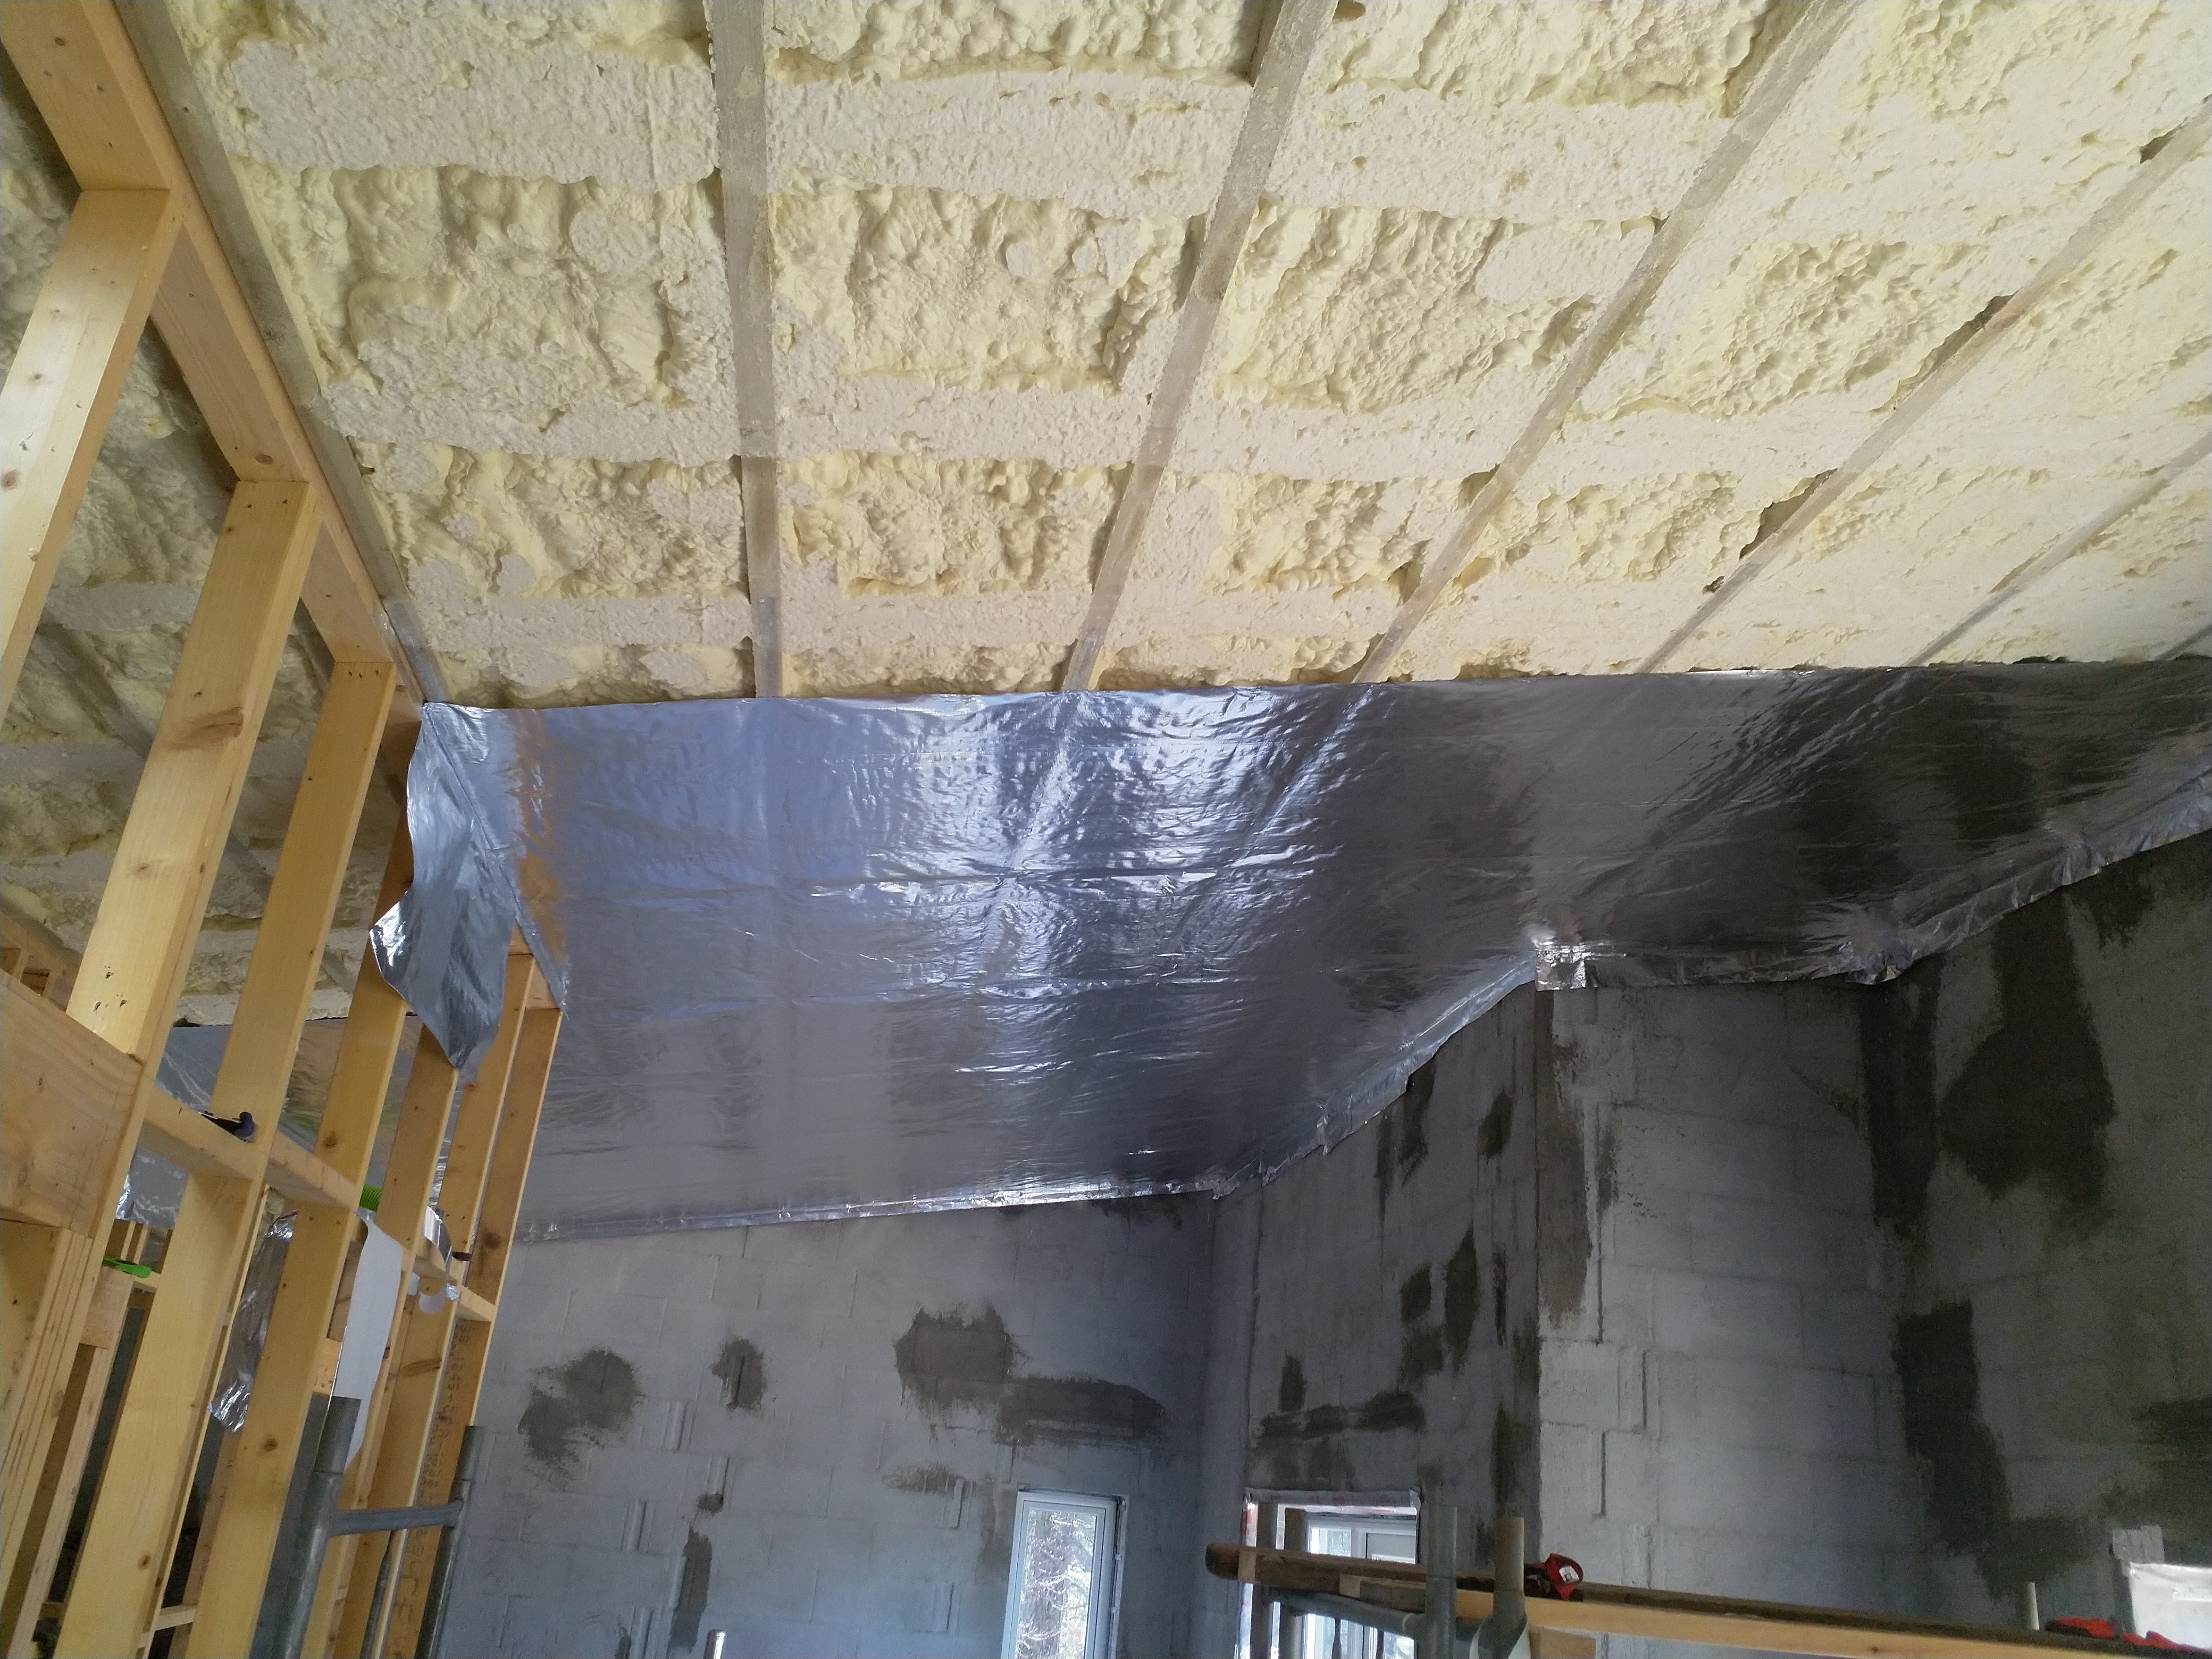
Yes! I do not have pics, I am afraid, as I am one of the world's worst photographers. Basically temporarily clear away the insulation from the eaves. Work out the vertical height (depth) of the insulation you want. cut a piece of breathable membrane which is a bit more than the length of the hypotenuse of that triangle. Lie uncomfortably on your front with your head nearly wedged in the eaves and a staple-gun in one hand and the breathable membrane in the other. Staple to the underside of the rafters tightly, so that as you push the increased-depth insulation up against the membrane the ventilation gap (the gap between the membrane and the underside of the roof covering) remains fully open. If there is a stub of wall to seal the membrane to at the 'bottom of the hypotenuse' then even better. This 'deflector' should allow you to insulate tightly and deeply without risk of getting air-flow between the layers of insulation or compromising the ventilation. I am sure someone with skills in CAD could draw that up in a moment.1 point
-
We had about 10 bags of trimmings from over 250m2 of roof. Job was completed in around 2 days. I did all the battens and vapour control layer. Yes very happy to share. The same company built our roof and did the foam (although as two separate contracts). JHJ Joinery and JHJ Insulation. They are based near Aberdeen. The guys on site had a really good work ethic, nothing was to much trouble, they got on with it.1 point
-
Seems very neat, and looks like you had minimal amounts to clean back? Are you happy to share who the installers / suppliers were?1 point
-
We used an airtight vapour tight membrane, double sided taped to battens and stapled, all joints and staples aluminium taped. At the wall the the membrane was glued to wall with airtight mastic. We then added 50mm battens to form a service void and plain plasterboard .
 1 point
 -
@greenbananaYou didn’t answer this?, is a party wall agreement required (that they have not put in place by the sounded of it A party wall agreement is needed if you plan on carrying out any building work near or on a party wall. You must tell your neighbours, provide them with a Party Wall Notice and come up with a Party Wall Agreement in writing. If you use a builder or an architect then they should be able to advise you on this, although they will not serve the notice for you. The following works require you to obtain a Party Wall Agreement: Any work to shared walls (party walls) between semi-detached and terraced houses. Work involving shared ‘party structures’, such as floors between flats. Work to garden boundary walls. Excavation works – or underpinning – to, or close by (within 3-6m), the party wall. Loft conversions that mean cutting into a party wall. Inserting a damp proof course into a party wall. Making party walls thicker or higher. Building a second-storey extension above a shared wall. Building a new wall up to or off the party wall.1 point
-
Yes, I was referring to a retro-fit, as would injected foam be. Cavity batts always number one choice in a masonry build, with cavities as big as you can facilitate / insulation beefed up to suit. All goes out the window ( literally ) though, as these types of builds are just so inherently, massively dogshit for ventilation heat loss vs fabric heat loss ( with the former an insulation killer ).1 point
-
i did look at eps beads but the u value is poor in comparison to tongue and groove recticel meaning a larger cav. Could be argued a larger cav could pay for itself in reduced brickie work though.1 point
-
17k for a staircase to the loft? 2.6k for carpet in the loft? I know this is London but wtf. Some of those figures seem way out there unless you’re going seriously high spec.1 point
-
I don't use my slab temp probes for cooling condensation avoidance, but I do control cooling flow temp from a calculation in loxone that works out the dew point from temp and relative humidity of internal air and the flow temp is set half a degree above dew point. It might reduce flow temp by 1° or 2° degrees at times from what you could do with a fixed cooling flow temp, so possibly not worth the trip. As @joth says though, still worth putting the temp probes in the slab, if you can use the data. It's good feedback. I use the temps from mine to allow some control if I'm getting effected by solar gain (during heating season). I've got two probes, one by some SW windows where the main solar gain is and one in a NE room that gets none. When I start to see a couple of degree difference in the the two temps, I circulate the UFH (without heating or cooling) to redistribute the energy from the solar gain. It's more effective if I allow the solar gain areas to get a bit warmer than ideal, ie. 23°C or 24°C, and no one ever complains about the living areas being a bit warmer in winter.1 point
-
Sounds very similar to our build (piled foundation, not far off on size etc) - with a fair bit of DIY (internal joinery, sheeting, electrics) and a reasonable internal fit I think we'll be about £1450-1500m2. If you act as QS you'll come in a fair bit cheaper than estimates based on book prices and lazy contractors picking up materials from the local merchant.1 point
-
56k will buy an awful lot of brickwork. Golden rule to remember 99% of architects are clueless on how to build anything. They are good at milking clients though. For example look at any of the window openings your architect has drawn and i guarantee you none of them will work brick. If they had a clue how to build anything they would design them to be built.1 point
-
Thanks so much everyone! I did take a look at the spreadsheets that were available but felt quite out of my depth to be honest - my Higher B in Maths is not serving me well here. The percolation rate from the SI was given as 1.5 x 10⁻⁵ (depth of test hole was 600mm) The Impermeable Area I'm taking to be the roof area? Roof area is 128m2. Footprint of the house is approx 80m2. As mentioned above the available space for the soakaway is 19m2 (underneath the driveway, so it would be filled with hardcore/gravel)1 point
-
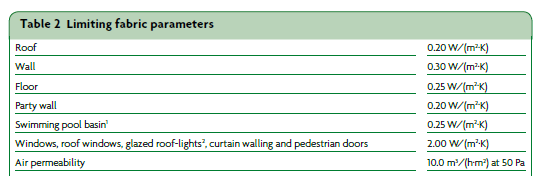
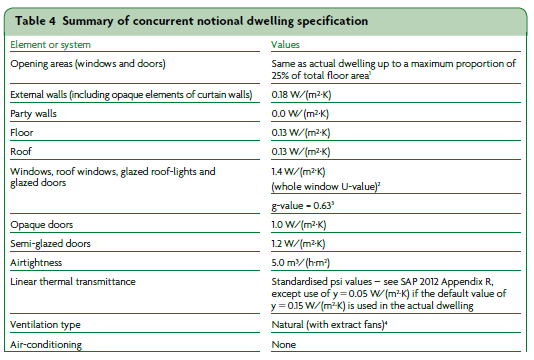
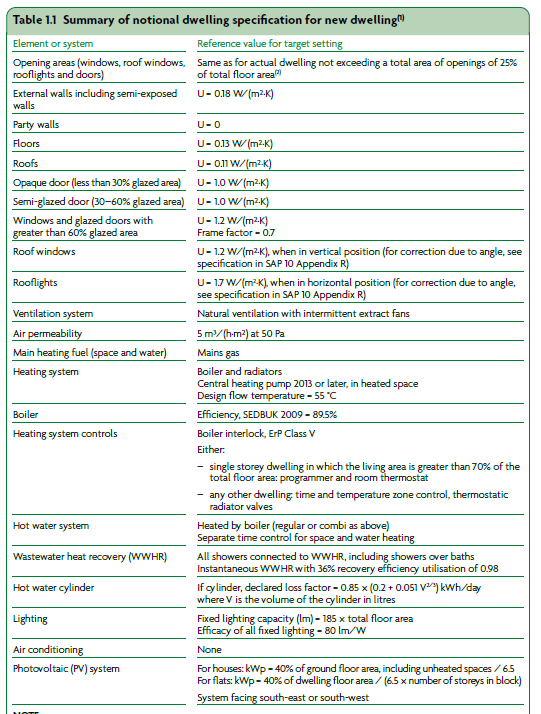
Old regs: New regs:

 1 point
 -
U value of 0.13 and 0.11 for flooring and ceilings, then 0.18 for walls seems a large step up from current which is nearly double some of these figures? Or am I reading it wrong? (page 12)1 point
-
There is some inconsistency in the number of vents I'm being told I need: My construction drawings have 24 periscope vents, but I don't think much thought was put in to those as at least 3 of them are under doors and another where a drainage lintel sits. NHBC guidance says "Voids should be ventilated by openings providing not less than 1500mm2 per metre run of external wall or 500mm2 per m2 of floor area, whichever gives the greater opening area. Ventilators should be spaced at not more than 2m centres and within 450mm of each end of any wall. Air bricks should be ducted through cavities and be unobstructed." The house perimeter is 60m so that makes for about 34 if every 2m. And this calculator says I need 12 (140m2 and 60m) (Their vents are 7,750 mm2 per unit so 1500mm2/m * 60m / 7750mm2 = 11.6 --> 12) Can I just have 12 vents, 6 on each of two opposing elevations, then?1 point
-
I am having a 'discussion' with our BR supplier about what sign offs are included, what I can certify myself to their satisfaction and what I have to seek elsewhere. I guess its about having all the paperwork completed before sign off. I have my list but I am not sure it is complete so thought I would put it out there by way of checking: Windows install - so do not need installation by FENSA certified team. Electrical install - so I do not need electrical sign off by electrician (as it happens I will get this done by my brother-in-law) but for completeness it is included here. Gas install - don't think this is ever in the BR peoples scope as needs gas safe qualification. Oil fueled install - I don't have one but it is here for completeness. Solid fuel install - I don't have one but it is here for completeness. Pressure vessel (UVC etc) install - so I don't need a plumber to sign it off. Water install from meter. - not sure there are any regs here but just in case. Sewerage connection - so I don't need involve the water company, other than inform them. Waste water and general plumbing, flows & trap sucking ect - always assumed this was part of the sign off by BR anyway but could be wrong! Ventilation system balance - so I can do it myself. Ventilation system compliance - always assumed this was part of the sign off by BR anyway but could be wrong! Air tightness - So, assuming I can trace the pressure and airflow sensors to national standard, I don't need a third party to do this. Sound insulation - not sure even how to test this but can't be rocket science, can it? So I don't need a specialist again. CO2 Energy Performance certificate - I wanted to do these but as I needed the pre-build one quickly I have already paid for this and the final one. Water use certificate - I wanted to do these but as I needed the pre-build one quickly I have already paid for this and the final one. What have I missed - probably something glaring!1 point
-
@divorcingjack The HSE guidance on this is very clear. Link here: http://www.hse.gov.uk/construction/cdm/2015/domestic-clients.htm I've cut & pasted the official guidance below but basically what it says is that if you are a domestic client (see definition below) then your client duties get automatically passed onto the contractor. Domestic clients: roles and responsibilities Construction (Design and Management) Regulations 2015 (CDM 2015) CDM 2015 makes a distinction between domestic clients and commercial clients, who commission construction work as part of their business. A domestic client is any individual who has construction work carried out on their home, or the home of a family member, that is not done as part of any business. While CDM 2015 places client duties on commercial clients in full, such duties for domestic clients normally pass to: the contractor, if it is a single contractor project, who must take on the legal duties of the client in addition to their own as contractor. In practice, this should involve little more than what they normally do in managing health and safety risks the principal contractor, for projects with more than one contractor, who must take on the legal duties of the client in addition to their own as principal contractor. If the domestic client has not appointed a principal contractor, the client duties must be carried out by the contractor in control of the construction work If a domestic client has appointed an architect (or other designer) on a project involving more than one contractor, they can ask them to manage the project and take on the client duties instead of the principal contractor. The designer then takes on the responsibilities of principal designer and must have a written agreement with the domestic client, confirming they have agreed (as principal designer) to take on the client duties as well as their own responsibilities. Any designer in charge of coordinating and managing a project is assumed to be the principal designer. However, if they do not have a written agreement with the domestic client to confirm they are taking on the client duties, those duties automatically pass to the principal contractor.1 point