
Leaderboard


Popular Content
Showing content with the highest reputation on 04/13/22 in all areas
-
This based on @Radian's comments what a pita these are to repair. Just done another one and thought it might help someone: First thing to take off is the brass nozzle. Some are a hex and others have two flats. Then clean all the gunk off with a blade. Use a small drill bit, held in your hand, to clean up inside. It's fitted with some type of liquid threadlock but I just replace later with ptfe tape: Then unscrew the knob at the back, take that and the spring out and with a pair of moles clamp around the barrel and unscrew that. Again it'll have threadlock, again use ptfe tape upon reassembly: Barrel off, you can see the pink foam adhered to the long rod that goes up the middle. Gun cleaner for that if still wet, sharp blade if it's dry. Then move to the small nut just in front of the handle: You should be able to knock the rod out with a soft faced mallet. Blast through the handle with gun cleaner as you go: Clean the barrel. I used a suitable drill bit (in the cordless if necessary) then a cloth soaked in gun cleaner and drag it back and forth. Blast any remaining loose stuff through: Imo then wear inside this nylon bush (just below the threaded section) is what kills a lot of these guns. Foam ends up coming out the back, dries and the gun seizes. And/or air gets in through the same point when the gun is closed off and hardens what's in the barrel. You will likely need to pick out the dried foam inside the nylon carefully: My trick is to slip on a suitable rubber O ring: PTFE tape the barrel where it goes into the gun: Tape the brass nozzle too: Reassemble with a smear of silicone grease on the moving parts: Hopefully you're then good to go. Not shown where the can screws onto the gun. You'll likely need to cut/dig foam off around there and have a twiddle up where the ball valve is. I've seen other guns where the central rod is (black), Teflon covered like on a frying pan, that wears leading to the same issues. An O ring might well fix that.8 points
-
Wow, we have finally started, and what a journey. The goal of the last 8 days was to try to make the the stars align. We had planned several meetings / connections deliveries all to happen the 1st week in April, and this was it, lets see what unfolds. Firstly, the plot, being located high up on the East coast in the highlands, which is basically a large un-serviced field has a few logistical issues, the main one being storage, the second distance. We had quotes for containers to be purchased and delivered in the region of 4.5K so alternatives were needed. The initial solution is the back of an Asda delivery waggon, 12ft long, 7ft wide,6ft high, with 3 lockable doors, and racking for the green trays, also a larger roller shutter section. £250 - with working fridge if required - (this may have a second life once were up and running with rare breed pigs🙈). just need to get it from Morecambe 430miles North. Secondly how to get everything to site. We bought an old removals wagon - 7.5Tonne ally box with tail lift. MOT till NOV 515,000KM - 1 careful owner Our hope was for this to get there in 1 piece, and be left on site as storage. the sum of £1200. all in with insurance (which may be cancelled) its has cost us £2K. Talking with my timber supplier, he warned me of impending price rises and possibility of shortages due to the unrest in the UKRAINE. so out of the blue I bought all the timber 450M of 6x2 C24, and 56 off 11mm OSB for the PODS. In addition to this I found a contact selling factory rejects of 120mm PIR insulation. In Scotland the pods need to achieve good U values, so 120mm on roof and in floors was required. Basically this guy buys pallets of insulation that are usually end of production run , or slightly damaged corners etc, and not full sheet sizes. I went to look, as he has had some bitumen coated and fibreglass coated boards. Generally the sheets are all 1200mm wide, min 600 long, most are around half board length, but will need to be trimmed to make them suitable for the warm roof. I did a deal to buy the equivalent of 44 Boards of 120mm some Bitumen coated, some fibreglass for the sum total of £660. This is a massive saving on 'Box Fresh' Now I had a problem, with the insulation tightly packed into the back of the truck and leaving some pockets to slide the timber in I had filled about 2/3rd of the truck, I didn't have room for all the timber or the other stuff I was taking. The revised plan was to cross our fingers and hope the truck will not only get to Scotland , but now return with a view of making another trip. Living accommodation. We found a static caravan, 2 bedroom in V good condition, delivered to site included in the price. The deal was done and he would get the van to site for our arrival on the Thursday, along with the delivery of our other investment an old Ford 550 Backhoe Loader, with buckets and pallet forks. We decided to set off Wednesday evening, with the plan to see where we got before we were too tired, then to sleep in the Wagon / Car. The picture below was us all loaded with 430Miles ahead. Me driving 'Nessie' as Mandy has called her, and Mandy Driving the Car / and trailer. I know we look like 'Travellers' but needs must, what will the new neighbours think when we turn up..... The Journey was horrendous. Setting off at 18.00 the trip was uneventful, with he exception of filling Nessie to the tune of £245 with diesel and not knowing how far these 150 litres will get us. Uneventful until we got to the A9 around Perth, then the snow started. Visibility was poor, and the local truckers seemed oblivious to it. Mandy had a big scare on a dual carriage way where she lost visibility of the edge of the road, and found herself nearly hitting the verge, a stab of the brakes and forgetting about the 16ft trailer saw said trailer try to over take her. Luckily she managed to correct this, and coming to a stop in the dark with snow on the dual carriageway, composed herself and set off again. At 03.30 on Thursday we pulled into a layby just after Inverness. Got our heads down for a couple of extremely cold hours (-4). and set off to the croft, arriving around 8.30.. During the drive we were informed the Static- our accommodation for the week was not going to make it - COVID... I managed to make a few calls and Borrowed a 3 berth Tourer from GOW Plant Hire / Groundworks in Caithness.. What a top bloke.... This is us on site day 1, digger arrived..... The Plot.. So down to it. Day 2 on site Friday. Electricity was to be connected on Wednesday 6th, we needed to dig a 30M Trench and install the cabinet / concrete base. This had to happen. Over to the digger to fire her up.... no go. Quickly the battery went flat. We moved Nessie closer, did a quick 30Mile round trip and bought some jump leads and by lunchtime and still no joy, turning over but not firing..... it was running the day before but they had to jump start as it had been sat in the yard for a few week. Ok looking at the battery it wasn't the correct one, so another 30mile round trip and the owner of a monster battery we tried again. no luck, I phoned a mate mechanic he advised trying spraying cold start into the air intake. ok another trip? , No, he told me to try deodorant as the propellant may well work, one quick spray and the old girl fired immediately. Best smelling digger in the highlands... Now to get to grip with an old backhoe, I've experience with up to 5 tonne 360 machines but never a back hoe, so this took a while to understand how to dig a straight trench next to a fence.. I managed to excavate the connection pit and around 15M of wandering trench by the end of the day. Day 3 Saturday It was cold and no amount of deodorant was working on the digger. The mighty battery was losing power... Time to try Nessie to give a boost, we got the Truck stuck in the mud... FFS. we needed the digger to move the truck, and the truck to help start the digger... This was a testing day, and I know from experience in building game you have days that just fight back, and this day was fighting hard. Mandy set off in search of some supplies and some cold start. By lunch she was back, I had made the shuttering for the cabinet base just needed the digger to get the concrete over to the hole. Cold start didn't work and we both felt deflated... Numerous attempts with planks, stone etc to free the truck were not working. As a last resort as the sun was now out and shining we gave the cold start another go and the digger jumped into life.. Obviously not a morning person... We moved the truck to relative safety of some drier ground with the aid of the digger and concreted in the cabinet. Another 10 M of trench, and we made a start exposing the water main. I noticed the digger was beginning to be sluggish and leaving hydraulic oil pools, when I check the level it was nearly empty. So Parked up the digger, next to the truck, batteries next to each other - just in case. We retired to the un heated caravan, and I went to the Generator to start it, we had a 2KW heater that helped take the chill off, A couple of pulls and the cord snapped😂. the day was going to round 12 like it or not. So tools out and repair underway. Day 4 Sunday. No Hydraulic oil till Monday so left the digger alone, and marked out the position of the pods, and the septic tank, I wanted to do some digging here to confirm the suspicion that the rock level was high, and some breaking out will be required. We hand dug a trial hole for the water main, as we found electricity cables running towards where the trench was going. We hit rock 300mm below ground, so were happy to dig this with the machine on Monday, We also started unloading the insulation and timber from the truck. We sandwiched timber and insulation with visqueen and ratchet straps to create a heavy mass that hopefully wont blow away whist were not there. Day 5 Monday. With Hydraulic oil on board and the shelter of the truck the digger fired first thing, and we were off. Mandy continued un loading insulation. We dug a small trench for the water (we new the main was laid in a blasted trench to a depth of 800mm) we had to breakout our trench with a 110V Breaker to obtain the 600mm depth and hand dig to expose the water main, I left Mandy to this while I dug the septic tank hole, I got to a depth of around 800mm before I hit the rock. This will need pecking out now. We installed a homemade standpipe, and blue pipe, then asked for a track inspection via the online portal. We were given date of 11/12/13April, but we put a note on to say we were on site until the 8th. They responded and the Meeting was set for Wednesday 6th - result. Day 6 Tuesday - the night was very windy and wet. A cold and wet start, We finished off the electrical trench, laid the ducting / draw cord and all was set for connection the next day. Made a start on the pods foundation dig. Day 7 Wednesday - electrical trench was full of water, and the ducting was floating. the heavy rain drains towards the sea, and thus straight into this trench, I was concerned that the Install may be called off. SSE turned up around 10.00 and were not bothered in the slightest. They connected a new length of 95mm Wavecon to the pole and jointed the existing 2 houses and our new supply - 2 core 35mm straight concentric to this 95mm cable. Resin pour joint box, and fitted the 100A cut out in the cabinet. They were done in 2 hours. left me to throw the cable in when the resin had gone off. Scottish water inspected the trench, and this has been signed off and will be added to the works list, hopefully a few weeks. I filled in the cable trench, We managed to rough dig out the pod foundations and found the rock is close to the surface. so the slab foundation will be pretty much mass fill concrete around the perimeter, with some MOT to reduce the thickness to 4" for the slab. This will then have a Radon barrier on top and a floating floor insulation on that, Due to the poor living conditions and more rain and wind we made the decision to leave Thursday morning. Day 8 Thursday, We packed up the caravan and Nessie then dragged the caravan out of the mud with the digger. The trailer was also dragged clear with the digger, but Nessie was so at home she didn't want to leave. I was pushing here through the mud, but she was sinking. Fortunately tour Farmer neighbour saw our plight and came along with his massive tractor and dragged her clear. We left site battered, bruised but happy in the knowledge that no matter what was thrown at us, we had achieved what was required and more to boot. Thanks for reading... its all possible, Mandy made a few videos if you want to see them https://www.facebook.com/The-Windy-Roost-101816829105927, you can follow the progress there as well...2 points
-
Sorry... Yes I meant "isn't!"1 point
-
A settling period is good, but only if the aerator has the oomf to break through settled sludge on re-start. 5mins in the hour does sound *very* short however...1 point
-
I can 100% assure you, documents with copy on them will be accepted. What they do not like are 1980’s photocopies or scanned copies of till receipts such as B&Q, Tiles r us, Wickes and so on.1 point
-
Yes . They do go black . Real black some of them ; so technically it’s “dirt” from pollution ????1 point
-
Around @pocster,s area stone goes black from Avonmouth (an industrial area and docks with a history of pollution) I know because I used to live close by (but escaped 😇).1 point
-
without spending more than a minute on it something like this.
 1 point
 -
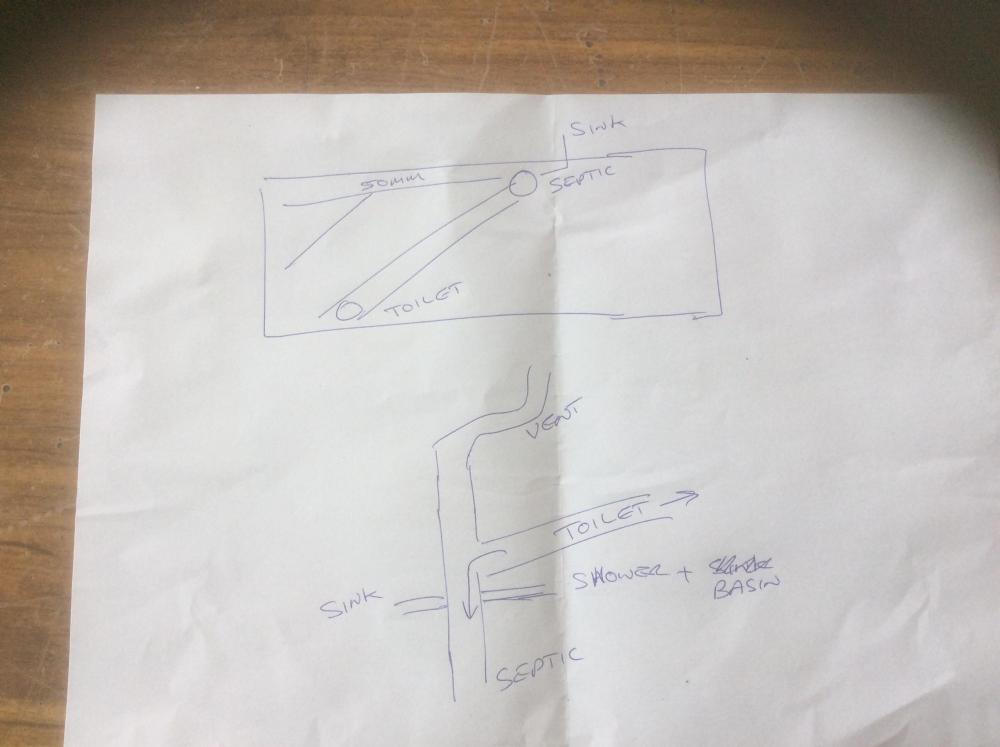
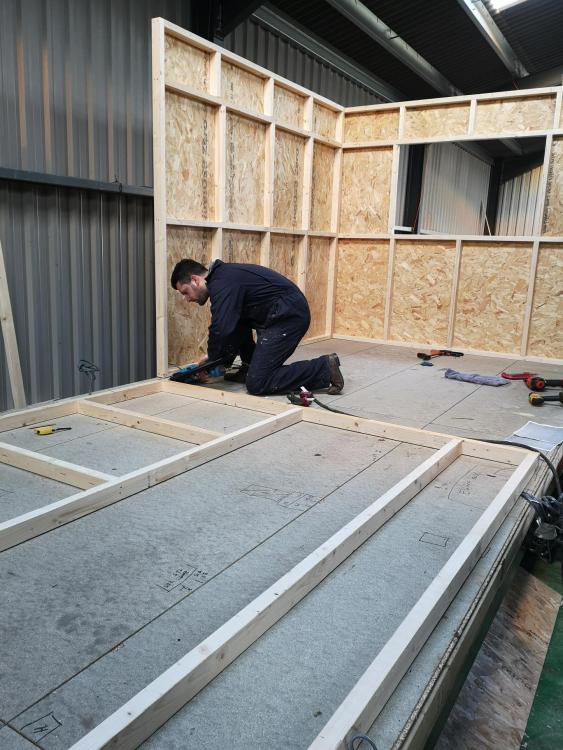
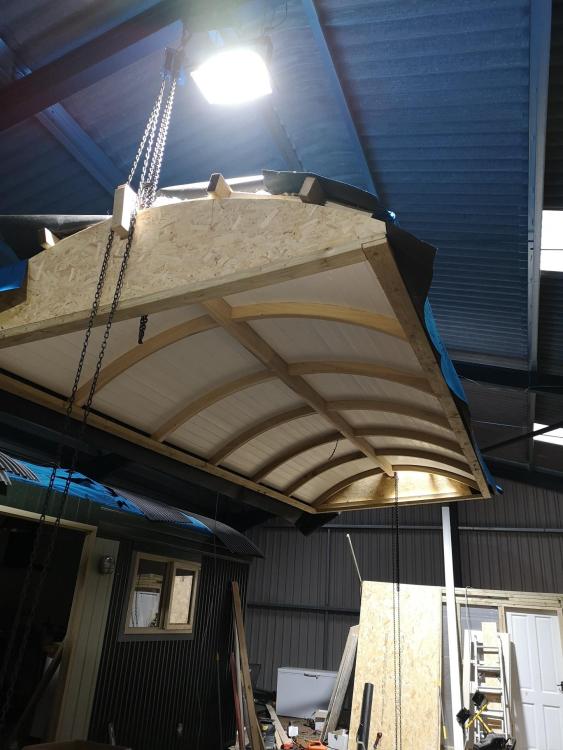
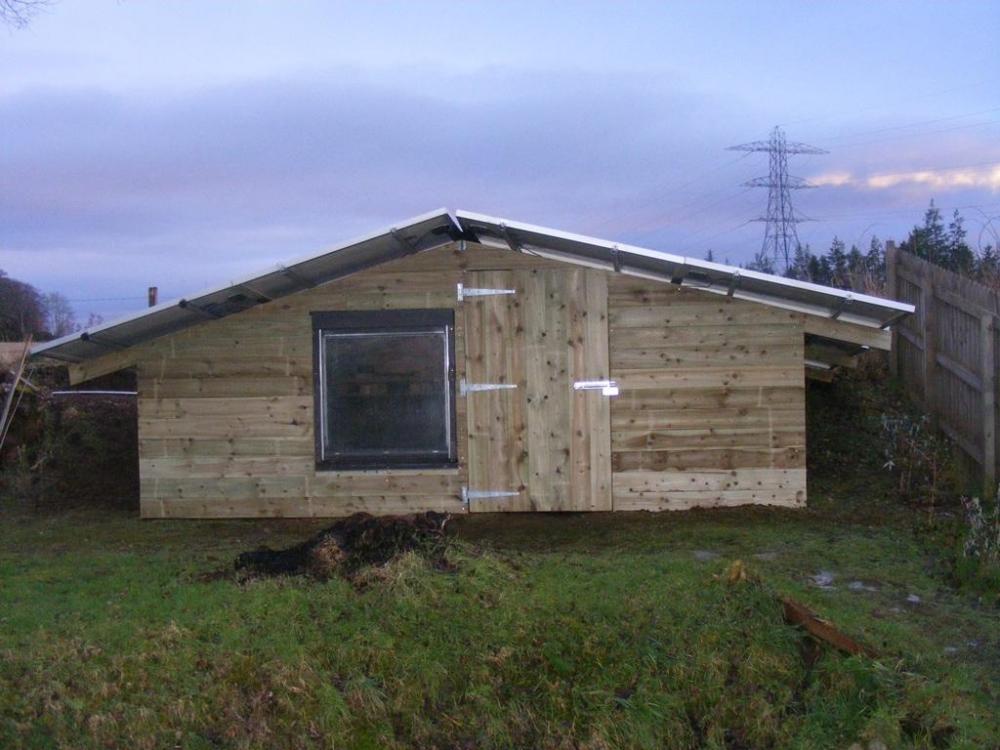
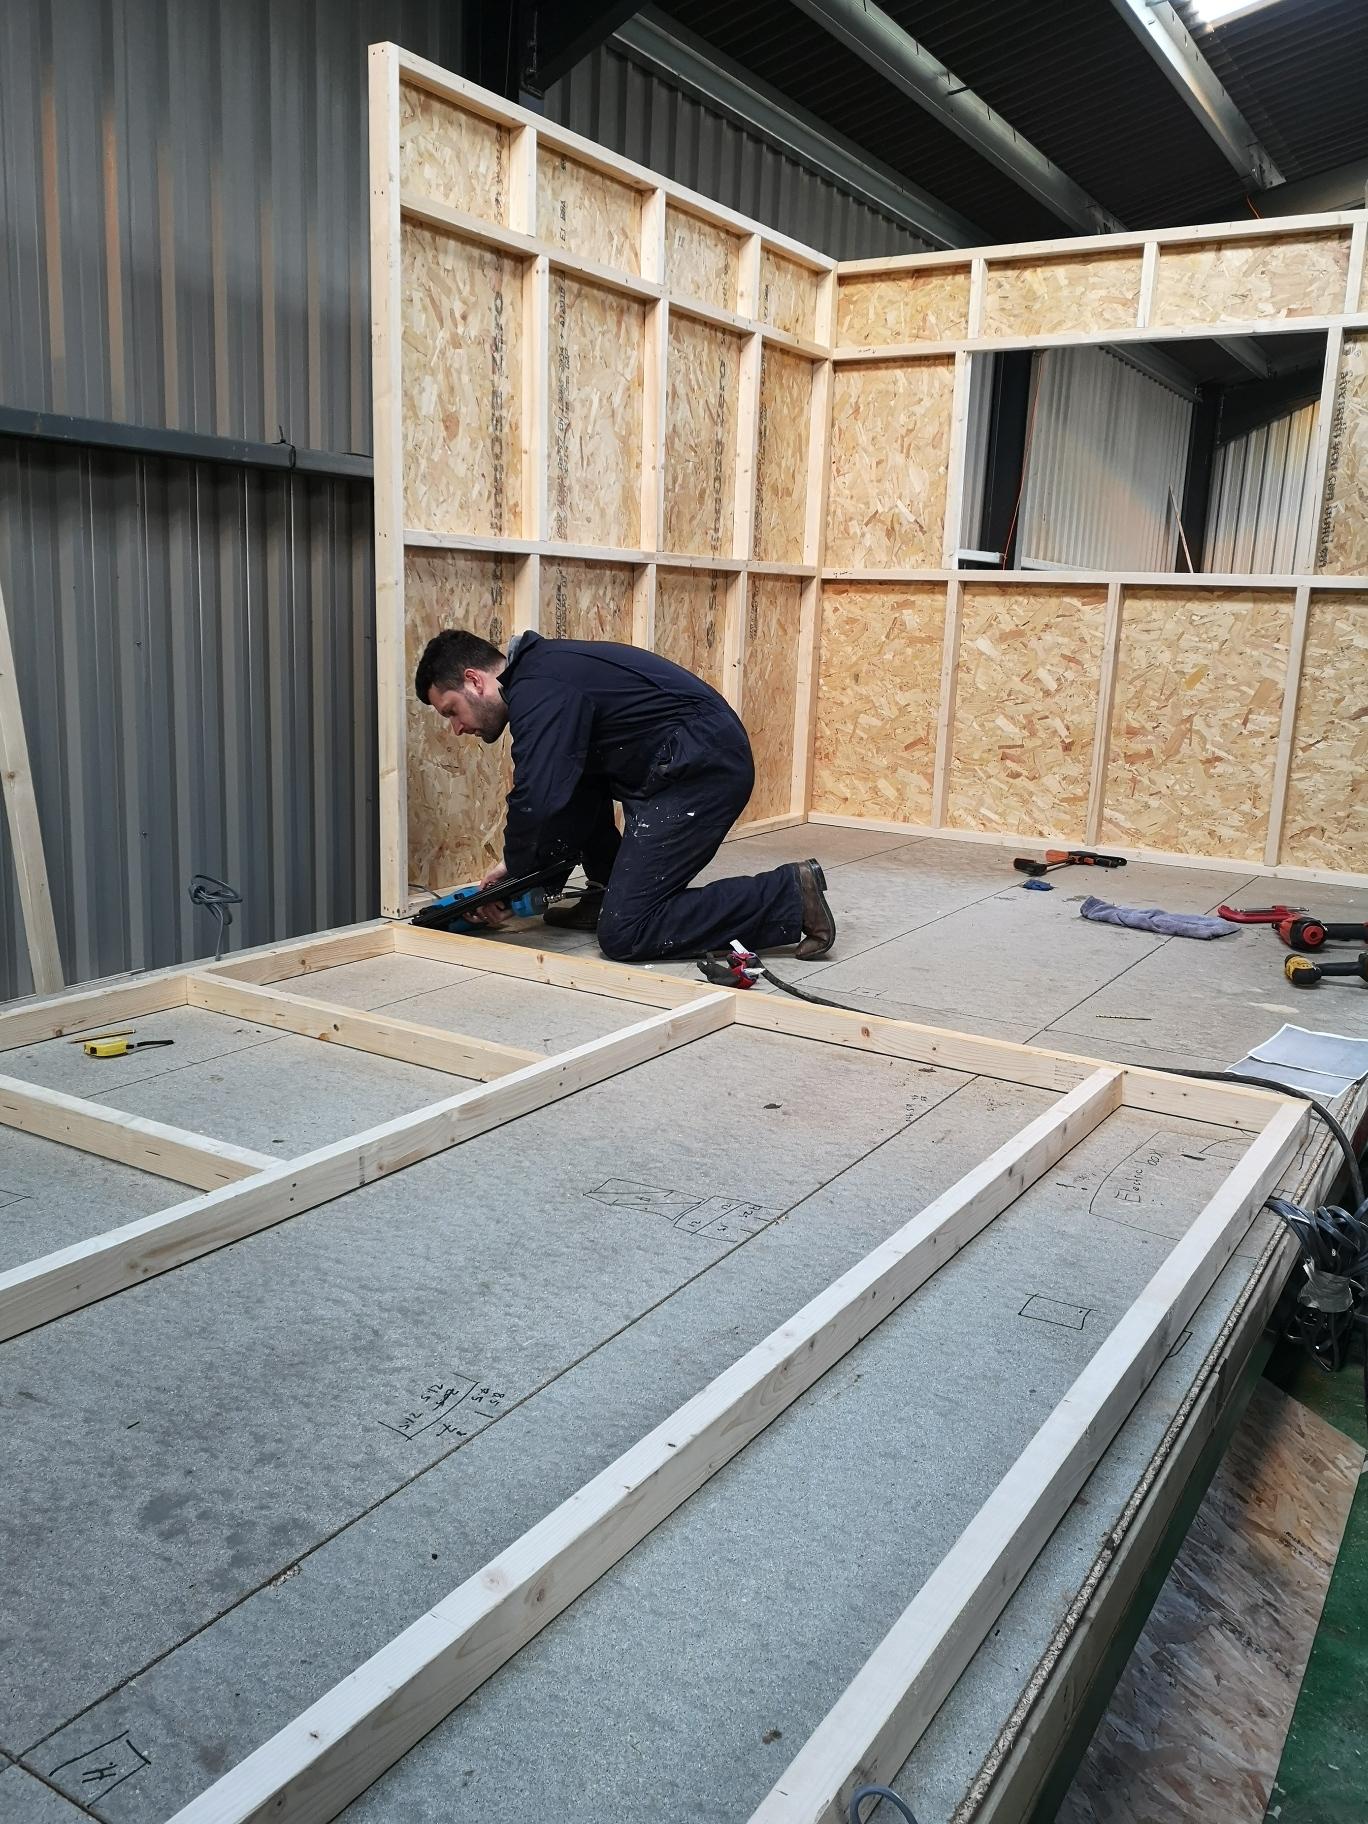
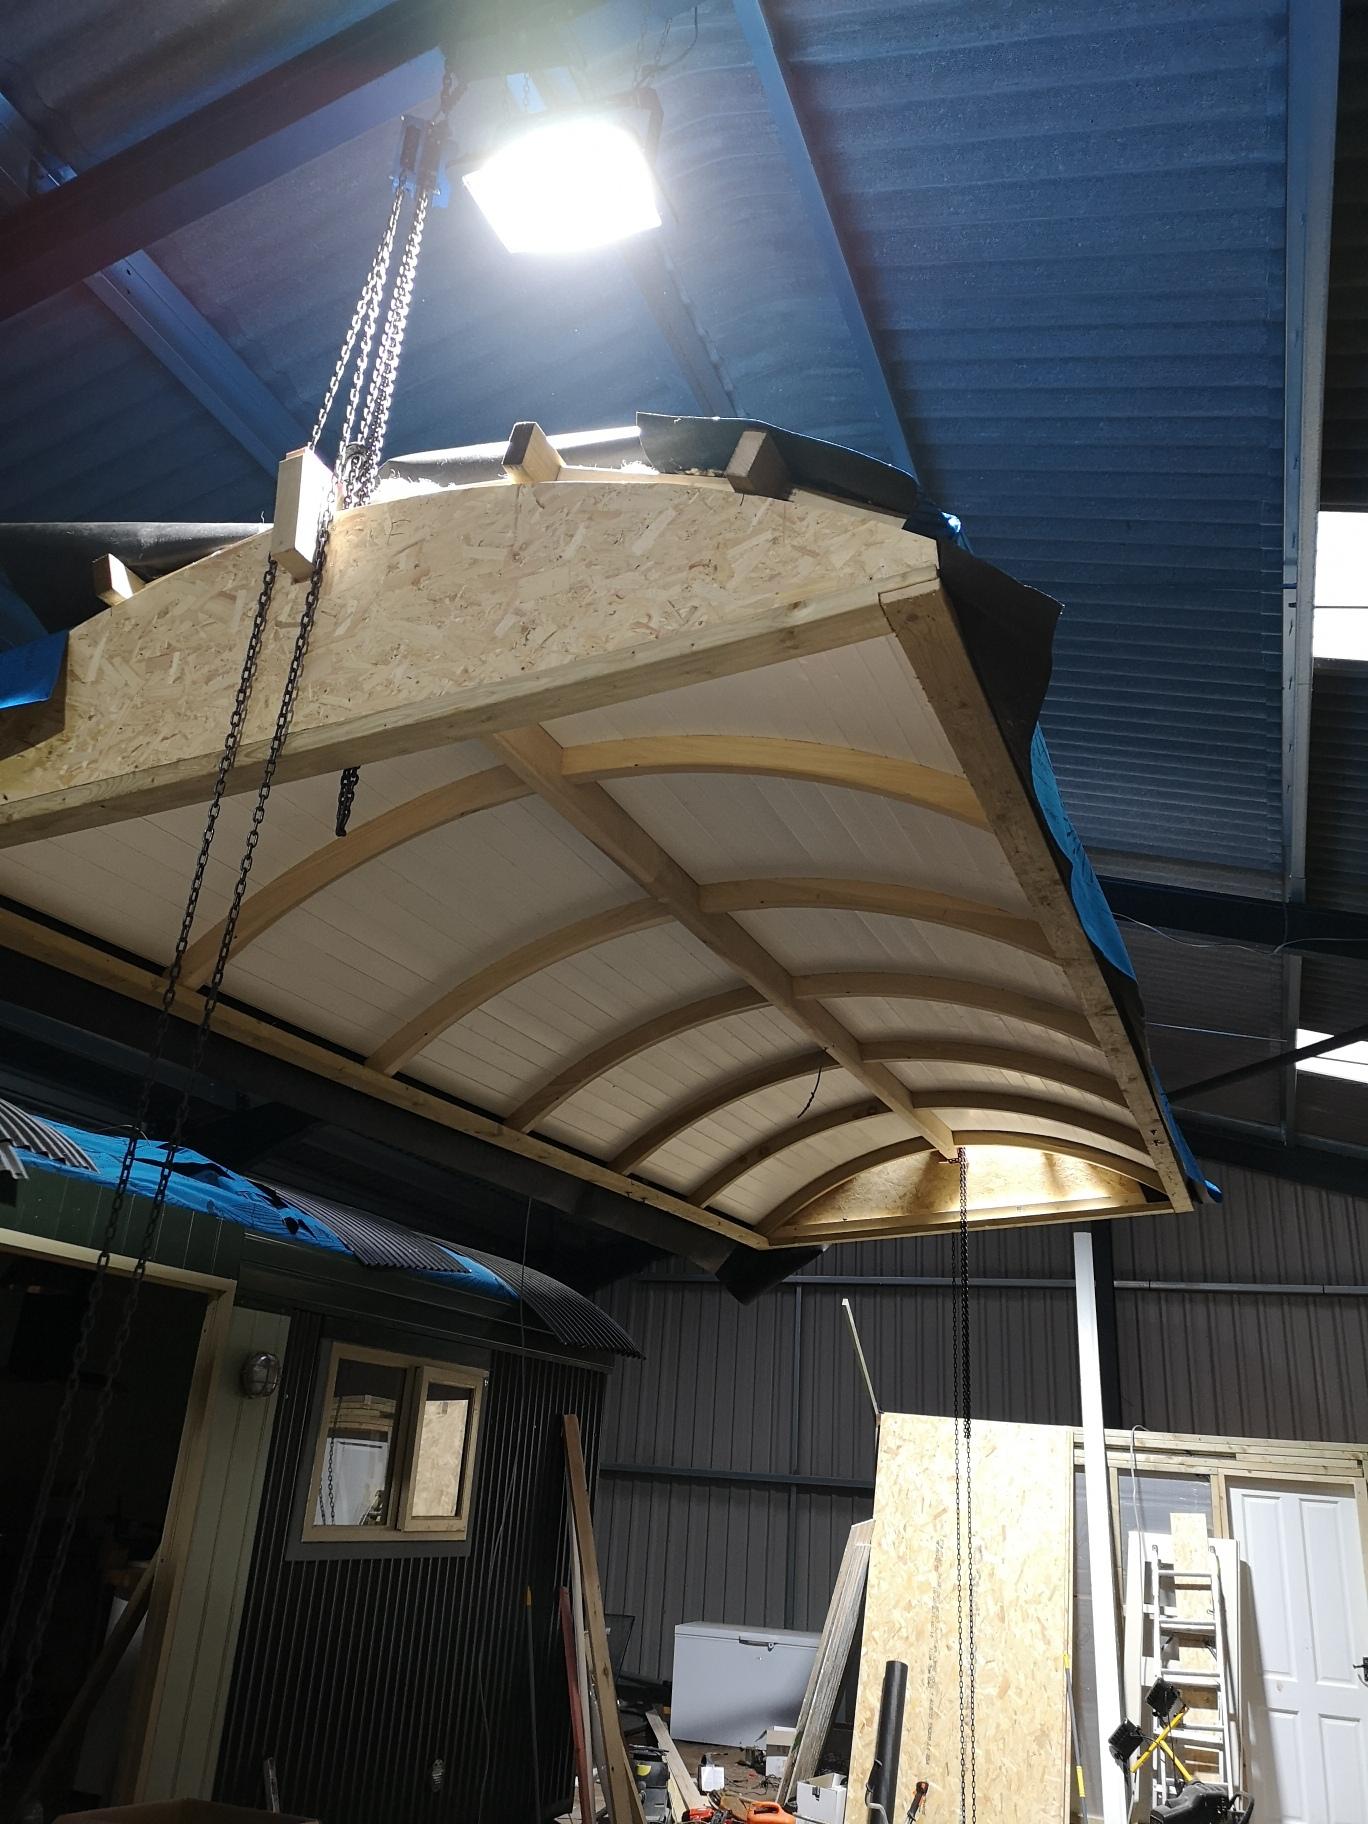
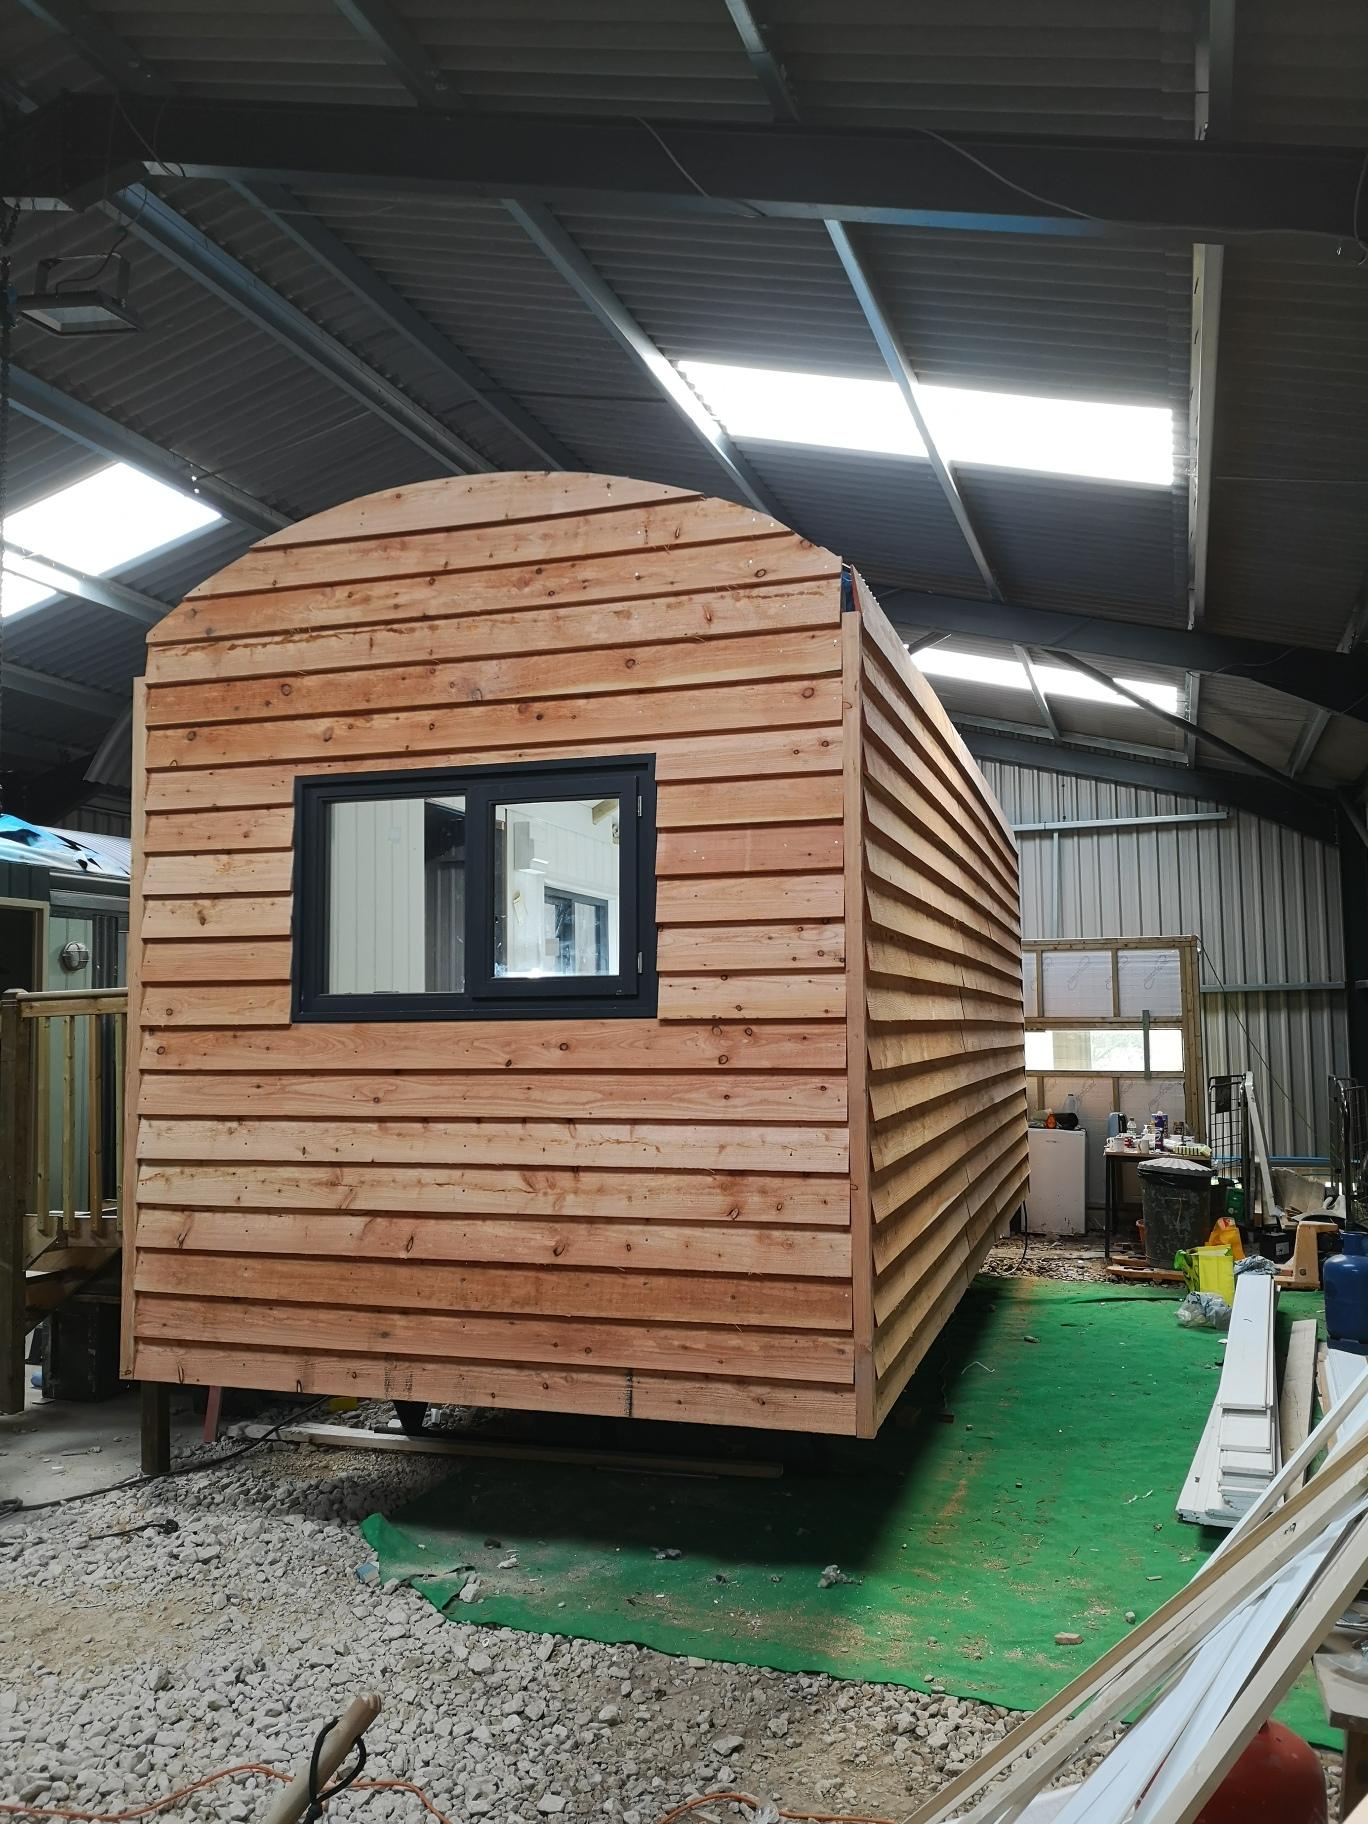
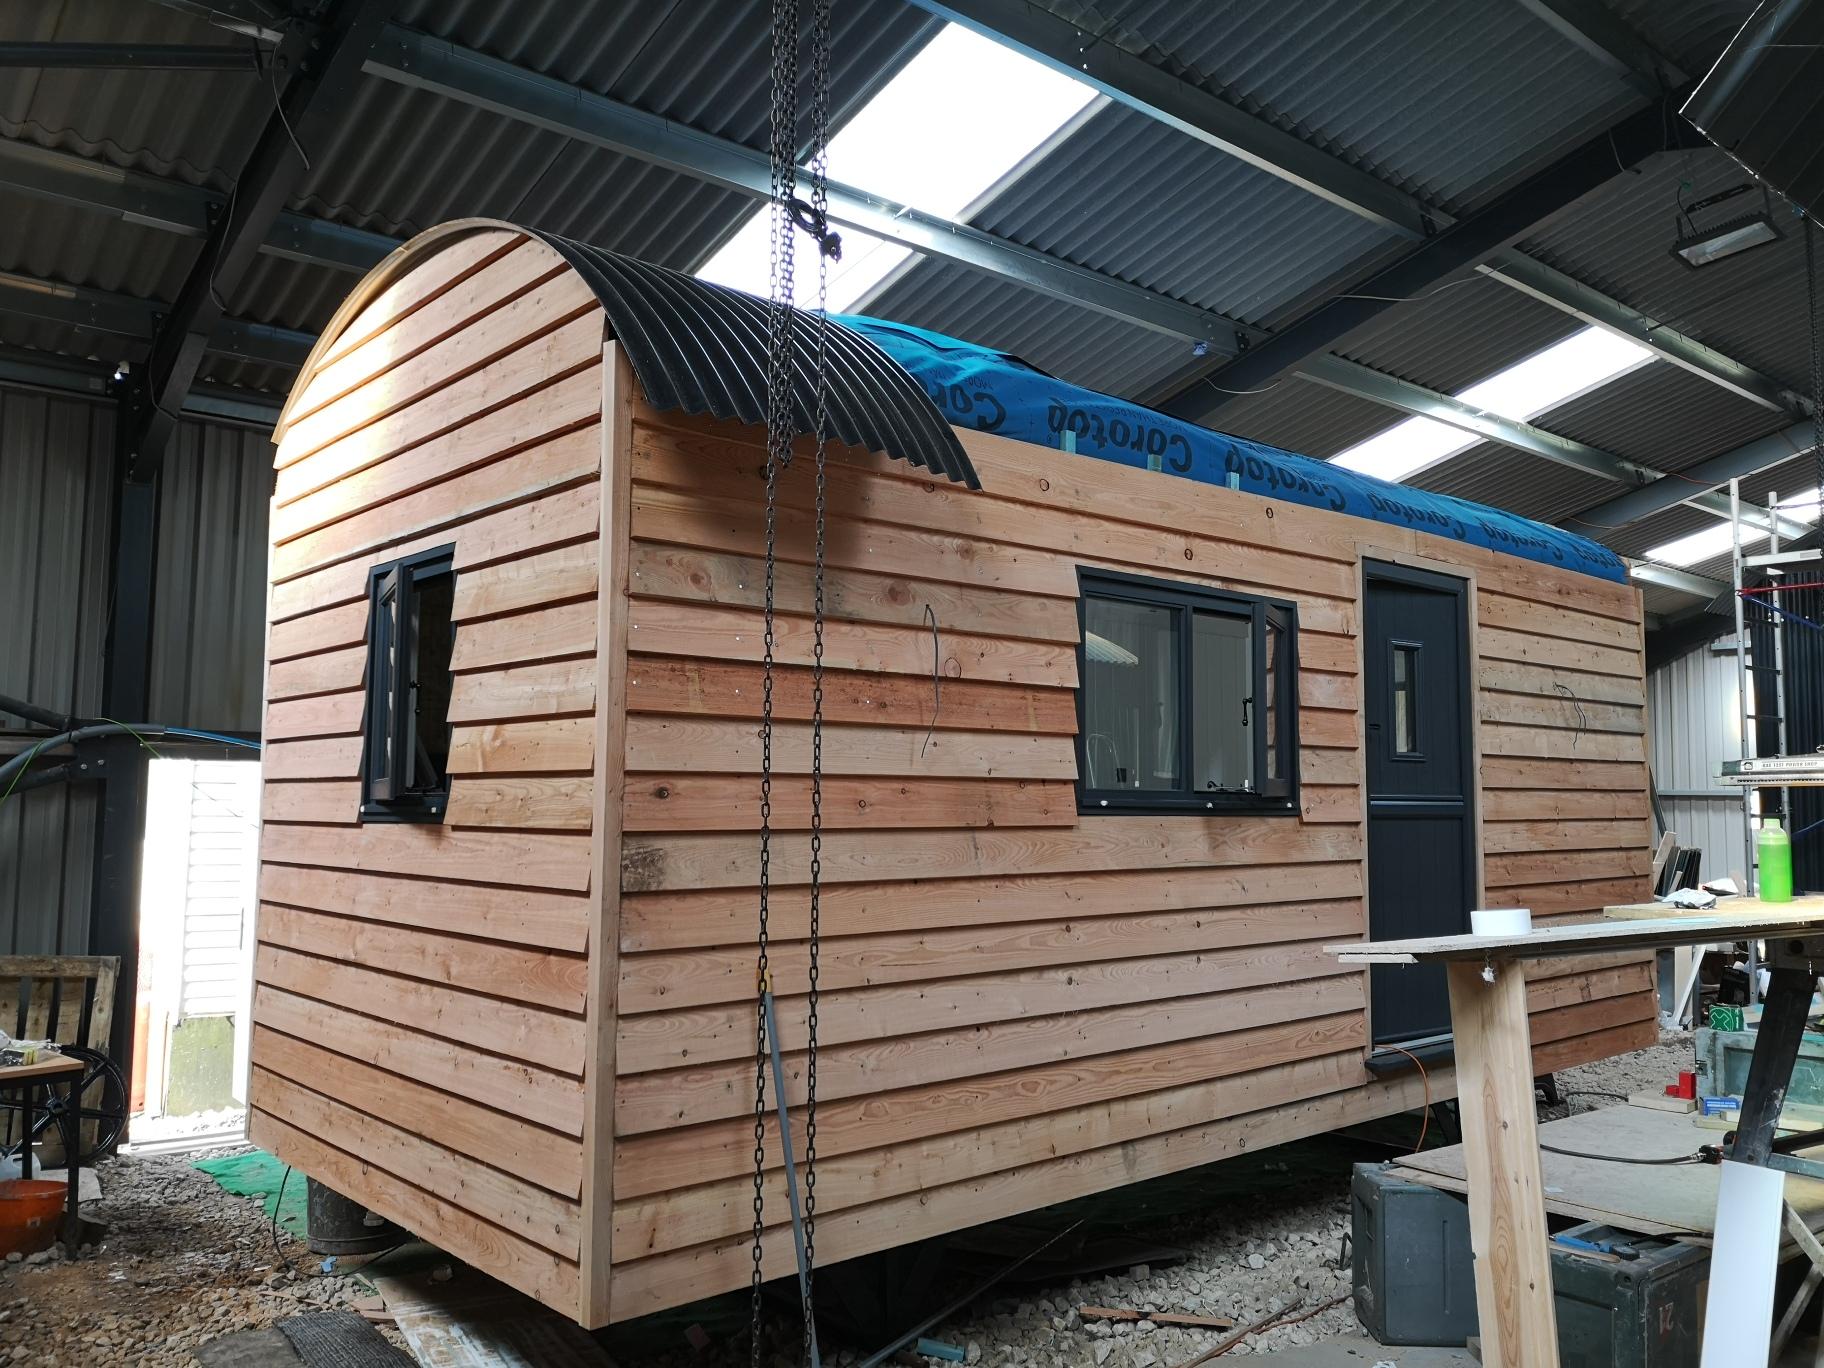
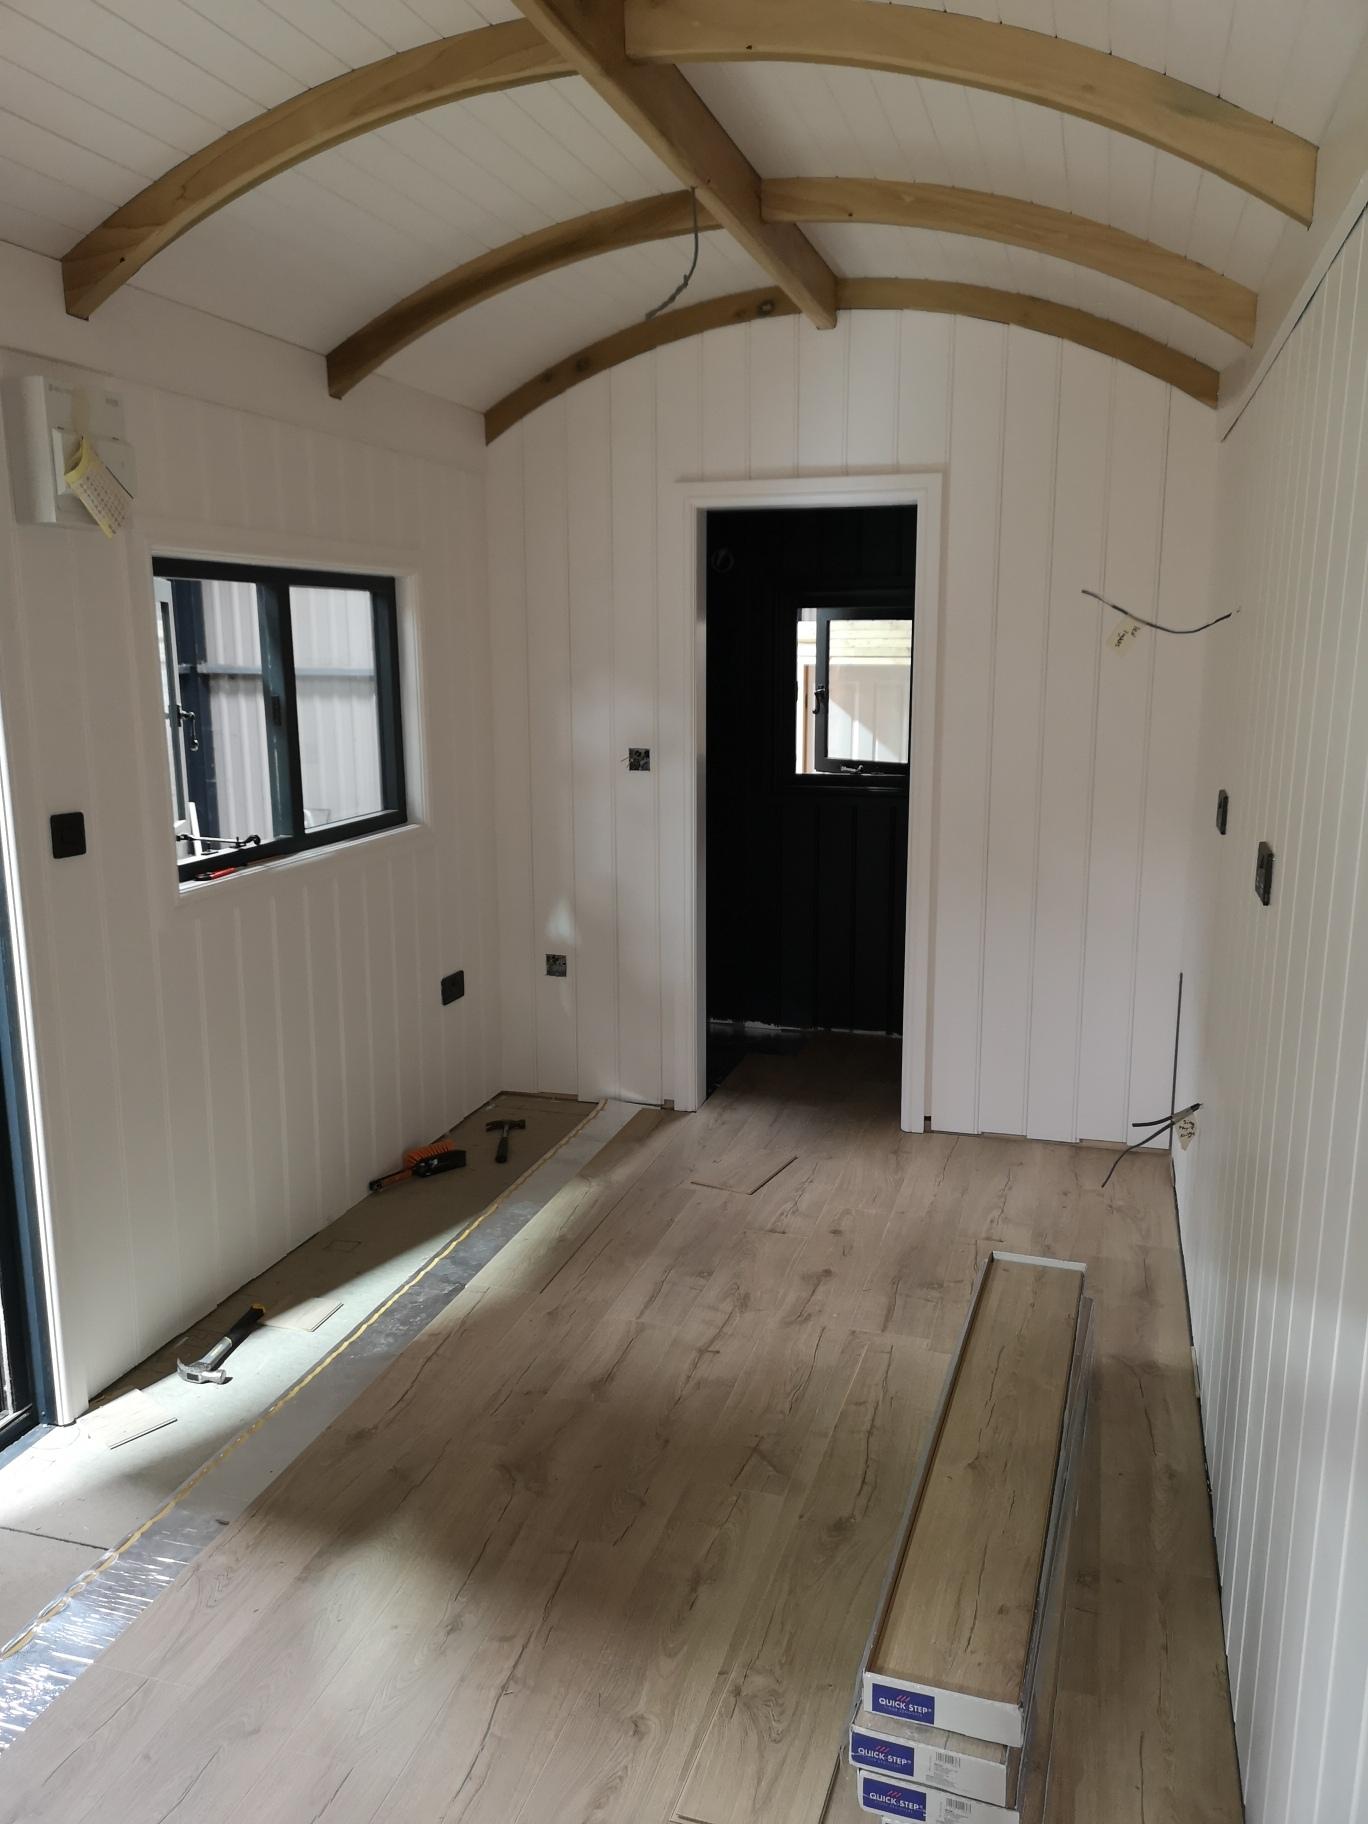
Hi everyone, I recently got planning for a shepherd hut to use as a welfare cabin on my small plant nursery, and will also be renting it out for 28 days a year under the planning rule for Hollidays. After looking at Shepherd huts for sale online, I soon discovered that the one my wife would be happy with was over £40k, whenever my wife points to something that is expensive in the shops I always say 'I could make that'. This is the first time I actually decided to take the plunge and go for it, and so far it's been an eye opening experience, and more expensive than I first expected with the cost of materials going up by the day. Overall I have really been enjoying it, and haven't chopped my fingers off yet with my dads saws. The worst I had was falling off a ladder and twisting my ankle. I've learnt so many skills while building the hut and it's given me a lot of confidence to look into the possibility of building my own home one day. I was determined to do everything myself, but decided I should get a professional electrician, as it could be dangerous if I got it wrong, I have also decided to get a plumber to install the LPG gas boiler for safety reasons. The hut is a standard wooden framed building insulated with sheep wool (treated for moths) and internally cladded in Tulip wood reed and bead cladding, externally I have added a breathable membrane, added treated roof battens vertically and then used flat head stianless steel annular ring nails to hold the Siberian larch feather edge cladding in place. The roof beams are made of Tulip wood and treated with two coats of osmo oil and then I will be fixing a corrugated roof to the top. The windows are hardwood double glazed and the door is a composite stable door. The flooring which I have recently finished is laminate flooring by quickstep which is water proof. I am at the point where I need to put the drain pipes and soil stack in place and connect the toilet shower and two sinks, I also need to do all the plumbing water pipes, which I thought I'd use push fit flexi pipe for. I have recently joined the forum as I really need some advice on the best way to do the drains and plumbing. I have a water well on site that feeds into a holding tank and has a gravity fed booster pump to get the water pressure to 2bar and a domestic sewage treatment plant that the 110mm drain pipes will run to. I'm looking forward to getting some advice and hopefully doing lots more DIY projects without killing myself Jonny


 1 point
 -
That is said a lot but I found it therapeutic. I have had stress related health issues in the past so it was a worry. I was lucky and had a brilliant main contractor who built the shell only, and my first words to him was “ look I know shit happens but I refuse to get stressed over this build, it takes as long as it takes”. We had the odd problem but frankly it went well. However I did not need a loan/mortgage and was retired so that helps.1 point
-
I think I'm just going to bite the bullet and get another installer to come up and sort it out. We are moving in at the end of the month and there's a ton of stuff to do.1 point
-
This stuff was good on the random stone . 1 : 4 mix with water at first . Always scared the acid will burn the entire wall away ! . Went over more stubborn bits later with it neat . Does the job 👍 Says not to use on sandstone. So tried my favourite ‘ wet & forget ‘ on them - jury is still out . According to the reviews you need to leave it and be patient…1 point
-
According to the website: "3. The final settlement tank is where the excess biomass settles to form sludge. At preset intervals, portions of the sludge and liquor are returned to the primary tank for additional treatment." however excess implies there was "too much" in the previous stage chamber. Why would it need to be sent back for additional treatment unless somehow harmful to the outflow? I'd be going back to Kingspan for a WRITTEN response on this as if SEPA got wind of a non-compliant install someone could be in a world of pain...1 point
-
just had a chat with the SE on this. He said he's happy with the 100mm wall from a loading point of view - the blockwork is more than sufficient in that sense. his only fear is lateral movement - if the beam was to move slightly because of movement upstairs the supporting wall could move/twist as a result and who's to say one of the blocks/cut lintels wouldn't pop out in that instance. But he's happy that the u-channel solution proposed by the contractor will resolve this1 point
-
The bit where the can attaches, use a socket to remove the top bit, this holds the ball valve. Once that bit is off, you can then use an allen key to remove the brass part from this section, and the ball and the spring will come out. This is often so clogged up it ends up looking like solid plastic!1 point
-
The manual says to fit a solenoid, talking someone who services them and they say not to bother with the solenoid as they often go wrong, better to fit a tee piece. I think I'll give that a go.1 point
-
By the points mentioned in my original post. An afternoon laying ducting & drawcord. Another evening putting together a grant application. Multiple emails to the quoter to work on the most effective opition. I had loads of bedrock to navigate my way through. One Saturday I spend an entire afternoon with an iron pinch bar, to ensure we avoided any rock breaking. Asking SSE to come out and walk my route and being extra nice. By doing the above it came down by thousands from the original figure. Your wayleave should be more straightforward but you will still need to go through the process. During the twlight I may have dug and found an existing duct for our water pipe/telephone. Some where in the region of £500 to £750 saved in permits and road opening contractor cost.1 point
-
As Siberian Larch grows on the Finnish boarder, do the Fins sell it. Get in quick before they join NATO.1 point
-
Looks really good! How many are you building? Looks like there are two in a couple of the photos.1 point
-
That’s so good! Wow well done. how did you do the roof curve?1 point
-
You can add sand to the top soil to improve drainage….1 point
-
It would be better if he reduced VAT on all insulation.!1 point
-
I used separate lintels inside and outside, yes1 point
-
Steel pegs in the outside skin. Window in the cavity touching on the back of the outside skin, nothing bridges my cavity, not even lintels 🙂1 point
-
As an aside-you are putting an admirable amount of thought & effort into detailing. With that in mind,I’d suggest ditching the PIR cavity insulation. Search the site here for others’ experiences. It’s too complex to summarise in a sentence why it’s such an impractical solution for masonry construction,but if pushed for a one liner I’d say the real world performance is NEVER anything like what it says on paper.1 point
-
Hi @Shire2020thanks for your reply. I agree ideally we do not want to be managing trades ourselves, anything we can do ourselves we probably will. Would like a contractor to manage trades for work we cannot do like electrician, plumber, plasterer etc. I'm sure they are all very busy around here. Our road is blocked up with trade vans every day at the moment. We have one builder who is going to give us a quote, I know his wife and I would trust them. I think probably they are going to be expensive though. How did you find your builders? I know you are supposed to get local recommendations, but I'm not sure how to get these without knowing anyone who has recently had any building work done! I feel like each stage is a job in itself, I'm just trying to take it step by step, getting as ready as I can for the next one!1 point
-
I'm in the same situation. Did you ever get a final answer about if having copy is a problem ?1 point
-
But like other things during the build I focussed on things I was capable of doing well and subbing out those I was not (plastering and paperwork !).1 point
-
We're not always as well organised as you Gary. Sometimes self-building reminds me of groping in the dark, and our VAT reclaims are so vital to the rest of the build that we decide to ask for help.1 point
-
Andrew at VAT431 is an excellent resource. Good value for money1 point
-
It was previous posts like @jack above that made me use “the VAT man”, and spend my time doing stuff I enjoyed and didn’t get stressed about.?♂️ (Plus I got more back through him than his fee was).1 point
-
Would you mind giving me an indication of the fee involved? Might be piece of mind to let a professional do it.1 point
-
I would recomend you get a VAT specialist to do this, he will know exactly what to do in fact mine saved me money by claiming more than I expected so saved his fee and more. He even contacted suppliers for original invoices when I had copies. I can recommend https://www.vat431.co.uk And quite a few here have used him with good results ?1 point
-
If you demolish to the foundations leaving no more than the facade standing, and this is a planning requirement, it can be treated as a new build for VAT reclaim purposes: see section 3.2.1 here I seem to recall that this is treated very strictly, so you need to be careful about how you go about it. Personally, unless you have no other choice, I'd nuke the lot and start again.1 point
-
Well I went for ground mount to at least get away from some of the shading by the trees. It had to be raised off the ground so see over the bank behind us. I chose an east / west split to try and get longer meaningful generation rather than peak generation (easier to self use). Then when the mounting frame was up and the panels were on, it was a no brainer to enclose the sides and make the "Swiss chalet solar shed"
 1 point
 -
I am not the best at paperwork and wanted to focus on the build so engaged a VAT tax man that does this for a living, was well worth the couple of hundred quid as he contacted suppliers whose receipts were not right (that I had not noticed) recovered money paid to my builder in error. He got me more money back than he cost me. I can recommend him and others on this forum have used him.1 point
-
Just a word of warning. If you are thinking of getting a new meter fitted steer the hell away from OVO. They are still branded as SSE despite buying the retail arm of SSE last year. We went with what we thought were SSE (actually OVO) to get our new meter fitted after having the supply cable done by SSE. It has been an absolute nightmare They signed us up with the assurance the we would have the meter installed within a week they just could not confirm the date. Turns out they have furloughed a lot of their engineers as well as getting rid of a lot of the support staff. I'm hearing of some people being told it will be months for a new build meter. Not helped by having to deal with a call center in the Philippines who really so not seem to give a monkey's. Also once they have you signed up and registered it seems like it will take weeks to get you switched over to another supplier. In the end we had help from someone in SSE Connections who still had contacts in what is now OVO. It's an absolute sh*t show and I would advise you to go elsewhere.1 point
-
Just to say thank you for pointing me in their direction. They have already responded, and are coming up with samples. They actually stock the products, so supply chain should not be a problem Thanks!1 point
-
Isn't all our power solar? Coal, gas and oil are very old solar power, and direct sunlight is the latest. Wind, water, timber are in-between.0 points
-
Don’t tell @pocsterthat 🤣0 points
-
He lost 20 pounds!0 points


.jpg.c21f3ac78c9b7efd90cbdcb312744dc5.thumb.jpg.7adcad4c0e384f5ecd7d56b0618df6e5.jpg)


This leaderboard is set to London/GMT+01:00