
Leaderboard


Popular Content
Showing content with the highest reputation on 11/11/21 in all areas
-
Have a look here at what may be the reality of any DG window install. I found a horror story. No Compriband or expanding foam used, oversize gaps, all covered up with trim, superglued on. Basically draughty, cold bridges. Your 5mm gap is a lot and you'll lose a lot of heat.2 points
-
The general opinion on here, and predecessor website, is that pellet boiler were not worth the bother or expense. And then there is the 'carbon neutral' miss accounting that makes gas no worse environmentally.2 points
-
More of the same... When insulating the ducts I noticed that the top of the MVHR was not insulated so I have installed flexi conduit on the cables ready to throw fluffy over the top. This is the inlet pipe running under the ridge. 150 diameter with insulation held on with cable ties An installed air damper in red. More about these later.... Water coil with thermal lid. Lid made from PIR. Lids off: The coils had no condensation drain so I installed one in the bottom. I cut the bottom 100mm PIR layer so the bottom if the box falls both ways to the corner with the drain and painted the bottom with a protection coat of metal paint. White 22mm drain pipe sticking out with temp cap off. Water trap still to be fitted... Side view of MVHR unit. Note the black "Summer bypass" with the white block on the side2 points
-
You'll may also, then, benefit from some additional information re this DHW strategy. I have been routinely oversizing the DHW cylinder to create a larger 'cheap energy capacitor' which I have then designed around heating once a night at 5p/kwh and there then being enough DHW to get through a typical day without recharging. Options for interim recharge, where required out of off-peak times aka 'on demand' are; via immersion boost switch ( with a choice of 30 mins / 60 mins / 120 mins manual boost ) which I call "guest mode" or to set the immersion to boost midday where there is likely to be PV available, safe in the knowledge that the immersion will only call if the UVC is depleted and usually by not much ergo the UVC doesn't monopolise the PV production. Freezing ( or the need to defrost ( two very different things )) is a statement I made as assumed. It can be mitigated or minimised ( risk / cause ) with a bit of thought.1 point
-
Really interesting to read this thread as we have ICF (Nudura) with 200mm waterproof concrete. BASF products used around the slab, outside of below ground walls and in the concrete. probably about 6-7K of product. Fairly efficient to apply. As stated, temp for applying to ICF was an issue but use a heat gun and a big tank of propane and you get a 1st class adhesion. A lot will depend on ground conditions - ours are very good - free draining sand. We had BASF out to inspect each area and they were very helpful with guidance/training as needed. As the wall junction with slab we used waterbar (on a raised concrete upstand in middle of the wall) and on the exterior before installing the membrane we used some leftover ICF cut into fillets to try and limit water build up at this weak area. also of course had land drain around the top edge of the slab on each floor. It's rained a lot and no signs yet (fingers crossed!) of water ingress and we've had some decent rain. I guess our worst case scenario is a retrospective internal cavity which of course would be highly disruptive but at the moment this does seem unlikely. Best of luck with whatever route you go and if you need BASF info feel free to message.1 point
-
I've got this to make a stove:
.jpg.1282727f16fc6e5f006203b2ed0b07bd.jpg) 1 point
1 point -
Update: Coincidentally (?) on the today, I've got a response from EDF complaints dept and a reply from my MP, not directly answering the question, but it seems they will sort it, nevertheless.1 point
-
Loose? Could you get in round the edge with some low expansion foam to fill the gap? If you do foam keep the windows closed until it's gone off. You might need to remove the glazing unit to drill and fix. To do that you have to remove the beads. You can get a special tool but a sharp chisel will do it: You can see a glazing bead removed here. Also the red packer between unit and frame. If you do remove the beads make note of where the packers are, photo etc, and which bead comes from where (pencil mark on bead and frame). When putting the beads back in put the short ones in first then the long ones as they'll bend more. Once the unit is out you'll be able to drill through the frame into the wall and fit frame fixings. Not got a pic but you can see s fixing hole on the hinge side of this door. You basically drill an 8/10mm hole and bang in an 8/10mm frame fixing.1 point
-
If the screws are going into the external wall then stainless steel. See if you can squeeze some foam filler in any big gaps. Frame sealant between external wall and external edge of window frame. Inside same but use caulking or what anyone else recommends.1 point
-
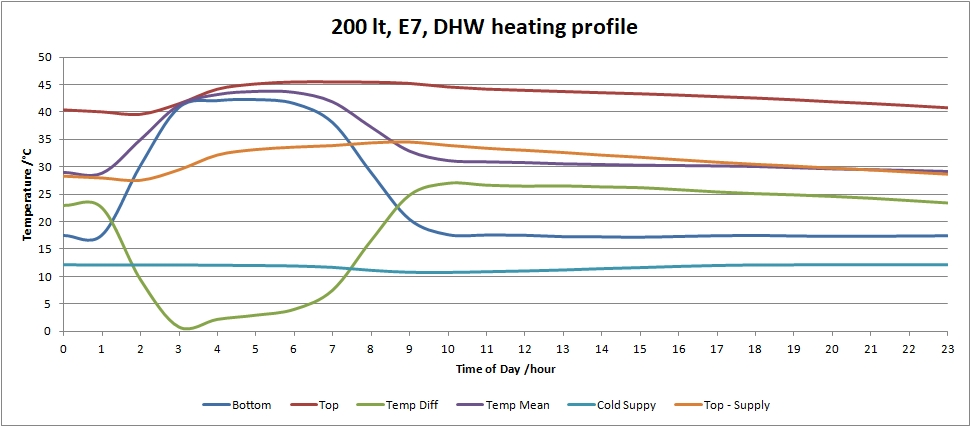
Bottom of my tank usually settles around 10°C higher than the temperature of the incoming water. It is worth, when looking at my chart, that most mornings I have a bath full out of it after the E7 heating window has finished.
 1 point
 -
There is a third possiblity, that one goes to bed clean and, through some unspoken activities, wakes up in need of a wash..........1 point
-
Okay, radiators operating at 32 degrees are going to feel tepid, if not cold. They are not going to put much heat into the room. I suspect you want the rads operating at more like 40 or 45 degrees. I would start by turning the weather compensation function off, and running at a fixed flow temperature. Then you can experiment with that temperature and see what works best. Once you know for certain what radiator temperature you need in cold weather and not so cold weather, then you will have enough information to turn on the weather compensating function again if you want to.1 point
-
Whoops! Looking back and I did thin over thick. It was a bit springy. Thick over thin would have been better. There's also 25mm EPS under the 100mm.1 point
-
Nope. I hope to get 350mm of fluffy stuff up on the loft. A 30 degree pitch creates a constraint for insulation above 300mm because near the eave it can bunch up and throttle air flow.1 point
-
Thick over thin I did...I think. Butt tight. Overlap the joints. Foil tape the joints.1 point
-
Get whatever services you need put down, eg pipes to a kitchen island or trunking to allow you pull cables later to the island. A gas or electrical feed if you've a free standing fireplace wall, etc. Then you can put the 40mm PIR down and cut around the pipes. Hopefully the insulated pipes will be about the same thickness making it very easy for you. Then the 150mm with fit nicely on top of everything.1 point
-
Have you tried British Gas? I heard they were still connecting people. Can't really blame the energy companies tbh - the Government's price cap was insanity and has directly led to this nonsense.1 point
-
Exactly what my fridge cost me.1 point
-
Yes you will be fine1 point
-
I'd snap their hands off and have it away1 point
-
Follow that white cable coming out of the timeguard and tell us or post a picture where it goes to.1 point
-
In my experience if you buy wood that has warped in store it will keep warping. Best trick I've found is to run it through the table saw and glue the bits with the curve back to back. Not ideal though.1 point
-
If this is only a temporary measure (taking the walkout) then as long as you don’t load the joists from above they don’t need anything as they are technically in tension with only self weight causing deflection.1 point
-
It's good stuff- it's heavy, really doesn't want to tear, and folds and tucks well.1 point
-
Not always. You have to take into account the RH. The important temperature is 277K, not 0°C. Then you have to take into account how long the ASHP is on. The longer it is running for, the greater the chance it will get some frosting. We still have a mentality that says 'turn the heating off at night, and heat up the water just before it is needed'. This is not the best way to run an ASHP system.1 point
-
A book called the Self Builder's Bible would be a good starting point, a large portion of the book covers build costs and the cost of basic or deluxe options at each stage of a build. People also account costs differently in their claimed build costs e.g. some exclude professional fees and utility/service installation costs. Some pay a professional builder to build a whole house and think choosing paint colours qualifies them as self builders, others dig their own trenches and personally lay each roofing tile. You need to tell us more about your build plans before people can point you in the right direction. Plot gradient, rubbish soft ground, trees, distances to mains services and energy performance expectations for the completed house are hugely influential on cost and the schedule of spending.1 point
-
This is website is considered as the authority on all things paving: https://www.pavingexpert.com/layflag1 - note how they do it. Sub then bed i.e. the sand/cement.1 point
-
Well done, I had no joy calling the big six, have lost days on the phone. I've now written to my MP, Radio 4 and the Ombudsman (who frustrating told me I can't complain about a company which refuses to supply a service).1 point
-
I looked into this, but aside from not having the space, it seems counterintuitive to be tied to buying a processed, carted wood product.1 point
-
My guess would be either an electrical element - immersion heater is on somewhere or the hotter hot tank water is flowing back to the ASHP when the heating is on or, if you have a buffer tank, when starting up the hotter water in the buffer tank returns to the cold ASHP, or the warmer water in the heating pipes enters the ASHP when first turned on, or something else, and all explanations give by other more knowledgeable people than myself! The only way to offer up suitable explanations would be to know when it happens, how long it happens, what is operational when it happens and what the temprature differences are. M1 point
-
first thing to do is to comfirm which Band you local celltower is on- your phone's diagnostics might show this, or download an app like Networ Cell Info or the like.1 point
-
Hi, and welcome. You say you are limiting the time the HW cycle is running because it is costing too much. Can you give more detail? How much? how are you identifying that the cost is hot water production? What temp is the HW set to? HW is better left on all day, rather than limiting it to 2 x 1 hour slots. Do you know what temp your HW tank drops to and what the ASHP can lift it back up to in an hour? For your space heating, do you have a buffer tank, or does the ASHP run directly to UFH or Radiators? If the latter, is there a permanently open loop so the ASHP has a min 100l of water to push around? 55°C is high for space heating, is that the temp you have it set to? and where is that measured, flow or return? In a very well insulated timber frame with UFH you'd expect a flow temp of around 35°C1 point
-
A few things spring to mind. HOW is the heat delivered to the rooms by under floor heating, radiators, or a mixture. When ALL the rooms are up to temperature, can you still hear the low level hum of a water circulating pump running somewhere? You say when HW is off, you only get tepid hot water from the taps. That does not sound right. Can you post some pictures of your hot water tank and any other pumps and controls you can see? Assuming you have a hot water tank, once it is up to temperature it should stay there all day only losing a little heat through losses. What is this "boost" that you switch on before a shower, again can you post a picture?1 point
-
That strategy also extends the longevity of the HP, which is a strategy I adopt with my new clients, and also helps avoid any possible ‘freezing’ of the unit in the winter / adverse months. Off peak rates ( 5p/kwh ) can now be utilised quite advantageously and using that plus PV during summer sees the ASHP having a very easy ( therefore long ) life. Ive just done a couple of ASHP’s ( PV + Octopus GO! ) where we’ve not bothered with the wet circuit to the UVC at all. Helps a huge amount as both have cooling in the summer and I did not want the ASHP doing 180 degree turnarounds from cooling to heating for no ‘good’ reason.1 point
-
Loads of details but after reading this last night and again just now, I still cannot get the picture in my head of what you are doing or wanting to know. a sketch or two? And or specific questions? I’m sure this is why no one has responded yet.1 point
-
The UK banking system now is much more secure than it was in 2008. So a UK bank default is much less likely than it was then, but never say never. In any case though, despite all of its problems, the UK is still a pretty safe debtor, and so as long as all your money is in separate bank accounts, with each balance below £85k and each bank covered by the FCS scheme, you will be fine.1 point
-
I'm a good way through putting up my internal walls and creating a cavity against an existing outer wall and I agree with @Johnny Jekyll it's been a pain. I'm the brickie, so no problems with me re-laying blocks umpteen times, or removing deformities on the blocks to get things as straight as I can for the PIR boards, but truly a pain. Beads or injected/poured PIR if a ever get the silly idea to do this again.1 point
-
Do as you chose to do. I have see it in practice often and advise it is is extremely poor practice. Often the cheapest grey polythene 9mm thick lagging too. Obviously there are a lot of people out there who have not given this much thought. The plumbers don’t seem to care from the reaction I have got, the builders don’t seem too interested as it’s a plumbers thing and the clients don’t know any better. Just letting people know that this should not be accepted normal practice if you care about conservation of energy. Heating pipes should be within the screed or laid on at least 25mm thick PUR insulation (with remainder of insulation thickness between pipes). If it is just the primary pipes that’s not quite so bad, these could be properly lagged with 25mm quality lagging as a minimum.1 point
-
I can always spend more. The house is "complete" but it is not "finished" You could write a thesis on the difference.1 point
-
They were all at fault. As soon as it happened they try to blame BC. But they were all ignorant and complacent in it. The architect had no real idea about cladding. The cladding designer seemed to have little idea. The contractor did his own thing in substituted materials, little quality control and installed cavity barriers incorrectly. The fire engineer didn’t consider the details fully. The manufacturer of products mislead everyone (to sell products) in knowledge of concerns and the BC officer was mislead, over worked and somewhat complacent. Everyone though it was someone else’s responsibility to consider fire safety in cladding. I would pin the biggest culpability on product manufacturer followed by the confused convoluted works procurement system.1 point
-
Internally I'd go 50mm PIR fixed to the 140mm timber frame, airtight vapor layer, 25mm battens and then the plasterboard. You don't have to have OSB on both sides. You do on twin stud walls and in some other cases but if you've only a 140mm stud then you generally don't need it. Obviously check with your engineer. The reason I'd go this route with the airtight vapor control layer is you can see it and patch it. eg if an electrician drills a hole for an external light you can seal the penetration or if an area wasn't taped correctly you can easily see and repair it. If you use an internal OSB layer as the airtight layer, then have PIR and the battens forming the service cavity you'll have to rip a chunk of the PIR off to enable you tape the electrical cable to the OSB or repair the poorly taped joint, etc. Also the airtight vapor control layer is a lot cheaper than an additional unnecessary layer of OSB. As a separate item I'd consider 35mm battens otherwise wider battens if using 25mm eg 65x25. When overlapping two sheets of plasterboard you're adding a lot of screws and the thin batten can split. It needs a bit more rigidity as it's the 50mm PIR between it and the main timber support structure.1 point
-
Same issue with risers within the building!1 point
-
Make sure removal of OSB skin will not affect structural properties of the wall, it may be there not only to keep the cellulose in place1 point
-
That’ll just be the tip of the iceberg, sadly.1 point
-
305mm wide cavity 3x100mm batts, they don’t like sliding over each other, crumple, roll up or leave gaps at the corners. the brickies put some in which I had to remove and re do as folded! I banned them did every bit myself.1 point
-
One thing I’d suggest if following Tony’s example-stagger the joints of the insulation sheets so there’s no chance of a small gap from inside to out.1 point
-
Why? It’s your build!, (unless your founds are already in?).1 point
-
Cleanliness is next to Godliness.0 points
-
Would it be enough in your loft?0 points


This leaderboard is set to London/GMT+01:00