Leaderboard
Popular Content
Showing content with the highest reputation on 03/27/21 in all areas
-
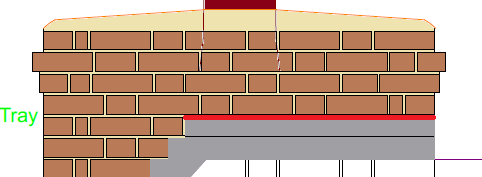
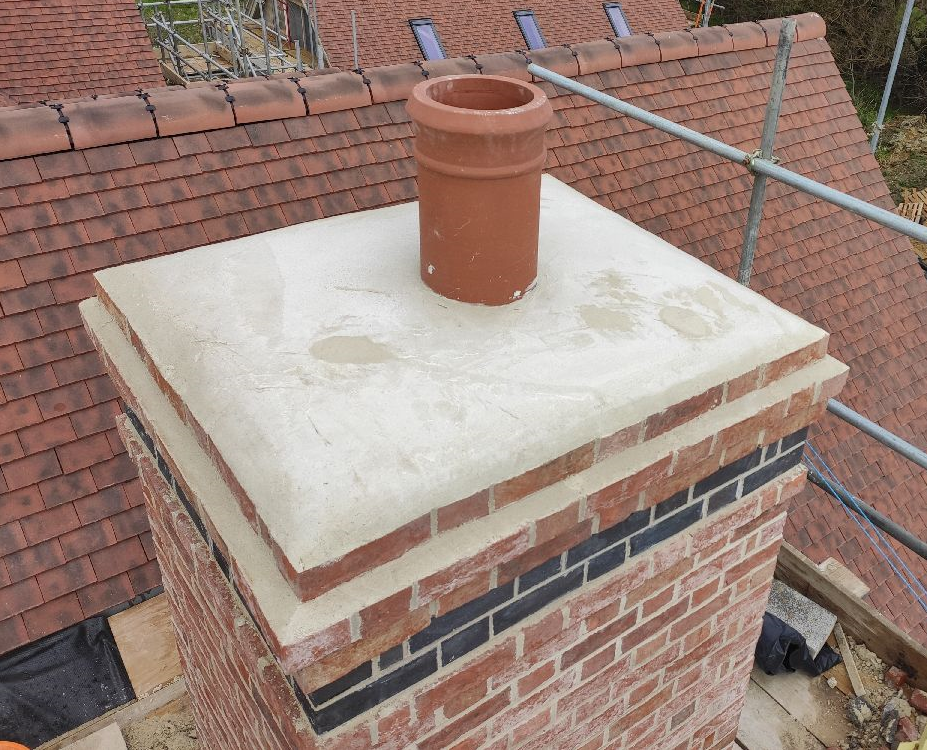
Well the main chimney is finished, then had to rush to try and save the flaunching from some rain which has resulted in some minor damage. A shame, but I guess you seldom see the top of a chimneys flaunching and it's more important that it is weatherproof. Here's a photo after I enacted a repair (approx. 3 hours after the rest of the flaunching was finished and in the half light). The perspective of the photo makes the pot look massively off centre, but it is in the centre. The second chimney is up to the level of the second lead tray. The tray is placed on to protect the brickwork from any rain before it's finished. I'm still liking the hybrid approach of having the tray sticking out around the back and part of the sides (shown red) and folded down over the flashing. Round the front and part of the sides cut back to flush with brickwork.2 points
-
Thank you Roundtuit, I will keep this post regularly updated of any developments. If I can help anyone else avoid this nightmare I would be really happy. I wouldn’t wish this on my worst enemy. It’s so unfair.2 points
-
1 point
-
Sharp sand, laid dry and levelled into the hollows. Then Celotex, slip membrane and screed.1 point
-
1 point
-
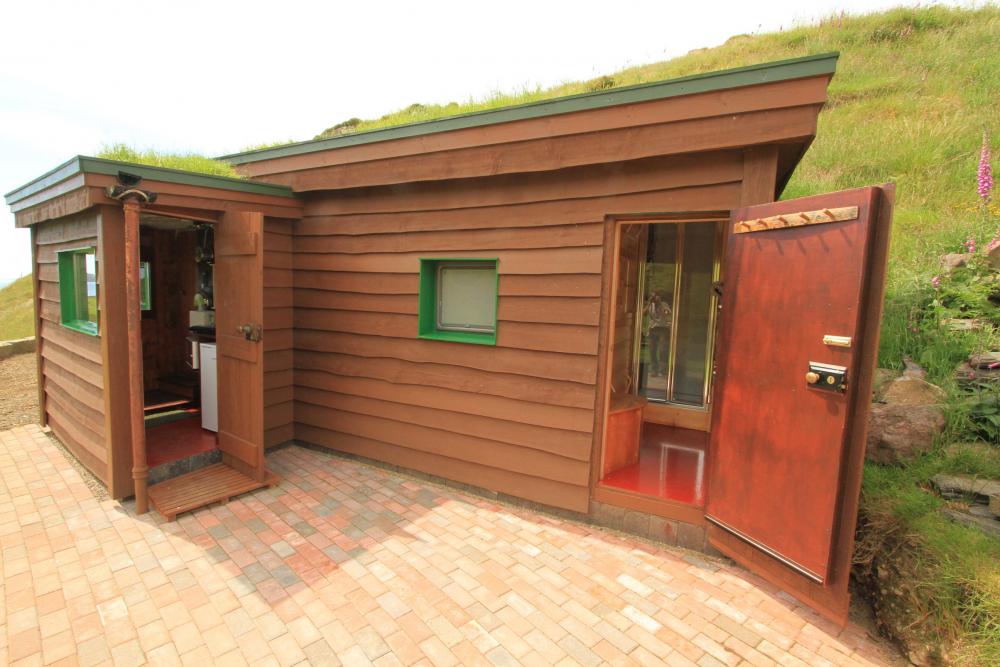
I clad my cabin with Scottish grown larch 7 years ago, I paint it every few years to keep it looking smart with Cuprinol and the larch is as good as the day it went on, there is absolutely no movement that would be cause for concern and no distortion at all, I really could not be happier and it’s definitely my go to material for exterior use. I used minimal fixings - single row of ss ring shank nails along the centre of each board and ss screws in window work etc. I did all the work myself and was very carful with grading the timber and making sure that the overlaps were sitting down really snug on the board below it, using a draw knife to shave off protruding edges. The painting could be an issue for a bigger property but then you would just use a much better quality paint rather than the budget Cuprinol ducks back that I used for £10 for 5 litres.1 point
-
1 point
-
All good, was just the angle in the first picture, as Dave says hopefully a new plug and fuse will sort it out1 point
-
1 point
-
These do not need to be airtight. Just having the floor at the base and the ceiling at the top will be fine. Important that the insulation and vapour control (tape or poly) are intact and no external air can enter the service void.1 point
-
The battens give you a service void space - to fit cables, sockets and switches. If you need to fix heavier stuff like rads you can add wider timbers to those areas. You could fit polythene over the Celotex before battening, or use aluminium foil over the joins. There is not much point in adding 25mm mineral wool in the batten space. It will prevent you adding other wiring etc later should you want to. You could consider leaving a gap in the battens for wiring to run horizontally. Apparently if you have a socket on the wall you can run power cables at the same level so that if you decide to install another later on you can just cut out and install another. Your 50mm of Celotex will make a huge difference. Leaving the batten space empty means it is classed as a low emissivity gap and counts a bit towards your total u value.1 point
-
A fuse, by it's nature is a resistor, and will get hot at close to it's full normal load. Fused connections units of some makes are notorious for failing like this, often with a fishy smell.1 point
-
Moulded plug syndrome... seriously tho? the heater takes a fair bit of juice and there's a degree of heating and oxidising at the contacts of the fuse due to this current. This is a vicious circle- heating reduces the springiness of the contacts in the plug, makes more heat, causes higher resistance, which makes even more heat... it's why it's worth taking a look inside any plug that is on something over a kW, every now and then.1 point
-
Welllll.. *maybe*. Look, fact is that this entire awesome forum is full of people who surely have their weaknesses and gaps in knowledge (or at least I do) but are designing super custom, eagle-eyed eye for detail houses. That level of detail will be wasted on people who have not spent that much time. If I were someone like that, I would look for 'tell tale signs'. While selling my house I would make sure to mention that this house is exceptionally well-crafted and give a few examples. Someone with 'bags of money' would certainly be positively influenced by that, but also still check for things that they often get told about objectively much crappier houses than 'ours'. My real estate agent would speak about service voids and acoustic isolation and hot return. a competing house's real estate agent would point at in-ceiling speakers and underfloor zones everywhere. THEY would make a point of those things, and for you to have zero answer would not be ideal1 point
-
I expect the sort of buyer that might be concerned the house has cold bedrooms, will have long since given up by the time they have found the whole house is heated by a 5kW ASHP, it has MVHR, it is air tight, triple glazed windows and has solar PV. Throw in "passive house standard" and they have gone running to find a Victorian house with a gas combi boiler and radiators.1 point
-
No I wouldn’t seal it If you were looking to seal it You would add a airtight membrane prior to pp Crack on1 point
-
I found blue grit a pita to use. I tried on some green mrpb here despite everyone telling me not to bother! I skimmed straight on the board.1 point
-
Yep likewise - really helpful and they do a variety of products and thermostats from the cheap and cheerful up to the WiFi enabled ones. Mat is quicker to lay - prime the floor, let it go tacky and then roll out the mat. If you’ve got the height then a quick layer of self levelling over the top and you’ve got a perfectly flat surface to tile over 3 hours later.1 point
-
I never thought that I could just fix anything to the actual cupboard units, that was just meant to cover everything The wall unit is 307 deep so I was planning to do exactly what you've said, fix a timber frame to the wall for the toilet frame to fix to, to bring it out to the front of the cupboard unit. The only cupboard unit my Mum likes does have the setbacked toeboard, but I'm sure I will be able to bring that part out where the toilet area is (and leave the other units toeboards set back). I'm sure there's a solution there.......................... I have hit a small issue that you've given me a possible nice solution to. The toilet cupboard unit may not be available anymore, so it might be a nice feature to as you did and frame then tile it.1 point
-
1 point
-
I used Gypsum contact adhesive on moisture boards for years Blue or green grit The last three or four years It’s stoped appearing in the bill of quantity So no Skim or tile directly onto your green boards1 point
-
Harry, Harry, Harry. Have you been a naughty boy ? Threat of enforcement, more threat of enforcement, a few letters either way, and i can see that taking a couple to Three months. The head of enforcement will then have a couple of internal meetings at the council, where it will be discussed. What have you done wrong, who has complained etc. This will include the councils legal bods, because they will know that if enforcement is served, and you take it through to appeal and win, it could end up costing them a considerable sum of money. ( all councils are skint) If the breach is not massive, they may decide to take no further action. Sometimes, they will have a quiet word with you and let you know that if you put it in for retrospective it will get passed. One way to think about it is........ let them know that you are having some drawings, etc done, and that you will be submitting that to planning as soon as available. Keep in touch with the enforcement officer and make sure that you avoid an enforcement notice being served on you ( very important ) Stall on the retro application for as long as you can, but have the papers ready to submit so when the enforcement officer gets the hump, you can put them in before the enforcement notice is served on you. Planning app (retro) now in. Council will prob take the usual 12 weeks to consider, and give you a decision. (Lets say refused) You now have 6 months to appeal that decision. Tell the council that you are preparing the papers for appeal. Keep in touch with the enforcement officer, and stall out as much of the 6 months that you can. Bung in the papers for appeal. the average is 9 to 12 months for the appeal. You get refused at appeal, at the enforcement person is back on your case.... Stall him out for as long as you can. He will have to go back through the council meetings again. Eventually, you will get served with an inforcement notice. You don't comply and you string it out with the enforcement officer for as long as you can. Say 3 months. Appeal the enforcement notice. 9 to 12 months to be heard. You get refused, and now you are prob left with a couple of months before the council start really coming at you. On each of the processes above, you change small things, (planting for screening) changing the colour of the dormer so it stands out less etc, etc. You can prob end up with a process that will string out for 3+ years. How do i know ? Because my mate is the head of enforcement at a council. Hope that helps you naughty boy.1 point
-
Best UFH for bathrooms are the single wire heating mats that are not very expensive at all and can be laid by your tiler and installed by your electrician. I got mine here http://warm-star.co.uk/1 point
-
Half way through is ideal. If you want belt and braces ask the concrete company to put fibres in the mix and it will be bombproof.1 point
-
I am one of many that chose not to fit UFH in the bedrooms. Several years use including a long very cold spell this winter has proved that bedroom heating is not required in a well insulated sealed house, even here in the Highlands. I installed cables to each bedroom for an electric panel heater. Even those have never been used and no panel heaters have been used, not even portable plug in ones.1 point
-
NO! It's shit and weakens the mortar. It's less than a fiver: https://www.screwfix.com/p/cementone-cemplas-mortar-plasticiser-dark-brown-5ltr/63831? https://www.toolstation.com/everbuild-202-integral-liquid-waterproofer/p80460 Stick any leftover on Freegle. I usually add like a litre to a builders bucket of water and use that. Besides proper stuff probably costs less than Fairy anyway. I'd be putting it in the slab mix too. The de-aerating qualities saves a lot of tamping to get the air out. Why aren't you mixing your own concrete for the slab. 8'x10' slab. Done in about 4 hours on my own. I think actually the waterproofer I used was Sika, scored off a site in that big yellow 25l tub. I then used the Everbuild waterproofer below for the brickwork:1 point
-
Fussy tart! ? Take a photo of the tiles. Blow it up to A4 and laminate it. Hang behind the waste, in front of the pipes ?1 point
-
I did ask before, have you found out if you have legal cover with your house insurance/mortgage???1 point
-
Sorry, can't add anything other than 'Good luck!', but please keep us informed. Your neighbour sounds like a weapons-grade ar$ehole, and your journey through this (whatever the outcome) will be helpful to others.1 point
-
IF you were planning to tile the room anyway, then i think the cost difference is minimal. You buy a wet room shower former instead of a shower tray, and you buy a tanking kit which includes a tile decoupling and waterproofing membrane. The finished result is vastly better.1 point
-
I always like horizontal cable runs about 450mm from the floor. leave a good bit of slack in the cable (providing you have 50mm of cover, ie; behind battons) If you then want an extra socket, say inbetween Two existing sockets, cut a hole in the plasterboard, and the cable is there waiting for you.1 point
-
A lot of people don't realise you can run cables horizontally in a wall (I had a stand up finger wagging argument with a builder who tried to insist I could not do that) As long as there is one socket in the wall, it creates a safe zone both horizontally and vertically from that socket where you may run cables.1 point
-
Sorry I should have been more explicit. No pipes buried under concrete. Service hatches for the back of shower mixers. Pipes run under cabinets or in accessible service cavities. Have some kind of removable ceiling tiles to access the underside of the upstairs shower waste. I almost managed it. But the plumber was a moron and managed to install extra fittings where they weren’t needed hidden inside stud walls. Also there’s a small amount of water appearing from under the bath and I’ll need to remove some skirting board to take off the shower panel. Grrrrrrrrr1 point
-
Would do again: Induction Hob. Always preferred gas but the induction hob has converted me. UFH Open plan kitchen / family room (with separate formal lounge that’s only used when people come). Would like: ASHP Single Phase electric so that I could get a smart meter and use a variable tariff. PV instead of solar thermal. Boiling water tap. 2 dishwashers. Plenty of room for this and a house this size makes it easy to justify. Larger utility and services rooms. I could easily spare a metre off the main kitchen / family room and not notice but this space would be very beneficial in the utility and services rooms. One of the showers to be electric so that if the boiler failed I had a backup. Wouldn’t do again: Central vacuum. I just never use it as I have 2 cordless vacs (one upstairs, one downstairs) that I just whizz round with in less time than dragging out metres of vacuum pipe and putting it away again afterwards. Electric boiler (would have been much cheaper to run an oil boiler even if less green). Installing the MVHR unit in the loft when it would be much more convenient in the services room.1 point
-
Sollution: Create a service void for all the wiring. Fit at least one socket on every wall. run cable at socket height around the whole room in the service void, then you can cut a hole and fit an additional socket anywhere you find you need one.1 point
-
We are doing it all again UFH again ASHP not included on the first Lack of gas supply on the next two has forced our hand German Kitchen again Instant hot water tap again I thought we had maxed out with insulation Add even more this time Things I thing are a waste of money Bifolds Look great Hardly ever use them Sliders or French doors more practical Woodturner Looks great lit Novelty soon wore off Radiators in the bedrooms and bathrooms We’ve never needed to use them Solar panels Look horrible Take forever to pay for themselves Electric gates If we hadnt of intended selling we wouldn’t have installed the gates I joists Posi a little bit more expensive But much easier to get all the services in I’m sure there are things I’ve missed ?1 point
-
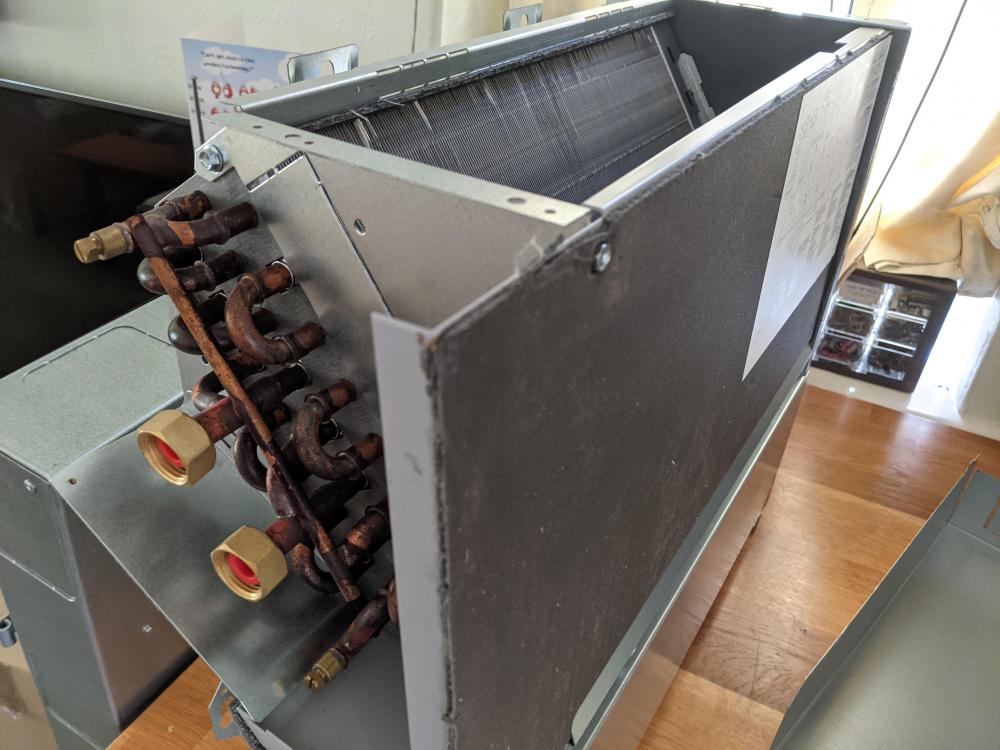
Well 6 months on we finally got this working! I won't quite say commissioned yet, as we're still running the FTC6 in single zone for fan coil + ufh, but now the plumbing is all complete I can think about getting the control systems properly working. (I say plumbing is complete, there's still a broken flow sensor to replace) Progress has been so slow with our MCS installer I actually got my main contractors plumber to help me debug the fan coil yesterday. The issue was obvious, looking at that photo above the red things in the threaded connectors are bungs. Kinda important you remove those before hooking it up, else no water ain't flowing anywhere. Would have been nice if the MIs has mentioned that! Being in the loft, this is obviously the highest point in the system by quite some way, so bleeding the system has to happen here. It has manual air release vents but it'd be nice to have automatic ones (or a system fill point up there next to it) to allow single person system pressurisation. Anyway, bit of a faff but I think this is really going to pay off come summer. It's amazing how no one at all on our build has ever seen anything like it. Thanks RHI random restrictions. They're so common on the continent. Glad I read about it here. In a pinch a plinth heater would also have worked I think, but for cooling we'd have to DIY build a condensation tray and ensure it doesn't get into the electrics.1 point
-
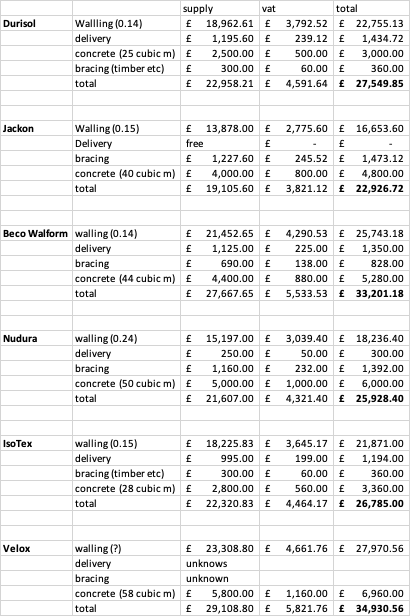
So all of the ICF quotes are in. I've tried to standardise them as much as possible, but some have interesting notes which I'll detail below. Putting this up for others who might find it useful in deciding their supplier or working out costs, but also for any feedback or thoughts from the more experienced (that's all of you!). Our build is approx 220sqm footprint and 260sqm of wall. Durisol includes a 22% discount that they put on without negotiation Beco Walform have quoted for the 375 but say the 313 would save around £8K (inc vat) and only increase the U value to 0.165 (though the published value is 0.18) so much better value Nudura say that a U value of 0.24 is plenty and anything more gets really expensive Velox includes the steel that goes inside the wall. I've included a price of concrete at £100+vat/cbm. This is a little on the high side, but it gives comparison. None of the quotes include rebar (if required [except Velox]) - would have to wait for SE calcs. Can anyone suggest an amount (in £ or quantity) that they used on their build? I know that we'll be able to reclaim the VAT on a new build but were costing things as a worst case scenario. Labor to construct I'm guessing at 9 days for 1+1+me: 2 days build, 1 day pour (lower ground). 3 days build 1 day pour (upper ground). 1 day build, 1 day pour (gables, finishing off etc). Hope that helps someone and thanks for your thoughts!1 point
-
0 points
-
0 points
-
Have had to have it sprayed with a biocide just a year in as it'd started accumulating green and black mold. It's warped quite significantly in many places and has needed repair. Lots of sap coming out, requiring cleaning up an repainting where not left natural. Significantly distorted aging from panel to panel, do we're treating it ourselves to try and help even it out.0 points
-
0 points
-
0 points
-
0 points
-
0 points


