
Leaderboard


Popular Content
Showing content with the highest reputation since 07/20/26 in all areas
-
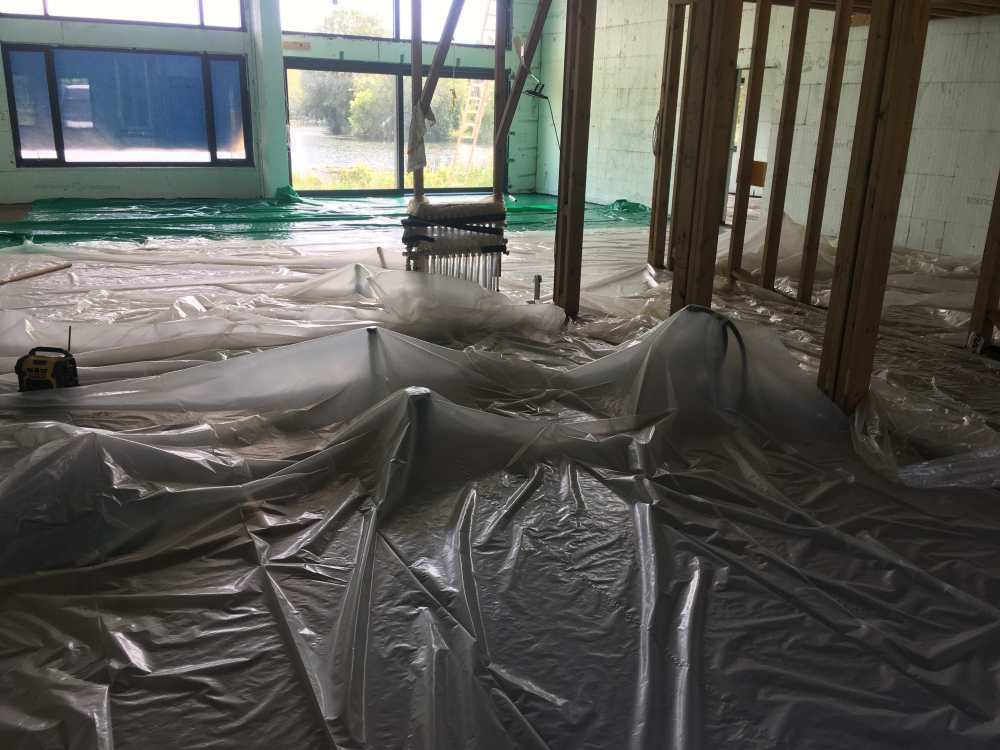
Block and beam? No! Ground bearing slabs. A decision that has given me sleepless nights and resulted in some serious hard graft. We had 60 ton (that’s what we were told 🤔) of Type 1 MOT delivered and had to then proceed to get into the bays and levelled up, before compacting it. The brickie was an arse as he should have stopped building and said “get your hardcore in and laid”. His work was rather shit, so I knocked some of it down to enable me to get a dumper in distribute the piles to make levelling it quicker. Building control were fine with me using grano dust as the top layer. This compacts nicely and gives a much harder surface than sand. Below are a few pictures. Hoping to get everything finished by tomorrow. I’ll breath a sigh of relief that it’s done and dusted.7 points
-
We're first timers in our sixties, renovating a 200 year old Gloucestershire property as our last home. It's very basic (no central heating, damp) with a stone centre, brick semi-added pre 1860 and s 20th C. extension at each end. Removing the plaster and some ceiling my wife has revealed questionable [cough] building techniques which explain some of the cracks and a patched up Inglenook which we plan to restore. Early days but we have a builder and architect for a garden room style extension. We have lots of ideas and plenty of time, but of course not enough money :-) If you've done anything like this by all means tell us we're barmy, it just say hi. Met a couple this morning and got chatting about this, and they recommended this forum highly. I'm learning so much useful stuff from others offline and online. For others I can recommend Mastodon (a non commercial social network - no ads or algorithm getting in the way). Posting questions there has been a great help.6 points
-
Lift the 5a one as much as possible, then same for the socket to see if you can hide this. Plasterer was shite, decorator equally as guilty. Just unbelievable that this incredibly low standard of work could have escaped the 80’s and still be so prevalent today in 2026. I bet neither of those two tossers houses look like this. Utterly embarrassingly low standards from these people. The ‘fix’ is to remove the outlets, PVA the openings, apply EasiFill and allow to dry fully, then sand and paint, then, repeat if necessary, and paint. If you have a PM then send the bill to them.3 points
-
I was recommended a screed company, I was told they are absolutely shit hot, I met the main man and he knew what he was talking about, I asked about screed curl at the edges and covering the screed to slow down evaporation. he said it wasn’t necessary. so I did some more reading and asked a few questions. they did the screed, an hour after they had gone I hosed it down with a very fine mist spray, I then covered it in polythene and also covered all the windows to stop the sunlight coming in. the result is I have the flattest most level screed I’ve ever seen. you need to satisfy yourself how it should be done, and any short comings in your opinion you need to make up. buy the polythene and install it yourself or do you due diligence and insist on a curing agent. if you think they are good why do they not want to cover it ?
 3 points
 -
Flanagaj, I think maybe you are trying to be a builder without being a builder. I write with sod all experience except my own troubled extension. We ended up having to ditch a bad builder and then decided (as we had a dry shell by then and good alternate builders were not available for 18months plus) to continue by bringing in trades to get to completion. It is not an easy process because unlike a proper builder... 1/ You do not have a little black book with several good contractors for each and every trade - people you know from experience are capable and you can work with. 2/ You do not have any real clout with trades because for them you are a one off customer - a few £k's or £10k's of business - builders will be known sources of regular business 3/ Some trades people may be wary of a novice builder, or sometimes take advantage. 4/ You lack deep knowledge and experience of your own - of trade specifics, trade tendencies, what to watch for, how to specify a job These things do make it difficult. Finding good trades can be a lengthy process where the only proof is in eating the pudding. These things affect timeline enormously, you can never call in a favour from someone, no one will ever call you looking for work, you are potentially the job that gets delayed in favour of others. For your slab specifics, do you have a concrete mix specification defined that is what they are going to meet. My SE sepcified the mix for us. And where you don't have a contract only a price/purchase order/invoice then I would suggest always emailing to ensure you have something in writing which defines your requirements. In case of dispute at least you then have something more than verbal conversations and a price. You can even then write down what the contractor has told you verbally about the job, answers to your queries, etc. But try and get someone you can talk to, I've always been able to talk to my SE or Architect or the QS that dealt with closing my original builder contract, to get bits of advice or a site visit.3 points
-
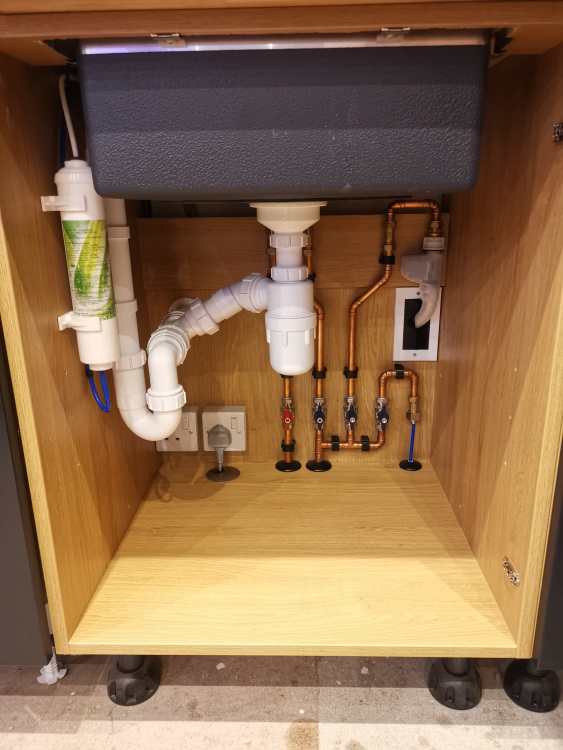
Why can't everything just be moved under the sink? Don't think I've ever seen any plumbing, water or waste behind the actual machines. Yes you lose the cupboard space, but so be it. My machines have a recessed section at the bottom so pipes can travel past it without interfering with the space. For what it's worth I did that in 2 places on the opposite sides of the room in my gaff, no regrets.

 3 points
 -
potentially use a 2 gang socket extension to bring out the metal work form the backbox that you use to fill into and upto, then remove when all filler is dried. ML Accessories | 2G16EXT | 2G 16mm Galvanised Steel Skeleton Extension Box | Superlec Direct2 points
-
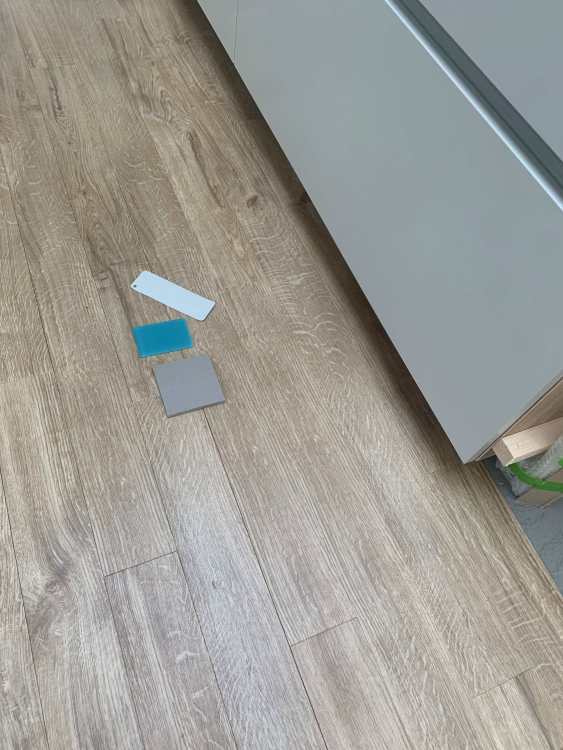
Number one. Not just because the more grey colours seems to contrast with the block, and overpower the eyes (this will lead to your eyes looking more at the smaller surface area of the wall and be distracting, rather than the feeling the blockwork is the wall, and the mortar just s supporting role) But because there are green tones in the first that will age better. Over the years this will allow nature to grown alongside it in a complimentary way. If you intend an ultra modern gravel and slab surrounding design, then fair enough, but anything growing next to the grey would seem like a weed in a lawn and out of place. (just purely my opinion and feel free to ignore)2 points
-
Are you letting it go silver? Have you viewed final "colour" with mortar as well? Image of our attached just as eg. Took us a while to choose whole "package"
 2 points
 -
It is subjective but firstly is your whole frontage brick, may make a difference.... We only have a plinth, (9 at highest where ground slops at back of house) so we chose high contrast mortar that "matched" the cladding. If it had been the whole house, would have been too stark for us, and maybe the planners. Having said all that my vote would be nit no.1 (too warm), no.3 if your looking for high contrast, no.4 if you want it to "blend"2 points
-
For future reference, these are a fantastic way of getting around bad edges. Several on the market, but these 'skim over' ones are loved by the plasterers I've fitted them with. As they can just go straight over. They even make downlighters ones2 points
-
For me this is a interesting challenge to design a solution. I appreciate that you find it far from interesting and it's a worry. Stage 1: One option I would be inclined to look at first is to install another beam or beams below the ones you have if it turns out they are so heavily corroded they are well below capacity. Remember we would look initially to design these for the latest loadings prescribed in the design codes. The following is based on using a trick we deploy when we are needing to support say a large opening in a historic building or repair steels, more applicable to you. The existing beams have a point of support on say the main walls. Thus in the round we know these are the strong and proven points. It's a reasonable starting assumption the walls locally will have pretty much finished settling in and around the existing supports, thus we want to put our new point loads at these positions. Let's say, as we don't have much information that the beams are supporting the ground floor flat but also an internal spine wall that runs up the building and it turns out there is a fair bit of load. It make the challenge more interesting. This is in a bit of reverse order. How do we calculate the loads and do some other thinking. Well the loads are easily calculated once we know the building layout, floor and roof span directions. From that we can calculate the forces on the existing beam/s. We would want to split these between permanent loads ( dead loads from the materials) and imposed ( live loads) from people, furniture, snow roof load etc. Next we would want to have a look at the existing corroded beams, try and identify their section properties when new and as they are now, corroded. We can then make a reasoned guess as to what their original design strength was and what it is now. The extra thinking comes for example as one obvious question is why has it not fallen down to date? Have the beams deflected a bit too much and shed load elsewhere. Remember a building does not often fall down until it has exhausted every alternative load path. This is what SE's often call redundancy, which helps stop what we also cause disproportionate collapse, like the domino effect. We would want to get a handle on this before we access any confined space. Any Engineer is going to want to do a pretty comprehensive dilapidations survey. This heads off any "adventure’s seeking to take advantage, but it also protects the honest residents if some further cracking occurs during the works. In summary stage one is doing some fag packet calculations, a survey and from that we can get a feel for how the building is "working". Stage 2: Again not quite in the right order but it easier to hold the narrative. Lets say we can install beams under the existing, then do some bolting etc to support the loads, maybe by stiffening the webs of the existing beams or by using other simple plates / angle sections. This means the new beam/s load the supporting walls in the same place, proven to have worked so far. The big thing is that there is a good chance you won't be able to get the new beans into the basement in one complete length. Thus splices will be required, which tend to flex a bit. Also critically the new beams won't take up the load unless we pre deflect them. For them to carry load the building would need to settle onto them.. high probability of cracking as we move up the building. There is a technique we use on historic buildings where we get the new beams in with a bit of clearance and then jack between the old beams and say the top of a new beam to pre bend the new beam so it takes up the load. We have calculated the loads so have a bench mark as to how much we need to jack / pre bend. We are only talking mm here so we would use say dial gauges. In practice what we do is jack it a bit then run up stairs and see if cracking is starting or if existing cracks are opening up, doors starting to jamb an so on. This takes time, it's not a one day job! Stage 3: As above and in reverse order. The new beams often need to rest on a new padstone below the existing one spreading the load from the existing corroded beams or we need a spreading arrangement. This is partly a detailing and practical thing. But once access is gained with a fair wind usually there is a way of applying the load to the supporting walls in the same place as the existing beams are. Again simplistically we just trick the building, it's sub structure into "thinking" nothing has changed above. But this is not an exact science and 99% of the time some minor movement will occur and that has to be communicated to all parties. Comment: Infilling the basement or sifting the loads to a different place invites lots of potential settlement problems and so on. You would need to investigate the basement floor and the soil under which is going to be less consolidated than the soil under the main load bearing wall for example. Construction safety is going to be the driver here in terms of a structural solution. I would look to have at least head height clearance for folk to work. Two means of escape from the basement. Make sure we have a good ventilation strategy during and after the works, avoid any welding, use of volatile paints etc and make sure there is compliance with all the regs relating to working in confined spaces. In summary it may turn out that the SE solution is not complex, it will likely need a diligent / experienced and well supervised Contractor. The hard part is herding the rest of the cats, project administration and agreement of where the liability lies etc. This goes along way towards explaining why many designers don't want the hassle of a project like this, the design fee has to be attractive not least.2 points
-
Fire Resistance.2 points
-
To put it into real life context, in the Steading we left a significant proportion of 600mm original wall exposed internally. This was for aesthetics and a historical nod. That would never pass Passivhaus which is an extreme target. I have no intention of sacrificing lots of money and aesthetics for the certificate that comes with a few % energy benefit. But many do and it's their choice and money (never regained in £ payback). We did get respect from the bco who agreed it was a good design feature, and we balanced the insulation by extra elsewhere. You are building all new, so can more easily tweak the insulation. Should be easy enough esp with a proper analysis with expertise. You say lots of insulation. What products?2 points
-
My Amtico fitter was outstanding. It is all he does and he is so good that he limits his quote area When he installed our >100sq m he trimmed every single plank on two sides at a 45 degree angle to stop the "glue squidge" problem. This was absolute genius and I cannot fault the quality of the install. I had some very fixed ideas about how I wanted it laid but all his "suggestions" were the exact right ones in hindsight. I have laid Amtico myself in a previous house and I got the "glue squidge" problem and a line where two plywood boards butted together, I was still pleased with my efforts but a proper professional makes a huge difference in quality Regards Tet2 points
-
I feel for the guy, having been through similar myself. This is a very difficult industry in which to pick one’s self up from, and restart, as you have to ask people to entrust a lot of money up front, and only your trading history and client references can perpetuate this. When little fish get knocked by big fish, it causes irreparable, or sadly often terminal amounts of damage. They seem to be genuine, and if so I wish them the best in reestablishing their business (and reputation). Thanks for taking the effort to post these details, a lot of people read them.2 points
-
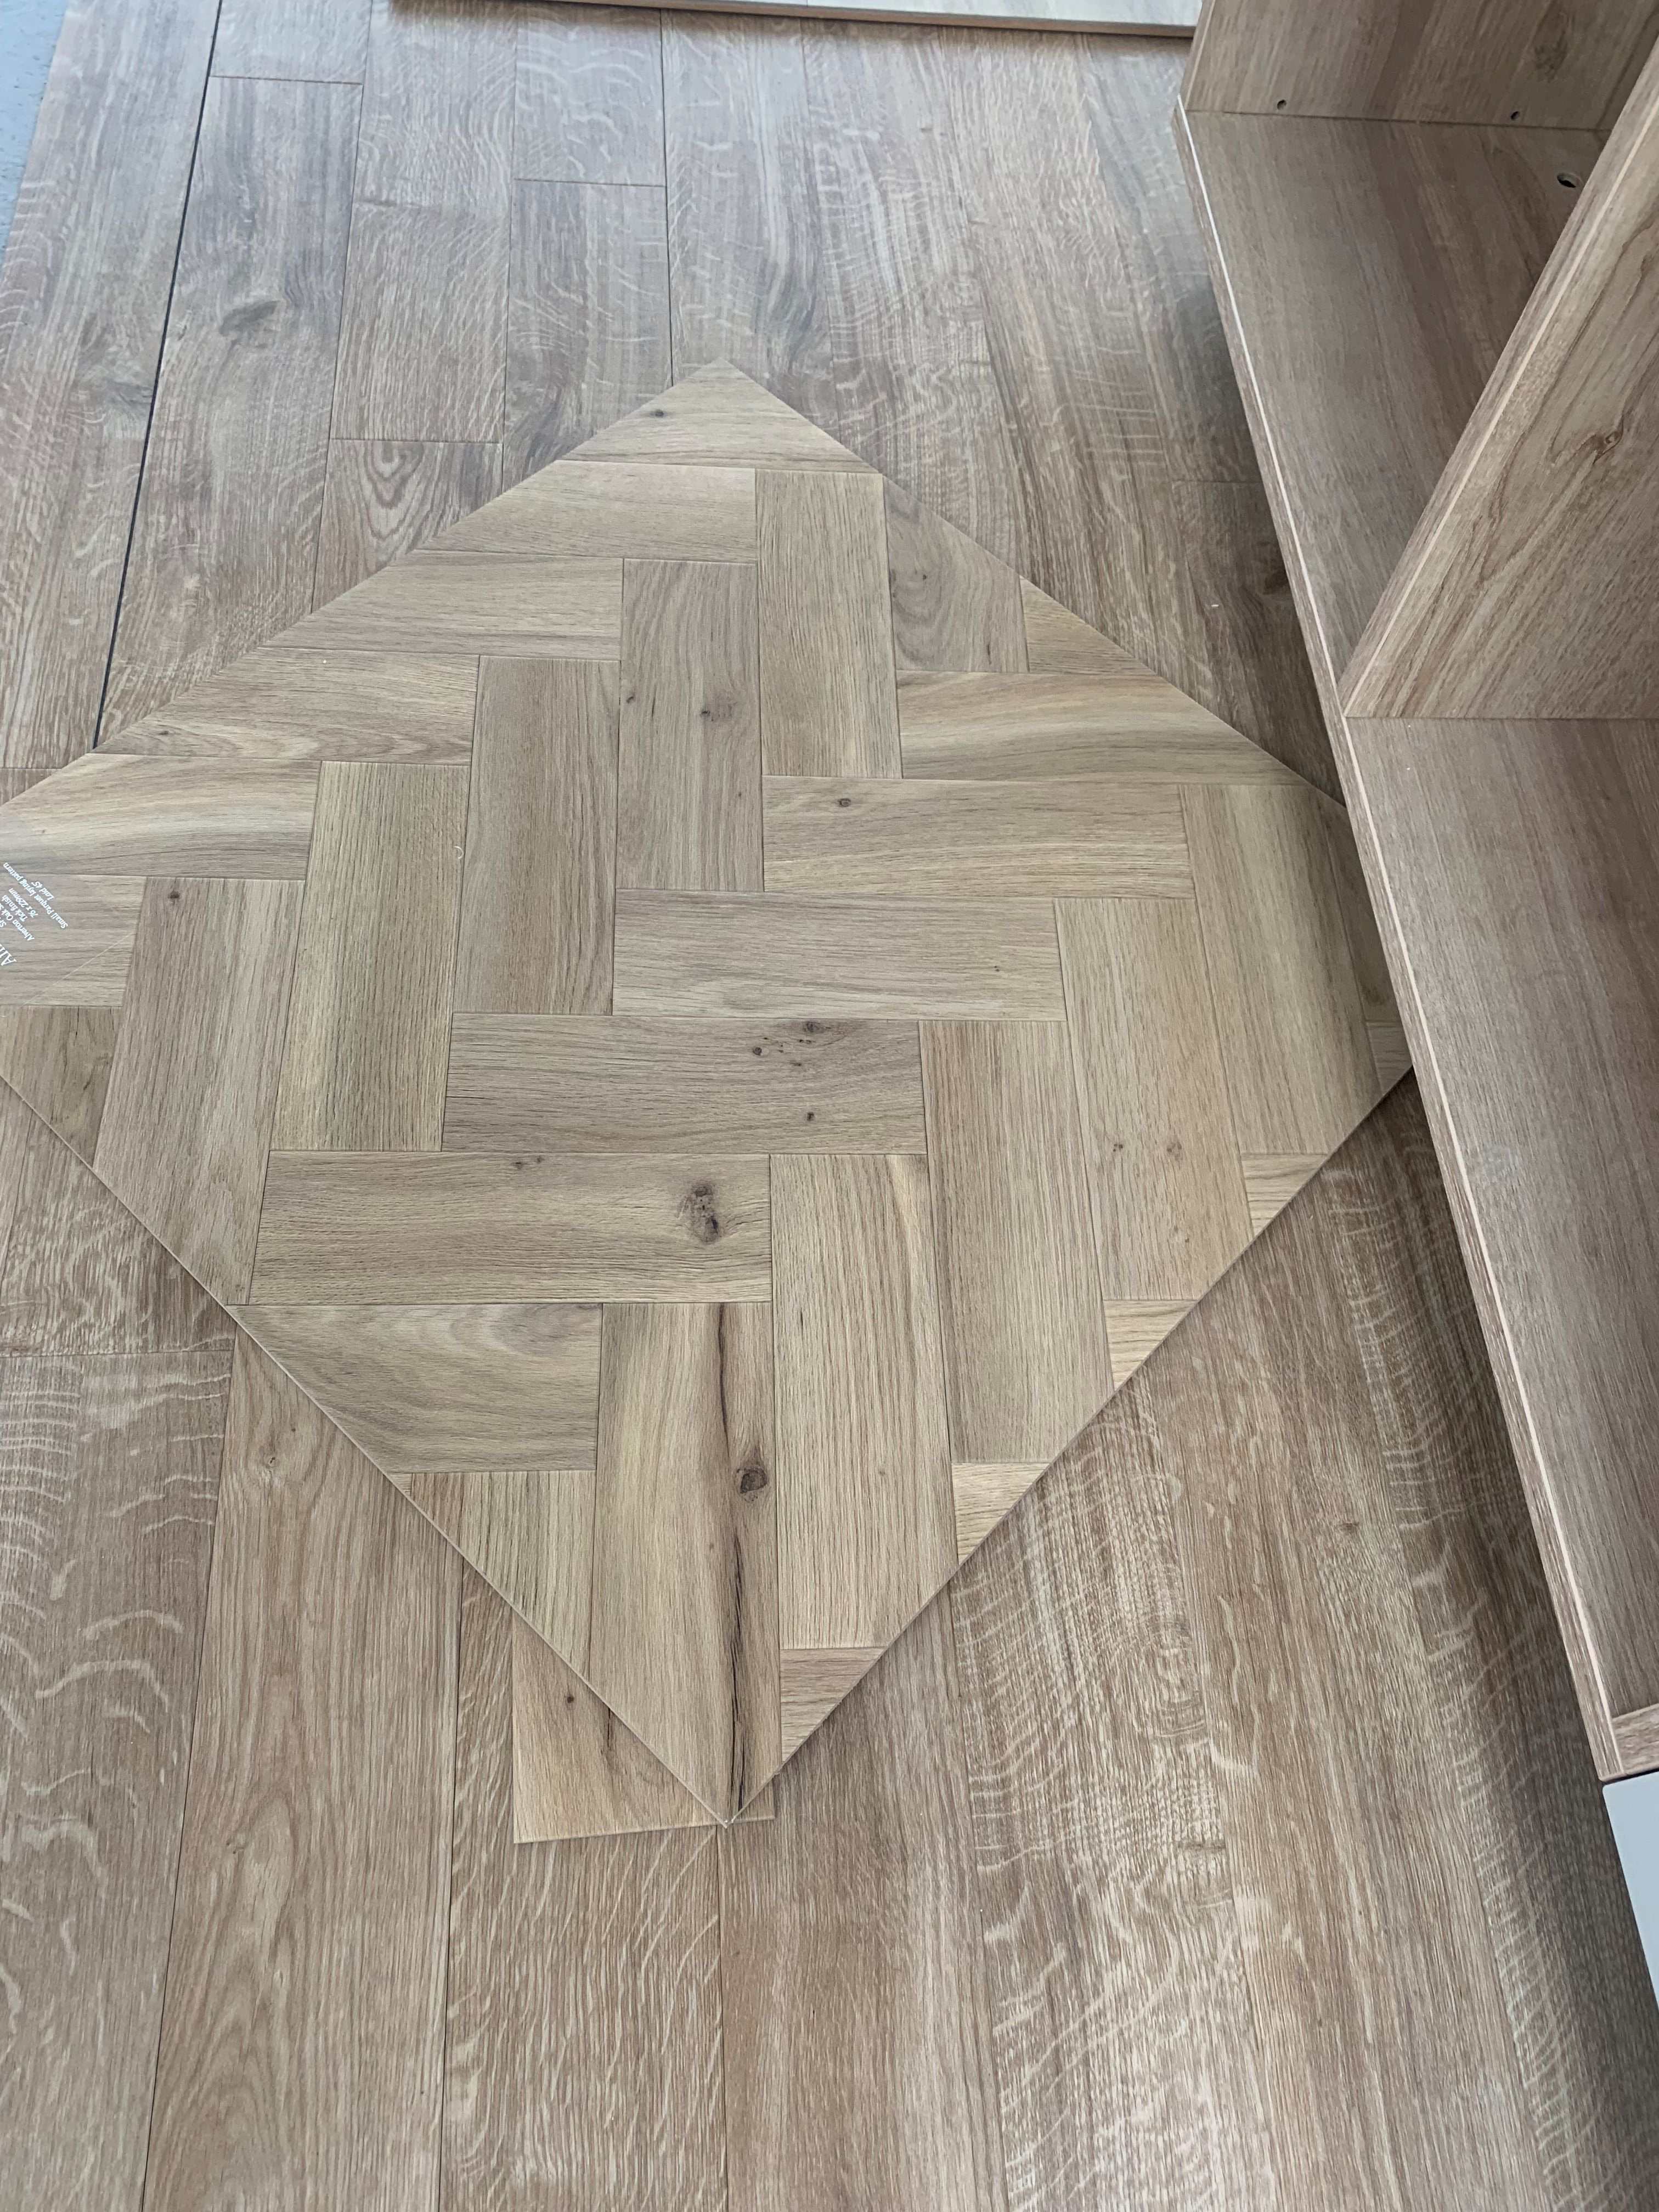
Amtico Spacia are the cheaper brand and the planks repeat more often than its more expensive sister-offerings You are also hampered by the laying pattern you have chosen. (IMO) Straight patterns show up repeats and duplicates more obviously. This is one of the reasons we chose a herringone laying pattern for our Amtico Spacia. Over time and especially as you fill your room with rugs and other furniture the repeat highlights will become less noticeable Regards Tet2 points
-
I am that plumber. During my renovations I had my washer on a hose that was about 5m long, absolutely no problem for like 3 years. Obviously not best practice but it certainly worked.2 points
-
Is this attached or detached? Fire regs may need that closed and FR. Closing as per the pic is normal, and garages are classed as cold ventilated spaces so why would you care about a small cold bridge when the whole garage is 'cold'?2 points
-
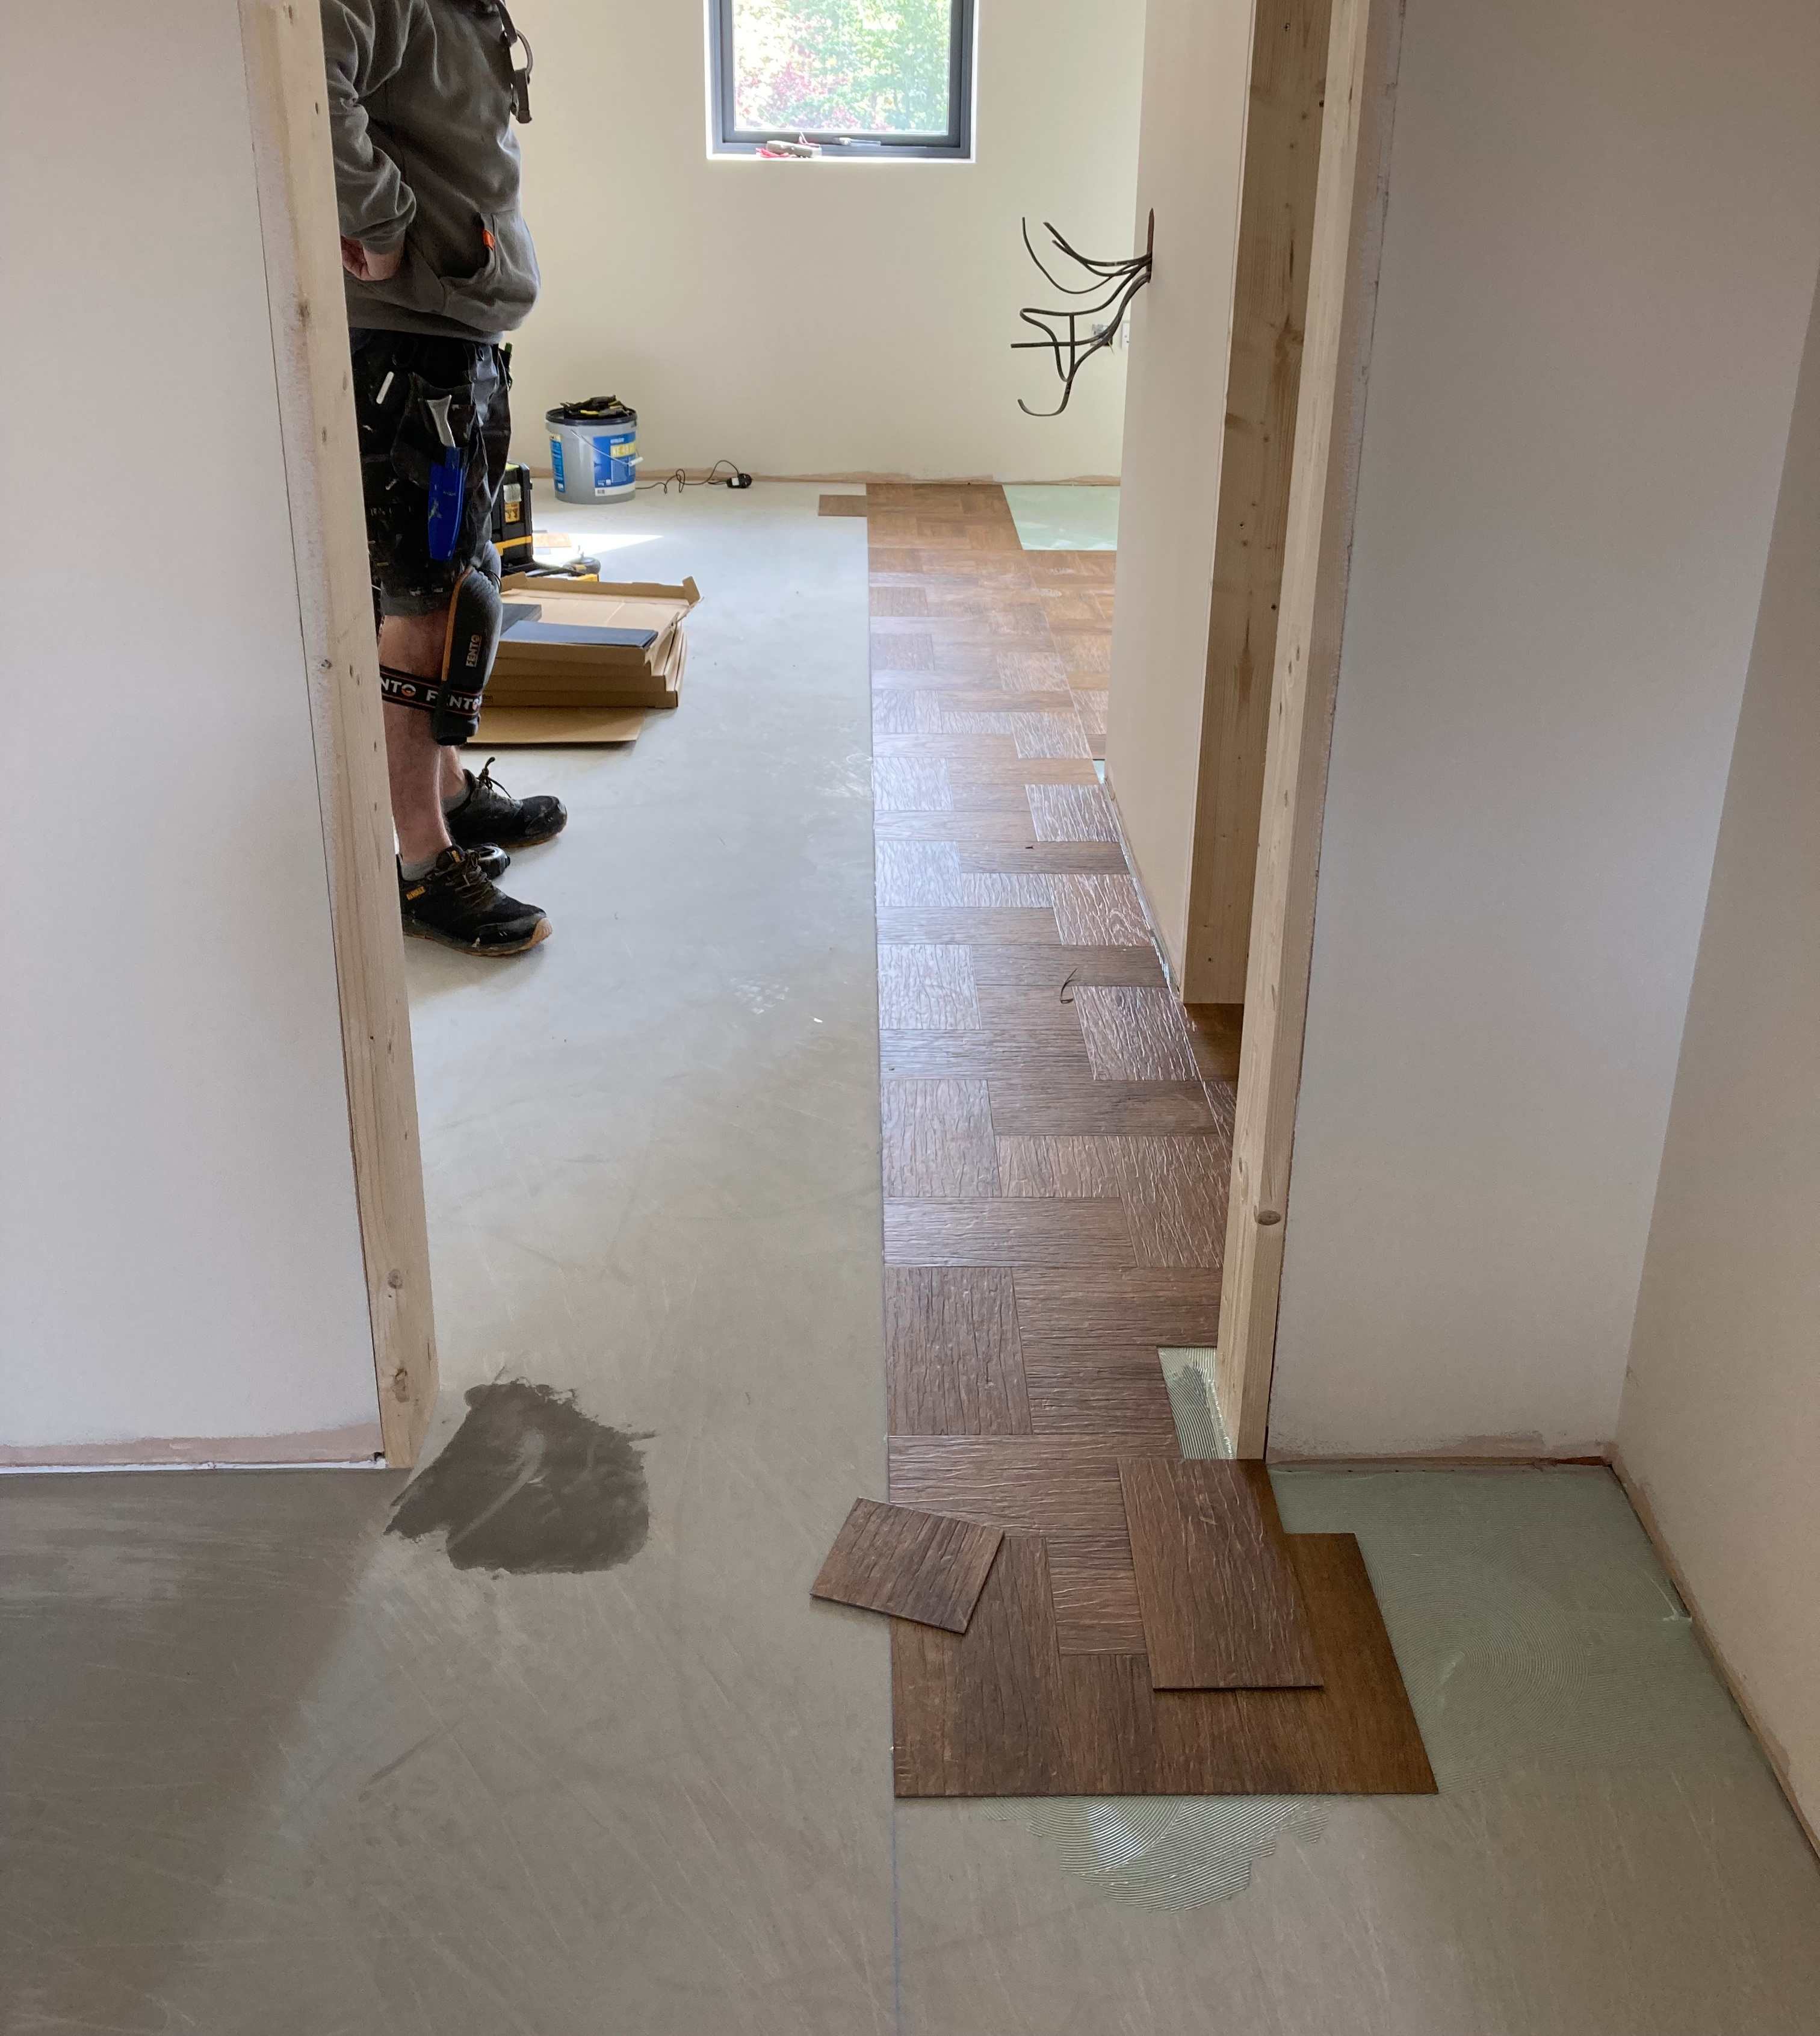
Our Amtico supplier/fitter provided the information when asked Our choice is both heavily patterned and embossed with a wood grain pattern. The format is 5 tiles (individual)in a 450mm square, so although there are repeats they are way less visible than they could be. Even then a couple of tiles were removed and repositioned during the process. At the end if the day they are not wood, and were bought with long term practicality considerations as well as aesthetics. Photo shows the initial laying out process (after the floor had ply and leveller) If you are really unhappy is it too late to change design now? Better that than live regretting it for the next ? years
 2 points
 -
Taped onto what? 90 bend is going to be tricky. Have a feeling others might have better suggestions but from what I know I would be wanting to use the old cable to pull through the new. (so total space occupied doesn't increase). Have one person pull the cable you are withdrawing and another feed in the cable you are installing. If the old cable is not stranded then will make things difficult. Easiest way is to cut an access in the plasterboard and then repair it. But if you've tiled or something then that's tricky. Another thought is can you abandon the existing cable route and make a new easier one. Finally, instead of feeding the multicore cable through, can you use the existing cable as a power feed for a smart controller installed locally. May be the last choice but guess you can hide a local espnow/shelly type device locally and connect to it over wifi/matter/zigbee/etc1 point
-
My memory is vague but I think that's about the point I stopped liking my 3d graphics course at university. (some of the best teachers I had were on that course, very keen on props and jokes) * It's possible I learned about that maths after that course but it's long enough ago that Silicon Graphics were cool so I think it's a an accurate enough story 😛1 point
-
Not planning on using dyes and will order the required 10 ton of sand in one go, so as to avoid possibility of slight colour shift.1 point
-
They are pretty crap AFAIK. You get ones with a small tank (15L) which then use energy continuously to keep warm and will give you reasonable flow for the first 15L and then cold water if you keep wanting to use water. Or you get them that heat directly on demand. The little 3kw ones you see advertised won't do much if you expect much flow (some limit the flow to produce the set temperature, in which case you will likely get a dribble). The 15L tank ones will heat the water to 80C to get the maximum storage from the small volume. They aren't well insulated so will lose a lot of energy to the surroundings. Compare this to a big well insulated cylinder designed to run off a heatpump (50C). The big cylinder stores less heat per unit volume but is better insulated, and the losses from the tank are much lower as the surface area/volume ratio is better AND the delta between the water and the surrounding air is lower. A good 300L tank at 50C will lose less than 2kwh a day. If heating with direct electric thats what 50p? If with a heatpump that's more like 12-15p. It's a fairly weak shower, especially if the incoming water is especially cold. If you haven't experienced it yet (or this is all you are used to) I encourage you to try the difference. Find some friends/airbnb's and try an electric shower vs a modern pressurised water tank fed system (not an older gravity fed system). Night and day. The government grant can be used for new houses so I would strongly check the rules before ruling it out. If not strictly covered right now, I suspect you could get creative with heat sources used during construction that you then need to 'upgrade' at the end. Insulation will be by far the best investment you make in the property both for comfort and running costs. Insulating an old building is hard and compromises will be needed, but in general if the compromise is a smaller room vs a colder room I'd go for the smaller room. Always1 point
-
If you’re going oil + UFH, you’ll need a large thermal store / buffer tank to accept the huge swings of heat that the oil boiler will inevitably output; basically you’ll struggle to use the heat as fast as the boiler is producing it. A thermal store with a hot water coil is an option, but you have to keep that very hot all summer so needs some serious thought / design input before pulling the trigger.1 point
-
If you want to go direct electric with no tank and don't want variable water flows (ie, slow kitchen tap if shower in use) then you either need individual units for each tap or a very big three phase central unit. TBH. If you want decent flow rate in a shower you need large units anyway 15kw+. The electrical infrastructure will add up quickly. Cylinder is the way to go IMO. Heat it via heatpump or direct electric (that's just a cost/environmental calculation). Direct electric can be relatively cost effective in use, but if you need to spend on bigger electrical supplies, large cables, etc, you could easily spend more. Plus the boiler upgrade scheme will include installation of the tank as part of a heatpump system. Installers tend to have healthy markups that somewhat defeat the point vs DIY without the scheme but I get the impression this wouldn't be an area you'd want to DIY anyway.1 point
-
What is that? All heat pums are suitable! Not all cylinders are suitable for heat pump heating. We just heat our cylinder now via immersion, we are on Octopus cosy tariff and it allows heating 3x a day on cheap rate. So although there are advantages using the heat pump we have just stopped bothering and immersion adds very little in real terms to our bills.1 point
-
You could minimise the staining by masking with tape but set the tape a tad wider than where the bead will finish. Do not plan to peel the tape off to give you as clean edge. That will lift the bead edge slightly and allow muck in to go mouldy. I used the Cramer kit. Cleaned the area first with Multisolve. https://flic.kr/p/2dDDn5o https://flic.kr/p/2dHvhmN1 point
-
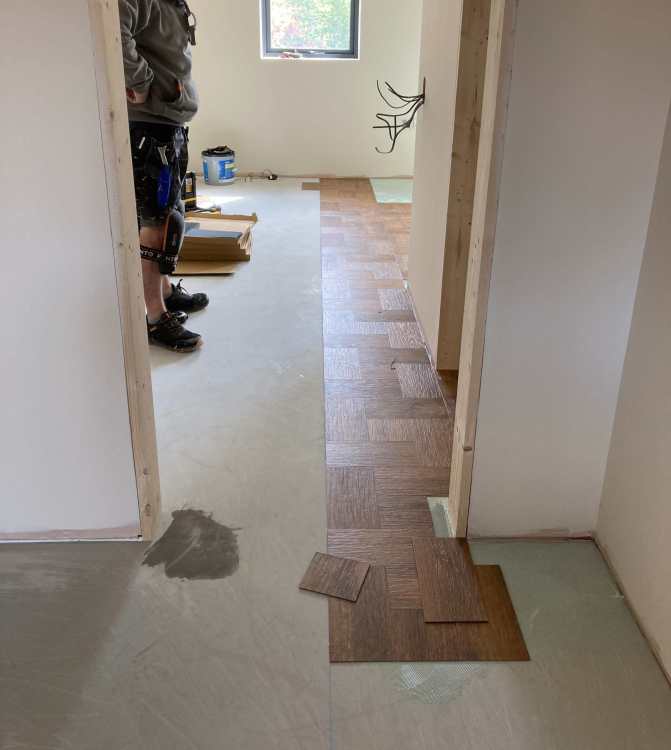
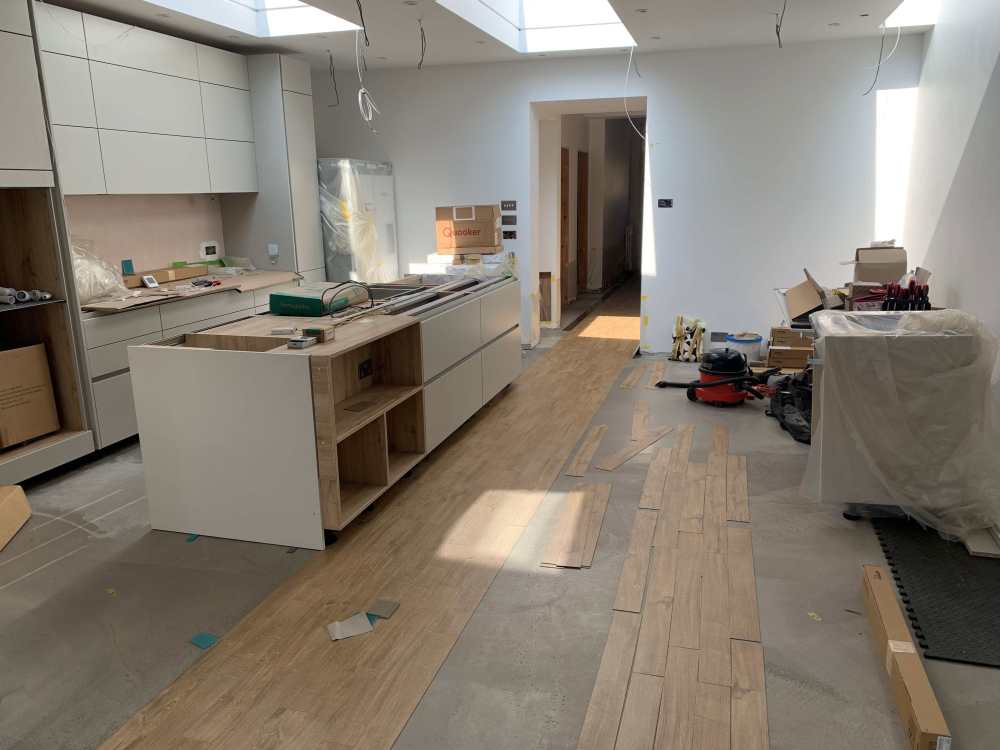
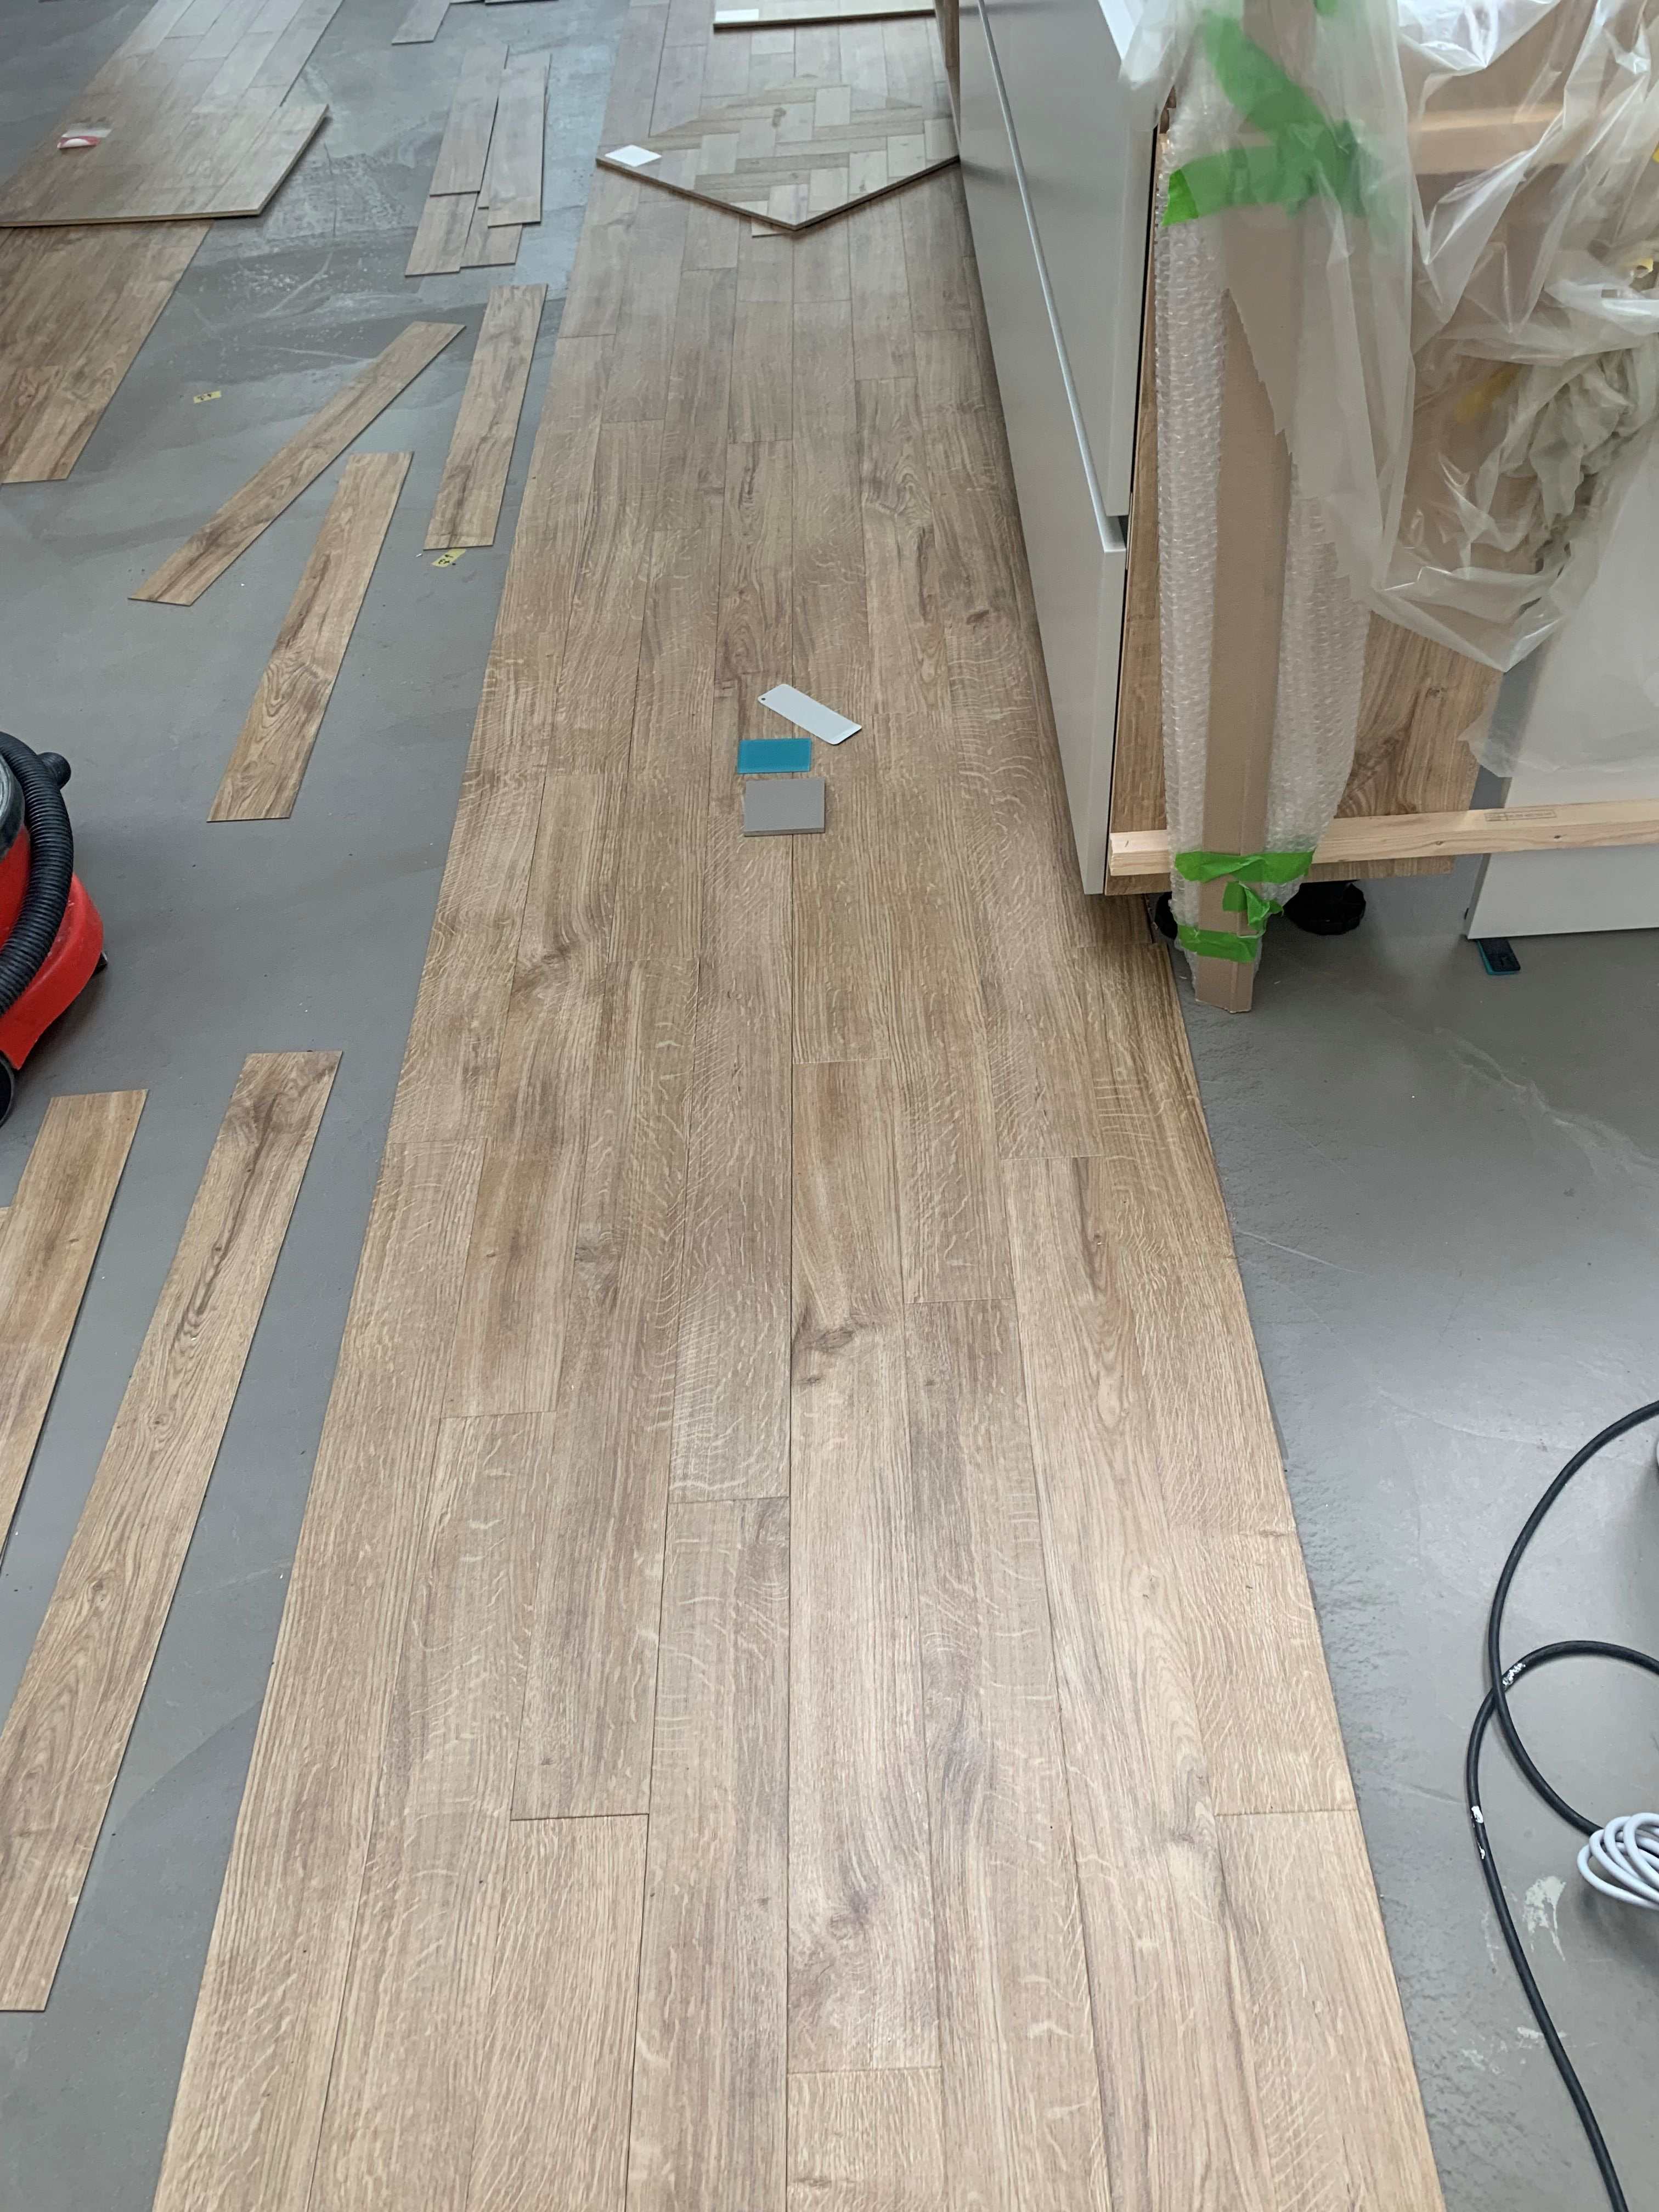
So we have been going around the houses, but I think we are coming back to where we started ! Young fitter laid the central strip 4 tiles wide on Tuesday and was happy to transpose tiles I had loose laid first. Has done a good job I think. Just one place where you can see a curved line reflecting the light and running fingers over it shows there is a small ridge running across the planks - he has agreed those tiles will need to be taken up and relaid. Seems unclear why the ridge (about 50mm wide) is there - whether it is the floor finish or some excess adhesive. Seems to follow a curve like a trowel would. He has loose laid another central strip 4 tiles wide alongside for me to rearrange as I see fit. Overall the current layout looks better than the first go, but still has a tendency to look marbled as much as planked when viewed over a distance. Not that keen on that, and so we took a rain check on laying more to go around the Amtico range again to see if there might be something better. Only found 2 alternatives, both Spacia, somewhat lighter in tone, and a 1 week wait to get even 2 boxes to lay out - Amtico completely control distribution and pricing, nobody except them holds stock. Only signature has a larger image area. Twice the price and we cannot find one we like. No featured oak in Signature, and generally speaking the designs/colours are a little more artificial and processed looking for our taste. Going with the fashionable parquet or herringbone layouts would hide the limited image size more, but we always wanted to emphasis the straight through line and feel these layouts may perhaps go out of fashion again. As time has ticked by I have grown more accustomed to the Spacia featured oak, and as it is more mid tone than our alternative of Alverton Oak or Westmere Oak, will probably hide dirt/marks better. So likely to continue with that this week now. I attach some photos and welcome any more comments though. I have some wider 184mm plank featured oak - interestingly in a box of 9 planks there are only 5 unique planks (or 1.2 sqm). So even less scope to manage repeats. I see no reason why Amtico should use such small image sizes in 2026 in the digital age. I can only suspect they have done it the same way for 25 years and have lost zeal for continuos improvement. Large open plan rooms is a long standing trend now. Digital image handling is now trivial. By not having any large floors on show they conceal their weakness, but ultimately evasion is never a good business plan. I have used ChatGPT to investigate other LVT makes and Moduleo seems to have the biggest pattern repeat, but have seen some mixed reviews. Yes I have become like a mum's net poster here, fussing over detail that may soon be forgotten if we ever finish. But in posting at length maybe someone else will find the factors in our deliberations might influence their own decision making. I would certainly encourage people to buy 2 or 3 boxes of an Amtico wood design and lay it out on their floor before making a final decision.


 1 point
 -
The Spain/Portugal blackout last year comes up as an example of why renewables are dangerous.quite often. Nice explainer video of what happened. TLDR: 1. The Spanish grid regulations did not use the capability of renewables to stabilise the grid. This made them reliant on fossil fuel plants for grid control 2. Earlier oscillations in the grid caused the grid operator to demand higher voltages to dampen them (as is normal practice) 3. One of the 10 fossil fuel plants had a fire and had to shut down leaving even less grid control. 4. Some of those fossil fuel plants didn't it comply with the procedures so the voltage rose more than desired but still below the threshold 5. Some PV plants had been misconfigured to shutdown at a lower voltage than they should have and tripped out. So the main takeaway was the Spanish grid was not well managed. It also makes the point that the model the Spanish used (relying on fossil fuel plants for stability alone) is not followed in the UK where the renewables are configured to contribute to grid stability1 point
-
Environment How to unlock unlimited geothermal energy, anywhere we want Earth contains more than enough heat to power humanity many times over, but so far only a few lucky places have been able to exploit it. Now we may have a way to tap this vast clean energy source almost anywhere By Katharine Sanderson 21 July 2026 A geothermal power station in Iceland’s Hengill region, one of the few countries with natural geothermal reservoirs that allows it to turn underground heat into power Science Photo Library Deep under your feet, Earth is hot. Really hot. Some of that heat is left over from the planet’s violent formation. More is continually created by the splitting of radioactive atoms in the rocks below. In a few places, Earth’s hidden furnace dramatically makes itself known, bursting through the crust as volcanoes, geysers and rivers of magma. Spectacular stuff, but also extremely useful – if we can get at it. Conventional geothermal power works best wherever geology has done the hard work for us: where fault lines crack the crust and hot water or steam rises close to the surface. That’s why countries like Iceland, New Zealand, Kenya and Indonesia can turn Earth’s heat into warmth for homes and electricity for grids, while much of the rest of the world has barely touched it. Its appeal is obvious. Unlike solar power, geothermal doesn’t fade when the sun sets, and unlike wind power, it doesn’t stall when the air is still. Over the past decade, advances in drilling have begun to loosen geothermal power from its geological shackles. Some projects aim to improve on nature, creating cracks and pathways where none existed. Others are more ambitious still: they want to drill so deep that geothermal power could work almost anywhere. “Ultimately, the whole world is the goal,” says Matt Houde, co-founder of geothermal energy company Quaise Energy. That would turn it from a niche resource into something far bigger – a way to tap the planet’s hidden heat wherever we happen to need it. How we harness Earth’s heat To convert heat from Earth’s interior into usable energy, engineers pump cold water into naturally occurring reservoirs in hot rock. There, it warms up and returns to the surface as hot water or steam, which can be used to drive turbines and generate electricity. The water is then sent back underground to begin the cycle again. It’s a simple concept, and unlike fossil fuels, geothermal heat sources are practically inexhaustible on human timescales. “If you measure in terms of the energy stored within the Earth’s crust, geothermal heat exceeds by orders of magnitude all hydrocarbons,” says Houde. The trouble is that traditional geothermal requires three ingredients to work: heat, water and rock that is permeable or fractured enough for water to move through it. “Traditional geothermal systems are very constrained to countries and regions within countries where you have this unique combination of conditions,” he says. That is why geothermal has flourished in places like Iceland. Sitting astride the mid-Atlantic ridge, the country has those core ingredients in unusual abundance. The global oil crisis in the 1970s pushed Iceland to exploit that advantage, and geothermal now makes up over a quarter of the country’s electricity supply. That may not sound like much, but Iceland’s geothermal plants can keep generating whatever the weather, making them a steady backbone for the grid. “Geothermal is really well placed to be the glue that will make low-carbon electricity systems work,” says Iain Staffell, a sustainable energy expert at Imperial College London. However, most countries don’t share Iceland’s good fortune. They may have heat or water or fractured rock, but not all three at depths that are easy to reach. Traditional geothermal plants are limited to mining heat from less than 2 kilometres underground. Go much deeper, and the engineering becomes brutal. Drills must chew through hard, hot rock. The vertical shafts that connect the surface to heat reservoirs, known as wells, must survive punishing temperatures and pressures. Even after all that, the rock may still be too tight and unbroken for water to flow through it. A worker surveys the vast interior of a geothermal cooling tower in Monterotondo Marittimo, Italy Alessia Pierdomenico/Bloomberg via Getty Images Still, the prize is enormous. The International Energy Agency estimates that geothermal’s technical potential is around 150 times current global electricity demand, assuming we can exploit heat down to about 8 kilometres. Conventional geothermal typically taps pre-existing reservoirs of hot water or steam in permeable, fractured rock less than 2 kilometres underground, leaving much of that potential out of reach. The implication is clear: to expand the resource, engineers must drill deeper – and create the underground plumbing that nature hasn’t provided. Enhanced geothermal The first of the new geothermal techniques does exactly that. Enhanced geothermal systems target hot but impermeable rock, typically 2 to 10 kilometres underground. Engineers pump in hot water at high pressures to open or widen fractures and create pathways for fluid to circulate. This is known as an enhanced geothermal system (EGS), and it is the most mature technology in geothermal’s new era. But this approach has a downside. Forcing water into deep rock doesn’t just create useful cracks. According to a 2023 review of the research, it can also disturb older, pre-existing faults that are already under strain. Many faults are held still by friction, like a heavy book resting on a tilted table. Pump water into them, and the pressure in their pores and fractures rises. That partly props the two sides of the fault apart, reducing the force clamping them together. If the fault was already close to slipping, that can be enough to induce an earthquake. An investigation commissioned by the South Korean government concluded that a nearby EGS project triggered a magnitude-5.5 earthquake in the city of Pohang in 2017. More than 80 people were injured and the earthquake caused an estimated 300 billion Korean won (£148 million) of damage, making it the most destructive in the country’s history. Is a broken jet stream causing extreme weather that lasts longer? Scientists are scrambling to understand how climate change may be interfering with the winds that carry our weather, with potentially catastrophic consequences Bill Ellsworth at Stanford University in California was part of the team that helped establish what role the geothermal plant played in the disaster. “In Pohang, they drilled a couple of wells that were a long way apart,” he says. The hope was that pumping water into one would fracture the rock enough to connect with the other, creating a route for water to pass between them and gather heat. But trying to force that kind of connection through the subsurface is risky, particularly if the drilling intersects faults that are already primed to slip. That is why newer projects are trying to be more deliberate, says Ellsworth. In Iceland, for instance, engineers try to create EGS reservoirs more gently without blasting them open all at once by pumping cold water slowly and at relatively low pressure. Over months, the cooling rock contracts and cracks, says Lilja Magnúsdóttir, executive vice president of resources at Icelandic energy company HS Orka. Iceland also has an advantage born of necessity: it is a seismically restless place, so the country has already invested heavily in monitoring. At HS Orka, that now includes using geothermal wells themselves as early-warning sensors. When magma begins to move, it compresses the surrounding rock, creating a telltale signal in the well. “It’s a really cool design,” says Magnúsdóttir. But even where EGS projects have learned to manage seismic risk, hard rock still makes an unreliable basis for a plumbing system. Fluid can leak away and contaminate groundwater, for instance. And the same fractures that make the system useful can also make it dangerous. Advanced geothermal One way around this is to stop asking the rock to carry water at all. Where natural fractures and reservoirs don’t exist, an alternative to EGS is to drill a sealed loop through hot rock. Engineers drill down, then sideways, until the boreholes connect underground, before lining and sealing them with steel and cement. That creates something like a buried radiator where fluid circulates, but never comes into direct contact with the rock itself. This closed-loop system is known as an advanced geothermal system (AGS), and it has been tested successfully in Germany, where Canadian energy company Eavor has developed a geothermal power plant at Geretsried, which began construction in 2022 and started producing electricity last year. Because closed-loop systems don’t force fractures open in the rock, they should reduce the risk of induced earthquakes. And because they don’t depend on continually pumping water into and out of those fractures, they should reduce it further still. In a few places, including south-western Iceland, Earth’s buried heat lies close enough to the surface to be tapped easily by geothermal plants. Water from this plant also supplies the nearby Blue Lagoon geothermal spa Dieter Telemans/Panos Pictures There is another possible advantage. If the working fluid stays inside a sealed pipe, it doesn’t have to be water. Companies can, in principle, use fluids that pick up and release heat more efficiently. Eavor’s working fluid is a company secret. The firm China Huaneng Group, meanwhile, has built the first geothermal demonstration plant that uses supercritical carbon dioxide – CO2 that is compressed and heated until it becomes not quite a gas and not quite a liquid. In that state, it is dense and flows easily, and is very good at moving heat. The firm’s test facility began operating in May this year in Zhengzhou, China. But these systems have their own difficulties. Eavor has had to scale back the number of wells it planned to drill after rock debris clogged parts of the pipe network. Its plant works, but not yet as efficiently as hoped. That points to a broader question: can closed-loop systems circulate enough fluid, and draw heat from the rock fast enough, to be commercially useful? “The jury is still out,” says Ellsworth. “Time will tell whether these ideas of having just a single closed loop will be actually successful.” And while AGS could be safer and cleaner than inducing fractures deep underground, it is still limited to places where hot rock lies within reach, usually a few kilometres down. To make geothermal truly global, companies will have to drill much, much deeper. Supercritical geothermal The deeper you go, the hotter Earth gets. Go deep enough and water crosses a strange threshold. At about 374°C (705°F), under sufficient pressure, it transforms into a supercritical fluid – akin to the CO2 in the China Huaneng demonstration plant – and can carry far more heat than ordinary hot water or steam. “There are a few countries where geothermal does provide a sizable mix of the energy supply. But strictly the heat itself, which is fundamentally what geothermal energy is, is actually available anywhere if you go deep enough,” says Houde. Supercritical temperatures are usually found at depths of at least 5 to 20 km, and often deeper. The rocks become harder the further you go: basalt or granite rather than the softer sedimentary layers often found closer to the surface. This rock chews through even the hardest tungsten carbide or diamond drill bits. Then there’s the time spent not drilling at all but instead replacing worn-down drill bits or equipment that begins to fail at higher temperatures and greater depths. These delays quickly push up costs, says Houde. Quaise Energy uses millimetre waves, a portion of the electromagnetic spectrum, to laser through hard rock found at great depths Quaise Energy Quaise, which is based in Houston, Texas, wants to get around this by drilling in a different way – without using a drill bit at all. Its plan is to use conventional drilling for the upper part of the well, then switch to high-powered microwave energy once the rock becomes too hard. The hole would be lined with corrugated steel, helping the microwaves travel downwards. When that energy hit the rock, it would heat it until the rock cracked, broke apart or even vaporised. “There’s no drill bit mechanically destroying the rock here, it’s just the interaction of the energy with the rock,” says Houde. The rock would be reduced into a fine ash that is purged from the well with a nitrogen-rich gas and collected at the surface. Quaise isn’t alone in pursuing non-contact drilling: Slovakia-based GA Drilling is also trialling laser- and plasma-based systems, and carried out its first field tests in 2023. Once the hole is open, Quaise wants to create a deep, EGS-style reservoir. Water would be sent through fractures in superhot rock, picking up heat before returning to the surface to generate electricity. In principle, it is geothermal freed from geography. Rachael Tremlett/New Scientist Quaise’s test holes are still just a couple of kilometres deep, but the company sees them as a proof of concept for something much larger. Its first planned superhot geothermal plant, located in Oregon, is intended to come online by 2030, accessing temperatures up to 400°C (752°F) at a depth of 3 to 5 km. A potential future site would push deeper, potentially to 10 km. “By 2035, we want the first superhot well producing energy at a depth greater than 10 kilometres,” says Houde, who thinks his company’s technology could transform any region into geothermal country. But there are still serious uncertainties. One is whether such deep wells can be kept open under the immense pressures found kilometres below ground. “It’s unclear whether that is possible,” warns Ellsworth. Houde accepts that the hardest engineering lies ahead. “I think it’s very viable for getting to these initial depths to prove superhot geothermal,” he says. “I think it’ll become increasingly more challenging to push the frontier on how deep we can go.” Iceland offers a glimpse of how these different strands of geothermal might converge. Instead of simply resting on its laurels as one of the world’s great geothermal success stories, the country is fast becoming a test bed for what comes next, says Magnúsdóttir. Its deepest geothermal well – the second well by the Iceland Deep Drilling Project, a consortium of the country’s leading energy companies and its energy authority – has already brushed against the promise of superhot geothermal. It was completed in 2017 and goes down 4.7 kilometres. “It is the first well in the world where supercritical conditions were confirmed in the geothermal well,” says Magnúsdóttir. Icelandic operators are also using EGS techniques to get more from existing fields, stimulating deeper faults to reach another kilometre or so of heat. Next year, the Iceland Deep Drilling Project plans to drill its third well. “There, they just have to go down to a little over 2 kilometres to reach supercritical conditions,” says Magnúsdóttir. But even at that relatively shallow depth, the engineering challenges remain fierce. The main problem is well integrity. At such high temperatures, the steel casings that line the well can expand, deform and fail. In Iceland, engineers have been testing fixes, including flexible connectors between sections of casing. This sort of engineering will be crucial if geothermal is to win over investors. Projects are expensive up front and slow to prove, and often need permits before developers know whether a site will work commercially. But the reward for patience can be unusually durable. “It’s very, very costly,” says Sanjeev Kumar at the European Geothermal Energy Council. “But once you’ve drilled that hole in the ground, that lasts for over 100 years.” That is the promise and the problem in miniature. “We know that very deep geothermal energy would be fabulous if we could reach it,” says Ellsworth. “We just don’t yet know if it’s possible.”1 point
-
Thanks both Redbeard & Nick, found helpful info through this thread - so grateful. For anyone else in same situation, this is what we will use: fire rated aerogel strips on the steel, and the cold roof will have fire rated rockwool (cold roof), and fire boards internal areas, on the outside, we are aiming to clad with bricks around the steel to go up all way on the corner.1 point
-
"Thermal bridge free" is a common term used in low energy home design, but its use relies on the person reading/listening understand what the term means. It just means that the losses at junctions have been reduced to a level that they have no effect on the overall structure's heat loss and can therefore be considered as a continuation of the floor/wall/roof U Value. The PassivHaus threshold for "Thermal bridge free" is a PSi value of 0.01W/(mK). The PHPP thermal modelling package considers any thermal bridges with that Psi of 0.01W/(mK) or lower as not needing to be individually calculated into the building's overall heat loss. They obviously do still need calculating to show they are under 0.01W/(mK), but their heat loss does not then need to go forward to the total building heat loss calc.1 point
-
This may be nonsense advice for your situation, but we chose to run a garden lawn sprinkler, actually two, on a hose timer - coming on for say 5 mins every hour. We actually did this for a couple of weeks as we were away and the weather was properly hot. Zero cracking. As others have said, a little cracking isn’t a big deal anyway. The contractor asked whether we wanted relief cuts / control joints, but we chose our sprinkler method and plan to use it again.1 point
-
To take a few points from posts above, firstly you (the leaseholder 'collective') need to appoint a SE with the remit to clearly establish the issue and to make recommendations for remediation. As @saveasteading suggests, rust is not (necessarily) equal to disaster. This needs to be an invasive inspection by someone with the whole picture. We have the Professionals' opinion (Doomsday scenario) but no apparent assessment of the immediate issue. For example, if an inspection of the beams found that rust was bad enough to weaken, but not catastrophic, then that (a) supports to temporary propping suggestion and (b) may suggest that breaking the span - permanent props on footings/mini-piles, maybe - might be a feasible 'treatment'. All of this from someone who is most definitely not a SE!1 point
-
Get the fitters to leave them long, and ask if they’ll be happy to come back and trim them properly for you ‘as and when’.1 point
-
Haha! If only you knew about my problems! A £60k court case is causing very much procrastination and too much time to think about stuff like this. The steps as you see them will have 150mm of PIR insulation on the horizontal treads and an effective 100mm of PIR on the vertical risers. With 50-60mm of screed over, followed by a 4mm microcement finish. It's more wanting to avoid any irreversible regret. I have this vision of walking through the house in a state of blissful house completion euphoria and the sensation of a stone-cold step bringing me back down to earth with a chilling bump! Call me an over-thinker, it's the truth, but I hold dear the attention to detail that quality has allowed me! Thanks for your help all, as usual.1 point
-
There is a UK High Hedges Act so neighbours can complain about high evergreen hedges. If nobody complains there is no height limit I suppose, but if someone complains they might end up having to be cut... https://www.gov.uk/government/publications/high-hedges-complaining-to-the-council/high-hedges-complaining-to-the-council I think there is a document somewhere about what heights are acceptable depending on differences in ground level and stuff. I suggest you think carefully about how to resolve. As they are already 5 feet lower than you, you are already well screened to potentially 11ft up their building. To mitigate 2nd storey overlooking you may need to think strategically. A single well placed tree may resolve the main problem ? Two or Three deciduous trees should be exempt from the high hedges act. Screening is usually more valuable in summer, so deciduous trees may be fine for you. These factors likely contribute to the popularity of pleached deciduous trees in some London gardens. If planting hedging plants do give thought to maintenance. It can be easy to go for the fast growing species, but fast growing can get out of hand - I speak as someone that had a number of leylandi type conifers. Yew may be slow growing but you can cut it right back when you wish to and it will just slowly regrow. Laurels grow like fury but I have one a landscaper was supposed to have removed, now happily growing back. If trying to screen a window looking into your bifolds etc then somtimes a tree part way down the garden is as good or better than a tree at the boundary. Or indeed a pergola.1 point
-
Much better this time. Used some rapid set and did 2 boards at a time, seems solid now fingers crossed.
 1 point
 -
IMHO it’s 6 foot without planning.1 point
-
Not necessary. I've been both. Sometimes in one camp or the other. Mostly doing both together Turn friction into bouncing off and it is very satisfying and productive. Good designers and good makers who can accept suggestions will flourish. If there is friction then it's not for long / only once.1 point
-
Are you sure about this for your chosen unit? Our Solido runs as an SBR plant and only discharges twice per 24hrs, immediately after a settling period. It pumps (well, airlifts) down to a fixed level each time so up to a few hundred litres in 20mins.1 point
-
I shall follow this, not because I want one, just that I find it interesting. You say you don't that a 'reed bed' but is a small orchard not the same thing? 'Let my plops fertilise your crops'1 point
-
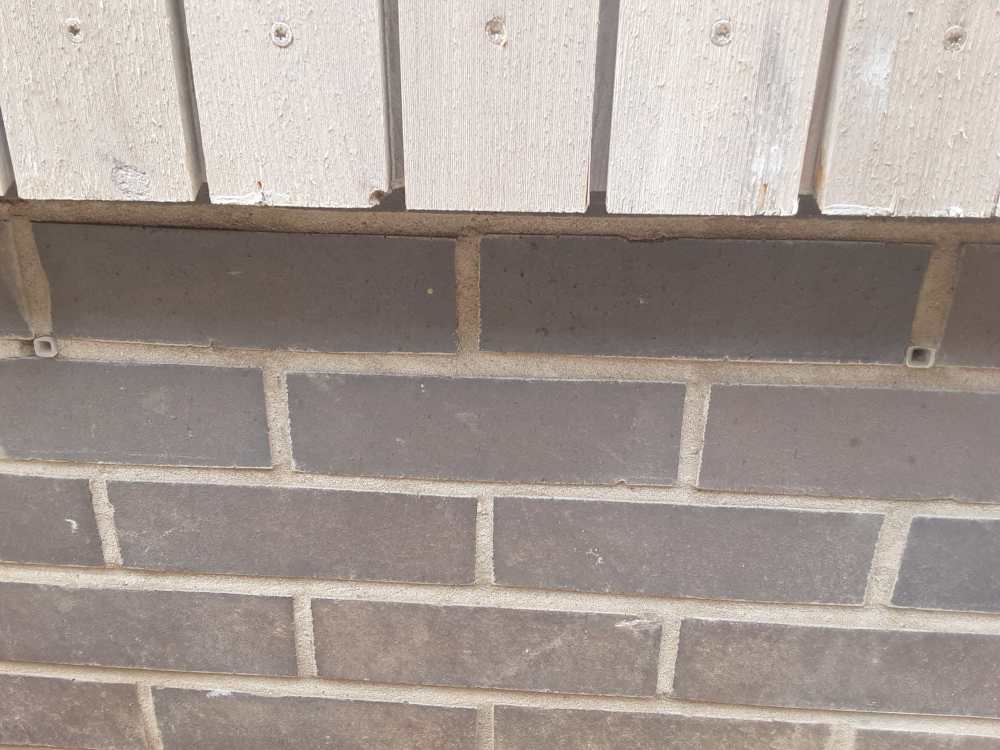
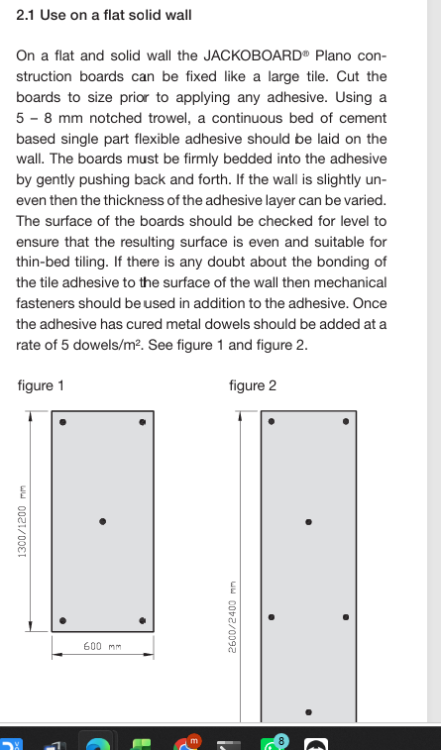
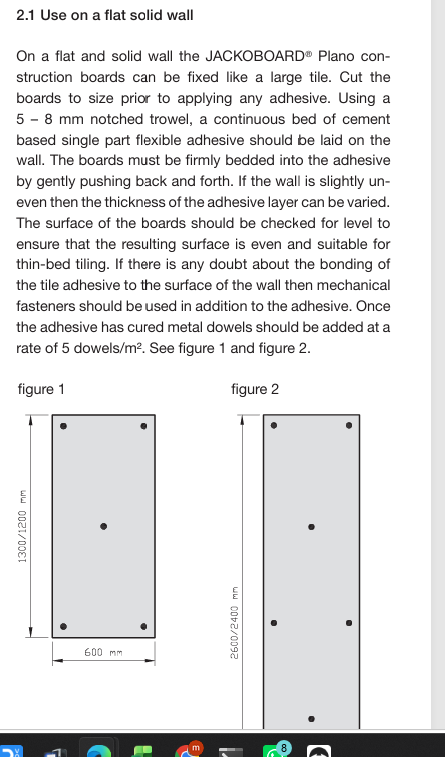
5, if the same as jackoboards, their instructions suggest one in each of the corners and 1 to the middle.
 1 point
 -
I think it was this.
 1 point
 -
This isn't holding up any of the second floor is it? If not, I can't see any reason to introduce FR here unless the BCO has mandated it? #canofworms A 'better' architect would have instructed you to thermally break the steels at their feet, but maybe not so much of an issue if they're in the cavity / cold spaces vs faced into the room. I would reduce the size of the window to accommodate some tile backer type XPS insulation board, wrapping 4 sides around it to thermally break it; 6mm would be 'better than nothing', but 10 or 15mm better, 20mm if that doesn't wreck the look etc. Stick the XPS boards to the steel with a non-silicone mastic, leaving no pathways for cold air to convect (horizontal lines, joining at the 4 corners, two or three of, plus some extra blobs in between).1 point
-
These are things of beauty. Tres bien!1 point
-
No. Insulate the room, and ventilate it, but “throw a blanket over the battery”?!?!?!? NO!1 point
-
Sorry I don't mean I am personally hoping the English and Welsh get these wind farms and pylons in the numbers we have been "given" in Scotland. What I am saying is while for so long England in particular has banned them, they have instead been built up here so the good folk of England who largely make the rules, have not seen the blot on the landscape that they are, and if the good folk of England don't see them, they obviously think they are good.1 point


This leaderboard is set to London/GMT+01:00