
Leaderboard


Popular Content
Showing content with the highest reputation on 09/14/26 in all areas
-
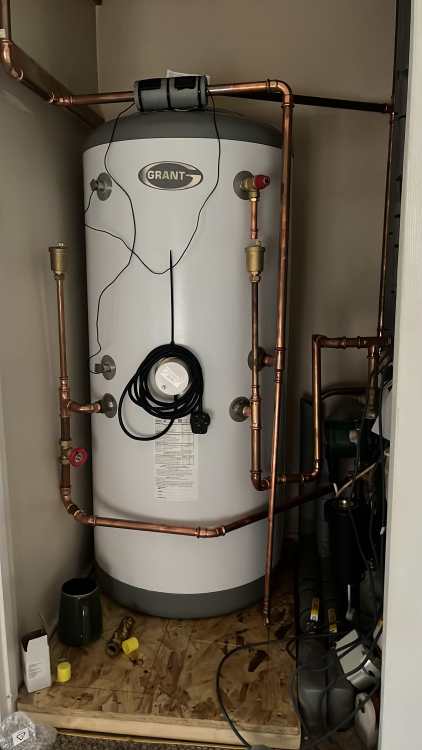
New Tank Fitted over the weekend Grant Tank - 180L 2.7m2 coil surface area couple of errors in pipework configuration that are resulting in increased heat loss but I'll fix them over the next couple of weeks. meantime a quick experiment on boiler efficiency (compared to old tank data) revealed Boiler efficiency Old tank when heating HW - efficiency was 88.97% (condensate volume 157 grams - condensate stopped after 10 mins of a 30 min cycle due to return temp being above 54 deg) New tank when heating HW - efficiency is 93.29% (Condensate volume 332 grams was generating condensate all the way thro the 45 min cycle) Can show workings if required....... Heat Loss Old Hot water tank fully lagged pipework - london loops everywhere (U loops on any hot outlets from tank) best I could get in term of temp decay in the tank was 0.4 deg per hour (most of the time it was 0.5 to 0.6 deg per hour) so heat a tank to 50 deg and 20 hours later it would be down to 40 deg (thats a just bearable shower according to SWMBO) New Tank - no lagging on pipework yet and minimal london loops and the tank losses are down to 0.19 deg per hour - so heat a tank to 50 deg and 24 hours later it's still over 45 deg - I think I need a better hobby!!!! PS Yes I need to fit a tank stat PPS The tank is set up as a vented tank (so no G3 certification is required)
 3 points
 -
I think you have to change your expectations or nothing will suit. I don't know when I last used a decimal mm in construction. I appreciate it may be a mindset and things like cutlery laid approximately can be an issue. I'd be interested to know what measurement would have been acceptable 1mm? 0.5mm? Measuring tapes aren't even that accurate. pencils get thicker as you draw a line. Saw blades have thicknesses, materials are variable, hands are not machines. There will be many worse discrepancies in your house should you choose to look for them. Nobody else will notice.3 points
-
It’s what I do / have done, in every single kitchen and bathroom job I’ve ever done. Dulux Diamond for the finish stuff in kitchens for most folk, or appropriate bathroom paint from whoever. 2 coats on brand new plaster in the same day, and customers think I’ve gone the whole 9 yards. Contract stuff is fine to leave on ceilings, but it isn’t very good on walls as it’s quite chalky and doesn’t wipe at all well. I use it sacrificially, for obliteration, and as above for use as a paint-come-filler for the very minor imperfections that you cannot see with the eye (until you pole sand lightly to show any defects). You must leave this to go bone dry before sanding, and I only say to dilute 10% water if spraying; current client is about to go full on Picasso and that’s the instructions for dilution from Wagner. Depends on how fussy you are whether you pole sand ceilings, or not, but my go-to plasterer is on site atm and he is shit hot, so very little needs doing tbh; he’s incredibly fussy in corners etc, and is pretty much the best plasterer I know or have ever met. If the plasterer is of ‘lesser finesse’ then you’ll have it “all to do” downstream and will soon regret not getting someone better. He’s Coventry based, and if anyone needs (wants) an exceptionally good spread then PM me for his contact details. He’s also an excellent external renderer, and does micro-cement and Venetian (etc) plasterwork. He has pics of some of the jobs he’s done and it’ll blow you away! Tres bien It’s all in the finish folks, and you’ll be staring at it in every room for the next couple of decades or more, and if that’s not right then what was the point in getting everything else behind it A1?3 points
-
Be very wary as width, length and depth are often confused. It is errors such as these that can lead to screwups. For kitchens I consider length and width to be side-to-side and depth to be front-to-back. Height and thickness can also cause confusion. With some of the induction hobs in a 600 deep worktop there is often only 50mm remaining front and back after the cutout.2 points
-
Many thanks for the pics @Nickfromwales1 point
-
I'll be painting my bathroom ceiling this weekend and I'm after a few opinions. After plastering everywhere in my place I usually mist coat with contract matt and then a heavy coat of contract to act as a type of filler-paint, filling in small imperfections that I get in my admittedly just above average skim. I then sand this back before my final 2 coats of vinyl, a technique I got from @Nickfromwales and it's worked great for me. My question is, what's everyone's favourite bathroom ceiling paint, I've been looking at Zinsser Permawhite. And will I be ok to do my usual contract matt-pole sander-topcoat technique in the bathroom?1 point
-
i pole sanded my ceilings and walls and quite often i dab on a bit of thick contract where there may be a little nick or divot and then just flat that back once dry. I find that works way better than any filler and it sands like its not even there with a sanding sponge. Ok thats what i'll do in the bathroom as well then, then cover in Diamon or more likely the Zinsser. I did my plastering in the bathroom as its only small so im ok to smother that in contract to fill it bits i may have left a bit rough. Cheers lads.1 point
-
My point is that most people don't know that. Or that tapes come in 3 degrees of accuracy and some are beyond that and just wrong.1 point
-
OK Yes I am fully aware of measurement errors, and manufacturing or building tolerances etc. etc. But IMO that isn't really a reason to just wave your hands too much, go whatever, and ignore things. Otherwise things can escalate. Be as precise as you reasonably can and they won't escalate. Specify 1.5mm wrong on position, and 1.5mm wrong on incorrectly understanding tolerance, cut 2mm wrong, shift the worktop along 2mm when fitting - get unlucky and you are 7mm wrong now. Maybe it still won't matter, or maybe something will foul and someone is £7k down and 2 months late.1 point
-
Those with a bit of foresight would have been "adapting" for a long time. I would not as a matter of course buy a house less than 10 metres above sea level or built on a river flood plain. If everybody had planned ahead like that, no such new houses would have been built like that over say the last 20 years. But if that is the only place planners will grant permission then the sheeple have been ushered into a whole load of expensive trouble ahead. I have been sharing this wisdom with my daughter who is buying her first house. I have advised her not to consider any in the area she is currently renting as there is a flood history there (next to a river) She has settled on one in a different part of town much higher up.1 point
-
🤣 Definitely over thinking this one. That's well within fitting tolerance. Whoever fits it on the day will get it approx there and if you are measuring the the millimetre after it's installed you are going to be disappointed. If it looks good, it is good and you won't be able to see 1.5mm by eye. You need a bit of wiggle room as everything moves with temperature and at different rates. 2mm each end will be sealed with a sealant. Obviously, it's an area when you can give clear instructions/supervision. "I want a minimally visible sealant bead". 2mm is going to be required to fit the slab. Understandable, but think in this case your expectations are a little high and could maybe get you in trouble. Focus on the visual result and not the millimetre. Increased precision increases cost exponentially (or more).1 point
-
Yes. I used one of those hollow diamond-tipped drills with wax in the internal 'hollow'. I dribbled splashes of water to help form a grinding paste - interesting to watch the water on and in the surrounding stone evaporate after a few moments - cue for another splash of water. I find myself increasingly using AI to solve little problems like this. Annoyingly, I also find that AI (Gemini in this case) just plain wrong. Hence the check-question to BH. Thanks everyone for your help.1 point
-
And building huge flood defences, reorganising food supplies, dealing with greater fuel insecurities, health care will have new priorities. There is a lot to consider. Turning off lights, adding solar panels and driving less is mitigation.1 point
-
And even then I'd still want to position the hob so that the worktop has plenty of meat front and back. If it's a fairly standard size one then that means in the middle. Don't want some teenager/contractor/other putting their weight in the wrong place only for it to go snap. (Yes, when installed the underframe is supposed to be able to fully support it but if you narrow one edge to a thin strip murphy will intervene).1 point
-
These worktops often arrive with the cut out not fully formed, to give it more strength when moving and fitting.1 point
-
There was, and still isnt, any possibility of collective action by everyone to do what needs to be done, before we consider there are no guarantees that even if we did it would make any useful difference. Human behaviour being what it is, it was always going to be that way. Adapation was and is the only realistic route forwards.1 point
-
Yes. You are overdoing it. And another completely unnecessary new thread, whereas you should have just carried on in the existing one!!!! I have suggested this a number of times, but you seem intent to ignore the polite nudges.1 point
-
I'd feel really nervous about how this is going...ditto for your hob post.....how can you confirm the measurements are "right" if you don't have measuring positions, same equipment, all the facts about what can and can't be done...? In contrast out fitters came to template (physical sheet material took circa 2 hours for kitchen and utility) and that was the point at which we discussed finer detail such as how far back tap was etc. From that point in it was their measurements; their job to match slab to the measurements; their risk. We were never asked to "sign off" other than confirming the slab we had chosen. Are they actually asking you to confirm the drawings or are you acting out of caution? Btw very similar sinks (Franke) 5mm overhang all round (no accessories on sink ledge). Our old place was closer to flush (was indeed a stonemason who branched out into worktops) ....we prefer the larger over hang as, to us, it appears more finished.1 point
-
Few ways to look at flow rates. 1. Determine loop length and set flow rate 2. Auto adjust actuators, these read flow and return temp and set flow rate to achieve to pre programmed differential temperature. 3. Mine are set fully open - the highest flow rate (by reading the flow meters) are tweaked down, similar to that as discussed by @Nickfromwales. I have also further adjusted to get room temp close to where I want. Wouldn't get too hung up on exact flow rate for each length, open flow meters fully. Set circulation pump to achieve close to 2 to 2.5L/min and leave it at that. Then adjust any loops that are over 2.5L/min down with the flow meters. Your thermostats will do the rest.1 point
-
I I think these are the type of screws for hangers etc. https://www.tcfixings.co.uk/product/simpson-tx20-csa-connector-screws-50mm-x-35mm/17499?gad_source=1&gad_campaignid=17347847741&gbraid=0AAAAADfLLCp7Mywl_VK9JlivX3AWSyoTk&gclid=Cj0KCQjwk5nVBhDiARIsAHNGqadLNGLJMo6ttMmHRe1au_g_ycT8PQaa09USMbr3oTc-UsjKuZZcrDoaAqAKEALw_wcB Normal screws are not suitable, these have a shoulder to fit the hole.1 point
-
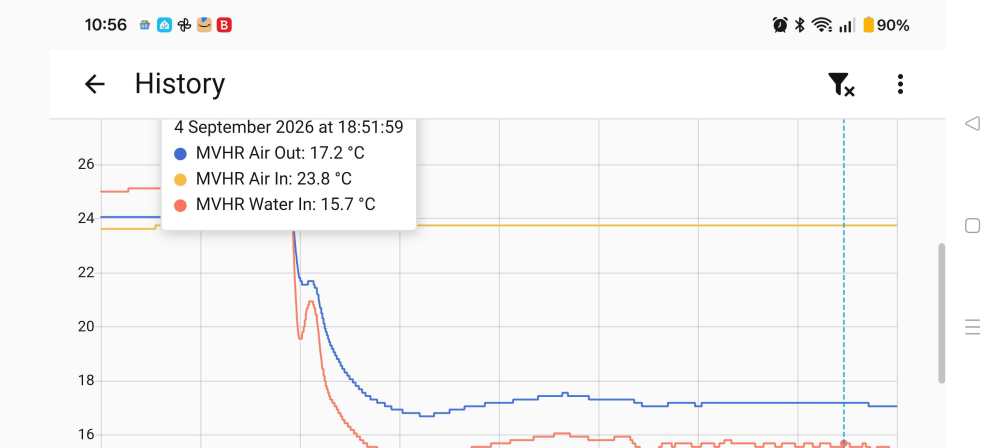
That's because you are thinking the wrong way. With UFH (cooling) it's not really about cooling the airspace, will come that in a second. The floor surface becomes cooler than your body, its primary cooling method is a radiant heater in reverse. Your body is the heat source and the floor sucks the heat from you. The second thing it does, is it becomes a heat sink for the building fabric, it again sucks the heat away. Biggest thing we noticed when we did UFH cooling was the thermostat on wall only reads a couple of degrees cooler. But you feel way cooler and more importantly the whole building gets back to a nice temperature way quicker. We have recently also added a DIY MVHR cooler (car heater matrix installed into a duct filter housing), not because it's just like Aircon, because it isn't, as airflow rates are way to low, but because it cools the air coming into the building and gets to the high areas in rooms. That air is about 6 degrees cooler than it would otherwise be. So over a few hours has a cooling effect. A chart showing the effect on the air existing the MVHR unit to go into the rooms The yellow line is air temperature as it leaves the MVHR unit. Blue is after the heat exchanger Red is water temperature.
 1 point
 -
For general interest. When written risk assessments became a requirement, we put one together that was about 8 pages long, and attached to it a standard A4 form for each specific task. So there might only be one at the start of the job. HSE snap visits (maybe 10% of projects or one per year) asked to see it. They were able to read it in 5 minutes, and follow up with questions and a site tour. One inspector said he wished all manuals were like this, but that sadly it was changing. What they most want to know. Who is in charge? Everyone on site should know. Then asks that person what is happening today, and show me the relevant paperwork. Then a look at the work in progress and site in general. Often they'd give good advice When I retired, our file had expanded somewhat, as required, but was kept relevant and job specific, and was generally one lever arch, half full. On a major national contractor's site I saw they had 3 very full, big files. I happened to be in their cabin, being a subcontractor, when HSE turned up. The manager couldn't find the relevant bit. HSE not impressed. That file was designed to keep the hierarchy safe, not the site personnel. Mine he read and praised, looked at what we were doing and that was that. The bulk of the paperwork that is just waffle was (and is) of no interest. So do it. They don't expect a professional file for a self- build but would from any biggish contactor you are using. They have always been decent people in my experience. The best bit of advice I can give for safety is to think "what could go wrong" and note the measures in place or sort it. Practically it is often by not having too much going on at the same time. If I could find one of my blank forms I'd depersonalise it and publish it here...but I can't. Maybe someone else can. What you really, really don't want is HSE turning up to you after dealing with a nasty accident somewhere else and finding a shambles.1 point
-
You ask all bonafide contractors for their RAMS too, before they step foot on site, and you also do inductions (regardless of how “busy” you are). And make the site a safe and organised place to be. Allow a lot of time clearing up, sweeping (M-class vacuum needs to be on site as you’re not supposed to kick up dust these days), festoon lighting, don’t have sharp or ‘stabby’ things poking out of ground (rebar protruding needs to be bent back over itself or a mushroom cap put on it), no unmarked or open pits or trenches or barrier around them, list goes on but not rocket science. Take risks with your own life all you like, they can’t jail you for that, but when you invite any 3rd party there then the onus is on you to make them ‘not expire’ ahead of their predetermined departure from this life.1 point
-
Not for the last 35 years, and not for the next however many I have left to go.0 points
-
Oh dear lord……..0 points





This leaderboard is set to London/GMT+01:00