Leaderboard


Popular Content
Showing content with the highest reputation on 11/07/23 in all areas
-
Except there is a power difference between the flap being closed, partially open and fully open, as well as the power loss though the casing. When the units are charging up at night, the output flap automatically closes. If the unit is blasting out heat first thing, then it is faulty, get it fixed. During the day, there are incidental heat gains most of the time. If the output control, even on old heaters like mine, is set correctly, then it tracks the inside temperature nicely, i.e. as the room natural warms, the heater is loosing energy, but not in a linear fashion, it follows Newton's Law of Cooling. This keeps everything in equilibrium. There is, therefore, no need to adjust for the evening. Now if you have a heat load of say 30 kWh/day, and your storage heater only has an effective capacity of 20 kWh, then you will have problems, but that is incorrect sizing, not useless technology. If people cannot get storage heaters sized correctly, and learn how to operate them, there is little hope that heat pumps are going to be successful. They are much harder to set up. But as I have said, a heat pump is a better option, but there is going to be a steep learning curve, so steep that most people will fall off it unfortunately. Cross post, same sentiment.2 points
-
Save your money, cut out with a grinder - it'll all be hidden by the pan.2 points
-
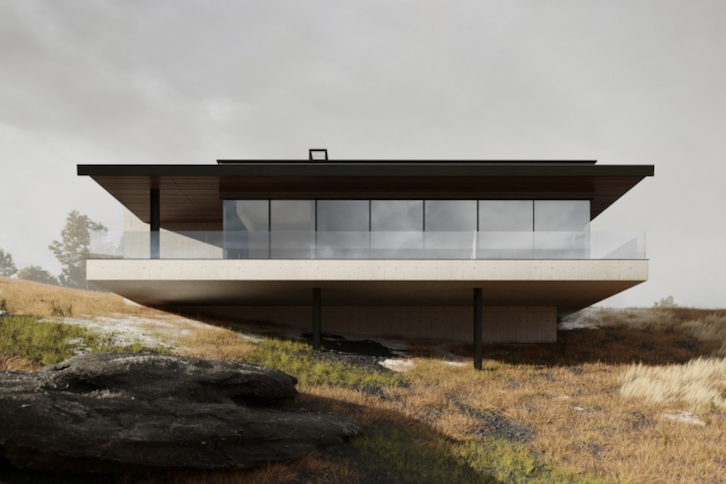
Looks nice. See you have two supports for the balcony section, increase to four and the huge expense to cantilever vanishes. Not sure how you get passivhaus energy performance with all that glazing? You are also going to need to add plenty of additional insulation to the sip to get to passivhaus standards, so somewhat defeats there advantage. Although you have an overhang for shading watch out for low eastern and western sun, as it will find its way under and overheat the house, if you don't plan well.2 points
-
If these are not on the wall already and you feel you can mark them out accurately (even better if you can cad them up), then your local waterjet place may do them in a few mins for cash. A good option, especially if you have a few to do.2 points
-
I would just build up the ground level by 4cm. It only needs to be built up in one place. 5cm in case any inspector has a wonky tape measure.2 points
-
For just 2 resistors it simplifies to Rt = (R1 X R2) / (R1+R2) When I get time I will look up the ohms per metre of the 2 cables and try an example. I don't think you actually need the parallel resistance. All you need is the ohms per metre of the 2 cables and then work out the current through each cable when in parallel at a combined total of 32A. You are looking to see if they share the current in proportion to their max current carrying capacity or of one gets overloaded.2 points
-
Properly chuffed with myself how far i've progressed this year, but its a good time to take a break i feel, before the last huge job of doing the new bathroom, hopefully next year. Finished the external wall insulation off in the courtyard area, and got my new set of water butts all connected, should provide enough for the front garden and car washing (when i have the energy!) during a prolonged dry period. Just got the silicone to do on the corner and the join. Probably the most important job was the lower parts of the roof, to ensure the insulation was all good, and to stop any mice from getting in, which has been an issue the last couple of years around this time. Took off 3 rows of tiles and pushed the 4th row up, which got me to the natural overlap of the second row of felt, allowing me to take off the old battens, and put a new layer of felt under the overlap and down to the bottom. Also replaced the end of the dry valley, with a correct formed end, tiles need a little tidy up at some point, but its watertight. This was the mesh i used. It was then fully packed with insulation and overlayed with some ventilation trays which i didn't take a photo of. And the front was even worse, including the weather, of course it decided to pour it down the second i had the old felt off. Front existing felt was in very bad condition, and one of the battens appears to be fire damaged, no idea how The valley needs repointing, still on my to-do list. And a small indulgment, a bit of colour for the driveway, also filled with spring bulbs so hopefully will remain colourful right through to next summer1 point
-
Hi guys, I intend to build a single floor frontal glazed SIP passive house inspired house on a hillside cantilevered in N Wales UK. If anyone has done a similar cantilevered project with SIP's, please let me know. Many thanks. Pic attached for ref
 1 point
 -
your meant to strip the bricks out to remove the heater. how is 7.5p a kWh expensive? It’s the same price as my gas? if people can’t figure out storage heaters, basic gas central heating systems they have no chance running a heat pump.1 point
-
thinking about this as a sip build is irrelevant, there will be so little in the way of sip construction in that design. 50% of it will be steel and concrete, 20% glass, then do whatever you want for the remainder. I agree with others, a couple of extra columns will save you multiple of thousands in engineering design and steel and concrete. Cantilevers are nice , but not for what they cost.1 point
-
Only if sized and used incorrectly. Mine, from 1987, are fine. If my house had twice the heat load, I could just charge them up to a higher temperature and for a bit longer. Like a heat pump system, they are not used like gas or oil fired central heating. If people can't get them to work, then they need to read up on them and stop blaming the technology.1 point
-
Snip the little tabs off that I’ve marked red and problem solved. They just stop the wings/lugs pushing back like some of the cheaper dry liners do. Usually ok without though. Next time fit them before skim coat or do it properly with nogs and metals boxes!! That way you don’t get the lip of the box showing either
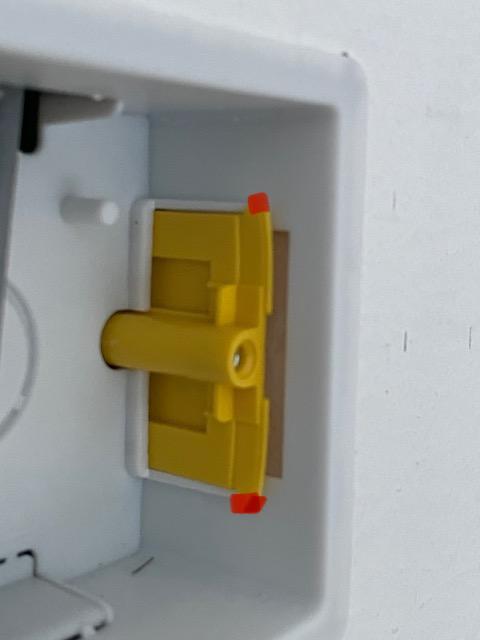 1 point
 -
I was just looking at stud wall pattress boxes. I have used double boards for my wall construction, so need 22.5mm depth. https://www.ukelectricalsupplies.com/norslo-1-gang-47mm-dry-lining-box.htm Norslo DL147N have 30mm depth I thought I’d post this for anybody looking for this in the future.1 point
-
Sleep on it, something will pop into your head, when you are not thinking about it.1 point
-
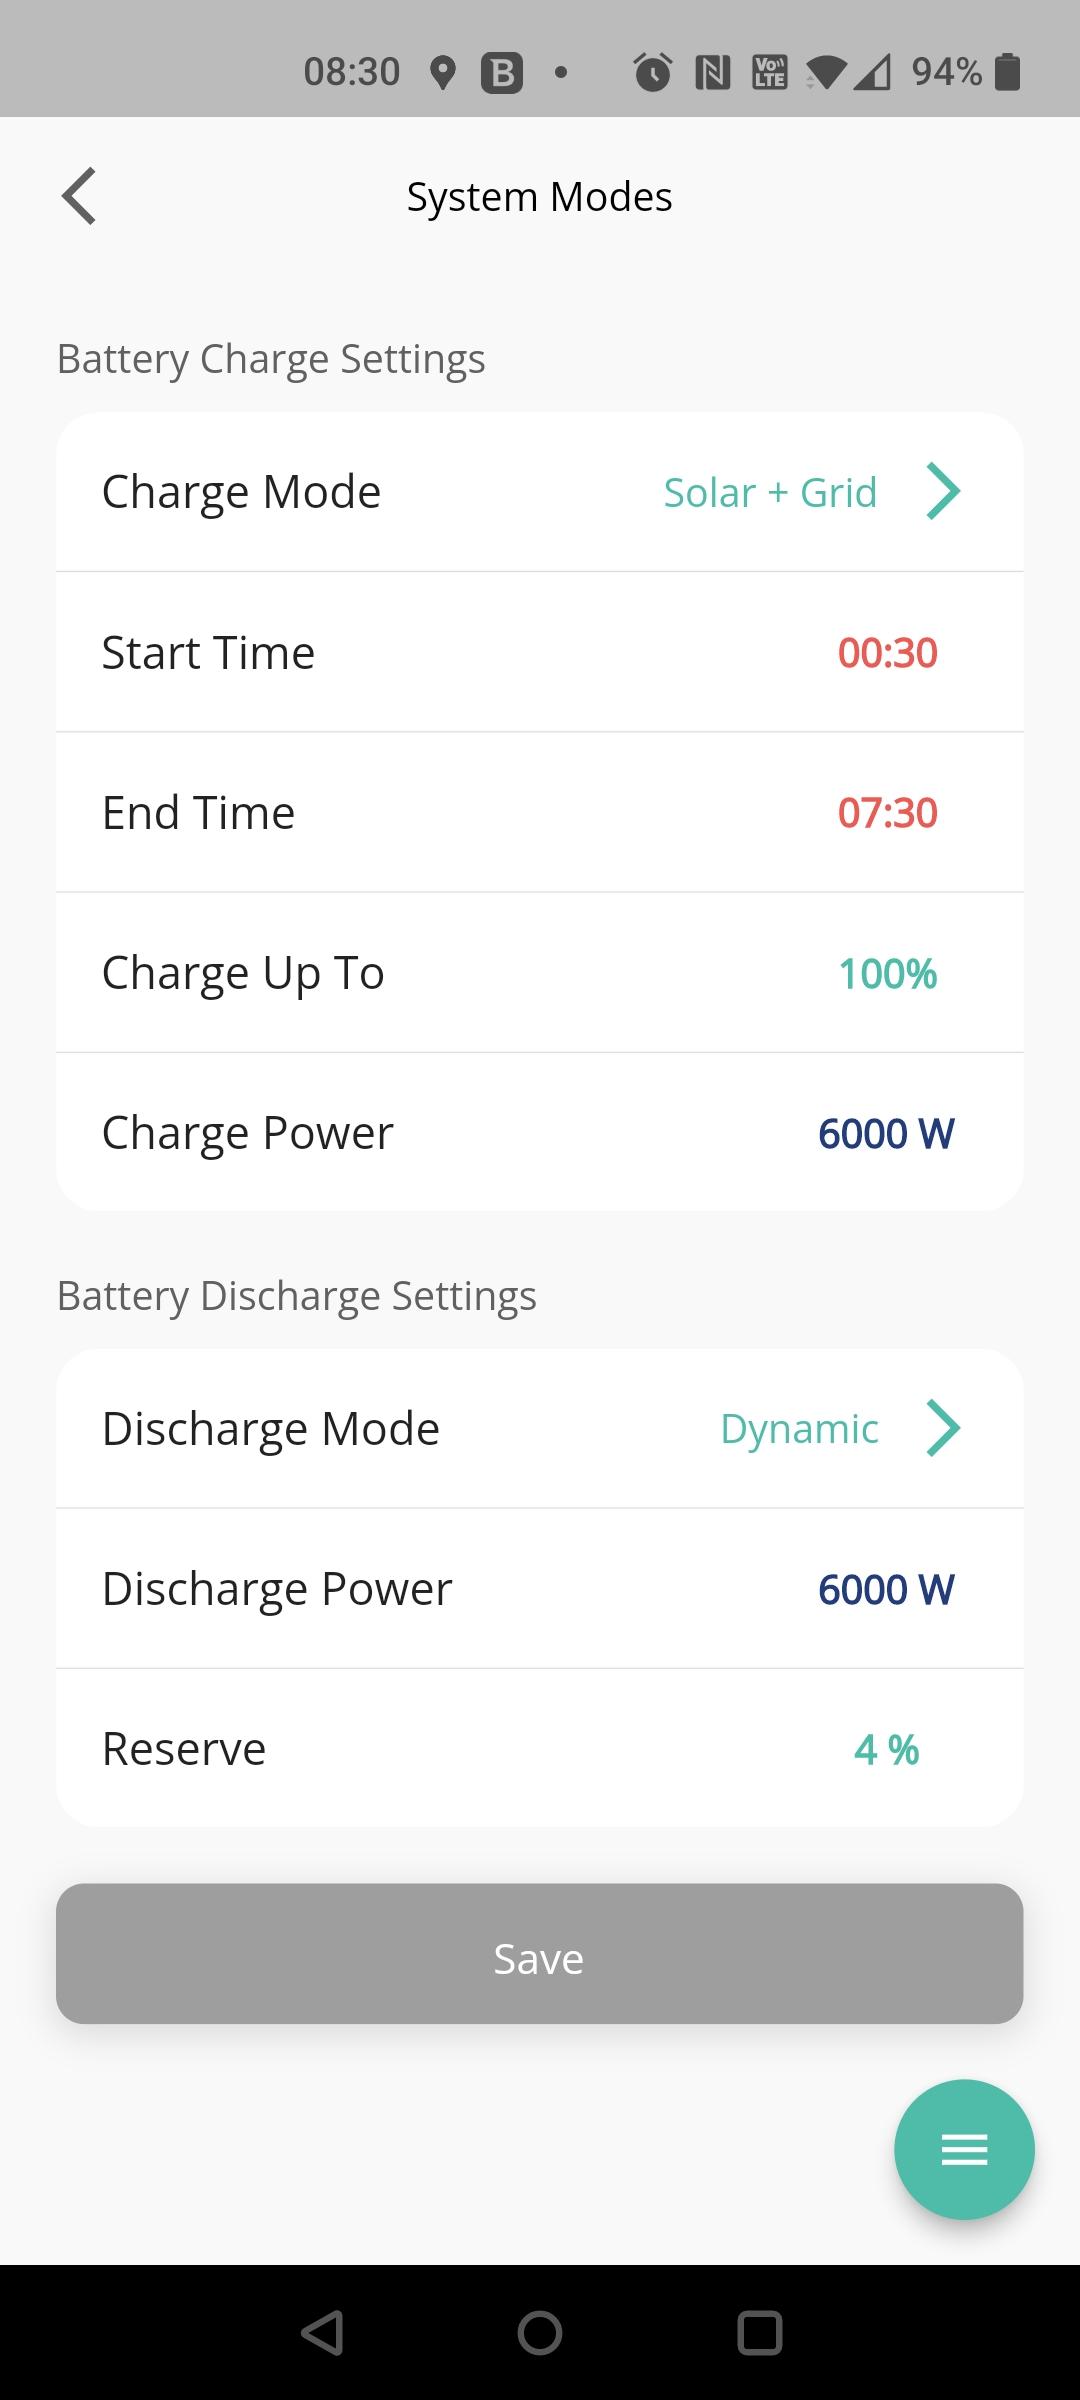
The installer/sparky got the following response from Givenergy: ”Unfortunately, GE will only give approval for a singular 6mm cable to the AiO Battery.” I suspect that means no warranty etc if it’s not installed as approved, I also suspect the sparky won’t install it unless it’s iaw the manufacturers now very specific guidance which is fair enough I suppose. I’ll run the points raised in this thread past him but it looks like it’s time to reassess. Thanks for all the input (despite me only understanding half of it!)1 point
-
Reading between the lines I felt that might be the case. OK.... how about this aproach (the one I came to think was the only thorough repair)1 point
-
The cable between battery and Inverter (all one integrated unit) and gateway is AC, nothing to do with PV or DC. PV ties in to the gateway again in AC. The battery/inverter kicks out up to around 7kW. It takes a charge of 6kW.1 point
-
our tiler is doing our bathrooms at the moment. i'll take a photo of how they've been done when i get home and will post it up here later.1 point
-
Yes, sort of draw a line around the outside of the holes required giving 10mm or so wiggle room. Might need to be closer at the mounting holes dependant on the pan design1 point
-
As an indication of how far I am from understanding the finer points of this, I don’t know if: “…= 9.7kW!” is a good thing or a bad thing - but it’s clearly a thing.1 point
-
so there's this guy, right, who literally built his own house in London just by following a DIY tutorial. 😲 can you believe that? I mean, London's not exactly known for easy building projects. he must've spent ages on YouTube and home improvement blogs, 'cause you can't just wing it with pipes and electric stuff without getting zapped or flooded. 🚧 and the weather? classic London with rain probably didn’t give him a break either. he definitely had to be a jack-of-all-trades kinda dude. 💪 laying bricks, doing woodwork, plumbing, and who knows what else. bet the neighbors were watching this whole thing unfold like some reality TV show. they must've been placing bets on when he'd give up and call in the pros. but nope, this guy sticks it out, probably with more trips to the hardware store than a kid to a candy shop. 🛠️ the house must be full of all these quirky features that you'd never find in a regular home, like shelves that can hold like, two books before they become modern art on the floor. gotta say, it's pretty inspiring. makes you think about what you could do with a couple of tools and a whole lot of patience. 😃 who knows, maybe his house will start a new trend where everyone's DIY-ing their own places. "Hey, who did your extension?" "Oh, just me and a couple of internet videos." That would be something!1 point
-
All of my extract pipes and corresponding manifold are as dry as a bone, have been since I installed them nearly 4 years ago1 point
-
I've looked at this issue for myself (old cottage , full time job so too busy to 'fix it') : I'd like to be proved wrong - but there is no product that deals with the problem. Your problem statement hints this is just one problem in a chain of related things. We had rotten wood, loose putty, worn this that and the other. And yes, I tried a couple of 'solutions' (that much abused word) to the problem. While I have no criticism of the various 'products' , the original problem merely replicates itself at the join (not joint) between the wood and the repair product. Water gets in freezes, expands and out pops the covering paint, more water gets in and the process repeats until the owner decides he can't stand the delay any more (after she has been as patient as she can). How about this. secondary glaze until spring 2024 Spring that year : window out; Support the lintel replace window frame and opener or repair (frames) properly with wood replace repaint Idea?1 point
-
First wall hung pan I went for cutting the holes accurately, now I just cut out an area to encompass all the holes just making sure the pan will cover it.1 point
-
Looks nice. Very LA hills. I double down on the overheating cautions and also the heating energy requirements for all that glazing. Good windows are still 5 times worse than average walls in terms of heat loss.1 point
-
The pipes should be insulated, so you’d not expect much condensation. They shouldn’t have dips in them for puddles to form. And that air is on the way out, it’s not coming back in ever!1 point
-
Yes, a very important point. The electrical shock risk is reduced, but not the fire risk. All switching has to be capable of dealing with the DC currents as well. Not a case of assuming that ordinary switches can cope.1 point
-
Sounds like a sure fire way for me to ruin a tile Thanks, I'll give it a go later on. Wish me luck...1 point
-
The two in parallel should be fine - say 47A in free air. I think the resistance arguments, while theoretically correct, will be irrelevant as the cables with be roughly the same length. You probably can't measure the length of each cable exactly as they're buried, but if you have the right equipment, you could measure the small resistance. I still think the calcs will get you v. close to the theory for 6.5mm^2. However, they'll be some who find that 'it doesn't meet regs' (although be hard-pushed to say why) and some will rightly point out that 'it isn't to manufacturer's spec'. So your decision and your responsibility unless you get a spark to sign off and use his/her PI.1 point
-
You can make little cutouts at the back of the plasterboard very quickly with a plasterboard saw to make them work, particularly if there's not many to do. Some of my walls here have two sheets of PB, so 25mm thick. Alternatively, for a few mm, you can just be gentle and pull the screws up tight without the tabs latching, and they'll hold the whole thing in place fine.1 point
-
As I said, very complex. Found myself doing this sort of thing, when I first built the house, slowly undid it all when I started seeing the bills - KISS wins every time.1 point
-
If anyone say anything buy a big bag of gravel and build up ground level. Who is likely to be measuring?1 point
-
Ah not to worry: if your experience is anything like mine, most of the sockets will be in roughly the right place, but in-the-wrong-place in SWMBO's opinion. and you'll need at least six multiple socket extensions to placate her but the dog(s) will object and chew those sockets . then the grandchildren will be inserting pens in the unprotected sockets and you'll be glad you fitted RCBOs1 point
-
I fixed the probe to be in the centre of the duct and didn't move it as I took the measurements, so I was always comparing like with like.1 point
-
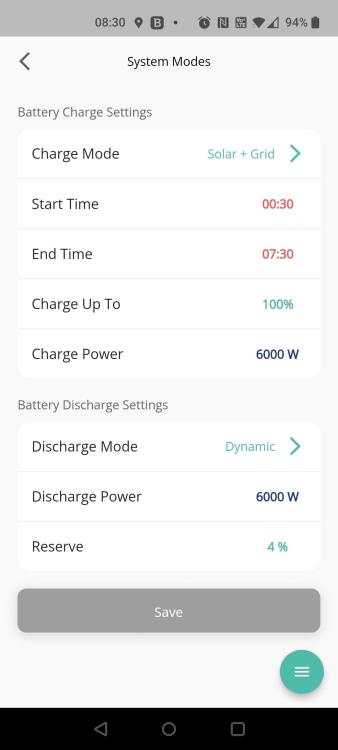
You can limit the watts going between the battery and the gateway, your install can set hard stops also, which the end user cannot change later. Discharge and charge power are all setting that can be changed. If this simplified the install.
 1 point
 -
Sorry no idea of the quality.1 point
-
It will but you can work around it, dot of silicone on the lug track to hold in place, and once you’ve got the face plate screwed it it won’t move anyway. The other thing you could do it shorten the track guides slightly, this will give a longer run and give you the satisfying click ive butchered a few of mine over the years and they’re still where I want them1 point
-
These go to 17mm: https://www.tlc-direct.co.uk/Products/MTMDLB1.html1 point
-
I suggest each cable has its own appropriate mcb rather than paralleling both ends - perhaps a 16A and 24A mcb, although the sparky should be choosing and fitting this sort of stuff. Nb there shouldn’t be an RCD involved unless it’s the expensive dc capable type.1 point
-
Are you sure you need the install to be so complicated? Its complect just reading it, let alone installing and getting to work efficiently.1 point
-
All much of a muchness I suspect! This is a 9000 BTU nameplate Midea Xtreme Save R32 unit fwiw.1 point
-
you're overthinking. Having spent more than ten years measuring flows in fume cupboards, Biological safey cabinets, and various laminar flow units, I can confirm that airflow is just-about impossible to read repeatably... Flow in any tube/ duct is irregular and as @S2D2says the longer the straight length before the probe the better. You can use egg-crate to try and straighten/ laminarise the flow, but it's all over kill. Probe in the centre of the duct, fix it there, take readings. Done...1 point
-
For Building Regs, you can get a completion certificate once you are at shell stage and complied with all the regs. Floor and wall finishes don't matter, but electrics need to be complete and signed off, as does gas and drainage, heating and ventilation. All insulation in place, doors and windows fitted, airtightness signed off, entrance access in place. You will need your as built SAP. External works not an issue for Building Regs, but probably over 90% of the spend will need to happen. Don't risk running short of money in the current lending climate or you could go skint.1 point
-
What a journey that was, lying builder and a few no show days caused the finish date to slip, and following a 2month delayed start, but I got there in the end!! Good things come to those who wait eh. So the outside shell of the building is now completed, and yesterday I started work on the inside. The lean-to roof was extremely close, but just squeezed it in with a slight pitch modification. This leaves me with essentially 3 sections of wall to clad: Near side will get done with EWI and brick slips, and the flue will get extended through the EWI, far side will get EWI and brick slips right up to the soffit, and that will leave a triangle with 1 missing corner above the extension. This will get clad with timber, and insulated to match the EWI spec. The EWI will likely get done first, the timber later. Downpipe is to be fitted yet, and will temporarily get routed down the soil stack. I'm going to get several large water storage tanks, but as you can probably see i've got a mountain of block paving to shift first!! Really pleased with my size choice for the windows, had worried they weren't going to be big enough, but think they are spot on! First day of me on the job, got the first layer of insulation in, 100mm PIR. Need to hit it with the expanding foam, there is then a further 50mm to go on top of this, and then 25mm under the rafters, before the plasterboard. Hoping the new Windows for the front of this and also an upgrade for the kitchen to triple glazed will be coming tomorrow, and planning on fitting this bank holiday weekend if they do. Other developments: I also made the decision to invest in another battery, a further US3000C module to take me to around 6.6kWh of usable, and unlock the full 3kW output of the inverter, and given the current outlook to import pricing, I think i made the right choice. Very pleased with how the battery system is performing even how it is currently with only a single module.1 point
-
So after 2 years since the planning permission was granted, and a 2month delay from the builders I'm finally underway on what will be the last major building work on this bungalow. Having real trouble finding a joiner who's available to do the roof, so I may end up having to do that myself. The one bit i'm unsure on having never done a lean-to roof before, the wood plate which goes on the wall, is it fixed using thunderbolts?1 point
-
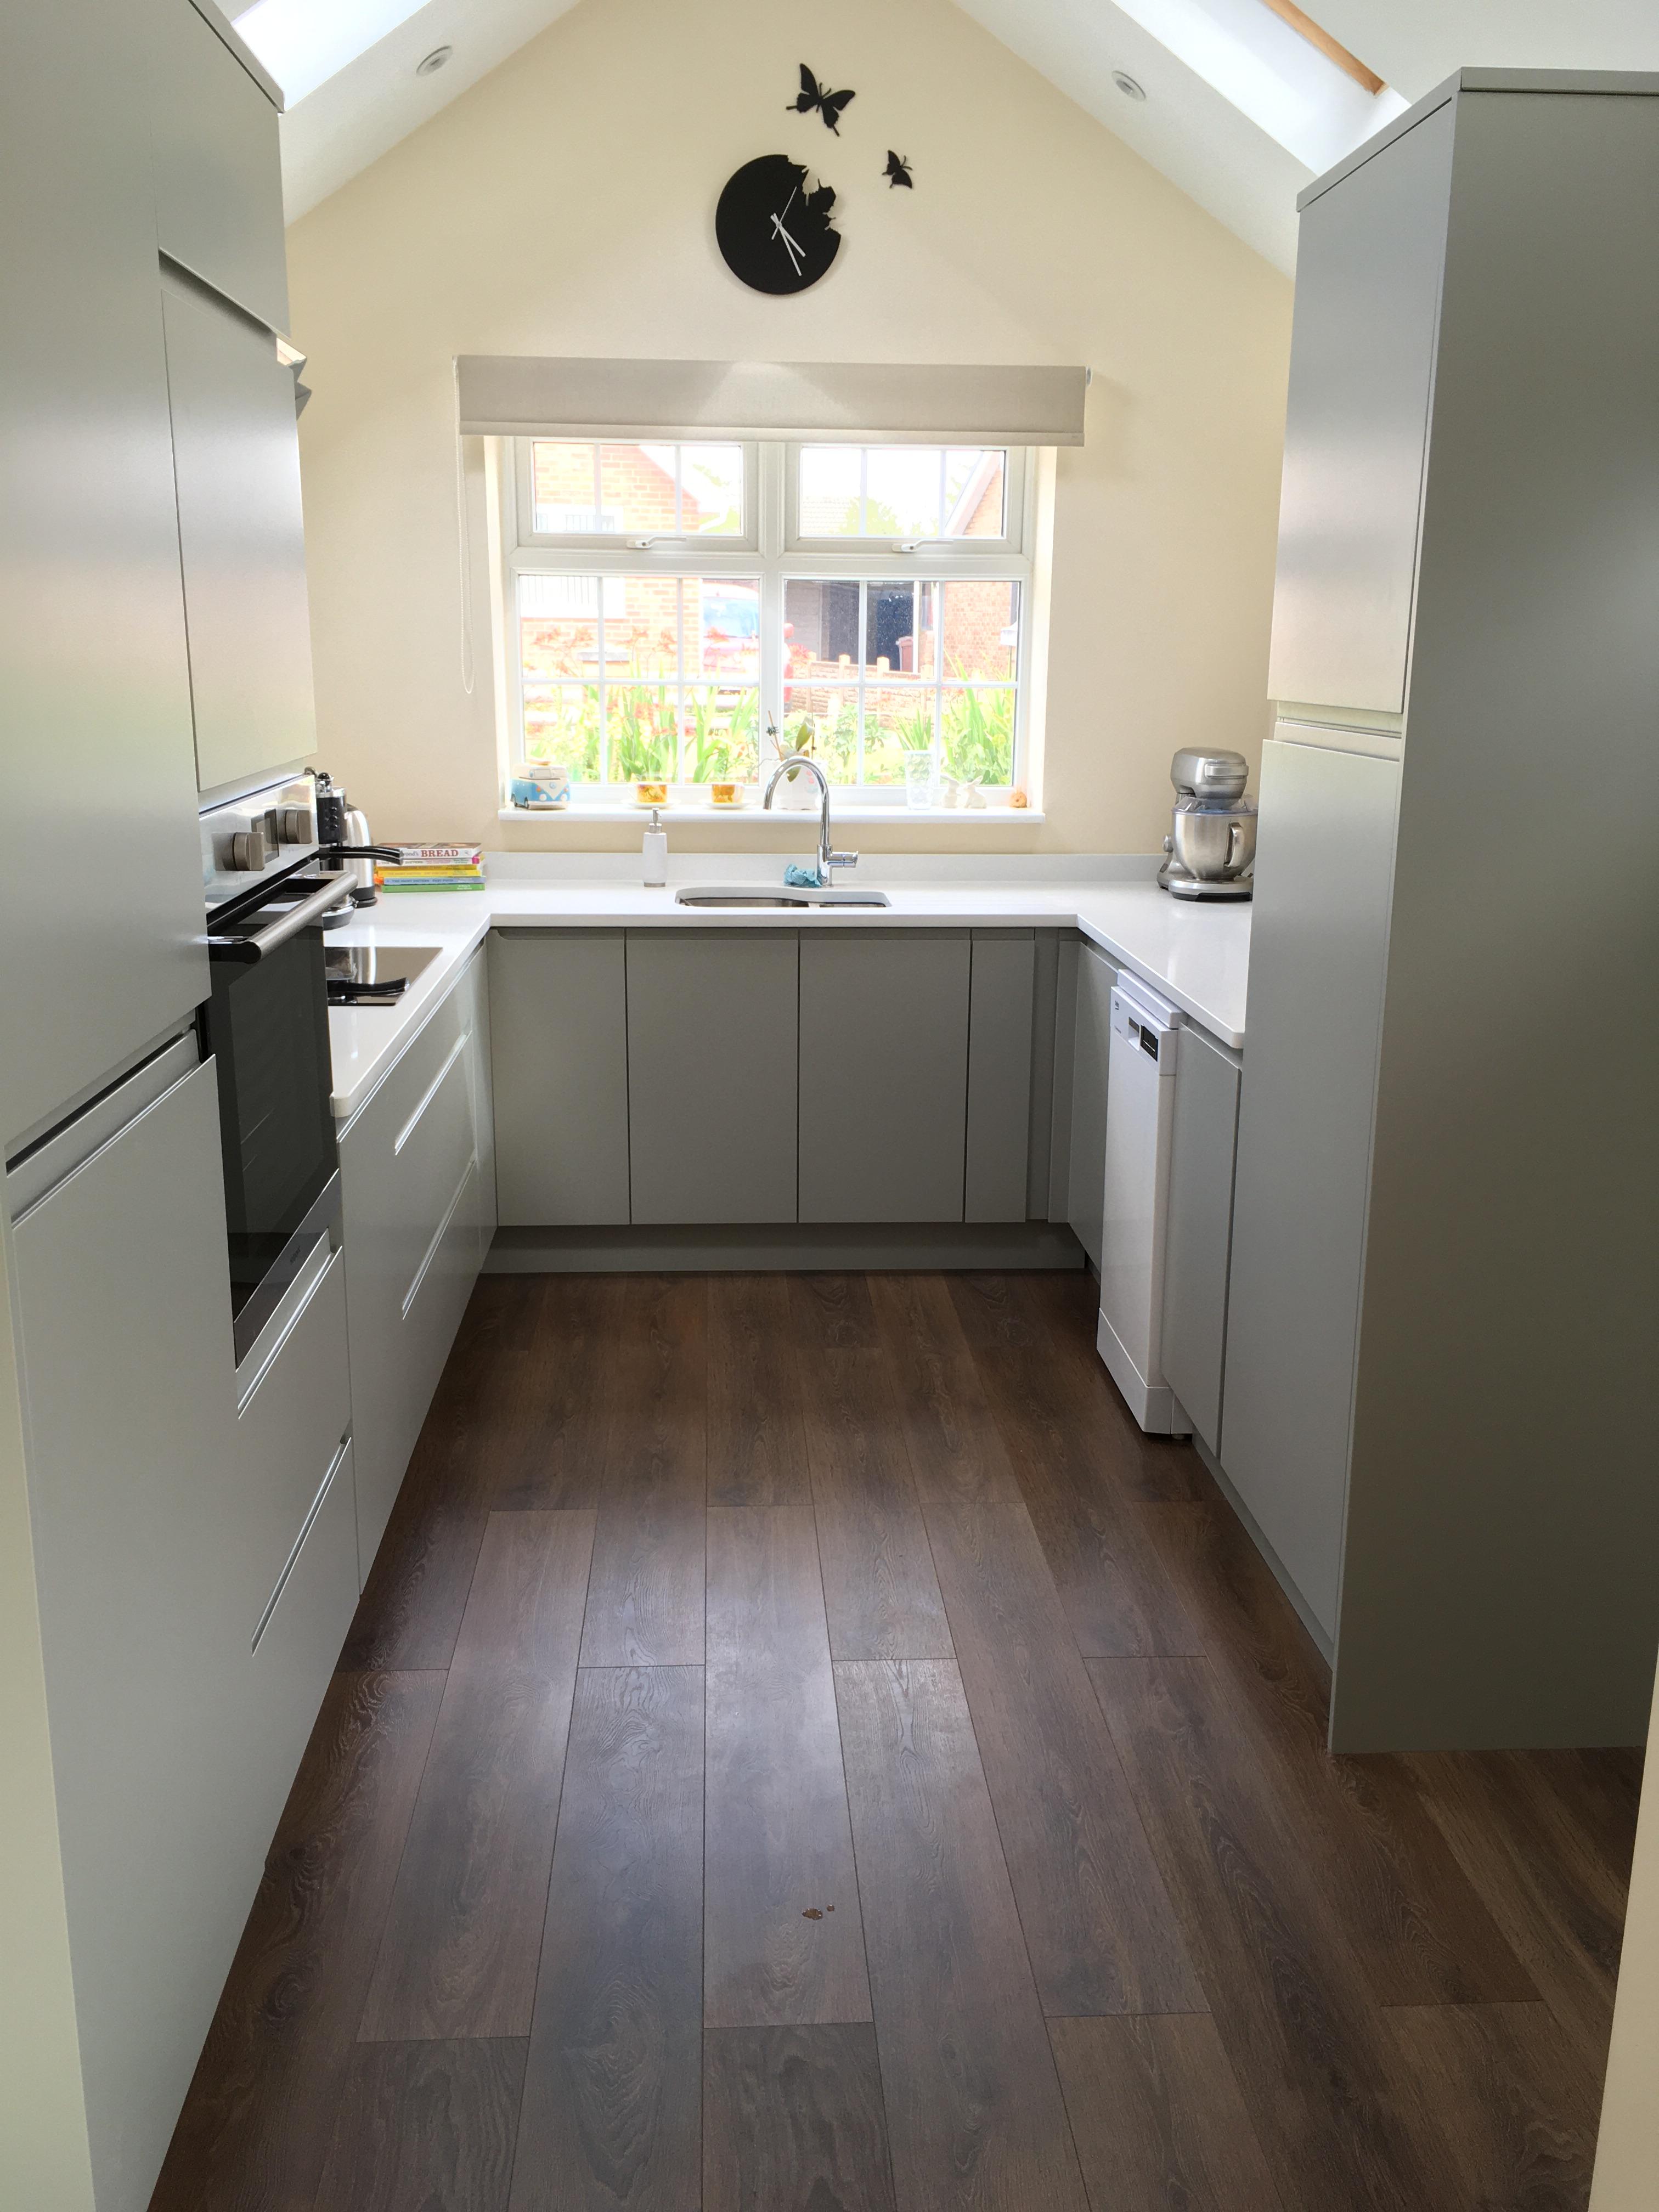
Didn't realise i'd not posted a final done photo. Just the walls to paint at some point, but not decided what colours to go with yet.
 1 point
 -
Good luck to all selfbuilders, hope you will make even better controller... for those who want help Im available always by personal message.1 point
-
I’m waiting for someone to say it ……….. 🫢0 points
-
pretty standard for a self-builder, no? 😉0 points
-
Because the lazy sods didn't even bother to look at it properly.0 points