
Leaderboard


Popular Content
Showing content with the highest reputation on 06/10/23 in all areas
-
My background is a mixed bag, I've been employed over 20 years in design predominantly precast concrete products (b&b, stairs, hollow-core, lift shafts, the list goes on). In addition to this many years designing structural steel. Currently I'm employed designing retaining structures. I'm not here to promote a business, just to give advice if I can.3 points
-
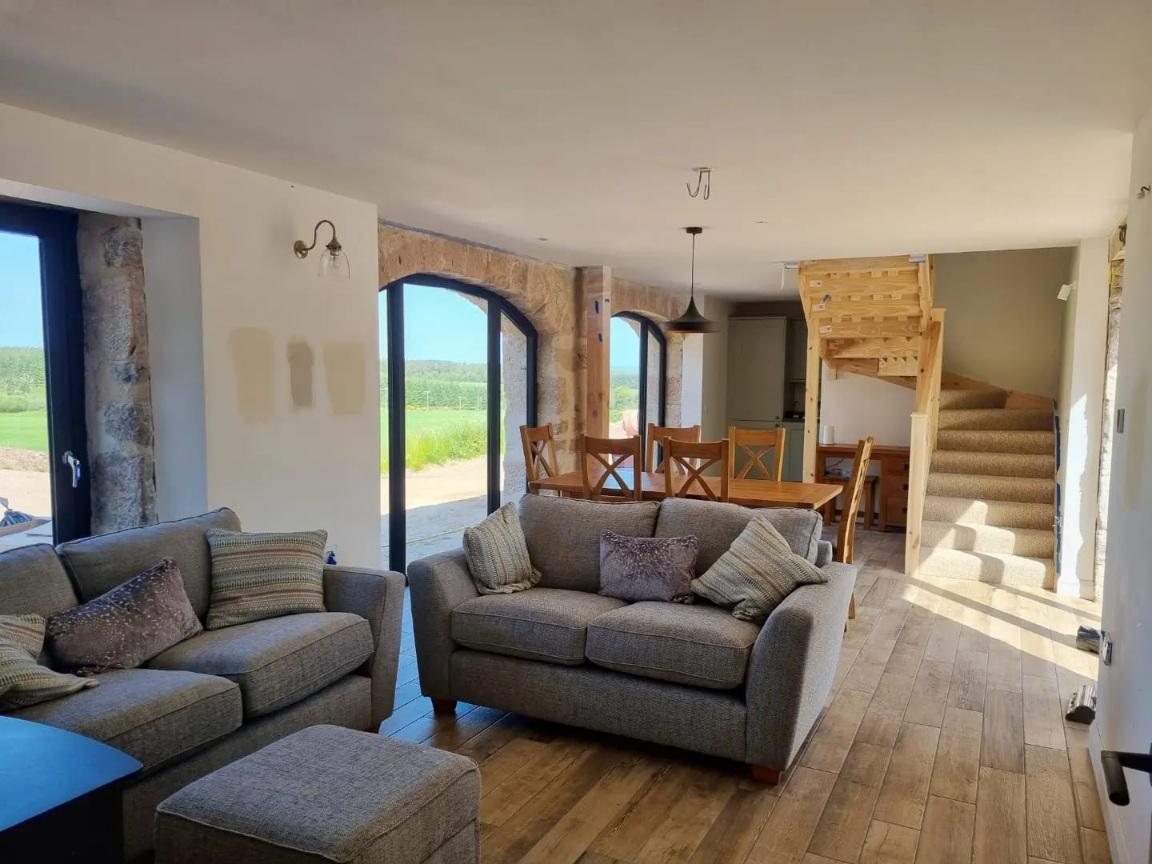
Moving in to the building after 2 years in caravan. It's a big day. Some comfort for the on- site couple and visitors, and we are all pleased with it. This area is all conversion with original timber ties on show, joists and rafters hidden
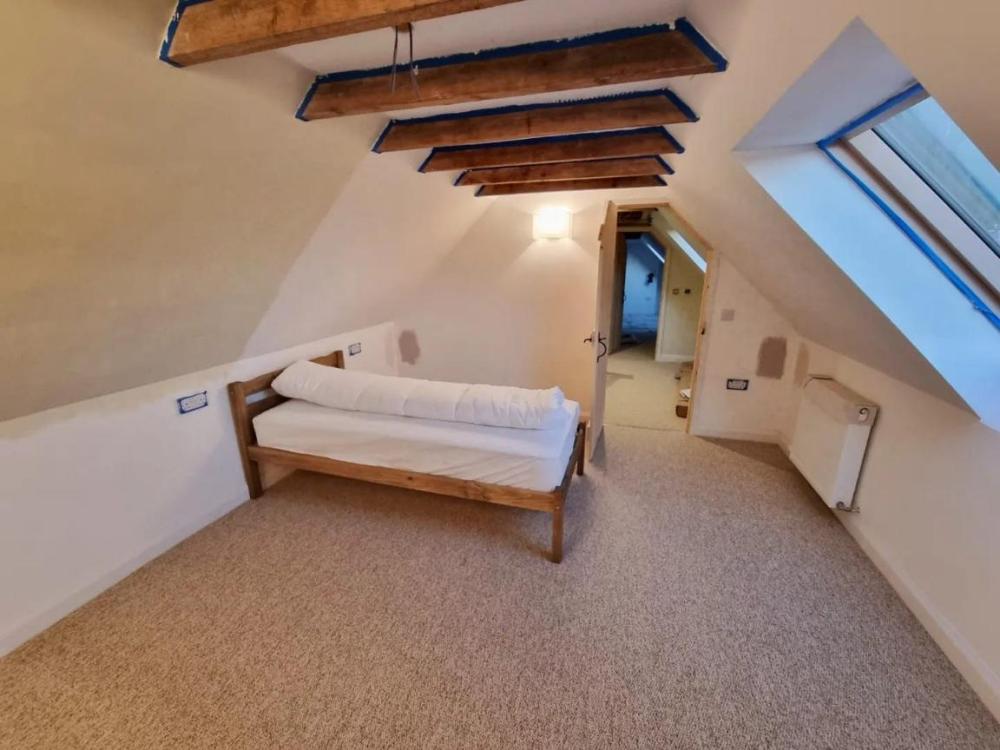

 3 points
 -
We had same problem. Our plot was/is on clay and a percolation test showed soakaway wouldn't work. Also have a piped ditch along the edge of the road. When we applied for PP one consultee said "They wouldn't want us to make flooding down the hill worse" so we got hit with a planning condition to get the drainage approved. I proposed an underground rainwater storage tank with overflow to the piped ditch under the road. We wanted one anyway. The planners approved it even though it doesn't provide storm surge attenuation if its already full. Its been very useful when there is a drought as we can use it to water the lawn or the veg plot. We have even pumped the water 200 yards across the village green to an allotment. Its not used for anything in the house. Too much leaf mould gets into the tank for that. As far as I know the EA or County Council wernt involved, unless the planners consulted them a second time but I doubt it as approvalto discharge the planning condition came back too quick. If you don't get hit with a Planning Condition I would just propose discharge direct to the ditch to the BCO and see what he says. Perhaps write on the drawing that you have Riparian Rights. If it becomes an issue then perhaps propose a crate system for storm water attenuation or rain recycling tank. I wouldn't involve the County Council unless someone tells you that you have to.2 points
-
Yes definitely fit isolators in flow and return, will save you a lot of grief if you need to change or replace anything.2 points
-
Yes, and all fancy fittings I still think that 'a house' can be built cheaply and of adequate quality. The real problem is, and self builders are the worst offender, is getting carried away. If, for example, you spend £7k on home automation, then forking out £2k on just the bathtub seems a bargain. It will still get a scum line on it the same as a £200 one.2 points
-
As I stated earlier BC will follow the rules and insist on at least one Personally As a render contractor I’d put two in regardless of block work arrangements Simply to protect the render Two stop beads back to back will be barely visible2 points
-
Beans are in! A scoop of compost in each hole. The expresso cup removed and plant popped in. Then a bit of soil packed around it & watered. Lastly a spray of garlic water around the perimeter. Fingers crossed.2 points
-
I played with loopcad and got a reasonable layout. Then just went to Wunda and got them to do it properly instead!1 point
-
Well done, looks really good 👍1 point
-
No, if you read that properly it said “you are one of those that” … manage to successfully walk the line between commercial presence and unacceptable business promotion. a compliment 🤷♂️1 point
-
I think that we count as lowish water users. The Thermino covers 1 x bath and 1 x shower comfortably. (~4kWh and ~2kWh). Write up on whole system in tedious detail! https://www.earth.org.uk/note-on-solar-DHW-for-16WW-UniQ-and-PV-diversion.html Rgds Damon1 point
-
Only 2 yrs in caravan … lightweight ! - looks good by the way 👍1 point
-
As above^ Try and ask them for a breakfast bar backing panel1 point
-
Your wife is right.1 point
-
1 point
-
I have twice used barrels to overome this. Of course use the water for the garden etc. But in winter you can leave the tap open to dribble to empty over say 24 or 48 hours. This reduces the storm surge which is the main concern. It may impress to submit numbers eg 50 litres over 48 hours. = 1.04 litres/ hour. As developers are allowed 5 litres per minute per acre they can't sensibly argue.1 point
-
Shockingly, so will most cladders and roofers so you may have to lecture them and insist...and then watch I can assure you that, done properly, the steel should last a long time. I've been on problem roofs, not by me, and seen that damaged plastisol Edge or middle) will allow a roof to rust badly. Corus/Tata provide a warranty but the small print makes it close to worthless. The other thing to point out is proximity to the sea or pollution. You must tell your supplier. From memory, about 10 miles.1 point
-
where's that coming from?^^^1 point
-
Yes, the wall will be plasterboard, then the oak treads will be made.1 point
-
We used Lindab steel guttering which was galvanised and then painted. The instructions for cutting it were to only use hand tools, because then the galvanising creeps back over the cut surface. I was a bit sceptical but none of the cut surfaces showed any rust after six years.1 point
-
I think pear stairs ask you to sign a disclaimer if the design breaches building regs in any way. Different kettle of fish to a bespoke high cost jobby but I would assume same rules apply?1 point
-
Directly in the middle of the window. Wife says looks better, no different in my opinion but here it is.
 1 point
 -
For us the Thermino 150 (~7kWh) seems to have worked out about perfect in terms of DHW availabilty and physical size. (3 bedoom London home: 2 adults + 2 teens.) I have just today turned off the gas combi entirely (as a test, for at least a week or so) and do not expect to hear any shrieks from unexpected cold showers. Rgds Damon1 point
-
We're using "corrugated" profile sheet on our roof and most of the cladding, it's a 14-3 profile, whatever that is. Works out at approx £14+vat a sqM1 point
-
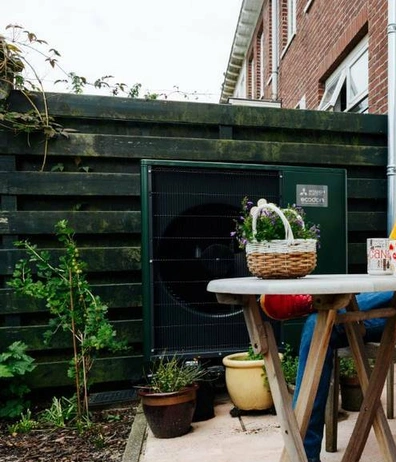
Or just to the left in the recess behind the fence?1 point
-
Could you rotate it round the corner, behind the wood fence?1 point
-
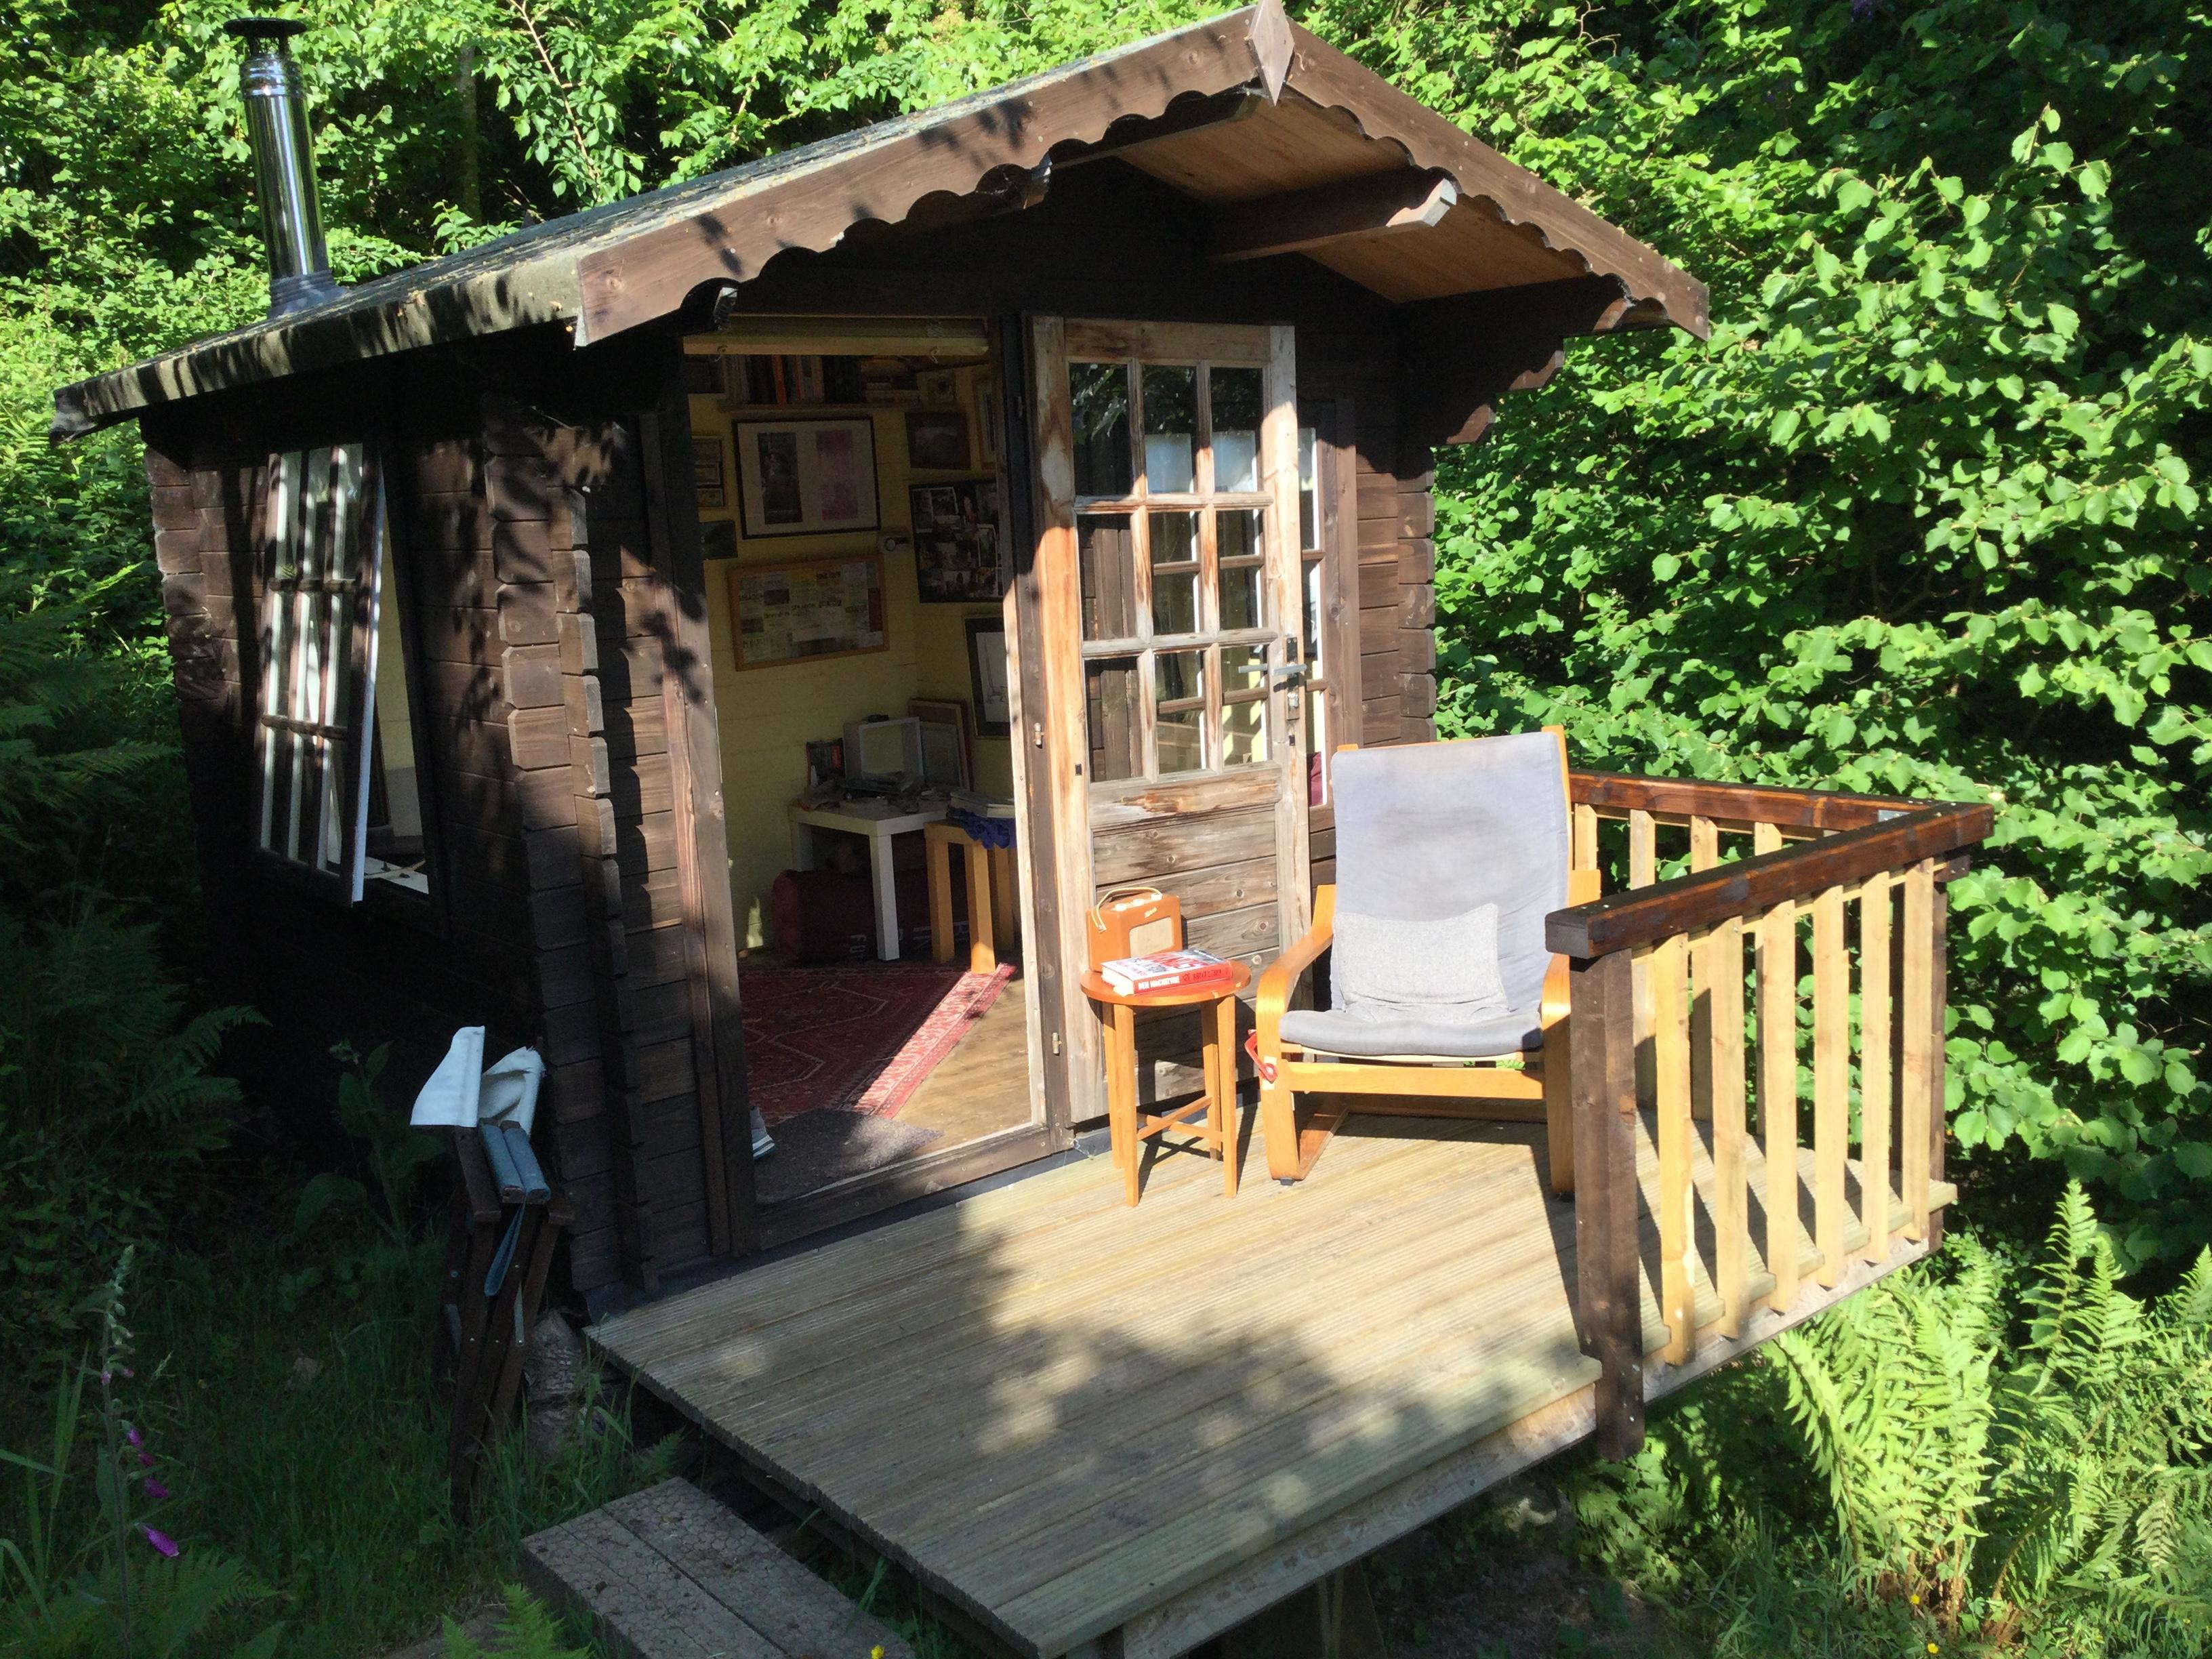
Nice one BigJ, been doing -many- a beer on my deck here.. a sun trap spot, south-facing cabin. Thanks Zoot1 point
-
I would get a cheap night time tariff and run the hot water during this window.1 point
-
- buy the blocks 6 months early and leave them under cover - put in bed joint reinforcement around the openings - leave the rendering for as long as possible so if any cracks do occur, they can be made good The render system will have its own MJ requirements.1 point
-
Sometimes helps to narrow the search to "air conditioning" as in the UK the conspiracy is to believe A2A is just for cooling. E.g: https://www.saturnsales.co.uk/Stylish-Wall-Mounted.html gives you an idea of how much you're being rushed for installation (sundries like pipework notwithstanding). In my own case I cannot see the VAT saving would outstrip the installation costs (even if I were prepared to have "trades" drill into my property with their "minimum viable effort to get the job done"..). Frankly, a friend went through an F-Gas course as it was cheaper than installation! At the moment I'm a bit stalled on design. I have a ~45m2 floorplan with an 60% open-plan kitchen/living area, and a bedroom and a half -- do I need an implementation with a unit in each of the 3 spaces, or 2, single-splits or a multi-split (seems preferable just for finding places outside for the units). Or even a large emitter centrally located. With water it's somewhat easier to "whack in an extra radiator". I'd be interested if anyone has opinions or literature about effective placement of mini-splits. Back-of-envelope calcs (heatpunk) think the heat loss at -2.4C is 2824W, -- that might be rather high based on some of the existing radiators1 point
-
Starting to sound like (expletive deleted)ing witchcraft this gardening. I have heard that deflowering a virgin makes the volunteer potatoes stand to attention. Off to find a virgin for you.1 point
-
3 x 3 x 0.06 x 1.7 = 0.92. Nearly a ton. Get the barrow cleaned and oiled.1 point
-
Welcome, it’s always good to have professional advice from experts here.1 point
-
@Dave Jones True, but shit happens, and this is resolvable, we are human and self builders at that! We often have other day jobs, and not everything we tackle is done with loads of knowledge, history and hindsight. Layouts change, and even the best laid initial plans over time become obsolete, and as the structure goes up we start thinking 'what if' or someone says ' it would be nice if'. 👍, hell, I've pretty much redone all my external soil and grey water runs because what looked acceptable on paper, looked cack in real life. Anyway, i'd go with what Conor says, recessed and filled with your topping of choice. Over time it will become less noticeable. Get or paint a green lid, or grass topped one - C-11 GrassTop Recessed Manhole Cover, 450 dia - Grass Top Covers1 point
-
Paving slab and a statue of some half naked Greek godess?1 point
-
Here is some food for thought. Concrete blocks tend to shrink mostly. The stronger the block the more shrinkage you get. ie a 7.0 N block will shrink less than a 10.0N block as the 10N block tends to have a higher cement content. Concrete blocks can swell, mainly to do with thermal expansion on a very hot day, the outside face expands more than the inside. During prolonged heat the whole wall will expand. But the thermal expansion is relatively small in comparison to the concrete shrinkage. Clay bricks are a bit more tempremental. Generally they also expand as the minerals in the clay and chemicals resulting form the firing process react with the air for a good number of years. They also shrink / swell as the moisture content changes. Think of a clay brick more as living material. It can swell and shrink where as a concrete block tends to mostly shrink. In summary when designing I would for standard builds look at putting a movement joint every 6.0 m maximum in a block wall and 9.0 -12.0m in a brick wall depending on the brick selected and then review. But it gets a bit more complicated than that. You also need to know what other walls are framing into the wall; corners (internal and external), window / door lintel positions. All these features introduce stiff and weak points. This variation encourages the movement to take place in an uneven way and that encourages cracking. To do a good job you do want to have a look at the founds, even if to say, yeh I had a look and know I have checked the following. You may have a set of cross wall strip founds but heavily loaded external founds.. both will move a little differently. Also you may have a big set of bifolds with large point loads, the found will tend to settle a bit more or less here depending on how it is designed. The other thing we need to consider is the strength of the mortar as generally this has a cement content. Too strong and it locks the blocks together and shrinks and swells in its own right. @Mike and @nod can see where you are coming from here. Often separating the found from the superstructure is a plastic DPC which should allow the wall above to slip about on the underbuilding thus relieving the stress. But how much stress relief that develops is a bit of a guess. Ideally if the bedding was perfectly flat this may work.. but in real life on site this is hard to achieve in the heat of battle. In summary for blockwork under the usual conditions that apply on a building site I would not hang my hat on a block wall longer than 6.0m without some kind of joint. There are two main reasons for this. I need to be sure that the wall won't crack for safety reasons.. and also if it does crack and becomes unsightly I'm going to get in the neck anyway. Now.. the fun part. many years ago, some 25 plus (did not know then what I know now) when I did a self build as a young lad I wanted no joints in I think a 9.0m block wall. I was just starting out and had employed an old school SE. He suggested that I use concrete block but in a lime mortar. I did not know enough about lime mortar back then so bottled out and just put in a joint. But I wonder.. would I design something like this now? In theory I would have a look at it. Maybe start with an NHL 3.5.. and if the exposure is benign maybe just have a look at NHL 2.0.. oooh! Now the lime mortar moves and lets (in theory) each block shrink as an individual unit... and that will let you build a longer wall beteen joints. My concern here would be the render and the practical side of this. What kind are we going to use? We are talking doing big panels in one hit. to make a good job.. a change in the weather, someone twisting their ankle on site, getting a dose of the runs and you could end up with an expensive and frustating out come. If you could get it work structurally, in the round I would want to balance the risk of cracking, a rough uneven finish with using standard joints. My gut feeling is to go for the tried and tested method of joints at 6.0m or less in blockwork if you don't fancy taking too much of a risk. Would be interested to know if anyone has used concrete blocks with lime, if so how did you get on?1 point
-
Any walls of my own design are without movement joints. Where specified by others, they are built, usually with a steel behind to compensate for the weakness created. None have been a problem. Bricks expand after manufacture, as they cool down. Blocks shrink, as all concrete does. Get aged, cold bricks, and aged blocks and nothing moves. But that is me with my own insurances. Best do what you are told.1 point
-
This is down to brick and/or block type. Manufacturers will advise, 10m(?) for brick, perhaps only 6m for block (and render?).1 point
-
I think our builders installed them on anything greater than 6m so definitely fit them. They are probably on your drawings?1 point
-
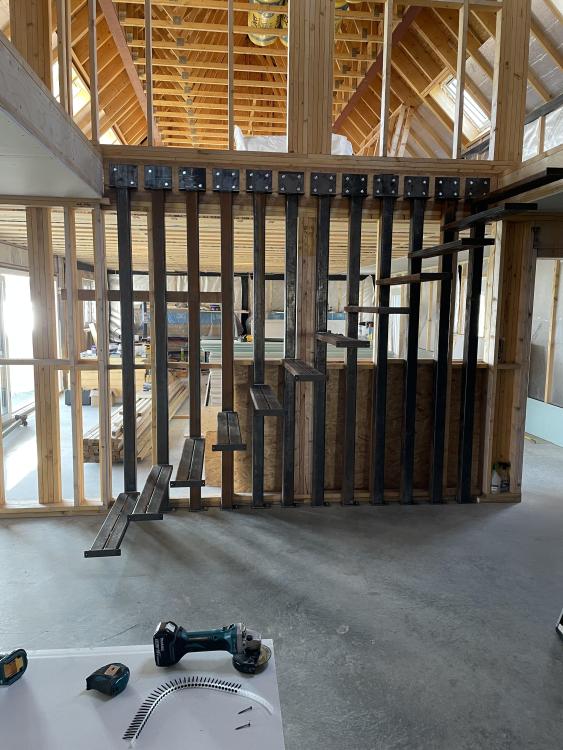
@pocster All of the steel work for the stairs finished today 👍🏻 I will need to come & give you a hand with yours 😂
 1 point
 -
I phone call to BC would be your best option1 point
-
Correct. I should have said correctly designed foundations don't influence that, at all.1 point
-
No who told you that Foundations are designed to suit the ground1 point
-
The wall & render are liable to cracking due to expansion and contraction of the materials used. The foundations don't influence that, at all. If you have cracking due to foundation movement you have a whole different problem.1 point
-
Guess you're not going to get the full benefit of 125mm insulation as the bottom 25mm is bridged by the rafters. Did a quick check with a U value calculator and it's 0.178 with it all on the joists and 0.183 with it as you have it. Both round up/down to 0.18W/m2K. Put a decent vapour barrier behind the ceiling and it's unlikely to come to much harm as the deck material has 100mm insulation over it which used to be the spec anyway. This should keep the underside of the waterproof layer above dew point.1 point
-
Thanks chaps, although not high enough to stop a -very- drunk Zoot falling over it into stream, I present my diddy handrail. It's at an alarmingly 'perch ass on corner of it' height too. A bit low! But functions to stop my seat going over. @Onoff hi there hope you're good- thought you'd like to see a bit more Zoot cabin progress: few more pics follow. Zh
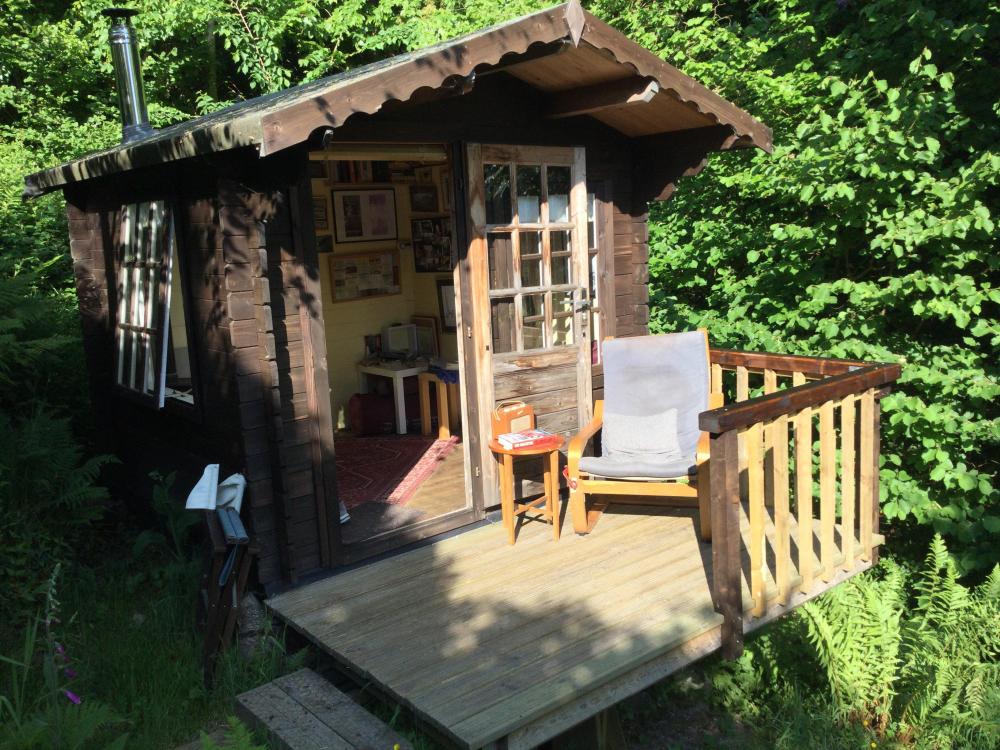 1 point
 -
But you are saying that from the land of common sense. I don’t think regulators and gas networks live there.1 point
-
That's entropy man.1 point
-
science speaks for itself, 20% better in the afternoon vs early morning
 1 point
 -
I think there's some confusion here between "airtight" and "vapour tight". OSB is, to all intents and purpose, more than adequately airtight as far as a building air test is concerned. It won't let air through at a rate that would make a jot of difference to the house air tightness in practice. OSB is vapour permeable though, so will allow water vapour to move through it. As such, OSB is not suitable as a vapour control layer - for that you need to use one of the boards made specifically for vapour control, such as Spano DURÉLIS VapourBlock or SmartPly, or similar. Our build uses Spano DURÉLIS VapourBlock as the inner skin and OSB as the outer skin for this reason.1 point


This leaderboard is set to London/GMT+01:00