
Leaderboard


Popular Content
Showing content with the highest reputation on 11/27/22 in all areas
-
Before you go too far designing/buying kit, if youre looking at a 6kw inverter youll need permission from your DNO so probably worth speaking to them to check you can connect a 6kw system to the grid.3 points
-
Little confused why you are doing WC and then adding expensive thermostats? Sort of missing the point of WC. Nighttime and most of daytime you will be on setback, only a couple of degrees though. You may want to read the Chofu manual, that is original manufacturer's and their manual has all the functions not included in the Grant manual. The controller is the thermostat in an original install etc. Chofu-Operating-Installation-Manual.pdf2 points
-
You probably don't need anything. A permeable ground membrane of some type to stop weeds and gravel over it to protect. I'd probably dig some kind of shallow drain around the edge to make sure water can't pool anywhere underneath.2 points
-
You should not be on boost. First are all the terminals in rooms fully open, if not, open them all. Start from the furthest thermal, leave that fully open and adjust MVHR speed to get the flow rate you require. Then work you way back to the mvhr unit adjusting the terminals. Work on supply only or extract only get that one right first. It will take a few goes to get it correct. When you have both supply and extract correct, set the boost flow rate. The kitchen extract should be circa 45m3/h. Cooker hood rates can be ignored.2 points
-
normal. nothing to worry about.2 points
-
Dig a land drain around the house at the top end to divert water away. And knock through a land drain at the low end to let anything that does get in, out. Makes a nice little run for the rats though. It shouldn't degrade the structure but trapping water is rarely a good idea.2 points
-
First fix is installing the cables ready for plastering the walls etc. I certainly would do that in wet. I would not do final fix, connecting it all and testing it until the building is dry.1 point
-
Best solution I see is ditch the idea of electric UFH, not cheap to run, no matter what anyone has told you. With a few mm of insulation board you will loose quite a bit of energy downwards. It will be less efficient with energy than your central heating, but also cost more to run as it runs on electricity instead of gas, lpg or oil.1 point
-
First fix yes, advise him to bring wellies and a raincoat for if the roofers don't get finished.1 point
-
uPVC fascia isn’t as strong as you think when compressed - it’s a thin plastic skin on foam.1 point
-
YES. I have a pretty standard 4kW panels and 3.68kW inverter, but when I submitted my paperwork (pre G98, I forget which) I got an almost instant reply to disconnect it immediately and apply for approval (what would have now been G99) And telling me there would be a fee for even applying. In my case they had seen the inverter model number which contained "4000" and assumed it was a 4kW inverter not 3.68kW and were demanding prior approval, even though that would only have been slightly over 3.68kW. Sending them the paperwork for the inverter confirming it's output was limited to 3.68kW sorted the issue, but it showed there is no leeway. To date in over 3 years I have only exported just over 300kWh. the fact you don't intend to export is irrelevant, the fact is you could.1 point
-
Quote seems a couple of grand heavy, might be worth getting a few more but prices are getting a little daft atm. Remember it includes a whole bunch of other kit, mountings, cables, scaffolding etc. And will give you an MCS certificate to get paid for export. Even with your high usage you may end up exporting a fair chunk.1 point
-
Is this true even if you don't plan to feed back to the grid?1 point
-
Hi @umer This can take a few months to get a reply from your DNO. It took about 2 1/2 months for us and a £360 fee.1 point
-
That's something I rarely see being considered here. Maybe the majority of BH contributors are retired 😁 But seriously, given the best way to run UFH is constant room temperature and the response time is in the order of hours, what if anything can be done to minimise heating costs with such an occupation pattern?1 point
-
not really - they are combined pressure and temperature and go at either 95°C or 3.2bar. Even at that point, the tank starts to rapidly cool as mains cold comes into the tank - if you have steam then it will exit via the tundish vents anyway. I’ve seen plenty of internal stubs with AAVs signed off with D2 connections on them and no-one has picked up on it. @tuftythesquirrel if your plumber is signing off the G3 it’s his cert anyway - BCO will just ask you for the book as proof.1 point
-
Here you go. Steel beam not visible, course of Marmox, course of 7N Celcons, course of med density agg, lower bit of cavity tray. The bricks are left out to clear out the cavity tray. Cavity will have 150mm EPS beads. Bricks will have a coat of Stormguard. Probably a course of slate under the Marmox to get the coursing to work.
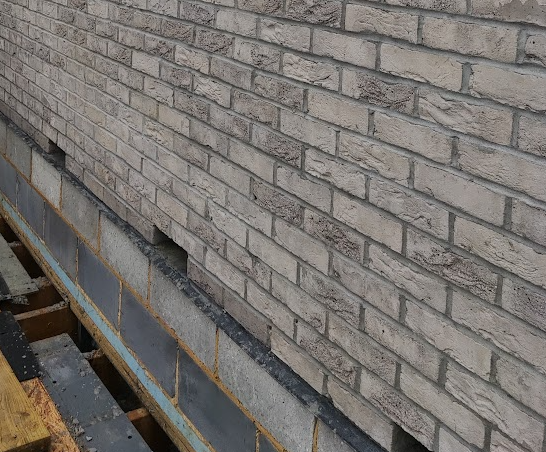 1 point
 -
Its an outbuilding, having timber above the insulation, no screed.1 point
-
PM me if you need help to spec the TS, and don’t forget to go via Trevor at cylinders2go, mentioning my username and the forum. He’ll look after you 👍1 point
-
Every manufacturer of a stove will publish the clearance distances from sides and back to "combustibles" and it will vary from manufacturer to manufacturer. For instance our Medip Stoves Churchill 5 convection model requires only 150mm from side to combustible materials and 100mm from the back to combustible materials. It is 550mm wide so in an opening 900mm wide the sides could be combustible material, i.e. plasterboard. The 5kW thing is irrelevant for you. A stive under 5kW may be able to get away with no combustion air provision and just draw air from the room. You are proposing a room sealed stove with combustion air direct from outside so you can fit any size stove that is appropriate. This is the current version of our stove, changed slightly from the one we bought several years ago https://www.mendipstoves.co.uk/churchill-5-convection-logstore-dual-control-ecodesign-woodburning-stove1 point
-
No, the bushes you showed have the wrong male/female orientation (they fit into a 1/2" female and accept a 3/8" male bit you've got a 3/8" female on the end of your tap connector).1 point
-
There's a simpler calculator here - just enter the outside temperature, outside humidity and inside temperature and it'll tell you the resulting inside humidity (assuming no additional moisture or dehumidification taking place as S2D2 says).1 point
-
That's the exact situation we're in. Soil stack vent to atmosphere by the garage . AAV Internally. UVC to Tunsish to HEPVO to soil stack.1 point
-
My UVC's pressure/temperature relief discharges to an internal soil stack via a HepVo. This soil stack has an AAV at the top - is is not vented to atmosphere. This was approved by Building Control (England) because we have an outbuilding that has a WC and the stack there is vented to atmosphere. Because of this, all the soil stacks inside the house can have AAVs fitted and none vented to atmosphere. Jeremey Harris explained it on here. Not sure though if I'm missing the point on Passive House - soil stacks internally are not a good thing? P.S. the plumber refers to the HepVo as a "fanny trap". You have to look into it to realise why 😯.1 point
-
English Brothers have not bowled my current clients over, but there are no perfect TF companies ( given all that I’ve seen ). MBC TF seem quite steady, with ups and downs to boot, but each instance yields the best final results I’ve seen to date. I’ve worked on both of their passive offerings a number of times ( PIR + wool and Warm-cell blown frames ) and am very impressed with both. The Warm-cell blown frames win hands-down imho. Graveyard silent ( resilience to outside noise ) and huge thermal time constant with excellent decrement delay. PIR filled frames and roofs do not compare very well at all, again imho.1 point
-
Hi, We ended up with English Brothers. Our next door neighbours went with Vision Development. Of the two of us he sang more praises.1 point
-
ours was the same, however, the areas where the water was pooling /gathering was around the edges where the builder hadn't filled in. I know I live in an area that has quite a variable water level, due to slow draining ground more than anything. I figured the water ingress was seepin in between or through the trench blocks and via the openings that had been created for the service ducts etc. I spent a weekend lifting the blocks on the b&b floor, then on the tractor loading wheelbarrows whilst the missus and boy spread MOT under the beams (Looks bloody good, and when I had to go tunneling for a lost hammer, i didnt come out covered in mud, so that was a bonus). The builder thought I was mad for doing so quite honestly, they dont tend to bother with these details. It looks a lot better, and for the sake of a few hundred pounds worth doing and justified in my mind. I've also put in some drainage around the property about 10m away or so from the build over the last year or so, basically 4ft deep trenches wrapped and filled with 4-6" limestone chunks leading off to a drainage ditch. Just to give the water somewhere to go. Logically once your DPC, and DPM is down your habitable area is a damp proof box, and going about things as slowly as I have, I've seen the seasons pass, dry and wet alike and not seen or noticed any issues. All is good, and I have no worries. These was taken after a wet spell, albeit we had no walls or roof at the time, so it was likely to puddle... Lifted them blocks more times than I care to remember.
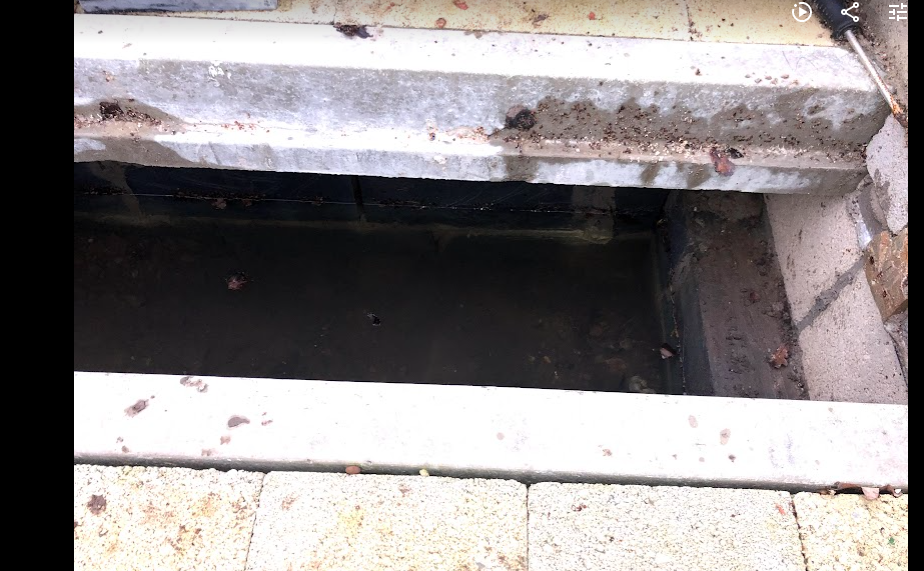
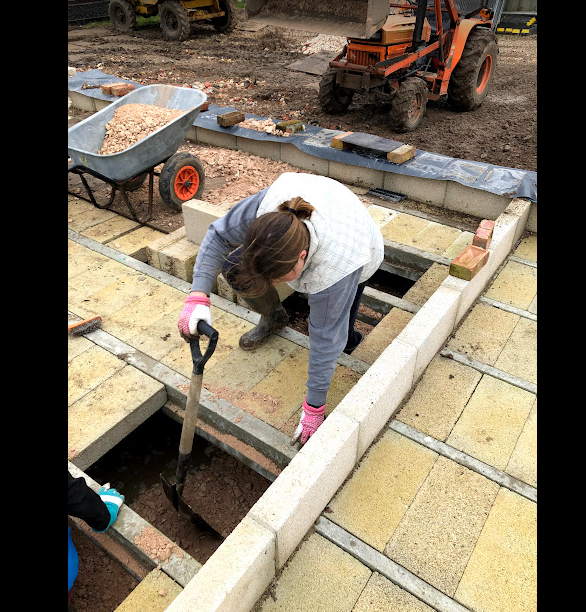
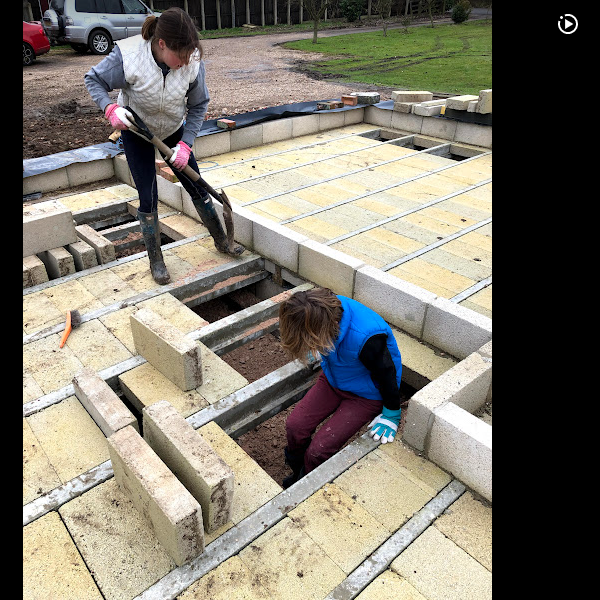 1 point
 -
Everyone seems to have their own favourite and I'd be pleased to see other suggestions, but for this job I'd probably use Puraflex.1 point
-
You're a new user, you dont have the right to upload yet. Maybe @jack can help?1 point
-
You are right, the engineer in me just likes to get to the bottom of why rather than just cure a problem1 point
-
But surely you've said it all: the rain running down the window runs over the edge of the plastic cill and follows it horizontally into the inside of the wall. Fill the gap with a decent flexible PU sealant - so the water stops at the outside - and that will cure the problem.1 point
-
ASHP to do both space heating and DHW. Then add PV. Much of it depends on what you think is important. Constant supply of heat Cheapest installation price Most reliable Cheapest running costs Least GHG emissions Simplest to install And many more1 point
-
Can't comment on the vid distribution due to only having a single TV (I know, radical) but maybe my Loxone experience can help here... Firstly, I'd not go for the Loxone occupancy sensor but go for the Faradite instead unless you want the acoustic angle? Personally I think they are much nicer - they are small, no relay clicks, just put them everywhere On to cabling - I went tree for the Loxone switches, spots and LED strip stuff (spots run from tree based on load, a single tree to each room and branching as you mention would be more than enough and my recommendation) and then ran a separate CAT6 for the Faradite with a couple of cables serving 2 sensors with diff cores (watch digital and analogue input counts on the Loxone end as that escalates!). I also have all 240v radial obviously routing back to Loxone over 1.5/2.5mm T&E. I was originally going to run T&E to each light switch but didn't bother and I think that was the right decision, switches will move away from needing T&E over time IMO and it's a waste of money/resources. You can happily run the Touch switches using normal CAT6 (as I am for a couple). I separately ran CAT6a for all my PoE gear e.g. Unifi cameras and AP. Not strictly required but has worked a charm with some very long runs. Now, what would I have done diff...? Run more spare cables (CAT6 and T&E) between key areas (for me this would be comms room, utility room, loft and garage) and put in spare twin wall ducts (100mm ones, it's easier to slot insulation down them into slab and for me again this is loft to comms, comms to utility and utility to garage). I ran specifically colour-coded cables which helped too - green for tree and green CAT6 for Faradite, blue for CAT6a PoE, orange for data, etc...1 point
-
Hi, Have you any breakdown of the costs which you could share? Privately even? How much is a cable design do you know?1 point
-
Buy a humidity meter first if all, to determine the % in the house, then decide if dehumidifiers are needed.1 point
-
Main Beams: The guide only covers main beams (eg the beam parallel with the wall) upto 3.4m (Table 3.1). If you want to use that guide you would need three posts to reduce span to 2m. In that case they suggest main beams are 195 x 44 C16 doubled up. Joists: Table 4 suggests 195 x 45 C16 for a 3m span. I don't know/think you can order oak to C16. May need to specify "Structural grade oak". I recommend any metalwork in contact with the oak is stainless steel as oak can corrode other metals.1 point
-
Well I have a 5KW ASHP no calcs, passive esk build, my house is bigger than yours my DHW tank is also bigger and it copes just fine. I found my ASHP on Ebay dead cheap, still new so took it as a punt and it paid off. Others will be along shortly (who know what their doing) and talk figures ?.1 point
-
Or, better still, can you remove the thermal bridge that a vent pipe running up from inside the house to the outside will create? If you can fit an AAV at the top of the internal stack then vent the foul drain externally you can remove the thermal bridge and also remove the need to cut a hole in the house.1 point
-
Essentially there are two different requirements in the Building Regulations themselves, but these aren't 100% clear in the guidance in the Approved Documents. The first requirement is that the foul drain has to be vented to atmosphere, such that there can be no build up of pressure inside it - the idea is to allow any gases to escape via a vent. The second requirement is that there has to be a means to prevent a partial vacuum forming in a soil pipe when a toilet is flushed or a basin or bath emptied. Common usage was to combine both of these requirements into a single vent pipe that does both functions, and either run it through the roof or run it up the outside of the house if the soil pipe is external. However, there's no need to do this at all, you can split the two functions and solve each individually. You can fit a vent pipe, to allow the foul drain to be at atmospheric pressure, pretty much anywhere along the pipe run. You can even fit one beyond the entry point of the soil pipe inside a hedge or flower bed, at fairly low level if you wish, or run an external vent pipe outside the house and up above eaves level. To resolve the partial vacuum problem you can fit an AAV inside the house, well above the highest outlet, in a position where it can be accessed for maintenance. This will open if there is a partial vacuum in the soil pipe and allow air to be drawn in, then close to prevent smells from escaping. An AAV cannot stop any build up of pressure in the foul drain, so if you fit one then you need an external vent as well. The advantage of fitting an AAV and an external vent is that there is less heat loss. Internal vent pipes act a bit like chimneys and constantly draw cool air up through them, so unless well-insulated they will draw heat from the house and can act as a focus for condensation. If you have an existing vent to the foul drain, then you should be fine with an AAV for the new upstairs bathroom. It needs to be well above the highest drain and accessible for occasional maintenance/replacement, so you can't build it into a wall without some form of access cover, plus it needs a reasonable air supply.1 point
-
@nod look away now ?0 points


