
Leaderboard


Popular Content
Showing content with the highest reputation on 11/16/22 in all areas
-
I would do nothing and say nothing, see if they spot it. Can you make a more obvious fault somewhere else? they are happier if they find something wrong.2 points
-
But within 1m of the boundary needs significant fireproofing which negates all the benefits. That’s the problem with this sort of project. Standard 100mm medium weight blocks - cheapest you can find - and infill between steel frame (ie inside the webs) and then insulate the lot externally. You could use paint grade blocks but tbh they aren’t worth it.2 points
-
Practically you could build the great pyramid of Giza on top of a 175mm joist spanning 2.1m. You might have to leave the top stone off considering you put some holes in it! I wouldn't give it another thought. If BC note it you could always screw some metal plates to the side of the joist to reinforce it.2 points
-
Before you do this, make sure you know where the valves are to isolate the heating pipe loop. Last thing you want to do is have a failure and uncontrolled release of water. Reccomedation from personal experience.2 points
-
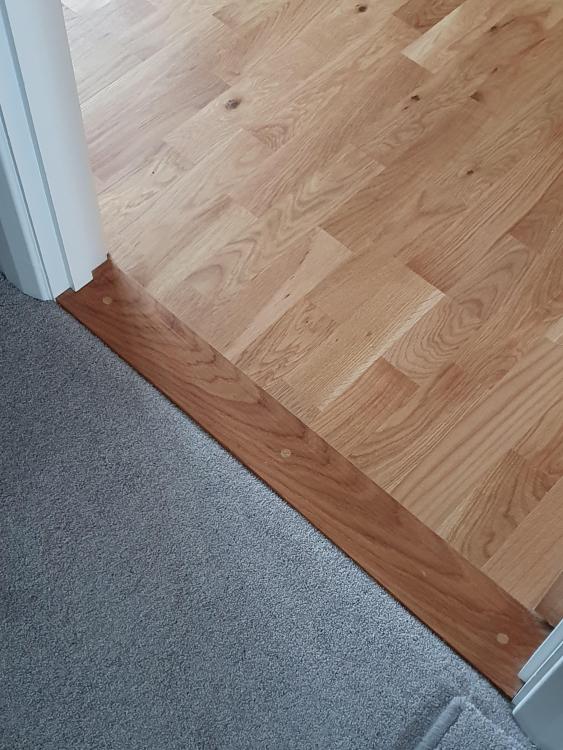
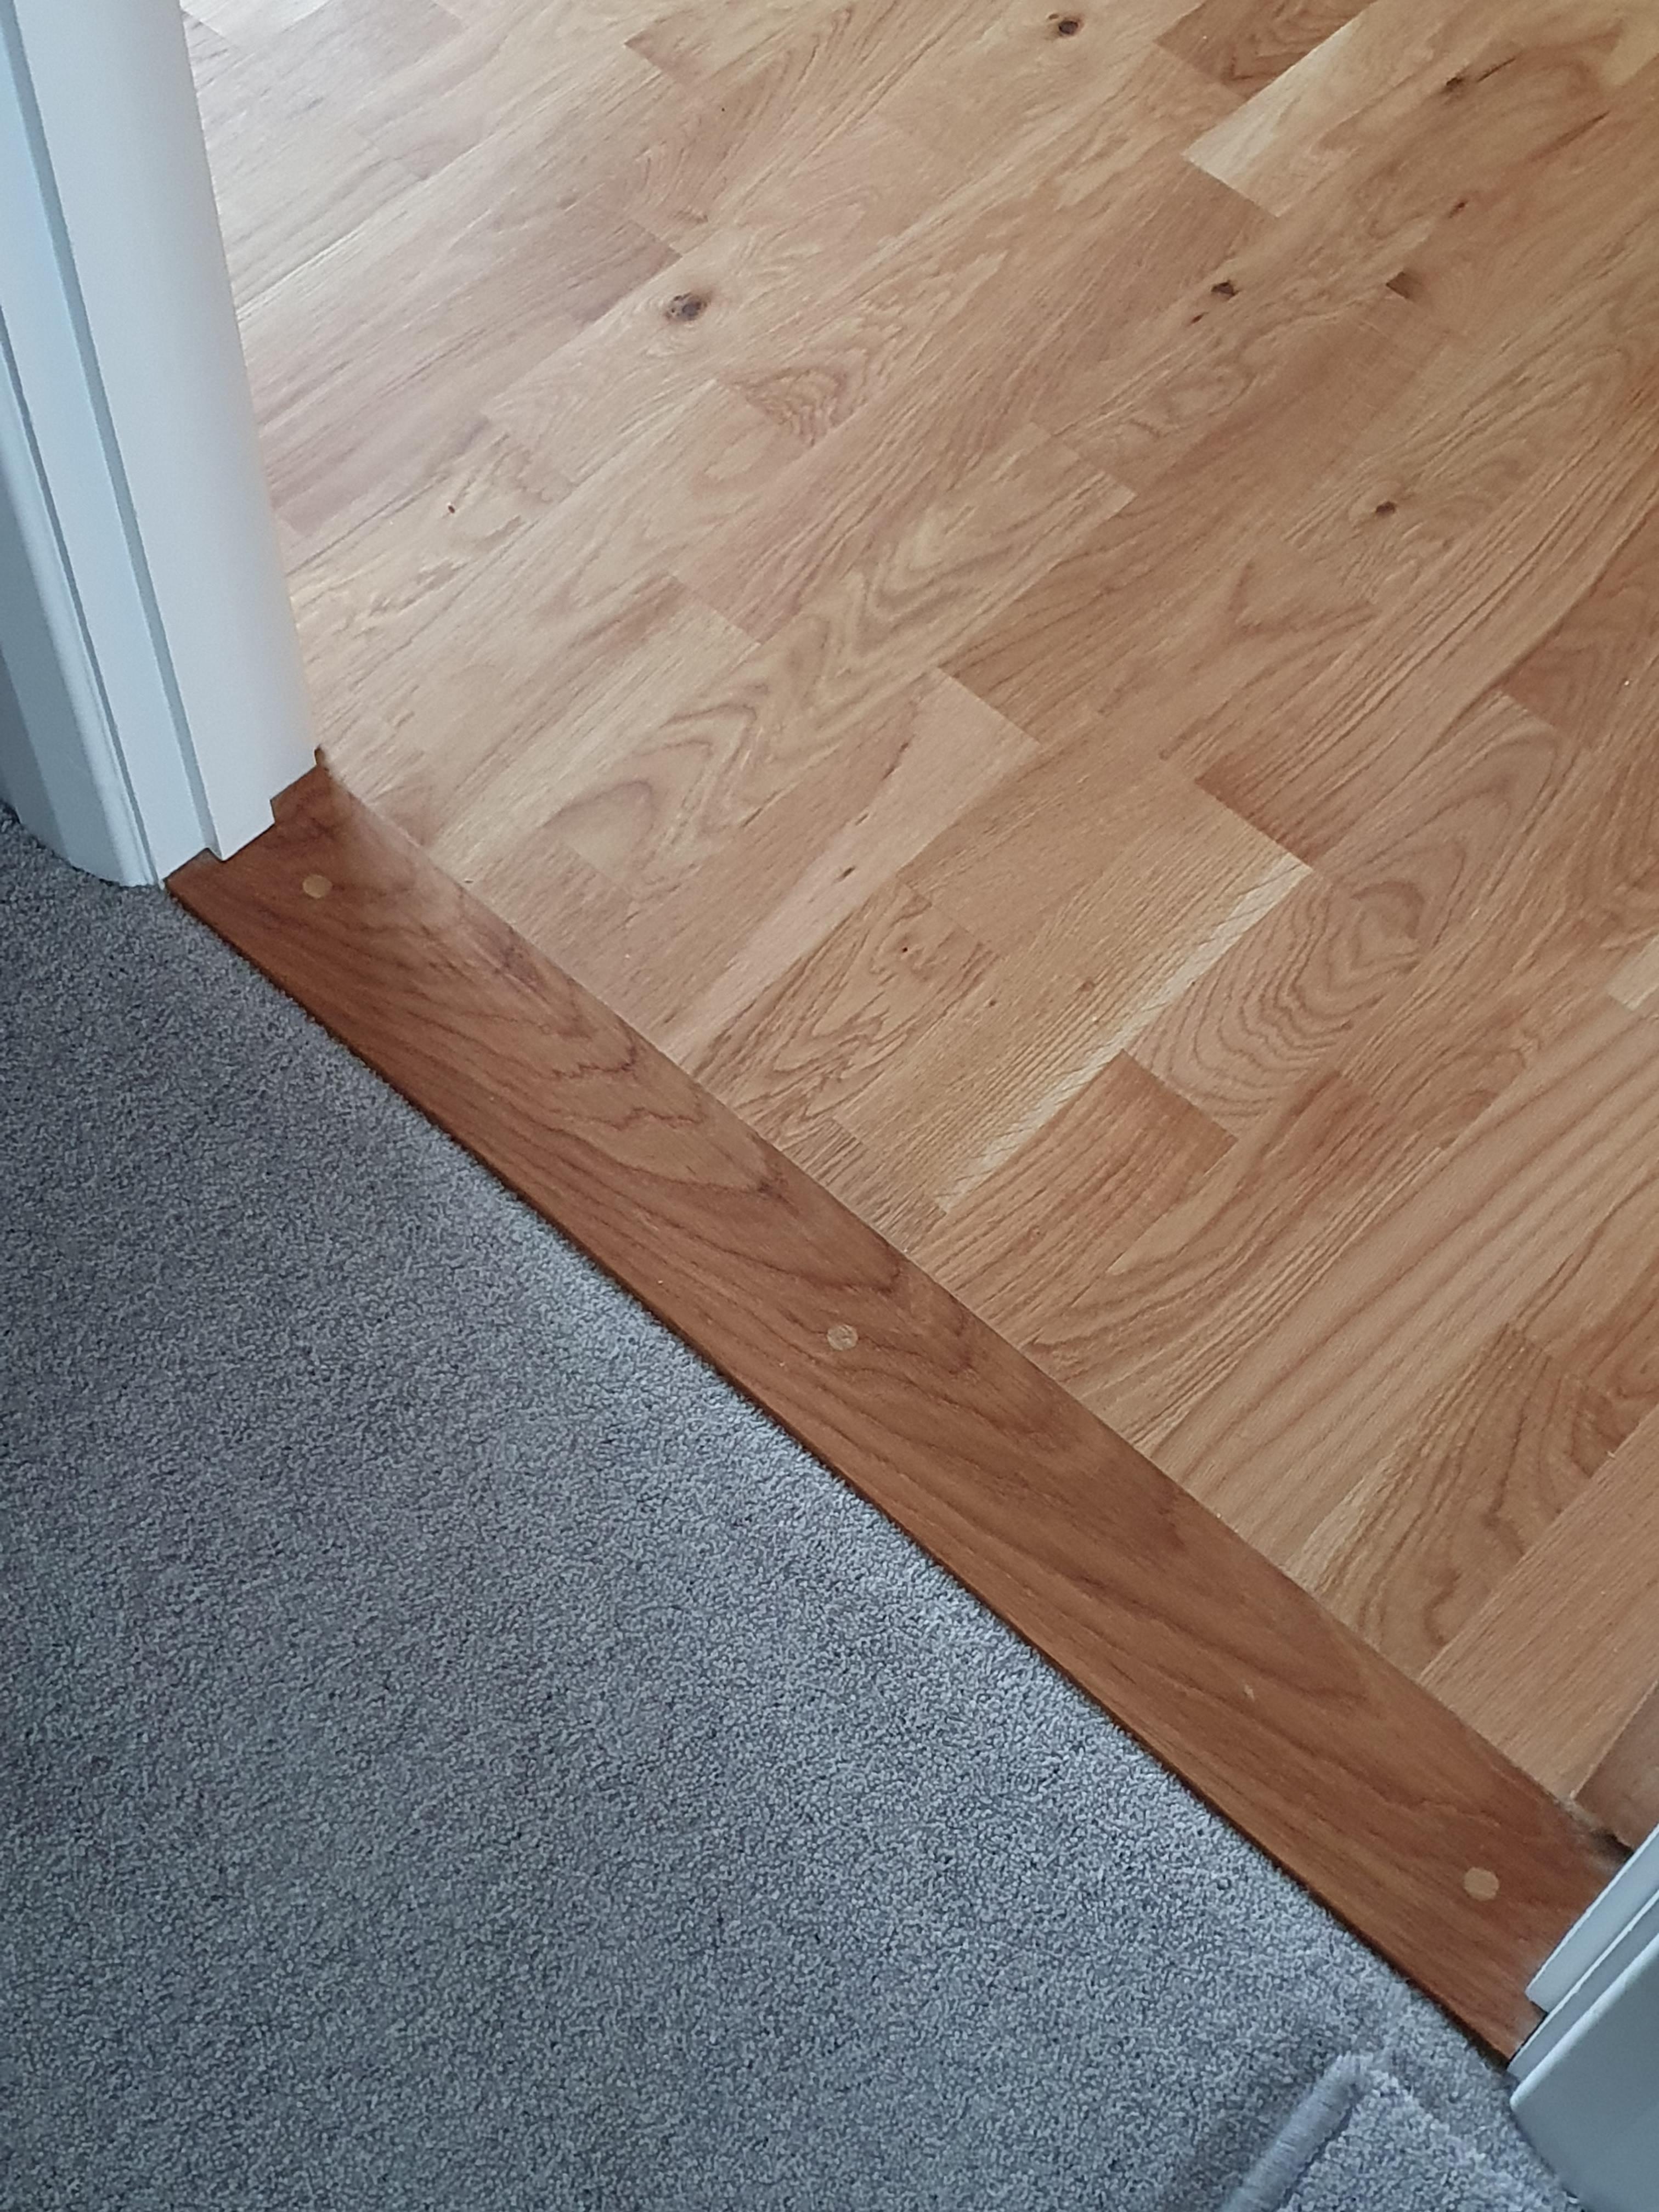
We had the same dilemma looked at various solutions. In the end we got 20mm oak thresholds made, that just stud proud of the 19mm thick wood floor. Screwed down and pelleted. Then the carpet fitters just laid up to it as the would any other area. Small run of oak flavoured silicon between the threshold and timber floor is enough.
 2 points
 -
Timber is still expensive vs blockwork but if you can do most then labour cost will be lower My workshop is block because I wanted to hang lots of stuff on walls and didn’t want to have to find studs to do it and easy to render to, you could always labour for the block layer, mixing, moving blocks etc and reduce your labour costs, Render on blockwork has got to be easier/cheaper than on a stick frame, timber moves and I would be concerned with how you mitigate that with a stick frame and what would you would use to clad the frame to render on? And the additional cost of that 🤔2 points
-
I have tp link three m5 deco and two ax3000 covering an old stone barn conversion of three levels and two barns all Wi-Fi no cables brilliant mesh system. I can be out in the veg plot with full Wi-Fi which is 30m at least to main deco, using one in a barn to boost signal, also have cheap security camera on it. I was going to get outdoor type but these do the job for me sending signal from in house to in barn to in another barn. There are new Decos coming out soon.2 points
-
OpenTherm is a Honeywell boiler protocol. Heat pumps are mostly designed in countries where they don't have boilers, and there isn't much crossover between the boiler world and the heatpump world. If you're using a boiler controller for a heatpump you're doing it wrong - you should be using the heatpump's own controller instead. Anyway, I knocked up this code and it reads the weather comp settings. An algorithm to change them is left as an exercise for the reader - I have put in an example of how to write a register, but it's commented out so it doesn't change any of your settings. I have a Modbus TCP server (actually a Raspberry Pi 1 running mbusd and a USB-Modbus adapter) at the IP address in the code below. You also need to install the pyModbusTCP library (I got it from pip). It's also possible to use the same with a USB Modbus adapter but needs reworking to use a library other than pyModbusTCP (I previously used MinimalModbus). #!/usr/bin/env python3 from pyModbusTCP.client import ModbusClient # the values return are 16-bit signed integers, # so convert to python integers def sint16(v): signbit = 1 << 15 return (v & (signbit - 1)) - (v & signbit) def read(mb, reg): result = mb.read_holding_registers(reg, 1) if isinstance(result, list): return sint16(result[0]) else: return 0 def write(mb, reg, val): mb.write_single_register(reg, val) # hostname of the ModbusTCP server hostname = "192.168.4.117" # connect to the server on port 502 mb = ModbusClient(host=hostname, port=502, unit_id=1, auto_open=True, debug=False) # read settings from the holding register table # these are in units of 0.1C, resolution 0.5C z1_fixed_outgoingwater_set = read(mb, 2)*0.1 z1_tm1 = read(mb, 3)*0.1 z1_tm2 = read(mb, 4)*0.1 z1_te1 = read(mb, 5)*0.1 z1_te2 = read(mb, 6)*0.1 print("Zone 1: Fixed setpoint %f" % (z1_fixed_outgoingwater_set)) print("Zone 1: At min air temp te1=%f, outgoing water temp is tm1=%f" % (z1_te1, z1_tm1)) print("Zone 1: At max air temp te2=%f, outgoing water temp is tm2=%f" % (z1_te2, z1_tm2)) # set Zone 1 fixed outgoing water setpoint to 55C ##write(mb, 2, 55*10) When I run this I get: which must be what my installer has configured it with.2 points
-
So finally we been granted full permission to proceed, my drainage pan has been approved and deemed I do not impact the nutrients to the broads in addition to those expected by my initial application that was already approved, common sense has prevailed. Quite why I had to wait when this assessment was done 29th September I’m not sure. But it done now. Hooorahhh South Norfolk and Broadland District Council Habitat Regulations Assessment (HRA) Screening Please note: Undertaking the HRA process is the responsibility of South Norfolk and Broadland District Council as the Competent Authority for the purpose of the Habitats Regulations. However, it is the responsibility of the Applicant to provide the Competent Authority with the information that they require for this purpose. HRA Drafting Date: 29 September 2022 HRA Completion Date: 29 September 2022 Application Reference: 2022/0699 Application Address Land North of Brickle Loke, Stoke Holy Cross, Norfolk Application Description: Variation of conditions 2, 4 and 6 – amended drawings, materials and velux windows Proximity to SPA/SAC Within catchment of The Broads SAC Lead Planning Officer: Please note that all references in this assessment to the ‘Habitats Regulations’ refer to The Conservation of Habitats and Species Regulations 2017 (as amended). Stage 1 – Details of the Plan or Project Does this application relate to residential development only? Yes European site potentially impacted by planning application, plan or project: The Broads SAC Is the planning application directly connected with or necessary to the management of the site [If yes, Applicant should have providedevidence and justification]] No Are there any other projects or plans that together with the planning application being assessed could affect the site? [Applicant to provide the information sufficient to allow an ‘in combination’ effect to be assessed] No Stage 2 – HRA Screening Assessment Screening under Regulation 63(1)(a) of the Habitats Regulations – Significance test: the Applicant is to provide evidence so that a judgement can be made as to whether there could be any potential significant impacts of the development on the integrity of the SPA/SAC/Ramsar. Whilst the application site falls within the Broads Catchment Area shown on the NE map, and does provide overnight accommodation, it does not present any increased foul water implications beyond those that would occur lawfully under the consented and implementable permission 2021/1154. The scheme would not lead to non-sewerage discharge to watercourses that would necessitate an appropriate assessment for nutrient neutrality. Does the evidence submitted suggest the proposal will lead to a likely significant effect, without mitigation measures, on European Site integrity? No2 points
-
A short blog to show my Mini spilt Air2Air install, in the Windy Roost Static. I looked at installing a wood burning stove, but we have zero trees on site, so when I looked at the costs of twin wall flue, terminals, flashing, creating a heat shield and making the caravan tidy plus the hassle of getting wood / coal, the costs were adding up. A quick question on here - Build hub, some options were suggested and I decided to go with the a cheap Air 2 Air heat pump from Appliances direct. The unit is a Telefunken 12K BTU split unit. cost around £375 but did not included the pipe to connect from indoor to outdoor unit. I got 5M twin insulated copper pipe with the flair nuts from ebay for £56. Our Static has a gas fire - useless, and a chimney breast made from chipboard, the side panel just screws off to access the flue. This was the perfect place for the indoor unit, as it would be a neat install and the rear will allow for the pipes to be hidden, also I could use the hole in the floor to route the pipes/ drain and power for the remote unit. I removed the light fitting, screwed the bracket on the timber, and drilled a 80mm hole, for the pipes / drain and power. Then its a case of posting all the pipes/ drain and power cables through the hole, really straight forward, the indoor unit then just clips into place. The indoor unit comes pre wired with a 13A plug top, and you need to run a 3core and earth cable from the indoor unit to the outdoor unit. this is Live, Neutral and a control / switch cable. Next to the chimney is a double plug socket, so I wasn't messing around running new cables, I just drilled an 8mm hole in the side of the chimney breast and used 2M extension lead to plug the unit in. I used some zip ties to secure the extension lead and plug to the pipes (these were put on after the photo below). and that was the internal work complete. zero mess, and no rework / decoration required. The outdoor unit was going to sit directly outside, behind the chimney breast, the ground outside was not level but it is bedrock, so a made a simple frame and made level concrete pad, and cast some hook bolts into the concrete. For initial research I spoke with a Local (ish) refrigeration engineer, and he said he would connect for £120. but was telling me there is nothing to it, and if I was doing everything else then maybe I do it all??? I found an American You tube guide which was helpful on the pipework side. (linked below) Basically, the unit comes pre charged with gas, so you are not filling with gas etc. the main issue is removing the air from the two pipes you install. This is done with a vacuum pump. (some more expensive units come with pipes and they are pre-vacuumed with quick connectors) I found a vacuum pump and gauge set for sale on Vevor for £79 so £41 cheaper than the refrigeration engineer. I bought one, and an adaptor. I'm not suggesting anyone does this without an F - Gas Engineer, but the main issues are leaks, if when you connect the pipes up and they leak you are going to loose the gas, and the unit wont work. To Purge the pipes Step 1 connect your pump to the centre of the two gauges with a hose Step 2 connect a second hose to one of the gauges and the other end to the one way valve on the outdoor unit Step 3 Open the valve on the corresponding gauge from step 2. Step 4 Run the vacuum pump for 15mins to remove the air, and you check the gauge is reading negative. (-30 blue gauge in pic below) Step 5 turn off the pump and wait 15mins, and check the gauge is still negative. (-30) - this proves there is no leaks Step 6 close the valve you opened in step 3. Step 7 Open the 5mm Allen screws on both valves to the gas fill the internal unit. That is disconnect the pump plug the indoor unit in and you ready to go. Notes: I used expanding foam in the hole at the rear of the fire. We have no intentions of using the fire as it is /was rubbish. Also the indoor unit should not be near a source of heat. The total install time was around 4 hours. and total cost £530 More importantly my caravan has warm air. lets see what its like in winter.🤞1 point
-
This will be building it the most expensive way possible. Time for a healthy dose of cost engineering by going through every element line by line and deciding if you really want it and/or could the same effect be done in a different more cost effective way. Do you really need a 500m2 house? That’s pretty big and apart from build costs will be expensive to run and furnish.1 point
-
No reason to doubt it. But I still say you do what I suggest above. I have just about done with the discussion I think....now up to you, and do keep us informed.1 point
-
Yes you can. If their Engineer is fully qualified, and has PI, then going straight to ultimate experts can save you a lot of money. I am just concerned that you are still talking to Sales, and not Engineering. Imagine buying this house, then the injection people turn up and shake their corporate head. So you must get a written quotation, and written assurances from their Chartered Engineer that this is the correct proposal for this house, and confirmation of their insurance cover.(which should be in Millions, not thousands.) Part of my concern, and others here I believe, is that this process may close the cracks but not resolve an underlying problem, Underpinning takes foundations deeper, where the ground is more stable. I understand that the resin just fills gaps between the foundation and the wall, but please advise.1 point
-
There is negligible bending stress at the end, so it is fine. The bco should also know this. But if he doesn't, tell him that you know it is not ideal, but have been informed that there is negligible bending stress at the supports. Then you may just end up needing proof. I'm sure it will be easily explained in some book which we here might find.1 point
-
Hill, clay, subsidence and now buried bombs. I will take the property off their hands for 10k. You have actually raised a very important point. Without being 'in the trade' it is very hard to to find out what companies liabilities are, and how they can be enforced. Probably why we need solicitors to act on our behalf, then if the builder (expletive deleted)s up, we can claim against the solicitors insurance.1 point
-
Excellent! Something for me to worry about if I choose block 😂 (I think I will...) I was getting worried that I couldn't think of much to worry about.1 point
-
These are heat pump water cylinders, plain and simple... Don't let anyone try and tell you otherwise. If your heat loss is 1.1kW then have you considered just using a willis heater to drive your UFH loops? With interest rates heading upwards, you'd probably be better off going direct electric and leaving the ASHP costs in the bank.1 point
-
If its an eBay auction, ebay will reimburse you if its not as described. The key is how is it being described?1 point
-
Not really, if you were framing it all with 3x2 then it would be incredibly flimsy and fragile, but a decent framed wall with tight joints is surprisingly stiff and once you have some plan bracing in they will stand up to knocks are high winds1 point
-
When I have a free day, a pencil, paper and a dictionary, I shall go through that. Even turning legalese into something approaching English is hard work compared to thermodynamics.1 point
-
Not sure how plentiful it really is. Takes a lot of land and water. Microwaved bamboo could be used to build super-strong skyscrapers TECHNOLOGY 24 April 2020 By Alice Klein New Scientist Default Image Bamboo can be made strong enough to build planes or cars by microwaving it Aaron French/EyeEm/Alamy Scientists have created an exceptionally strong, lightweight material out of microwaved bamboo that could be used to construct the next generation of skyscrapers, cars and aeroplanes. At the moment, steel, concrete and bricks are the most commonly used construction materials, but they are non-renewable and their production contributes substantially to global greenhouse gas emissions. Bamboo, in contrast, is a fast-growing, renewable material that is already used in houses and scaffolding in many Asian countries. However, it is not strong enough in its natural form to construct tall buildings. Advertisement To make bamboo stronger, Liangbing Hu at the University of Maryland in the US and his colleagues treated it with chemicals to partially remove a substance called lignin, then microwaved it to remove water. This caused the bamboo to shrink by about a third of its size and its cellulose fibres to pack together in dense layers. The tightly-packed cellulose layers were able to form strong chemical bonds called hydrogen bonds that enhanced the strength of the bamboo while still maintaining its lightness, says Hu. Read more: High-tech wood could keep homes cool by reflecting the sun’s rays The tensile strength of the microwaved bamboo – or the amount of stretch it could withstand without breaking – was 6 times that of steel when compared by weight. It could also withstand slightly more compression than concrete and bricks and did not degrade when left outdoors. These properties make the material suitable for constructing skyscrapers that would be lightweight but stay stable by being strongly bolted to the ground, says Hu. It could also potentially be used to make lighter electric cars that could make up the weight with bigger batteries for travelling further, or lighter aeroplanes that require less fuel to propel them, he says. Hu’s team and other research groups have also used wood to make super-strong, renewable building materials, but bamboo has the advantage of growing faster, meaning it can be produced on a larger scale, he says. Hu and his colleagues are now planning several engineering projects to test the potential of their microwaved bamboo in real-life building contexts. Journal reference: ACS Nano, DOI: 10.1021/acsnano.9b08747 Menu Bamboo road bridge can support 16-tonne trucks TECHNOLOGY 19 December 2007 By Mason Inman The novel bridge with horizontal beams made from a bamboo composite proved strong enough to support even heavy trucks (Image: University of Southern California) Bridges built from bamboo instead of steel could provide a cheaper, more environmentally sustainable engineering solution in China, a recent experiment suggests. A novel type of bridge with horizontal beams made from a bamboo composite proved strong enough to support even heavy trucks in tests. The bamboo beams are cheaper and more environmentally friendly to make than steel or concrete, yet offer comparable structural strength. Yan Xiao, who works at the University of Southern California, in Los Angeles, US, and at Hunan University in China, led the development of the bamboo beams used to make the bridge. Advertisement Instead of using round, pole-like pieces of unprocessed bamboo, which have been used as building material for many thousands of years, he came up with a way of assembling timber-like beams from many smaller strips of bamboo. Precise details on the process remain proprietary, but Xiao says the strips are cut from large stalks of bamboo, arranged in multiple layers, and bonded together with glue. The technique has never been used to build such large beams before, Xiao says. Sustainable harvest Last week workers finished assembling a 10-metre long bridge of Xiao’s design in the village of Leiyang in Hunan province, southern China. Using prefabricated beams, it took a team of eight workers just a week to assemble and did not require heavy construction equipment. It proved strong enough to carry a 16-tonne truck and, and based on structural testing of the bridge, should be able to support even more weight, Xiao says. Pound-for-pound, bamboo is stronger than steel when stretched and more robust than concrete when compressed. Also, stalks several meters tall mature in just a few years, rather than a few decades as with trees, so more can be harvested from the same amount of land. Furthermore, since it is a grass it can be harvested like mowing a lawn – leaving the root system intact so that the plant can regrow. Green solution Bamboo beams could work for bridges up to 30-metres long, Xiao says, making them suitable for carrying pedestrians in cities or cars on highway overpasses. “I think very highly of the work that professor Xiao is doing,” says architect Darrel DeBoer, who works with unusual building materials. “It’s quite worthwhile to find alternatives to the concrete that we are using way too much of.” DeBoer notes that cement production releases a lot of the greenhouse gas carbon dioxide: 5-10% of global CO2, according to different estimates. This is an unavoidable part of the chemical process used to make cement from calcium carbonate. Bamboo, on the other hand, soaks up CO2, as it grows. “From an environmental perspective, bamboo is a great choice,” DeBoer says. Cars and Motoring – Learn more about the latest technologies in our comprehensive special report.1 point
-
https://reasonstobecheerful.world/hempcrete-construction-us-building-code-sustainable/?utm_source=Reasons+to+be+Cheerful&utm_campaign=35cae6aa4a-EMAIL_CAMPAIGN_2021_11_22_04_40_COPY_01&utm_medium=email&utm_term=0_89fb038efe-35cae6aa4a-389709485 Another cheerful article on how we can improve buildings while contribution to saving the planet. I still hope to build a house one day and my plan is definately to use hempcrete. Hope you enjoy the story.1 point
-
I think PayPal covers online purchases with section 75.1 point
-
@Gone West my son is a carpenter - so he took care of the joists / deck, then we got an approved Sarna installer to do the SPM @DaveJones - there's a 20 mm gap between the top of the cladding and the underside of the deck and there are Glidevale vents in the upstands against the parapet wall1 point
-
Timber Frame - would have to be OSB sheathed anyway - put this on the inside layer for hanging things etc. Would also be easier to get a decent level of insulation too. 140mm flexible batt between 600 c/c studs. Simple. I think this is the route I'm going. Unless I decide to teach myself some brickwork. Generally prefer dry trades though!!!1 point
-
https://recoupwwhrs.co.uk/documents/Recoup_WWHRS-Energy_Statement_Overview-Specification_Outline.pdf1 point
-
seen a timber frame build levelled with window packers so you should be ok!1 point
-
those mini piling figures are tosh. Seen screw piles used before to underpin, clean and quick. https://www.abcanchors.co.uk/access-all-areas-underpinning-with-helical-piles/1 point
-
Difficult to say without length of run, trial pit and site specific but I would work on £1k-£2K /m with a minimum £6k to cover enabling works. (Haven’t done any commercially, only F&F in last 6 or so years).1 point
-
Photo would help If they are solid joists iThey would have to be pretty bad to fail I joists can be strengthened with 18 mil ply Probably won’t be picked up if it’s only holes a bit close1 point
-
Automatic air bleed valve. Unscrew the little cap on the top and any air that has accumulated will hiss out.1 point
-
Even college trained tradespeople have great gaps in their knowledge. I suspect many tutors don't know in the first place. How beams work shoud be fundamental training to sparkys, plumbers etc. One hour talk with hands on examples of the effect of depth, and how the middle is neutral space. And then there is airtightness, vapour barriers....1 point
-
In collapse maybe, but they can start to bounce excessively, and that is part of the design assessment.1 point
-
There are laid down rules on where and what size you can drill or notch a joist. Working in mostly older houses I encounter all sorts of drilling and notching in all sorts of places. Most trades don't even know you are supposed to stick to certain rules and drill whatever hole they need where they need it. I have never seen a joist failing due to holes in wrong place.1 point
-
Cost per m for silvershadow's benefit? Or if that is commercially sensitive, a range. I assume that an insurance company or mortgager would want it professionally supervised.1 point
-
I think this revolves around: 1 - Is the change a real problem in any respect? (important) 2 - Will they be able to see it? F1 point
-
Better to have a timber wall plate fixed to the top. Otherwise you need to figure out a way of attaching X number of timber joists to a steel beam. Beam under the masonry can be packed out with brick and dry pack mortar - lot cheaper than more steel. Making beams bigger isn't necessarily straightforward, while in general deeper means stiffer, that is only definite in the major axis... they can be more slender which can be an issue with torsion resistance (for the bi-fold door underside plate) and lateral stability (for the beam below the wall) .1 point
-
This is the typical set up but they usually come with (inadequate) instructions.. Run CAT cable from your router to each AP. Power up one of the AP. Browse a Web page listed in the the instructions. This web page actually resides in the Access Point. You may have to enter a password listed on the box. Then you have to change things like the admin password, the SSID (network name you want), the user password and the chanel frequency (so its not the same as your router or neighbours). Then you should be able to connect to that AP over WiFi. Repeat for other AP. However it's not always that simple and there can be tricky problems with IP addresses. If not confident then the mesh type are simpler.1 point
-
I always use a desktop when photos are involved, so perhaps yes?1 point
-
I’ve seen injection done under large slabs to re level and it worked well (drive and pathway). But it is still under pinning but without the tried and tested methods of excavate and replace with known quantities of concrete and bearing dimensions etc. I’ve been involved on some big stabilisation projects but I would not use this under walls etc as the bearing surface etc. is unknown. Yes it might work, but for how long?1 point
-
Without digging (no pun intended) for information on the product/process, am I right in thinking this is a soil stabilisation process by injecting a “substance” that then solidifies? If so then I would be very sceptical for future insurance or mortgage purposes as it is effectively underpinning.1 point
-
if an insurers SE says the footing has failed then any 'resin' is literally paving over the cracks. It sounds like your looking for an easy out to justify the price and have latched onto this. Underpinning is not a massive job and will fix the root cause. Webuyanyhouse wont touch it with a bargepole as they wont be able to flip it with subsidence which is all they do. stick by your guns there is always another place.1 point
-
Been meaning to do mine for two decades. Hard choices have to be made, waste time drawing a house, or waste time at the beach. @irnbru There are a number of free CAD packages, as well as free illustrating/photo editing ones. A lot of people use Google SketchUp. You can get a few ideals of what it can do here: https://sketchup.engineeringtoolbox.com/1 point
-
Firstly, i am both Engineer and contractor. For a clientI I take few risks. For my own, and family, i take more chances. We have taken on severely distressed buildings 5 times, always to live in. In every case there have been nasty surprises, even to me. These would nof have come up in reports other than as general warnings. More accurately these are considered decisions, not risks. So the default here is to say to be careful. The discount may not begin to cover the risks....but i don't know as i don't know enough about this property. If this house was possibly to be mine i would cost the repairs of the known problems, but also allow for the unknowns. Repairing to live in rather than sell is an advantage. Things like the drains can be dealt with as and when. A builder either has to get it right, or disguise the problems, in order to sell it. Stitching is a repair, not a solution. Best have an expert look at what caused these cracks and the floor movement. A good local SE could simply have a walk round inspection and give off the recird advice. This works for easily seen problems and avoids unnecessary detail and report cost. For example i once suggested this, on the basis that the SE would say only whether the house would get a mortgage, and why not. Client paid for 2 hours and avoided an expensive mistake. The discount may not be remotely enough. Be prepared to let it go. On a positive. Maybe the ground is ok and thd floor is just very badly made, and can be repaired. Maybe the walls are cracked for other ressons thsn foundations, and just need repair. On a negative....often houses are beyond repair, demolished and rebuilt as new. Be careful, get independent professional advice.1 point
-
Hence factors of safety. Some for load, material, and build quality. And a lot of that weight is at the edges. Then, most structures are governed by deflection limits...ie they flex and feel uncomfortable long before they break. I assume that the stairs did not fail in this instance.1 point
-
The Geobear Google reviews do not inspire confidence. Unless the property is at a huge discount (at least twice the cost of proper underpinning, drain replacement and crack repairs) I would not go ahead.1 point
-
The mechanical side of our MVHR installation was one of the very few things we entirely did ourselves. It was extremely easy. We had a layout from the supplier, but when we went to do the installation we realised that the open-web joists allowed much shorter routing in some places, by going on the diagonal. In terms of tips, I'd suggest making sure that there are no "closed" routes. We had a minor scare when we realised all supporting joists around our stairwell were solid, even though half of them were shown as open-web on the plans. Thankfully, the savings we made pulling some of the runs on the diagonal left us with more than enough to take a slightly longer route around the stairs to reach the affected room. For pulling through the ducts, you really need two people, as they tend to catch on edges of joist webbing. Where your ducts join the manifold, you should ideally have a reasonable length of straight run beforehand. That is, don't have a duct bending right before the manifold. It makes them harder to join to the manifold, and can really obstruct the paths of adjacent ducts. Think carefully about whether manifold position can reduce your runs. In our case, moving the manifolds by a few couple of metres saved us multiples of that distance in ducts, because nearly all of the runs went in the direction we moved the manifolds. For example, if you have 10 ducts coming out of a manifold and they're all going in the same direction, moving the manifold 1m in that direction saves you 10m of duct. You might not have the option to do that, but we had the space and it worked well. Think about how you're going to support the ducts, as they shouldn't have significant dips along their length. It can be as simple as some offcuts of wood bridging wider gaps, and/or using something like leftover breather membrane screwed to something above to provide support.1 point
-
I need to install extractor fans anyway so the trickle overhead is small there. That's a lot less involved than ducting to a centralised unit. I don't want this to be anti MVHR as I think it suits many well. Personally: - I don't like all the ducting of MVHR. - I don't like the expensive single point of failure of MVHR - For my situation I don't believe the economics of MVHR work. Across 6months of heating season the average dT is about 13C and so the PIV annual running cost is £172 electricity. MVHR only about halves that due to its fan having higher power consumption. Even at £172pa the payback time would be looking like >15 years, based on a modest £2500 outlay. I suspect there are other annual costs that raise MVHR to costing over £100pa to run, taking the payback beyond 30 years. MVHR is largely about the heat recovery. What would you do if you ignored the heat recovery part of it? Sell me on MVHR without mentioning heat recovery ?1 point
-
The plot is what it is. I would change the layout Have living room and Kitchen / diner at the front as two separate rooms one either side of the hall. That way the main living rooms get the sun. If the one to the left (west) is the living room you could have a window or even patio doors onto the side garden to get afternoon sun. Then have the bedrooms at the back either side of the bathroom with the north facing windows. I did some work in a bungalow with that layout last week and the layout seemed to work well. A variation would be double doors from both the living room and kitchen diner into the hall, then by opening both doors to each room you can pretty much open those up as one big space when you want to. I would also build the roof with attic trusses to allow for a future room upstairs. Think how you might add a staircase to serve that later on and build it so that is easy to convert later.1 point


.jpg.c21f3ac78c9b7efd90cbdcb312744dc5.thumb.jpg.7adcad4c0e384f5ecd7d56b0618df6e5.jpg)

