Leaderboard
Popular Content
Showing content with the highest reputation on 10/28/22 in all areas
-
4 points
-
3 points
-
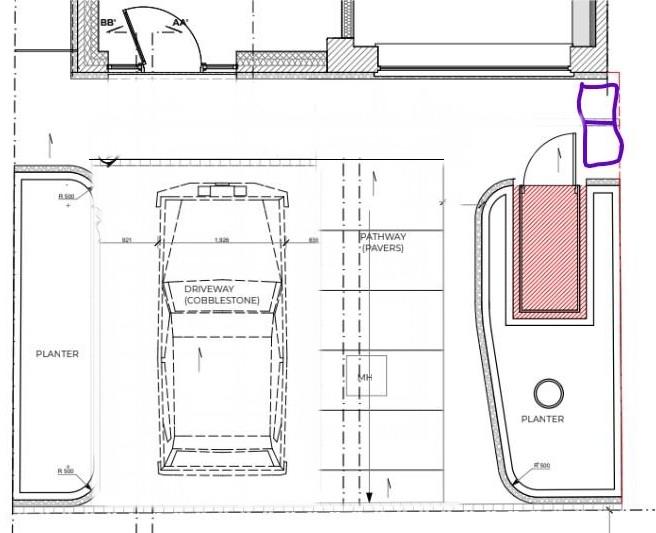
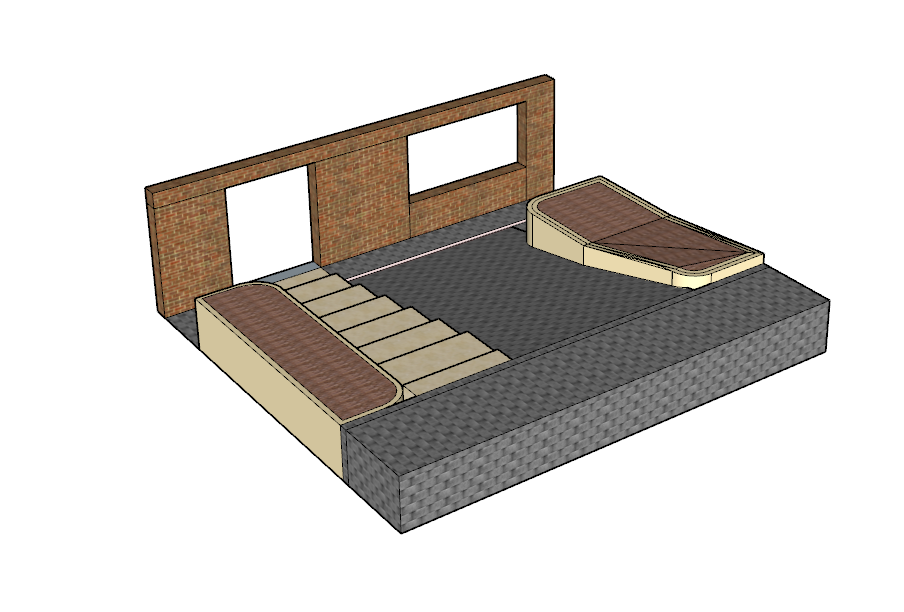
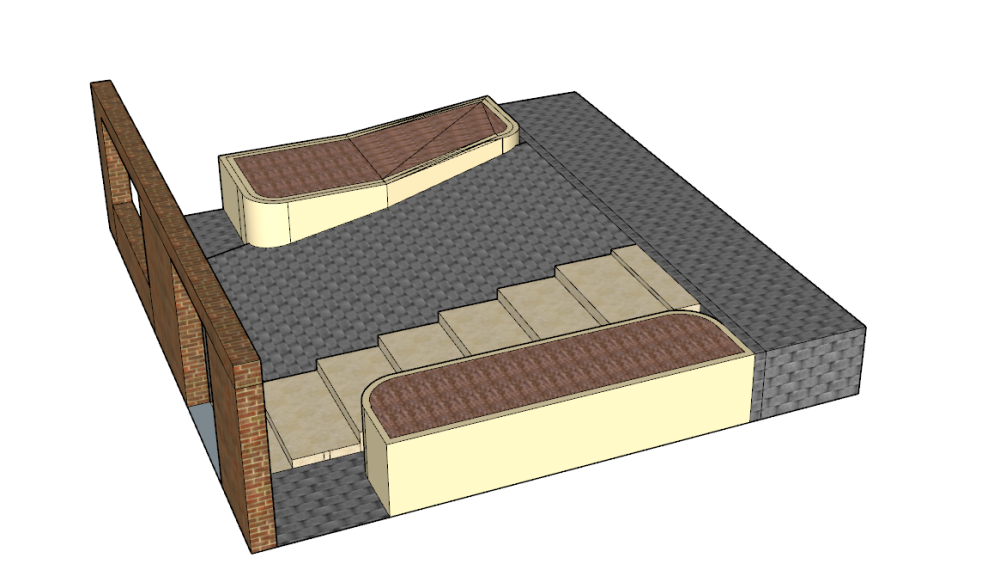
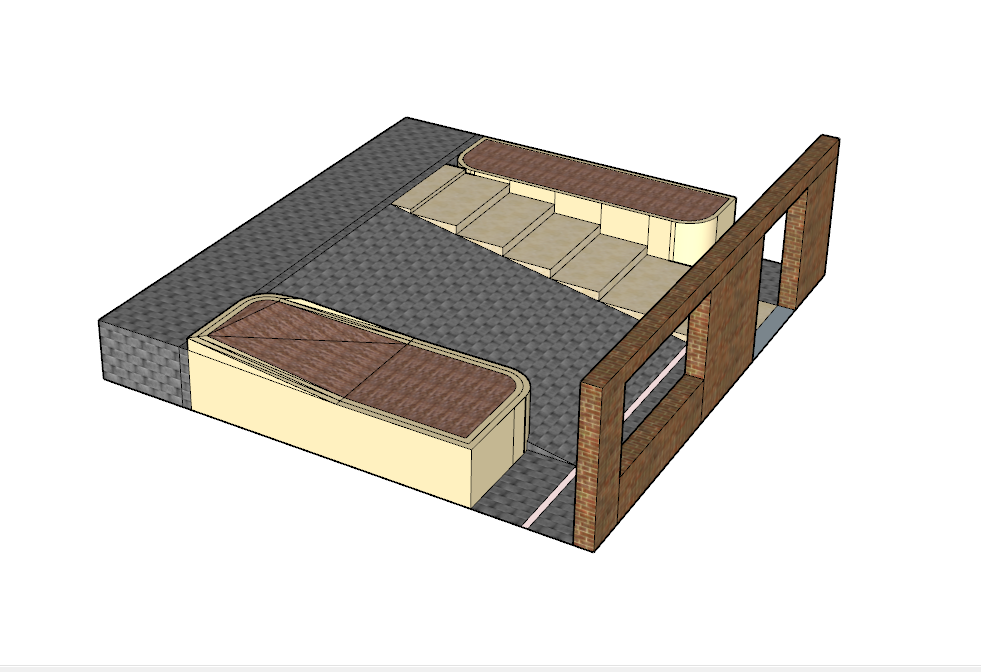
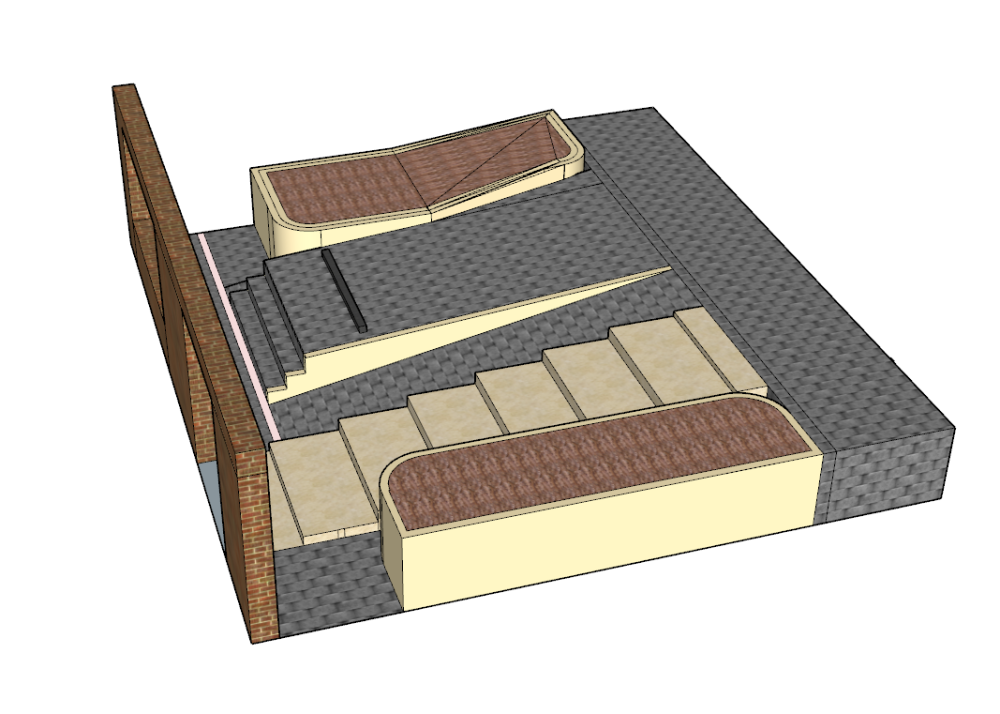
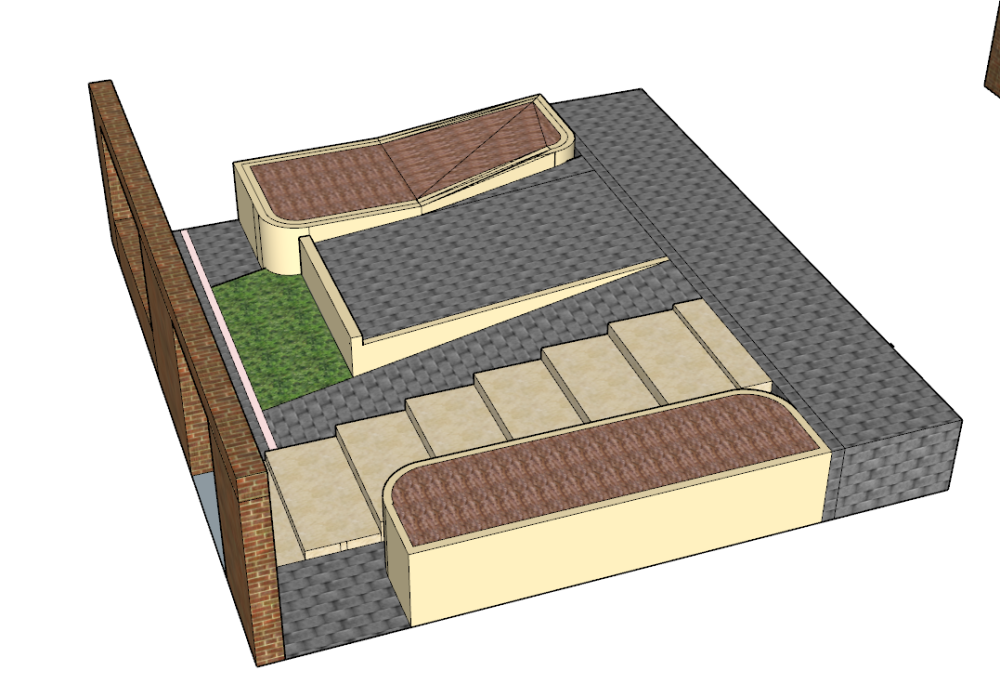
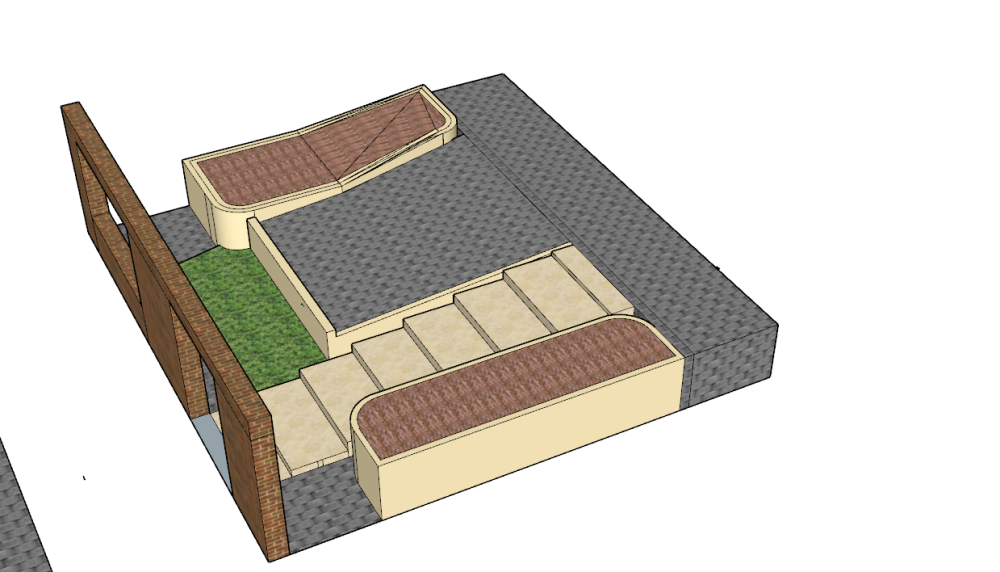
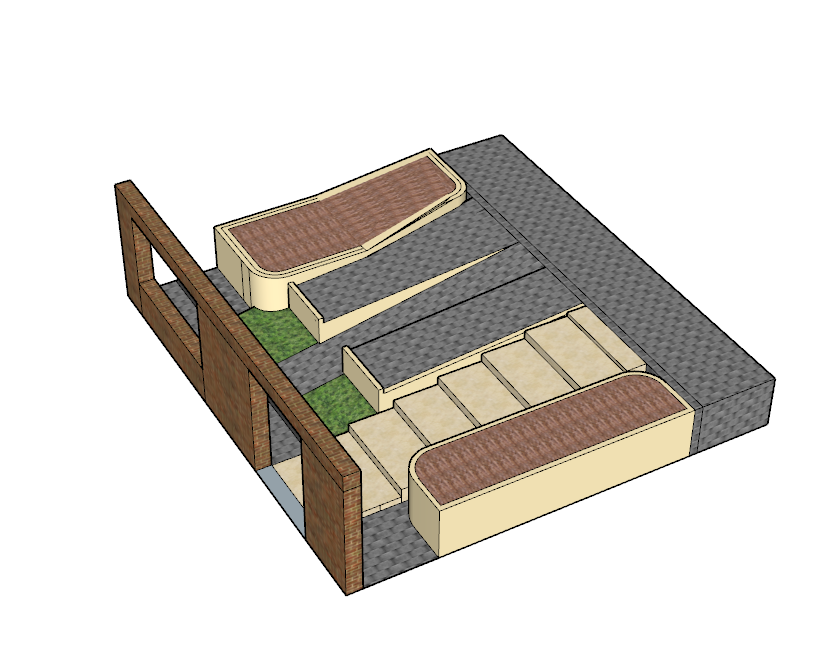
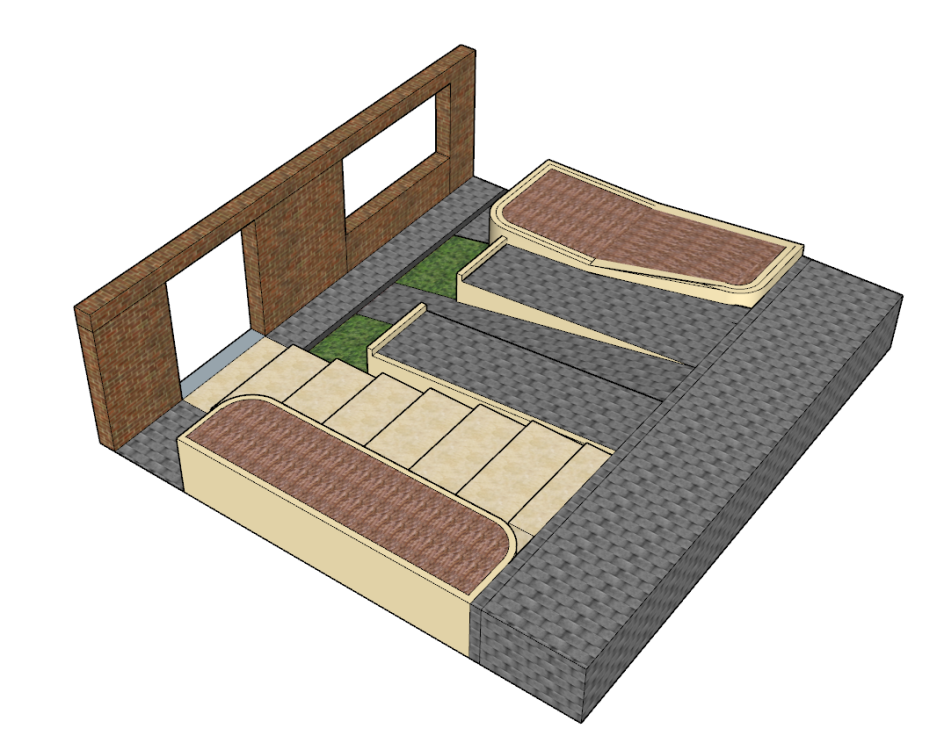
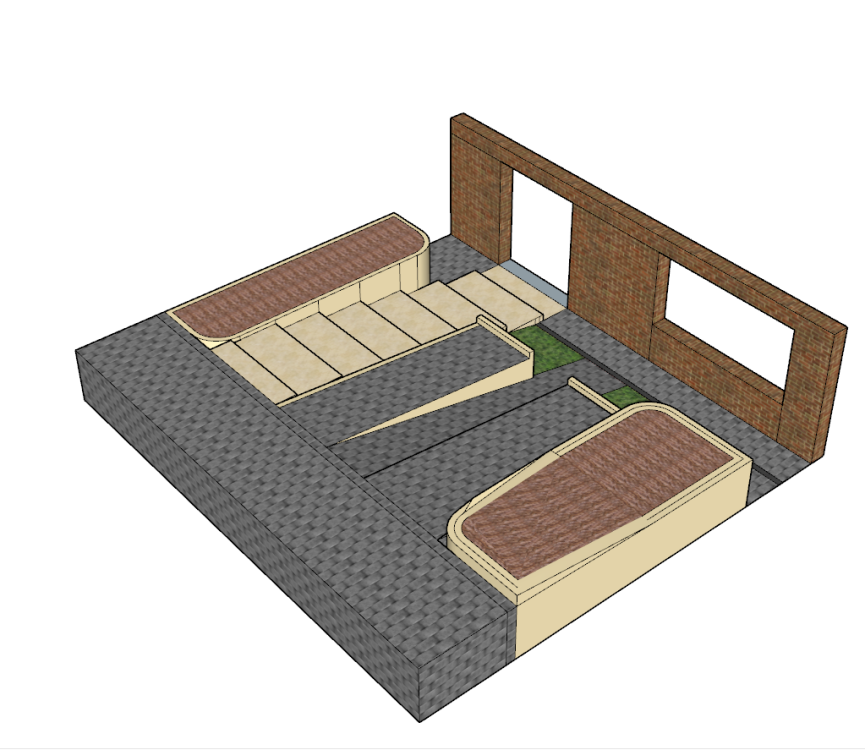
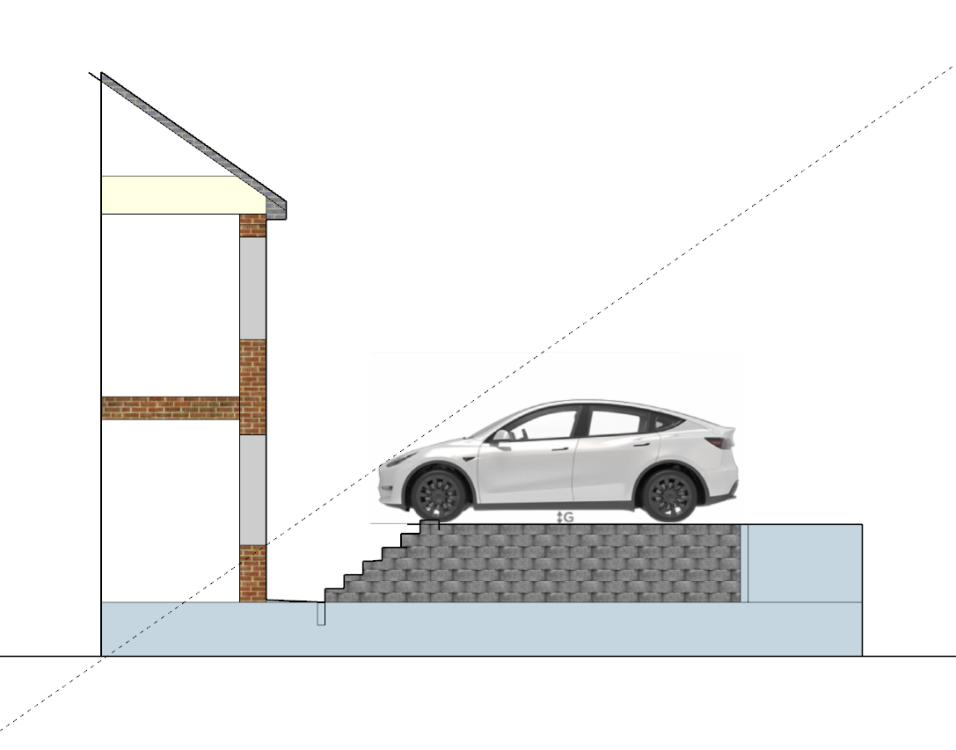
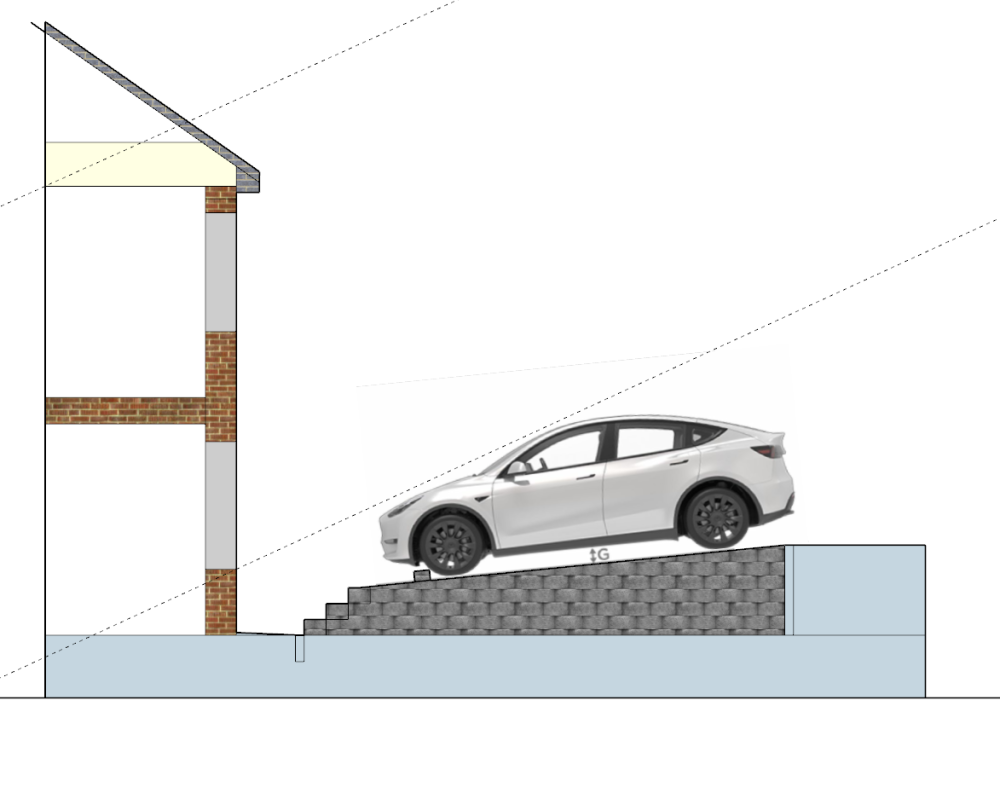
Now on to the 3D views. I'm doing my best guesses re some of the dimentions but it should give an impression. The Origional The parking space with bike/bin ramp and bump stop. Passengers would be in danger of stepping off the ledge and a drive may accidentally get a wheel on the bike ramp. The same as above but with the steps removed and replaced with a retaining wall and some greenery. This wall would probably need to be poured concrete to be strong enough to take the bump of car tyres. The logical solution. You'll need to lug the bins up the steps but it'll be easy to park and egress the car without falling to your death. Finally, my favourite. "The Oil Change". Uninhibited access to your wife's sump plug. ( No giggling at the back @pocster) Bins and bike access A-OK. Safe getting in and out of your car. Added greenery for a nicer house front.3 points
-
The immediate thing to me is there is only space for ONE car. Do you have more than one? Where do you park the other? I would want 2 spaces in front of the house if that was the only place. Sod the planters. It looks like you have side access so the bike shed would be in the back garden.2 points
-
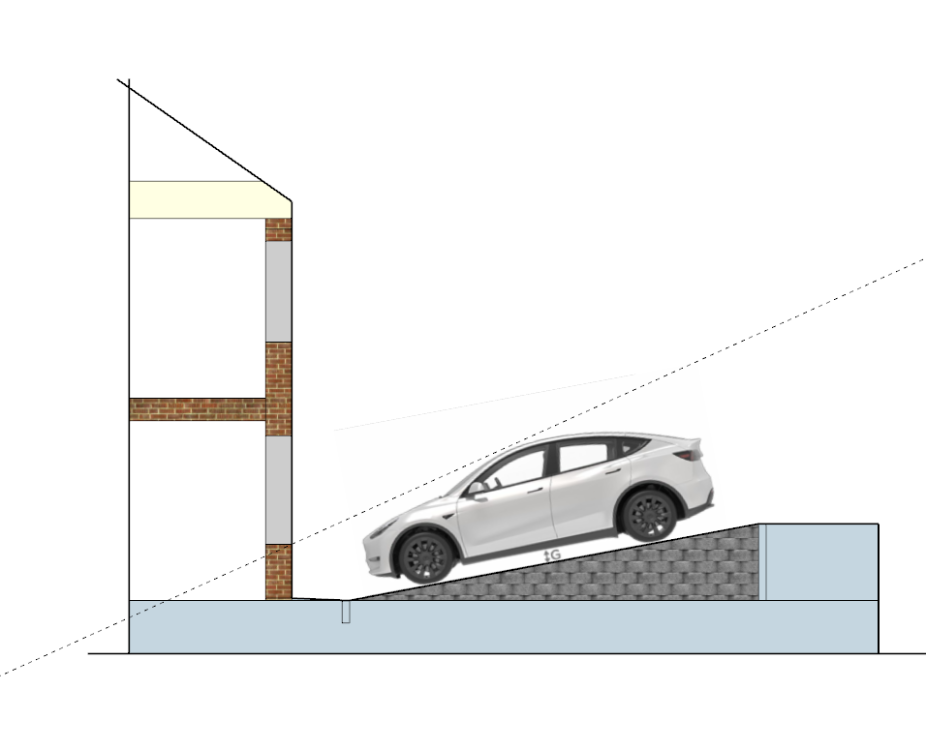
Right ho, here we go. This is your current situation. 1:5.33 slope. Very steep. Assuming a 750mm windowsill in the house a 24 deg view from the horizon of the sky and a view of the car bonnet. Here's what it would look like level. A 35 deg cut of the sky and a view of the car underside. not ideal. I tried various other styles and compound slopes etc but here's the one I settled on. It's 1:12 which is the max recommended for wheelchairs AFAIK. By shoving the car towards the road a little more ( tesla model Y is 725mm longer than your wife's Fiesta) I was able to keep a 26 deg view of the sky. You'll still be looking at the number plate but compromises need to be made somewhere.2 points
-
2 points
-
Lol. Listed buildings and conservation areas are one of my hobby horses. It’s yet another example of how backward-looking this country can be. I’d keep the very best, de-list the rest and make it easier to demolish and replace with sympathetically designed efficient modern buildings.2 points
-
Listed buildings and conservation areas are for the most part like forcing someone to drive a classic car. Terribly inefficient and unsuited to modern life. They look lovely but that's not much use the occupants who often unable to rise to 19th century living standards not to mind 21st.2 points
-
Too right, far to many listed buildings and I fir one would not touch a Listed building with a barge pole, yes keep a few examples. Then again everyone here knows what I think of bloody planners 🤯2 points
-
you could stick some 50/75/100mm celotex to the garage wall. 20 min job to give you a rapid improvement for utility. Can use megastick in a foam gun. Check the door between utility/garage is properly draft proofed (should have intumescent strip being a fire door).2 points
-
I’ve been meaning to provide an update on the progress of this build for a while, and I find myself with a spare couple of work hours 🙂 At the end of December 2021, we left you with 95% of the lower floor walls complete, and looking forward to getting the first set of steels installed. Of course, last winter’s weather, including some furious storms, had a thing or two to say about that, which included me going down at short notice and staying in the local Travelodge (other chains are available) ready for the inevitable turmoil that would greet me after the 90mph storm. It turned out not to be too bad, with only limited damage to the caravan awning, and some items moved around the plot. In early March we decided to make our first visit since that storm, and were greeted by a lovely surprise - the first set of steels were in place. I am still amazed at the lack of communication from some building industry people, but as I am told by the locals “its Cornwall”. It was time to order the next set of materials to get to the upper floor stage, which we wanted to get done by the end of June/mid July (it’s always good to have a target even though you won’t meet it 🙂 ). This included joists, flooring, the next set of Nudura and wood to create partition walls. In the meantime, we got started with applying the over-specced, and over-engineeed waterproofing scheme that our “professional” had stated we needed after deciding that their first spec was not up to the mustard. Can I just say at this point - there is an awful lot of discrepancy with what we self-builders are being told is required, and even after asking a lot of dumb questions, it’s almost impossible to get a straight and consistent answer, even from the same person sometimes. This is where having some common sense mixed with an engineering/technical background does come in extremely handy. Suffice it to say, that I have ditched some of the “uprated” waterproofing spec on the basis that logically it was overkill for the build type and soil conditions. Some will question “what about building warranty/guarantee” which is fair, but on the basis that we are not intending to sell and to live there for many decades to come, we are prepared to take what is a very small risk on this. Come early May, and with careful planning and scheduling I had 3 major deliveries lined up for the same day. The careful scheduling went South of course, and everything turned up within an hour of each other. 3.5 non-stop hours of handballing Nudura ICF, webjoists and floorboards, a 150kg, 6m long glulam beam (more of which later) and enough wood to build an ark (at least that what is seemed like at the time), I was a gibbering wreck, only fit to nurse a mug of tea and a heavily bruised thigh (did I mention a glulam beam?). For 5 weeks between the end of May and the beginning of July, supporting partition walls were created and installed, joists hangers and joists put up and some flooring. This work also included the installation of that 6m glulam beam which was a one day job on its own. So finally, at the beginning of July we were ready to miss our end of June/mid July target date but roped in some family members to help get us cracking on doing the second floor Nudura walling (the pic of the family is from July 10). . We were still on for an end of July concrete pour, until …… I would insert some pictures, but cannot take responsibility for any impact they have on the squeamish and faint of heart. Neither we, or any of the medical staff who have been involved with the treatment, can put our finger on where the infection came from but shortly after that July 10th picture of the family, the wife was struck down with Cellulitis that turned into necrotising fasciitis, which could have led to sepsis. If you read the link, you will realise that building a house suddenly becomes the least important thing on your mind. However, I am happy to report that the first operation saved her foot, and quite possibly her life, and the subsequent 3 operations to clean and repair the foot have been traumatic and very worrying. She is now on the mend but ….. I AM DOWN A LABOURER. Thanks to the NHS, however, and the enforced hospitalisations, and visiting being taken care of by other family and friends, the wife was able to send me to Cornwall (rather than Coventry) and I managed to get the walls finished and the concrete pour took place on September 9th. Now to wait for the second set of steels to go in, and I can order the roof joists. We might be semi weathertight for the winger 🙂1 point
-
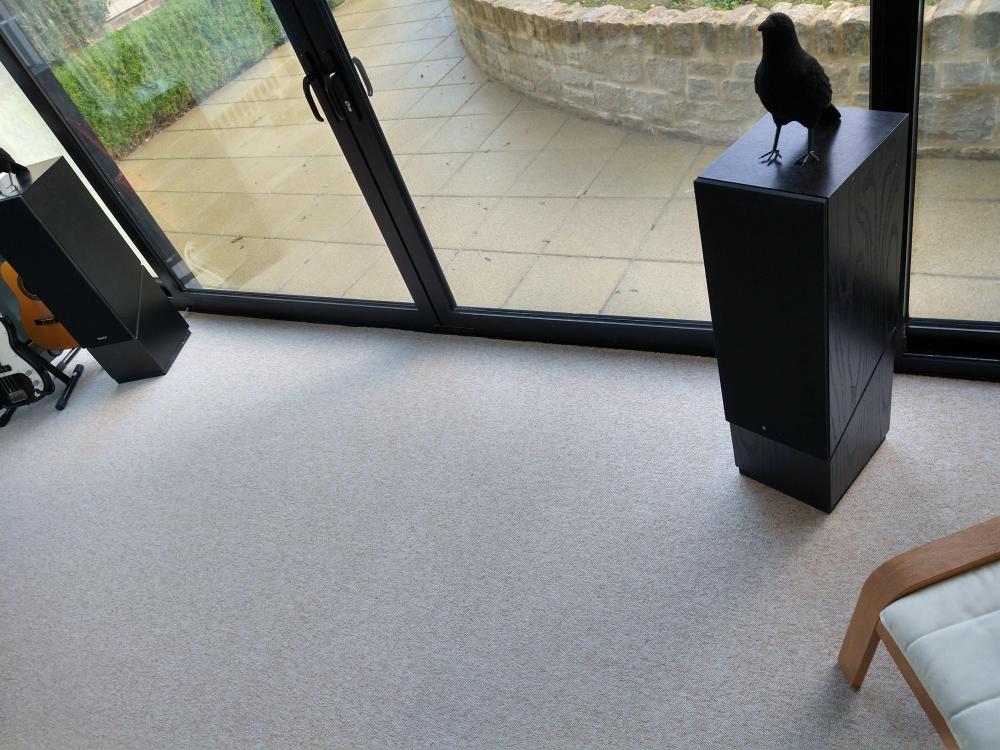
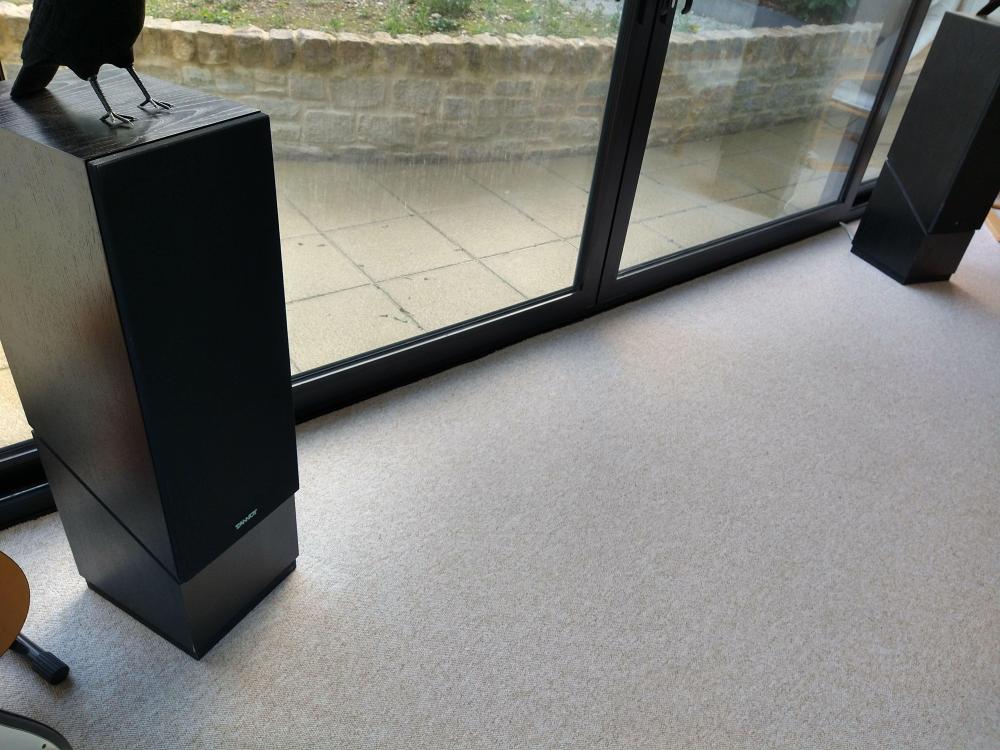
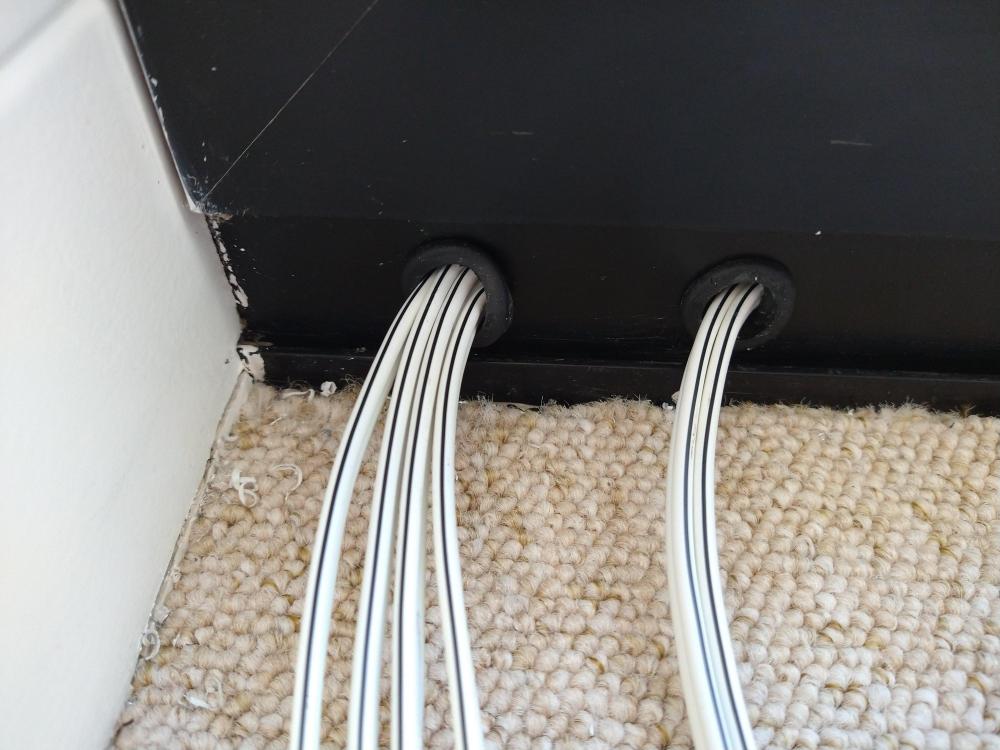
Problem:- the speakers in our cinema room are not against a wall but sit in front of a 6m wide glazed sliding door unit. The central two sliders are the main way in and out of the building and up until now we've been regularly tripping over the speaker cables lying loose along the floor. Not any more! So I finally plucked up courage and attacked my aluminium framed sliders with a 20mm drill bit 😱 Having seen the profile of the aluminium extrusion when I visited the factory that produced them, it struck me that there was a continuous channel running the entire length. It's been playing on my mind ever since. I did toy with the idea of sticky-backed black trunking but it would have been just too vulnerable on the threshold area. So what if they cost a few thousand quid, it's only a few holes. I finally caved when I drilled the first (test) hole and checked I could pass a conduit draw tape the full length. The 20mm holes I've made also accept standard electrical box grommets and blanking plugs and was reassured by how well the blanking plug disguised the holes if I ever change my mind. Thought I'd share this hack in case it gives anyone else the courage to make use of their frames in a similar fashion. Not that anyone else would be daft enough to build a cinema room with fully glazed walls like this.1 point
-
Yes running a buffer, but the buffer has no thermostat, so just floats at supply temperature, so is never hotter than target flow temp. Plumbed as a 2 port buffer. Boiler fires up when it sees the return temperature drop to a level where its happy to fire up, keeps firing until it's no longer happy. On an average 10 degree day, fires for 10 mins, off for 2 hours. -5 day, on for 30 mins off for 30mins.1 point
-
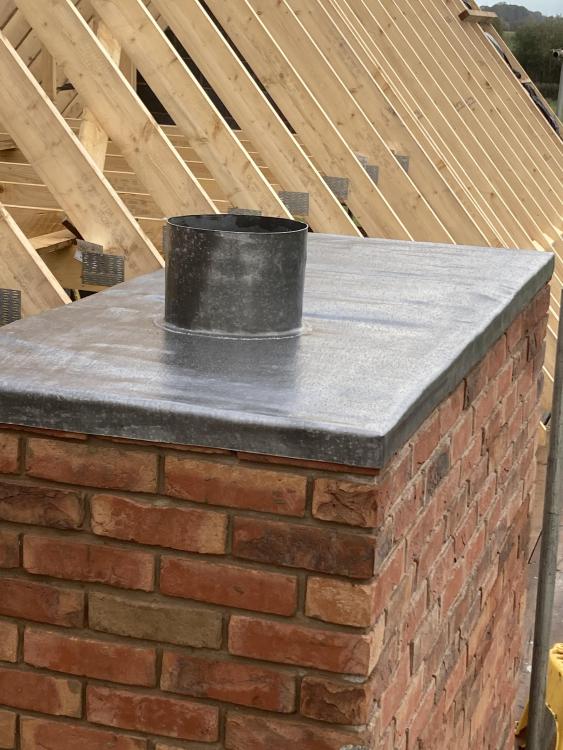
Ah.. appreciate your frustration. That chimney cap leadwork is great.. lifts your spirits.. then.. next day your "baw is burst" You'll know that lot needs lifted, the battens and vapour barrier sorted etc. I get it too, one day great work from the builders.. next day they have put the wrong brain when going to work. But we all have "off" days!1 point
-
It's because I'm having discussion with BC about why they need a pile of trickle ventilation installed in an old Victorian house when I'm doing an internal slapping in a wall to make an open plan kitchen. My argument is.. the place is freezing and draughty already.. we don't want to make it worse. As loads of folk have said on BH.. and lot's know much more about it than I do.. it only takes a small hole to reduce air tightness. If that hole is next to a solum vent on an east facing elevation say then it's akin to leaving a window open on a night latch? Yes I'm being dramatic but I think I have a point?1 point
-
Hi. You can go onto the land registry and register an interest to stop them getting it or saying it has been in their possession, for a long time. Essentially they will need exclusuve use, and to fence it for 10 years then they must advertise for the owners to come forward and then wait two further years. So it's a long way off but that does not solve the immediate problem for that you need legal advice.1 point
-
Check the size of higher output modules. A quick google pulled up this, a 345W module, but it is H 1.98 W 1.002, so 178W/m2 https://static1.squarespace.com/static/5aa1453f4611a037c22bfb95/t/62b590589b7c74228bb0f616/1656066146918/UKSOL+Poly+72+cell+5BB+345w.pdf The ones you have been quoted are 162 W/m2 So not a great deal of difference1 point
-
Have you timber suspended floors? If so have you popped off any plinths in the utility room and looked behind the appliances. You may find unsealed service penetrations allowing the cold air in from the solum. Utility rooms and kitchens are always tricky on new builds. While the rest or the floor insulation may have had a cursory quality control glance, quite often the plumbers / sparks mess about with the floor insulation when there is a "miss interpretation" of the drawings. It nearly never gets put back properly. I know someone who knows someone who is a site manager for one of the big house builders. They get a heads up from BC on which houses are to be air tested! For all... if you are going to buy a new build ask at the show home loudly if the one you want to buy was air tested.. just for a laugh you understand..1 point
-
Yup, the door stops are missing, gawd knows why they stuck those three odd bits on 🤯 Your always whining 🤣 (enjoy).1 point
-
6 person is about £1,700 + vat, from marsh, delivered. Fibreglass and very tidy. Discuss any tech stuff with Marsh but orders are through any bm. 4 person obv should be less. Yes, air bubbles preferred to anything mechanical. There is an extra shallow one but costs more.1 point
-
I was told with the pumped outlet to get back to a big pipe ASAP so you can run 30-40m in 32mm pipe but I lifted the water 1m high and into another chamber where it then exits in 110mm to the pond. Flows fast and does not put back pressure on the pump.1 point
-
Buy 100m rolls of pipe or you will end up with loads of silly 10m bits that go in the skip.1 point
-
Thought I should join this forum as I am planning my first new build in Northern Ireland. Happy to learn from others going through the process. Any top tips are welcome.1 point
-
I am a happy user of a standard Conder ASP6 the gravity outlet version. I know they do a pumped outlet version as we might have used it until they allowed us to discharge to the burn. I think the consensus of this forum is any of the air blower types of treatment plant are good and we have satisfied users or most makes on here. To some extent the decision will be swayed by availability and delivery options, particularly if you are in a remote location. Mine was bought through Travis Perkins which had the advantage of delivery on their wagon with a hiab to unload it. Whatever you fit, as you have high water table issues, make sure you concrete the treatment plant into the ground.1 point
-
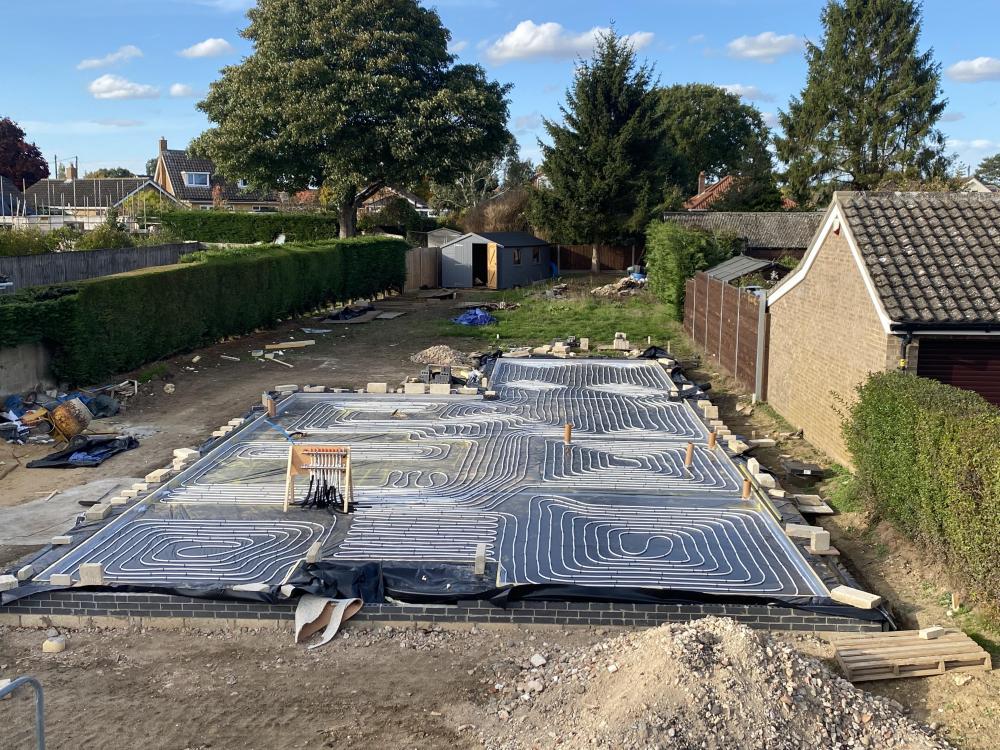
Wunda default to serpentine but I asked for spiral and they did that instead no questions asked.1 point
-
Does the fan have a backdraft shutter in it? If not you have a hole in your wall, Dear Soapstar, Dear Soapstar ... 😉. Fix is a replacement fan with a backdrafts shutter (from about £30), or even an HR fan - which I think would be justified in a utility. F1 point
-
Graf one2clean for me. installed but not used yet. we have sandstone about 2.5m down so I didn't want to go for one of the conical ones and the one2clean gets good reviews and is slightly shallower dig. external pump unit for blowing bubbles in to the brown stuff as well. there's lots of threads on here about this subject. what I found from my research was that everyone seems to recommend blower units rather than disc based units and everyone seems to have different brands and everyone is happy with them. so, I would suggest that the pretty much all do the same thing. just find one that ticks your costs/requirements/environmental discharge and then see if anyone on here has one installed and ask what they think of it if that's not already been asked!1 point
-
1 point
-
1 point
-
Very interesting and ties in with what a lot of people here have been saying about Zoots old stone cottage.1 point
-
I just read right through this fascinating thread. There wasn't one mention of what you might cover the windows with at night - blinds/curtains etc. We live in a house built in 2016 of blocks and all that. It has double glazing. The north side is colder than the south etc. We get condensation on the windows. If we left the blinds completely shut at night, we'd eventually get the black stuff on the window frames and reveals and it would develop from there. So, from September to March, we open the blinds a minimum of 5 inches from the ground/sill so the air isn't trapped against the cold glass/frame/handles/key hole and so on. This is from 11pm at night. There is no condensation. The rooms have the same humidity, but the warm air isn't trapped against the coldest surface. We had the same issue in our previous eco-house, which had an MVHR. Another thing, we considered buying a house near Bristol, which had a pair of very nice modern efficient extensions around an 18th century grade 2 listed tower. It had MVHR and an incredible ground source heat pump. It was about 220 sq metres. The electricity bills were out of this world [in my opinion] and the tower was full of mould [I'd say the bedrooms there were unusable]. The new and the old just didn't mix humidity wise. The owner was eco-friendly and wanted to save the planet, but he'd actually created a damp monster in that house, by mixing modern insulation in some areas, with no insulation in others. Just saying.1 point
-
looked at this, higher you want the flow temp the lower SCOP you get. I've also factored in waste water heat recovery which does help a lot, at least on paper.1 point
-
Lower and Higher heating values. https://www.engineeringtoolbox.com/fuels-higher-calorific-values-d_169.html1 point
-
I used Jouplast (from Wickes). but they seem to be selling less of the range every time I look. Non level base, pedestals range from as low as possible to probably up to 200-300mm high. Easy to do and very easy to change your mind and re do it all. We used 1200x400 20mm thick porcelain tiles.1 point
-
I’ve used quite a lot of these Most brands Jouplast are the market leader But expensive 450 sounds high 250 is the highest I’ve used1 point
-
Hoping these may help someone in the future. Days 1/2/3 of my build.1 point
-
1 point
-
1 point
-
At 150 ctrs and 70mm screed depth the 16mm O/D pipe will be 2.5% of the volume. I think @Canski's site manager was trying to cover his bad estimating.1 point
-
Just a bit more to add to Gus' excellent explanation. There is nothing magic about 450mm depth, probably originally foot and a half, but it is a good guide to how deep frost will go in the uk. Frost and freezing causes changes to the ground as explained. If you were in an area that gets especially cold or for long periods then the frost can creep deeper. My own house was built from timber in the 1920s. It has 2 bricks above dpc, then 2 below on 150 concrete. So not remotely 450mm. The house moves up and down seasonally, mostly through clay shrinkage, causing doors to stick. But it is still standing, even the brick chimneys. I have often designed buildings with 450 or 500 deep edge strips where they are not structural. It works nicely with 2 blocks, and keeps the strip and internal slab safe from frost. Hence also 450 or so depth for water pipes.1 point
-
Or leave the chimney in place and find a use for it. A floral display perhaps, or storage. We only fitted the gallows bracket because the wall was already gone, and the chimney propped on the joists. These houses work using the chimney as a major part of the structure and a ventilator. Doing a proper job will be disruptive and expensive. Who knows what the next wave of buyers will think. Perhaps they will value the chimney or fear that it has been removed.1 point
-
For a gas hob, this makes no sense to me. If anything cleaning will be harder. For induction it's a different matter. Do wonder if the hole cutting is hard or not in dekton1 point
-
So those room-in-roof attic trusses in the foreground are above the garage? That'd be an easy way to get more living space! It's weird how they put up studwork at the transition to standard roof trusses like this was going to be a room. How did you access this loft to take the photo? But yes, boost the insulation over the utility part and complete the partition to keep it snug.1 point
-
Swap the car for an automatic. She clearly can’t drive a manual. Make sure you tell her that too. “Look love you clearly can’t drive a manual car. I’ve told all my internet buddies about your terrible driving skills and they agree.” Then smack her on the bum and ask where your dinner is. Sorted.1 point
-
Stick the reveals in with PB adhesive, then put a few screws in once it has set.1 point
-
Yes Its Hitachi re branded Excellent value Half the price of pasloda Same nails and gas1 point
-
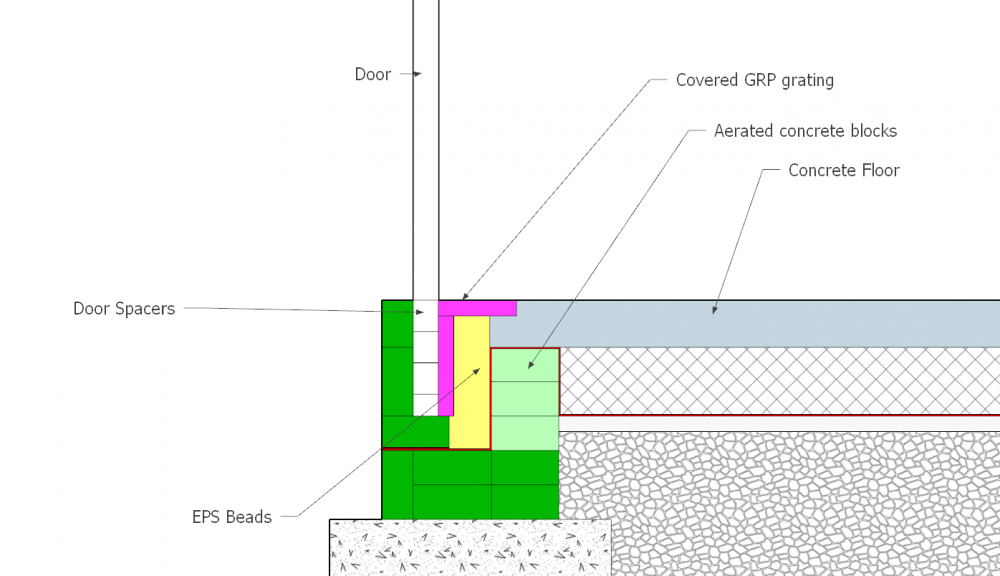
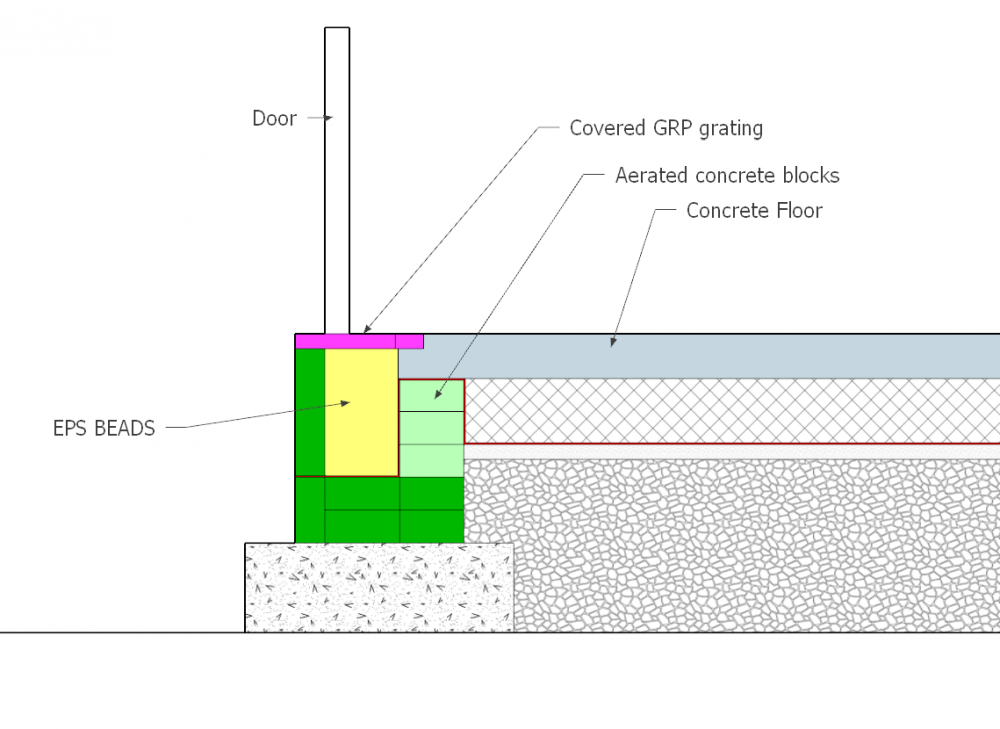
I bought some secondhand GRP grating from ebay and laid it across the cavity, level with the top of the floor. It's proper stuff. Really tough but can be cut with a wood circular saw and suitable dust extractor. This is the detail that ended up being built. A bit messy but works fine in the end. The holes in the GRP covered mesh are filled by the EPS beads. K value of GRP ends up at about 0.065 W/m/K. Below is what I wanted to do. Simpler to construct and better thermally. I was talked out of it by various disbelievers. Early on in the build wasn't belligerent enough to insist I knew better.1 point
-
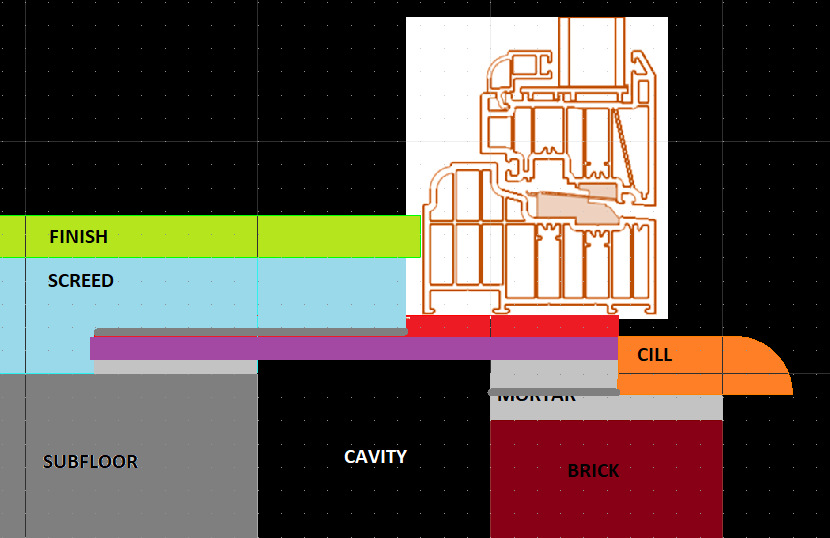
I plan to use this detail as I have heavy sliders but one thing bugs me about this. If dense EPS is used in the cavity so load bearing, why is the inside skin blockwork breaching the insulation to create a thermal bridge... is this really necessary, why can't the insulation just carry through as with a normal block and beam!?1 point
-
In the spirit of over engineering. I could use both. The slate would serve well to spread the load as well as adding stiffness. I'd need something thin and compressively strong between the slate and the HardieBacker. I wonder though if this concentrates the stress on the screed at the end of the slate? Would it want to crack between the two Es of SCREED? Not is there's no movement going on I suppose. Should convince the wife that a slate floor would look nice. ?1 point
-
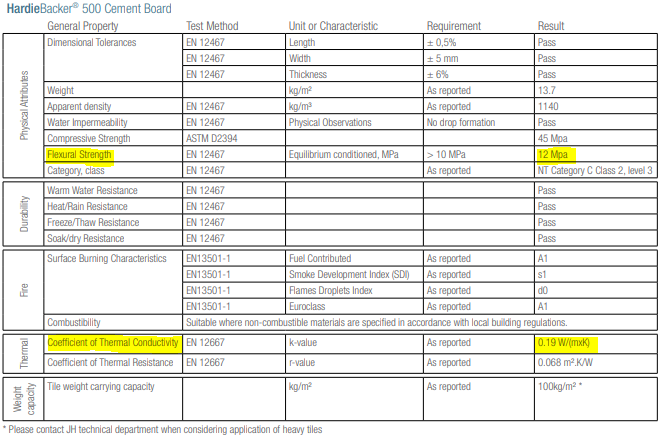
I can't do that unfortunately as my insulation is underneath the concrete subfloor (precast Thermabeam). Looking at the datasheet, HardieBacker looks like a good option. Below is the table relevant to the HardieBacker 500 Cement Board which is 12mm thick. It has pretty high flexural strength, 2x or 3x that or cured screed. Purenit (datasheet) has a compressive strength which is only 4% of HardieBacker, so it's flexural strength will be poorer as well. Halving the thickness of a bending member reduces is stiffness by a factor of 8 and its strength by a factor or 4, so even though the HardieBacker is half the thickness of 25mm Purenit, it would have about 6x the strength. Rearranging the equation for Flexural Strength, the fracture force is F = (2 * width * thickness^2 * flexural_strength) / (3 * span). Popping some numbers in: thickness = 12mm *(100% - 6%) = 0.01128m width = 100mm = 0.1m (complicated this as there is obviously more to the side of the loaded the area, but if there is load spreading under a point load...) span = 100mm = 0.1m flexural strength = 10MPa (this was the stated requirement and the result was higher) This gives a fracture force of F = 850N = 85kgf. Great, that should strong enough! A bloke in high heels can stand on the centre of the cavity and not crack it. Thermally, it has half the thickness of 25mm Purenit and about twice the thermal conductivity, so same result. The Psi-value would probably be something like 0.19W/mK * 0.012m / 0.030m = 0.08W/mK. That's better than most lintels (0.3 to 0.5 W/mK). So if 2.4m long and a 20C temperature difference, it will conduct 0.08W/mK * 2.4m * 20K = 3.8W of heat. I used 30mm as the length of the bridge as that is the distance between the warm screed and opposite cavity edge. It's even thin enough that I can get a nice bed of mortar under it on both sides. Would be cool if you could get it in ~225mm wide strips or ~225mm square tiles, but it should cut easily.1 point


