Leaderboard


Popular Content
Showing content with the highest reputation on 03/20/22 in all areas
-
Well, it’s been quite a while since my last blog post but we’ve not been idle but I do admit to having been slack in updating the blog. At the end of the last blog we had a superstructure and the roofer was about to begin his journey up the scaffolding. This is where that tale begins….. ’Twas a sunny November morning when all was quiet that a white van man arrived at our site to felt, batten and slate our sloping roofs. And he wasted no time at all in cracking on with it after the site orientation was complete. With his dad along to help with the battening it didn’t take long for the membrane (or ‘felt’ if you’re a roofer) and battens and counter battens to be done. After discussions with our BCO it was decided that we would fully fill our rafters and use a breathable membrane (Proctor Roofshield) attached to the roof trusses and then 25mm x 50mm counter battens and then slate battens which gave us 50mm ventilation. This allows us to not need soffit vents (or indeed soffits) which fitted in to the design of the house better and also meant we don’t have to worry about creepy crawlies living in the soffits. We started with the southern elevation so that the solar PV array could be installed and the roofer (Chris) fitted the first few rows of slates and some flashing leaving it ready for the solar team to arrive before moving on to the northern elevation So while Chris was busy working on the north side of the house the solar installers arrived and fitted our GSE trays. Once done they started to fit the panels. But it was then discovered that the company who did the ordering ordered the wrong size GSE trays and the panels wouldn’t fit. So the solar installers took all the trays down and left site after wasting a day’s work. Meanwhile the flat roofers attended site to single-ply membrane our flat roofs and balcony. A great bunch of guys from a company recommended to me by Chris so I had every confidence of them doing a great job, and they didn’t disappoint. DPM, PIR, OSB then single-ply membrane. First roof which will have a wildflower green roof being overlooked by our bedroom balcony Second roof above our utility room which links the house to the garage which will have a sedum roof They will return a little later on in the blog to install the green roofs. Meanwhile the solar installers returned after the correctly sized GSE trays had been delivered and managed to fit it all in a day. We think it looks brilliant. 28 x 375W LG panels, each with Solaredge optimisers as we have lots of trees around us. And when they’d finished each panel was giving out 1V and was confirmed each was working by being shown the 14V on each string in the loft. Job done for now until we get electrics first fix done and they can come back and fit the inverter. The only real issue we had with the solar is that the panels were resting on the slates making them lift up in places. I created a thread about them (https://forum.buildhub.org.uk/topic/24530-slate-tiles-lifted/) and after much discussion and deliberation I decided to simply use black CT1 to stick them down which worked nicely. A bit of a bodge but you can’t tell from the ground and a lot less disruption to timelines than other solutions. While all of that was going on Chris was busy slating the northern elevation and it was all coming along nicely. During that I had another discussion with the BCO about vent pipes. I asked if I could have one by the STP but she was adamant that I had to have one through the roof. When I mentioned I didn’t want a pipe sticking out the top of the roof she said that they do slate vents. A quick google search revealed what she was talking about and I purchased the item and it was installed. Looks fab and from the ground you can barely notice it which is just what I wanted. And now the solar PV install was finished he could move on to the southern elevation. But while he was doing that the flat roofers came back and installed our green roofs. The wildflower material So that’s those finished although we were still waiting on a Velux roof light for one of the roofs which was delayed but the flat roofers came back to install that for me and finish off that roof a bit later. They also installed our patio paving slabs which we think look ace. So, back to Chris and he’d now finished the main house roof slating and it finished off around the PV panels nicely. He did make a start on the garage roof but as we were still waiting on Velux windows he couldn’t finish that so he left site and would return once the Velux’s were delivered. During that period our windows and doors arrived! We used Norrsken for these and went for alu-clad triple glazed windows and sliders. The majority of our windows are fixed and we had quite a small profile for the frame which means more glass. The installers, Elite Installations Nationwide (https://www.eliteinstalls.co.uk) were brilliant and Jim and his team were a joy to have on site. They brought their spider crane with them which made lifting our windows up to the first floor a breeze for them. We decided to be bold and went for a red front door. We love it. As the window install was done the week of Christmas the installers couldn’t finish them all in time before the Christmas break so we wished them a safe trip back to York and would see them in the new year. Happy new year!! (Belated). With the new year came the return of Jim and his team to finish off all our windows and doors. Once they were installed it made the house feel so much more like a house. Closing the front door had a feel of shutting out the outside world and we were (almost) water tight at last. We also eventually received our Velux roof light and sloping and vertical windows. So the flat roof was finally completed and so was the garage roof. So we are very nicely watertight at this point. All that’s left now is the time-lapse video for this period of time. Sadly our camera only shows the south side of the building so we only get footage for stuff that happens on that side but it still makes for an interesting watch and I hope you enjoy it. Until next time.3 points
-
I would want that stripped and done correctly. And battens to BS 5534. Ask Building Control or your warranty provider to inspect and break the news if you don't fancy it.3 points
-
I did ask the question on our first build and Daves advise was if you have gas nearby it will be cheaper than ASH Good advise We will install ASHP on our next two The problem I have Is The government and sellers telling those who are now looking at ASHP that by replacing there gas boiler They will save money Even if all of us with our newly built well insulated homes could break even an older home hasn’t a chance Whilst we are on a gas boiler here and our house is twice the size of our previous home It’s cheaper to heat Which is all down to the amount of insulation Had we gone the TF route It would have been even cheaper to heat You simply can’t under estimate how important good insulation is Even something so cheap to install as a insulated loft hatch can make a significant difference While I don’t agree with the insulate Britain tactics They are correct in what they are saying3 points
-
That needs all removing and redoing. The absolute minimum headlap is 75mm at 15° and you’re probably looking at less than that on that edge and that will get driven rain under it. Whole lot including battens off and I would want membrane replaced too as it will be like a seive and it will leak. That is missing a full row or two of tiles - needs to be re-gauged and start again.2 points
-
Thanks for the mention.... just found this whilst looking for something online. A little update.... We moved into the house in May 2021 (about 3 days before BTD aired) and we did build it for just under £300k (after the VAT reclaim) and we have spent about another 30K on top after finishing off bits and pieces, garden etc... The journey was crazy (and over dramatised) by channel 4, but by doing most of the work ourselves, we saved a fortune. For insurance, they advised the re-build cost would be £650k - so a huge saving - Plus we have a very efficient, warm family home! We've had a few valuations since and because the house is so unusual,, they have struggled to value it. They range from £950k to 1.2M - Not bad for a couple fo years of work and yes..... we would do it all again. We over spent in areas and massively clawed back in others!! Wishing anyone who is on their self build journey to keep going, if you dont give up.... you will get there2 points
-
Plot 1 done, my plot done apart from kitchen that was waiting for the worktop template completed today. Plot 2 done in 4 weeks. and externals wrapping up in terrible conditions. 15 months - 3 plots - 7,000 sq. ft at £110 psf to a high (London SW1 spec) in Cambs. Have been self censoring on here as I have been critisised as a bit of a Swearey Mary (in the good times of Viz!) which is fair enough for the community. So this post will pretty much wrap it up for me as coming back from site where every other word consists of 4 letters to post here seems pretty much impossible! All the best lads. Tony1 point
-
Best thing is to start at the outside and work in with some questions: What appliances are we contemplating. Which way do you (or you for that matter) want to be looking when preparing food. Are we having an Island and if so what might you want on it. In the end you only need to chase out the above worktop sockets, from below the worktop, as everything else can be run in the service void behind the cabinets (not IKEA as they don't have much of one.) The real crunchers are getting the triangle right and the orientation.1 point
-
Haha I know, there’s some much better examples from google! I use roomsketcher. It’s probably not the best but it’s really easy to use for a novice designer! It’s the design we are going for in our kitchen as we had a pillar in the middle, being 10m long so was best way to incorporate it.1 point
-
Insulation, Air tightness, and controlled ventilation. The way we should build houses.1 point
-
Yes, also, we are keen to maximise heat decrement delay as well. Hence not going with something like the multi foil insulation materials. We need to stay cool in the summer, not super hot!1 point
-
Climaflex round the pipe and then foam that in place. Adding a few stainless pan scouters to the mix does deter the small furry beasts. One of these also finishes it off nicely.1 point
-
The water pipe should be lagged as it comes up through the drain bend. I shoved a load of wire wool down it and finished it off with expanding foam, capping the bend with a 32mm drain connector (link) (as our supply was 32mm MDPE)1 point
-
Where do they think any water that gets there is going to go? asking for trouble on a steep pitch roof let alone a shallow pitch. As above, strip and redone properly1 point
-
Don't forget the ceiling, you may need pipework running across the ceiling before heading out to different areas of the building. I needed my plant room walls finishing whilst the exterior render guy was on site. On a rainy morning he put on a base coat and finished with acrylic thin coat. Painted ply ceiling and floor the same finish as the rest of the ground floor.1 point
-
I left my plant room unfinished on purpose as it's the only place I can still see the cast concrete walls, which I really like. Floor is covered in self levelling compound that was used in rest of basement and it wears reasonable well. Unfinished plasterboard to the interior wall where the door is and ceiling. BC just asked me to fill any gaps with fireproof LE foam which was a 20 min job.1 point
-
+1 Then make him put it right, there is no way I would accept that, whatever is under that bottom batten needs lowering, water pooling there is unacceptable IMO and a problem waiting to happen (after the builder/roofer has left).1 point
-
LVT is only about 3mm thick. Just paint on the plant room walls.1 point
-
@zoothorn did you read my last post slowly and take it on board ..?? 1m length of single wall single to twin adapter 1m length of twin wall through the roof top hat you need a bracket somewhere on the twin wall near the bottom but that’s it ….1 point
-
Both halogen and incandescent lamps are certainly much less efficient than LEDs at turning electrical energy into light. However the electrical energy which is not turned into light is instead turned into heat and, during the heating season, this will offset the requirement to heat the house by other means. Now for most people and for most houses, most lighting takes place at the same time as heating, and when this is the case all types of electric lighting are 100% efficient in turning electrical energy into either heat or light. There are obviously exceptions, a small proportion of domestic lighting takes place outside the heating season (summer and early autumn), and of course any lighting in areas which are unheated (garages, outdoors) is also an exception. But its clear that the saving in total energy consumption in a typical domestic situation is nothing like as much as the difference in 'efficiency' would indicate. I have never seen a calculation, but a rough guess might be that the reduction in energy consumption is somewhere around 20-30% of the figure that the crude calculations indicate (on the basis that roughly speaking houses tend to be heated from (say) mid September to mid April, but lights are probably on for about twice as much time in this period as during the summer period. In commercial premises, which are often lit throughout the year, the savings in energy consumption are greater, even more so where the accommodation is cooled in summer. That' not to say that domestic LEDs aren't a good thing, they generally last much longer and there is definitely some energy saving, albeit nothing like as much as the simple calculation based on the comparison of the efficiency with which electrical energy is converted to light, would indicate. If you have gas heating, then shifting the heating load from the 'lights' to the 'heating system' will reduce cost (because gas is cheaper than electricity, not because you are using less energy) and of course if you have ASHP then you also gain because a typical ASHP is 300% efficient at converting electrical energy to heat. EPCs reflect both the expected cost of energy and the expected energy consumption. Depending on the heating type, the switch to LEDs will affect one much more than the other. I have no idea whether EPCs are sufficiently sophisticated to make this distinction however!1 point
-
Put permanently-open trickle vents in the windows. Leave a letter with the tenant stating they must not be found to be closed off / blocked.1 point
-
It’s always the plumbers fault1 point
-
Not mandatory, just good practice. My accessible door is under a roof area, so no need for drainage.1 point
-
If there is a loft I would suggest a Positive Input Ventilation unit as it will eliminate the mould issues.1 point
-
@zoothorn What diameter is the hole in the top of the stove..? How far is it from top of stove to bottom of the roof ..?1 point
-
On the subject of long, or delayed builds. There is an individual plot in town where they have done the foundations, erected the ground floor timber frame and then sheeted it up and left it. The frame for the upper floor appears to be there covered in sheeting. It's been like that 3 or more years. the delay appears to centre on the overhead power cables over the plot right above the house. I don't know what the story is but you would have thought they would have had them moved before starting.1 point
-
That is why I fitted a wood burning stove in mine. Free heating, but keeping up the supply of logs was a challenge.1 point
-
I don’t know that’s fair. Scaffold and access costs could easily be £1k. Running a company and providing a warranty costs money. For example the numerous regulatory schemes and bodies that will need paying, presales people, MCS administration, and of course all the usual overheads as well as those specific to solar contracts such as the 3rd party transaction insurance etc.1 point
-
Here's a pic of my favourite stick build as described previously. Cellulose, continuous external 22mm woodfiber insulation , robust osb airtightness layer, windtight by design, everything nailgun compatible, off the shelf timber sizes, generous service cavity, negative embodied energy, excellent decrement delay, completely moisture safe, U value 0.13 W/m2K. Yum Yum Yum!
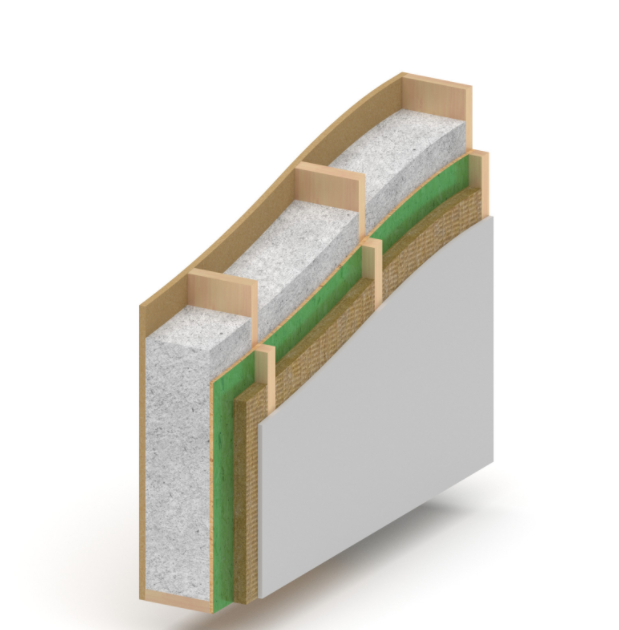
 1 point
 -
Most likely due to lack of airflow, not 'ingress'. Mould starts when the walls stay damp because the air stagnates. My mate rang me about his HMO and was about to pay some "damp specialists" to resolve. I told him to fit an open trickle vent and ask the room tenant if they dry their clothes in the room. He bought a communal tumble drier and fitted the vent. Problem solved. I also told him to get furniture a little way off the walls, as a full height wardrobe up tight to the wall is a damp ( humidity and stagnated air ) trap so mould will thrive there.1 point
-
What you need to remember is that this compound is not water, it will not run off of high spots like water. so you need to identify high spots and mark them up with a big circle around them, they apply compound to the lowest spot first. if for arguments sake you pour on a high spot you will raise the high spot, maybe only by 2mm but it will rise, so you add 2mm to the high spot and then need to add more to a low spot to compensate. so start in low spots and build up to just having the minimum over the high. as long as your compound doesn’t have a minimum thickness.1 point
-
Yup, I've now got twice the number of alerts from both google photos and microsoft one drive photos. I think they're both mocking me. I look at the photos and often wonder what I've done in the last year yet it feels like I haven't stopped! I'm currently at double the anticipated time, probably, and still have no idea when it'll be finished. Yeah, meet a few of them that consider this self-build. It's such a relief when chatting to a couple of friends who have been through the process and understand the challenges beyond, one asking me the other day whether I wasn't overcome with decision fatigue, the other saying frustrating it is when apparently small jobs end up taking days! I've seen a few near us where they've finished and gone. There's one project I drive past regularly however, that still puts me at ease because the developers started building works before we even got planning and it's still going on (and it's only one large georgian style town house new build and one existing cottage renovation). I'm hoping I might just beat them to it 😁 Like you, I've felt like I've been in a miserable hole with the building work for at least the last year and now the sun has come out as I start to make the kitchen and have a functioning bathroom in the house. It's starting to feel real... well almost. Doing it all myself with not a lot of prior experience, the one thing that I did not anticipate was the amount of time I'd have to spend doing research and learning new things. In all honesty, I think this has been the biggest delay factor beyond the supply problems due to covid. Put this together with a tendency to go round in circles a bit and overthink decisions and it's a recipe for slowing progress. I'm also a bit of a perfectionist - so much so the others on a plumbing course I took a while ago were taking the piss out of me for it. However, people I know are now starting to call me for advice and it's so nice to be able to answer the questions knowledgeably off the top of my head, or like the other day help someone out sorting a problem and fixing it with ease - at least someone can benefit from the learning! 😊1 point
-
Reading through this thread so many things rang true. Just checked my gallery on my phone and i erected my Hereas fencing in March 2017 and reckon I got another 2 years to go. There have been gaps in construction where very little has happened for a month or more as I have other commitments. I think I was naive with the costs and time it takes and over spent early in the build. Also I had limited network of trades and employing someone cold found in the local free ad is not recommended. My initial passion for project has been sucked away by stressful conflicts of time, cock ups, redos, and seeing other builds go up and now lived in since I started. Now still at it and in the third national/international crisis since start. The more prices go up the more I have to do myself. My advice to anyone starting is decide the max you can afford then divide by two to get your build cost budget. Never again.1 point
-
Thank you, worth knowing about. Got my tip today, works alright. Though I do think at £2.60 for 1, it is expensive. But shall see how well it lasts. Soldered the pins to the GY-302 pretty easily, now see if I can detect light with it.1 point
-
It is now unnecessary. You can get wireless switching, which gives greater flexibility as you can use any socket or existing lighting circuit. Why waste time, and cash, on all the extra wiring. I have never bothered to work it out, but I would not be surprised if the length of wiring for the light circuit in a typical house was greater than the power outlets circuits. To give you an idea of what I mean, the person who designed my house assumed that the front door would be used as the primary entrance. The car parking is at the rear, so we all use the rear door. The light switch is on the opposite wall from the door. Now to put this right with traditional wiring would be a major job, pulling up chipboard flooring, drilling though joists, wall chasing. Much easier to just get a wireless switch and remember to change the battery after 300,000 uses. As it is, I know where the switch is and walk the 3 paces to it. When I press the remote on my car, the interior light comes on. I have had the facility for over 30 years, and I buy cheap cars, but not in any house I have owned (though this is the newest house I have ever had).1 point
-
Just watched that episode. Surprised that building control allowed her to live at the house for so long without the essentials. Fair play to her, lots of determination.1 point
-
Yes because you will only get (be able to afford) half a kitchen.0 points
-
New patio might be cheaper... 😉0 points
-
That fast. Maniac0 points
-
I'd listen to the advice or you could be doing Meibion Glyndŵr's job for them!🔥0 points
-
Christ ! Why not just tag me 😂0 points