Leaderboard


Popular Content
Showing content with the highest reputation on 02/17/22 in all areas
-
Just to bring this back down to Terra Firma for a mo; The Willis heaters are built, tested and sold on the basis that they will perform admirably as delivered, eg -3kW max delivery switched by the in built stat. The reason I use them, and fit 2x, is that you can dump circa 6kWh into a heat load at any one time, reliably. If there was a remit to dump 1 or 1.5kWh linear I would choose a different device. This is almost scaremongering afaic…. This thread has discussed Willis heaters, not kettles, so for this thread to be of value, let’s keep the apples and apples together For completeness, Willis heaters would absolutely never be on 13a plugs, and always on the 20a DP switches that they require for safe, reliable use. I installed some Willis heaters once, alongside my sparky, and they went in hardwired into 13a fused spurs fed from 16a rcbo’s. I subsequently got shot down ( aka re-educated ) here and was duly informed that they should have been on 20a DP switches ( which my company then instructed my sparky to return to site to change accordingly, with immediate effect ). That made me then go away and revisit this, as more than a few of my new build ‘passive’ clients had also expressed an interest in going “all electric” so I wanted to be sure I had a robust method of going forward with their heating / DHW arrangements. Ergo, I am now VERY familiar with this method and discipline of heating, and its execution. I have been granted access to data collection from some of these all electric clients, so I hope to be able to summarise in a year or so across the board with the different dwelling types. The above-mentioned Willis heaters had, however, been in for a full winter ‘heating’ season, fitted into a PH which used 2x Willis heaters for CH, and none of the system components showed absolutely any evidence of degradation / fatigue etc. The use of bootlace ferrules is of huge significance here, as no known heavy loads on flexible cables should be made off without them, a-la @TerryE’s comments above. There would only be issues with “boiling” aka kettling if there is insufficient water flow / circulation or the in built stats on the Willis heater(s) we’re set too high. This is all either controllable or can be mitigated by design.3 points
-
The light in a given area is measured in Lux. This unit better represents perceived brightness and can be provided as a single figure recommended for a particular task. One lux equals one lumen per square meter so an 11m2 room as above, with a 1000 lumen light source would provide around 90 lux. Something like 200 would be more typical for a general domestic setting but it depends on the type of room. Here is one table of recommended lux levels for different activities. 90 Lux might just be enough in an adult bedroom. Nudge Nudge. Oh, and one more thing... it also depends on the age of the occupants. Over 65's require double those figures.2 points
-
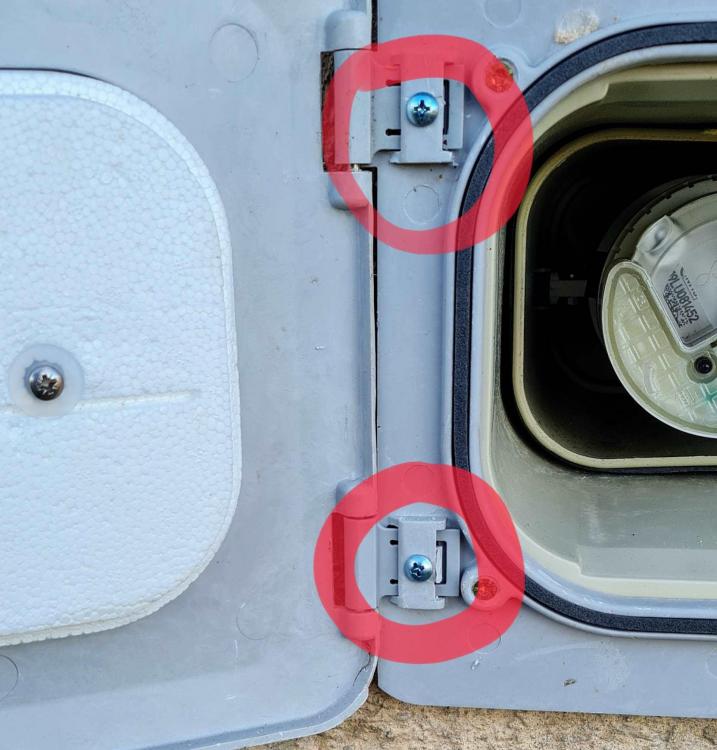
Super @ProDave strikes again (see his post immediately above) Oh, the simplicity, the elegance ..... I never thought a self tapping screw could bring so much joy........

 2 points
 -
Hi @Marvin, thanks for the great response! By plasterboard tenting I mean we have dot and dab plasterboard, not edge sealed and internal penetrations also not sealed, so we have an air current behind the plasterboard from the cavity and loft. There are probably other names for it as I believe it's a common issue in modern-ish houses where care was not taken during construction. Your post is basically a list of the issues with our house when we moved in and is a great reference for anyone in a similar position. Here's a summary of what I've done around these issues so far: External penetrations sealed around pipes etc. One window frame sealant redone, I need to get round to the rest as they all have gaps Several internal penetrations sealed when possible, tv aerial holes, water main penetration etc. Bathrooms are indeed a pain as I can't get to the pipes due to built in cupboards that were installed before we moved in Intumescent brush seals on integrated garage door to house Flexible expanding foam and sealant applied to all of upstairs junction between chipboard floor and skirting before new carpet was laid Slip layer on floating chipboard floor lapped up behind skirting board when kitchen subfloor was replaced and taped to plasterboard Letterbox replaced for a better sealed version with draft brushes Loft hatch replaced with Manthorpe GL250, old one had no seal whatsoever Chimney sheep and cap fitted to disused chimney Humid/stale air upstairs was indeed a problem, I installed a Nuaire Drimaster PIV system which solved it overnight, the air is much fresher. This is coupled with a trickle extractor in the main bathroom with humidity/switched boost. Felt lap vents fitted in the loft to prevent an annual two-week January phenomenon where condensation would go crazy and effectively rain in the loft Loft lids fitted to downlights in the loft, sealed to plasterboard to allow insulating over Separate thread on loft insulation to come, watch this space!2 points
-
FWIW this is exactly the route I ended up taking. I have a 1-wire thermistor in each room with wood (bamboo) finishes, sending data to loxone, and it cuts off the call-for-heat if the temperature gets too high. It also can dynamically adjust the flow temp, e.g. use a high flow temp when the screed is cold and gradually back it off as the screed warms up towards the limit. I have all the logic for that implemented, but it's pretty flaky controlling the Ecodan FTC6 via their MELcloud Wifi interface, it would be much better done over the modbus interface but unfortunately you can't have both interface modules on a single FTC6 so meh, I just don't bother with this level of flow temperature control feedback. ... if i left the ashp on 24/7 it wouldn't be interesting anyway, but the nature of overnight cheap rate (and solar PV) does make it more worthwhile to back off the temperature then blast it as hot as possible during the cheap rate window2 points
-
You're certainly confusing me with apples and oranges, apples and apples and so on. No wonder we seem to be spinning our wheels ? ? But I've been agreeing with you all along! My "explanation" continues to be that the heating effects (dynamics thereof as @TerryE puts it - while even he seems to think I'm disagreeing when I'm not?!?) are different, and therefore that the products are intended for different uses and require different electrical installation methods as a consequence. I just don't get how what I've written here might confuse readers - the only reason I keep littering this thread with my responses to you is because I have a passion about achieving clarity on this very issue. Again, I entered this thread with the observation that anyone not requiring the full 3kW on offer from a single Willis (or indeed 6kW from two) and who were considering plumbing in two for redundancy (possibly only connecting one to the electrical supply) has the option of wiring two in series with the advantage of safely making it 'plug and play' with a 13A plug. This also opens it up to control with standard time-switches, smart sockets etc. and may be particularly attractive for temporary use before full commissioning. This would be the only safe way to power Willis heaters without installing a new 16A/32A radial in 2.5mm/4mm cable - which would otherwise require the services of a qualified electrician.2 points
-
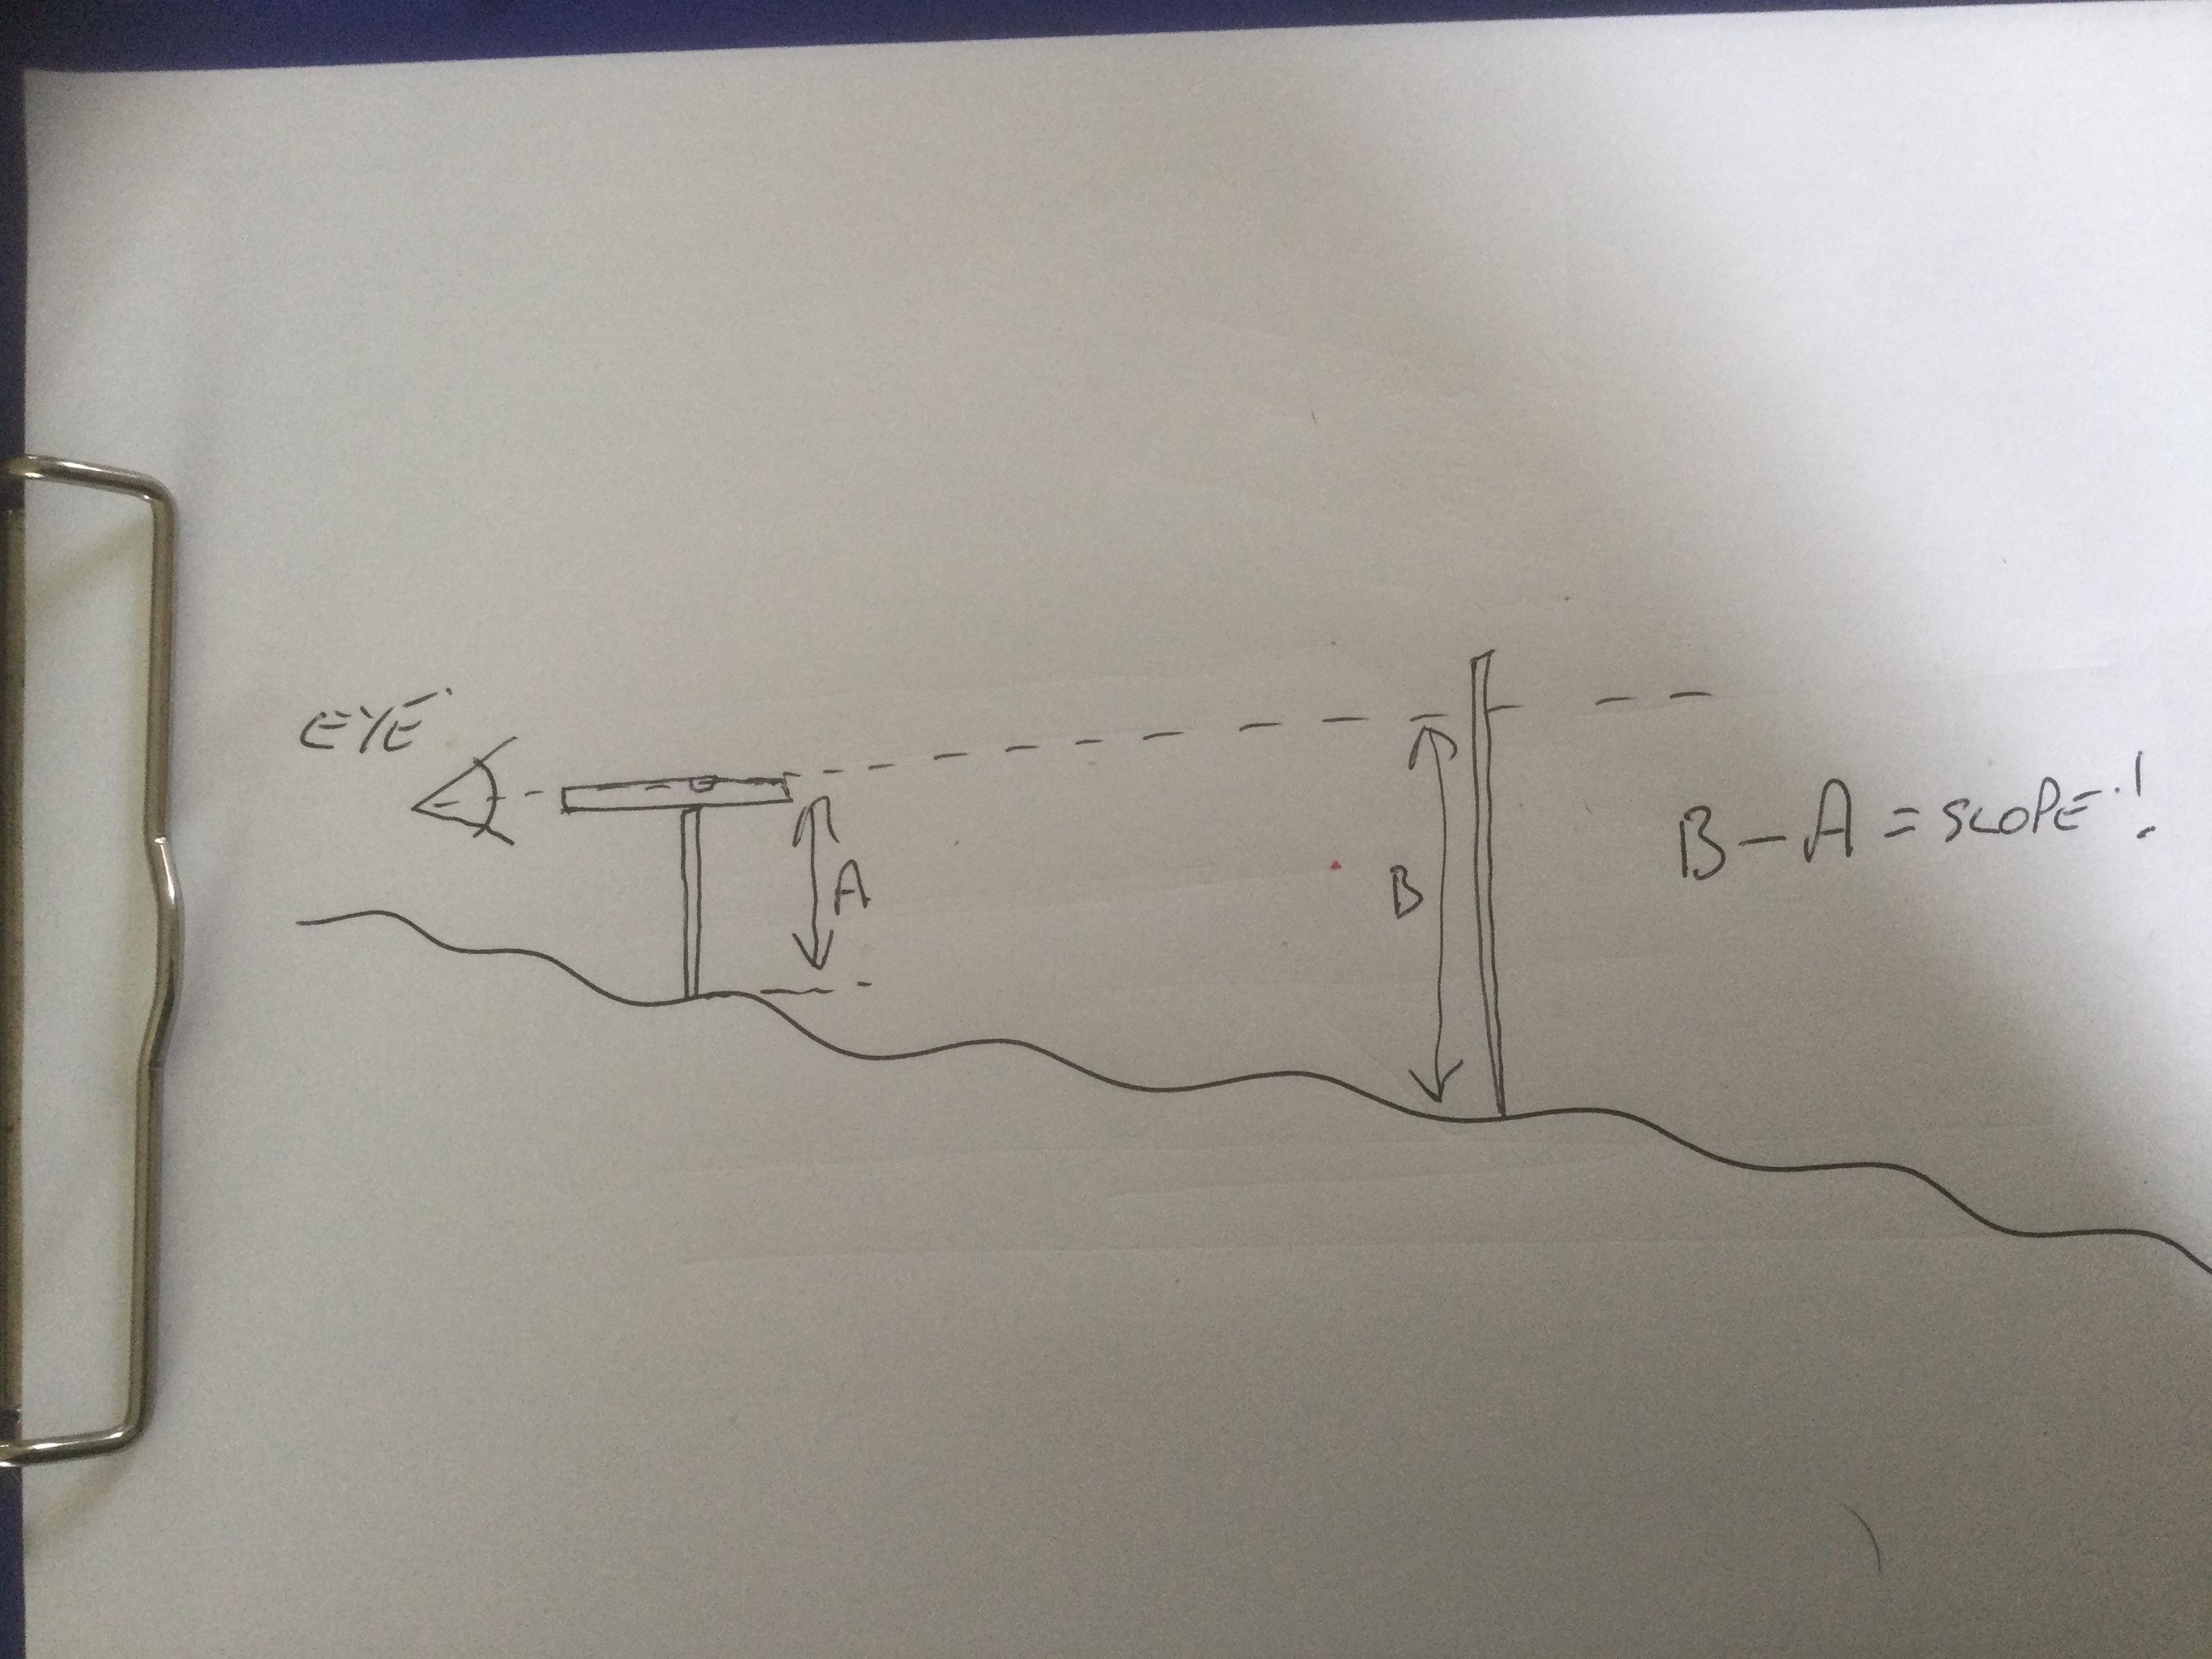
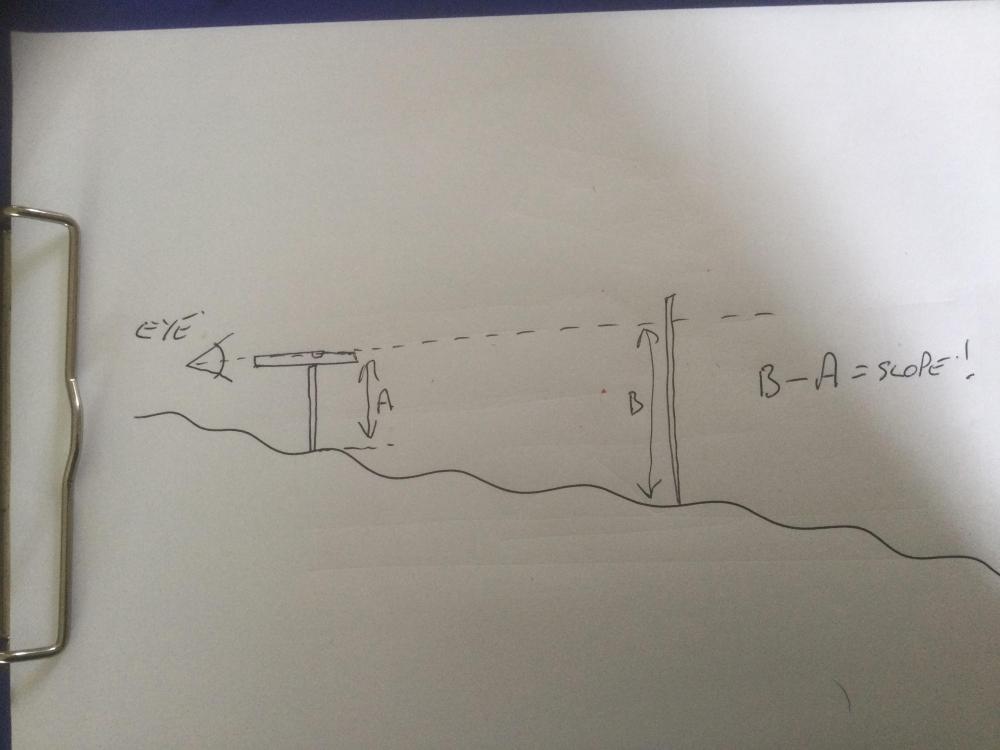
How accurate do you really need to be?. Use a spirit level and two poles with a friend!.
 2 points
 -
I edited my own post to add the above line and seem to have deleted the original post, I shall post again below: Perhaps the OP @dnoble could start by answering the above and posting some photos then we can start to chase this down. Unless I am mistaken we still don't actually have a system breakdown, just snippets of information in insolation, and as a group we are going round in circles with the same thoughts and assumptions. The OP is looking for a specialist, I doubt he needs a specialist as the collective minds of this forum can almost certainly unravel the details here with the only exception being if we do decide there is an issue. OP states that the panels were self-installed, so all the details must be easy enough to list. I posted what I think is a good starting point and it appears to have fallen into the ether. I think it is fair to say that when people take their time to answer it is worth exploring said answer or at least acknowledge it. Rant over.2 points
-
Just checked, we went for a gas combi boiler. 2k fitted with filter including the 360 quid for the mains gas supply. 10 year guarantee. Now this might not be a popular choice on here. Double the level of insulation of building regs plus airtightness of 4.7. We also didn't need MVHR. 2k. All in and we don't use much gas for heating given the insulation. And we were able to have a gas hob. No space taken up by a hot water tank, no heating water when not needed and as 2 of live here no need to run 2 showers at once. Now we don't live near a main road, no outside noise, no nasty smells as we are 400m from the sea. I think everyone agrees max out on the insulation. Get the airtightness good. Once there the heating energy demand should be so low why not go for the cheapest install option available?2 points
-
Greetings @S2D2 I have to ask... what was meant by the phrase "plasterboard tenting" As for air-tightness of an older building, well little things can add up to alot of improvement. Here are my cost effective suggestions: With airtightness I always look at every hole in the outside of the building. Many times services passing through the external walls are not sealed properly. A bit of external sealant will do the trick. Old pipe holes through the external wall not mortared need to be filled. Check around windows outside and under all external window cills for gaps. Again frame sealant will do the trick. Cavity walled buildings have air passing between the 2 layers of external wall so if a pipe is not sealed on the inside the air from the cavity will enter the building. Check all possible pipes internally for gaps and seal where required. Bathrooms can be a nightmare - from holes in walls where pipes pass through to no floorboards under the bath. Pipes boxed often have hidden holes or bits of floor missing. Check for poor sealing external openings. Sometimes draft excluder will do the trick. Internal soil stacks often have the round pipes going through square holes. If you can get to them, seal them up. Internal joists are supported by the internal layer of the cavity wall. When installed they should be sealed around otherwise the air from the cavity will get in. Any time your doing work which exposes these joists Check to see if they are sealed. If not, a big hole a bit of mortar or a small hole a bit of mastic will do the trick. On suspended floors air can flow between through the join between walls and floors. ( This sometimes makes the edges of carpets next to the skirting dirtier than the rest of the carpet. On light carpets often a grey edge to the carpet). If you get the chance seal between the floorboards and the bottom of the skirting with mastic. If you have other floor finishes you can seal between the top of the finish and the skirting but use a suitable sealant as it will show. ( A white Dow corning 785 for water areas with vinyl perhaps, and a suitably coloured sealant for wood floors. In cupboards with tanks or pipes in check the floors and ceilings for holes and fill where required. Check the front door letterbox shuts properly and either mend or replace. The same goes for cat flaps. Check that your loft hatch seals correctly. Use draft excluder where required. External overflow pipes to old toilets allow air to blow back up the pipe and into the room. Next loo installed needs to have an internal overflow. When all this is done, you may find humidity becomes a problem. The moisture was originally blown out of your home with all your heat. If so invest in fans for wet areas. Fans are usually best when they have humidity controls and mechanical shutters built in. This will mean they only come on when damp and stop drafts when not in use. Boilers that are not room sealed require a supply of outside air to run and so somewhere there should be an air brick. Next replacement make a room sealed one. Open fires or, log burners that are not room sealed, also require air as above. Using open fireplaces can be comforting but when not in use the air is soon replaced. NOTE: Take into consideration that if you manage to seal your home up tight you need to have a way of refreshing the air that your breathing! The 3 main ways to do this is leave a window/door open, have trickle vents or mechanical ventilation installed. Good luck with staying cosy. Marvin.2 points
-
This has got me thinking. Our ASHP uses 1500kWh of electricity each year heating the house. so guess a COP of 3 that's 4500kWh of heat. With Kerosene at 10.35kWh per litre, that's 434 litres per year. Round that up to 500 litres for boiler efficiency. Our old house had a 2500L tank. So I would only have to buy fuel every 5 years and that would give a LOT of scope for watching the price and buying when it's cheap.2 points
-
Thanks for this @Nickfromwales and @Radian I can see the variables are many and this is why I have seen many differing results. I have been using about 260 lux in kitchens when installing 240v down light GU10s which are daylight, 4 or 5 Watts each, 120 degree angle and it seems to work fine. Sometimes I add an extra down light if light is required in a particular area. In all the bathrooms (lots) where lighting was required 4 of the above works well on a typical 2 by 2 metre room: 1 for the door, and one each for the loo basin and shower.1 point
-
There are so many views on how to insulate an old building like this…. It’s always the same with one team firmly set in the traditional camp with lime being the key word and the other team at the very far end of the field talking about PIR and Gypsum ! If your stuck in the middle god help you…. Your either going to get converted by one side and hated by the other or both sides are going to kick the shite out of you for sitting on the fence.1 point
-
Is it not easier to fit smart bulbs to the outdoor lights? I have 3 hive smart LED colour changing bulbs in our outdoor lights. I can control each of them separately including day and times they come on and at what colour temperature. I just have to leave the power onto them.1 point
-
Was having this exact discussion with my sparky on site this afternoon lol. We both gave up eventually and decided to use common sense, plus the clients were sensible enough to buy fittings to ‘road test’ the ones favoured vs areas of concern which helped. If you realise that a single pendant in the middle of a 15’ x 15’ room is / was the norm, and that had a 60w bulb ( or “lamp” if you’re a sparky ? lol ) and then some manky shade wrapped around it killing off most of the light output then it brings you back to earth. I do lighting design for most of my clients, so come across this quite often. Regs / the good book don’t really give much definitive help because they don’t take into account wall colour, room height, fitting type / material / emission etc so common sense has to prevail imo and getting fittings to test before final fitting is a good idea for sure.1 point
-
None. Afaik. Only issues arise when you’ve burnt the gas and it is odourless / poisonous ( CO1 ).1 point
-
I ran a kitchen company for 20 years. Bespoke high end, and seriously expensive. Range from £35 to £200K. The truth is that all kitchens are not made the same. My ironmongery was Hettich or blum. Some companies use cheap far eastern copy ironmongery. Don't expect it to last for 20 years. It won't. Mfc board (which cheaper kitchens are made of) also varies in quality. Egger make decent quality Mfc. There is a lot of shite Mfc used within the kitchen industry thats full of aggregate and iron filings. When you are looking around ask them who manufacturers the boards that the kitchen carcasses are made of. If they can't tell you, then the cabinets are either shite, of the knob you are chatting to was selling double glazing last week. Moving on. Kitchen fitters. Most top end good kitchen fitters are not carpenters. They are kitchen fitters, and that is all they do. The lower end companies sub out the fitting to all sorts of tossers who should not be let near a kitchen fitting job. Bear in mind that 20 years ago i used to pay each of my fitters £1000 per 5 day week. Be very wary of people who tell you they will fit it for £700 quid gov. Don't get me wrong, a lot of people can make a fair hash of fitting a kitchen. However having a kitchen fitted that you want to last 20 years will, in my opinion require the skills of a proper kitchen fitter with the skills and equipment to know where kitchens are normally put undre stress etc, in order to do a proper quality job. Sorry, i can't give you any advice on laminate worktops, as i never used them. The likes of Wrens worktops are shite, and will not last 20 years. Be aware that if you step up to a composite top, you again need to be aware that the quality varies between manufacturers.1 point
-
C’mon…….you could instantly tell which socket the fire was plugged into as it was brown instead of white!! I’d be interested to know how many deaths from fires were attributed to these, back in the day…. In principal we both know this would work. Then you put your sparky hat on and things change significantly. If someone were to come in to work on this, and one heater had failed, they may then, mistakenly, drop the dead heater out and run the working one off the plug top. They’d think they were being a hero, but they then put you at risk. What you / we do for ourselves is not something we can do for 3rd parties, particularly when there is a liability trail and a warranty / commission of a new CU. The chat here is just a little ‘loose’ in terms of who “could” do “what”. You can set fire to your own house or electrocute a family member, but I cannot do that for a client. If somebody wants to DIY this as you suggest, then that’s fine, in principal, but imo not a good idea at all. I like your posts, don’t take me wrong, it’s just a huge no-no from a sparky PoV to have 2x 230 volt devices connected up in series in a residential domestic setting, unless they came that way from the manufacturer and the unit was supplied with 1x 230 volt input and then split this after the incoming connection. Technically you could ask a sparky to give you the 13a socket and then plug into it whatever you wish, but then the liability and responsibility lays with you for whatever happens downstream.1 point
-
That makes a certain amount of sense. The more stationary the encapsulated air, the better the R-value. I have a very draughty loft (not a euphemism) so I'm considering a top layer of breathable thermal quilt to do a similar job. This is also reflective so may reduce overheating in the rooms below during the summer.1 point
-
Looks like my buffer has no coil (Cool Energy Inverter model 18) so I won't have that specific issue but plenty more things can go awry ? Glad all is working as you want it to now - electric start next week and hopefully ASHP install just after!1 point
-
He will have to stick the pb to the insulation Screwing it wont work1 point
-
Ha, can’t find it now ? but I read somewhere with a cold loft (draughty) the laying of paper between layers of insulation cuts down the “washing” effect robbing heat. Perhaps I was dreaming (I am old?).1 point
-
it's EPS300. our SE said the thickness didn't matter as long as it was EPS300. so I did the calculations and decided that 300mm EPS just gave a stupidly low U-value and the 200mm was sufficient for our needs so decided to save some money. the PIR was just something to staple the UFH pipes to! it was cheaper to use that than to pay for more screed and click tracks for the UFH pipes. we're going for 190mm Frametherm 32 between the rafters and 100mm PIR (maybe 90mm, I will revisit those calculations in due course) below the rafters. UFH on the ground floor and basement but don't ever anticipate using the UFH in the basement. I am really not worried about heat loss tbh, but I see a thermal bridge and try and resolve the issue. the curse of a mind that troubleshoots for a living! pi$$es the wife off no end as every time she talks to me about something I have to find a solution to it.1 point
-
yep. and timber isn't a bad insulator anyway.1 point
-
Yeah . But how much ‘heat ‘ are you going to loose across that bridge ? My SE wanted ‘special ‘ bolts for some galvanised brackets to prevent a thermal bridge . The bolts were expensive. I argued if we had a 1000 then maybe . But for 20 ? . The heat transfer/loss must be minimal . Far more important in the big things like insulation in the roof and walls is installed well .1 point
-
summin' like this? as is at the moment: with a 25mm x 50mm batten: with PIR: I could then add some 25mm PIR between that batten and the corner batten like this?
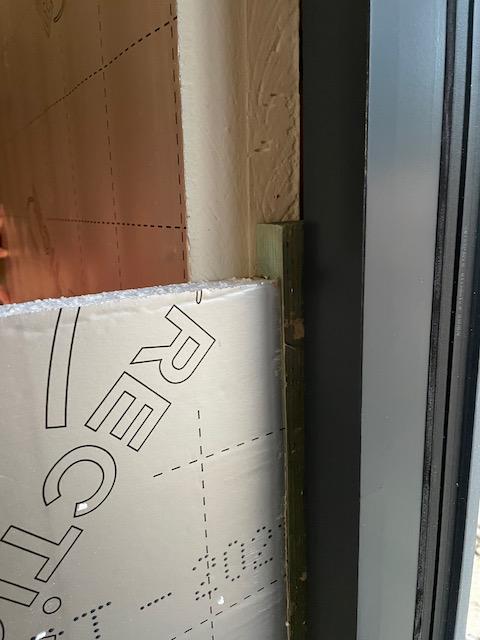
 1 point
 -
https://www.tigoenergy.com/product/ts4-a-o TS4-A-O Description Optimization is a Flex MLPE function available as an integrated modular junction box base (TS4-O) or as an add-on unit (TS4-A-O). Design using unequal string lengths, mixed orientations, or areas of mismatch. Install in shaded areas with a reduced setback ratio. In addition to optimization, the TS4-A-O enables module level monitoring, and rapid shutdown in compliance with NEC 2014, 2017, 2020. Functions Optimization Monitoring Rapid Shutdown Features and benefits Suitable for up to 700W solar modules The higher performance optimizer with Predictive IV Technology (PIV) The ONLY optimizer with selective deployment Includes the benefits of Safety & Monitoring Meets US NEC rapid shutdown requirements Optimizes right out of the box Shade and age tolerance to maximize lifetime yield Works wirelessly with the TAP & CCA Configuration 1 module per TS4 Required CCA + TAP Says the CCA and TAP is required on their website. we are also assuming that the OP has got the optimisation tigo ts4 modules as well and not one of the other versions1 point
-
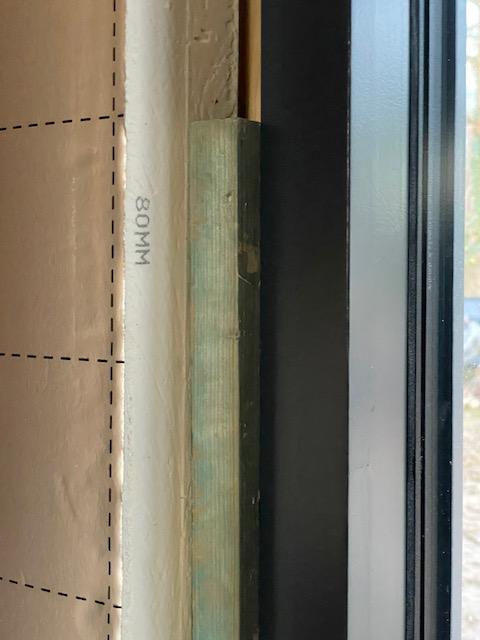
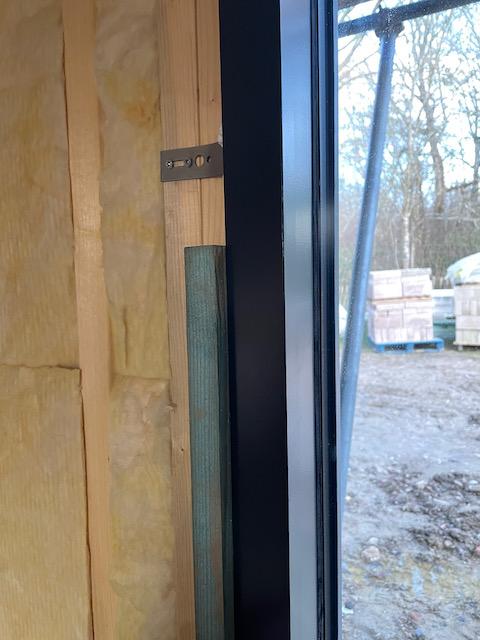
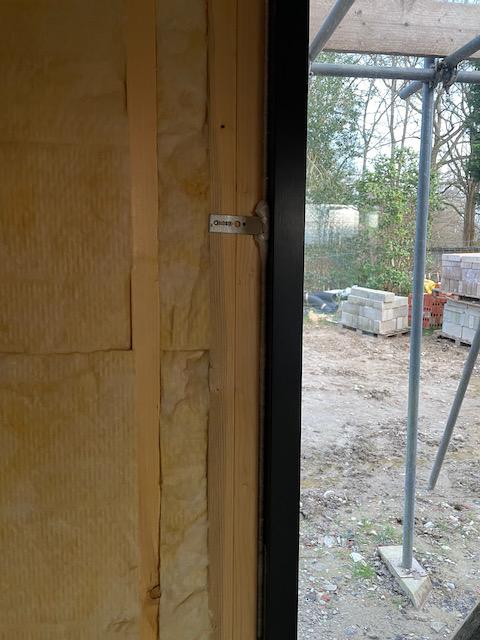
Do it flush. Foam the window first. The weak point is where the frame and wall meet and if you cover some of that with insulation it will help reduce the cold bridge. Protect the frame with tape and cut and remove it after plastering / painting.1 point
-
Have to agree, everyone wants to be an engineer, some that I would not employ as a technician. Best comment during our build (by someone calling them self as a engineer) was 'why are you insulating the floor, heat rises, you are just wasting your time and money."1 point
-
The answer in West Cork is to throw a net over the roof and tie that down with massive boulders. Not for you? Thought not.1 point
-
Ive no hands on experience with Tigo optimisers, but AFAIK you dont need a gateway/TAP for them to optimise panel generation?? Happy to be corrected but I thought the gateway/TAP/CCA were all to allow remote monitoring and some other enhanced functions, other than power generation?? Remote monitoring would be an absolute god send for the OP!!1 point
-
Yes absolutely, it is not rocket science, but you DO have to be able to read a manual. I keep finding what should be simple system boiler installs here that are not working, and have never been right from new. There are plenty of installers that have no actual understanding of things work, can't think through the flow of water through valves or electricity through switches and other controls. and just wire a system "the way they have always done it" turn it on and leave without making sure everything actually works properly. Concepts such as pump over run, frost thermostats etc completely baffle them, so not much hope for getting an ASHP install right.1 point
-
+1. maybe use a thin metal strap folded into a hinge and screwed to inside, it’s a bodge but no worse than the boxes themselves1 point
-
That's the exact point I was making earlier: Even 2kW heaters (the maximum usually available from reputable suppliers) are pushing it. I could only find one "13A" smart socket that was built with robust enough components to handle 8 Amps comfortably. A FLIR camera comes in very handy for this kind of exercise.1 point
-
Someone you lay ?1 point
-
@SteamyTea, either way I would be very uncomfortable leaving a 12A load connected through a standard UK plug for many hours overnight unattended. They just aren't designed for this type of use. Seems a recipe for a fire where the insurers could reject the claim.1 point
-
Basic water level https://www.instructables.com/member/retswerb/1 point
-
@Radian, a kettle is on for no more than the minute or so need to boil a litre or two. A Willis is designed to be on for hours. These cases differ in time profile and therefore in thermal dynamics.1 point
-
If it's a small area a solo surveyor should get it done in half a day and a basic drawing knocked up for a couple hundred quid.1 point
-
Basic surveying shouldn’t cost much at all. You don’t need fancy instruments. for your project a water level or basic laser is more than accurate enough. and yes a layperson can do it.…. What is a lay person anyway?1 point
-
And we know which one he is ????1 point
-
Option 3 would be my choice but if possible I would have a small amount of ventilation in the void, nothing crazy but some sort of airflow to allow any damp to be removed when the wind was blowing. I am thinking that on my renovation I will use 75mm pir between studs and then 50mm over the studs followed by PB. I have no issues with noise as I live in the sticks.1 point
-
You got to stop the water getting though, not just thinking that a lime finish will let it dry out faster. Do you have a gutter/downpipe leaking onto it? With your builder, there is still time.1 point
-
You need to leave a void I often gypliner properties 50 mill Rockwool bat for sound and insulation 15 mil void While The bats will repel water in a cavity There not waterproof and any damp on the masonry will strike through While line plaster can be quite fashionable it will act s a sponge if the walls are damp Which is probably why the previous owner MF it out1 point
-
First thing to look at, is the boiler running in condensing mode. For this to occur your return temp back into the boiler needs to be below 53 degs. The lower the better. Can you run the DHW and CH at different temperatures? Otherwise as TonyT said.1 point
-
Ran hot tap in WC, probably has longest dead leg off the DHW loop and is just 15mm bore. Activated MVHR booster (which triggers DHW return pump) and turned on tap. Hot water in 8 seconds.1 point
-
Or even worse, the bbc1 point
-
You are (strange) but totally right to be honest - make them tell you to f*ck off! I wasn't sulking but, if I was, sulk over. Happened to me at Audi Sports Net and will probably happen again - who gives a toss! I just don't want to ever be in a situation where I self censor - there is just no point in posting in that environment. Anyways, notice given on my shithole rental today (nice views mind) - move 'planned' (ie I have done f*ck all about booking anything) for w/c 14/2. We are not even going to be wet in the plot until week after next. Should be fine though. Called off the air test for the 11th and the b/c final inspection for the 14th. Sold Plot 1 - largest price achieved in the area ever - shows that people will pay for spec and quality - this was a major call when speccing the thing. I just think that quality sells itself and while the sales agent needs telling the market sets it's own level. Plot 2 will sell this w/e for even more. They are great plots tbh - I would have had an excitable accident in my pants a couple of years ago to have had the opportunity to live in one of those. Carpets in today - no joins. Had to move a 5m x 12m carpet through the plot and around a swerve. The thing weighed over 1/4 tonne. Boomed it up with the forks to get it in over the terrace thing and then 3 of us sweated and swore for an hour moving it in place. Got 1500 sq of carpet done - galleried landing and 4 massive bedrooms with joins under carpet bars only at the door thresholds. I didn't think that could be done tbh. Anyway - for those sensitive souls on here (don't ever go near a site if you are!) I appologise in advance for any upset I will cause ? Blame that Pocster chap - he has probably offended you alreay anyway! I have offered a walkthrough without thinking how I can do it - I can load it up to You Tube but would rather not - any alternatives?1 point
-
Before Grenfell, Kingspan and Celotex were BBA certified for use on tall buildings.1 point
-
The BBA certified it, then pulled it, I believe they would owe it to you, as a duty of care to tell you why. I would contact them for comment and explain on the back of their cert you used it. Now have issues. Although, as I type this, I think, actually it would be advisable not to tell them you have installed it as per that cert, because, if it turns out they screwed up, they might be scared you come for them. I might play the "I proposed to install it as per the now revoked cert, what were the reasons so I can avoid issues" - a lie but probably worth telling it!1 point