Leaderboard
Popular Content
Showing content with the highest reputation on 10/24/20 in all areas
-
I appreciate that you have identified yourself as an Interior Designer trying to understand the market up front. Thank-you - that gives the basis for a useful conversation. My comments relate to my use of an ID on a recent project as a small LL. I hope they are helpeful to you and also to other SBs. As an ID you need to pattern your engagement very individually, and IMO the key things will be understanding the requirements, and educating people as to what is possible. Each self-builder is very different, and the market is perhaps well-desribed as "micro-segmented into units of one", which you *may* find ways to aggregate *a little*. ? The example of upfront guidance and material provided by the Architectural Practice Allan Corfield may be a good parallel example you could learn from. I used an Interior Designer for the design and refurb of a student rental in the last 2 years, so my comments are 'notes for a customer' and relate to a customer view, not following the question structure. You need to look at the other side of this view to find your routes to market. The key aspect for me was that I as given advice by a professional lettings agent I already respected. It was left-field for me, and I had to do some work to appreciate the possibilities. - For an established ID with a proven track record the costs per day will not be that different to hiring an architect. - Proving experience is likely to be more difficult, but it needs the same due diligence as you are hiring an artistic skillset, which is more personal than a trade skillset. But IDs do not have a standard training route as well established as an Architect. Past portfolio is critical. - I treated PM as a separate skillset. Not all Architects are good PMs; the same applies to IDs. Needs a separate segment of due diligence. - £250 will honestly not get very much, unless using eg a student or getting a favour / loss leader. £250 is less than one day if you are only buying one day, which may not even be enough properly to understand your requirements - but £800-1200 plus expenses may be one week. You may get a few sketch ideas, or perhaps a piggyback off another project. - Like an architect, you get out what your put in. The only way to judge the outcome is if you have defined and communicated your requirements / expectations / scope well. If you have not, then your ID, as your architect would be, has nothing to go on except their own opinions and guesses about your needs. You need to have enough knowledge and self-knowledge to ask questions pertinent to both. - You need the skills to distinguish between style and fashion, and to communicate the your aspirations to the ID. - It is important to have enough creativity remaining in the project to give satisfaction to the ID. IDs and Architects are rightly not happy if they are reduced to a monkey dancing for the organ grinder. It needs to be a continuous collaboration, and it will not come down like a spaceship from the sky. - Cost control is probably best as much by adjusting scope and time taken plus looking for synergy, not by *excessive* arguing about rate. It is a rather different ballgame if your role is as a developer, when you are looking for perceived value, rather than personal value. In my case I was approached by my (excellent) lettings agent with a proposal to update, using an ID that they had used for previous projects which I could see. The PM was handled by the agent managing the ID who did all the purchasing and nitty gritty, and me giving detailed input in response to a detailed proposal which involved a certain amount of re-scoping then touch-bases throughout. ID was looking after all the purchasing and implementation. Project was a big success. I'm not talking about numbers online, but you could PM me. My comments. HTH. F2 points
-
Maybe I’m not the right person to answer this as I have an interior design qualification but I think self builds are a very personal choice, we have all put a lot of time and effort into the design and build and have already made a lot of choices regarding materials and have a vision of what we hope to achieve and this includes the interior. In our last build I had the interior designed before the house was completed, this time we were once again refurnishing the whole place other than beds but I decided to live with the basics until I got a feel for the place and within a few months I had it in my head how it should look. I think most self builders work to a very tight budget and as the build progresses and things don’t always go to plan , unforeseen costs crop up and very few would have the spare funds at the end of the build to then engage an interior designer.2 points
-
Yeah I turn it off every time we open the house up... trouble is I’m not always here and swmbo like to open up the house as much as possible but has no idea how heating works. Exactly... this is the thermal mass discussion that goes on regular here on the forum. It’s great for a steady constant temp but is slow to react and needs managing differently to ‘normal’ heating.1 point
-
Even if you had to pay double their local rate you would be quids in! Wistow - blimey - just down the road from me! About 2 miles I would say, just the other side of Upwood.1 point
-
I don't know if they will do it but it can't hurt to ask - https://www.mickgeorge.co.uk/contact £360 is a joke.1 point
-
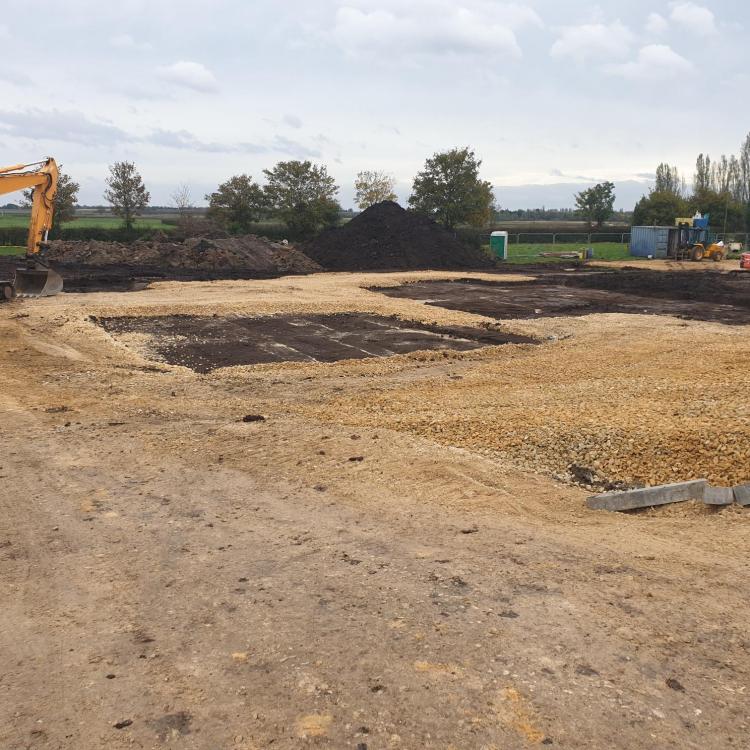
Made some fairly decent progress - all 3 foundations dug and poured with minimal waste concrete (3 - 4 cube for the 3 houses plus the quad garage - I can live with that). 240T of 50mm clean limestone spread around the plots. The clay goes away next week (I found a local farmer who wants the stuff so loading and transport costs only - £2000 all in). Got water and power (borrowed from the neighbor) laid in yesterday so teas are now available in the cabin & water there for the mixing station. Getting tea laid on must be milestone No 2 after getting the concrete in! Bricks & blocks etc arrive next week and the brickie starts on the 3rd Nov. Game on.1 point
-
1 point
-
1 point
-
1 point
-
Measure the pipes and you’ll find they are probably a “standard” size such as 28mm or 32mm OD. They are expecting you to fit a compression backplate or similar to the sub floor and then the stand pipe fits into that. Water goes up the inside of the standpipe, no flex required. Photos and make / model of the taps also useful.1 point
-
I helped fit one a long time ago - I think it had a floor fitting / mount that the standpipe connected into (separate hot / cold feeds that were like a push fit) and then secured with bolts.1 point
-
Its fitting sort of a poor mish-mash of both, plus some zoot construction to patch the poor area up prior to pB'ing over it all. Its the zoot bit I'm terrified about. Im digging out a pic..1 point
-
The data is here https://environment.data.gov.uk/DefraDataDownload/?Mode=survey You can select tiles of data you want to look at. I use a GIS software called Qgis to look at the data as well process it and present it (amongst of data sets). The tile you download is a geo referenced tif file, which is a image. The colour of a pixel in the image represents the hieght at that point. You can use Qgis to export the image to 3D contour lines for use in other software.1 point
-
1 point
-
So I finally went ahead and purchased the Huepar level and detector with my birthday money. Used it in anger for the first time last weekend leveling the workshop foundation shuttering, and then the first course of footing blocks this morning. What an excellent job. I can only imagine using the old traditional 2 man optical level, would still be at it...1 point
-
@SuperJohnG Once you've worked out ducts, make sure you have UFH layout worked out and give some thought to in-slab temp sensors (assuming you are having in-slab UFH)1 point
-
That’s the issue. Flat roof vs pitched roof, very different design scenarios.1 point
-
Original one was a cheapo-sack-o-shit, new one is a tidy Triton, hence the better flow rate. Adjust the shower head itself maybe for a spray vs jet ? The heads usually rotate to change settings ( the actual head where the water sprays from. Above triumph says otherwise1 point
-
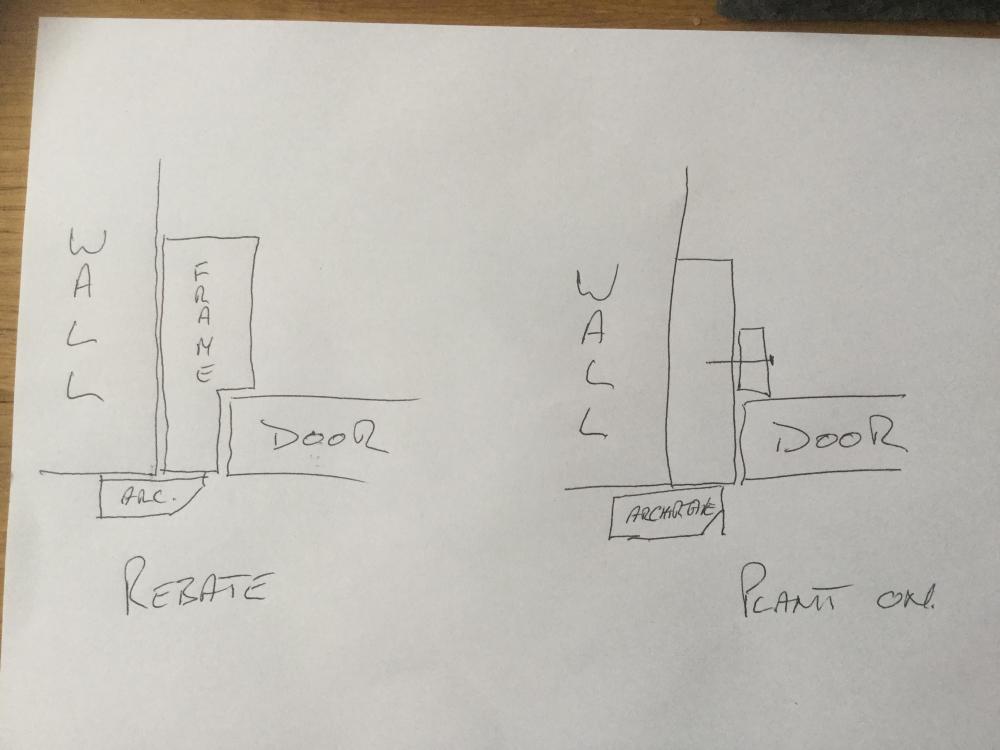
Or no nails a bit of 6mm ply to the underside of the lintel if it looks a bit rough. This instead of using the header supplied with the frame kit.1 point
-
Raise the rooflight upstand, add more insulation to the same height on top of joists so everything is flush. Then, have a step up from the existing door to the new higher level. You'll have one small area of the step where the insulation isn't up to the rest then?1 point
-
Shut off flow to all which are working and try to purge the lazy one/s through1 point
-
1 point
-
1 point
-
1 point
-
Hi Jamie. I would go back to basics before you open the wallet/ purse / gourd or raid the money tree in the garden. You have three walls and a roof with no openings. You do have quite a "stiff box" to work with. Most walls and roofs are pretty stiff. Think about them as deep beams, the roof, if it is detailed well it acts like a deep beam and thus able to transfer load down to the foundations quite adequately via the walls. If you have bottom supported bifolds, then yes they are heavy but when you work out the horizontal loads that appear at the head of the doors (when they are open) you may often find that they are no more onerours than the loads that occur when the doors are shut and the wind is sucking them outwards. It's just my view but bottom supported bifolds are more common now. Logically it's ok to float one part of a structure and connect it to another. You just need to design for the differential movement. Ask this. Say you have an 18 th centuary house, you add an extension, both will move differentially relative to the seasons, temperature and so on. Both the old house and the new extension often still float on the ground (unless maybe on similar rock), just they move up and down differently. All materials are elastic and some can also expand/ contract differently if the are sensetive to moisture. Before you go down the "steel route" and the associated foundations, deal with the cold bridging etc then it may be worth while going back to basics and avoiding all the extra interfaces and assosciated labour cost. This way you may be able to bring it all in budget and still have a competant structure / safe design that will still allow you to connect the house to it later. In summary you may get this within budget if you go for bottom hung doors, do away with all the steel, base plates and thickened founds and approach the design in a different way.1 point
-
Overall it went swimmingly well, couple of minor issues but soon resolved and need to return to sort out a handle issue but John Knight Glass were, IMO really great and for final sign off we wait for contact over next couple weeks when someone else comes to site to check everything with us so enough time to raise any snagging issues hopefully. Despite some panic on the canal bridge when the trailer was about 8 inches off the floor, everyone held their breath when the glass got over successfully. The other option being discussed was asking CRT who were dredging at the time to transport them to us. Although that didn't happen, I'd of been quite pleased to see that ? The windows we picked were the aluclad UPVV studio KF320 windows and KS430 sliding door and we are more than happy with them. A couple from work in progress. It was nice as the sun was setting getting some pictures of the house today, finally with the windows.1 point
-
The solution was a local man with a telehandler. He had an ingenious solution which involved attaching a large crate to the forks. The crate was about 1m square and plus some extra battens tied on. This allowed my 6m wide trusses to be balanced on top and then slid off at the loading bay once lifted. Two hours to lift 18 trusses. The telehandler has a 9m arm and it was about 5.0m to the top rail of the scaffolding.1 point
-
Right, first thing is to let us all know how much oil you use, in litres, not cash. And preferably if you can split the usage into heating and non heating times. This will give an idea if how much is used for hot water (DHW) and house heating (space). If you read up about ASHPs you will notice people saying about over sizing them. This is not a mistake, they perform better when working at about 70% of the maximum rated output. This is quite different from gas and oil heating which generally performs best when at, or close to, maximum output. Floor area can be a bit confusing, there is a formula that allows for livable area and one that is for total area. Livable area (excluded hallways, landings and bathrooms I think) will always be smaller. Also the external wall/door/window area is important, a bungalow, terraced, semi detached and detached will all have different thermal losses. If you are up for a challenge, you can calculate simple losses if you know the U-Value of all the build components.1 point
-
I think you get to find out if SE adds anything in a couple of decades ?. Not sure how old you are but you may need a big magnifying glass as well.1 point
-
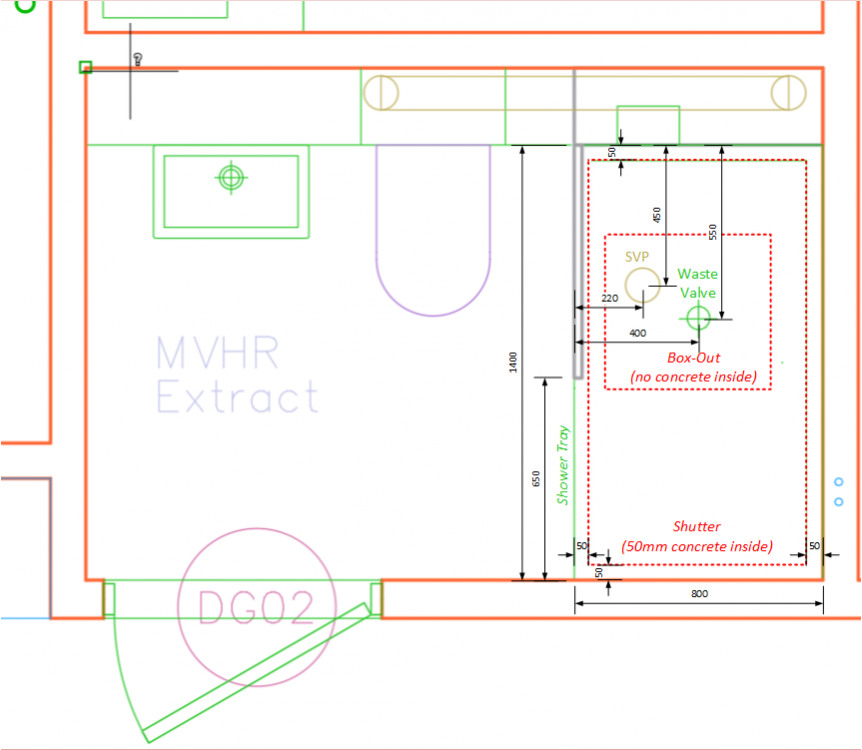
I think there's a solution following some more thought and Nicks help! Shutter 50mm all the way around from the tray edge and fill with up to 50mm concrete during the floor pout to accommodate the depth of the tray (30mm) so that it only sticks up by a few mm. The SVP / Waste value area is boxed off fully with no concrete poured in so that the pipework can fit. The diamond cut the slab to the tray outline after the pour and polish to allow the whole tray to drop into the recess. This way there's much more tolerance for inaccurate placement of the tray shutter prior to the pour, with accurate cutting out of the tray profile once the TF is up. FYI @Nick1c if you're considering the same.1 point
-
0 points
-
It works too well at times. Note to self - remember to tie the other end of the cord to something too big to fit in the duct... extracting the resulting mess from the vacuum cleaner was almost as bad as extracting half a ball of wool from the dog.0 points


