Leaderboard


Popular Content
Showing content with the highest reputation on 09/18/20 in all areas
-
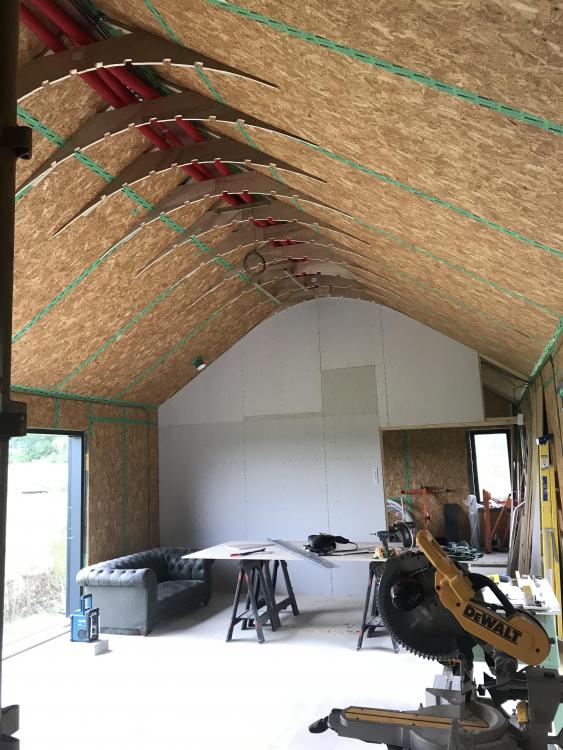
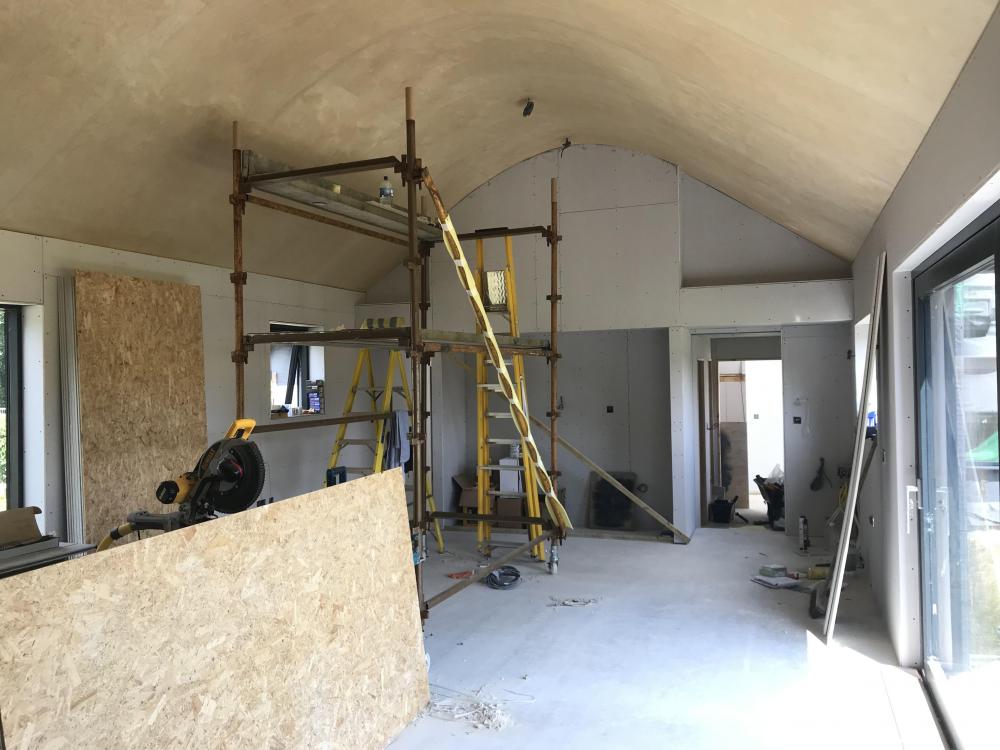
We have a vaulted ceiling and the ducting ran under the steel ridge. In hindsight I could have run the ducting in the warm roof space as I had 70mm timber on top of the rafters. My solution was to make a curved ceiling.
 5 points
 -
When you just know that's false nail glue not tile adhesive! ?2 points
-
How about using a sarking board.2 points
-
I would want it to look perfect if you have paid somebody to do it, if it looks inferior to the rest I would want that section re- rendered. Would it be be simpler to fit round vents so they can be drilled in using a core drill so the new round vent will cover the round hole, rather than them trying to cut out a square hole. Just a thought.2 points
-
We had our final inspection yesterday and building control were happy with the house. Just awaiting on an EPC certificate and we should have our completion certificate next week. We had a little tidy up before the inspector arrived so probably the ideal time to upload a few pictures. Landing and upstairs - not posted much here as this was covered in a earlier blog entry. Considering we put in outline planning in 2009 when we were 23 it's been a long time coming and a great relief to know it's nearly all over. I intend to post a couple more entries with the last bits of outside work and one about the costing/finance. Thanks for all those who commented over the years and answered odd queries, much appreciated. The to do list of actual jobs is getting short now. Proper downpipes – ordered Gravel - ordered, coming on Monday2 points
-
Not entirely, but he is using it in the wrong context. You can petition the BCO on a signed off job to take the factor of 5 or factor of 10 ( if they've been lucky in love that morning ) where OPEN vents to atmosphere are required to vent the network sewerage system and each dwelling must participate in that duty. If the BCO looks at the topology and agrees that losing the vent ( aka stench pipe ) is not going to be to any detriment then you may get permission to do away with it. NOW; As jerk-face aka your plumber has simply said you don't need one, some questions arise. 1) Is this ground or 1st floor? 2) How many bathrooms T into that one stack? Building regs will stipulate that you cannot omit an AAV on a vertically downwards discharging stack if the fall attains a drop of 1299mm or more ( from the bottom of the WC pan outlet to the bottom of the horizontal sewerage pipe at the manhole that it discharges to ) which is referred to as the "invert". The logic is, that after you discharge your Sunday roast plus 7 pints of Guinness and flush the loo, the contents of the pipe travelling south will, if travelling south for more than 1300mm, create a vacuum behind it as it falls. That creates a deficit with some welly behind it in the above waste network. That force, albeit it only momentary, literally sucks the water out of the basin / bath / shower trap ( whichever is the one with the path of least resistance ) and then that leaves a clear path from the sewer gasses in the street and your nostrils ( can be hugely exacerbated by a windy day for good measure too ). So, the issue you have is allowing a bit of air into that cycle to alleviate the 'drop''. Can be done easily by T'ing in a small AAV ( 40mm ) behind the bath panel ( 9as long as the bath is connected to the same stack in the same room as the WC ) and also, if the issue persists, the basin trap can be changed to one with an integrated mini-AAV. DIY for this is certainly do-able1 point
-
My tessies are large ??1 point
-
I take my cap off to Pocster...He did a crap job of his soil pipe (and took some stick for it) and he is willing to tile, and put pictures up ! Anybody that wants to do there own tiling gets a hugh thumbs up in my book. I would rather be stripped naked, tied to a chair, and have hot candle wax dripped on my bits. However, i suspect that Pocster might actually enjoy that, so perhaps the pain of tiling is something that he gets pleasure from ?1 point
-
But you said 'tomato'!1 point
-
Prick still doesn’t get blanked out does it ?1 point
-
Thank you for suggesting a ) it’s a luxury bathroom b ) I am a outfitter c ) it is complex d ) for wasting time reading this thread You are a true man amongst men ???1 point
-
F***wit! Use the search function on here! (4001 ?)1 point
-
Ah, I see what you mean. Ours was just screwed in place but then it was just a bog standard shower screen above a bath so was only hanging on the wall. You luxury bathroom outfitters may well have more complex setups and fixing requirements than this!1 point
-
This was fun: Back tiles went on first: Then the bottom tile. My bottom tile is at a very slight angle. Then the top tile: Finally the sides: Yellow are 1mm packs.1 point
-
F off I measured the base tile there and was certain the grout line was central . Must of ‘moved’ magically overnight .... ? I will live with this anomaly- it shows I am human and not a tiling machine . ? When I spent a king’s ransom on tiles and stuff I told the guy I wanted zero mitring . Because I (expletive deleted)ing hate it . These little square ends are nice . But they fit in either way round and wobble !!! . Even with a blob of ct1 they wobble - so need to be left to set . Ucking rubbish !1 point
-
You can get silver CT1... https://www.ffx.co.uk/tools/product/C-Tec-Ct1-Silver-5060209630410-Tube-Sealant-290Ml-Cartridge--Silver1 point
-
25 x 50 lath and should be fine. Issue normally is the laths aren’t down tight so bounce, so double nail them1 point
-
25 x 50 with trusses at 600 ctrs is standard here.1 point
-
Why not concentrate on making the internal leaf airtight since it is easier and more effective? There isn't any real advantage to having two airtight layers.1 point
-
I am NOT a slave. Then again I had to cook your dinner later - perhaps I am a slave.....1 point
-
Wow, a great house! Views to die for!!!1 point
-
Looks great, definitely inspiration for my own self-build.1 point
-
Congratulations!1 point
-
So this one has been 10 years in the making, which is when I originally built this extension, and not long after i'd built it, the outdoor bunny became an indoor bunny! So the glorified rabbit hutch has now become the kitchen it was intended to be. Worktops just been installed. Will crack on with tap, dishwasher, hob, and oven later this week. Really pleased with it all, just need to choose some paint, but will sort that in the autumn, as I've got the old kitchen to rip out and the room to bare brick, and floor to replace first!1 point
-
I think we are done with going up, so it's time to put a roof on the house. It's fully made from SIPS panels, approximately a foot thick so very little internal structure is needed. We had a little bit of argument on site today unfortunately between the SIPS people and scaffolders, but it was resolved and progress was made. It comes down to differing cultures and a lack of experience of the speed of this sort of build locally. The front as seen from the driveway approach. It has become quite an imposing building now. The green membrane is somewhat spoiling views out of the windows for the moment. We've decided we will need to acquire a small MEWP like in the foreground for fitting out, as later photos will show! The rear elevation Arty shot of the garden from the attic window. Lots of work to be seen out there! Daddy, I've changed my mind. Please can I have this room? The "This room" from the question above. The space works better than I imagined. Trying to show the interesing ceiling shape of the vaulted ceiling in the master bedroom. It gives plenty of scope for hiding discrete lighting HVAC and MVHR without damaging the effect. We have a bit of scaffolding to complete tomorrow so that roof access is possible for application of the membrane, then it is time to look at my small snagging list. I can hardly believe you can go from foundation to a near water tight roof in seven days!1 point
-
The bungalow we bought back in autumn 2018 with plans to demolish and rebuild. Only now, finally, is our build kicking off..1 point
-
Demolition, site clearance, reduce dig and installation of pre-insulated pipes for ASHP and potential future garden room. The pre-insulated pipe we used in the end was "REHAU RAUTHERMEX 25mm+25mm/111mm DUO PIPE". The ground was luckily fantastic, apart from one area with some roots and a couple of soft spots left over from the demolition. So we managed to avoid the extra 800mm reduced dig that had been specified based on 2 trial holes in the old front garden. At over 200m2, that would have been a lot of muck-away and hardcore..1 point
-
Things seem to be happening very quickly and progress has gone really well. The block and beam of the huge extension is coming together now and the focus has been outside, although with the occasional downpour the inside is now half empty with our 1970s bathroom suite finally gone. In the interim I've sold everything inside, the kitchen, boiler, naff internal doors and even the crappy floor tiles we took off. All copper and rads ready for my dad to weigh in. Have now run out of stuff to sell! Here are a couple of pics from this week. The final pic, the bank you can see and the path runs 90 metres from the entrance to the end of our garden from one old railway bridge to the other old railway bridge the other end which is over the canal. The railway at the top of the embankment is no more. It was the line that ran from Whitchurch to Chester and we can clamber up to the top of the embankment which is now an overgrown mess of bramble and ivy, no track any longer. We cleared some of the ivy and when we were clearing the garden of shrubs, bulbs and plants that we knew would get disturbed I literally moved every one by hand and planted it on the bank and we have been lucky that the majority of the plants have taken and had daffs, bluebells and lots of other things flower so it looks quite nice, even the foxgloves that seem to have gone crazy. We do need to sort out some sort of wall or something to replace the rockery' bit which was already there. I dread to think of the cost for such a long length. It's not as high in some places and levels off.1 point
-
In the last few months work on the house was on hold because of the COVID 19 pandemic. With the rules starting to be relaxed we have now been able to make some progress. A few months ago I posted on BH about being a bit concerned about the bath being a tight fit as it’s 1800mm and the distance between the wall was 1802mm. Not sure how the plumber got it in but happy that it fills the space. The bath is made from Carronite so it should feel more rigid when showering. Our joiner fitted the hydro lock panels and the plumber came back to fit the shower fittings. The Joule Aero tank has now been connected up. The tank holds 260 litres and utilises a heat pump which draws air from the bathroom, utility and ensuite. We visited a couple of properties that utilised this set-up and although they were happy with the efficiency of the system the feedback we got was to consider potential vibration noise from the tank. We took some steps to do this, firstly sitting the tank in a cupboard in the utility room, using a thick anti vibration mat with 22mm plywood on top. The ducting throughout the house is metal but we switched to flexible ducting for the last bit to ensure any vibration would not travel through the ducting. We also fitted a silencer to reduce the noise travelling through the ducts particularly to the ensuite. These steps have had the desired effect. Because we have yet to move in, I was able to monitor the electricity consumption of the tank when it heated the first 260 litres. To get the water to 50 degrees it used 4 units of electricity which would be about 50p. The tank also has a dual immersion which could be used to heat the tank more quickly if desired. After the air has gone through the system it passes through an external vent through the utility wall. In the last entry I mentioned that we wanting to prepare the ground for grass seed. The first job was removing a lot of stones. I’ll probably use the smaller stones to extend the parking area slightly and it would be good to use the larger ones for a small wall or some other feature in the garden. After the stones were removed, we raked the ground and then sowed the seed. The grass is starting to come through which is promising but we will need to fill in any patchy gaps. I can see why people go for the more expensive option of turfing but a big bag of seed is very cheap and although it takes some time and effort it’s satisfying to see the grass come through. I guess this is a good analogy for our self build! We had a sunny weather spell which allowed me to finished off some painting and my wife put some oil on the cladding. This had been previously left to weather but as this is on the southern elevation this could now do with some oil. We chose one which had a slight pigmentation and after applying the finished result was that it looked very similar to the pre oiled look but helped to even out the upper areas that had yet to sliver as they are shaded by the soffit. We plan to work our way around the house with the oil. We have used various tins of Osmo throughout the house and although it is quite pricey it does the job well. This is the tin what we used on the cladding. What is next? We had hoped that we could order some furniture from Ikea to furnish the downstairs but I think the pandemic is affecting stock issues and delivery. We now need to decide whether we want to move with limited furniture or wait a few more weeks. The next jobs: - a little bit of electrical work, lighting fittings, connecting up cooker, towel rails etc - BT due to connect us up on Tuesday - need to get some tiling work done for splashbacks - order some chips to spread around the site. - need to decide what to put as a finishing layer on the access road. - need to order materials for ramp, decking and downpipes for guttering. I hope everyone is keeping well and thanks for reading.1 point
-
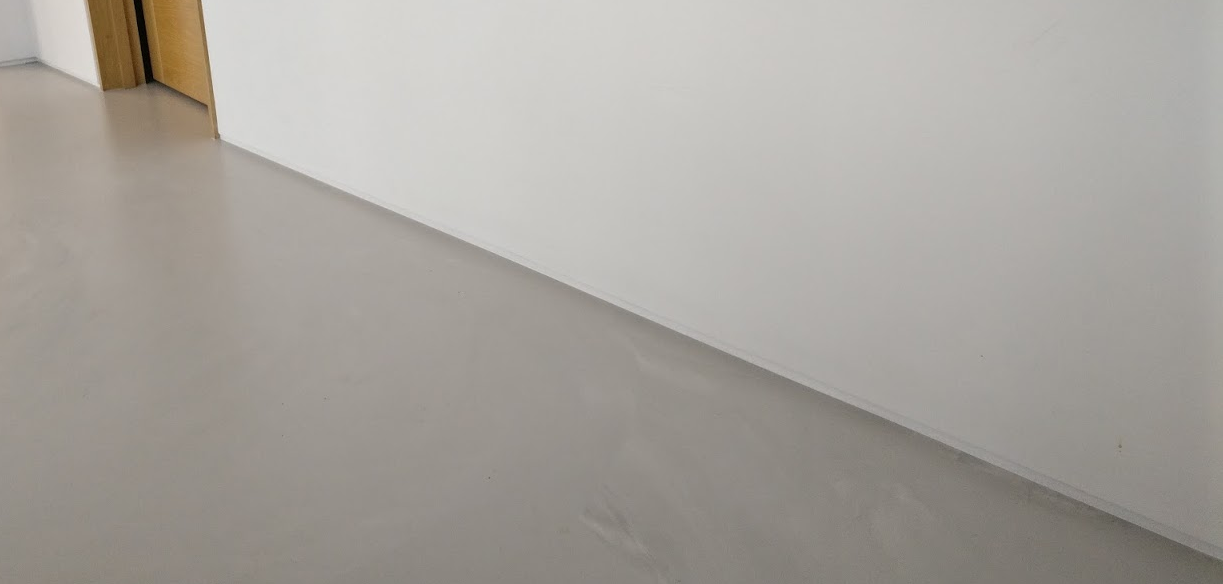
We've put shadow gaps at all floor-to-wall joints and around all door linings in the living areas of the house where we have hard floors. We haven't used them in carpeted or tiled areas. We've used them for their aesthetic. We have minimal steps/rebates/shoulders etc. around any features and have tried to keep that theme running throughout the house. We have used a very simple skirting/architrave in carpeted areas. Our logic to this was that the more hoovering required in these areas would risk damage to the bottom edge of plastered walls if we used a shadow gap against carpet. We also wanted a slightly softer look in the bedroom areas. Some thought needs to go into how it is best to deliver shadow gaps around door linings. Two schools of thought: 1. temporary ply liners in to board and plaster to, then remove ply liners and fit final liners, or. 2. fit final liners and mask/protect then plaster up to them. We went with 1. and found we got some cracking around the liners as we fitted the final door liners. As the liners were screwed in they pushed against the edge of the shadow gap trim and the plaster cracked behind it. This happened on a couple of doors and required chipping out the cracked area and filling. If it was a painted or varnished finish to the door liner I'd try 2. next time, but natural, lacquered or oiled finish and I'd stick with 1. to avoid staining on the finished door liner. We used Qic Trims https://www.qic-trims.com/product/type-r/ After decoration you will need to mastic the gap from the edge of the shadow gap trim to the floor/door liner. There will always be gaps that need finishing. Shadow gaps do seem to mean different things to different people. To me they are a small rebate at wall-to-floor and wall-to-frame junctions that disguises the actual joint in a shadowed area. I know they are also used in conjunction with skirting to create a rebate above the skirting, but to me that's not a "shadow" gap. Our version of a shadow gap:
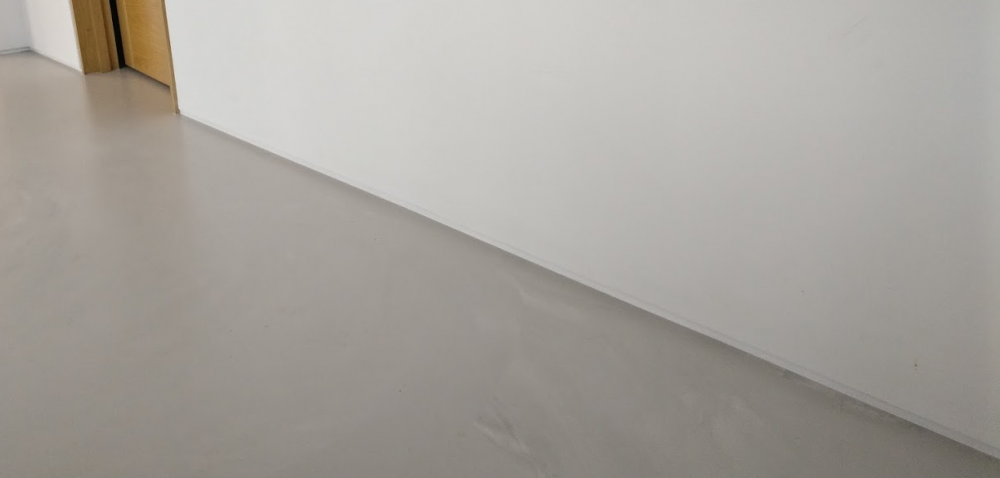 1 point
 -
If this is a Friday night, we can (expletive deleted)ing well look out for tomorrows instalment ?0 points
-
2 kegs of gelcoat weight about the same.0 points
-
We dug this out at our previous house three years ago About 9ft tall
 0 points
 -
Ooh get her! You're not you when you're hungry!0 points
-
Appears not0 points
-
Well excuse me ! I knew I read it somewhere and did I not say exactly as @Nickfromwales said ? So I was right ! . @Onoff I have a proper solution to those (expletive deleted)ing rips - don’t retile just build a suspended ceiling . Oh , next time try measuring tile height against floor / ceiling height . Silly (expletive deleted)ing useless (expletive deleted) wipe shit ass seamen stain ???0 points
-
our kit erector wanted us to hire a mate of his with a hiab to come put the trusses up-£150 per hour and 4hours travelling time, we refused as our local plant hire guy had said he would do it, they were adamant he wouldn’t manage it but had to eat their words, he was getting them up quicker than they could fix them!
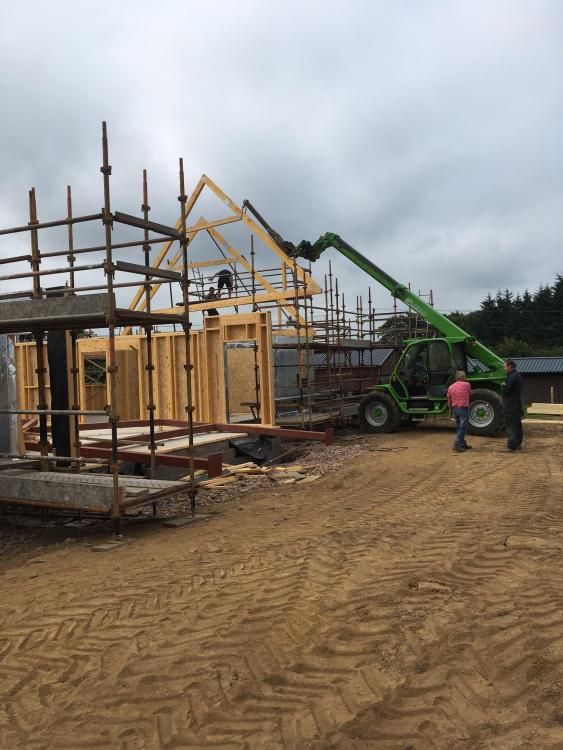 0 points
 -
4000 abusive posts to the same person count as 1. ?0 points
-
0 points
-
Dim the lights and divert their view...0 points
-
Interesting, but possibly the most boring voice over guy ever employed!0 points
-
I think uncle @Nickfromwales told me this when he was upstairs tiling the bedroom with mummy again .0 points
-
I'm sure Hillard Tanner has a sporran tucked away in a drawer somewhere.0 points