Leaderboard


Popular Content
Showing content with the highest reputation on 01/13/20 in all areas
-
Yes, building regs were revised a few years ago, so there's now no limit on the steepness of the fall, and no requirement to faff around using back drop chambers if the fall happens to be a bit steep.3 points
-
Who are you speaking too for supplying the blocks and where are you based? I am still a consultant in the precast concrete industry so happy to suggest some local suppliers. Delivery is usually the killer on these items.1 point
-
@K78 sounds like you might be onto something. If you can get all your structural openings to marry with the size of the lego blocks so you don't have any cutting onsite it would be an easy build. One thing I think you may have missed when it comes to ICF is that when using the larger blocks (200mm EPS on outside skin) the chance of a blow out is zero. With my build I added additional strapping on the outside for the first pour (up to 2.8m) but was told this was totally unnecessary. For the second pour I put nothing on the outside at all. The inside was obviously fully braced and strapped. No blowouts, no bulges, no movement on the outside skin in the slightest. If you think about it a 200mm block of EPS sandwiched in on all sides cannot twist or deform enough to blow. Different story for the 70mm inside skin where I do have a couple minor bulges in places where the bracing was not sufficient. Might be another option to consider if the Lego doesn't stack1 point
-
I see no reason why not.1 point
-
Got a positive response today. They have built everything but a house (barns, underground bunkers, swimming pools, warehouses etc). They do sizes all they way down to 300x300x300. Lintels are blocks with reinforced steel cages inside. Currently go up to 1.8m long but could do 2.4, if there was demand. His concern with BR was insulation. He wasn’t really familiar with EWI systems. He is a concrete guy after all. They are bonded with a 2 pack resin which is suitable for industrial applications and swimming pools, so I can’t see it being a issue with a house? They let us build houses out of osb polystyrene sandwiches if we want to after all. ? Im also not the first crazy person to do this. He is sending me details of a house in Holland that was built from 300mm concrete Lego.1 point
-
I have just started my posh shed, and i have got loads of bloody trees. I have kept it to under 30sq mt because i wanted to steer clear of BC. I have done 12 piers at about a meter deep, and once i got about 600mm deep i was at the bottom of the clay, and into bloody hard ground. What about building 2 and then when they are finished, and your house is all passed out, doing a sexy link (glass etc) to join the 2 ? The gap would only need to be about a meter, and a link between the 2 would then not cost a lot.1 point
-
Not necessarily expensive we are surrounded by trees with a row Lylandi in between the house and the trees similar to yours We dug deeper strip and added clay board to cope with the ground heave Definitely not a deal breaker1 point
-
I went with a 32mm stop tap in MDPE then reduced down to 28mm and into a pressure gauge / regulator. Then reduced down to 22mm before heading off to kitchen, hot water cylinder, bathroom etc.1 point
-
I am approx 100 metres from the main supply and was advised to use 32mm. The flow and pressure are both very good. You would need a 32mm stop tap in the property, but everything else would be stepped down to 22 or 15mm to supply the various outlets.1 point
-
I contract both taping and Skimming The cost is the the same on houses Largely due to to taping materials being more expensive You only really gain with taping when the walls are above 3.5 metres1 point
-
The losses in a 25mm pipe are proportional to the length, so a 32mm pipe will flow more even with a few meters of 25mm at the start. I fitted a 32mm supply for my place (a 40m run if memory serves) the water authority would only use a 25mm tapping off the main and a pre-piped 25mm meter box, it was then stepped up to my side of things and I felt it was all in vain, especially as the fittings within your property become large and bulky with 32mm. That said it only cost about £30 more and I'd probably do the same again.1 point
-
I had 25 similar distance was fine. Having 32mm in new place on 10m run because pressure seems crap locally and wanted good flow rate1 point
-
what you must remember is that in europe they nearly always spray the plaster on the walls --so it will be different stuff i think not many here doing mechanical plastering yet1 point
-
As with external you will need a tight base coat and a fibre mesh The plaster will shell off without1 point
-
size of main doors? --they will be hardest part to insulate well normal priced roller shutter types have crap insulation I am already planning this for my workshop --maybe make big sliding door from metal sips panels or cold store panels and fit seal edge seals1 point
-
All posh sheds should have a toilet and shower, how else are you going to get cleaned up before going into the main dwelling, also I think it’s imperative that a man shed should have a loo ! Keeps one out the house longer........1 point
-
No, the plywood was a former/shutter, open at the front i think, into which they stuffed the lime, then took the wood off and brushed it up to look ok. Ended up looking like this -1 point
-
Sounds amazing, if I had such a shed I would be living on it !1 point
-
I would redo that and also get the flow from the basin and shower into the pipe as high up as possible too as otherwise it will just continue to block.1 point
-
I think you could get best pointing job done and it still will not make it very pretty - and that would be a lot more work than brick slip system and you still will have the bricks which have blown faces andf surface cracks for water to freeze in in some parts -- New windows being replaced and new window ledges -maybe external insulation then slips or render or just render the brickwork ? looking at mock tudor ,that does not look orginal? they had better wood then lots of gaps and nail holes obvious --maybe hiding lots of other crappy brickwork1 point
-
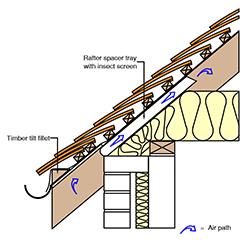
In the case of tiles... The bottom edge of one row of tiles normally rests on top of the row below, but obviously at the bottom there is no tile to rest on so they usually rest on the top of the fascia. If there is no fascia a triangular batten is used to maintain the pitch. Note the membrane goes over the top of the triangular batten and into the gutter. So in the case of counter battens the counter battens would need to stop above the triangular batten.
 1 point
 -
It is further complicated by the fact that hmrc take the purchase price and sale price and draw a straight line. Real house prices don't do that. It could make a massive gain while you lived in it, and then make no gain at all sitting empty unsold in a flat market, but the hmrc calculation could still leave you owing tax on the "gain" made while you were not living in it.1 point
-
Do you have CIL in your area? If so you can get exemption as a self builder but you have to live in the property for 3 years after completion or you have to pay the full charge. If you build the new property to live in yourselves you will have 9 months from the completion date to sell your old property to avoid CGT and you will avoid all of the issues of not being able to reclaim VAT, potential CGT on the new house, and you will avoid CIL (subject to staying for 3 years), and you get a brand new house to boot.1 point
-
Fine looking house with character. I honestly think slips would ruin it. Money would be much better spent on a car or nice holiday imo. If I was buying that house. I’d be worried the cladding was hiding something if it was present. I agree repointing is a much, much better option.1 point
-
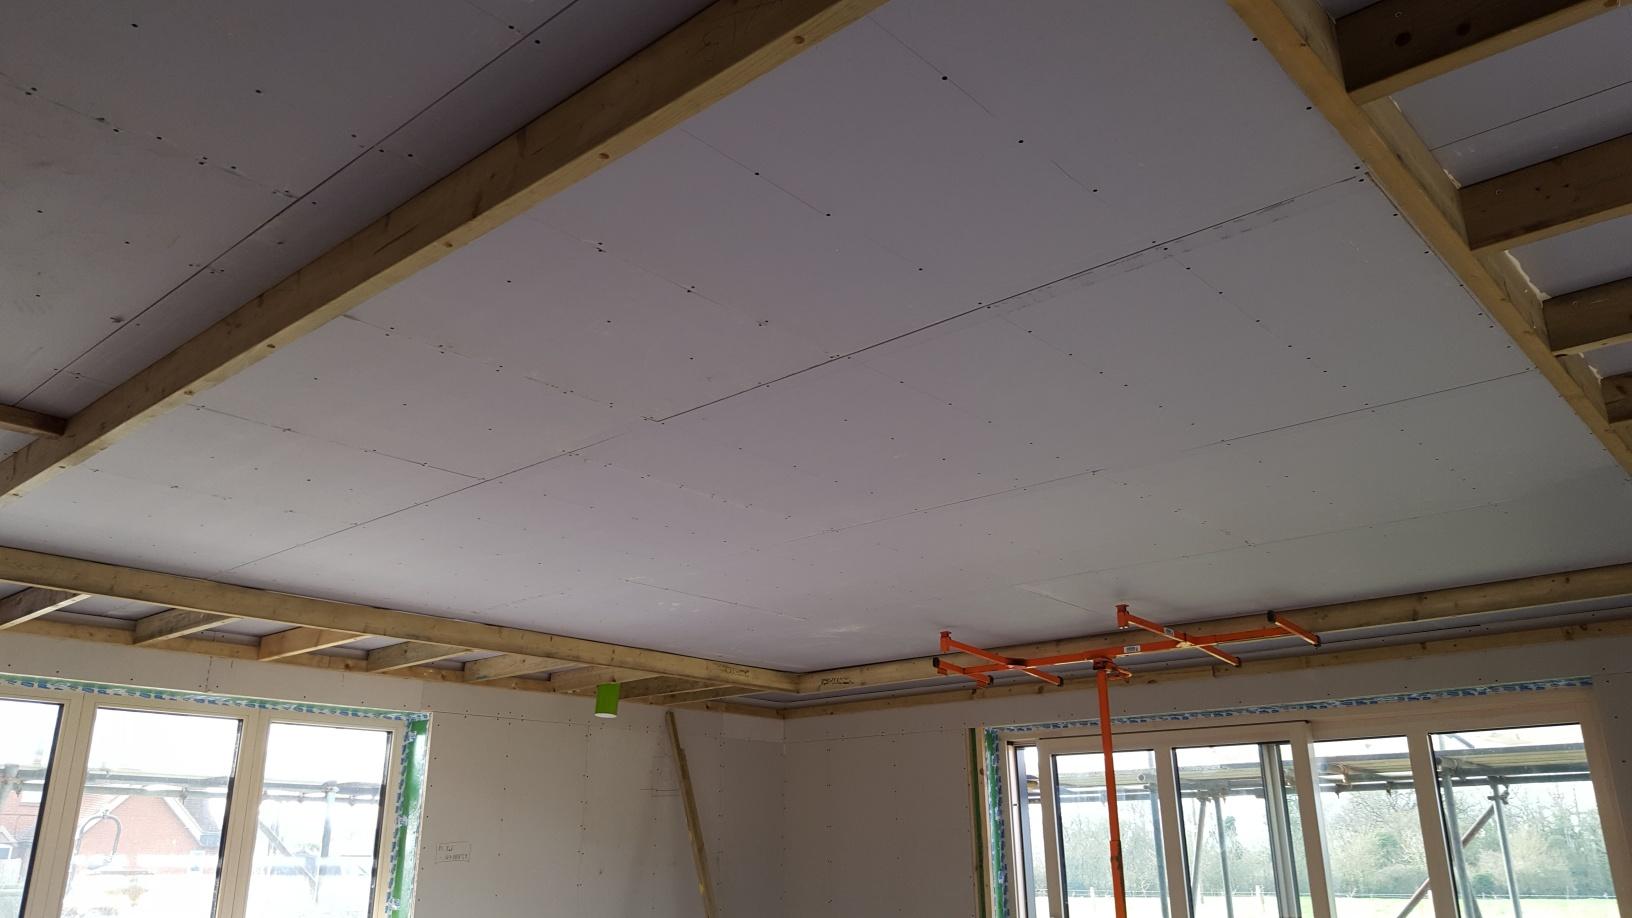
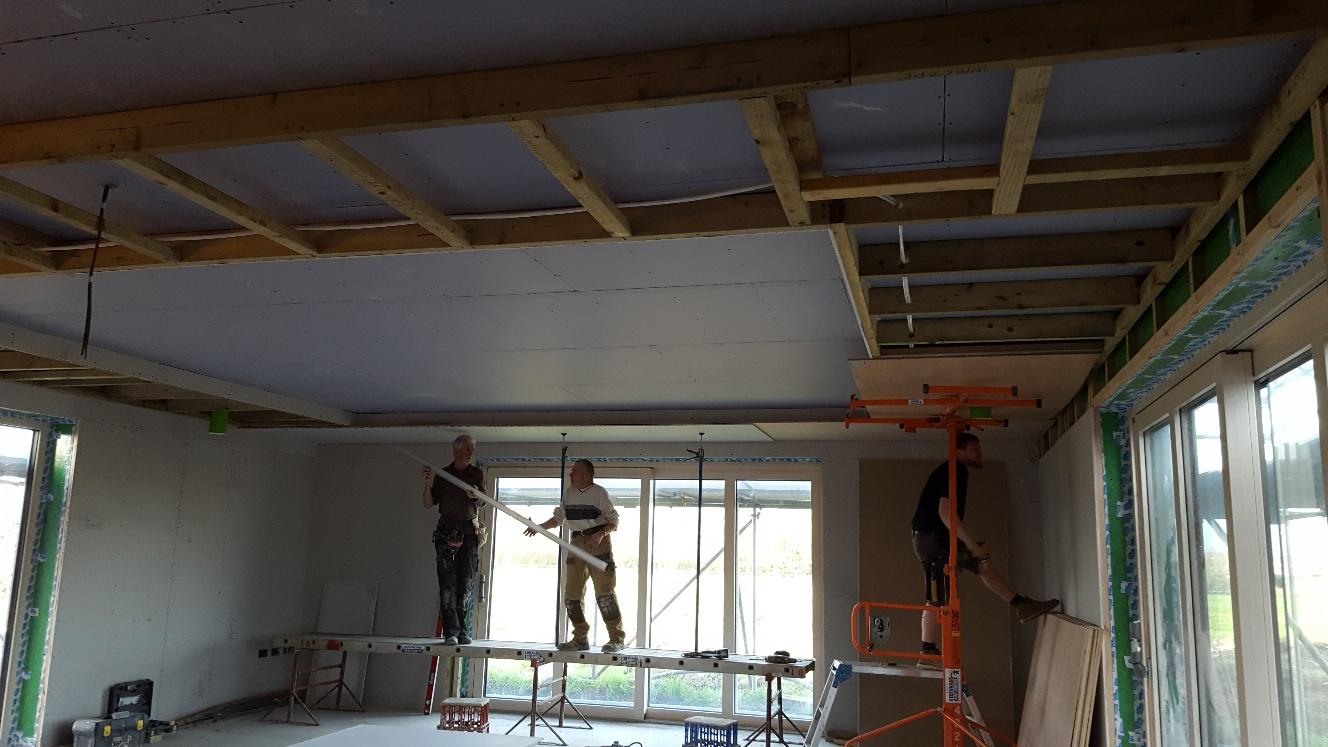
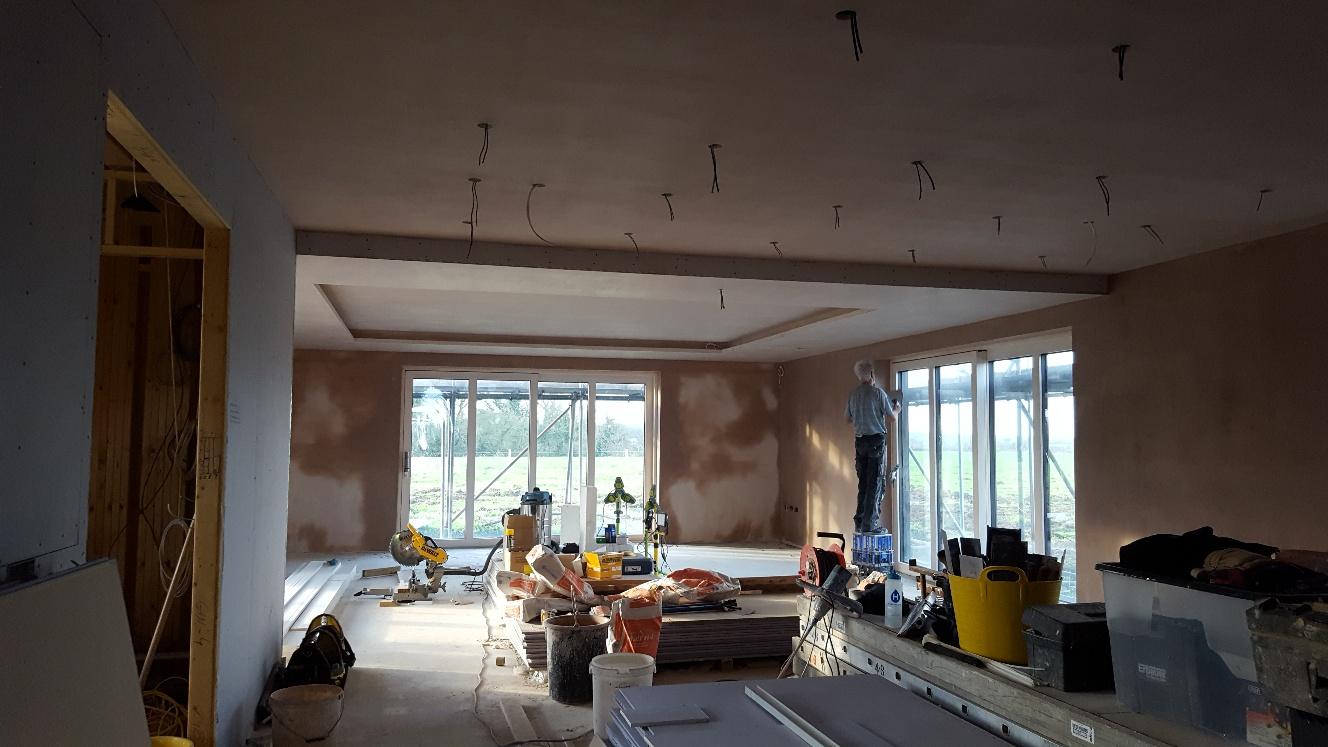
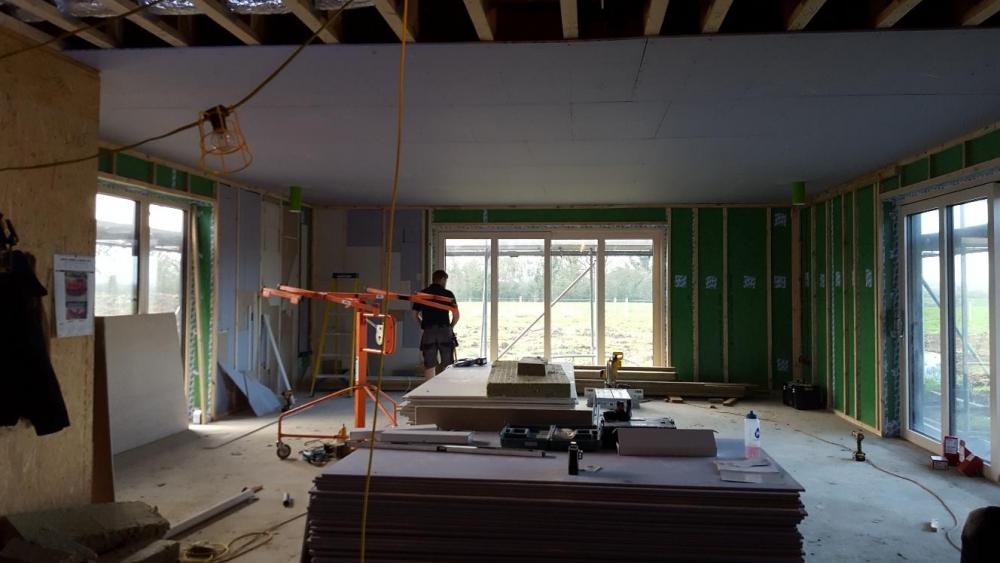
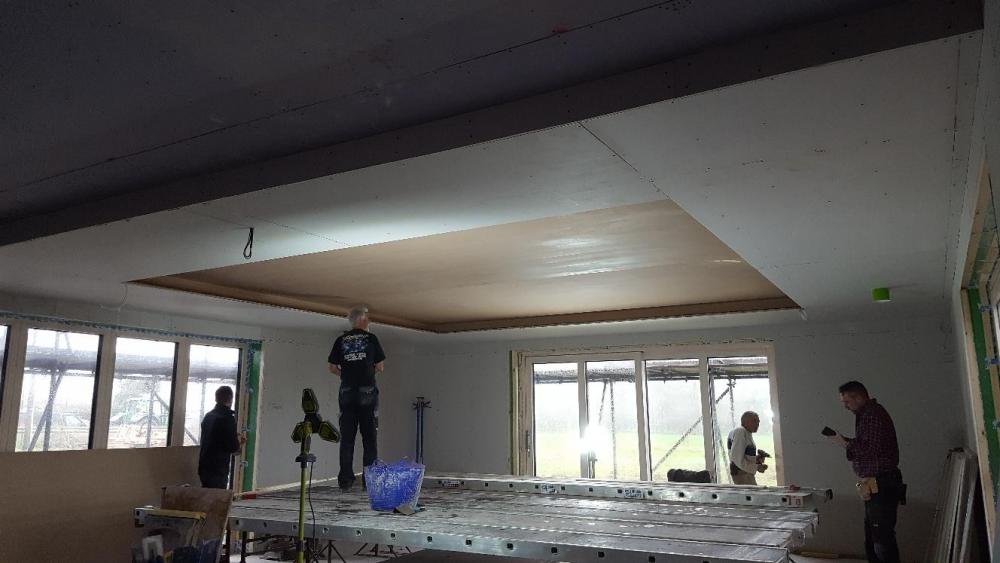
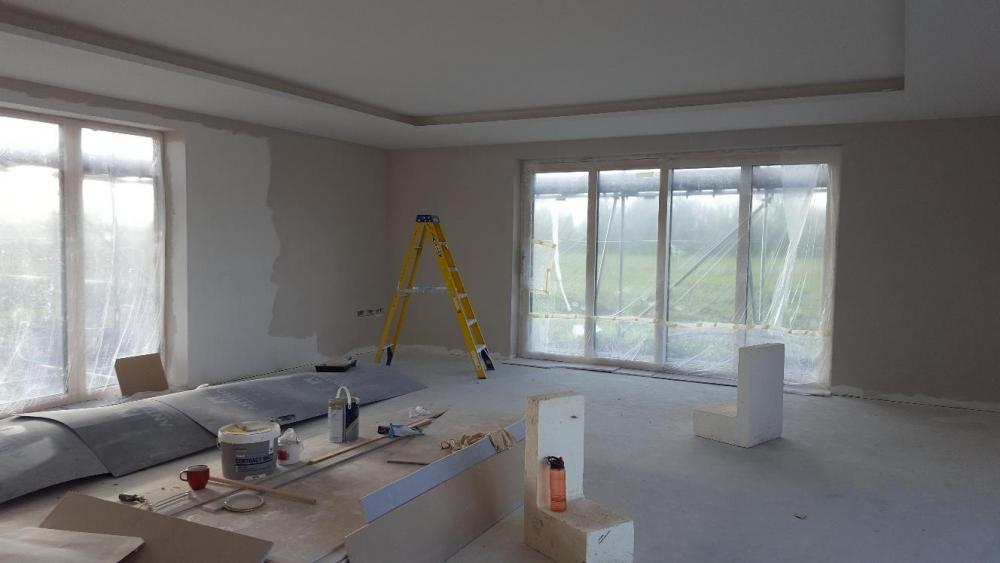
Sorry for the delay on the reply here, I've been transferring everything to a new PC in anctipation of the death of Windows XP and 7. Anyhow, I've found a few photos of the ceiling feature in the lounge area whilst under construction, so here they are. First off, the entire ceiling was dry lined with acoustic plasterboard. Heavy stuff, quite literally, and it took the PB lifter and plenty of strong arms to get it all up there. After the entire lounge/diner/kitchen ceiling was boarded, construction of the dropped border area was started. Note that the lighting electrical connections were all pulled through the boarding and in place throughout. There is a perimeter border, on the top of the walls, then the inner border at the appropriate depth. Noggins were put in all around to stabilise the whole thing and to make sure that the next lot of plasterboard had something to attach to. The green tube poking out at the bottom just left of centre is the MVHR inlet. There is another at the mirrored position on the right hand side, just out of shot. Next up was boarding the dropped section. This was done on the horizontal and then vertical pieces on the inner inset part. The horizontal was done in two stages - first up using ply, then the plasterboard was attached to this. Also, timber was put around the edge of the inner rim in the form of an upstand. This gives the impression of greater depth and more substance, as well as something to hide the LED lights behind. Once all the boarding was done, plastering was next. As seen in the photo, the inner section was done first. You can also see the right hand MVHR inlet now. It's worth making a comment on the staging boards, which I hired in for this job. They weren't cheap to hire, but it made the job of plastering so much easier and what it cost in hire was more than made up for by the quality of finish they were able to achieve and not having to waste time moving things around to get from one part to another. The whole of that lounge area ceiling was plastered in a day as a result. Here's the final plastered result, looking from the kitchen. The excess MVHR inlets was cut away immediately before plastering. Then, finally, here it is with the mist coat sprayed on.


 1 point
 -
I believe that it's best to fit the Willis heaters so that the immersion is at the bottom, rather than the top, so as to avoid getting an air pocket adjacent to the element that cannot be bled out. Alternatively, they can probably be mounted on their sides, with the side pipe poking upwards. I'm no expert, mind, it just seems more logical, and potentially a bit safer (in terms of avoiding overheating the small bit of element in the air pocket) if they are arranged like this. It may be that the MIs say different, and MIs always trump any other advice.1 point
-
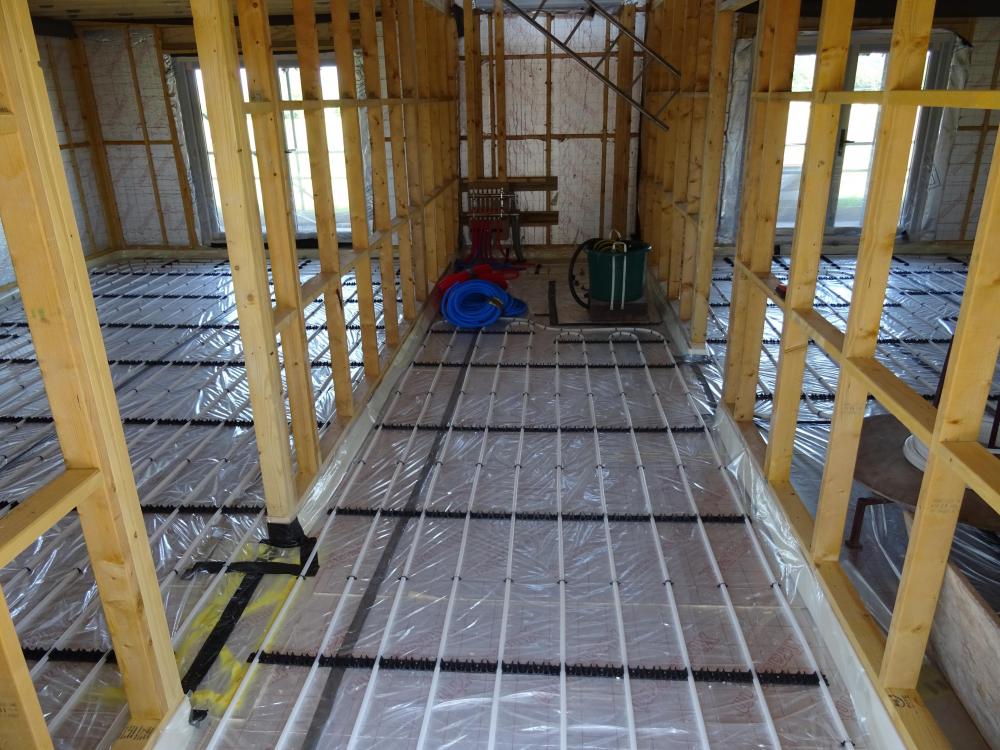
Our studs went in first and we even glued one set of studs as this was fitted after the screed was poured. You will see from the images, the bottom of the studs are protected and the manifold is already in place. Hope this helps.
 1 point
 -
I fix studs everyday for a living Never on top of UFH As Russ has already pointed out You can glue the sole plate down it usually as a change of plan Get them down and run a rip of ply aroun the bottoms 50 mil higher than the floor level1 point
-
This question is asked a lot, and the answer always depends on the circumstances of the case. You can seek a certificate of lawfulness from the council to confirm that the planning permission has been commenced (anything less is not secure enough in my opinion). Whether the council grant one is likely to depend on whether you can demonstrate that the demolition was intended as part of the redevelopment rather than an unrelated operation. Anything you can supply to prove that will help. Alternatively, you only need to dig a foundation trench on site to keep the permission alive, so it may be easier to do that and record it properly.1 point
-
The position of all our internal walls, kitchen units, kitchen island, ground floor WC, utility room units etc were all accurately spray paint marked on the insulation under our slab before the UFH pipe was laid, so we could be certain that we had no pipes underneath anywhere where we might later need to drill any holes. Our pipes are also towards the top of the slab; the reinforcing fabric is in the centre of the 100mm thick slab and the 16mm pipes are cable tied to the top of this, to get them closer to the upper surface. Concrete has a reasonably good thermal conductivity, but even so I'd want the pipes nearer the top surface than the bottom. There will always be a thermal gradient inside the slab, and even though there is insulation underneath it I'd still prefer the thermal path to the upper surface to be as short as possible.1 point
-
Yep And it’s pretty much anything to anything ...! You normally tile under the pan anyway so it’s ceramic to porcelain/ceramic/stone etc1 point
-
Very good point, The pipes actually go around the trap itself but I agree it needs to be kept well away from the trap or well insulated.1 point
-
You can normally walk on a screed after three days As far as drying out allow a day per millimetre Another option is a concrete liquid screed Drying out time is around a week Add 30% to cost As far as cracking screeds always crack exspecially with UFH But if you are intending to Tile or glue engineered flooring down The heating must be run for two weeks so as to completely dry out and to allow it to move Its also worth installing an anti cracking matting prior to tiling1 point
-
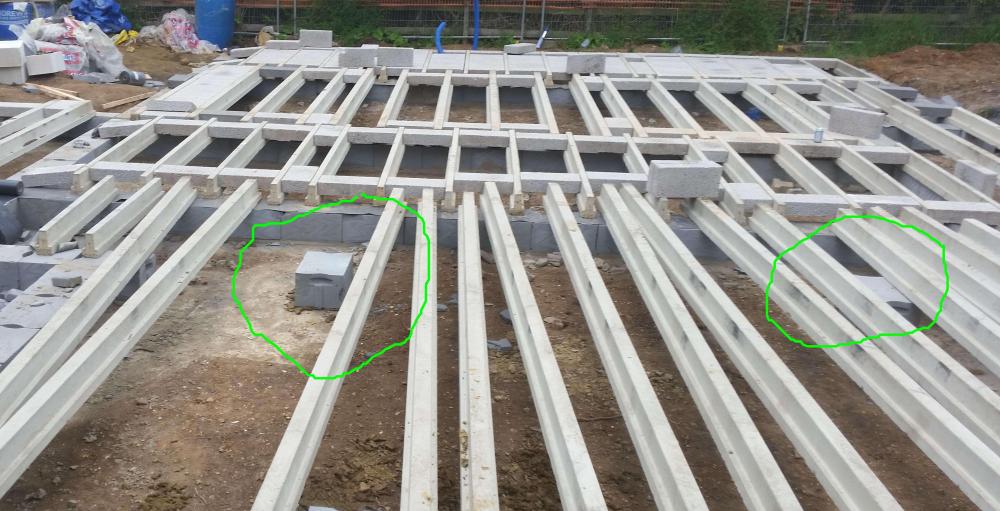
the problem is around here there is SOOO much building going on ..its unreal, i have heard mention of 650-700 per thousand ! ... its like Auf Wiedersein pet all over again LOL Not wanting to drift too far off topic though .....but i just had a little suprise. I went tout to site, before they tidied for the day and I was looking for where the "padstones"? are going ...these are under the beams to support the BIG wooden posts that basically hold the house up. Now on the plans they look quite substantial ...sort of 500x500 set on the concrete footing But i asked the lads what were those trench blocks (singles) underneath the beam ...and they said thats pad-stones where the FEET of the timber-frame go/rest Am i being anal here or are they a little "under-engineered" ..I mean these trench blocks are really crumbly too
 1 point
 -
Another little gem for you. I'd never fit the frame on rubber as it may promote movement. The frame needs to be in rock solid, so I would say that was a bum steer afaic. Acoustic insulation, lots of it, in the ceiling void below will deal with 'noise', but TBH the better made stuff is pretty quiet, and I've fitted scores of them. Some frames com with an acoustic gasket that goes between the pan and the tiled wall, but I bin them as they do very little for noise and stop you getting the pan bonded back to the tiles. If you don't routinely climb a step ladder and pee into the middle of the water then noise relative to the toilet is not a cause of concern, just use the acoustic insulation all round / below and you'll be fine.1 point
-
I’m sure in the back of my mind Geberit warned Abacus over infringement a while back as even the shade of blue paint on the frames was the same... Manifold radial systems are worth investing in though for plumbing as it makes life much easier !1 point
-
I don't have a hour to lose on marketing drivvle, but good that the vid covered some basics for you. I've been fitting 'continental' stuff for decades and no complaints yet. Purchasing through the likes of Megabad sees lots of nice Hans Grohe / Grohe / Duravit / Geberit stuff in your bathroom for not much money. Ebay can turn up some bargains too, so up to you what you want to achieve TBH.1 point
-
Overpriced and not the best quality.... They have essentially copied (like everyone) the classic Geberit systems that have been around for decades on the continent. If you shop around you can get the Geberit systems cheaper than Abacus and spares are readily available - I think Abacus spares are only available from certain suppliers. I looked at their manifold plumbing system and I’m pretty sure it’s rebadged Emmeti which is a very good Italian manufacturer but can be had for 50% of the price.1 point
-
UFH is a budget option if you have the planning and foresight to put the pipes in the slab. Manifolds are expensive, controls don’t need to be. There is nothing wrong with running everything as a single zone and just balancing the flows to equalise the temperature. The issue may be an over zealous BCO who wants “zoned controls” although how you advise them that there is no heating in the upstairs “zone” is beyond me ... After having worked on one of the most complex systems I’ve seen (thanks @newhome...) that has 4 manifolds, 4 controllers, 14 zones and 15 programmable stats, the simplicity of a single zone and a constant flow is compelling. Furthermore if you have MVHR, you will need to be cautious that you are not really “not heating” a zone as you will be creating airflow between rooms constantly.1 point
-
Our builders put the stud up as soon as possible, UFH, screed, everything else went in afterwards. This allowed first fix to take place for all trades, electrical, plumbing, MVHR (me), it was easy for people to visualise where they were and what need to go where. I big empty room may be tempting but where exactly is the drop for teh sockets/light switches, how far in from the wall is that vent terminal.....1 point
-
Hi, I am fitting all the internals walls, including load bearing to the slab before I fit 150mm Celotex, UFH and screed. Again on the first floor walls up before UFH, etc. Will send a more relevant photo tomorrow. You can just see some internal walls at the back behind mvhr.
 1 point
 -
Hi Jane, Utility is on ground floor and all my living accommodation/underfloor heating is on 1st floor. I've been reading it's best to have manifold on the same level as the UFH.1 point
-
or just put some glass in the Wendy house.....0 points
-
About half the size of my house, put a second floor in and it is bigger. I need a new shed, but it is about 3 m by 2 m.0 points