Leaderboard


Popular Content
Showing content with the highest reputation on 06/06/18 in all areas
-
With no more access to the eBuild forum I can't be sure of the exact date my concrete slab was poured though it was definitely pre May 31 2016. I think the slab should be cured enough for tiling by now!5 points
-
Well that’s us 4 weeks in foundation all in , underfloor heating in , still haven’t solved the electricity problem although we have been in touch with the owners of the other five plots and believe they are looking into it so we’ll just have to wait it out, I did find out who would own the cable that WE would have to pay for and it wouldn’t be us but it would belong to whoever installed it either sp energy or private contractor! Everyone I tell can’t believe it, So waiting on the kit, when I ordered it 7 weeks ago it was a 7 week lead time, spoke to them 3 weeks ago and they were indicating 21st June, last week it was 2nd July and now today they tell me they’ve been chasing my SE for the last 10days without success for information to do with beams/joists which they had hoped would be timber but the truss firm can’t make it work so are now talking steels! Now they’re indicating mid July and our tempers are fraying! Hubby is blaming me as ‘it was my idea to do this again’ caravan life definitely doesn’t suit him, as for me I found myself in fits of laughter tonight trying to shower in a bathroom one square metre and when you drop something there’s no room to bend down to pick it up! And I thought we were so much better organised this time around- hey ho?3 points
-
It seems that some councils are saying that the self build exemption from the CIL only applies to new houses and not conversions. This isn't an issue for all conversions because existing floor area can be deducted from the CIL calculation. However if you plan to add a large garage, extension or outbuilding as well then some councils (example Croyden) are trying to hit you with a CIL charge on that extra space. If you find yourself in this position you might find this helpful. Unfortunately you might still need to argue your case as this was settled before it went to court but still... https://www.boyesturner.com/article/boyes-turners-cil-victory-saves-self-builder-client-nearly-800002 points
-
Not necessary .... dig a trench 12” wide in a vee and then put the soil immediately adjacent in a long pile 12” wise on the road side. Flatten the top and plant straight into it. Fill the trench with 30-50mm limestone no fines to the top and you have your run off and hedge in one go..2 points
-
I'm going for all internal and the rear one on the garden-most wall ( below #1 sons room too as he's moaning about wifi being crap in his room ). Go climb a chuffing tree like I used to !!!2 points
-
I took the plunge on one of these. Momo is now part of the family and has been providing sterling service for 2 months so far. I love it! Some input: The boundary wire installation needs careful planning. our whole lawn area (front, back and sides) is one contiguous area so this worked well for us. route it around obstacles like beds make sure you allow for a permanent docking station with electical supply. Ours is on the side of the garage do not bury the wire initially, you will need to adjust layout as you fine-tune the installation hard obstacles like trees, vent stacks can be ignored if taller than about 100mm - the mower will bump, reverse and keep moving be careful of rapidly growing hedges, weeds etc creeping over the mowing area. they will stop the mower from working lanw area needs to be kept clear of toys, clothes, dropped fruit from trees etc. Momo chewed a sock that fell off the washing line, then sulked mower cannot take care of edges - i use a battery strimmer to do this I went with a Worx Landroid 106, suitable for our lawn area of approx 400m2. Good balance of features and price and some nice reviews, has a edge-trim function which makes the mower follow the boundary wire and get as clean an edge as is possible with this type of mower. These have app control so you can monitor and set your timers (need wi-fi in the garden). The app also permits multi-zone setup, I have not tried it. Momo has covered 100km since start and it is nice to come home to a trimmed lawn - I tend to work away from home so in the past we would go from knee high to cut and short and straggly - we now have farily even and well managed areas. I have not buried the wire so beware cutting too low as this will cut the wire and then mower stops. I have set it to about 45 mm and that suits us. Also be aware that the cutting is based on the robot wandering over the lawn at random, so some areas might get missed. If you extend the frequency and time every area should eventually get cut. No stripe effect possible. We send Momo out very day, though on weekends we reduce his working time. I purchased from here - they offered the best prices, a 5-year warranty and 30-day money back guarantee. Nothing to lose. https://www.myrobotcenter.co.uk/en_gb/lawn-and-pool-robots/lawn-mowing-robots?countryswitch=2&mrc_data_area_rasenmaehroboter=822 points
-
50mm thick screeds make for horrible UFH emitters imo. You need to have very accurate ( short hysteresis ) room thermostats and NOT use a regular TMV on the UFH manifold to achieve a smooth heating curve from such emitters. They ( typically ) heat up too quick, cool down too quick, and incorrect / unsuitable controls allow for uncomfortable overshoot / undershoot seeing the slab go from hot to cool, rather than staying 'warm'. This can be of benefit if your not in all day, eg working family / kids in school etc, but for anything else id not go less than 75 - 80mm of screed. If building to passive / near passive standards then these problems become more apparent, especially the overshoot. With thinner screeds and the need to better regulate flow, a buffer tank is essential.2 points
-
For our avid readers it turns out that @newhome & I have mutual acquaintances if we go back far enough! We've just been doing the whole "small world" thing via pm.2 points
-
Thinking through the issues involved in advance of first fit, I realise that the issues of shadow gaps (or not) is one that I need to think through. I did this search on site Are shadow gaps just a style thing? Or a feeling thing? Or used when needs must? Or just cheaper and so a way of saving money? @LadyBuilder would disagree arguing that they are are all the rage, @ProDave uses them with care, I note, @Stones dislikes them but uses them when it suits. @Trw144 uses them everywhere. At this remove (when will I ever get to first fit?) I'm thinking - go for it - shadow gaps are cheaper and will impress people like @LadyBuilder when they come to visit. I bet there are some real gottchas using shadow gaps. What do you think?1 point
-
It's been a long journey, but our little cottage is finally up and running as a holiday house. First guests just checked out and left us with some very kind words having thoroughly enjoyed their stay. Of course it's not exactly 'finished' but it's certainly usable. I'd have liked to have had a few extra days to tidy things up, but all the essentials are in place. There's decking still be be built out the front, I'm hoping to get this done in a gap between changeovers soon. I must say it feels pretty good to get to this point.With over three years of very hard work behind us, and a lot of faith that it would all be worth it, we are finally seeing money coming in. And having had to down tools I am going to have this curious thing called 'free time' again... although I'm sure I'll manage to fill it all1 point
-
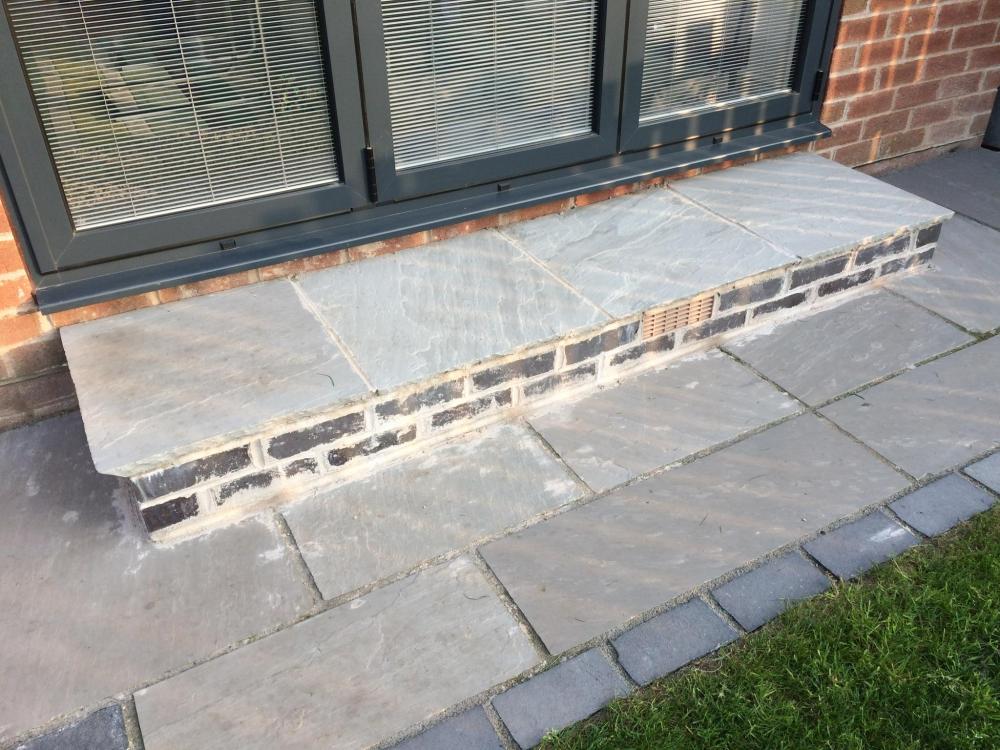
Please could you give me your thoughts on this ‘local heroes’ handywork. Marks out of ten perhaps.
 1 point
 -
+1 Even if you plant two rows it should be possible without any reinforcing. The recommended distance between the rows varies up to 1m, but here it suggests 250mm.. http://www.peakdistrict.gov.uk/__data/assets/pdf_file/0008/78857/hedgeplanting.pdf So the width of the flat top would need to be about 500mm wide and with 45 degree sloping sides the base would be 1m wide. Obviously with a single row it would be narrower. If you will have to maintain it take care over the selection. We made a mistake and planted several dog rose plants that have vicious thorns on them. I'm now digging them out. Whips are pretty easy to plant. You just dig an L shape slot with a spade, lift the corner, stick one in and heel it back down. About 1 in 20 will fail. If feeling keen you can replace these of just let neighbours fill the gap. If rabbits are a problem it's a bit more work fitting plastic spirals.1 point
-
I have done NOW!1 point
-
Brick acid and maybe a stiff brush and see what that looks like. Was there a air vent under the door cill?? What did he joint the bricks with,the handle of his shovel.1 point
-
Well ! Naturally I had to google that ! Makes my glass look cheap ! - I was thinking more M & S handbag !1 point
-
Make it a Hermès Birkin and you might have a deal1 point
-
@pocster does mine:1 point
-
Exactly ! Apparently you only usually get drawings on supply AND install . No drawings for just supply - that’s insane !!! . Just got new drawings ; looks correct now ?1 point
-
Think you need a goat or possibly a giraffe.1 point
-
I had a Robomow one for a few years and was quite pleased with it. It was cutting around 350 square metres of grass. I was very lucky with the price I paid and a few years later they were a lot more expensive. Prices have come down a lot recently. My next door neighbour who wasn't great with DIY then bought one and couldn't get it set up right so gave up on it. There are a few issues to bear in mind. It doesn't strim the edges and obviously doesn't weed which seemed to be a bigger job in our garden. They say that the small cuttings will mulch into the lawn over time. However, I found that after a couple of years use my lawn was choked with cuttings and it needed regular scarifying. As noted you have to put a perimeter wire around the edge of the grass to define the area that you want cut. If you have multiple areas then this is a pain. We just had front and back. You get really stung on spare parts. We left the box that sent a current through the perimeter wire permanently outside. After a couple of years it broke and they wanted £100 for a replacement. The perimeter wire would also sometimes come up and then get cut by the mower so had to be fixed. Finally the battery eventually needed replacing and was maybe £200. I just checked and spare parts are available which is good, but are very expensive. https://www.magic-parts.co.uk/acatalog/DATABASE_ROBOMOW.html We then built an extension and the shape of the garden changed which would have meant reinstalling all the perimeter cables. At this point for this, a new battery, new cabling, new blades, and a perimeter switch I was looking at about £400 after three years of use. The power supply and controller were also getting erratic. Basically with these lawnmowers costing £500-1000 you need them to have a long life to pay for themselves. I think I paid around £500 over 10 years ago which was quite a deal at the time. I decided to buy a Bosch battery lawnmower which was a great product. After a few years I got a fantastic deal on having someone cut the grass, £160 a year for doing it every two weeks. They also strim the edges. My reckoning is that I over the years I have spent around £100 a year on tools to do it myself anyway so this was a no brainer. I have never looked back.1 point
-
If it doesn't like rain then it ain't going to work in NI!!1 point
-
We plan on having shade sails, as we had these in oz. will probably only suit a modern build. Very funky.1 point
-
Im wiring a GJD system into my new place. The folks put it in the house they built 30 years ago and their current one, it is rock solid. Ubiquiti for these, probably one internal would be suffice and an external one for the garden.1 point
-
How does it work the cuttings?? How long do you get in a charge?? Is it noisy or could it be done at night time?? How much of the boundary wire do you get?? I would have maybe 200m plus of a boundary.1 point
-
Yup. Any insects caught up in your slab will be fossilised by now ?1 point
-
Here’s one I did earlier?
 1 point
 -
With my test kit, the bulb you squeeze to pump it up leaks air, solved by bending it's pipe double to "crimp" it while testing. When BC came to witness my drain test, they got bored and said "that will do" after watching a stationary manometer for a minute.1 point
-
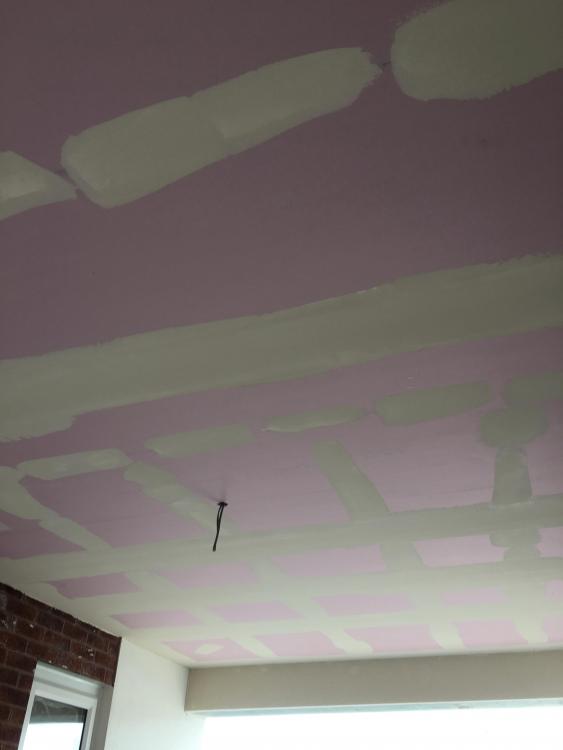
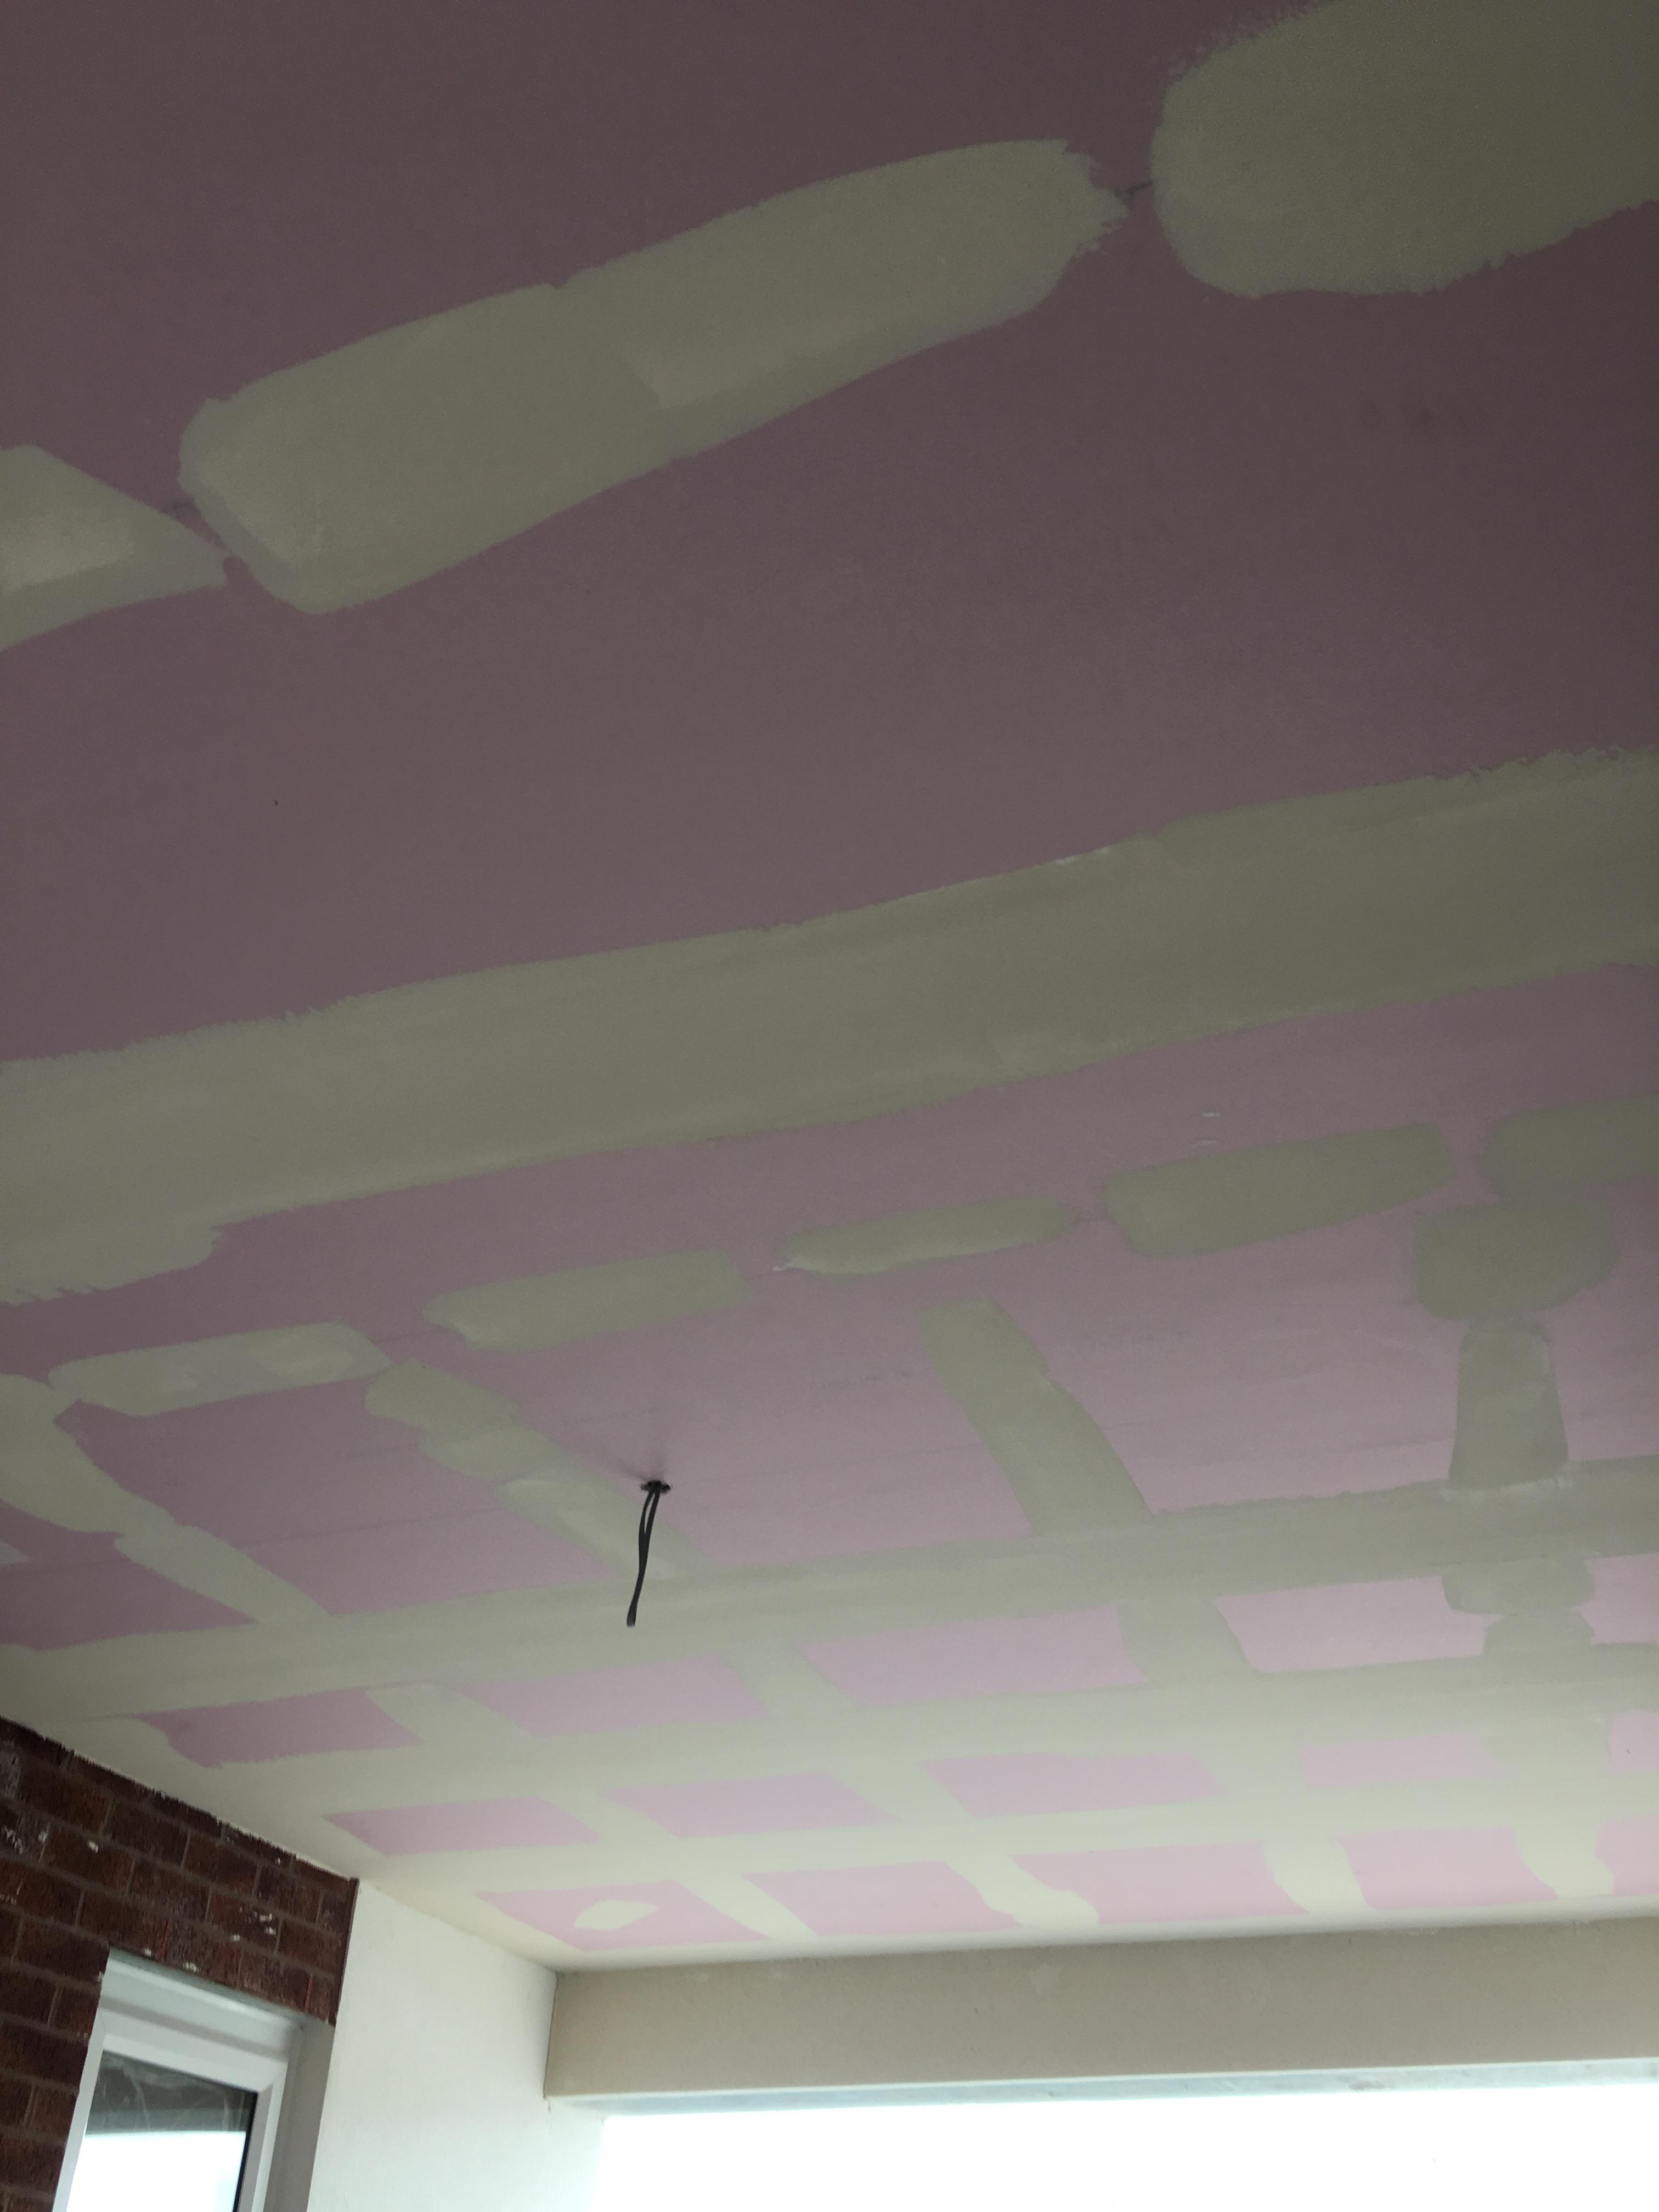
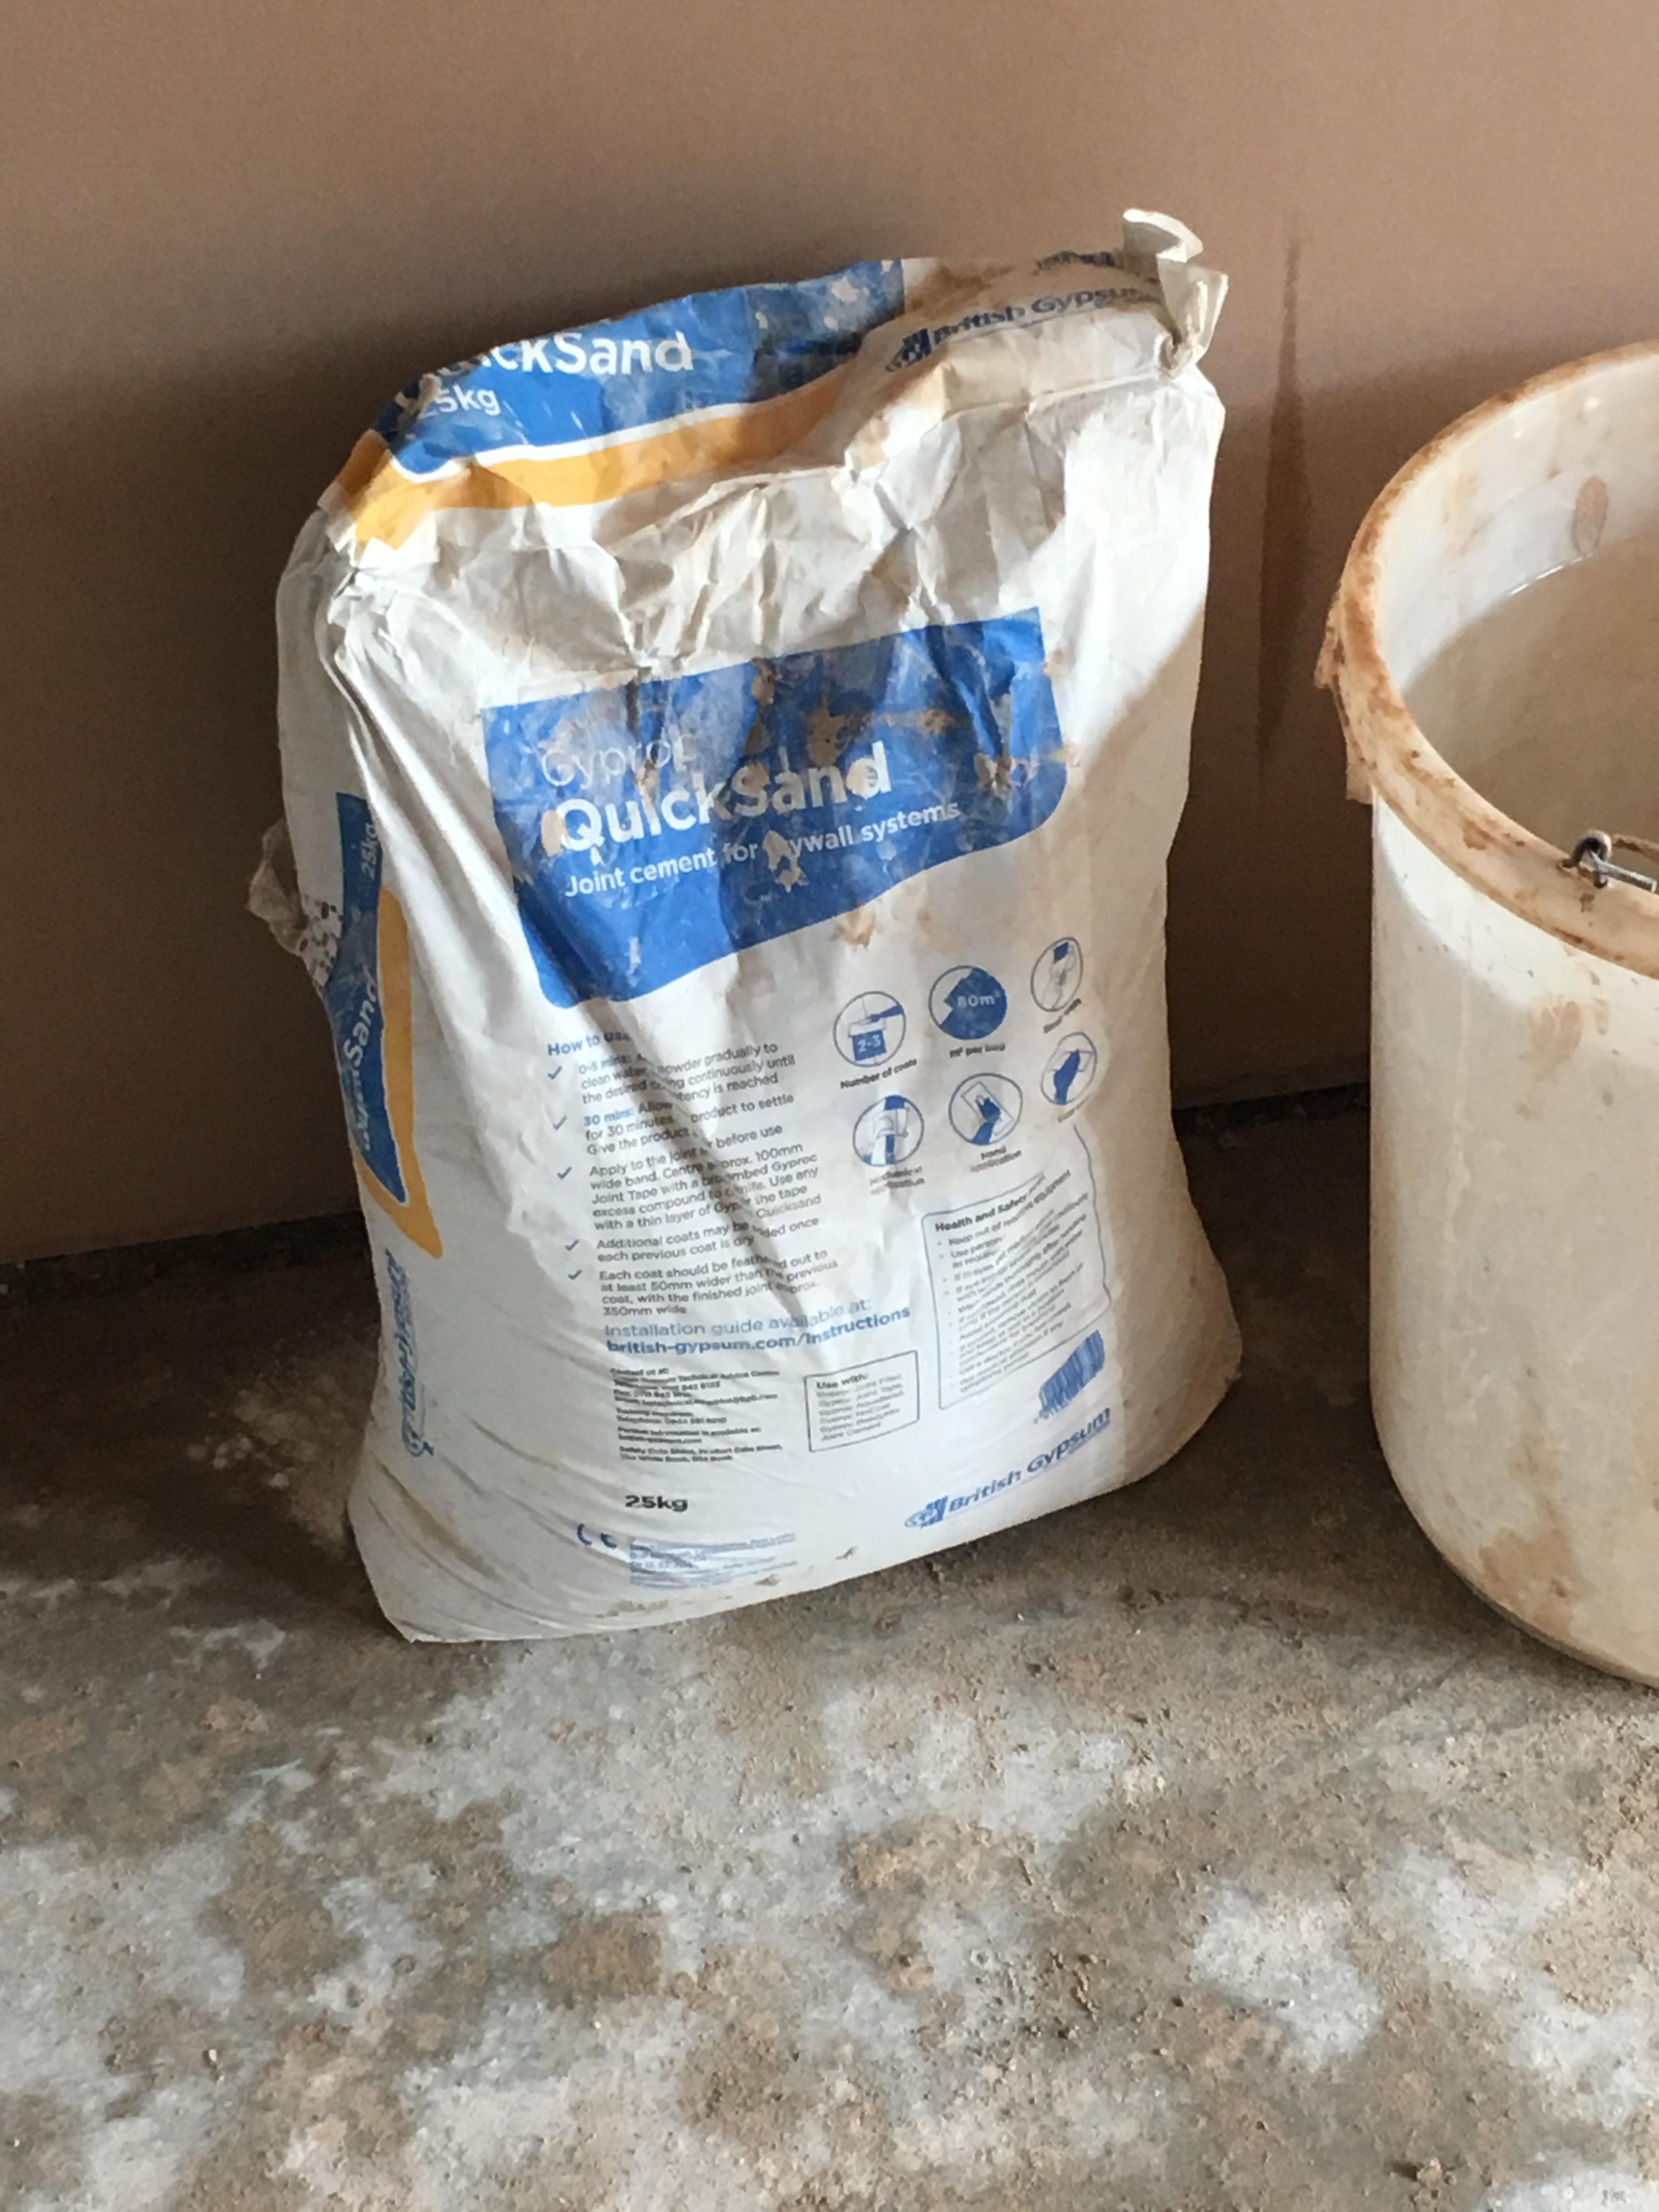
Use the joint filler sparingly Hard work to sand if you get any high spots quiksand for top coat Build up in several coats sponge the edges
 1 point
 -
We have a friend with a husquevarna, he raves about it. Hates gardening so it suits him. It likes straight lines and so does he. I have only about 350sqm of lawn so couldnt justify the price tag for the robo. I have bought a bosch cordless rechargable mower, its light as a feather, cuts well and does stripes. Whole lot cut on one charge. I am v happy at less than £300. If I had larger grass areas would def go for a robo.1 point
-
a friend of mine has one too. He swears by it, I believe the latest gen has just been released. VERY comprehensive long term review here (8 parts): http://www.automatedhome.co.uk/reviews/husqvarna-automower-review-part-1-the-robots-are-coming.html1 point
-
All my Fermacell I filled with Alabaster filler and it’s never moved or cracked. Tend to use Easyfill 20 now for most things - you can use it to tape too1 point
-
Friend swears by the husqvarna one but he's maybe on commission from local agent. Programmed to come out twice a day.1 point
-
I watched a youtube video yesterday, definitely did it wrong lol!1 point
-
Really such lights need to come on one by one as you walk up the stairs and go off once past. By running up and down really fast you can pretend you're in an episode of Knight Rider.1 point
-
Mine eventually went on fine, when I did it the way Wendy told me to. It was a good reason for me not doing it myself.1 point
-
Just dig a hole with the JCB and bury the shipping container. Then a few light tubes and a periscope. Will be quiet, may float when it rains, but that gentle rocking s soothing.1 point
-
I just couldn’t find a stair light design that I liked so in the end went for plaster moulded units from these guys: https://tornado.co.uk/index.php?route=product/product&product_id=111&gclid=EAIaIQobChMIxoC88ri-2wIV7Z3tCh36JQi4EAQYBSABEgJ2nfD_BwE Installation needs to be before skimming ideally. I actually retro fitted which is not a job for the feint hearted ! Still not decorated but I’ll try and remember to take a photo of them installed.1 point
-
Stop press.... Just found this... https://www.boyesturner.com/article/boyes-turners-cil-victory-saves-self-builder-client-nearly-80000 You would need to contact them to get details of the case. I note it was "settled" just before it went to court but even so it might be useful.1 point
-
Not a lot. If they come and say Oi! You ask how far it needs to be moved then move it that far plus a foot. Watch advertising trailers in fields nex5 to the motorway, which I think is still done.1 point
-
Alow mate, got a new billed apenin in a cuppla weeks gunna need a good few cube, bout 40 I rekon then the floor screed, yer loads to do what’s ya best on that, Cubs I asked that uver mob darn the road like and they sed 75 squid a cube what ya rekon fella. This his works best sarf of Watford. Not sure how well it would go down in sunny Yorkshire.1 point
-
From memory, the power for our external blinds goes through each window aperture, between the top of the window frame and the overhead reveal. It's held in place by the low-expansion foam that seals around the window, and sealed by airtightness tape. Not sure that's the best way - a conduit through the insulation would probably be better, especially in terms of airtightness - but we weren't sure of where and how we'd need to connect the blind motors, so left it until the windows arrived after the insulation had been installed. I find external power points useful for things like pressure washing, power tools, electric garden tools, temporary lights, stereos and chargers. I wouldn't flood the place with them, but I do think that one in each place around the house where any of these sorts of things would be used is helpful. The one outside the garage gets used a fair bit. We also have one near our front door which can be used for Christmas lights. This is also the time for putting in conduits through the walls for things like: External lighting (including wall lights, but also garden lighting if you haven't left one or more conduits through the slab to run that) External sensors CCTV (including front door intercom if likely to ever be of interest) Taps - I wish we'd put in more of these. We have one on the left side of the house, and another at the back. We could have done with one on the right, at least. Also, if you're having a water softener, consider putting a softened tap to where you wash the car (if you do that at home). A hot tap (which will also be softened if you have a softener) would also be useful. I wish we'd put a hot tap in to rinse the dog. We thought we'd be clever having a shower installed in the mud room, but the amount of dirt that comes off the muddy-puddle-loving dog most days means that it's a lot of effort cleaning up after giving her a rinse. It'd be a lot easier if this could be done outside in an area where a bit of dirt wouldn't matter. Doorbell - I've lost count of the number of people I know who've built houses or done substantial renovations, only to realise that they didn't run a wire for a doorbell! They end with with cheap plasticky doorbells stuck to their lovely new front door frame with double sided adhesive.1 point
-
Nothing would induce me to tape and fill boards, either tapered or square edged. Our old house had ceilings that were taped and filled and in the early morning and late evening the light would shine across and highlight every slight ridge. Once it's caught your eye, you find yourself getting more and more annoyed by it. It was the one thing that convinced me that all our plasterboard was going to be skimmed. I just couldn't live with looking up and seeing regular ripples across the ceiling.1 point
-
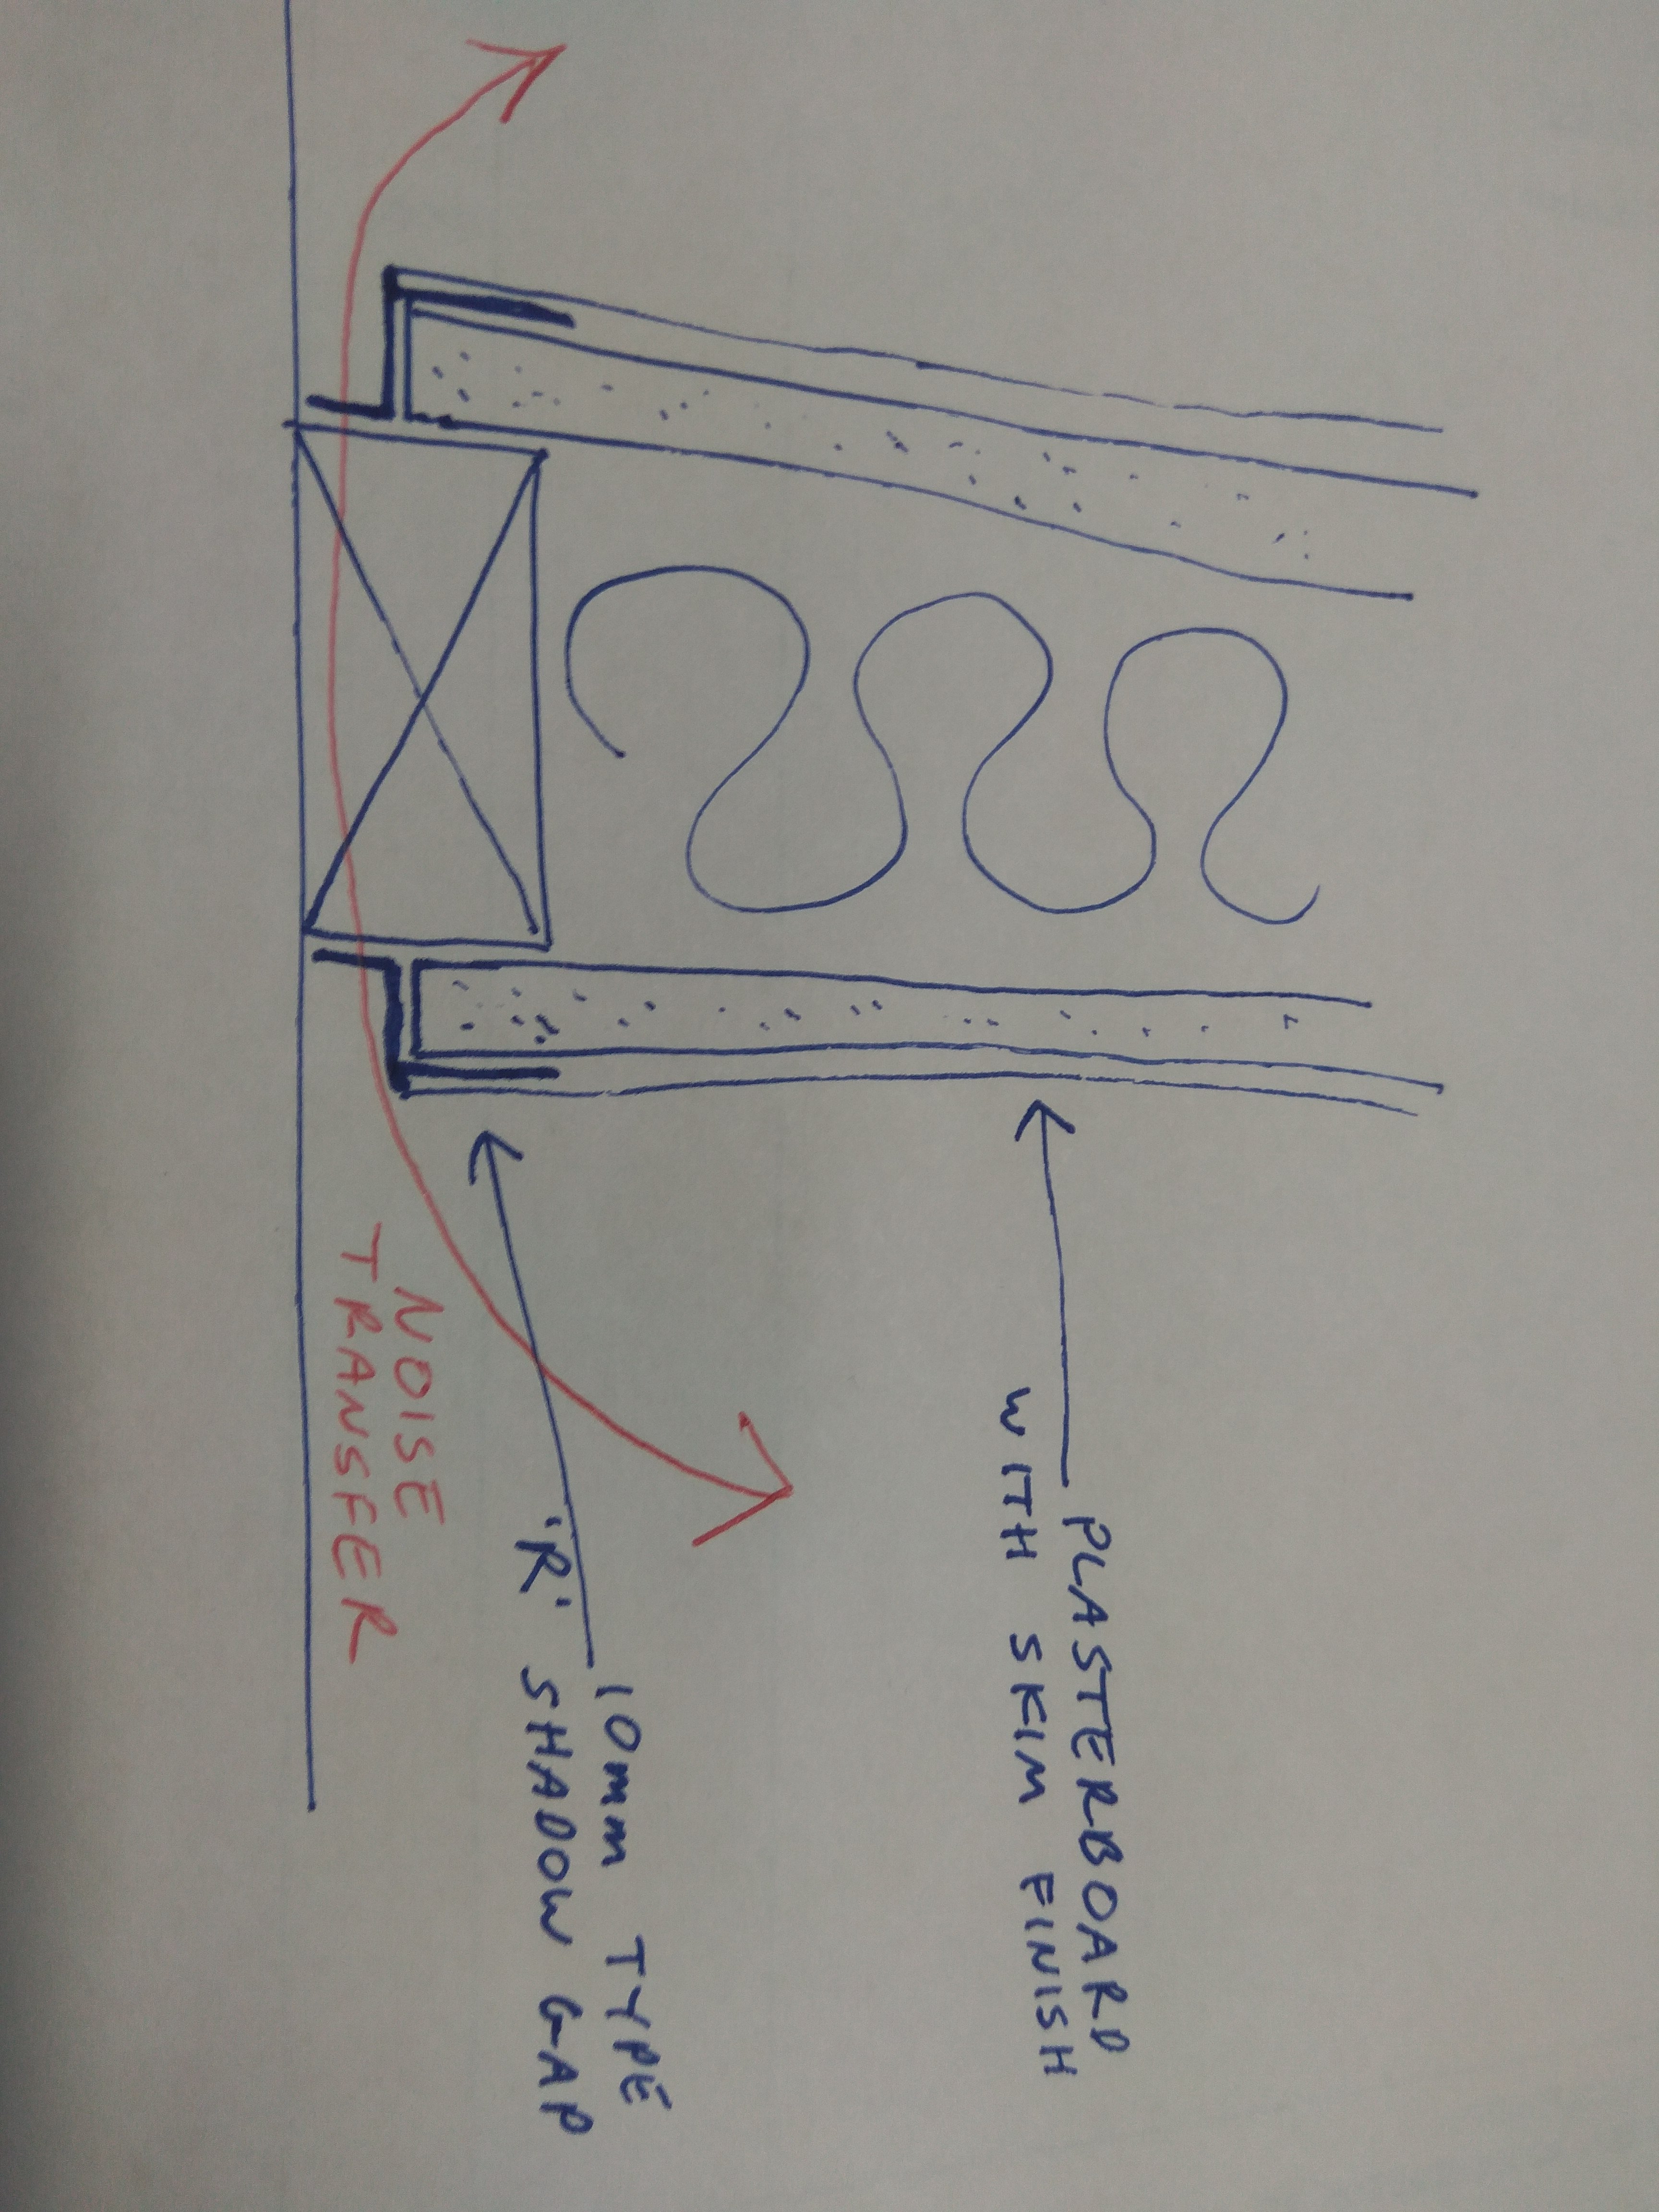
I’ve specified shadow gaps in a lot of projects and like IanR above for aesthetic reasons. They look so crisp and sharp. They’re more expensive than skirting and architraves if you use painted MDF. If you’re looking at shadow gaps v’s some oiled oak skirting and architraves or similar then they work out cheaper. You also need a good plasterer. I’ve seen a lot of crap shadow gaps as if they’re out by a few mm it really shows up. You don’t notice a good shadow gap but you can’t avoid a bad one. Always use aluminium trim. Don’t use plastic and check on delivery if you’re buying them for kinks and bends and they’re easily damaged in transit. I always use Type R instead of Type D and don’t use the 6mm as it’s too small to get accurate. On internal stud walls you’ll have to think about acoustics if you’re only using one layer of plasterboard. The trim can be an acoustic weak point and may need to be bedded to the frame with an acoustic mastic to help noise control. See below sketch. Not sure if you can rotate images after you attach them so sorry.
 1 point


.jpg.c21f3ac78c9b7efd90cbdcb312744dc5.thumb.jpg.7adcad4c0e384f5ecd7d56b0618df6e5.jpg)