
Leaderboard


Popular Content
Showing content with the highest reputation on 05/23/16 in all areas
-
Welcome back it is, I'm sure, as it's not the name of the place that matters, but the people that hang out here. Bit like your local pub changing the sign outside but still having the same regulars.......................3 points
-
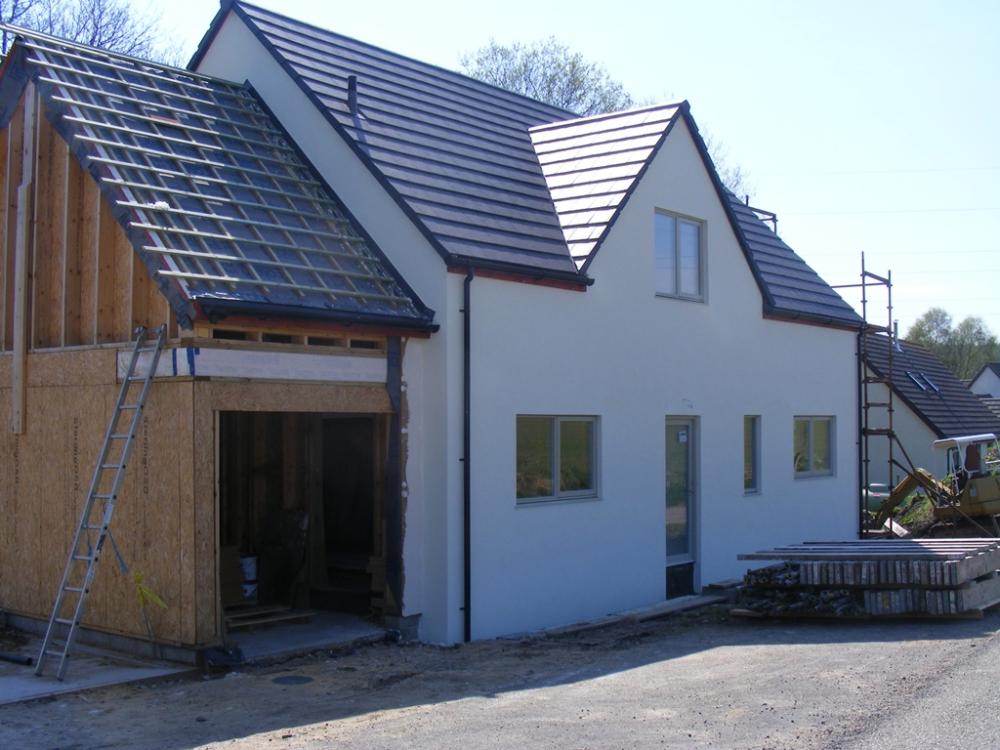
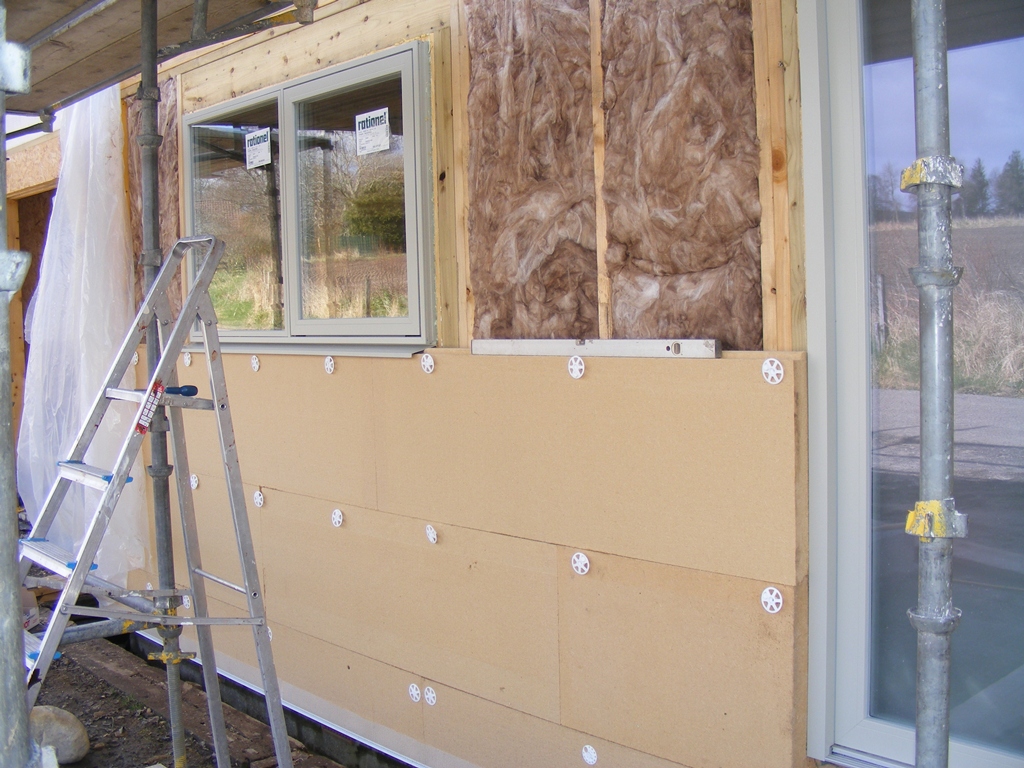
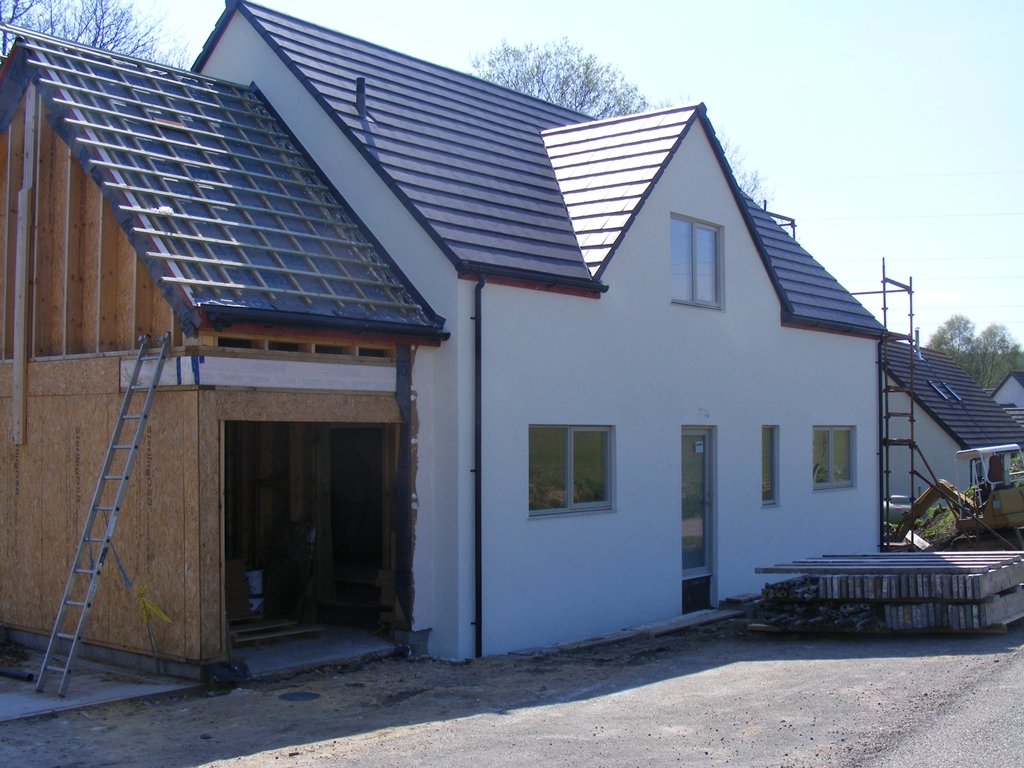
A lot of people ask me about the detail of how my house is built so I thought it worth a thread to explain things. First off, I didn't want an "ordinary" timber framed house with a cavity then a brick or block outer skin. That outer skin just costs a lot of money and adds nothing to the insulation of the house, it's just an expensive rain shield. I still wanted the traditional Scottish look of a white rendered finish but I want all elements of the wall make up to add to the insulation and air tightness of the property. The solution is a timber frame, clad with 100mm thick wood fibre external wall insulation boards (I used Pavatex, but other makes are available), and the render goes straight onto the wood fibre board. Here's a picture to make it clear: In that picture I only have a few of the fixing screws in place. A lot more were added and then driven fully home. The board is fixed to the frame with long screws with big plastic spreaders to stop the screws pulling through the board. There are a few twists to the frame however. First thing you will notice is that it is not an "ordinary" timber frame. For a start it's built with much thicker timbers than normal to allow more insulation in the walls. But secondly people keep telling me i have put the frame up "inside out" The OSB racking layer is on the inside of the frame. That's done for vapour permeability reasons with the least vapour permeable layer on the inside. With this build method you can either fill the frame with blown in insulation from the inside once the wood fibre cladding is fitted, or in my case I have chosen to use Frametherm 35 as it's less than half the cost of blown in insulation but gives the same U value. So I am fitting the insulation from the outside as I fit the wood fibre cladding. Insulating only that bit of frame I expect to get clad in that day as I don't want the insulation left exposed to get wet if it rains. The render is a lime based system from baumit.com. It has 3 layers, a base coat that is mixed from dry powder, then a primer that is painted on, then the top coat comes pre mixed in tubs. A fibreglass mesh gets pressed in to the base coat before it is dry. Overall benefits of this approach Vs an ordinary timber frame with blockwork outer skin: Simpler foundations (no need for provision to support the outer brick or block wall) More insulation for a given wall thickness More of the job can be DIY done, perfect for self builders. And an unexpected one, because there is no cavity, there is no need to pepper the wall with weep ventilators, so you get a clean render finish with no "warts" And here is what the finished and rendered front of the house looks like.

 1 point
 -
As a longtime harvester of forum knowledge for a boat build I completed a while ago I am familiar with the bizarre ecosystem of online forums and the need to pan for the nuggets of gold amongst the crazy gravel and try and ignore (or resist the urge to participate in) the aggy clashes between dogmatic keyboard-pounders foaming at the mouth in dark rooms sometimes half a world away from each other. I was therefore very surprised when I found ebuild which seemed to be an oasis of informed and good-natured conversation populated largely by apparently pleasant people - with an added sprinkling of Obi Wan Kenobi build-gurus sporting almost laughable levels of in-depth knowledge. I was sad to see ebuild die, hope this place will be as good. The signs are positive. I'm building a small (not tiny) house in West Wales, solid wall with EWI. We are off-grid electrically already with PV and a small wind turbine (live on site in a caravan). We intend to have an unecessarily deep bath. We might not have a woodburning stove now (partly seeing sense, mostly seeing the price of decent room-sealed stoves). Our windows are going to be bigger than is wise. We don't really know what we're doing.
 1 point
 -
Before considering which kitchen to fit, get a good, reputable kitchen firm or free-lance fitter to come and measure up. This will give you an idea for a basic layout, based on the size of your room, and your requirements / needs. That'll help you to stay focused when visiting the various showrooms, and ensure that you get the most out of your chosen kitchen supplier and chosen range of units etc. Ask your questions here, for impartial, free advice to help you make your decisions.1 point
-
Hello all, I know like me a lot of the ebuild regulars managed to get a deal on the Kingspan/Mitsi MVHR units. I'm about to complete 1st fix on mine and was wondering how people went with the control of these from remote locations? I tried to keep an eye out for the 'official' controllers but there have been none for sale anywhere (i think Joe90 got the last one that was on ebay). Anyway I came up with a few possibilites but for now I have just made sure I have ran plenty of cable to the correct places to cover me should things change. What I probably will do is use a standard single gang back box and have a blank plate which I will drill out to take a rotary switch and some rockers (purchased from Farnell). For the boost areas I am think of using intermediate lighting switches and have one pole for my lighting circuit and the spare pole as a volt free contact for MVHR, another option for this is some battery powered time delay switches I have found which have a set of volt free contacts but this means another switch in WC, utility, etc and things could start to get a bit cluttered. All wiring is going back to a junction box next to the MVHR to allow for paralleling if needed and future expansion. I'd be interested to see how some of the others have done it and how they have found it in real life.1 point
-
You'll need something big to cart it away as 64 batteries at 21kg each won't go in a Nissan Micra ! UPS - Eddisons Auction1 point
-
Evening peoples. Good or bad, im back Much thanks to those who have put in the effort to start this.1 point
-
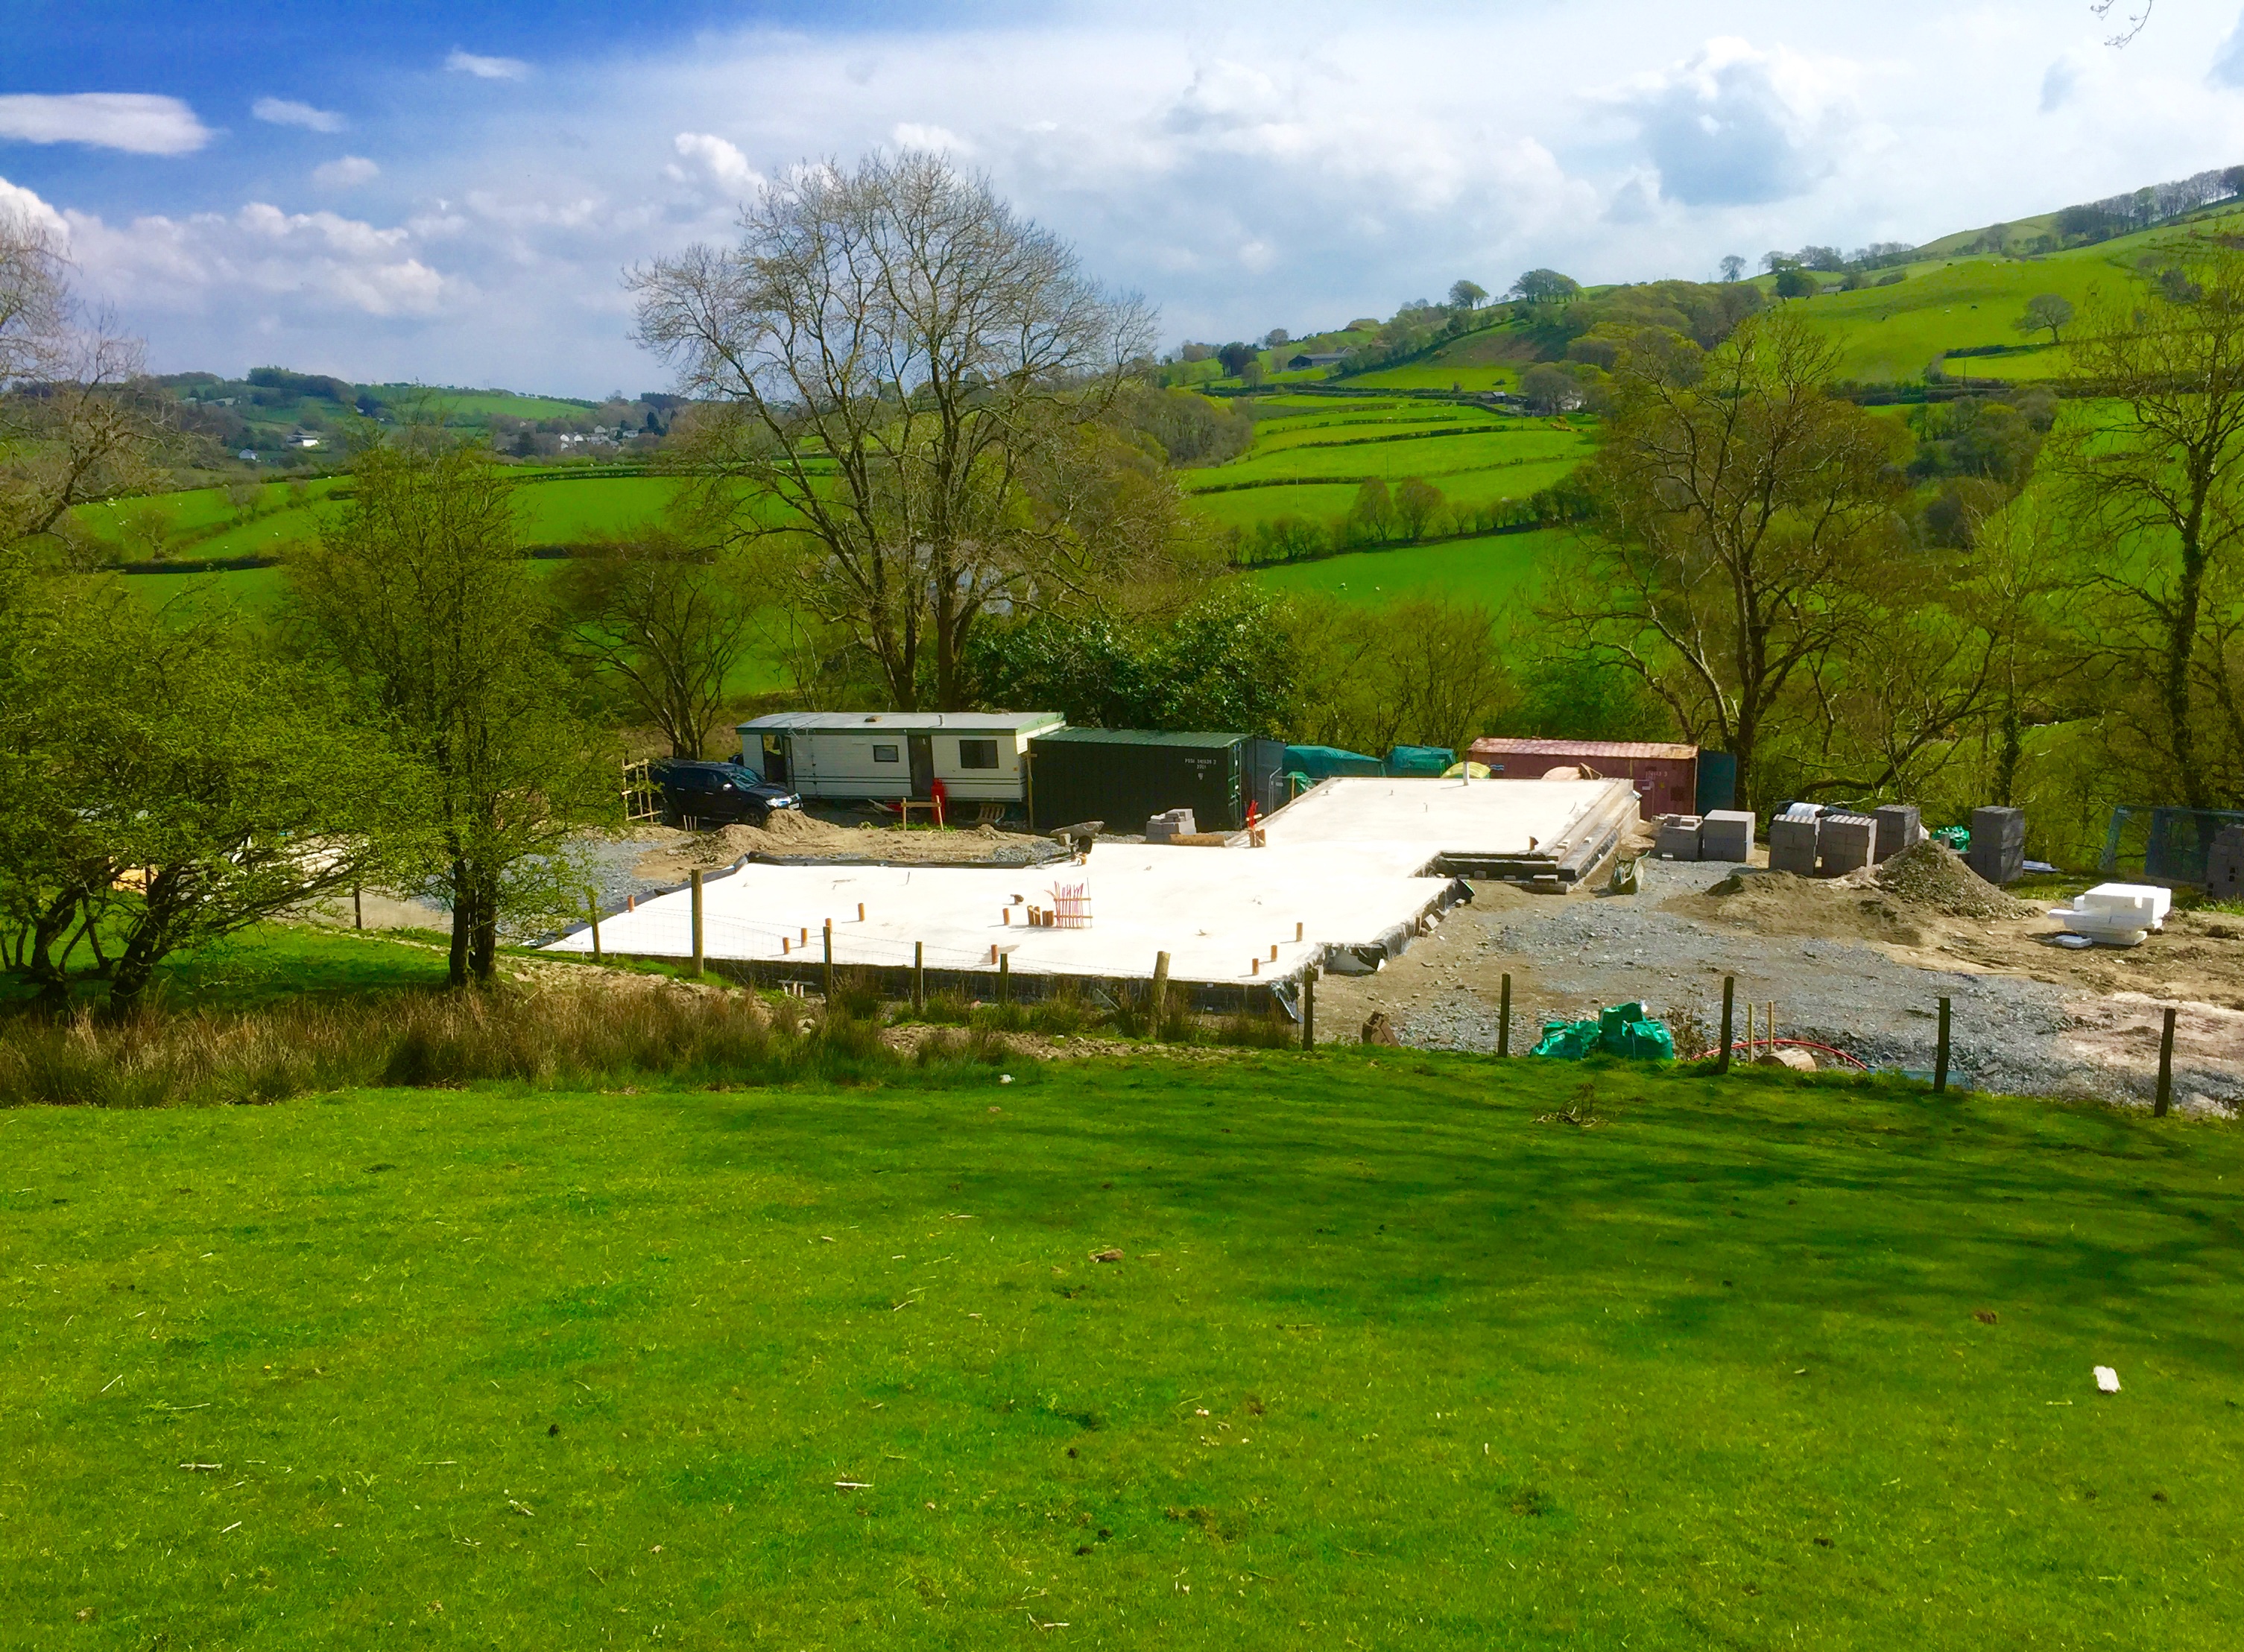
Hi All Glad that the guys have got this up and running so quickly - looks great with loads of features which will likely take a while to get used to. We will have been going for 2 years in August when my Friendly Farmer arrived on site (in the middle of a small town) with a 12.5 tonne excavator to dig out the 750mm - 1600mm depth and 500+ tonnes of our stiff silty clay which I then filled in with about the 400 tonnes of stone. This week I have been a stay at home Dad and have been trying to build a shed in around doing the school runs. Slightly worried I have over engineered what is a storage shed as I'm building it out of 2 x 4 with a 12.5mm OSB internal skin and fencing feather edge boards on the outside (it's in a corner and was meant to have larch cladding to match the house on the two exposed sides, but funds are low and I have the feather edge boards here - not sure why, vastly over estimated earlier somewhere). But I'm ok with that, the current shed you might go through the wall if you lent on it plus I got to hire and play with a first fix paslode1 point
-
Originally published on the closed forum, on 14th March 2016 Having made the decision to relocate to Orkney, we set about finding a site that matched our expectations and desires. We saw some truly outstanding sites but eventually settled on a parcel of land extending to just over an acre, which had planning for the erection of a new dwelling house. The practicality of the location, the far reaching views and feeling of local community were all key factors that we considered in deciding on this plot. Having identified our site, we started thinking about possible designs, what we could fit on site, what catered for our needs, and how we could reflect the local 'venacular'. Our starting point was our last house. That layout worked very well for us (we like our houses being open plan) and we drew heavily on it for our design. We came up with the following basic floorplan which met our needs and allowed us to reflect the local venacular of narrower 'Longhouse' buildings arranged in close proximity to each other. The following document is a useful reference for this sort of design http://www.gov.scot/...590/0122537.pdf Having come up with an outline design, it was time to speak to the planners to establish whether what we wanted to do was acceptable or not. Next entry - Planning1 point
-
Hi to everyone, I've missed ya! Me: building large 3 bed on family farm in rural Lincolnshire using a local builder for most aspects, used ebuild to help review the build and guide it towards more modern sustainable efficient practices I reckon the advice on ebuild saved me many many pound notes so I am happy to contribute towards this new site. Just tell me how!1 point
-
Evening all, Long time lurker (at least on the old site), first time poster. Firstly just wanted to say thank you to everybody involved in setting up the new site. Was a shock to see the ebuild site no more. Hopefully buildhub will also have such a vibrant community of build experts! About us A couple of years ago we moved into an old bungalow complete with damp issues, dodgy roof and fantastic jungle just outside Alton in Hampshire. The plan at the time was to extend it, numerous quotes and spreadsheets later we decided to wait, save, and start from scratch. So hopefully in the not too distant future (2018) we will start our project. Should be a fun experience managing work, kids, cat and the build, my wife’s got her work cut out. Well back to lurking, and I am sure as the time approaches there will be a ton of idiotic questions. Thanks again for everybody’s generosity with their time, ideas and building knowledge.1 point
-
In the Uk at least 4x2 is not always 4 inches wide and 2 inches deep. Crazy I know, that's where the terminology comes in, which I will hopefully provide links to later starting at the largest here are just some of the different 4x2's -4x2 rough sawn, this is more of a fencing material and is very rough to the touch, It is nearly "full dimension" e.g 4"x2" or 100mmx50mm -4x2 regularised, this is usually sold in either treated or untreated (green or not) and has been planed on all sides with the corners rounded, will usually end up at about 90mmx45mm or 3 3/4"x1 3/4" -4x2 CLS (Canadian lumber standard) looks very similar to regularised but is even smaller usually around 87mmx 38mm or 3 5/8 x 1 5/8 -4x2 PAR/PSE (planed all round/planed square edged) this is more of a joinery type material usually without treatment and square corners but very smooth. this usually comes at about 90mmx 45mm -then there is the option of strength classification C16, C24, T26 -options on joinery grade material 4ths, 5ths,CVG the list goes on and hopefully it will get filled one day but for the moment just make sure you know what you are asking for HTH Ed1 point
-
Glad you made it here. Welcome back.1 point
-
Thanks Jack, Looks like I am in good company! To be honest the thought of knocking down the house we are living in (warts and all) fills me with equal parts excitement, dread and sometimes plain terror! Just depends on the day of the week. It will be good to know that others that have been there done that are at the other end of an internet cable.1 point
-
Sounds like a proper shed to me...You won't regret it in 10 years time?1 point
-
Plus ça change. Me again.1 point
-
Welcome aboard!1 point
-
Non Fit. All Black: £140.00 ea Black with Silver: £115.00 ea so with an array of 10 panels its £250.00 + VAT1 point
-
When the chippy has thrown the stud up on a first fix and the wall is 4 mm out of plumb, you'll be loving that extra width tolerance the linings have. Besides it's the decorator who has to caulk it not the guy who fits the lining! I usually plane a bit off mine to be fair, but I dare say the manufacturers know this but would rather make one product which fits all, rather than 2 separate products. After all 3 cuts with a plane and you're done1 point
-
Hello everyone, good to be back and it's reassuring that those with experience are available to comment, support and guide us. Thanks for the gang that got this website up and running so quick. I'm the Wales MBC timber frame mentioned above with foundation in and Brendan and team due back weds this week to start the timber frame.

 1 point
 -
I was chatting to Andrew directly, but had a chat with Joan the other day. I'm planning on chasing them tomorrow, so bear with me. TBH not sure how they plan to configure them but the idea / requirement was to double the capacity but only have one set of charging / control gubbins.1 point
-
I'm just talking to Sunamp at the moment about making me a 4 cell SunampPV rather than having to install two SunampPVs in parallel. I'm just waiting to hear back from them about unit configuration /size. I'll let you know how i get on.1 point
-
On windows the "proper" way using a pole is generally known as "reach n wash" in the trade and utilises de-ionised water either from a tank in the back of the van or via a wheeled trolley that looks like an oxyacetylene trolley and holds damn great cartridges. In the old days cleaners would go to back street filling stations to get their de-ionised water. The dirt on the window is wetted then agitated / loosened with a brush or dolly on the end of the pole which is water fed and controllable. The water is then used (no soap) to wash the debris off and downward. Leaves a fairly streak free finish. Kit's pretty expensive. If done regularly reach and wash is OK but if engrained then a proper dolly / squeegee together with nylon Scotch type pad is used. If you have heavy staining the cerium oxide powder or CO2 can be used. Window cleaners who miss the corners are referred to as "Sinbad" (think portholes). Listen to a couple of windows talking and you might hear one say "I did a Dionne!". Translated this means he knocked some or all of a particular job as in Dionne Warwick's Walk On By. EDIT: Meant to add that the lads I know who clean solar installs on commercial buildings use the de-ionised water fed pole generally.1 point
-
DO NOT PAINT WHERE YOU ARE TILING OR TANKING. !!!!1 point
-
Wow, I am so pleased you guys have taken the time and trouble to get this site up and running on our behalf. I'm sure those who use this site are as appreciative as I and once I post this message, I shall stand up and salute everyone of you. Well done. Now lets get back to reading and asking questions................................ PW.1 point
-
In case it's not obvious, the roof is a warm roof, hung from a big ridge beam. That too is clad with the same 100mm wood fibre board in place of the normal (in Scotland) sarking board. And the roof will be insulated in the same way as the walls but this time from the inside so we will have a vaulted warm roof.1 point
-
Grass was invented by some fiend to control men. In my life I've only ever seen one woman mowing a lawn, and one woman mowing a field. Keep the geese, dodge the poo. Save the money.1 point
-
Hello there and welcome, members old and new. I'm the top welsh plumber, with a few good tips for you! My name is Nick ( from Wales ). My background was firstly in electrics, but then I branched off into plumbing as I found it more interesting ( sorry ProDave ). After 18-20 years 'on the tools' I have seen and done just about everything that is pipe related, so I decided to join a discussion forum to share information, help others who have questions to ask, and to gain knowledge myself about the new ( to me ) and strangely niche world that is low energy and passive house technology. Many of these disciplines have been around for quite some time, but until around two and a half years ago, where I stumbled upon this forum's predecessor, I'd never even heard of some of the systems, and their benefits, and nor of the simple and sensible ethos of 'fabric first' and the huge rewards possible from installing and utilising such systems ( correctly ). My areas of 'expertise' ( I will be learning until I die btw so don't really like the term expert ) include all types of central ( space ) heating ( including underfloor / under-tile ), hot water systems, cold mains pressure boosters / reinforcement, general plumbing, electrics ( in particular heating and hot water systems and controls ), kitchen and bathroom fitting, tiling, and all their associated disciplines. Feel free to post in the topics here, and we, collectively, will be able to help and advise accordingly to the best of our knowledge. If we can't advise on it here, it probably hasn't been invented yet Enjoy the the forum, and I look forward to chatting with you. Regards, nick.1 point
-
all those involved in getting this up and running. Swisscheese is back. Thanks1 point
-
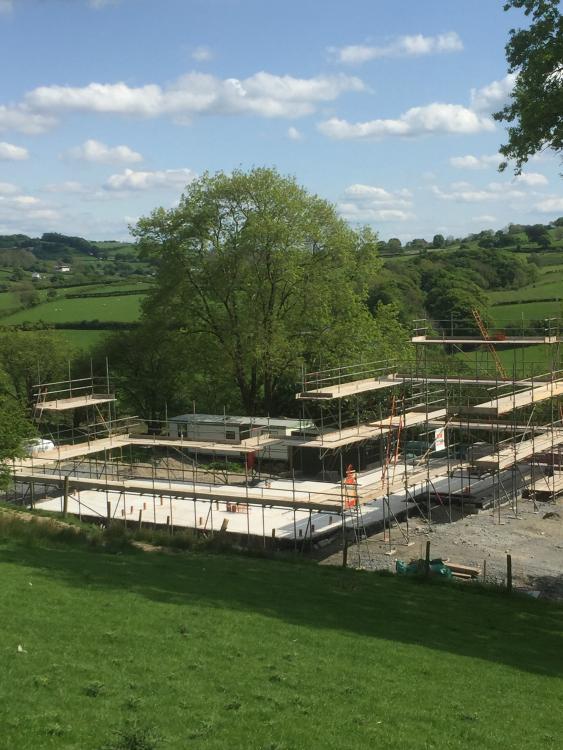
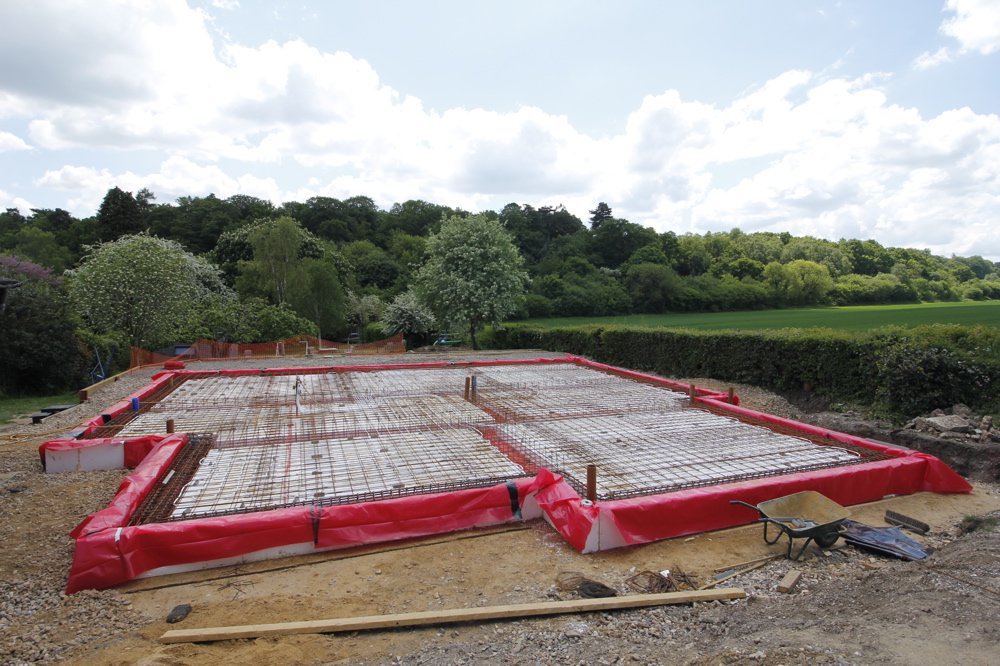
Passive slab all ready for the pour. Just finished pressure testing the ufh pipes
 1 point
 -
Good checklist. From my experience, once we had been thorough many of the points on the list, the single most important aspect to choosing the architect was thinking "Yes, he gets it, he understands us, and Yes I think in partnership, we can work together."1 point
-
Thanks Jack, better user name too - "notnickclegg" was soooo yesterday ;)) I look forward to asking more silly questions and contributing where I can.1 point
-
Welcome aboard! You are right about things changing- most houses built 30 years ago might struggle to comply with current building regs. I know a few retired joiners who were surprised that I'm not just nailing plasterboard and plywood to either side of a 4" stud, as for a while that was the only way to build a house!1 point
-
Welcome! Glad you managed to find us OK, we were a bit worried last week that we'd put all this effort into creating this forum and then no one would join!1 point
-
Hi and welcome to the forum. Building next door is very convenient. I am building next door but one, just 50 metres up the road.1 point
-
Welcome back, it's really great to see so many friendly names from Ebuild finding us.1 point
-
I was JmS on ebuild before. Glad this place is here I'd like to thank Jeremy for the expanding foam nozzle he posted to me just when everything hit the fan on ebuild. Also a reminder for our resident plumber from Wales, about his thoughts on the kitchen extractor motorized damper fitting1 point
-
The wetroom formers have to be in first, so they both agree there. A good tanking kit will have a rubberised strip ( like a 4" wide fabric plaster ) that joins the horizontal surface to the verticals, so water can't get past that ( after its run down the tanked wall ) as that's the bottom of the watertight seal formed BY tanking. That strip needs to be on top of the former and over coated with tanking solution to be a complete system. Any water that gets to the tanked layer needs to drain freely so must be able to fall south until it can get to a drain / waste. 1) tanking has to be the FINAL waterproof layer. It has to be built up in layers, with subsequent drying times observed between coats, so you'd not want to be applying layers first then fitting the former and strips ( which have to be bedded into wet tanking solution btw ) and then having to repeat the whole process again. 2) tanking below former is just a waste of time as water should never get that far, ( unless your the cock that fitted the one I'm currently ripping out as part of a big insurance claim ). Shower trays have a different discipline as you cannot use the strip. So given that I'd say your tiler is making the right sounds, and the plumber is,.........a plumber. I'll chuck some pics on later when I get back on the iPad ( as kids have commandeered it again ) and show you a couple of examples. Fwiw, I'd pay the tiler to tank. It's not as straight-forward as your making it sound. The strips have to be bed in etc and if it's left too thick in places it really knackers the tiler up. That's one job to just stump up for and let the tiler do imho.1 point
-
The whole window pricing thing seems to be a lottery. As Jeremy, our Internorm quote was way more than the others at over £20K, then there were a batch around 12-15K, but Rationel were by far the cheapest here and by the time the negotiating was done it was just over £8K I'm pleased with that outcome as they were the second best in terms of U values, only marginally worse than Internorm, yet the cheapest. But then others find Rationel to be expensive and at least one reported Internorm as being their cheapest quote so it makes no sense at all. P.S my Rationel windows came via an agent and that was supply only for my builder to fit.1 point
-
We're being plastered too - certainly focuses the mind to get all those little jobs done as the tackers rip through the house covering everything in board! My top tip is to photograph the whole house before walls get covered up, especially where you've put in support noggins for cupboards, TVs etc - write the top and bottom heights on with a sharpie so you can find them again from the photos.1 point
-
It's an interesting concept, but my first thought was that those doors would never work in the winds we get up here! 175kg for a 3m door sounds quite light. My 2.4m door is 250kg.1 point
-
My advice is whatever way you think of doing something if new to that particular task then ASK for the collective's comment first. G'teed there'll be someone on here who's done it before. Same with the "where to get" questions. And speaking from experience nobody'll think less of you for asking loads of what you think might be real numpty questions either. (Or will they? ).1 point
-
Join the club. My screen name hints at my past, but I'm now retired Ha! Every day I get up and go about jobs related to our house build. And one of those jobs is networking - because I don't know the answer to most of the problems I face. Just like you. So there's a natural push to lurk and ferret information out - reassurance that you're not the only eejit who has put a window in upside down, or had to post 7 meter steels through a living room window (my son's place last night..... don't ask) That's the power of a community like this, everyone's keen to do a sensible job at a fair price, almost within their budget. Ever found anyone coming in under budget? No, neither have I. I have heard of people who did that, but never met them. But, for me it's the massive reassurance of coming up against some form of knotty problem and suddenly thinking.... I'll ask about that on buildhub, and almost guarantee an answer.1 point
-
Hi all We received Approval for a Change Of Use (via Class Q PD) of a steel portal framed cow-shed in late 2014, and spent the next year fulfilling a couple of conditions and deciding on how to tackle the conversion. The final pre-commencement condition being discharged in late 2015. Time and time again EB proved a valuable resource and pointed us in the right direction as we slowly made our decisions on how to approach our unconventional project. Work is underway and we hope to pour the new floor next week, with a timber frame arriving mid-June. Looking forward to sharing the highs-and-lows and having somewhere to bounce ideas and raise questions. IanR.1 point
-
Most people have bridesmaids and pageboys...1 point
-
I'm BACK! Evening all, old and new. Greetings from Kent. I'm originally an apprenticed mechanical & production engineer by trade working in my day job on lifting and access equipment tending towards the electrical / plc side of things. Proud owner of a large, detached money pit, you name it it needs doing or re-doing. Wish I'd found the old eBuild site sooner as I'd have done so much differently and saved a bundle of money to boot. Learnt a hell of a lot and hope to continuing doing so here! And no, I've not finished the BATHROOM yet!1 point
-
I'm considering installing Solar PV, but due to the recent cut in FITs, I am looking at a non MCS installation (to reduce capital outlay). To try and establish whether this was possible, I contacted my DNO, to find out what the procedure would be to connect to the grid. Sadly, the response was limited, advising that only MCS accredited installers could make a G83 connection. When pressed, they referred me to the ENA (Energy Network Association). Thankfully, the ENA knew what they were talking about and confirmed the following -"You will need to comply with the ER G83/2 a copy is attached. ER G83/2 is a qualifying standard to the GB Distribution Code. ENA_ER_G83_Issue_2_(2012).pdf 634.08K 0 downloadsFor a single generator below or equal to 3.68kW then you can connect this without the permission of the DNO but you must by law inform the DNO of the connection within 28 days of commissioning the generator.There is not a requirement to use MCS installers in G83 or D Code but you must use type tested equipment. A list of such equipment can be found here - http://www.ena-eng.o...peTestRegister/Where you decide to connect a inverter that is not on the list then you will need to comply with ER G59/3-2 as that equipment will be classed as non type tested.I would expect the installation to be installed by a competent registered electrician.To qualify as an electrician, you need an industry-recognised level 3 qualification, such as:*Level 3 (NVQ) Diploma in Electrotechnical Services (Electrical Maintenance) *Level 3 (NVQ) Diploma in Installing Electrotechnical Systems & Equipment (Buildings, Structures and the Environment)The competent electrician will also have to sign of the relevant installation forms as prescribed by the building regulations and the model forms can be found in the Wiring Regulations BS 7671. These forms must be made available to the owner and retained on the property and made available when required for inspection by the relevant authorities eg HSE.I would also advise compliance with Part 712 of BS7671 - Solar photovoltaic(PV) power supply systems.If you still wish to export to the grid then you will need to discuss this with your supplier. Not sure what there stance is with regards to non MCS installations. DNOs do not arrange or fit metering." So, for those considering this way of installing PV, it seems simple enough if you install type tested equipment, which the vast majority of self install PV kit currently available is, then all you need is a qualified electrician to do the final connection, and to inform the DNO of what you have done.1 point


This leaderboard is set to London/GMT+01:00