
Leaderboard


Popular Content
Showing content with the highest reputation on 05/04/23 in all areas
-
Block house here. 0.31ACH. Airtight paint to wall floor junction. Airtight paint to all chases. OSB window boxes taped to windows and airtight painted to walls. Wet plaster to all walls. Airtight membrane below cold attic continuously ran over all internal walls. Returned to wall and sealed with airtight sealant. Service cavity for ceiling. Airtight attic hatch. Our Tony Tray ripped under the hollowcore plank so I cut it away and sealed later with foam and airtight paint. DIY blower door was the secret though. It really showed up any faults. Things I would change. Pour the ground floor slab over the internal foundation walls continuously and continue the walls from slab again rather than introducing lots of separate areas for leakage. Use the green building store detail for plywood window boxes rather than fitting OSB ones post window install. Ust the green building store detail for a timber ledgerplate for the first floor. Pretape the windows before install. Tape wasn't that dear. About €15 per 25m. Much tidier than foam or sealant.3 points
-
Planning is the crux here. Others may know the local policies in this area. But I would quietly patch up the existing static caravan so it is habitable, if not very pretty or desirable, and make it look lived in, even move in for a period over the summer? then apply for a certificate of lawful development. That gives you a fallback to rebuild anything that complies with the legal definition of a "caravan" which can in fact be a very well insulated bungalow of about 100 square metres. With that secured as a fallback you can then investigate planning for something different.2 points
-
We need a system schematic with model numbers of devices and we will have this sorted by sundown.2 points
-
I dislike the JG Speedfit stuff, and it was only last week where I was discussing them with a plumber and we both remarked that no merchants stock the collets which stop the fitting unscrewing itself and blowing apart! The chap behind the counter quizzed me then, as he had no idea what I was talking about...... Hep20 = push in > forget > go to pub. 👍 The kitchen will also have reduced m2 real estate, due to it being populated with units etc. I'd rather be looking AT pipe than looking FOR it ;). The cost is pennies difference, in the grand scheme, and I'd just go at 100mm c's and away to go.2 points
-
What everybody else says.(some of it anyway) Then do your own test ( as ProDave and others). Tape over all fan and other ducts. Close or tape over window vents. Dont assume any builder understands airtightness. Then tell the testeron site that you need 0.8 ( or whatever) and are confident of achieving it. Difficult gaps to complete are at the eaves ( and there is a lot of it) and openings. Examine the detail, discuss with the builder. Supervise.2 points
-
Hi Everyone! I have a small patch of land (possibly 0.5 acres after site clearance) that I am hoping to build on, it is effectively in the middle of nowhere as the connecting road is very quiet and rarely used. I am currently talking to a couple of mortgage advisers to assess what our budget might be. The land is located in Buckinghamshire and is an Area of Outstanding Natural beauty and agricultural land but has a static caravan on it. This has been in place for at least 23 years (shown on google maps satellite view) and has had council tax paid for at least the last 13 years. The land has been owned by my family for many years and they always intended to develop it but never got around to it. The caravan is now very dilapidated and is not liveable It has direct access to the road via its own driveway, this is about 200m long though There is no mains electricity, gas, water or sewage but the location is idyllic and completely secluded, the nearest neigh is over 300m away We plan to build a medium size family home in a single-storey barn style, we plan to build as big as planning and budget allows. I like the idea of going for almost passive house standards but only if the budget allows. We hope to make the site self-sufficient by installing a borehole, septic tank, solar plus battery system and possibly an LPG tank for cooking. Heating is likely to be taken care of using an ASHP and UFH plus we want a small log burner in the living space. I am thinking of getting a StarLink satellite dish for the internet - I particularly like the idea of the only evidence we live there being the smoke from a wood burner during the winter. I have no idea of what the energy requirements are going to be yet though so it is hard to decide on the size of the solar array and battery. This will be our first self-build so any advice would be greatly appreciated.1 point
-
Osb is no good Use ply or cement board Thin coat is no good for Ditra Ardex 200 is bombproof Better with a PB plank for sound deadening If you use a cement board or insulated tile board No need for Ditra Jus use a flexi adhesive The bed should be the same thickness of the tile your putting down Good to go 😁1 point
-
I realise it’s a minor thing but it’s the carelessness that’s pisses me off and the subsequent hassle it causes getting it fixed. So far all the damage should have been avoidable with just a bit more care. Meeting tomorrow with the company owner to go through the defects list. He’s confident his detail guy can sort it. I owe them the retention percentage which I’ve said I’m not paying until all the defects are resolved. The bigger problem we have is I think the windows have been fitted a touch too far in. They are in line with the kit as per the construction details but I can’t see how the cills can be clipped into place. We tried to fit one today and couldn’t get it to clip in. The kit company are due back next week to finish off so I’ll get them to fit a cill to see if they can do it. My follow on joiner isn’t impressed with their attention to detail. He’s pointed out a few things that could have been done better. Basic stuff. He said he’ll fix it. Although he’s impressed with the kit overall. One observation. I was on-site at 6.30 this morning tidying up and removing the carnage the kit guys left behind. The house was surprisingly warm. It’s got no insulation and the windows aren’t sealed up yet.1 point
-
Just put the 100mm soleplate down, then lay the 150mm soleplate for the footer of the stud framing onto that. Carry the upstand insulation up another 44mm ( or whatever the thickness of the soleplate is ) and for 50mm of overhang the OSB will be as happy as Larry.1 point
-
There are modern adhesives that will easily last 50 years, and allow for movement. Then you also have the tyvek type wraps that help. It is all down to detail though.1 point
-
I insisted concrete rendering then wet plaster (old school I know), can’t stand dot and dab or hollow sounding walls that is difficult to fix things too.1 point
-
This is what I mean. The notch will sit outside a 100 x 50 soleplate. Without the notch you'll not be able to "squeeze" the OSB sheathing into the sole plate. It'll just bend the OSB. The notch will create a 50mm gap outside the sole plate to stuff some mineral wool to break that thermal bridge. Despite what @saveasteadingsays I think It's important to keep the soleplate warm. Without it there's a risk of it getting cold, especially in contact with the slab and then you get condensation and rot. Not an issue with a permanently heated house but an intermittently heated garden room it'll save you in the long run. Line up all your studs on a bench and clamp. Snap a line and set your saw to 50mm and cut them "end on" along Line A . Set your circular saw to max depth/100mm and cut along line B. You'll probably need to do some tidy up with a hand saw but it'll be quick. Have a look at the detail above. I would use all 50mm sheets of EPS. Use 150mm under the main part of the floor and then thin that down to 100mm under the thickened edge of the slab. Also use 50mm for the insulation upstand. Lay the DPC as with plenty of spare over the edges. Lay your at the centreline (50mm) of the concrete on chairs. Tie the foundation bolts to the mesh in the correct place with some wire or cable ties. Pour your concrete. Level with a stick and float by hand. When it is set take your soleplates and use the hammer method to find the right hole location. Drill out holes and ensure it's correct/square. Notch your studs and build the wall as normal including OSB sheathing. Fold DPM over Upstand. Apply A/T tape for air sealing. Similarly tape all joints in OSB externally. Very effective and simple. Tape outside of doors and windows similarly. Apply breather membrane, batten and clad.
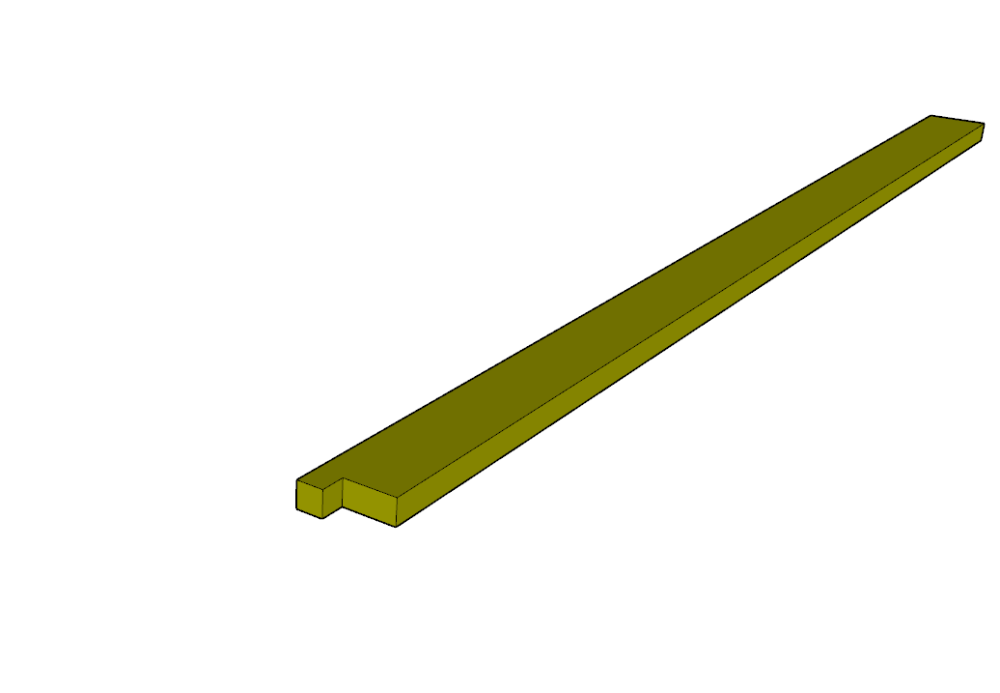

 1 point
 -
Quite a lot i would imagine....1 point
-
I used 4 x 4 timber packers from steel deliveries. Lapped them and screwed them together downwards and ends, and it is working fine after 4 years. I didn't bother with corner or side pegs. There is negligible load from the soil. If you practice 'no dig' the soil will stabilise permanently too. It becomes a crusty entity, crisscrossed by wormholes and good fungi. I don't fancy cutting the sleepers though, unless of course they are sitting there foc. I fear they might also distort dramatically when cut. Start collecting cardboard (without sticky tape) and newspapers to lay on the ground. They smother the grass and weeds, then rot away. The amount of worms in mine is amazing, due to compost and manure on the top over the winter.1 point
-
Not yet, but was going to later this year. I was going to use the 100mm thick sleepers and if they did flex tie them together on the inside with a short post half way along. Keep us updated I'll watch with interest.1 point
-
If the SE is pulling 5kW you will only have 0.7kW left to go to AC due to the DC limit. It was probably a fast track G99 or something, which was limited to 2x3.68kW devices.1 point
-
Max DC 5.7kW also, so if the inverter is pulling around 3.9kW DC side before losses for AC that leaves only 1.8kW headroom for charging the SE.1 point
-
OK @pocster is too lazy find his prior post asking exact same question, so I did it for you. The schematic was eventually beaten out of him on page 6, here: The answer is your PV inverter is an SE3680H so can output 3.68kW MAXIMUM (sum across internal use, AC coupled battery charging and grid export). So if the AC coupled Tesla powerwall is charging at 3.68kW that will consume all of your PV generation and none will go to grid or other AC loads. As you were.1 point
-
Lazy (expletive deleted).1 point
-
Essentially this may be your bottleneck, you see the DNO doesn't even want the inverter to be capable of anything over 16A on a G98 - however, G99 with export limitation would permit this but you then need to fill out the export limitation details to prove you won't blast more than 16A into the system. Once we see the mfr. & model no. of the inverter you have things will start to slow into place. Even a photo of your PV system showing the units would be good - a clear photo will maybe show what is connected to what and how.1 point
-
Why not just wet plaster it. Solves a multitude of issues.1 point
-
Yes, it should be stated on the data sheet for the inverter.1 point
-
That's a quick rabbit hole to close - no PV generation in winter is pants. About 10 to 20% of summer performance. Spend on insulation1 point
-
Glad you enjoyed our rubbish . So as you say what I ask is possible ? ( not interested in increasing export ) . I *suppose* having a DC battery mitigates the inverter limitations to some extent I.e it could charge at pv maximum generation . Would the DNO object in principle to g99 ( from g98 ) with a limiter imposed ? . After all I’m interested in my internal bottleneck only …1 point
-
I'm pondering this exact same question at the moment in planning for a PV and battery system. The information out there on inverters is quite detailed in the technical specs but the simple questions like "can I use all my PV generation as AC power for house loads or grid export" aren't very obvious.1 point
-
Only 1 inverter ( ignore Tesla ) Need someone else’s input ! . Yes kwH whatever1 point
-
So is your mind. Draw up a circuit diagram. A lot of it will depend where the generation(s) load(s) and inverter/charge controllers are.1 point
-
No membrane required, but you need to restrict the amount of moisture getting into the outer leaf, so either render for blockwork or a coat of Stormdry or similar if it is brickwork.1 point
-
You can easily tell if the joints are full from the rear of the faced brickwork if it has been built prior to the blockwork. ( only possible with full fill or blown in insulation) This is (usually) the brickies preferred method. We go round the back and smear all joints full while the mortar is still wet. On some sites now they are asking for the rear of the wall to be tooled with a bucket handle. I think that is a bit over the top.1 point
-
Hi, Not sure that I have any of that wisdom stuff to dispense, and I am in the middle of preparing for a meeting, but here is some of my write-up which may be useful (follow the "See also" links in the sidebar): https://www.earth.org.uk/note-on-Spacetherm-aerogel-thermal-insulation.html Rgds Damon1 point
-
In our kitchen above the cooker we have a 125mm extract point as part of our Villavent/Systemair MVHR system. We use bonded acetate fibre sheet which is sold by the metre in John Lewis upholstery dept for padding cushions and sofas. We cut it to a template and sew the edges to form a "hat" which goes above the automatic fire damper mechanism. Although we do very little frying it collects a black layer of miscellaneous grot and needs changing every six months. We also put discs of the same material in the bathroom extracts, they collect a lot of towel fluff and need changing once a year. As a result the ductwork stays very clean and we only need to change the filters in the central plant every 3 years.1 point
-
I read that link, was dismayed, and even got as far as trying to respond but was even more dismayed. This is all about more red tape, more rules, more paperwork for installers etc. This will do NOTHING to speed up the rate of heat pump installs. Typical government mentality, regulate everything, even though we have a PM who says he is in favour of the opposite. I gave up the will after the first few questions trying to respond, it is only looking for answers to approve their plans or make minor alterations to them. What I wanted to say is the whole plan is a crock of steaming excrement, it just burdens the market with yet more paperwork and expenses and ensures is is just the big companies who are set up to milk the system and collect the grant money that will operate in this type of market. What is needed is less and simpler regulation and to encourage the small plumbing end electrical businesses, even sole traders, to be involved in heat pump installation. That is the only way you will get the thousands of electricians and plumbers we already have on board and installing heat pumps.1 point
-
surely the whole point of beads is that moisture *won't* cross them...1 point
-
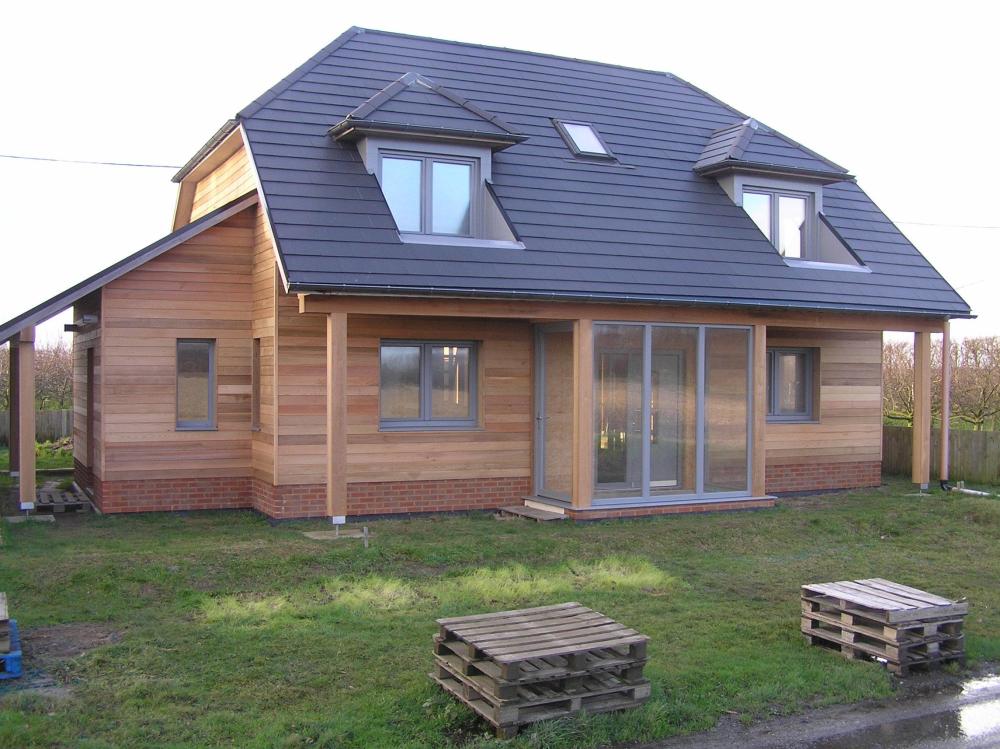
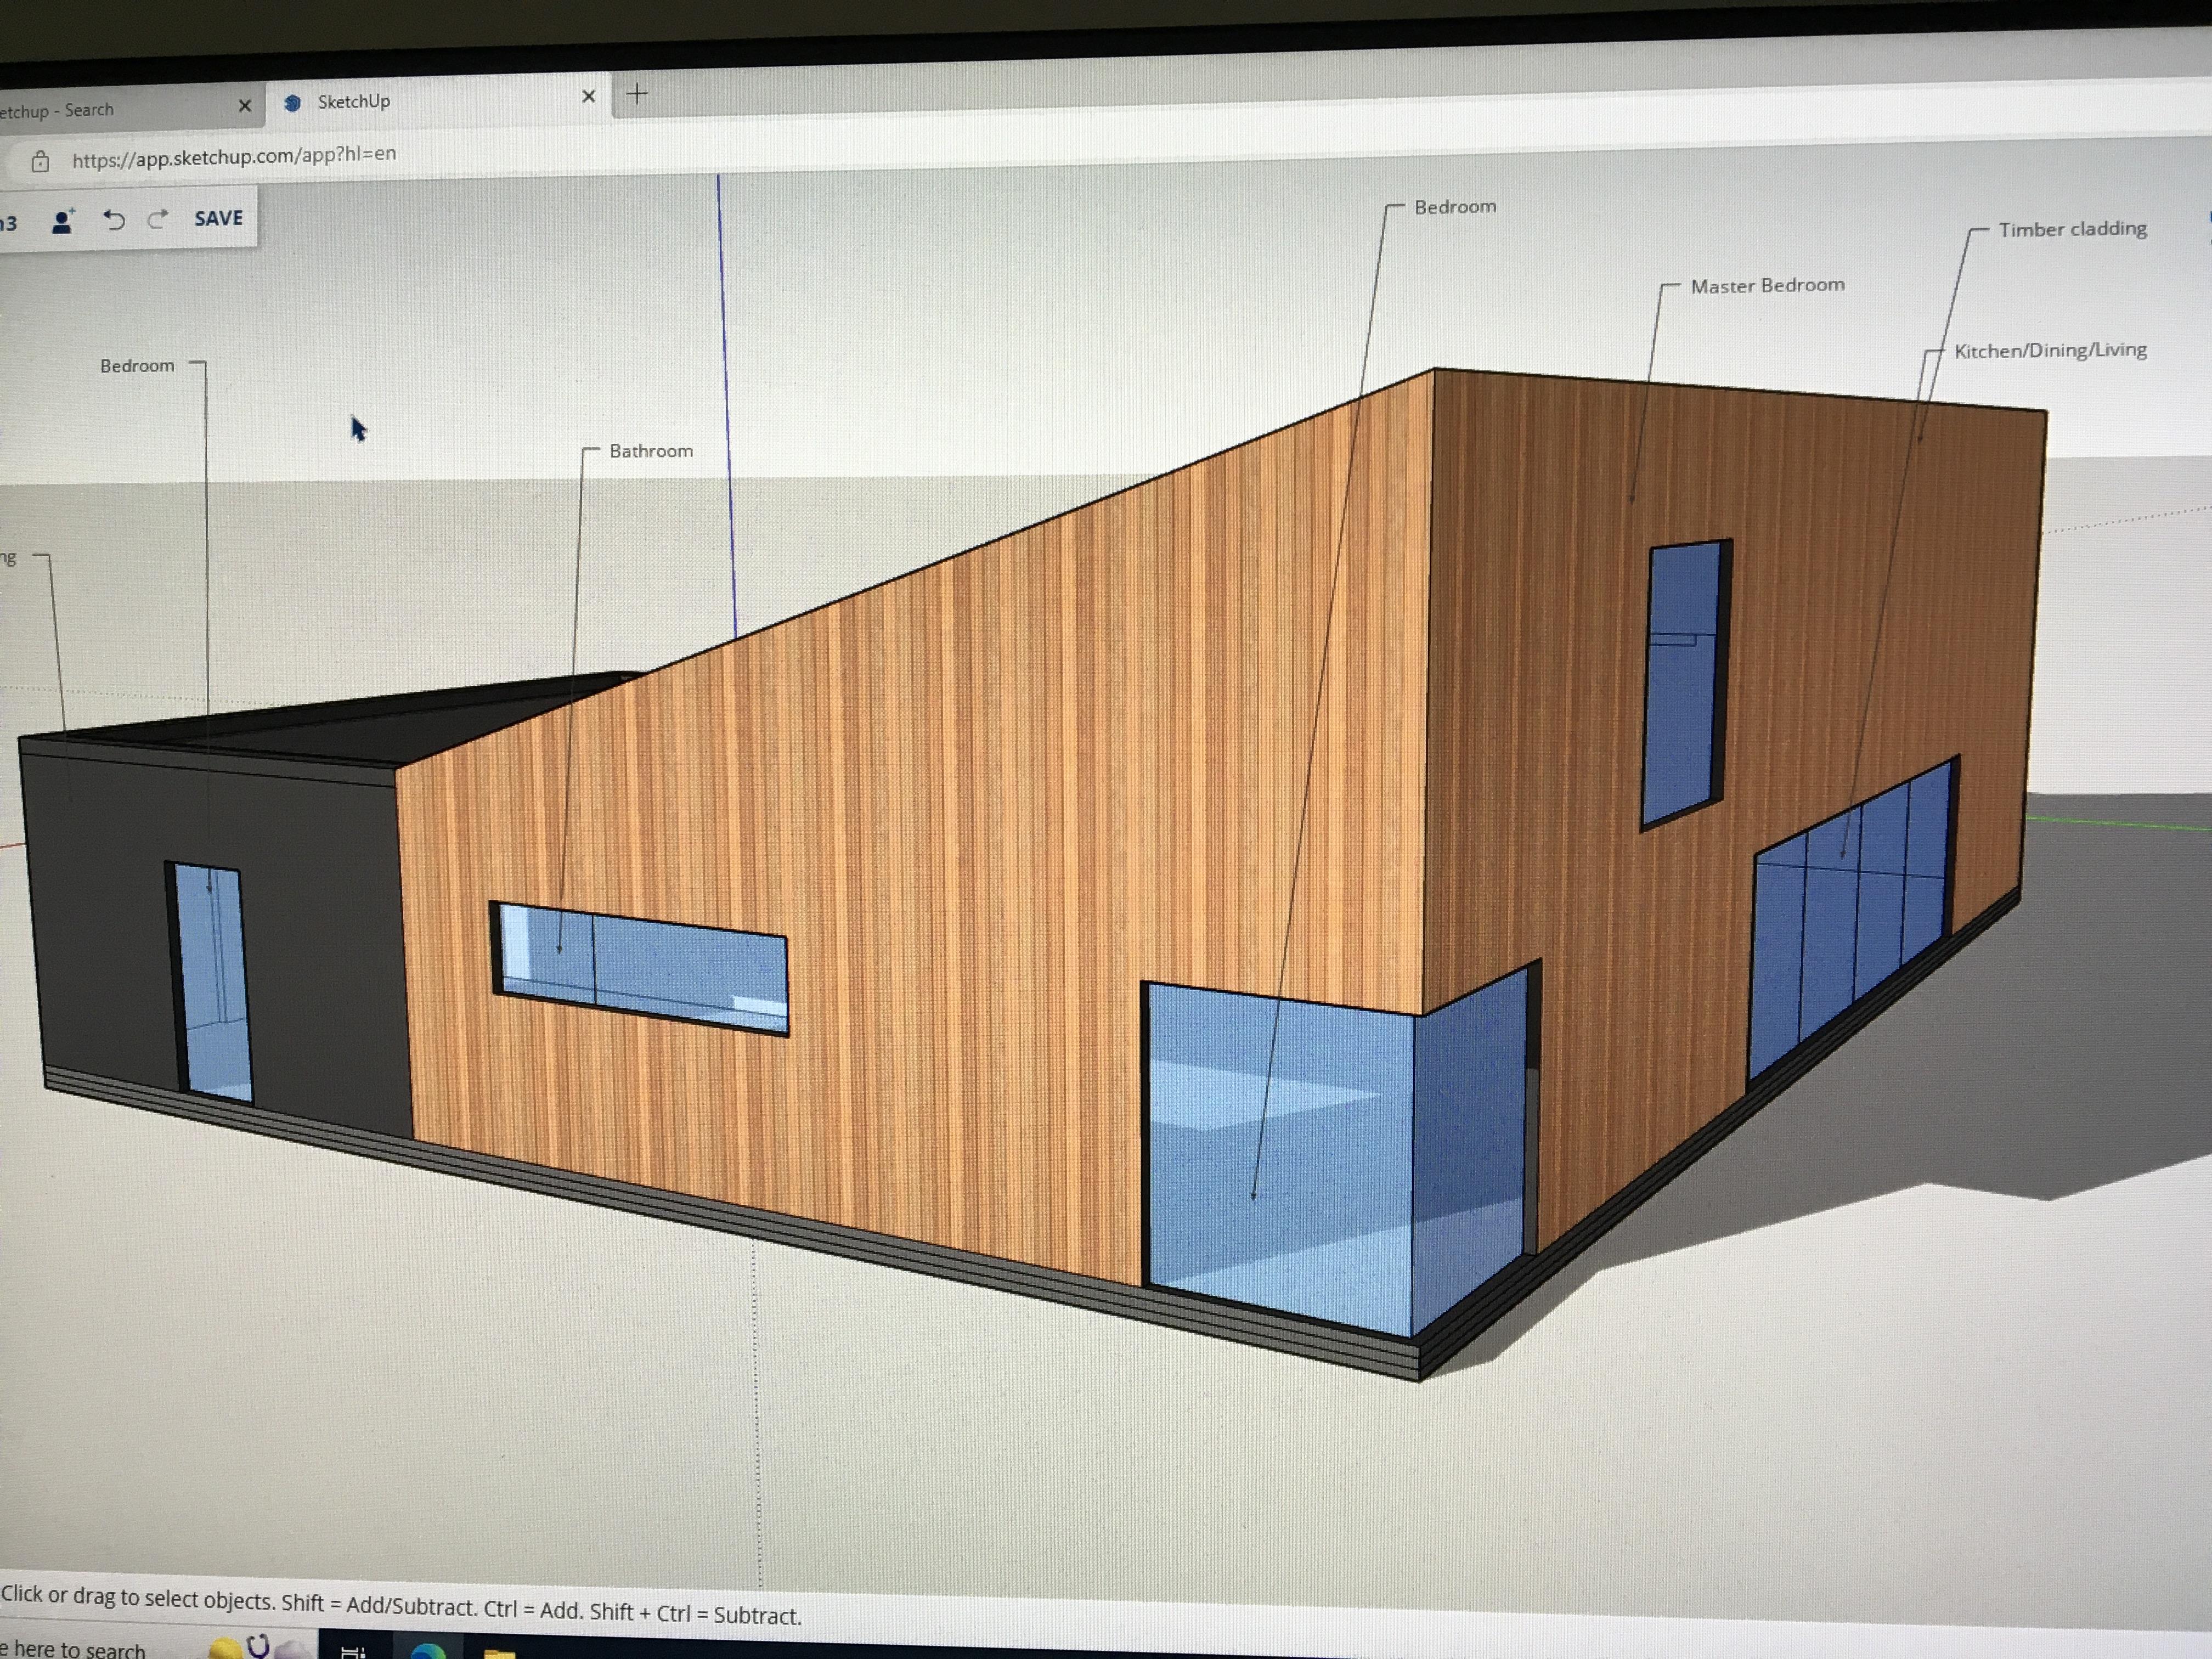
That is so uncannily similar to our build it's scary!! Floating corner, massive high single pitch... Black and wood cladding (though we used white render and the wood cladding for features)1 point
-
This depends on the type of slab you have. We had an MBC warmslab which is n × 50mm MOT 3 layers, each individually compacted followed by 50mm sharp sand compacted and refilled to 50mm; the EPC "jelly-mold" with the UFH piping fitted to the rebar within the jelly-mold then a single poured slab which covered the entire ground floor and which was spin floated and polished flat. (The biggest deviation across the entire slab was ~3mm slump along one exterior wall. The TF and internal partitions were erected on this after it had cured for 2 weeks. We then covered the entire floor with a riven slate as part of second fix (and the tiler took out the slump; he said it was the flattest squarest floor that he had ever covered). If you have a more conventional profile where the UFH and screed is laid as part of second fix then the internal partitions typically go in first and levelling goes from room to room. However, whilst the screeders will typically get the individual rooms pretty flat, you will often get left with a few mm ramp across door openings, as it they have to work towards a central hallway for rooms without an external door / means of escape. They will rarely get two separate rooms to the same FFL within 3-5 mm unless they are really good. If yours is in this second category then make sure that they give a room by room execution plan and exit / link strategy, because if you do have FFL jumps between rooms then you will at best get a shrug and "it happens". If you are erecting the (non-loadbearing) internal partitions yourself then I suggest that it is better to screed first, but others might take a different view. 🙂1 point
-
Clay tiles walls and roof.
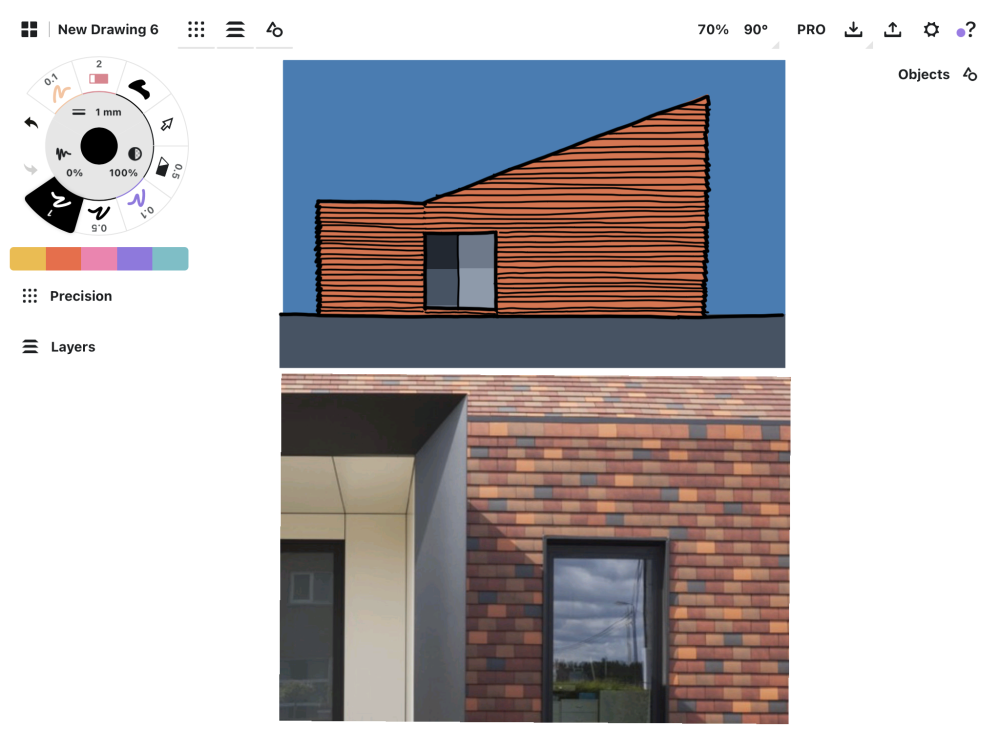 1 point
 -
Those aren't included in the £2500/m2 pencil number. Guesstimate number is 60k.1 point
-
Take photos with a measuring tape in place to show bearing length and email over. Depends who made the mistake the if TG engineer and the installer both work for the same company you might find, unsurprisingly, it will be "fine". The steels should really have been ordered from site measurements to solve issues like this, or an absolute guarantee the build would be done to correct dims and this imposed onto the builder, but even then, things slip. Options may exist to rectify, in fact I am sure they do, but you need to get this looked at properly now.1 point
-
Steel fabricators and/or the builder really should be taking site measurements prior to fabrication. Ditto with the timber frame fabrication. There are a couple of fixes - either needs to be properly approved by the design engineer, the steel extended (site welded if necessary), or the wall altered. Or a combination of these options. I would imagine that the engineer would say it's OK but you need that confirmation from them. This would be acceptable remotely if they have a full understanding of the issue (photos and written record).1 point
-
You should ask the engineer who specified the steel. The building regulations are not so prescriptive, however NHBC guidance does specify a minimum of 100mm for steelworks bearing lengths and it is a reasonable rule of thumb https://nhbc-standards.co.uk/6-superstructure-excluding-roofs/6-5-steelwork/6-5-4-installation-and-support/ I would have more concern that the wall is being loaded eccentrically but again this would need the engineer to confirm it is OK.1 point
-
Oh wow, your project does sound very similar! Yes, originally the only planning policy we could apply under was to convert the buildings so that's what we started with. The builders had to remove the asbestos roofs, after which we were going to agree on what would be required re dpc, potential additional foundations (no drawings to show what had gone in when the barns were built). But the corner ties of one building had completely gone, and the other two had cracks as well as being only 3 sided, plus not knowing what was underneath. Our intention was genuinely to convert, despite probably having some challenges to deal with, but there was a storm making the walls dangerous, a miscommunication with BC leading to some walls being knocked down for safety with the intention of rebuilding like for like, and then our planning officer happened to pass the site and called it in as a deviation from our permission. So we have ended up with a rebuild, which will ultimately be good in terms of the structure, but it want what we had intended to do or originally had permission for. Good luck with your build, look forward to hearing more about it!1 point
-
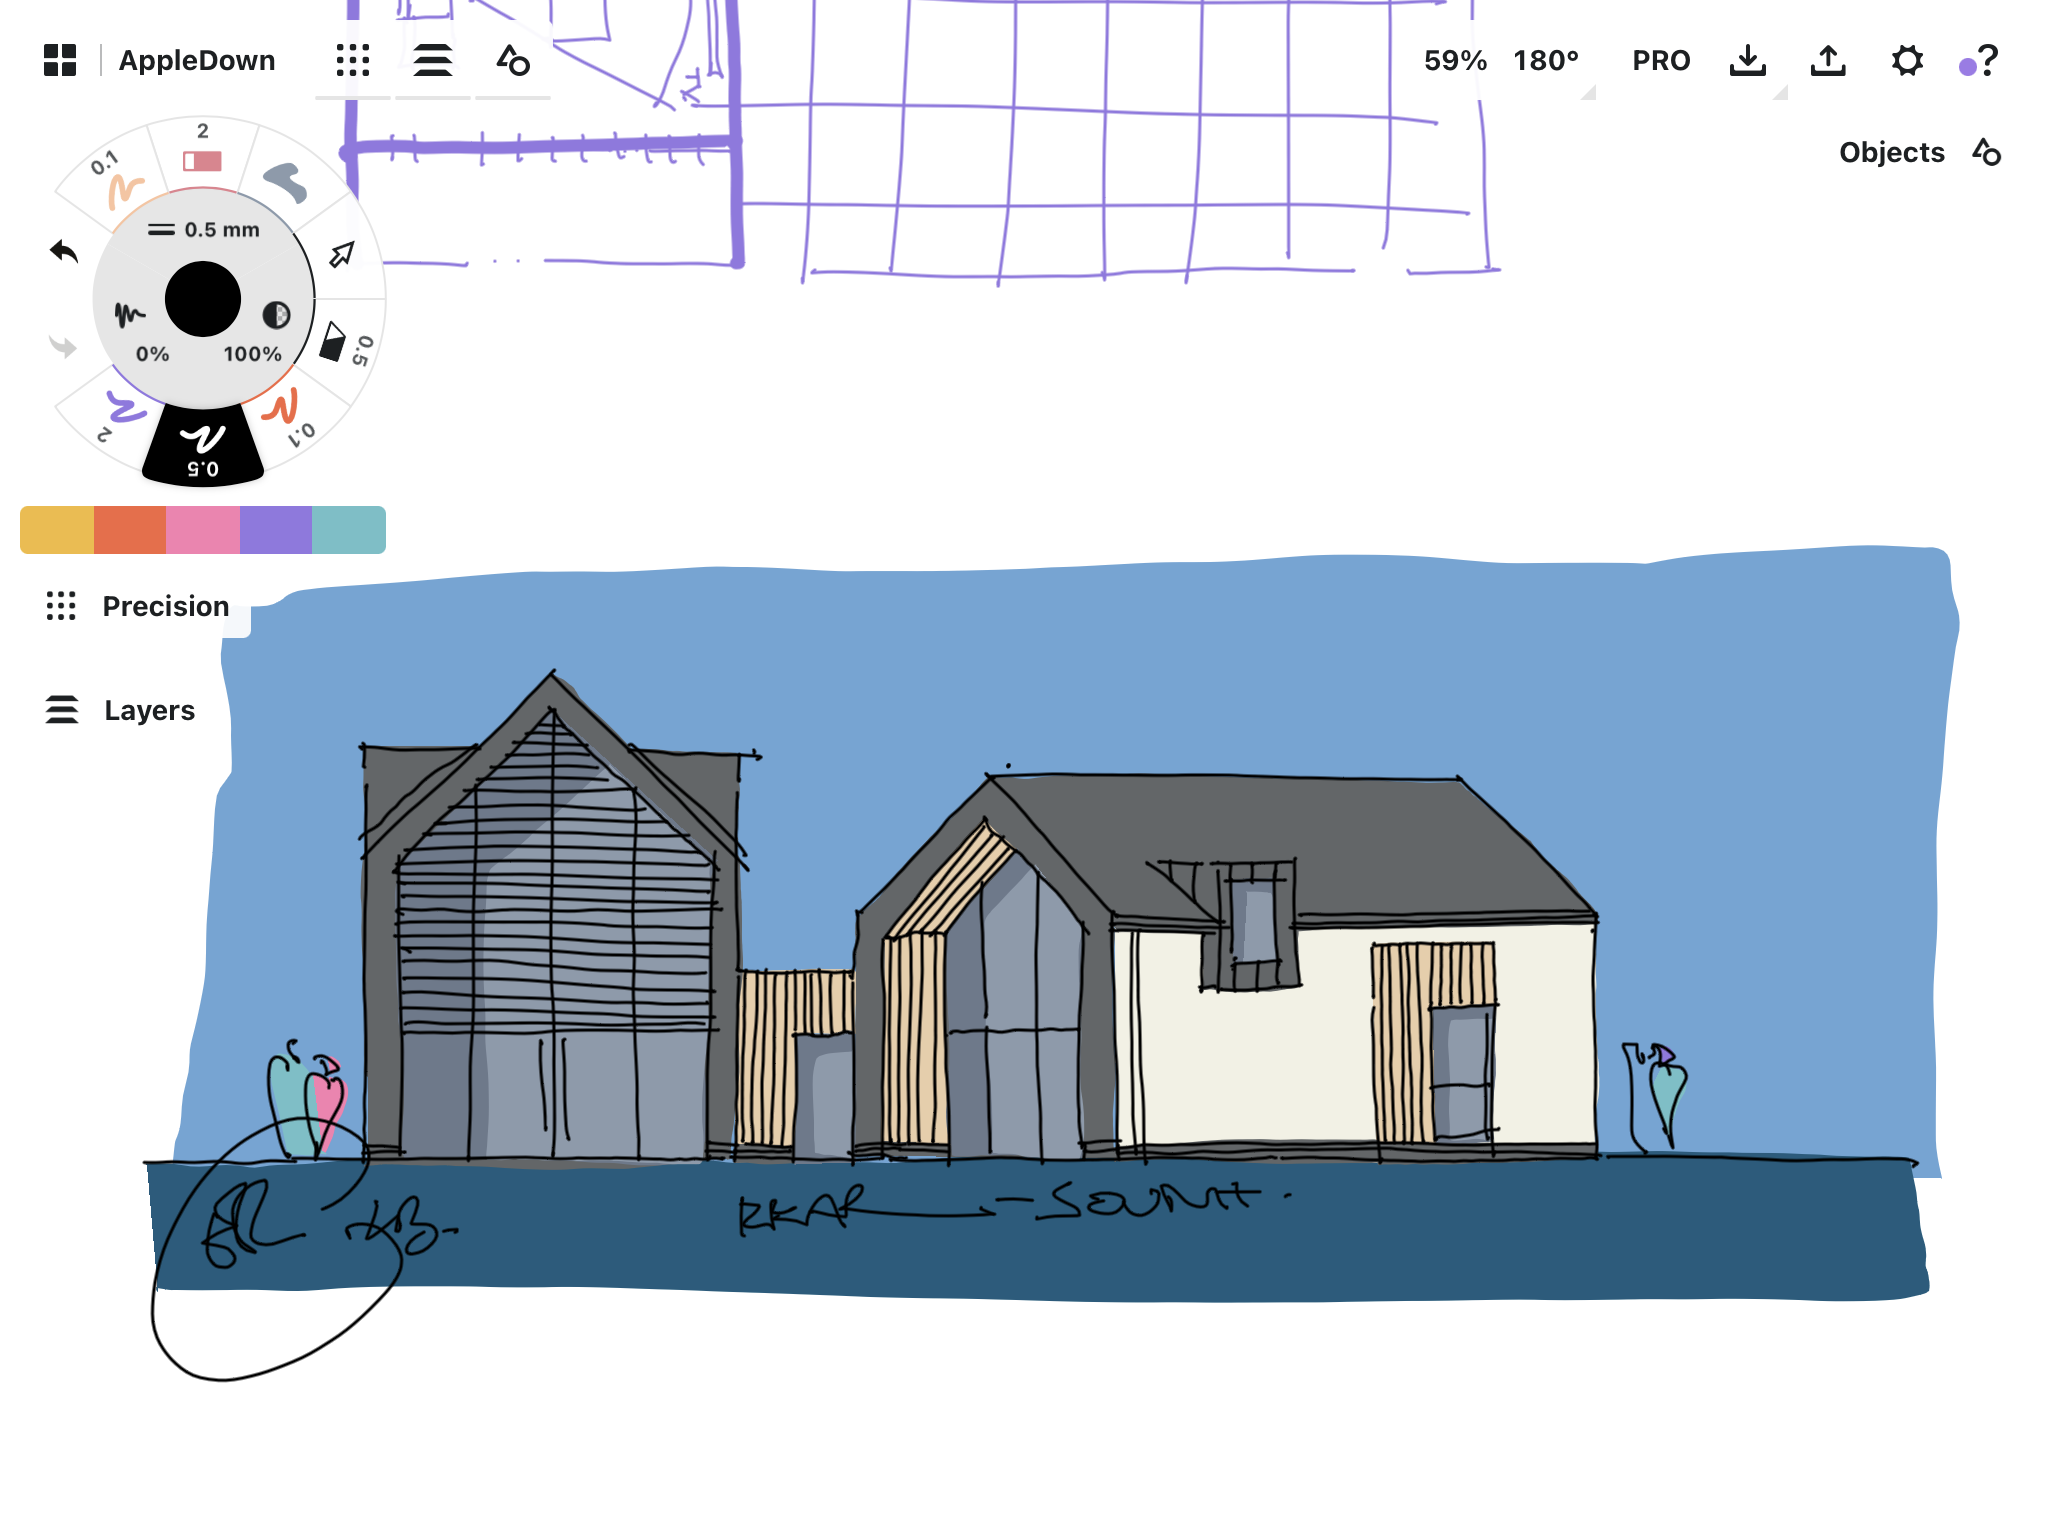
Had a bit of fun with your own layout this afternoon. Put a different set of clothes on it. Haven’t read your comments above but will do once I post this picture-take with a big pinch of salt please-letting my imagination run away with me.
 1 point
 -
If I may enter this. Passivhaus is good for providing strict, proven methods and attention to detail. Far too many houses are flawed because of corners being cut, lack of attention to detail, and basically not being a holistic design. So an option for control of this is a good thing. My own choice would always be to design the building I want. If that means that the big windows face south for the view, and have bifolds, then that is the priority. A wood burning stove too, if in the country. Then make it work efficiently, but appreciate that sometimes the doors will be left open, or the windows opened on a whim. But I don't trust 'others' to get it right and so I interfere and observe throughout. Not everyone can do that. And then there is the cost. It isn't available to everyone. Passivhaus is good design. Non Passivhaus can be good too, perhaps even better.1 point
-
If you are fixing matting to timber Use Ardex Absolutely Bombproof1 point
-
There is a big difference between a concrete floor and a concrete floor on top of a couple hundred mm of insulation. The insulation adds some give, so much so that a fell of some steps on to my bum, from a few feet up. Apart from the shock, I got up and carried on working. That would not be the case with just concrete. It's not soft, but it's not super hard either.1 point
-
Wasn't sure where to post this but here's our observations after storm Eunice passed through. Initially we watched the storm gather, we could see that that the wind was strong but from inside there was no indication, no sound, no draughts. As the wind picked up something we were not expecting happened, we could hear and feel a draught. We have two fairly large sliders and at the peak of the storm, the wind was pushing against the slider so much that there was airflow between the slider and the fixed pane. Not much and not continuous but it was definitely happening. Our air test was done to passive standards (positive and negative pressure) so we're fairly certain there is no problem with the sliders because if there was then the negative pressure test would have exposed that. Anyone have a contradictory view? A short time later we had a power cut , that doesn't matter. The house is warm, the Sunamp is fully charged (minus two showers), what could go wrong? Well, we're fully electric so there was no cup of tea to sup whilst watching the storm play out. Information gleaned is that the power will be out for over 48hrs And of course there's no heating. But what does that matter because the house is toasty warm at about 21.5° and we've not had any heating on for days. And the house is almost airtight, apart from the few blasts that squeezed through the sliders. Thanks to @Adrian Walker's advice we have a CO2 monitor, well we bought a couple. It was quite amazing how quickly the CO2 PPM started to increase after the power cut. Obviously the MVHR was having a bit of "quiet time", so now we had a toasty warm passive house that was not working as planned. As night drew in it got worse because lots of candles were lit. The only solution was to open some windows and get some airflow. Out of interest, it was only the monitors that informed us of the poor air quality, it wasn't something we sensed. So, we have a toasty warm passive house but with no airflow so a couple of the 'tilt and turn' windows on opposite sides of the house were tilted. That fixed things, air quality wise, very quickly but it also meant the passive house was now going to cool down more rapidly than planned. There are no heating options, apart from the bio-ethanol fire) so we were getting ready to break out the cold weather gear. Fortunately power was restored about 12 hours after the cut. We have a fair amount of PV, and it was quite a sunny storm but of course the PV trips off in a power cut. We were meant to have a battery system but the that didn't happen. The M&E individual who specced that (and didn't provide) had wired in an emergency power supply from which we could run the fridge and freezer in the event of a power outage, which was a pretty smart idea, shame it never happened, but actually my advise to anyone building to passive standards, if they have a battery system then make sure that the MVHR will run off the batteries. That's the main thing we've learned. If you have built to passive standard and have a battery system, make sure your MVHR can run from the batteries in the event of a power cut, I suspect most battery systems will power an MVHR unit for ages. Without that, you're not in a passive house anymore. Oh, and we had the first BBQ of the season this evening. Bit nippy!1 point
-
billt. Did you have any success linking the Viessmann 100 boiler to a Drayton Wiser using opentherm?1 point
-
Brick slips are slices of brick 10mm to 15mm thick which can be stuck to various substrates to give the effect of a solid brick wall. It certainly works as everyone thought our brick slips were whole bricks. https://www.wbs-ltd.co.uk/systems-solutions/system-finishes/15mm-brick-slips/ On the area under the porch glazing I stuck the brick slips directly to the EPS using gel PU glue. On the area under the front door you can see the EPS which was covered by the ramp up to the door. On the rest of the brick plinth the brick slips were attached using the Wetherby system on to BluClad board.
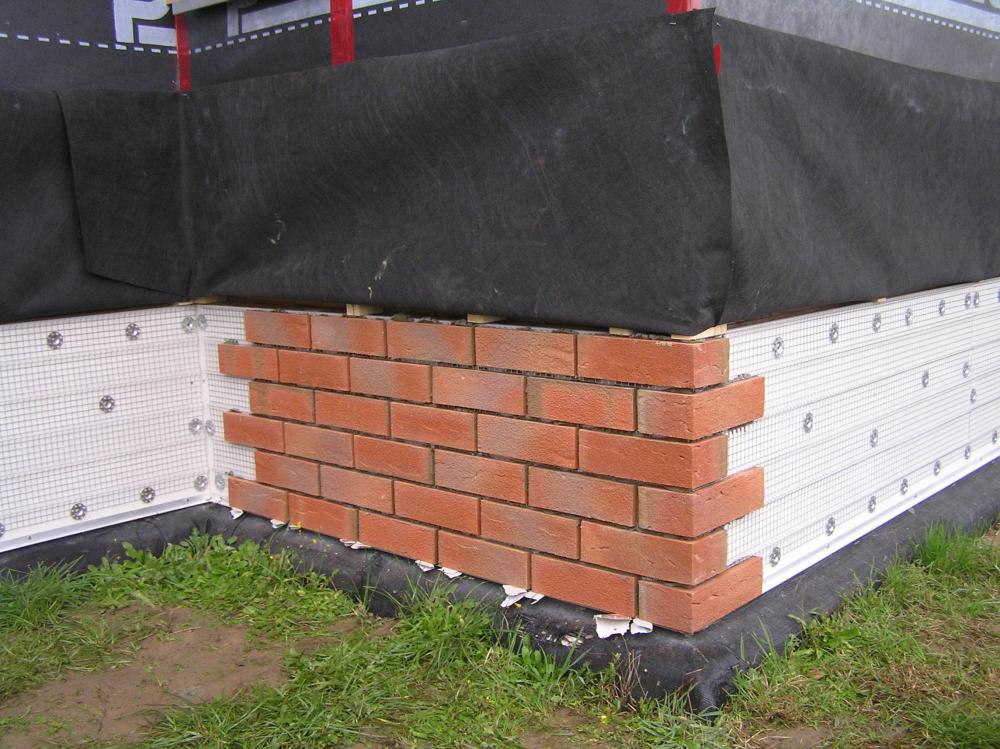 1 point
 -
No that's unfortunately not true. An Agricultural Unit gets one allowance to convert, with no renewal. They can now convert up to 5 properties, although not more than three large (greater than 100m² floor area) and the max cumulative area converted to large properties allowable is 465m². Small properties are those with less than 100m² floor area. But, the Agricultural Unit can not benefit from Class Q PD if it has used Agricultural PD (Class A(a) or Class B(a)) since 20.03.2013, until 10 years after that PD was used.1 point


This leaderboard is set to London/GMT+01:00