Leaderboard


Popular Content
Showing content with the highest reputation on 01/20/25 in all areas
-
In my case it was 13 years but same reason - didn’t want it to be a distress purchase - knew what I wanted and how I wanted it set up and saw no point waiting any longer2 points
-
pu adhesive I think @nod has suggested in the past, when peeps dont want to drill because of UFH pipework under studwalls, is this for the wall liner system?2 points
-
I replaced a working 11 year old boiler to avoid this issue, waiting for it to break results in only one realistic outcome, a new combi goes in.2 points
-
We're using the Fibolite 7n. When handling they're much more robust, feel more like a dense block than the thermalite 7, but still a decent weight and u value. Temporary timbers have held with frame fixers into the blocks very well.2 points
-
To my mind you are hoping you get a good brickie that can execute all this properly..and for that you will need to pay for a professional brickie @Canski may be able to give you some realistic rates. To be frank you'll need to stand over them all day long as fitting insulation properly into a masonry cavity is like buying a second hand car! Give it a miss unless you have the time! Fitting the any kitchen units for example is the least of your worries. A safer bet is to go for a TF which you can inspect, the air tightness and so on. Mind you if you have the capability to build this yourself then go for it. The big secret is to take care of your aerated blocks and condition them on site.2 points
-
I lifted our original unit upstairs, on my own, with a sack trolley, loads of spare climbing ropes, two Petzl stops as safety brakes, a steel cable and a tirfor winch. Took me about half a day to get it up a single, straight, flight of stairs. I used the tirfor with a 2:1 tackle to move it up one step, then locked it off with the ropes and Petzl stops, re-jigged the steel wire and tirfor so I had enough movement to get it up another step. The sack truck was rated to carry 150kg, but really struggled and has never been the same since. They only way to move these things safely is with something like the guys used on Thursday, a Zonzini powered lift and stair climber. That had the advantage of being like a mini-fork lift, in that the forks can be motored up from floor level to around the level of the back of a van, and then a couple of people can just about slide the unit across and strap it to the Zonzini. They are, without a shadow of doubt, a manual handling nightmare if you're on your own.2 points
-
Hi everyone. I recently had a loft conversion done and it's spurred my interest in DIY. Just looking to peruse the forums and see if I can make improvements on the build. Mainly to my new drafty eaves stoage.1 point
-
https://buildingcontrol.bathnes.gov.uk/building-control-services/building-control-fees-and-charges This isn't Yorkshire, of course, but does it shed some light? While searching I see a sugg'n from one firm that private BC can be cheaper but I am not sure that is always the case. Edit: Indeed it isn't: The search brought up only the application fee, not the inspection fee. I have sometimes had a discount from my LA on the 2nd app when I have done 2 together. Your price suggests maybe this has been applied. Assuming they are charging a fee for each extension, rather than one for both, I think your price sounds about right.1 point
-
I’ve laid a few dozen thousand Fibolite blocks as these are a preferred block for one of my developer customers. They are a good block and if you can get the required u values using them then go for it. Ytong blocks were my preferred option for my build though. A good solid aerated block that can be cut easily and nice and square using an old blade in a battery powered circular saw. Dritherm 32 is my preferred insualtion as well. Easy to cut neatly and doesn’t over expand when you get it out of the pack like some other makes. I used it on my build with my methods posted on a previous full fill cavity hater thread. Just make sure to keep it dry.1 point
-
Don’t forget to weight the track down overnight Bricks bags What ever you have handy1 point
-
I used Stixall for a bottom plate I couldn't mechanically fix, ensuring there was plenty of mechanical fixings in the end studs and header plate. Not budged since.1 point
-
I think if you attach your gl1 bracket quite low/close to the track that would give additional support to the pu glue1 point
-
Thanks for that explanation @John Carroll much appreciated. 👍🏻1 point
-
It should, units are important for clarity. kW kWh.1 point
-
May as well write it correctly, your posts look much more informed, and generally could be taken as way more factual. At least you show you know what you are talking about. kW. (k represents 1000, W represents Watts (as in a surname)1 point
-
It gives the impression that the customer has some control and can reduce their energy bills. I blame the marketing departments. (Metal Mickey was not at work today, so could not put the PCM under the lazer, hopefully he is in tomorrow)1 point
-
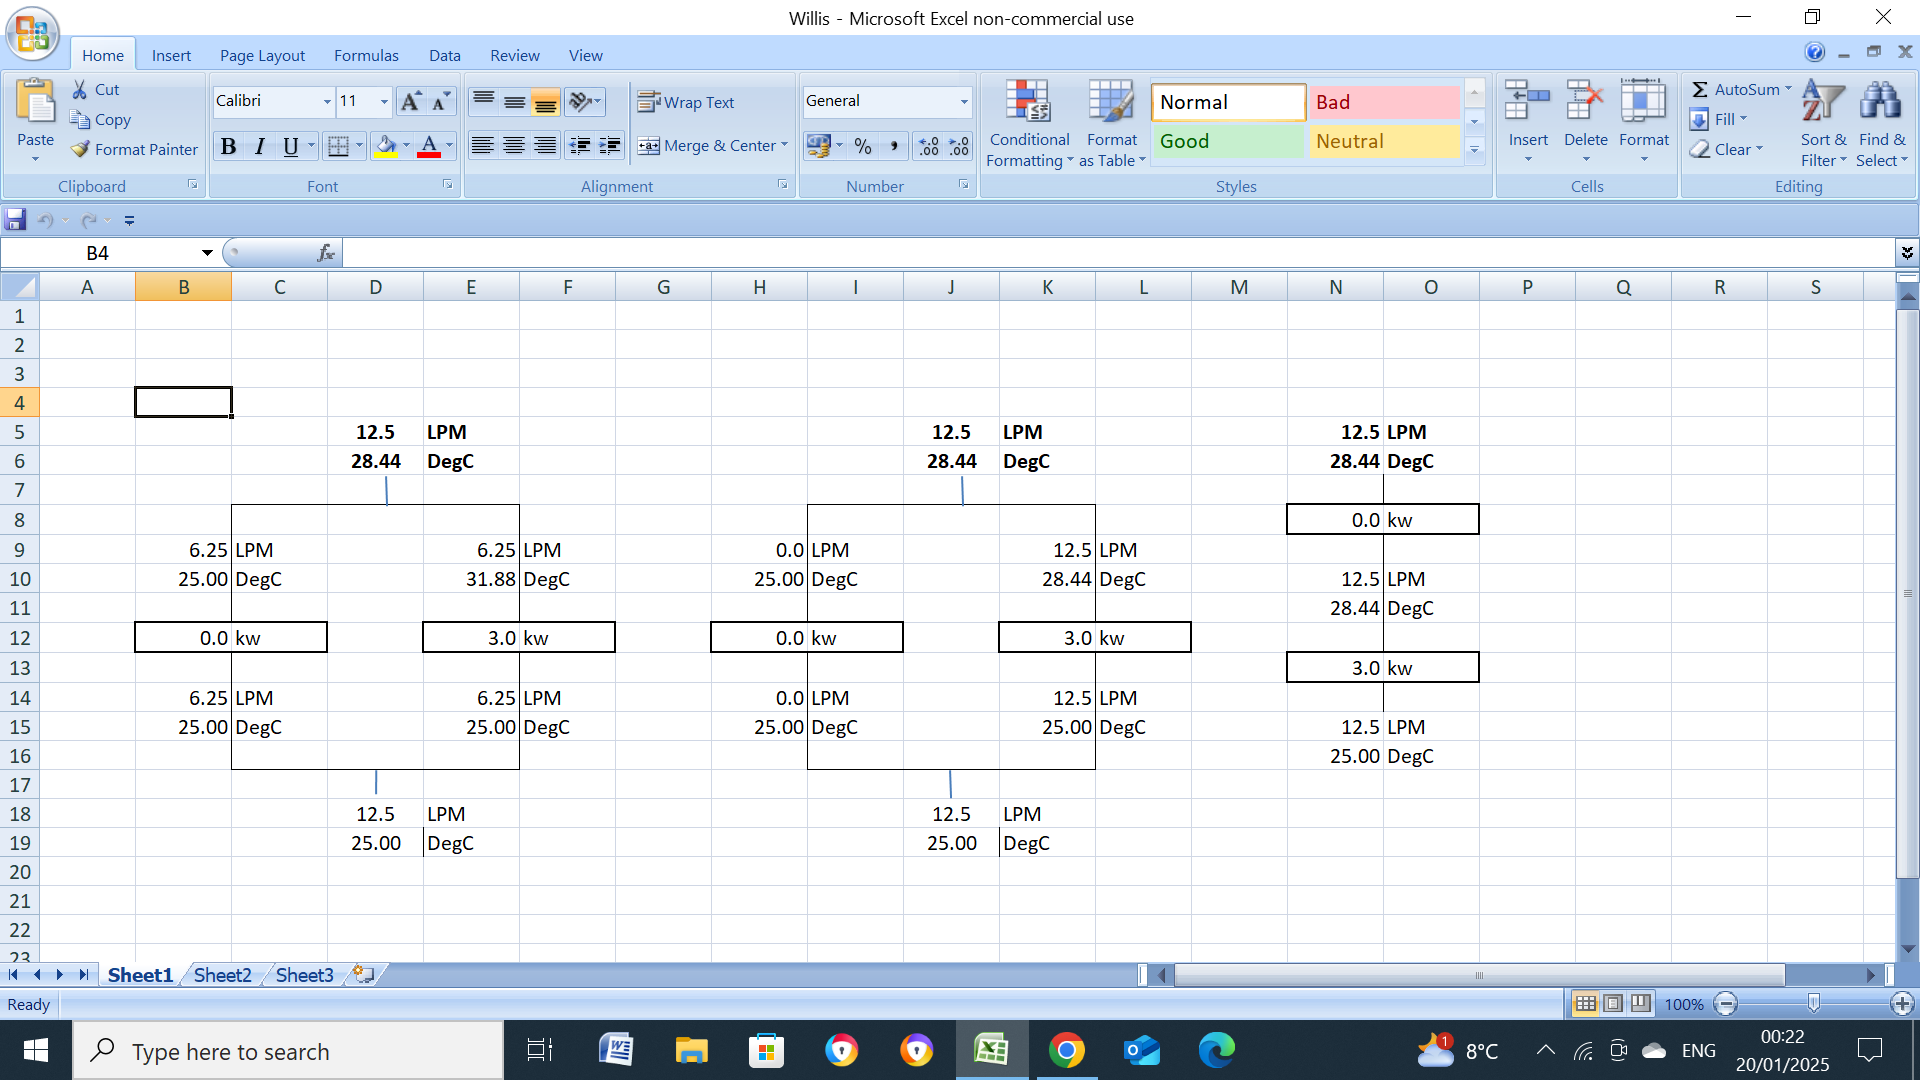
My maths?. I've allways used kw = (flowrate (LPM) x 60 x temperature rise, dT (deg.C)/860 so, kw = LPM*60*dT/860 or any variation of this once you know two of the values I used a total flowrate of 12.5LPM and 2 X 3kw heaters. From the above, kw = LPM*60*dT/860 dT = kw*860/60/LPM One 3kw heater, with a flowrate of 6.25LPM (12.5/2), will give a temperature rise, dT, of, 3.0*860/60/6.25, 6.88C, if the heater inlet temp is 25C, then the outlet temp is, 25+6.88, 31.88C, two heaters (on) in parallel will give a flowrate of, 2*6.25, 12.5LPM at the same dT of 6.88C with the same outlet temp of 31.88C. Two heaters in parallel with one switched OFF will give a 0.0C, dT , the other (ON) will give a dT of the above 6.88C. You now have 6.25LPM at 25C mixing with 6.25LPM at 31.88C. Let Tm = mixed temperature So, 12.5*Tm = (6.25*25)+(6.25*31.88) So 12.5*Tm = 156.25+199.25, 355.5 Tm = 355.5/12.5, 28.44C If one heater is OFF and the water flow through it shut off then 12.5LPM is flowing through the switched ON heater with a dT (kw*860/60/12.5) of 3*860/60/12.5, 3.44C, to give a outlet temp of, 25C+3.44C, 28.44C, the same as the above with the flow split between the two heaters. Two heaters in series, both ON, flowrate 12.5LPM. dT in both/either heaters will be, (kw*860/60/LPM), 3*860/60/12.5, 3.44C, outlet temp from bottom heater, 25C+3/44C, 28.44C, outlet temp from top heater, 28.44C+3.44C, 31.88C (same as with both parallel heaters ON, above) Two in series, one off, one ON, dT through ON heater, (kw*860/60/LPM), 3*860/60/12.5, 3.44C, outlet temp, 25C+3.44C, 28.44C, dT through top (OFF) heater 0C, outlet temp, 28.44C. (same as with one heater only on in parallel). You have ~ 800M of UFH piping, a loop might consist of up to 100M of piping with a flowrate of 2.0LPM giving say 6C to 8C dT at a flow temp of ~ 40c/45C, so each loop (assuming a dT of 7C) will emit, (LPM*60*dT/860), 2.0*60*7/860), 0.977kw, say 1.0kw, you should have ~ 8 loops so, at least 8kw if running at the above conditions, 45C/38C, so obviously 3kw will give a very much reduced output (it will give exactly 3kw if the heater stat never cuts out) because of the very low loop flow/return temps, each loop might/should have a flow meter tube showing the flowrate in LPM, if so, just add them to get the total flowrate.1 point
-
If this is the same company… https://www.thegazette.co.uk/notice/47732881 point
-
I've ordered one of the 50L Heatrae Sadia horizontal water heaters, should be here at the end of the week. Nice that it comes complete with all the bits needed to install it, PRedV, accumulator, tundish, built-in T/PRV etc, although the PRedV is redundant, as I already have a 3 bar one on the supply, plus our well pump cannot exceed about 4.5 bar anyway, given the depth of our well. If anyone wants a 22mm PRedV they are welcome to it, as I already have one spare sat here. Plan is to fix a doubled up bit of 19mm marine ply to the wall above the door, secured with loads of hefty screws into the studs behind the plasterboard. Should be fine to then bolt the bracket to this, as the max weight when full is only a tad over 70kg. Nice thing about this water heater is that it isn't smart, something of a rarity now. Last thing I want for a standby, emergency hot water system, is something that is too damned clever for its own good. Quite why anyone would ever feel the need to have a WiFi connected and controlled hot water heater is beyond me. I just want something simple that will provide some hot water if things go awry. Last thing I need is to be faffing around with an app in order to just have a shower.1 point
-
Not really, to be fair, the plot purchase was the major hold up (solicitors work to their own schedule it seems, no matter how hard they are pushed). As I understand it from our architect there were no really difficult questions or revisions on the warrant and nothing structural. Mostly on fire protection which was easily detailed on the building iteself. It is a little frustrating that the requirement to provde a reservoir of water for the fire brigade (because we're >100m from a hydrant) was not brought up until the last minute. I'd have expected the architect to be aware of this (given the location of the plot it's MILES from the nearest hydrant) and included it up front.1 point
-
Specific Heat Capacity times Mass Flow Rate time Temperature Difference. That gives you the power required. For just the energy you use Mass, rather than Mass Flow Rate. It is always best to use SI units (J, kg, K, s) rather than imperial or derived units. Convert all temperatures to kelvin, K, it can get funny when passing through zero sometimes, especially when dividing (after rearranging formula for instance).1 point
-
FINALLY! we have our Building Warrant approved. Nearly 2 years after making an offer on the plot; I really hope the rest of the project goes a bit quicker! 😁1 point
-
I think that looks like a good solution. I'm sure 50 litres of hot water is fine as an emergency supply, as 40 minutes recovery time is reasonable. Just read your last post. An aerating shower head would reduce the water use.1 point
-
I'm not sure if it's a good thing, but putting in my overall figures, it's pretty close to my "Total Heat Loss". But I'm pretty air tight, have mitigated most thermal bridges and benefit from plenty of solar gain, so I'd have expected your model to over state my thermal losses. But, costs are someway off. Either your Total Heat Loss value is dividing by COP of the HP (which I don't think it should be) or your costs are not considering the COP of the HP. It also assumes heating all year, where in reality I have around 90 heating days a year. Your ventilation value (ACH) - are you using that for the MVHR loses or for uncontrolled loses? It should be uncontrolled loses + MVHR loses in my view. I assume you've not accounted for thermal bridges ie. by setting some defaults values? Not all values are saved if you close and come back in. ie. location, manual house volume and energy source selection are not saved.1 point
-
The other day my wife asked what we’d do for showers if our system stopped working for some reason. I pointed to the newly plumbed in dog bath and electric shower. Has a handy shelf for sitting on and a door and step to get in. 😂1 point
-
Love the spreadsheet! Love it so much, that it inspired me to try and build something similar in an interactive web app. Still early days in development, and definitely not finished, but feel free to play around, and see if it helps you. http://pdmove-001-site2.jtempurl.com/1 point
-
Your a bloody legend mate.1 point
-
That’s normal though in my experience. Once you apply the final top coat with a harder paint it’s fine. I have always wiped the plaster with a damp sponge to remove any dust.1 point
-
1 point
-
The trouble with a lined tank, is any area where the lining is flawed or has a defect (crack, pin hole etc), the base material of the cylinder is subject to huge galvanic corrosion rates. That is the principle reason for the anode and why they have to be replaced periodically. I would not have a lined cylinder to save a few pounds, copper or a decent stainless steel, would be the only choice.1 point
-
AFAIK the phosphate treatment will not have any effect on the anode eroding. The anodes are to stop the tank material from corroding where there is some possible damage to the interior lining of the tank.1 point
-
A dense concrete block will be fine Most Architects specify dot and dab It does have a warmer fell if sealed properly Using an insulated plasterboard for dot and dab on the perimeter walls will up rate your U values and give you a very warm build Timber Frame is a very good option But expect to add about a third to your build cost1 point
-
Yes, it would and will, but the outlet flow and temperature will be the same, whatever configuration you use or way you install the heaters.
 1 point
 -
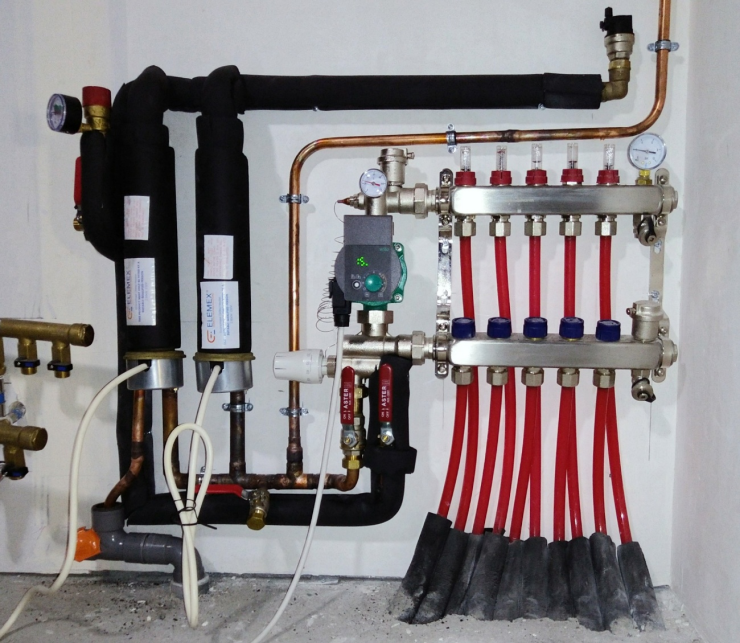
I've no questions, but with much thanks to those who documented their own Willis-based UFCH and in the hope that it may be of interest to someone else, here's a photo of my Willis heater UFCH which is now up and running on a temporary supply here in France. Sadly, due to French liability laws, I had to resist installing it myself and use a local plumber, in order to obtain a 10-year warranty. I'm not sure if it was the Willis heaters or the concept of 15mm pipe (unknown in France) that intrigued him most. The pipe disappearing top right heads to an expansion vessel. The insulation will be redone and completed more tidily once the room is finished. Once the electrical install is finished later this year, the heaters will be controlled primarily by Node Red running on a Raspberry Pi, via a Shelly Pro 4 PM which will also double-up as a backup controller in case the Pi goes down. The Shelly will in turn control the contactors that will switch the power, via a Hager 60060 load-shedder. The load-shedder will temporarily switch out the heating (and, if necessary, the hot water) when the total load approaches the 52A supply limit, which is likely when cooking.
 1 point
 -
Will do so now!.1 point
-
That's certainly more scientifically calculated than my interim finger-on-pipe method! But I guess you were intending to post in this thread?1 point
-
I'll qualify this by saying that mine is still running via a (suitably rated) extension lead, so I only have the temperature gauge on the manifold & finger on pipe to work with. So, based on my limited experience (the end of last winter and this), I suspect that you're just running the pump too fast. After experimenting manually with different settings, the pump tells currently me that it's running at 2W, pushing between 100 & 200 litres / hour, which seems to work well; It has no trouble reaching it's maximum of 38°C within a short space of time and without the heater cutting out. FWIW I corresponded with Elemex (one of the manufacturers of Willis heaters) on the topic when planning my system, who advised that "circulating of the pump /flow rate and heat transfer would ideally want to be smartly controlled to find the most efficient flow-rate : heat transfer ratio". Which I hope to do next winter. I do have twin heaters (pic), but only one active. That's mainly so that I can switch power from one to the other if/when a thermostat packs up; they're both permanently in the flow. And maybe so that I can get to temperature more quickly from cold / to take advantage of cheap-rate electricity.1 point
-
That's impressive! A very good point - a single start-to-finish solution would be much easier than the multiple moves that would be required to get it from van/pallet -> street -> corridor -> courtyard -> hoist -> floor -> final position. As long as a Zonzini can cope with semi-spiral staircases as well as straight flights, and provided the battery will hold out to the 6th floor.1 point
-
You are deluded if you think the SA can be anything other than floor mounted? Even more so in a confined space. It's a genie lift job for something like this, and if it ever fell on top of someone then the are brown bread mate. These things feel as if they are full of dark matter... @Jeremy Harris what say you on these being installed, elevated, in a confined space, in an apartment? Sorry - I was referring to the Telford Tempest suggested by Nickfromwales; I should have obviously quoted that in my reply to avoid confusion. No, I wouldn't want to suspend a SunAmp!1 point
-
There’s two types, glue down and click, the click version can have an underlay or has a built in underlay and can be used on slightly uneven floors. The glue down does not have underlay and needs a perfect base to lay on.1 point
-
We had 110 sq m of Amtico laid, it took 30 bags of Mapei Self-levelling Compound to get a finish. My Amtico guy was a joy to watch, it was a privilege to watch him work After the SLC he was meticulous going across the whole floor looking for any bubbles or imperfections that he sanded out. He used a primer to key the surface. As a tip for the install, he laid down every plank dry and marked where they would land. He worked in about 12-plank increments. He obviously knew exactly how much adhesive he could manage and he spread it out to the markings. The thing that surprised me most was that he also trimmed back the underside of the leading edge of every single plank to ensure that there was a perfect join. I cannot find fault with anything he's done I have done amticof mysel in a small bathroom. I did an OK job with the planks but failed to prep my plywood properly and ended up with a a small bump where the planks butted each other. That house is now someone else's problem but I wish that I'd had a pro do it Regards Tet1 point
-
We laid our LVT down on 2mm foam underlay. Still had to do a fair bit of scraping and prep. Feels great underfoot1 point
-
You should get a slightly higher temperature because the pipework surface area is decreased. Probably too small to measure though.1 point
-
The overall flow temperature you are seeing is the result of the return temperature, the flow rate, and the power you are putting into it with the heater. I would wager if you valved off the "off" heater, you would see exactly the same figures as you are still putting in the same amount of heat.1 point
-
Yes, they will file a questionnaire and statement. I think they get copied to you by the appeals system (can’t quite remember). They may or may not file final comments, probably not, because they won’t have any more information by then. You probably will want to - to counter their arguments and that’ll be the first opportunity after you have seen their case. I remember though that some docs didn’t get copied to us, so look out for updates on the LPA’s site.1 point
-
We had Amtico LVT floor tiles laid in the bathroom and en-suite at our last place. I took a great deal of care preparing the floor so the fitter could just come in and lay them. When he looked at the floors he said he would have to do some filling and scraping. He spent quite some time doing this and at the end it was like a mirror. He said it was critical that it was perfect, as any imperfection on the floor surface would show on the tile. I'm afraid I can't help with floor primer but IIRC he used a knife, straight edge and roller, but I didn't see a soft hammer.1 point
-
I have used Lead R which is a bit like flashband but tougher and a darker colour. Take your time to mark and cut the pieces and it should look OK. That flashband looks awful.1 point
-
If there are concerns about longevity of this wall, your neighbour ought to be even more concerned than you are. I'd start by talking to them and offer access to your side for the builder to improve it.1 point
-
Yes. Rainwater from the roofs into a rain garden, then into a holding pond, which we use to water our veg garden. Cost? 500 600 quid. Commercial grey water recycling we thought financially unviable. Unless we needed to feel scorched by the heat of our own worthiness in the pub. Nice to have, but we decided to spend on the kitchen instead.1 point
-
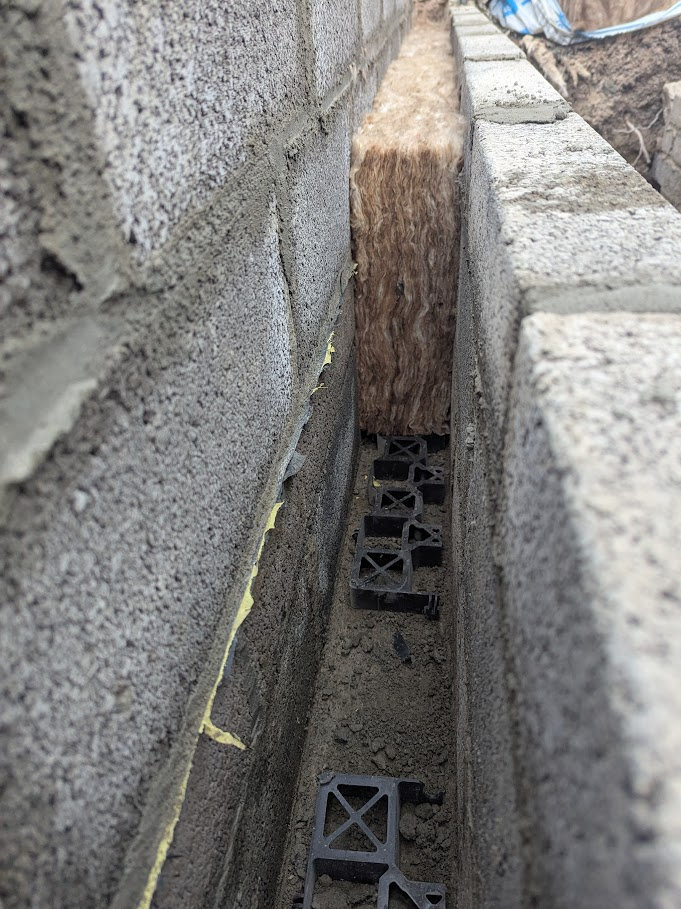
'Fluffy stuff' as my builder calls it is going in. Seems pretty easy to work with. And here's the jig for cutting the cavity tray profile. Straight cuts are super straightforward, but on an angle it's a lot trickier to hold the line.

 1 point


.jpg.c21f3ac78c9b7efd90cbdcb312744dc5.thumb.jpg.7adcad4c0e384f5ecd7d56b0618df6e5.jpg)