Leaderboard


Popular Content
Showing content with the highest reputation on 02/05/24 in all areas
-
The only problem with using black or grey pipe underground is it’s not as thick walled so in theory could crush if loaded a lot, personally I would use either and surround it in concrete (or not 🤷♂️)2 points
-
I would have contested that planning condition and instead asked them to specify "private treatment plant" The Biodisk would be my last choice, moving mechanical parts that WILL one day break is not a good idea. Have you bought it yet? If not I would hold fire on ordering and let us recommend something better (one of the air blower treatment plants)2 points
-
Well, @Iceverge , those two last posts of yours are one reason why I keep coming back to BH. Thanks.2 points
-
Many thanks to @crispy_wafer, who was kind enough to send me 2x couplers. The only condition was that I make a donation to the running of the forum, which I have done. @jack should see the funds in the forum PayPal account now. Thanks again - top community spirit on all fronts! Tim2 points
-
It probably goes over 3kW when you are doing more than one of: cooking, kettle, iron, washing machine etc, but that isn't that much of the day and everything under 3.68kW you would consume from a battery during those periods anyway, so yes, could still make sense. Try to find 3.6kW, rather than 3kW though.1 point
-
You may want to consider aluminium copings for this.1 point
-
Yes, why it is a big K for kelvin. No. Specific means by mass, kg, small k as it is 1000. Every material will have a different specific heat capacity and it is not based on material type i.e. gas, liquid, solid, density shape, metallic, non metallic, natural or man made, pure or alloy etc, and just to make it worse, most materials will vary the SHC with temperature and what phase they are in i.e. gas to liquid. This is also known as sensible heat. Wedged in between phases, the place where the state changes, but the temperature remains the same, will also have a different heat specific heat capacity, this one is called latent heat. Basically yes, when half the energy has gone, there is only half of the original to loose. This is where shape comes in, and is why surface area is important. The larger the surface area, the faster the energy can be lost, why we have large surface area radiators with low temperature systems. What is really happening is that it is giving up its sensible heat, specific heat is basically fixed. Heat is only the old word for energy and has nothing to do with temperature. This often causes confusion, just remember, if you see the word heat, replace it with the word energy, and see if it makes sense, if it does not, then replace it with temperature. I tend to think in terms of energy and power for most thermodynamic 'things'. All that means is how much of something do I have to play with, and how fast, or slow, can I get rid of it. Bit like budgeting at the end of the month when you know you have a bill or two to pay.1 point
-
Yup, I used to change the diaphragm on my Secoh pump every three years or so. I could then do it at my leisure rather than when it broke.1 point
-
I quite like it, but you can also get slightly thicker version from other manufacturers. I got it from EpicAir, they are quite good to deal with and if not not their site they seem to be able to get hold of it. Easy to use and cut, not cheap but gives a nice finish. better than trying to make a bendy floppy duct straight.1 point
-
Pir board over the studs, all taped together, foamed and sealed around sockets, taped to floor and ceiling plasterboard can go directly onto this with long screws, or add a batten and fit plasterboard to that. or you can use a 50x50 batten and I fill with a rockwool type slab, and plasterboard onto the battens. lots of ways to skin this cat,1 point
-
Or just the diaphram which can be diy,ed on most pumps.1 point
-
our existing bungalow has a biodisk. started smelling a bit recently. check in it and the disks had stopped moving. called out the local company and the motor was fried due to a seized gear box. £450 +VAT later we have a working Klargester again. can't wait until we demolish this place and move to our nice new Graf system where all i'll have to change is a pump every now and again.1 point
-
No. If it is going to support roof and floors it needs to be structural steel and will cost much more than brick / block, timber frame, sips or icf.1 point
-
I used 180 flexible ducting then wrapped it in rockwall insulation to stop condensation from cold air in the incoming pipe in a warm loft.1 point
-
Core master. Think £250 for two guys and their rig for half a day. That was enough time to get setup and 5 large cores drilled through 150mm and 200mm RC.1 point
-
An extra 25mm insulation is a no-brainer1 point
-
If you could get them to lift it into the hole, that would be a plus. The next one I do, subject to space and ground type, I may dig a ramp and manhandle it into place on gravel. That removes time pressure from the nagging digger driver ( who thinks getting it level is OTT. They only weigh about 250kg.1 point
-
How to size your tank is generally based on a three bed house with a minimum population of 5 people. You then add one person for each additional bedroom so yours would be 5+2. The manufacturers of the plants typically size them like this. Here’s the Graf options for example. However when I was looking I noticed some size them such that you’d need to go to the next one up https://www.graf.info/en-gb/products/sewage-treatment/sewage-treatment-plants/one2clean.html1 point
-
I think the basic construction - wall / floor / roof layup and heating system should be described accurately along with the epc in all house transactions. In fact, to get a somewhat accurate epc, the epc person needs to actually know what the layup is and the heating method rather than just guess (officially called 'assume').1 point
-
This is the one I used, I note the company has changed their name, no longer Conder. You would need a larger version that one is up to 6 persons. https://www.drainagesuperstore.co.uk/product/rewatec-asp-sewage-treatment-plant.html In a lot of cases which one you choose comes down to availability where you are and transport costs. I ordered mine from Travis Perkins as they gave the best price including delivery by their own hiab truck.1 point
-
I've now got the 4-relay ESP32 board that I discussed in an earlier post. I've still to test it out, but the general design and build quality is very good. I bought it on Amazon with Amazon delivery for ~£50. The same board is available form AliExpress (plus other variants and options) for around half that, but on a ~2 week delivery. It comes with a pre-installed Tasmota firmware that was vendor-built and configured to its hardware setup. This build includes some components that I don't want (e.g. Alexa integration) and missing some that I do (e.g. the on-device simple scripting). Nonetheless, it is easily usable out "of the box", so a good way to get started. However, there is quite a learning curve to being able to build your own custom Tasmota binaries -- enough to deter me and I have a lot of experience of building custom ESP8266 and ESP32 binaries, so I guess that only a few % of board users would be confident to go down this path. The other main OS firmware route is to use ESPHome. It's strengths and weaknesses pretty much compliment and contrast those of Tasmota: you can't get prebuilt standard binaries for ESPhome, so you need to configure and build your own. However, because everyone has to do this, the whole process is a lot slicker and simpler. If you use Home Assistant, then a couple of clicks will install the ESPHome add-on and this adds a docker container to HA that includes a complete build environment. You configure each ESPHome device through a YAML file that follows the HA configuration guidelines, and the add-on includes a Python script that converts this YAML and orchestrates the device firmware build. So doing these builds is pretty pain-free. For this board, the vendor even provides a step-by-step guide on how to configure their boards under HA. By default ESPHome connects back to HA and even uses this connection and a health heartbeat, so the board will enter a safe (all relays copen) state if HA dies for more than a configurable timeout. However this is also configurable and you can run the firmware with optional or no HA integration. It is also trivial to add simple interlock and other scripting rules. I will add an update when I have this all working.1 point
-
Phone the manufacturer as they know all the rules. Marsh will give you the price too, and your BM gets a commission out of that. Tell them the back story in case a particular klargester model has any significance. A sampling chamber is good practice too, whether or not planning or regs are asking for one. Normally I'd email thd planners to say I was using an alterative, but you don't need to here, as the BCI will approve it.1 point
-
Lack of planning IMO, nobody decides a sink position has to line up,with a drain 🤷♂️ much better (in a new build) is to bring the drain into the house and not have scabby pipes showing at all.1 point
-
I like Graf plants, marsh ensign also good. Whats good about the Graf One2Clean is that its one chamber, so any issues down the line, a de sludge and you can get in and fix anything (if needed) not possible in the smaller tanks with multi compartments. Graf also have a very high level of water treatment, so should satisfy any requirement of a PTP (package treatment plant).1 point
-
Should be fine, all down to what building controller is happy with. Probably look at it once and just nod. Two bathrooms upstairs and one downstairs on the same stack isnt un-common. Added utility sink and washing machine isn't adding much into the mix.1 point
-
The hse statement is sensible enough. If you choose to lean them, then secure them, any way you like. Is the cable readily adjustable, while holding the board just tilted back for removal? Thats the likeliest time for the stack to move. Hey, maybe the manufacturers have got it right, supplying them horizontal..1 point
-
I have a 3.6kW sunsynk inverter + 15.5kWh Seplos battery (from fogstar). Building the battery was slow but easy, and I think should only be done by people with some electrical experience. It's so crucial not shorting stuff out! I got the vertical 280L battery - big recommend - it's got wheels! Once built, a 15kWh battery is insanely heavy, so wheels are very helpful. Only issue I noted was having to pack out the bottom myself to get good battery compression. We use 7.5p elecy always now too. Well - more like 7.5p/efficiency, and the round trip efficiency is 76% (round trip carefully measured AC-batt-AC averaged over 30 days with a mid certified meter), making it 9.9p/kWh. The sun is peeking out now, so it'll all be free soon!1 point
-
You may find that improving airtightness will be more beneficial. What is the floor and roof insulation like? I am just thinking that ripping out the plasterboard will be a bit disruptive. If you do end up doing IWI you could use a PIR board which won't eat into the room as much.1 point
-
https://www.hse.gov.uk/safetybulletins/stackedboards.htm1 point
-
Eden Insulation in Appleby also use I beams in their cassettes. Panel Construction | Eden Insulation Ltd1 point
-
What can you do...... Well good news is that the house won't fall down. You should start to take note of internal humidity. It should be no higher than ~60% RH at ~20⁰ .Heating and ventilation is how to achieve this. Ideally mechanical ventilation of some sort. This will prevent the issue getting worse. Ideally you would remove skirting boards and ceiling plasterboard and air seal around the first floor slab internally. Practically this is probably not possible unless it's limited to a very small area of the house. In any case you will need to sort the external render as now it's exposed to the Donegal rain it will degrade quickly. This will require removing the existing paint and render and reapplying something of a higher permeability like lime or silicone render. Even something like less permeable (but more permeable than Evertex) like sand and cement with it's very high tolerance to moisture would probably be ok if you were to control internal humidity. However these solutions would only work if any exterior paints were to be of high permeability in the future. A couple of coats of an exterior urethane based paint would undo all the work again, especially with lime render. ( Sand and cement may survive as it doesn't mind the damp so much) The most robust and permanent solution I can see is to apply a layer of external wall insulation (EWI). In Irelands temperate climate, this would ensure that the vapour that escapes via the cracks above and below the slab would almost never reach a point in the wall below the dew point and condense. Normally this is rendered with a silicone or acrylic render however in our climate of driving rain this would need to be done very carefully or you might be back where you started from. It's not encouraged in Norway any more for that reason. https://www.mdpi.com/2075-5309/8/7/93 External cladding , metal wood or fiber cement over the EWI would be very robust. Come to think of it you could omit the EWI and just do this anyway but you wouldn't solve the problem of water condensing in your wall then. TLDR. 1. Control internal humidity with heating and mechanic ventilation. 2. Apply EWI + Render with caution or 3. Apply an external rain screen with or without EWI.1 point
-
The evertex coating you used has popped up on lots of forums with issues regarding bubbling and peeling etc. They must have had some issues with previous jobs because they closed and reopened under the name https://everflexcoatings.ie As far as I can tell it's a very thick paint, probably of very low permeability. When airborne vapour escaped from the interior of the house via air leaks it got to a point in the wall where the temperature fell below the dew point, the vapour condensed to water and as it couldn't dry out it soaked into the original line render, diluting the adhesives of the lime and it fell off as you can see. My theory is that insufficient air sealing was done below and above the first floor slab. There was an easy path for indoor air of high humidity to pass right through to hit the back of the render. Here it cooled and condensed into water. As the original lime was of high permeability, the condensed water was ultimately able to dry though it to the outside so damage was limited. However when the Evertex was applied the water couldn't go anywhere, it soaked into the lime render and then you had problems, gravity did it's part and the water migrated down the wall destroying the render below the slab area too. The almost perfectly straight fault lines in the render are my evidence of air leaks combined with the impermeable paint being the issue. I would almost certainly rule out differential expansion of the slab and walls as they are similar materials, and the distinct two lines at slab level rather than a complete band point towards air leakage rather than a thermal issue. TLDR: Bad air sealing above and below the slab allowed moist internal air condense behind the impermeable paint dissolving the lime render.1 point
-
Sounds like good pragmatic advice... when my TF designer said there's no problem in designing cassettes using i-beams, he was probably referring to work he's done for building firms. Maybe he wasn't considering the buildabiliity of it for a novice self builder like myself. I've seen the connection details in the JJI manuals and they are scaring me off a little. I might give myself a break, just do a "normal" cassette with solid studs, enjoy some straightforward nailgunning me-time and save the brainwork for other technical stuff, such as ASHP, MVHR etc1 point
-
I've fitted a unitrap, happy with the quality and flexible installation options.1 point
-
My corresponding as designed figures are around 0.12 for the first three and IIRC 0.9 for the last. As I discussed on some of my blog posts, the total heat loss from air exchange is about a quarter of that that of the combined loss from the walls, roof and windows, but that is because I have an airtight house (~ 0.5 ACH) and MVHR. But this would not be the case with a leaky house built to typical 2008 air-tightness standards and no heat recovery. This would increase this element of the pie maybe 5-fold and would become the biggest single source of heat loss. Do the quick check, eg. a JSH style spreadsheet of Σ A×U×Δt, to get the as-designed heat loss, but I suspect that your losses are so high because: The as-built performance is nowhere near as good as the as-designed spec. IMO, most builders are often very slapdash if not under tight quality supervision. It's just that their general ethos does value good thermal performance. Jeremy Harris once did a walk-around a new estate near his house (on a very cold Feb evening IIRC) with a decent FIR thermal imager and there were whole wall and areas of roofing with missing insulation, major leaks and hot spots around fenestration, etc. It is very leaky so your air-exchange losses are significant. That's why I suggested you borrow rent or buy a FLIR add-on for your mobile or even buy a cheap spot IR thermometer. Work out why your house is leaking heat like a sieve first before spending 10s £K on getting a more efficient way to generate that wasted heat.1 point
-
Your Rockwool is probably a good balance. The important thing is to install it properly, no gaps and not pack the wall tighty.. it needs a residual air gap.... see installation instructions. Following the installation intructions is probably the most eco freindly appoach.1 point
-
I’ve got lots of room my joists are 9” plus the counter battens so should not need any tight bends. Where they will go up the plantroom wall they will be between 2 joists so I can gently arc them then clip to noggins1 point
-
I don't know anything about the company, but you will pay for the windows - at least in part - using a credit card, yes?1 point
-
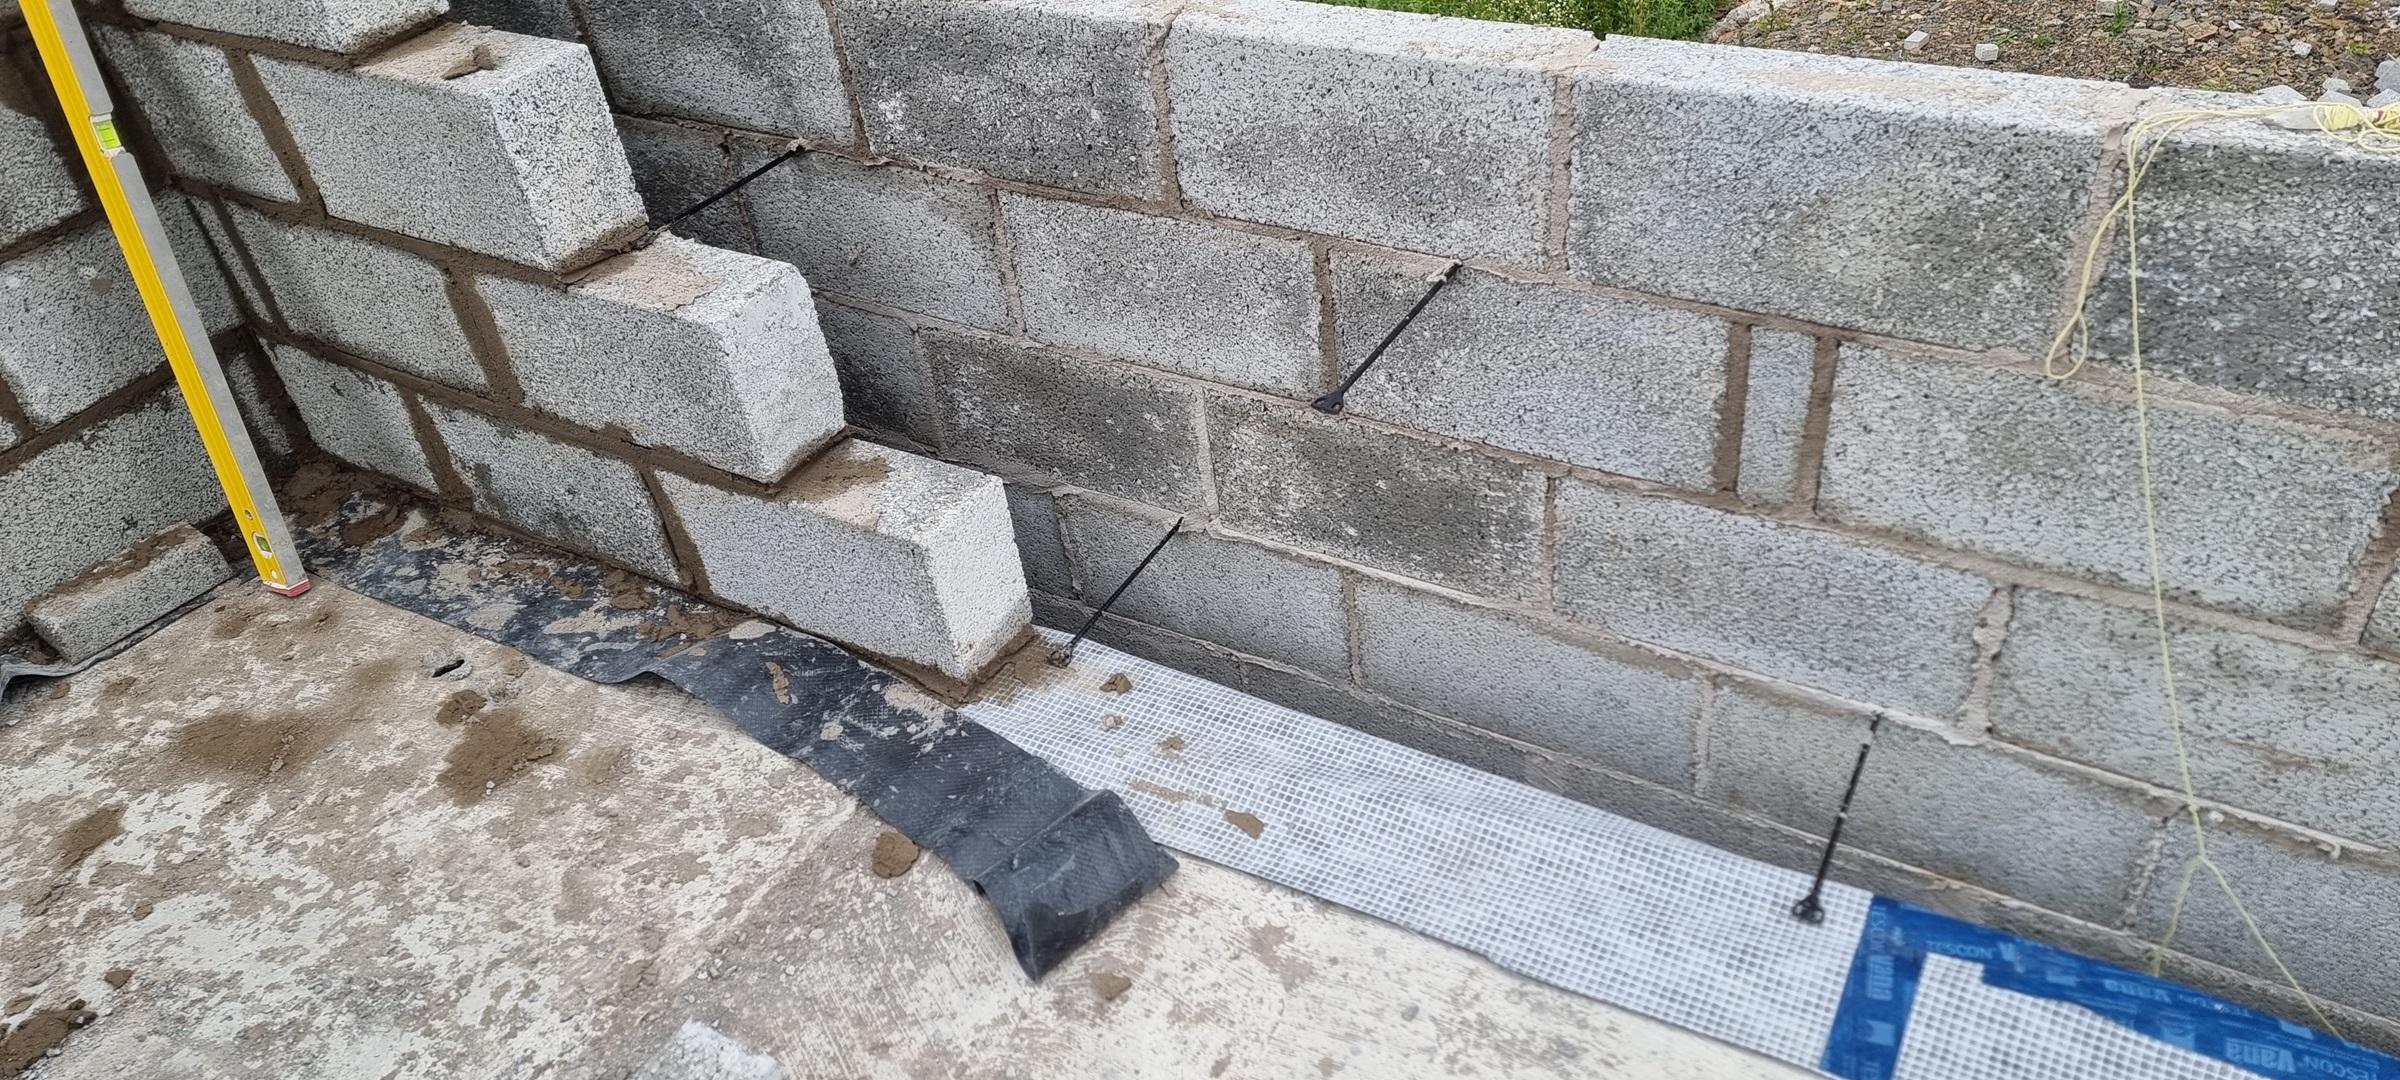
No we didn't apply any tape in the cavity. The tape above is temporary during constuction to keep the mrmbrane off the floor to protect it. I read on another forum taht it was impossible to keep mortar off the membrane so I went totally OCD on this. No need to tape in the cavity because the weight of the blocks above holds it in place ok, but in the days between the slabs going down and the FF blocks being laid, that is when it rained ono our site and the water pulled the membrane into the cavity. Another reason to seal the ends of the slabs, for us it was worst where the end was not filled. We needed to pull the membrane back up into place, but the blocklayers won't pause for anything so you need to be on site to make sure the membrane is still in the right place before blocks are laid on it! The solitex membrane is incredibly durable but it is vulnerable to damage if blocklayers drop blocks down the cavity. Happens rarely fortunately but woth checking and reapiring any damage with tape as you go. In your second picure you have dpc over the membrane in the cavity, this is probably wise to protect it in the the cavity. The membrane will eventually be taped to the walls as per your second image with contego solido tape and then plastered over. Another thing I did was after the slabs were laid I went around and chipped off the sharp ends sticking into the cavity with a bolster to remove any risk of puncturing the membrane if it was pulled tight against the slab. This is probably unecessary but was easy to do on a sunny afternoon. The membrane will need to be managed at internal wall junctions (ours were not tied in so a bit easier) and internal corners are a nightmare. First course, some dpc over the membrane: Later courses, the membrane was temporarily attached to the wall and covered with dpc to protect it: ... the membrane takes a lot of work. It was ok for me because I had time to be on site a lot and I like a challenge. It's far less hassle to fill the ends and have mortar and airtight paint above and (especially) below to seal the gap. Looking at ours now I'd say that the mortar above and below gives an airtight seal to the membrane and we don't need to do much more.

 1 point
 -
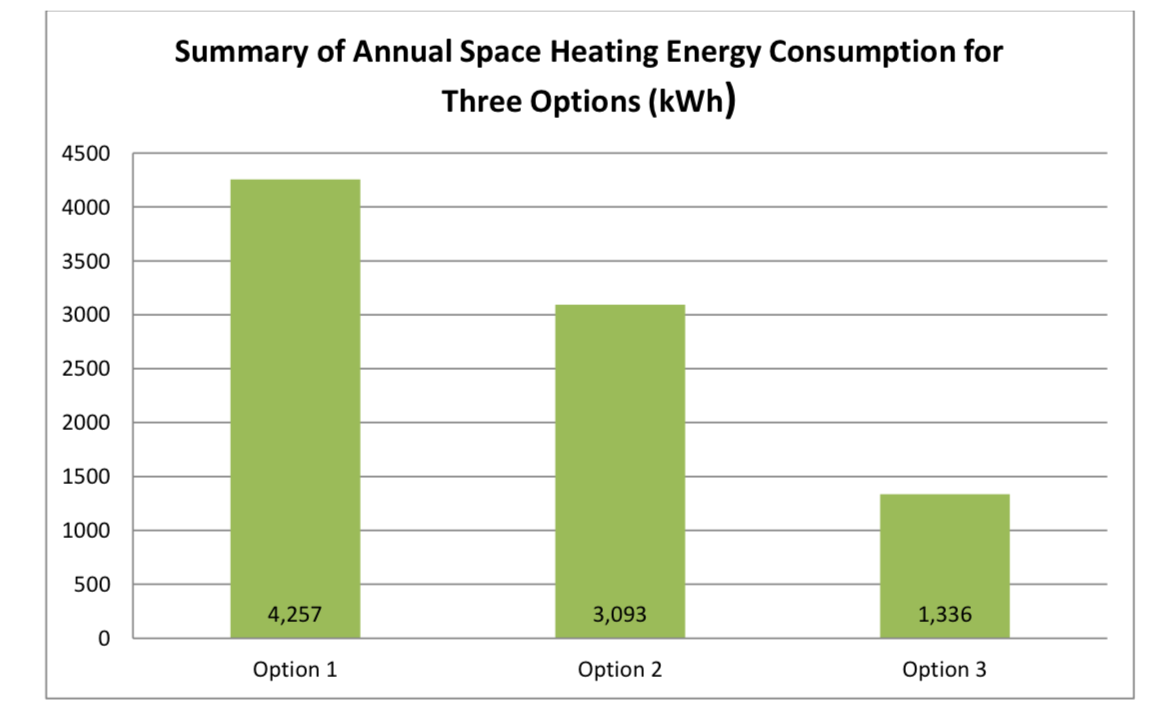
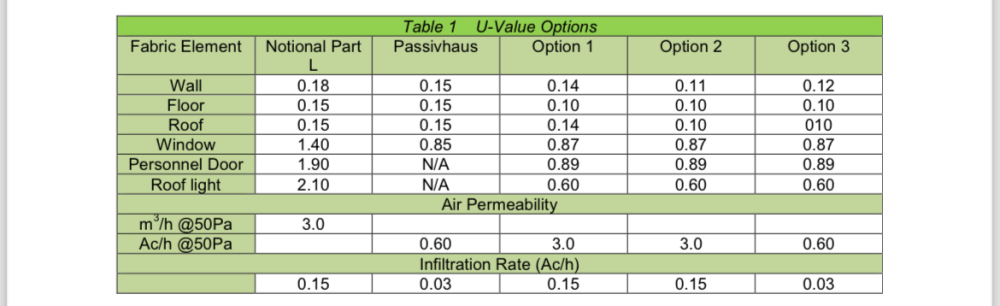
We did some thermal modelling on three options. And Once you hit a level of u values airtightness is more important.
 1 point
 -
Again Jeremy I think you are viewing this from a perspective that doesn't align with the motivations of why many of us are fitting MVHR systems. We are doing it to provide a high quality comfortable living environment. If the selected mechanism can do this more efficiently than others (e.g. thanks to any amount of heat recovery from MVHR compared to a PIV system) then that's a bonus, particularly if that mechanism adds further to the main goal (e.g. the added comfort from MVHR giving a supply of relatively warm fresh air rather than the cold that PIV or trickle vents would). I do agree with you that, if measured financially or in terms of efficiency, older and less-airtight homes reap fewer benefits but again it is not these benefits we are seeking, particularly in these types of homes. JFDIY's experience is a great example of the true benefit of MVHR for many. In my case we didn't have a problem per se to fix (e.g. condensation) but still have benefitted from it and thus consider it most worthwhile.1 point
-
MVHR...less dust in the house, less pollutants like radon, off gassing from furnishings and carpets, people on here with allergies report benefits, mould issues reduced, constant fresh air.1 point
-
So when you need a plasterboard, you take the clip off with a drill, move the board from the stack, then reattach the clip. Maybe cone off the area and set up some flashing lights and a siren. And have a couple of security guards on hand.0 points