Leaderboard


Popular Content
Showing content with the highest reputation on 01/23/24 in all areas
-
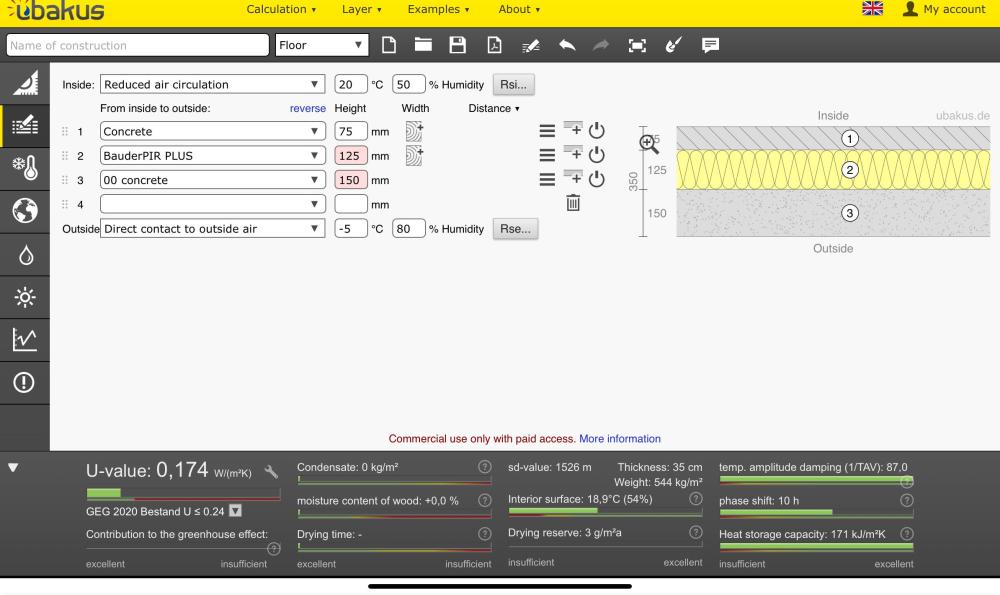
Why do people get so hung up about thermal insulation, it really is not difficult. The main thing to remember is that the power, in watts (W, J.s-1) that passes though a material is approximately proportional to three things, conductivity (k, λ), temperature difference (∆T) in kelvin (K), and thickness in metres (m). In arithmetic terms, the thermal conductivity of a material is written as W.m-1.K-1, or W/m.K (as I have never found a way to write a superscript negative sign on my Android phone). Different materials have different thermal conductivity. Taking extreme ends of the spectrum, natural diamond conducts at a rate if 2200 W.m-1.K-1 and a pure vacuum, for these purposes, is 0 W.m-1.K-1. Now we don't, in the real world, work at the extremes. So let us stick to some more common building materials. Ordinary brick, k = 0.72 W.m-1.K-1. Concrete k = 1.28 W.m-1.K-1. Timber k = 0.14 W.m-1.K-1. Mineral wool insulation k = 0.038 W.m-1.K-1. Expanded polystyrene k = 0.04 W.m-1.K-1. Polyurethane foam k = 0.03 W.m-1.K-1. Orientated Stand Board (OSB), 6% adhesive k = 0.16 W.m-1.K-1. Plasterboard k = 0.19 W.m-1.K-1. There is, obviously a lot more materials and it is down to whoever is calculating to find and check figures. An example of this is granite, there are a lot of different types and the k-Value can range from 1.73 to 3.98 W.m-1.K-1. So do your research. It is not normal to fit a metre thickness of any insulating material, If we did, none of this write up would be necessary. Because we use fractional dimensions i.e. 0.2m when planning the insulation levels of a building, the more common thermal resistance (R = K.m-2.W-1) is used. There are two advantages of using the R-Value, it takes the thickness of the material, and the area of the material, into account. Converting from the k-Value to the R-Value is really easy, just divide the thickness by the k-Value. R = l / k R-Value is often quoted and one thing to be careful of is that imperial units are often quoted. You may have noticed that R-Value has somehow introduced a m-2 unit, this comes about from dimensional analysis of all the International System of Units (SI) units W, which is kg.m2.s-3 and some arithmetic rearranging when combined with the other units, m and K. This is a useful as we do not have building elements that only have thickness, they also have area. The most useful thing about R-Values is that they can be added together to give a total thermal resistance (ΣR). Taking a simple wall build up of:) Outer: Brick, k = 0.72, 0.1m thickness. Full Fill Mineral Wool, k = 0.038, 0.2m thickness. Inner: Brick, k = 0.72, 0.1m thickness. Plasterboard, k = 0.19, 0.012m thickness. The overall thickness is 0.412m (dimensions may vary, so check). Using the sum (Σ) of l / k for every component makes for a long equation, and it is usual to use a spreadsheet. ΣR = 0.1 / 0.72(outer brick) + 0.2 / 0.038(mineral wool) + 0.1 / 0.72(inner brick) + 0.012 / 0.19(plaster board) ΣR = 0.139(outer brick) + 5.263(mineral wool) + 0.139(inner brick) + 0.063(plaster board) ΣR = 5.604 K.m-2.W-1. Note here that the effects of the mineral wool are dominant and that large R-Values are better. It is not normal to talk about a house, or wall, having an R-Value, but a U-Value (anyone know if R should be proceeded with 'a' or 'an', sounds like it should be 'an', but U sounds better with 'a'). Changing to U-Value, which is W.m-2.K-1 is simply a matter of taking the inverse of the R-Value K.m-2.W-1 U-Value = 1 / R So in this example: U = 1 / 5.604 U = 0.178 W.m-2.K-1. If the wall, ceiling, roof or floor is of timber construction, the technique is just the same, just that the appropriate areas also have to be included in the final solution, so you work out the U-Value for all the studs and noggins, plus the OSB thickness, and then the U-Value for all the insulation and the OSB thickness. There is one other thing when looking at heat losses, and that is the air film surrounding them. Air has a very good k-Value of 0.026 W.m-1.K-1 and is really the component that is doing the majority of the work in insulation, the material i.e. mineral wool or polyurethane foam is just there to stop the air conducting by trapping it in place. Because of this, some allowance has to be made for any air voids in the wall build up i.e. a service gap. To simplify this, it has been decided that two standard values are used, one for walls and one for roofs, with no regard to thickness. The wall R-Value is 0.18 K.m-2.W-1, roof R-Value 0.04 K.m-2.W-1. So taking the above example, and extra 0.18 K.m-2.W-1 must be added to the sum of the R-Value. ΣR = 5.604 + 0.18 ΣR = 5.784 Convert to U-Value U = 1 / 5.784 U= 0.173 W.m-2.K-1. It only makes a small difference, and at the third decimal place, but is still worth including because when the numbers are rounded, it may be the difference between the desired value or not.2 points
-
I am leaving (electrician). That is mainly because I am retiring, at least a year later than I wanted to, but I had to wait for other things to fall into place before I could finally quit (a property sale) Why anyone wants to work a day later than they have to for financial reasons beats me. BUT even if not retiring, I was getting disenchanted with the industry, the sheer number of people I meet who are frankly incompetent bodgers, and the extra regulation burdens that might be intended to raise the standards, but all I see is more hassle placed on people like me to keep proving you are competent, and it has virtually got to the point with me that I could not carry on much longer without going back to college to update my qualifications. Something I have no desire to do any more.2 points
-
Agree it lets you add ACH figure, but not a direct airtightness figure. If you were ventilating at 0.5ACH with MVHR, you add that figure and the efficiency of the MVHR. The spreadsheet assumes you are pretty much airtight and well insulated. If you know a target airtightness you can say add 10% of your airtight figure to the ach and drop the MVHR efficiency slightly. But if your airtightness is 3 or below, and you are using MVHR it's good enough as is - nothings exactly correct, but better than a ballpark away.2 points
-
Same here. Left the CT1 for I think 36hrs until putting any weight on it". My tiling doesn't look too bad from this angle...1 point
-
I turned off auto updates on my Ubiquiti kit early on after issues with an automatic update. Now I update manually after ensuring no major issues are found. Sounds like you’ve just exp the same. can you rollback the update?1 point
-
I squirted a load of CT1 behind my pan, tightened it up and wiped off the excess with baby wipes. Once the CT1 had cured I went over it with a bathroom silicone.1 point
-
Just checked and the price variance in Paris is fairly modest compared to other regions. For those in the UK, where the EPC rating still seems to be a minor factor, here's a map from the Notaires de France showing the difference the rating made to 2022 sales prices in France: AFAIK it's fine behind any plasterboard, though I am using fireproof board throughout (GypsoLignum / GypsoOmnia) - for its other properties, rather than as a fire board.
 1 point
 -
Unnecessary imo. I did mind line the Geberit wall hung frame with acoustic pads. Can't hear anything going down the soil pipe.1 point
-
I only replied because no one else did and I felt sorry for you .1 point
-
Hi all, Nice to be here, just bought a new house in western France and looking to green it up a bit. First question is on our heat pump, so I'll post in the relevant place. Iain.1 point
-
I worked for myself for around 23 years, general building, extensions and the like, subbing in where required. And as @ProDave mentioned there are loads of bodger's so getting reliable subbies is near impossible, if they're any good, they work for themselves, or are nearing retirement and want cash. For me the end was the endless reg changes for electrical work and the associated fees for part p, then CIS requirements of posting 0 returns every month or getting fined, VAT returns, waste carrier licence blah blah blah, just an endless list of people / government with their hands out. I just wanted to earn a living, not run an organisation, but that's what you end up with. All this before you meet the customers and The "Google says you do it this way". Now my house build is nearing an end I may have to go out and earn a few quid, I know I can earn good money doing what I do, especially up this far North, but I'm not interested in starting with all the guff again. I think the black market is calling. At least Scotland don't have Part P😉.1 point
-
Oh dear, oh dear oh dear. 🤐1 point
-
Leave it on 24/7 while the house is occupied, but be sure weather compensation is in use. What emitters are you using? Depending on the property layout and draftyness it maybe beneficial to turn off "areas" that are unused for long periods. Especially if that allows one of the 2 ASHP to be turned off - effectively doubling your modulation ratio. But depends how quick the rooms are to heat back up when needed, and your patience to wait (or turn it on in advance) French houses, especially older ones and in the south, tend to have very thick uninsulated walls. High thermal mass. This will take yonks (multiple days).to heat up with the ASHP running at an efficient (low) temperature, likely why the installer is well versed in leaving the things on all the time.1 point
-
Couple questions buffer yes/no Weather compensation yes/no When you measured the dT of 2 was the heat pump on an on cycle, just starting or just stopping? You don't normally have any control dT, as it's managed by the heat pump. Why would you need it?1 point
-
Before getting bogged down in arithmetic and heat pump settings, do you know how much insulation is under your floor where the UFH is?1 point
-
As above. Scottish Water have two accredited labs - one in Inverness and one in Edinburgh. Contact them here: Logistics Services - Scottish Water As them to give you a quote for sample analysis for potable water. If you're either not clear on how/what to test for, then there are companies who will sample, get it tested (probably by SW) and then interpret it for you.1 point
-
Scottish Water have testing facilities in most bigger towns. Our was tested in Elgin. Your local council web site should have details.1 point
-
We also don't know their other usage. Heating is less than a 1/4 of my energy use.1 point
-
Just cause they have all the kit, doesn’t. Mean it’s been installed properly , commissioned properly or the end user is using it properly, that’s before we look at the build quality.1 point
-
There is not enough detail. If they were on here, I would be asking: Is that high bill actual or estimated? What tariff are you on and what is the unit rate? Take daily meter readings at the same time of day and post them for us to analyse. Real meter readings not from an app or IHD. Post the EPC details of the property so we can see what the claimed performance is, if new build you might even have the full SAP details. Without any of that we can only speculate1 point
-
Just been back through the email trail and the data came directly from the glass supplier1 point
-
Welcome Ian Maybe a bit more context is needed, who has tasked you?, why have they tasked you, I have only worked on the periphery of the building industry as a supplier/installer. I found the majority of people in it a bit too 'laddish' and generally under educated.1 point
-
Yes, that's more helpful. From the looks of it you have one pump on the flow side - this pumps your hot water into the heating system and hot water cylinder - and one pump on the return side - pumping the cooler heating water back to the heat pump. The flow appears to be on the left, the return on the right, just after the system filter (the black bubble thing). I'm not familiar with the Mitsubishi Zubadan and can't find any tech specs indicating a need to install two pumps in series, nor can I find the heat ex resistance values other than that the pipework needs to be designed for flows that can exceed 1.5m/s. It's not unheard of for this to be recommended in some circumstance, or when one pump sits before a buffer and another after a buffer, but the question still remains as to why on your system? And then we've got the question as to why you're not getting sufficient flow rates even with the two pumps. I would be calling up Mitsubishi technical department to ask questions about the installation recommendations to determine the need to 2 pumps but it does seem like you need to get someone in to take a closer look at the installation. Was the installer MCS certified? And do you know which Certification body they're a member of (e.g. NICEIC, OFTEC etc.). It is possible to raise a complaint through these organisations for FWIW, but at least if it starts costing you money getting someone else in, you've got a better case to claim back the costs. If you complain through these bodies, the installer does at least have a time limit to act. Because you did manage to get heat to your cold radiators when you closed some trvs, I still think it's worth trying to balance the radiators while you're trying to sort this all out. It's also worth getting yourself set up with melcloud so you can see the functioning of the heat pump and energy use.1 point
-
Difficult to see even if all their heating is by the auxiliary electric heater (if any) not the heatpump itself how they could have used 4.3 MWh in six weeks. Has the meter been miswired so it is registering the demand for the whole retirement home complex???1 point
-
I imagine the architect drew up the houses for those builders. In any case, your house, your money, you are the boss. Assume you're stuck with the 150mm cavity with EPS blown beads and a fine pencil you'll scrape the 0.21W/m2K backstop for Part L of the building regs. Assuming you can compensate elsewhere with increased insulation then you could wet plaster internally. Vastly superior to insulated plasterboard for airtighess and cost. (Airtighess is much more important to insulation for comfort and energy bills) Here's a suggestion. Outside to inside. 20mm sand cement plaster. 100mm 13N dense concrete blocks. 150mm EPS blown beads with stainless steel cavity ties. 100mm 13N dense concrete blocks. 12mm sand cement plaster 3mm skim coat. U-Value 0.21 Then bump the floor to 200mm PIR or 300mm EPS. Top to bottom. 100mm fiber reinforced power floated concrete slab with UFH pipes stapled to insulation. Slip membrane. 100mm EPS. Radon membrane 200mm EPS. Get your truss supplier to supply trusses with 300mm thick rafters. Sloped ceiling from outside to inside. Slates Slate battens Counter battens 11mm OSB racking 300mm blown cellulose or mineral wool between the rafters. Airtighness membrane 47mm counter batten with mineral wool batts for service cavity. Plasterboard Skim.1 point
-
We used 25 to 50mm PIR with expanding foam to fill in the gaps!1 point
-
Keeping the outside noise, outside, is part of the overall equation. I overheard the plasterers chatting today about how quiet the house was. It was blowing a gale at the time.1 point
-
It’s worth bearing in mind that it is common for push fit insulation to be fitted less than perfectly, this can result in a dramatic reduction in performance. Blown insulation is less likely to suffer from this. We went for cellulose partly for this reason, partly for the noise attenuation (which is fantastic) & partly for decrement decay.1 point
-
PIR, refer to as what it is, rather than brand, or the builders merchants will have your pants down.1 point
-
Yup, kingspan galore. If you want to do the calcs on the U values,the drawing is optimistic with its numbers too. I make the floor 0.174W/m2K The walls are 0.163W/m2K the pitched roof is 0.196W/m2k The roof on flat is 0.167. My suggestion. 150mm PIR in the floor for 0.16 or 200mm EPS. 200mm eps blown beads in a wider cavity and ditch the insulated plasterboard but use wet plaster finish inside instead. 220mm blown cellulose between rafters and a 47mm insulated service cavity below with mineral wool batts for 0.153W/m2K as shown above. 400mm blown cellulose on the flat above the central section for a U Value of about 0.12W/m2K.
 1 point
 -
Not necessarily, with my build I designed the rooms then added the wall around them, only adding IWI to an existing build reduces room dimensions.1 point
-
https://www.manualslib.com/manual/1583441/Vaillant-Multimatic-700-2.html?page=94#manual Also I see Neil Gascoigne reports his Sunamp has an internal temp sensor which takes the place of the Vaillant VR10 DHW sensor and is wired to the corresponding terminals in place of it. I think these are SP1 on the Heat Pump Interface unit (not the VR71 itself).1 point
-
I think you will have to work from first principles. I am not an SE, but in reality, I can't see there being much difference in foundation loading for a normal house, it is not worth scrimping on a foundation, it may have to be reused in the future.1 point
-
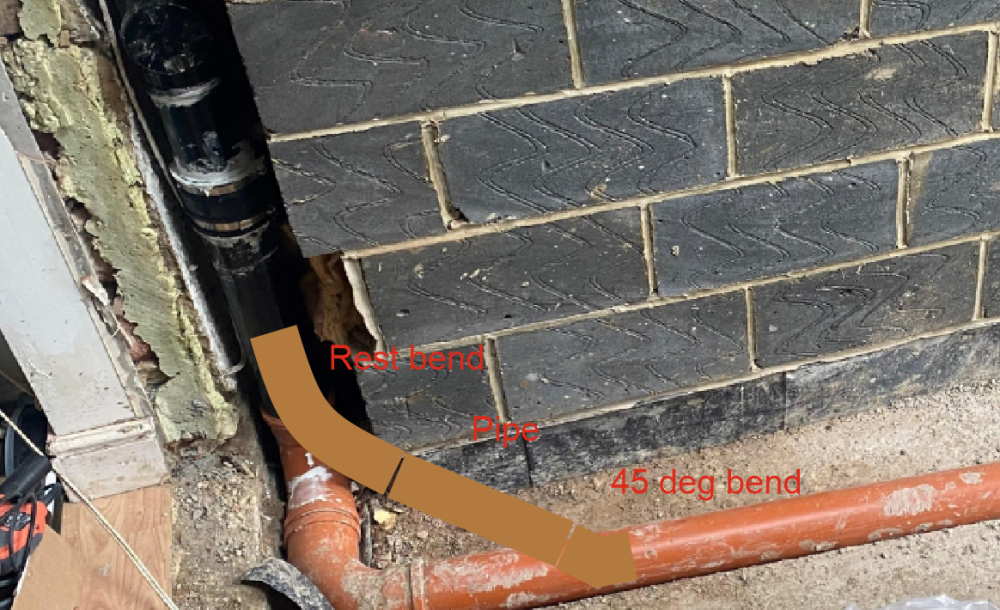
I would go for this: You will need to chop a bit out of the bottom block to get the rest bend out at about 45 degrees to the wall.
 1 point
 -
ICF hidden benefits? Here's a thing.. sometimes rather than comparing each individual element try if you can to look at the design in the round. It's hard to do but just have a look at the house you want to build and trust your intuition.. never be afraid to ask questions at the early esign stage as you are doing. Take a two story house with big open plan spaces on the ground floor and lots of glass... especially looking out to the back garden. When the wind blows it wants to push the house sideways.. we call this lateral stability. If you build a brick / block house then you end up often on the rear elevation with lots of glass with not much length of masonry wall between the glazing panels. You have a series of piers that want to not "topple over" sideways in the plane of the wall.. part of the problem lies in that masonry can't take tension forces that well. When you push a masonry pier sideways you get compression at one side.. and often undesirable tension at the other which can "burst the ball" SE design wise unless you have a lot of load above. If you start to push the amount of glass and fix some of that to the masonry piers you invite the problem where the masonry has to carry the wind pressure /suction loads from the glass.. it can go horribly wrong here as an SE and you then need say to say.. we wind posts etc... you go from hero to zero! In summary masonry is good at carrying vertical loads but not so good when you need to rely on a small length of wall to resist the sideways wind force or suction / pressure loads from glazing. It can / does work well when you have a good length of masonry wall though. Traditionally when faced with this problem we introduce a steel goal post which works to resist the sideways forces, take some of the vertical load and the pressure suction from the glass. We do this lots when folk knock the back out of an existing house. But there is a cost attached.. you need to fix the steel goal post to the rest of the structure and you need often to do some work to the underbuilding.. it gets messy and expensive. Now ICF has hidden advantages that can potentially save loads of cash. Imagine you have a wall with two large glass panels.. 5.0 - 6.0m of glass and 700 - 900 mm of wall each end, 700 -900 mm between the galss panels and say 500 - 700 mm over the top of the glazing.. this 500 - 700 mm could extend up into the second floor (you need to sequence the pour if you do this). The concrete core is just say 150mm thick. You do your ICF wall but around the openings you add a bit of extra reinforcement. Here what you do is to create a concrete portal frame (goal post) all hidden in the wall and in the concrete you are going to pour anyway.. the goal post all for a few extra rebars.. Another gem is that you can sometimes get the extra rebar that form the goal posts hidden in the concrete to resist the pressure / suction loads from the glass. Hope this helps. If you fancy post some drawings and I'm sure we will all chip in with further thoughts.1 point
-
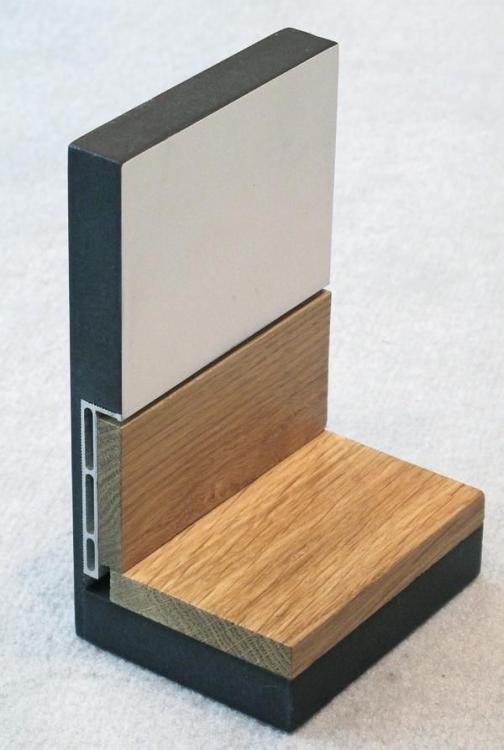
I prefer this type of finish, as previously mentioned I would hate to run plasterboard to the floor and get it damaged by kids toys, hoover. What about it getting damaged by say water from a steam mop or something similar.
 1 point
 -
At least the grout is a decent colour.0 points
-
Well, hopefully the builders will be gone soon. 😀0 points
-
0 points
-
What is this summer thing you refer to? I live in county Antrim.0 points