
Leaderboard


Popular Content
Showing content with the highest reputation on 01/11/24 in all areas
-
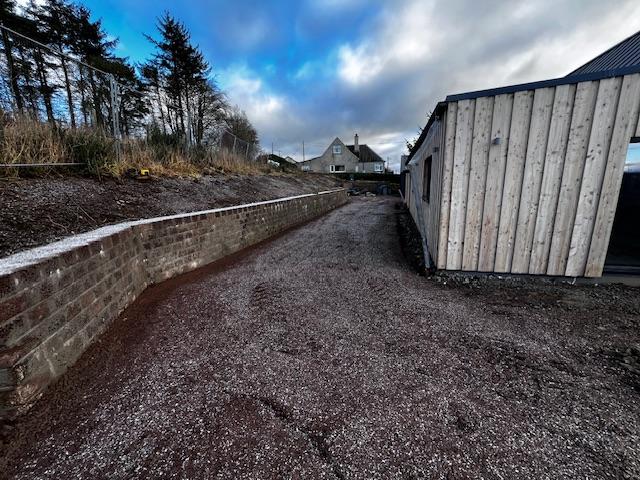
Since starting this build we've had a handy mound of "spoil" from which I have been taking regular photos from the same(ish) spot to remind me of progress during the "down" days which we self builders all suffer from time to time. I thought I'd share this with you. It starts in May 2021, when the major groundworks had been underway for a few weeks and goes up until April this year - about 2 years. First a picture of the mound of spoil for reference: and now the "timelapse": Since that last picture we've been putting on the warm roof structure, so any further photos from this vantage point don't show much sign of progress. so until something significant happens in August this view won't change much3 points
-
I actually remember reading about a case similar to this not too long ago. I have managed to find an article which covered it: https://localgovernmentlawyer.co.uk/planning/318-planning-features/47278-incorrect-plans-a-strict-approach The application was granted on the condition that the development complied with the plans. As the article mentions, the plans showed the development property as having a lower ridge height than the neighbouring properties. But, if it were built to the approved dimensions, the development property would be higher than both, in one case substantially. In the judge's view the plans showing the relationship to the neighbouring properties were not simply illustrative; they were a material part of the planning decision. The plans should have been capable of implementation and they were not. As a result, the whole permission was not capable of being implemented.2 points
-
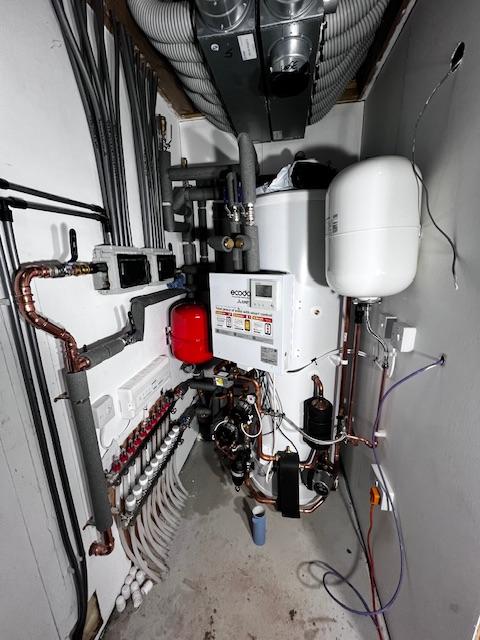
I tidied up the site again and put more hardcore down so we are nice and dry again. Also got the ASHP and HWC installed. It had a bit of a small weep at a joint after they left but was straightforward to fix


 2 points
 -
Just reread, yes missed that. The dream unit, can be set to run at a fixed temp, job done. Then leave to look after it's self.2 points
-
Effectively forming a rebate the frame sits in will work. If you wanted something less bulky you could put shear studs/pugs into the beam and have these in clearance holes or even sleeves in the top of the frame.2 points
-
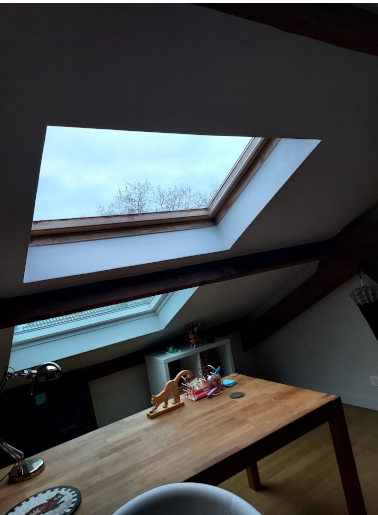
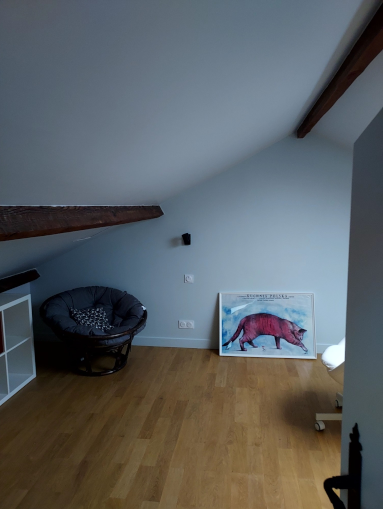
I just got an inexpensive thermal camera (HIKMicro E01, from Amazon) - and it's -2C outside, so I just had a load of fun. Here is a series of thermal pictures, with "normal" pictures of the same places to go with them, and some comments. Please tell me if I am misinterpreting things or if I am missing clues. (For context: I am at the end of a renovation carried out by what I believe to be a competent contractor, with plenty of help from here.) My aims right now are: - to evaluate the work that has been done - to see what I can have fixed easily - to know what issues remain that could be fixed in a further renovation a few years down the road. All right, let us get started. I apologize for the mess - I am still unpacking and assembling a few things. Keep in mind that the temperature->color mapping is different in each picture. 1. Attic entrance You can see the metal instruction in the wall insulation as clear as in an X-ray. (I believe I've posted pictures here of when it was being installed.) Is this a problem? 2. Home office 1 Skylights: i wanted many, and thought of heat loss as a worthwhile sacrifice. At least they are new (U=1.1-1.3 or thereabouts). Something funny seems to be happening in the edges and corners. This seems all right, but... A corner here seems very cold. Again: - the bit of ceiling immediately next to the wooden beams sems cold, - more seriously, the short walls are cold, where not covered by bookcases. The obvious solution is more bookcases. (I think somebody here said we were going way off a tangent when we started discussing the thermal properties of bookcases, but apparently they are real.) If there has to be an air gap of 2 to 3cm, that's actually better. However, I would need to let the electricity sockets show through the back, and I don't know how to do that (without calling a carpenter). 3. Bathroom I have nothing to say on the bathroom, save what I've already said - fairly cold short walls (and I would have expected the skylights' frames to be less cold: these are new skylights). Maybe others can find things to remark upon? 4. Second home-office/bedroom One of the skylights is old (with a wooden frame), from before the renovation, and it shows.


 1 point
 -
Can't remember, some county council page. It will be in the regulations. I had a big meeting on the su jecr once, with 2 bcos vying for who was the tougher. My technique for complex things in thd regs is to photocopy the relevant clauses then highlight the crucial bits and arrows making a cogent summary....or emphasising inconsistency.1 point
-
Just from a quick search, so not definitive. Basically one stair is OK but needs to be a protected route. Maybe sprinklers come to the rescue as thd original point. If you cannot provide a secondary fire escape, the staircase will need to end up in a fire protected hallway with a door direct to outside.1 point
-
yup that makes it perfectly clear … if you are showing relationships to nearby roof heights then get them right !1 point
-
Actually, the 4-year rule has recently been removed from legislation. Now all unlawful developments, including householder related developments, have to go unnoticed for 10 years to then be exempt from enforcement action.1 point
-
My understanding is that if you have habitable rooms down there you need an exterior stair also.1 point
-
In a standard house I think a single stair is fine. Going up instead of coming down, so what's the difference? It might need to be fire protected....plasterboard under. Rules change acc to the number of storeys though. It's all in the building regulations but not especially easy to follow. I recommend ploughing through it, as I could easily be misremembering.1 point
-
If you have it setup that each unit is picking up the WiFi signal from the previous unit, there is a drop in speed each time. You really want each unit connected via a LAN cable. For example in our upstairs office, we were getting 20mbs or less when in pure WiFi mode, but once I set it up and head all four units on LAN, then we were getting full 125mbs.1 point
-
I watched that video and bought the same setup 15 a day is a lot but it doesn't surprise me on a poorly controlled setup. Is your boiler the new ecotec with the digital controller on the front? if so you are hugely missing a trick by not using the proper controls. sensohome won't work for your setup and you could use a vr70 rather than vr71. I picked up a vr71 on ebay for 150 pounds, also you would need an electronic mixing valve to control the ufh which is wired into the vr70/71. the kit is quite expensive but it's an investment, my boiler runs at 45c on these cold days and is heating 24/7. how big is your house? @marshian I've watched that video a few times, it's one of the reasons I bought the same setup1 point
-
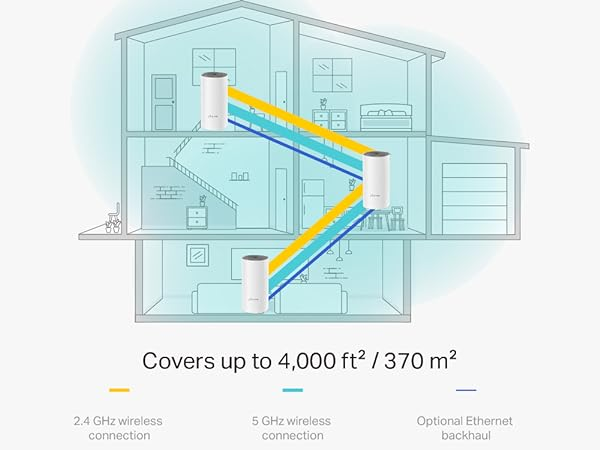
This diagram shows "Optional ethernet backhaul" Consider it mandatory, not optional 🙂 I.e. each Deco E4R is plugged into a cat6 ethernet socket back via the switch (you just ordered) and to the M9.
 1 point
 -
actually @Nickfromwales don't worry as in this post you've put the screen directly on the grout line between the mosaics and normal tiles. so there's got to be no issue with putting the screen on the grout line. I will just ensure I have a nice thick bead of clear CT1 to bed the screen on to and masking tape either side of the grout line. see.....you're such a master that you don't even need to respond to posts anymore! 🤣1 point
-
looking very nice, hopefully you will get some good progress in 2024.1 point
-
I think the free re-application now only applies where the original application was decided between 5th December 2022 and 5th December 2023, i.e they are phasing the concession out for new applications.1 point
-
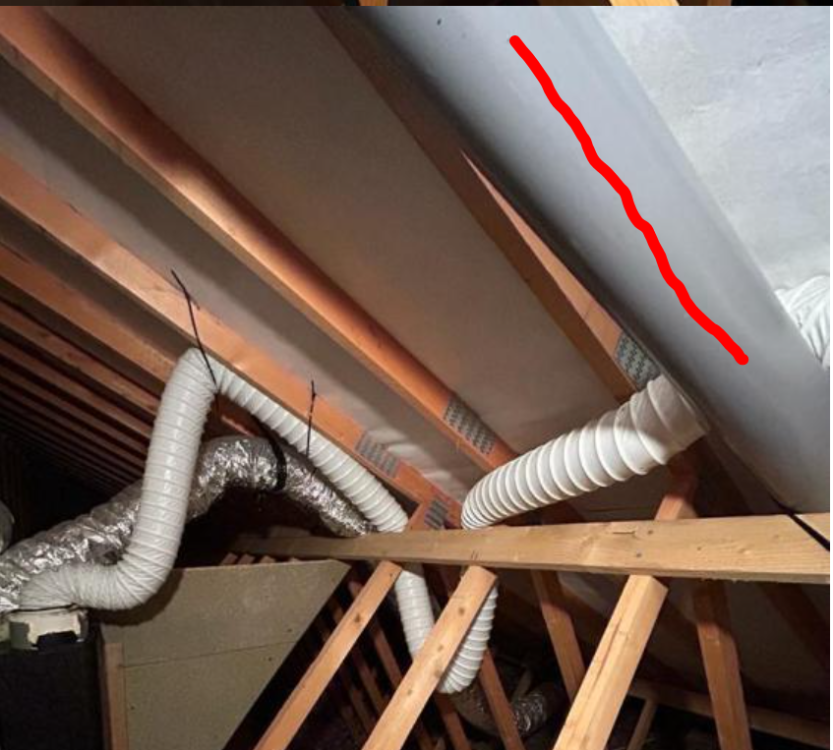
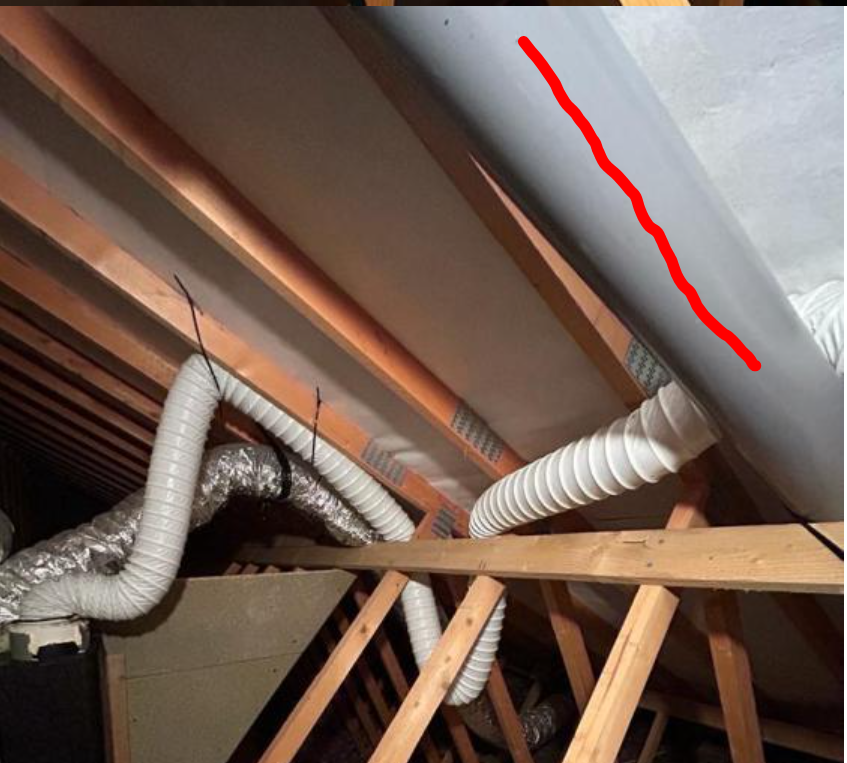
This what I Used:- Viva Magna Self-Sealing Waste Valve 32mm | Toolstation There looks like one similar in the blue highlight, but as the drain is going up hill then there's no hope of it draining @hotnuts21 She needs to get someone in to sort out the ducting and the unit will hopefully ok. Need to look for a local Refrigeration or HVAC engineer who should be able to sort it out. At the moment it has the potential to cause more harm than good. I bet the filters have not been cleaned / replaced, causing efficiency issues. Unrelated, but idea what this pipe is ?
 1 point
 -
So long as the fans run as required, at a constant rate (we exchange air at a rate of 0.3ACH) and you have a manual boost button, nothing more is really required. Auto boost, time clocks, not needed. In winter the humidity is likely to be too low rather than too high. For example today outside is 2 Deg and 99% percent humidity, inside 20.5 and 39.5% humidity. Last time I used boost was because we had 10 people in the lounge. Check/clean with hoover the filters every 6 months, replace with new every 12 months. Forget it's there the rest of the time.1 point
-
Just send them to be tested. I have PPE here already but honestly the amount of disturbance taking a sample was less than the disturbance I'd made to discover something that needs to be sampled.1 point
-
Oh dear! We have an HRX2 with no problems. However only after installing did we understand that all ducting and the MVHR unit needs to be inside the building thermal envelope to obtain proper benefits regarding saving heat in winter and cooling in summer!!! This is the "one way" waste connector we have fitted... https://www.i-sells.co.uk/domus-green-line-mechanical-ventilation-with-heat-recovery-condensate-drainage-kit-white?gclid=Cj0KCQiAwP6sBhDAARIsAPfK_wYvtNFQ06YTJNrp2FcwUG_o-N1L47Mj2wMqy8FUC0WHoCT-YlkamPMaAiSbEALw_wcB Our condensate waste pipe is down hill all the way! We have rigid ducting all insulated. We usually clean the filters every 6 months. Also think the bottom of the MVHR unit needs to be level. You really do not want to turn the unit off: Moist air entering the exhaust pipes from shower rooms etc will condense in the pipes rather than in the unit causing more problems!!! Marvin1 point
-
I have around 50 to 60L in total. Recent change. In an attempt to run the system hotter to get better performance out of the summer house UFH without overheating the house. I made the following changes. Added a thermostatically controlled ESBE mixer and pump to house UFH - this is generally dropping flow temp down to 29 from 34 so spends most its time less than 50% open, it also close fully. This in effect reduces the system capacity. Added a buffer across the supply and return piping, this acts a min flow valve, with 50L capacity. UFH in summer house is still rubbish, so now installing a fan coil, which generally requires around 35 Deg flow temp. Things still a little fluid, but will look to operate, as such 1. Single house thermostat 2. ESBE mixer, if no heat demand, flow temp 29, if house thermostat has heat demand, flow increases to 35. 3. Single flow temp of 35 degs for heat pump (may alter but will see how things go) 4. Fan coil, Salus self balance actuator to give a 7 deg delta across fan coil and shut off flow as required.1 point
-
Same here 😩. My wife is a life saver listening to me babble on about insane house build problems, that make no sense. The number of times I’ve stopped in mid-rant, when the answers comes to me. The very definition of a sounding board. Anyway @Thorfun, this thread is a goldmine of information, I sure there are many silent readers that have appreciated it.1 point
-
I designd ours around the smaller version of the Domus HRX. The spec said it would do 150sqm. Always found this a strange number as it should be about volume. That said it works well as our L shape annex is 98sqm. The unit is in the utility area as we don't have a loft. Main pipe work is 125mm dia galve spiral steel for the main runs and 100mm onto the room inlet/extract. All the extract pipe has rubber sealed joints. All joints both inlet and extract are also sealed with rubber tape then ducked tape. Main lounge/kitchen has two ins and outs. two bedrooms and long hall have one in and out. All these provid flow across the room. The on-suite and toilet off the hall only have extract terminals with a 10mm gap under the doors. The unit runs at 75% for boost, about 30% for CO2 purge and about 15% for normal operation. I set the flows from the terminals to give the building regulation requirements. this was at 30%. There is a C02 monitor in the system so I rfuced the fan to 15% and with 2 or even four people the CO2 is stable around 400. I think the purge comes in around 600 which has not happened yet. The kitchen, toilet (shower) and on-suite (shower) each have a umidity and temp sensor. Rh seems to be maintained around 45%. Towels in the bathroom dry quite nicely without any heat. Efficiencies vary from about 93 to 98% dependent on outside temps. 8 and above outside it is around 95-98%. Below 3 outside it drops off quite a lot as would be expected. Now the downside: I can only descibe the so call "Bluebrain" controller as shite. The clock is not maintained after a power cut of any sort. If you miss a short one in the night it can be days before you spot it. Next is the filter timer, that is it, it is just a timer nothing more, no cheking of reduction in air flow. The filters do need to be cleaned every couple of months. A simple task if you can get to the unit. The 100% bypass stated is not in reality in terms of temperature 100% bypass. While thay may say the heat exchanger is 100% pypassed but the unit as a whove it is not. Air still goes in and out of the unit and as for the most it consits of a big block of polystyrine. So on bypass the incomming air always gains a few degrees. Less is gained on boost. Getting around the "bluebrain" problem: Using my own sensors (based on D1 mini micro controller and ESPEasy) sending data to a Raspberry pi with MQTT and node-red I have added a D1 mini in the Domus controller as it fortunately has a number of inputs and outputs that can be switched/monitored. This added D1 also has a temperature sensor in each of the four pipes going to the Domus as well as the CO2 module. The bypass proccess takes much more account of the outside temp and time of year giving nice cooler night time flow unless the underfoor heating comes on and bypass is stopped. So while the original controller is still 100% in the backgroud to meet the "what if anything happens to me" requirement. My controller overlay allows much more control.... and a clock that is always correct. Finally you do need the set the terminals correctly after working out the flows for each room, the standard building regs can be used to do the calcs. Just work out what each room needs, (allowing flow under doors if needed) add them up and set the unit to provide that flow. Then a cheap airflow meter and some cardboard works fine. Once you have the terminals in the ballpark you may need to adjust the overall air flow and go around the terminals a couple of times. Then set to boost and see if your bathroom/tichen extracts are above the minimum. We have eleven terminals and it only took a couple of hours. Remember to record your data ech time so you know how it is looking and a final set with calculations that looks posh with a dated and scribbled signature that the building inspection can look at and put a tick in his box. Just my view...1 point
-
@MKF The graph’s useful, shows the right sort of behaviour from a on/off type of gshp. While the water loop has about a 2C delta, the glycol loop shown has a 7C delta - indicates the glycol loop could do with a higher flow rate. For comparison, we have a DT of about 2C input to output of our glycol circuit. Roughly every 4C drop costs a 10% COP hit. Given the glycol out of the heatpump is often below zero, is there ice on the pipes?1 point
-
tomorrow I will be fitting shower screens. I have read up on the threads about such stuff on here but I have a question for @Nickfromwales if he's around. Nick, I know you've been really busy lately and not been on here much but if you do pop on please can you answer this..... in this post you have put the screen just to the outside of the grout line at the edge of the shower former. is there a specific reason that you didn't put it ON the grout line? I was thinking to put it on the grout line but if the master doesn't do that then I will re-consider. was just wondering on the reasoning behind it. Also, in this post you mention putting masking tape either side of where the glass will hit the floor, yet in the other post you don't use masking tape. is that just because you've done a load of them and are a master and us mere mortals should use the masking tape?1 point
-
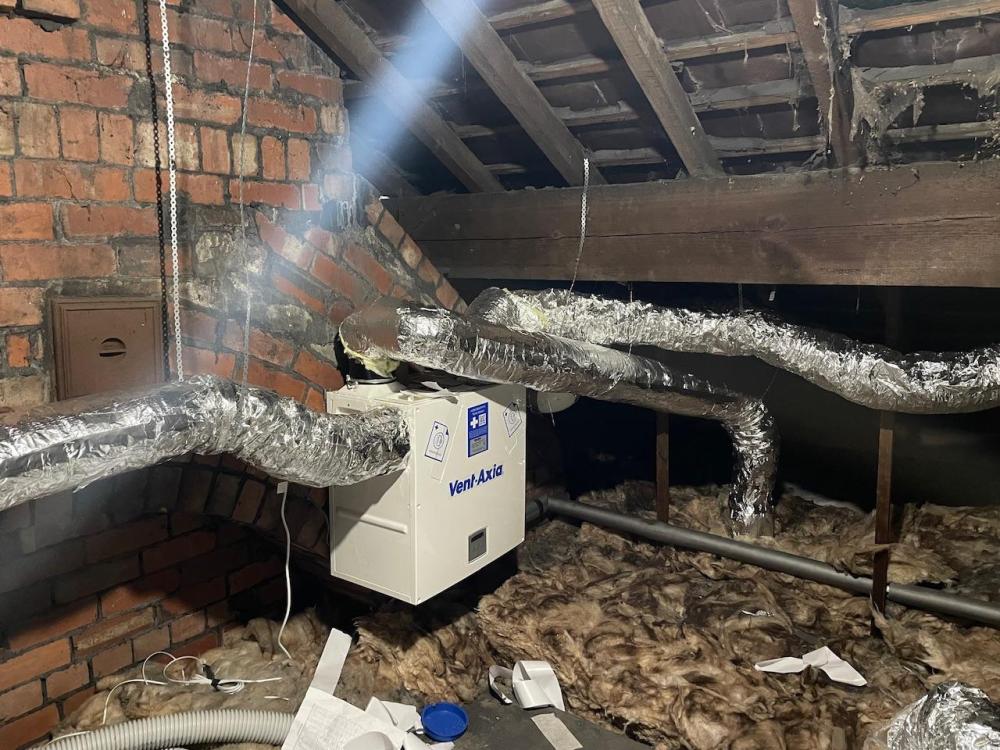
Complete shitshow. Tbh probably need a company in that knows what they are doing to redo the ducting and condensate pipework. Either that or spend a few a few hours here reading through the many posts and have a go yourself / help your friend out. Probably nothing wrong with the unit, it just looks like it was installed on a Friday afternoon by an unsupervised apprentice.1 point
-
I installed a Vent Axia Sentinel FH in my 1930’s semi in a cold loft and it’s performing quite well. I just wrapped everything in insulation (photo without everything fully insulated).
 1 point
 -
Finally!!!! pretty much 2 3/4 years after breaking ground. I think that i will be having a drink tonight!!!
 1 point
 -
Another recent thread on here recommended getting an asbestos testing kit.1 point
-
It is fairly subjective. The overshadowing would need to be considered harmful to the amenity space in the garden. In the past we have submitted shadow diagrams at certain times of day and year. You may need to get a daylighting specialist to do this but it may be that unless your neighbour brings it up the planners will not bother.1 point
-
sorry. that's not a photo of our setup. we used a sticky fast flash product on ours.
 1 point
 -
I was considering the Domus unit to begin with and in the end I found a good deal for a Nuaire MRXBOXAB-ECO2 with a display added later on. This unit is more or less the same as the Domus one. I have gove through the same journey that you are about to go on back in 2019. If you haven't already seen it, have a look at this: Good luck, feel free to ask any questions.1 point
-
You are not alone …1 point
-
Having the water flowing too fast won't make the floor heat any less well. You need an automatic bypass valve at the far end of the flow / return loop to ensure water always flows even with one or more of the loops shut down.1 point
-
At least I'm not alone1 point
-
You need proper help . There’s no therapy here …..1 point
-
Do I half know both of those. I bought a massive load of bolts for fixing timber plates etc. to the steels and doubling/trebbling joists. When they arrived, I went to put them on a shelf in the garage only to find a few boxes already there full of bolts. I'd looked as hard as I could to find what I had before ordering more as I was sure I had them but couldn't find them at the time! Now my head is even worse.....which is why I come here to hide and get some therapy1 point
-
thanks. but you know what? I'm a real daft (expletive deleted)er sometimes. I'd already started a thread about this very subject and the conclusion was the very same part. and I've already bought one! 🤦♂️ I'm so sorry for wasting your time. I knew something seemed familiar about my question and I did search within this thread to see if I'd asked it here as I thought I'd keep ALL my plumbing questions in the one thread. but it seemed I even failed at that. @Pocster is right......again......I am a useless mofo. 😭 that's the problem with having 100 things going on in my head at once, there's not enough room to store everything and things drop out and are forgotten about very quickly. I think I need a break from this self-building malarky. it's doing my head in.1 point
-
Nearly done. The low ceiling balls up by the builder has caused a problem with finishing above the cabinets. It was supposed to be open but because of the narrow gap it now looks unfinished. Options are to fit an LED light (I cabled for this) or frame it with a decor panel to match the doors. We’ll probably go option two and frame it. Really impressed with the kitchen fitter. I couldn’t have fitted this myself. The handleless shadow gap design needed an awful lot of work to get right. He’s been here two days longer than planned which I’ve offered to go 50/50 on.
 1 point
 -
I had my Solis 1.5kW Mini S6 Solar Inverter approved by DNO. Let me have your email If you want be to send the certification docs, they cover a wide range of units. May help.1 point
-
hi flossy, exciting times for you? i havent come across solo or timber frame it so cant comment on them. Flemming,scotframe and MBC i did look at. I can send you my spreadsheet if you drop me your email address. we have been in our house for 2 and a half years now - so its over 3 years since i did the evaluation so bear that in mind. I chose MBC because they covered more of the build, they now seem to be doing windows too - which would be a major headache removed in my view. I think its the most common cause of things not quite working (we have all watched grand deigns havent we?). Drop me you address and i am happy to provide anything i discovered over to you. K1 point
-
Basics are Heat pump will have a defined minimum flow rate. That sized heat pump could be around 25L/min or more. If you are trying to operate without a buffer and you have loops closed, or part closed - then no chance. UFH basics Heat output is linked to the mean flow temperature, the higher the flow rate, the smaller the dT so higher the output. You are stating the opposite? 6 loops will only output only part of the load your heat pump is putting out. Something sounds odd. Can you explain your full system? It is more likely your heat pump is cycling, so not transfering the heat needed. Too big for the duty it's being asked to do.1 point
-
I listened master. 40mm coming through the block and beam straight in to a 50mm bend and then 50mm all the way to the soil pipe.
.thumb.jpeg.66f1010b4ffb175cbfa74b54527ac035.jpeg) 1 point
1 point -
OK. So. I've worked out the best PV Panel in the UK, in value for money sense. Uh, it's @JohnMo's Longi 370WP - ha but my time was not fully wasted because instead I'm probably going for JA Solar JAM54s30 because it's the same basic size but much more power, or the JAM72S30-545 which is almost same price/sqm but much larger physically. Will have to check if it could fit a similar amount of panels. Here's all my research: Shop Brand Type SizeY SizeX Watt Price ex m2 GBP/kWh W/sqm PanelEst TotalW TotalCost TotalW/C tradesparky JA JAM54S30-410 1722 1134 410 80.76 1.95 197 801 21 8610 1695.96 5.076770679 easypv Euren Zebra 340 1684 1002 340 121 1.69 356 692 26 8840 3146 2.809917355 tradesparky JA JAM72S20-455 2112 1052 455 105 2.22 231 911 21 9555 2205 4.333333333 tradesparky JA JAM72S30-545 2278 1134 545 122 2.58 224 1059 21 11445 2562 4.467213115 tradesparky Trina TSM-425W 1762 1134 425 137 2 322 819 21 8925 2877 3.102189781 tradesparky canad CS6R-435H 1722 1134 435 122 1.95 280 801 21 9135 2562 3.56557377 tradesparky DMEG DM410M10 1708 1134 410 82 1.94 200 794 21 8610 1722 5 cityplumb Longi LR4-60HIH-370M 1755 1038 370 72.6 1.82 196 747 21 7770 1524.6 5.096418733 cityplumb Longi LR5-54HTH-435M 1722 1134 435 112 1.95 257 801 21 9135 2352 3.883928571 cityplumb Longi LR5-54HTB-425M 1722 1134 425 108 1.95 254 801 21 8925 2268 3.935185185 cityplumb Sharp Nujc400B 1722 1134 400 87 1.95 218 801 21 8400 1827 4.5977011491 point
-
Our polished structured concrete floor with UFH has been down about 18 months and no damage that we have noticed, heating has been on for about four. Issues we had were with the builder we used to get us to DPC and the subfloor work suffered from slope in his spirits and bent string. The outside walls were woodcrete ICF or glass. All partitions were done after the floor. Glass frames were done after the floor. The finished floor level was set to the threshold of the sliding doors (bedroom 4.5m living room 7m) and the main enterance door which was part of a 9m glass wall. To enable the floor to be finished at this level I started with 150x50 timber which was reduced in thickness by a Aldi bench plane machine (took a while) to the correct thickness and then screwed to the outer blockwork in the correct place. The concrete floating could then be done over the top of these levels. Next problem was the shower drains. Two were required. I couldn't find anything abvailable in the uk. So I modified two very expensive slot type drains from screwfix and set levels using the same process as for the doors. The main man from the floor supplier was more than happy as his power floaters had unrestricted access. The floor is 150mm with two layers of steel mesh and spacers. The UFH is between the mesh, I think. There are a number of expansion slots cut in the floor but most of these are under the intended partitions and edge of the mesh. The man incharge of the men that came to float the floor said we cant put a slope in the floor for the showers as concrete is flat. I pointed out that the other main man said you could. The two nice men doing the floating said they would come back later and do those bits by hand. They spent a long time power floating, well past midnight. Then a few weeks later the polishers came. Polished concrete is NOT a quick process. Our is a darker grey and is a fine finish with just the odd bit of aggregate showing.1 point
-
I've put polished concrete floors into a lot of projects. Huge polished floor to the atrium of a Performance Theatre, Several Universities Projects, lots of houses and even my own house. Many of the projects won prestigious RIAI Awards. I've also seen polished concrete floors by others go horribly wrong. Some put in the wrong reinforcement, some use the wrong mix, etc. I wrote the below for someone at work but is relevant for you too. If you've any questions on any parts let me know. Concrete The concrete is 35N10 which is reinforced with plastic fibres at 900g per cubic meter of concrete. As a polished floor goes in later it might need to also be a pump mix as you’ll have doors, windows and roof on. Whoever you get to do your floor will help input on this. Placing of concrete It’s not just the grinding and polishing of the concrete that’s important. The placing and power floating of the concrete is critical. Unlike a regular concrete floor, a floor poured which will be polished has to be super flat and power floated for hours after. Very few people in Ireland can do this correctly. Formwork for steps and other edges has to be perfect and have 45 degree edges to allow trowels into the corners. Little things like dragging a vibrator, shovel or rake through a floor when placing the concrete the wrong way will result in the drag mark being visible when the floor is polished. These things may not be visible to the untrained eye but are flaws in a lot of cheap or poorly installed polished floors that can never be fixed. Spend time and money on this part as a poorly poured floor can’t be fixed by grinding and could make the errors even more visible. Crack Joint These have to be around every 6 meters max and are a saw cut made the day after in the concrete about 30-50mm deep which is later filled with a flexible mastic. Don’t have any areas too small as they could rock like paving slabs. Don’t have them long and thin either as they can crack in the middle like a seesaw. If you have a few pipes in the floor, eg heating pipes coming from a manifold it’s a good idea to have a joint here. It’s also good to line these up with any columns you have. Hide them under lightweight internal stud walls and have them at all doors, etc. You have to think about underfloor heating pipes and ensure they’ve sufficient coverage before cutting the crack joints. That’s where the thickness of the floor is important. Expansion joint Not to be confused with a crack joint these are flexible day pour joints and are also positioned above expansion joints in the structural floor below. As a result they’re slightly wider than a crack joint but again are filled with flexible mastic. For a house you probably won’t have one however we had one on a larger project I worked on a major project. Coloured Stone This is optional. I’ve done it in some projects but not my own floor. Make sure you get the contractors to quote for 4-5 samples if you plan on using coloured stone as you don’t want to get a claim later. You can pick whatever stone you want and also the size of stone. Usually they’re sprinkled over the top during powerfloating. They can be mixed through at the concrete plant but you’ll use a lot more coloured stone and it will be a lot more expensive. Glass which can also be used has to be lead glass as ordinary glass can shatter when grinded. Slip Resistance The slip resistance of polished concrete usually complies with all regulations. Like any regular floor it can be more slippery when wet. Additional grinding and polishing doesn’t necessarily impact the slip resistance of the floor so thinking a shiny polished floor will be a lot more slippery isn’t right. As it’s a domestic situation I wouldn’t worry about this however if it’s a public building you’ll need to include in your specification a slip resistance pendlium test to be carried out at the end of the project to prove the floor is safe. This is a useful document to have in the safety file should someone slip in the future. If you want to get it carried out for peace of mind you can. Sealing Make sure you ask in your quotes for sealing the floor after it’s grinded and polished as the concrete is porous and will absorb tea/coffee spills and heavy traffic if not sealed. The sealing will make the floor a tiny bit darker but in my opinion is worth it. Protection Include in the spec for the contractor to protect the floor after its poured for the duration of the works. We had two layers of cardboard over the floor for three months. It dired out more in areas where it wasn’t protected and at joints but once exposed the variation disappeared. Just ensure it’s well protected everywhere particularly if its not yet sealed as any paint spills etc, will destroy it. Grinding and polishing You can very lightly grind the floor and then polish it as normal if you don’t want to expose aggerate or alternatively grind it to expose the aggerate and then polish it. Grinding a floor is time consuming and therefore expensive so include for grinding the floor to expose a lot of aggerate and for a lot of polishing. You can then later decide with samples not to grind as much or go for a reduced polish. If you don’t specify the amount of grinding required they’ll assume a very light grinding with no aggerate revealed. The floor will be grinded in stages starting at 10 grit working through 15 grit, 25 grit, 50 grit, 100 grit, 200 grit, etc. 800 grit is matt finish and 1500 grit would be a medium shine with 3000 grit a high shine. If you want lots of stone aggerate exposed they’ll spend longer at the 10 and 15 grit before moving up. Reinforcement We used a plastic fibres reinforcement. You can get thin ones and heavier ones but the heavier ones can appear if you look closely in the finish. It’s 900g per meter cubed that use used which is standard. Don’t use steel fibres and don’t use steel mesh. I researched a lot of failed concrete floors and one major issue with steel mesh is when they cut the crack joints they don’t cut through the steel mesh so the floor can’t crack at the crack joints. The joints are still reinforced and therefore crack elsewhere. Perimeter You’ll need flexible insulation 12-15mm thick around all perimeters and at columns, service popups and penetrations, etc. Don’t use rigid insulation as this won’t allow the slab to move and therefore risk cracking. Another issue is with stone walls which are very uneven require thicker flexible insulation. If you intend to dryline do this after the floor is poured and you’ll hide the perimeter insulation easily. Thickness Our floor is 100mm thick and that’s the optimum. Don’t go below 75mm as below this is too thin and you’ll risk cracking. If the floor changes thickness anywhere you’ll need additional crack joints. For example if you’ve steps, ramps or around all recessed matwells as you have a change in thickness in the concrete. Services All electrical trunking and mechanical services should be cut out of the insulation below the concrete floor. If a 50x150mm electrical trunking was placed on top of the insulation the concrete would crack over the trunking. Where we had several pipes close to each other in the floor we had to include a steel plate to rest over to ensure the concrete remained 100mm think and didn’t flow down between the pipes increasing the depth but also preventing the slab from moving. Underfloor heating This works great with polished concrete floors due to the thermal mass of the floor and the slow release of heat. It’s important to have the floor well insulated so put in as much insulation as you can afford otherwise you’ll be paying to heat the ground under the building. Another key point is to ensure the underfloor heating pipes are firmly clipped down to the insulation as any pipes which become loose or if the plastic staples become loose they can be exposed or damaged in the polishing of the floor. Also you’ll be cutting into the slab for the crack joint and if the pipes rise a bit you risk cutting them.1 point
-
Just went round feeling for them, a very long and tedious process. I was checking all joints, corners, windows, doors, cable and pipe entries. It is surprising how sensitive an almost bald head is at detecting a very small leak. Although the pressure difference seems small, you get a very noticable draught through even a small hole and in the case of a window, if you open the trickle vent in a roof window you get a howling gale that you can hear and feel easily, yet with the vent closed you can't feel or hear a thing. My main concern was to ensure that all the membrane and joints that are soon to be covered with plasterboard were leak free. In many places the membrane between the battens was blown up, inwards, showing an air leak in the fabric of the building that the air tight membrane was catching.1 point
-
To calculate U value (approximately, without corrections for surface effects) you find out the lambda value for each material layer in the wall and then convert that to the R value (thermal resistance) using the thickness of that layer and then add all the R values and take the inverse (divide them into 1) to determine the U vale of the whole wall. For example, say you have a wall like this: 15mm plasterboard and plaster skim: λ = 0.22 W/m.K 50mm service void (calculated λ using method in BS EN ISO 6946 horizontal heat flow method): λ = 0.28448 W/m.K 12mm wood board inner airtightness layer: λ = 0.15 W/m.K 300mm cellulose insulation: λ = 0.04 W/m.K 12mm Panelvent outer wood skin: λ = 0.15 W/m.K 25mm partly ventilated void (calculated λ using method in BS EN ISO 6946 horizontal heat flow method): λ = 0.14653 W/m.K * 20mm outer timber cladding: λ = 0.14 W/m.K * Converting these to R values (using thickness in metres): 15mm plasterboard and plaster skim: R = 0.22 W/m.K x 0.015m = 0.068 m²K/W 50mm service void: R = 0.28448 W/m.K x 0.05m = 0.176 m²K/W 12mm wood board inner airtightness layer: R = 0.15 W/m.K x 0.012m = 0.08 m²K/W 300mm cellulose insulation: R = 0.04 W/m.K x 0.3m = 7.5 m²K/W 12mm Panelvent outer wood skin: R = 0.15 W/m.K x 0.012m = 0.1 m²K/W Sum of all the above R values = 7.924 m²K/W Take the inverse to get the U value: 1 / 7.924 m²K/W = 0.1262 W/m².K * Note that the outer void and cladding improve the U value by reducing wind washing heat loss and by changing the surface loss, so although not included in this simplified calculation method, the true U value for the wall will be lower as a consequence of this.1 point


.jpeg.dd4db9573e6131d6fdf82dc60ce22ad4.jpeg)
