Leaderboard


Popular Content
Showing content with the highest reputation on 04/06/23 in all areas
-
I would think of it the other way round. On a sunny day your cylinder temp will be high by the end of the day, so will not need heating by E7 overnight. Size and operate for the same temps as a heat pump. So use E7 to keep the cylinder as 50 to 55 size at 300l plus. Set the other immersions to heat to max temp the cylinder allows.2 points
-
Two ways to self built, pay someone else to it or do it yourself. I started in the first camp, pay someone else, then I got the prices, picked myself up and moved into the later camp, not fully but mostly. Some jobs like the roof, the plasterboard and second fix woodwork were to big for me, so got someone else to do it. Just managed that process, got the quotes, made the 101 decisions required to cover things not on drawings etc. I had done DIY beforehand, the process developed through the planning stage, how do you do this, how do you do that etc. The process from site clearance to completion certificate was almost 3 years to the day. Ended loosing 2 stone in weight, tired, unstressed and learnt lots, but most all I enjoyed it. I can also say I built that, not many people can say that truthfully - but plenty on here can.2 points
-
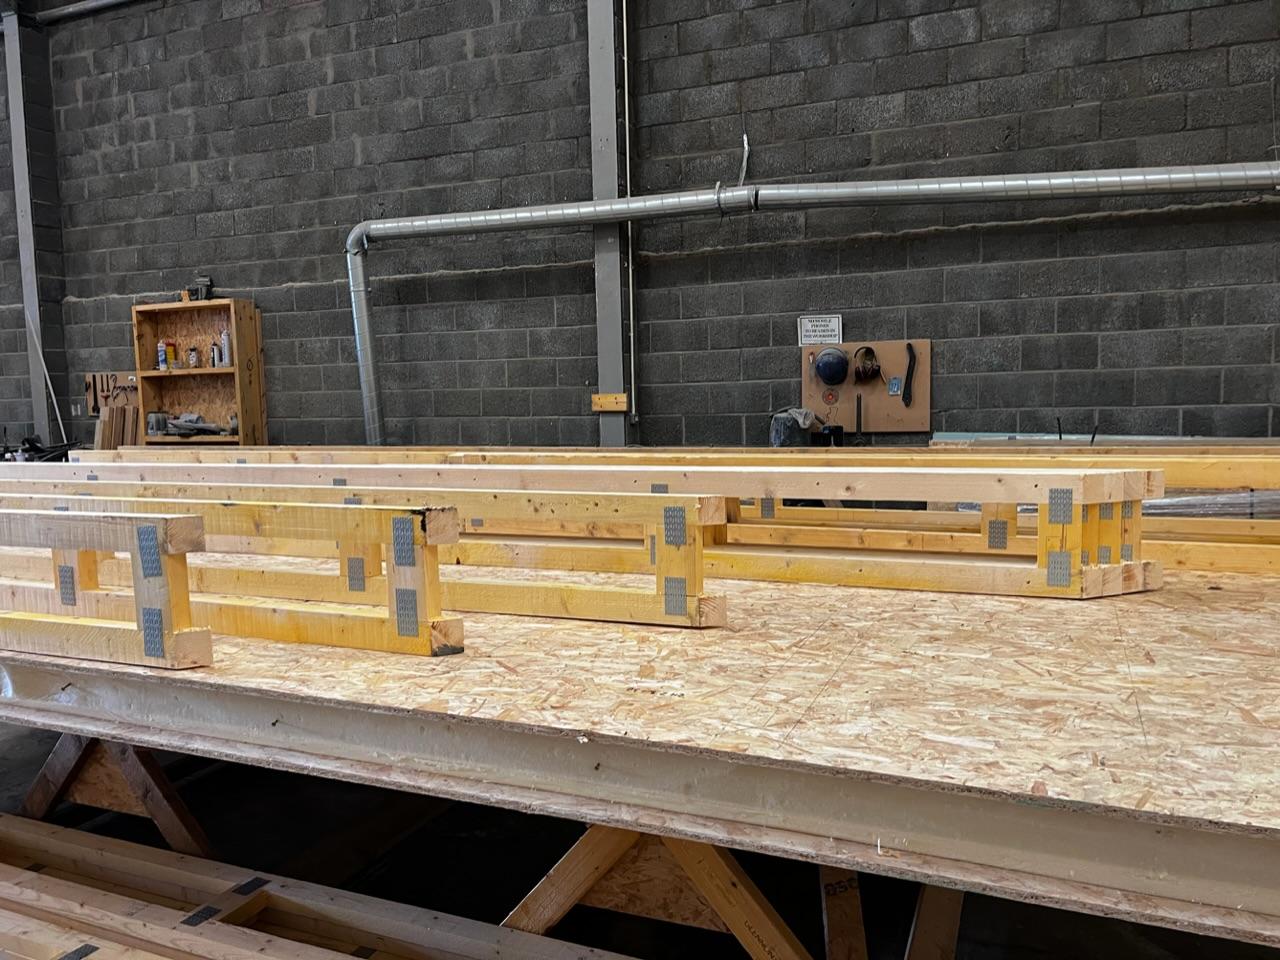
Other half went to see our kit being made today. I was waiting on the portaloo arriving 🙄 The middle picture is the flat roof cassette which is a SIP panel rather than the 302mm space stud everywhere else.
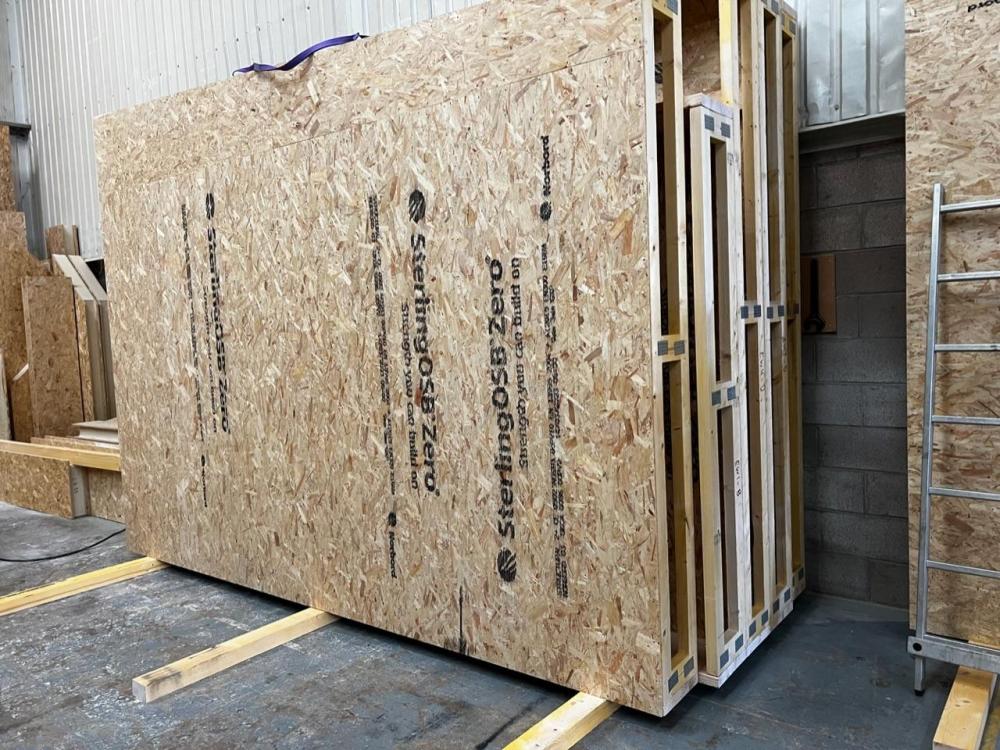

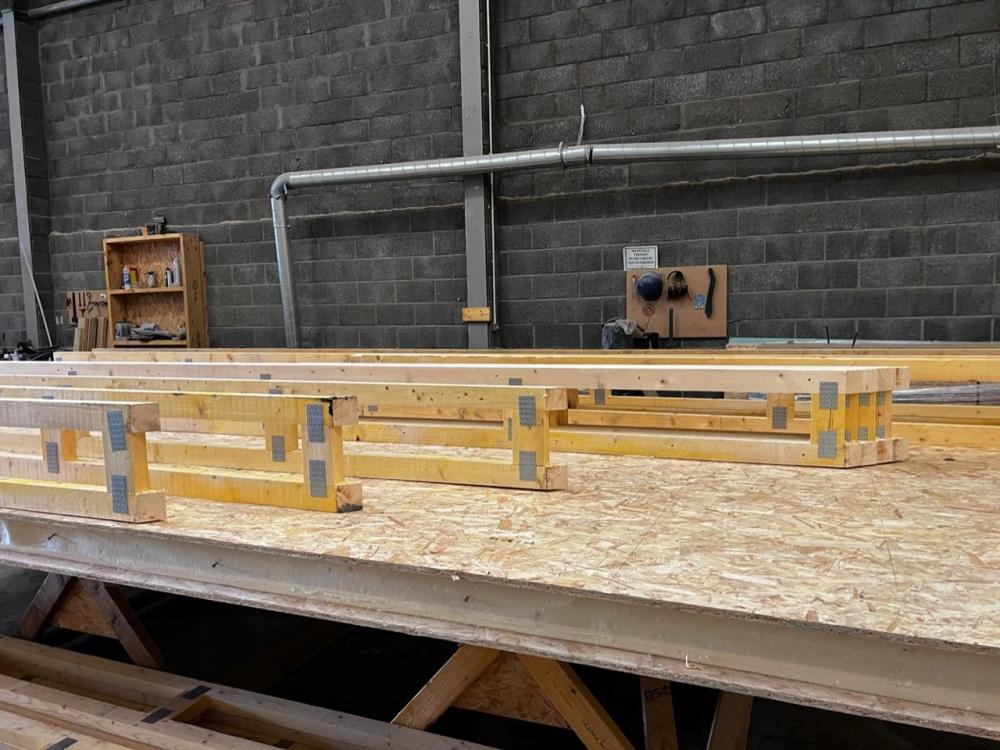 2 points
 -
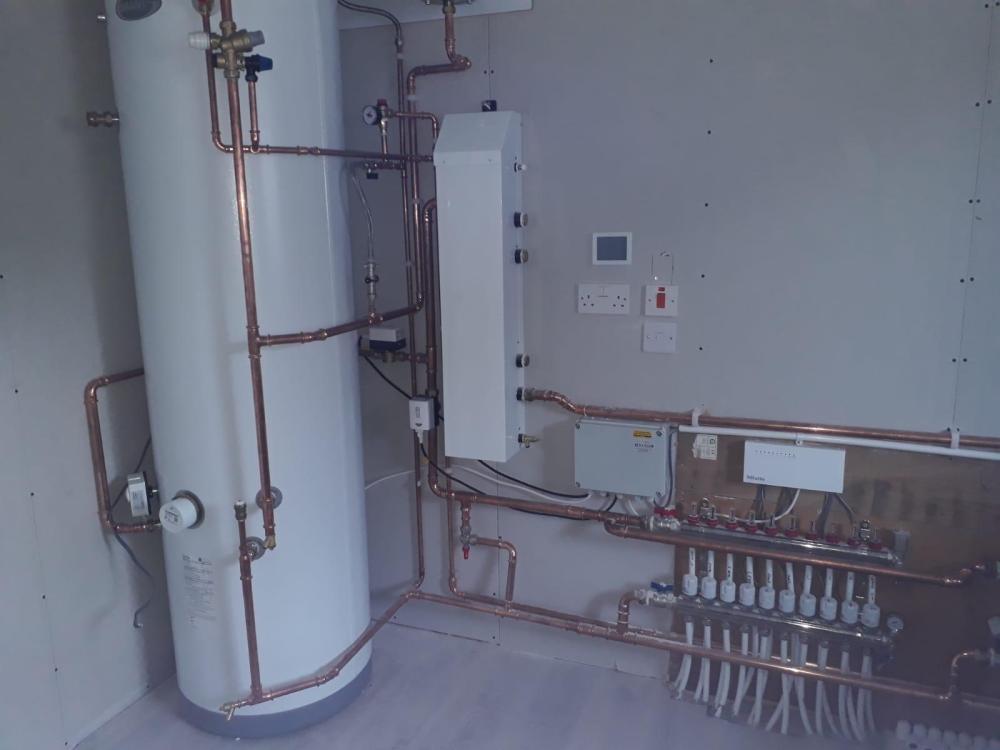
Talk to us here about that. The Grant is fairly simple to wire in it's basic configuration, the one I fitted, bought as a complete package came with Grant's own wiring centre and a volumiser and the pre plumbed tank. Here is a picture of inside The tall thin white box is the volumiser and the frey box just to the left of the UFH manifolds is the Grant wiring centre. You may find the 6kW ASHP is a little under sized if your heat loss calculations say 5kW. If the heat loss if 5kW on the coldest day, then your heat pump will have to run pretty much 24/7 but it will have to spend some time heating DHW. Just be prepared to have a back up heater, even if just a plug in convector heater if a few days of th year it struggles.
 2 points
 -
Thought I'd do a short blog on the Polycarbonate tunnel we built. Our big field suffered with no storage, and location meant containers were very expensive to transport. so one option was to build a polytunnel, which we have planning permission for. again due to location, 500m from the coast 73M AMSL I wanted something sturdy. so looked at off the shelf packages. in the Highlands and Islands the PolyCrub is seen as the mecca. Designed in the Shetland isles, guaranteed to withstand 100MPH winds etc etc. due to the ability to get CROFT grant assistance on these, the price is, IMHO, artificially high CIRC 6K for 4M *6M.. this wasn't going to happen, so after looking at many photos I designed my own.. Basic principle is hoops of MDPE pipe secured to posts in the ground, then 3*2 timber used as horizontal support, with Polycarbonate sheets secured to this timber. the bottom sides are then clad. My design was to use 65mm Black MDPE pipe, and secure the timber with coach bolts and penny washers through the pipe. this way I get a guaranteed fixing that won't pull out , and it still allows for flex in the whole structure. 4m wide x 6M long, but this can be extended. My ground has bed rock close to the surface, 300-500mm below ground, so just knocking in post wasn't going to be secure enough to withstand the winds, also where I was sighting the tunnel its on sloping ground, so I couldn't get it level. I cleared the area to removed the top vegetation and a bit of the top soil. and dug 14 holes. then due to rock levels I then core drilled the rock to allow for the post to be deeper. We then set these in concrete, (at the same time as doing the slabs for the cabins.) The next day we had a look and I wasn't too happy with the security of the posts, so slight change of plan, we created a plinth. basically I used some 6x2 either side of the posts, with a slight angle, then filled this with concrete (again we used ready mix at the same time as back filling the treatment plant) this added about 300kg of concrete to each side, and joined all the posts together, and gave us a solid plinth at the side. No Photos of the next stage but we cut 7M lengths of 63mm pipe, this when placed over the posts gives approx. 500mm dwarf walls and a 6M polycarbonate sheet, giving a head height of around 2.3M. we used a plumb bob to get the centre line on each hoop and drilled an 8mm hole through the pipe and secured the top 3x2 treated timber to al the hoops. One thing we found was that the MDPE did not bend uniformly, this may have been due to slight errors with the posts being plumb. The resultant timber (which was not very straight), snaked from hoop to hoop. after head scratching and re thinking. I decided it was a poly tunnel and to get on with it. we used 7 lengths of timber jointed with half lap joints to extend the length to 6.5M. if using a clock analogy the timber was placed at 9,10,11,12,1,2,3 positions, with the 9 & 3 o'clock being 500mm off the ground, also ensuring the 9 & 3 o'clock timbers were approx. 5.8M apart circumferentially. Then it was a case of securing the polycarbonate sheets to the timber. each sheet is joined with some soffit H joint strip. (you can buy a clear joining strip for the sheets but for a 6M length it was around £65. the H strips proved extremely difficult to connect the two sheets together, or should I say impossible. so I cut off the back edge on one side and used some glazing sealant. this way we could attach the strip to the polycarbonate prior to bending over the tunnel. and each sheet 'H' strip basically lapped over the previously installed sheet. day 2 we had the basic structure. It was noticeable that the curve was not symmetrical, so putting the door frame header in by securing to timbers at 11 and 1 o'clock was not level. I overcome this by using a ratchet strap attached to the 11, and 3 o'clock timbers and tightening until timbers at 11&1 o'clock were level. I then put the two door jambs in (concreted at the base) and cut to the length required and secured to the header. This worked and the tunnel was now more cylindrical. I framed the rear by baring 3x2's off the horizontal timbers. Last steps were to clad the base, I used 4*1 treated timbers that were screwed into the MDPE pipe and wooden posts. then used strips of visqueen to create a more sealed dwarf wall, this will help prevent driven rain from the winds getting inside. over this I used Larch timber backs* to create a vertical cladding All in with hardware, polycarbonate, timber, concrete the project cost £1200. not cheap, but its solid as a rock. It withstood the first Autumnal storms this week with winds hitting 50MPH. Its also very warm inside, even now as the temperature is falling. Larch timber backs are the offcuts from the saw mills and are reasonably priced as scrap. we purchased a pack of timber backs, approx.40 lengths of larch timber with bark in 4.8M lengths for £100. these are not uniform and taper etc, but as i only needed 500mm lengths it was straight forward to make it work.1 point
-
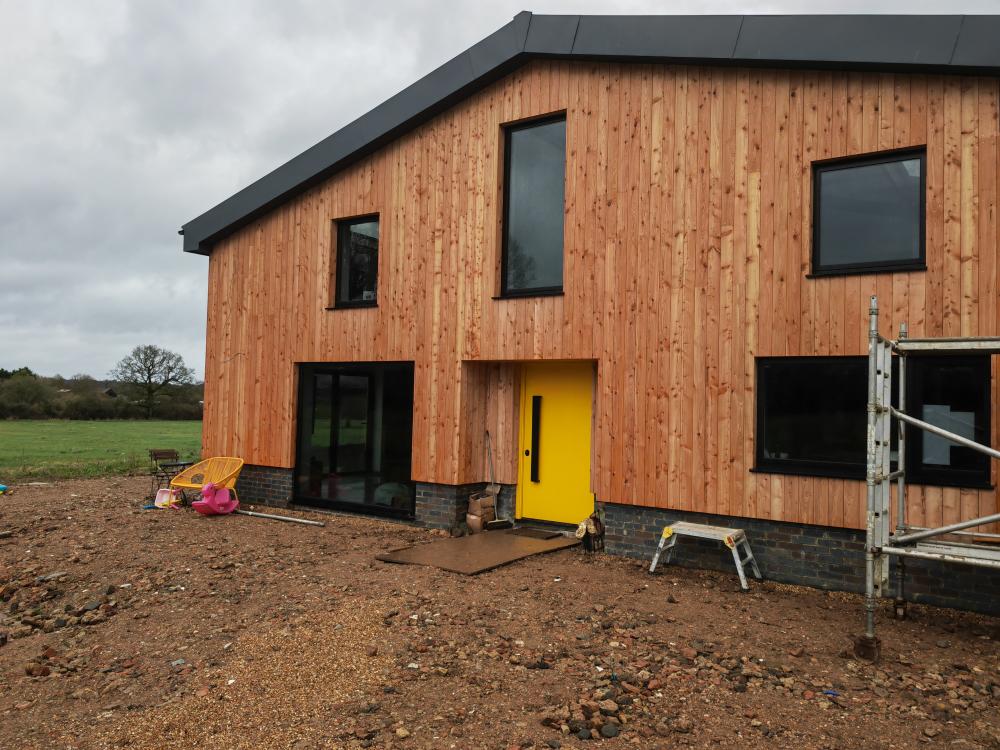
Hi everyone I just wanted to introduce myself. My family and I are just coming to the end of a self-build steel framed barn conversion which started back in 2019. We only have minor things left to do. I project managed and also designed the entire house and my wife and I did all the planning application. I'm not an architect - it was more the fact we were left in the lurch by a really poor planning consultant/architect that we decided to take over ourselves and pleased we did. Our house is fairly standard block and brick masonry cavity-wall construction and we have quite large 150mm block cavities (concrete blocks for the external skin and thermalites on internal skin) full-filled with 150mm breathable mineral wool insulation, plus a further 50mm waterproof mineral wool externally behind cladding (crucially still allowing plenty of ventilation behind cladding), 100mm PIR celotex in floor (would have done more in floor but we're limited by potentially low ceiling heights), 200mm PIR celotex warm roof with an airtight VCL. We had a builder build our foundations and shell and he also put up some plasterboard on internal walls, we have a full wet plaster on all external walls. We had a separate roofing company do our metal roof, a cladding company have done our larch cladding and electrician and plumber are close to finishing our second fix items. My wife and I took over from the builder after he left. I then spent many weeks applying a cement lime "parge" coat on the inner face of all external walls (prior to our plasterer doing the full wet plaster), and I applied air tight tape everywhere in an attempt to make the house as airtight as possible - it was hard because our builder did not see the importance of air tightness. I've also built an exposed brick wall spanning half the entire downstairs and we also fully prepared the entire groundfloor for our concrete pour - doing the insulation, membrane and steel mesh etc, as well as doing some of the insulation and VCL in the warm roof. We had a concrete company pour and powerfloat the concrete slab which acts as our finished floor surface, as well as being a good thermal mass. Our house is heated solely by an 8.5kW ASHP and costs very little to run, which does all our hot water and our space heating, via wet underfloor heating in our concrete slab on the ground floor (no heating upstairs aside from a couple of electric towel rails). We also have solar thermal tubes which isn't doing much at the moment with the cloudy rainy weather and we also have 7.6kW solar PV on our roof which will be connected to an inverter and batteries later in the year. We also have MVHR. We just had our air tightness test done and we scored 2.5 m³/hr.m² @50Pa for the standard air permeability air tightness test, and 1.96 ach/hr @50Pa under a passivehaus air tightness test (although I can't use the Passivehaus test result for my SAP calcs). Dealing with non-straight original timber roof perlins and other characteristics in the original barn, and being masonry construction meant getting it air tight was a challenge.. plus it was a bit of a battle dealing with most of the trades who did not understand the importance of air tightness - our main builder thought we would never be able to open our windows! And it was solely me doing any kind of air tightness work. I'm not sure if 2.5 for a masonry house is ok or not?? I had hoped it might be slightly better after all the time I spent but I'm glad it is lower than 3 though because we have an MVHR and these work better at 3 or below (and at the end of the day it is just a number). House appears to stay warm, costs virtually nothing to run, no mould or condensation thanks to the MVHR which also evenly distributes the warmer air downstairs to all rooms upstairs, so overall really happy. It's been a lot of extremely hard work, especially with three quite young daughters, and working full time. Sorry for the long introduction. Attached is a pic. Matt
 1 point
 -
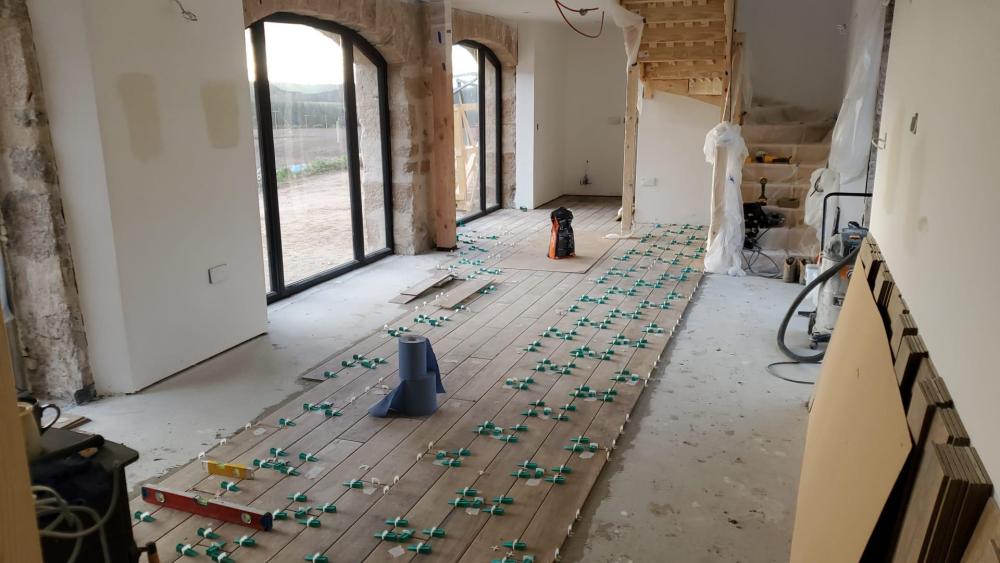
So it is going well with the levelling clamps. Pretty well essential for these 900 x 150 tiles, and quicker than manually minimising the steps. Achieving about 1m2 per hour with whole tiles, but will prob get faster.
 1 point
 -
Irrelevant now of course but I googled Isotex and buildhub and there is some discussion about them on from a few years ago and there are some red flags even then. When we decided to go with Heb Homes I couldn’t find anything negative about them. Not that this means everything but it’s a tick in the yes column. Subsequently they’ve turned out to be quite poor in our experience and I’ve also more recently found out I’m not alone. It is why I’ve been happy to share my experience on here and name them as buildhub is publicly searchable. A lot of these companies are relatively small so getting feedback on them is quite hard.1 point
-
Have you anything recent on record? This situation can be caused by a severe non-payment to the company. More likely though there have been cash problems for some time. Have the directors been taking salary or even dividends the while? I would make all possible fuss so that they know this isn't just going away. Perhaps that might get you higher up the list? I don't have much faith in liquidators..they always seem to get paid though. The design is yours. Have you got the drawings and calculations? If not then demand it, as that will take them 10 minutes. Jamie was full of positive chat.....anything on the record? Even if not, summarise it now and email it to someone, to here perhaps, to date it.1 point
-
My story: I had a few hours to kill and went to a property auction in which I somehow managed to buy a plot with outline planning permission for what seemed like an insanely cheap price. It later transpired that it was blighted with services that didn't run where the utilities companies stated where they did, and it looked undevelopable for a while. Thanks to a bit of leeway from the local authority we got through Reserved Matters with a contemporary design that sits with in the useable footprint, and I'm now at the stage where I need to decide whether I'm going to see it through or sell it to someone who knows what they're doing. I've got to to decide fairly sharpish whether I'm going to progress to the next stage and get building control drawings done. I'm leaning towards taking the SIPs route and getting someone like Potton erect and make watertight, but am mindful that I'm out of my comfort zone, so am very open to any advice that's forthcoming. I will need a property to move into within a few years, so if the numbers stack up getting it built does make a lot of sense.
 1 point
 -
I dealt direct with SSE and it was painless. Presumably you pay a fee to these organisations. I’d find out how much that typically is. My guess is that once you approve the work direct with the DNO it’ll be relatively straightforward so I’d do it all myself.1 point
-
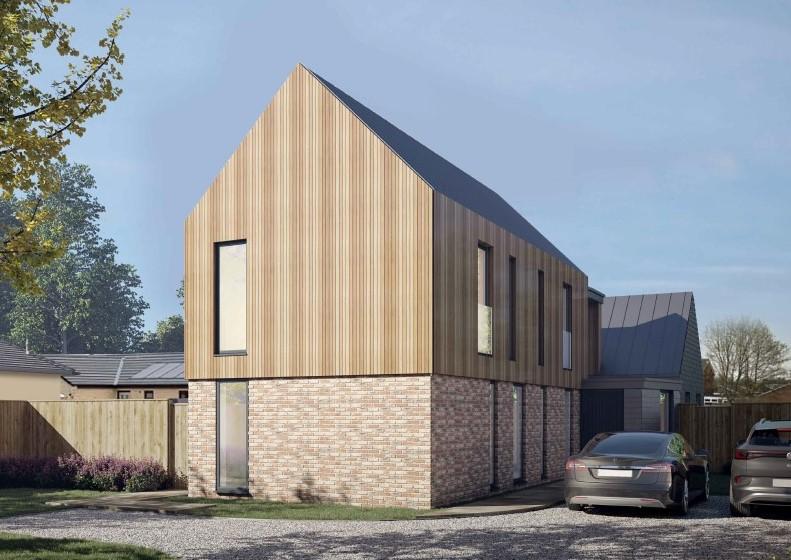
On a positive note. If you have the funds and time, then you have the huge advantage of being able to stop and think, ornto sack a contractor or cancel an order while you shop around again. The basic shape is good. Rectangular is good. Pointers to reduce cost and maintenance: No gutters or rwp shown. Please keep them external. Valley gutter...design the building around this...substantial with spare outlets and overflow, and assume you will have to clear it twice a year. (I'm really saying can you design it out?) Eaves detail needed. Thats a lot of wood, shown newly cut or treated. Allow for treatment if you want that colour, not grey. Dont assume sips. Shop around.1 point
-
Apparently it’s a combination of strength and ceiling height vs thermal performance. The MVHR ducting runs through this roof too. The final inside layer is insulated plasterboard. Largely naïveté on my part and I was too far into the planning process to change the foundation design by the time I understood it better. I did get a quote though and ruminated for a week about what to do then our warrant application got approved 5 weeks early so it made my mind up for me. The floor will have 200mm of Kingspan under the screed. The top block on the foundation is a big insulated block, we’ll have an upstand on the inside and likely insulation on the outside of the blocks if I can detail it with the cladding well enough. Not ideal but will still provide a very good performance. Everyone says your drainage will get damaged. Even the kit erection company said it’s common. I’ve only got one manhole cover in yet and banged in stakes and yellow tape marking where the drainage runs elsewhere. We have plenty of hardcore down and I tell everyone to stay clear of the edges but some knucklehead still managed to get his van stuck.

 1 point
 -
you don't have to worry about being hands on if you have the budget to get subcontractors to do the work. even project managing (although that in itself takes a lot of time!) will save substantial amounts of money. so it's possible to do a self-build with no hands-on 'building' work.1 point
-
I understand why you'd say that, but personally I think it's a fairly shrewd thing to gauge for a general consensus here, as I have. I readily admit that I perhaps introduced myself a bit on the early side. Either way I'm aware that I have a lot to learn before I decide whether to commit.1 point
-
I figured that if I took the watertight SIPs route then that covers the rump of the project that I feel out of my depth with. Regarding the rest, I know enough electricians, tilers, chippies, groundworkers, plumbers etc to muddle through it and hopefully not get too badly burnt. I am pretty good at managing costs and getting things done affordably, that's a big part of keeping the business I run afloat. My problem is I'm spinning enough plates with that, I won't have time to do too much hands on work myself, plus, in all honestly I'm a bit cackhanded. I know my strengths, and accept building isn't one of them. Thanks for your 2p.1 point
-
Well to be devils advocate…. I really enjoyed my build and didn’t find it stressful, I was fortunate that I was recently retired, lots of DIY and small builder experience had a great main contractor and had the funds in place. It is however a gamble and many are not as lucky as me.1 point
-
Sell it. It will be an expensive pain to build and the area does not look great.1 point
-
Finger-tip '... feel... ' : sell and move on. Why? It is much more common for ab initio self builders to have had a good hard look at the issue of self-building in its entirety - Self Due Diligence as it were, BEFORE they post here. Self-building challenges everyone who commits to the process: spend a few minutes reading and tales of woe that abound here. Never mind Sleepless in Seattle, sleeplessness is very common (see @Kelvin above). But then so is Optimism Bias. Supporting and following through on that optimism is *king hard work.1 point
-
It is not "fun". It is a huge commitment with all your eggs in the basket. If you are comfortably off, with time on your hands then that reduces the economic risk. If you manage it yourself you might make some money. If you diy a lot then that saves more as you are effectively earning a tax free wage....if you are good at it and fast. Do not underestimate the risk. The unkwown unknowns apply even to experts. We mostly do this for quality and personalisation (is that a proper word?) rather than gain. But from your report we can see that you are a risk taker, and have skilfully/ determinedly overcome obstacles. Is this the time to bank on the success, or to hope that you master construction management equally well?1 point
-
Costing The Earth had a bit about the problems with installations. Not listened to all of it, will catch up later. https://www.bbc.co.uk/sounds/play/m001kqzy?partner=uk.co.bbc&origin=share-mobile1 point
-
It's obvious with hindsight that the canny developers in that auction room were aware of the difficulty getting a viable build on the plot and figured it wasn't worth the risk, and that's why I ended up getting what I thought was a bargain. I've subsequently been lucky insofar that I had a planning officer sympathetic to the problems I faced, the Town Council had been recommending refusal. I also had a neighbour who set a helpful precedent by putting up a bungalow way closer to the neighbouring pumping station which the water company didn't want any development within 15m of. So, in terms of increased value, I think it's safe to say I'm sitting fairly pretty. The path of least resistance is to offload and bank a tidy profit for once in my life, but where's the fun in that?
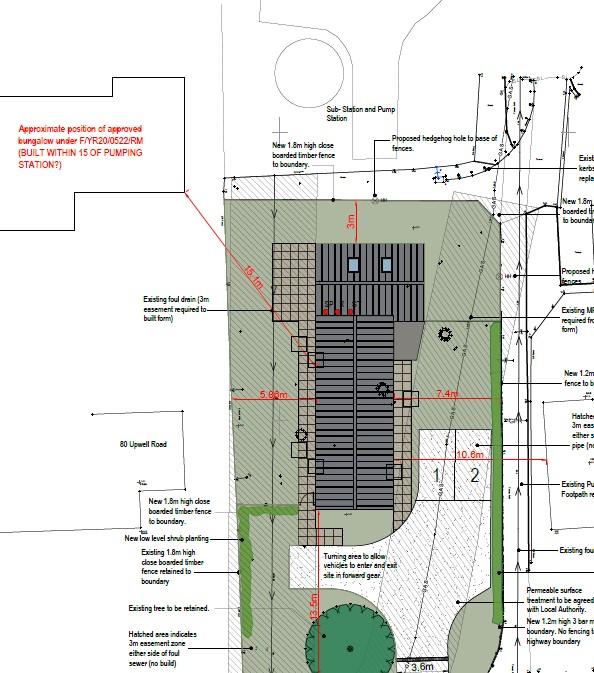 1 point
 -
unless its your forever home, take advantage of your good fortune and sell it.1 point
-
Fogg What i can say about my Potton experience is that the planning permission submission that they talk about is not part of their house design service. It is a referral to agents of theirs and cost me £2.5k. Then £6.5k for trial pits/foundations design.1 point
-
A small battery helps to make the most of this tariff, but it is entirely usage dependent as to whether it's financially worthwhile. As an update, my total billed electric cost (excluding standing charges) since switching to Flux 3 weeks ago is £0.78. Not bad at all considering I've also been running the heat pump which has offset around £63 of gas usage over the same period. As heating demand disappears I'm realistically going to have to change my direct debit to ~£0 over the summer as the export will easily cover hot water and standing charges. It's a great summer tariff.1 point
-
Welcome to the forum. I wouldn't worry too much about feeling like a fish out of water, most self builders do to start with. It's a steep learning curve but we managed to design and build our own Passivhaus without any previous experience. If it's what you want to do, stick with it.1 point
-
Slip some 1/4" thick plastic washers over the bolts before refixing the posts. That'll give a clearance and stop the staining.1 point
-
Snips it is then.1 point
-
Hi @Fogg It's common to speak of the build cost as the average amount of pounds spent per square meter of floor space constructed. I have heard of figures between £1000 and £2000 per square meter for a build cost. Find the internal floor area and this would be a starting point in my opinion. Other people I'm sure will add about which necessary items are not included in this figure. Watch every episode of grand designs, and learn some of the mistakes to avoid and where the big costs are. Good luck Marvin.1 point
-
Not entirely clear what you’re asking. I can assure you most of us on here were (or still are) out of our comfort zone so you’re in good company. First time self-building is not for the faint-hearted especially if you have zero experience of building. However, it is exciting and rewarding so if you have the right mindset, are relatively organised, and can solve problems then it’s doable. It can be a bit of a roller coaster though. The first question you need to ask yourself is can you afford it. You know what your budget is and being a Potton home they should be able to give you an estimated cost. Keep in mind that there are lots of hidden costs along the way so you need a healthy contingency. Doing it on a tight budget is more likely to need a lot more if your input. What I did was cost it as if it was going to be turnkey (the most expensive way to do it) and worked backwards from there. Be prepared for sleepless nights like I’m having right now as I have three current problems with my self-build I’m trying to sort out so can’t sleep!1 point
-
Give it to the farmer, make a friend with someone with useful stuff, might come In handy when you need a telehandler later in the build1 point
-
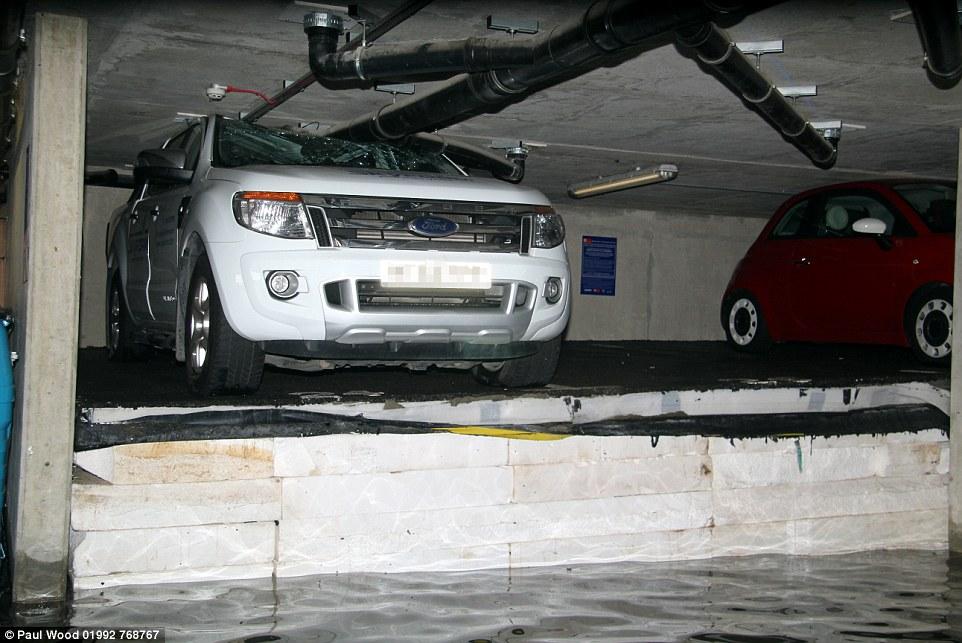
Insulation can be pretty strong.... https://www.dailymail.co.uk/news/article-3829379/Vehicles-CRUSHED-against-roof-burst-water-main-causes-polystyrene-insulation-beneath-car-park-float-raises-floor-four-feet.html
 1 point
 -
Celotex has a compressive strength of 140kPa, about 14 tonnes per square metre evenly distributed! A person sitting on a dining chair might exert 300kPa so it will crush the foam. Human footprints create about 60kPa so you can walk on it without damage (in flat shoes). As others mentioned, the screed and floor coverings serve to spread the load over an area such that the pressure will be much less than the compressive strength.1 point
-
you need to get over the hurdle as cheap as possible. stud out and put a door in, once its inspected you can remove it all. yes a pain in the arris but you are where you are. BCO are not going to pass it, you arent going to take them to court for costs so just crack on and get it done.1 point
-
G98 is a notification for micro generation less than 16 amp(3.68kw) per phase G99 is an application for micro generation greater than 16 amp(3.68kw) per phase G100 is for export limition as a supplement to G99 if the DNO requires it I suspect most installs will only require a G98 notification1 point
-
Could not agree more . So important that ... you might like to insert the date in that field too (if its a new issue) as in Salamander Cottage LA[..] 9[...] : Steels Drawings : 14/02/2023 Just have a quick look at your own email IN box. Look at those Subject Lines that draw your attention. BCO's got the same problem. Make it easy for everyone.1 point
-
Step one: remove chimney Step two: make good roof Step three: close loft hatch 🤦♂️1 point
-
The only time I have seen a chimney rendered like that (though usually at least smooth!!!!!) is following damage from a chimney fire. Is the foam just a crude attempt at blocking air and possibly smells coming through from stinky neighbours?1 point
-
Looks like an nursery school project, but probably nothing that couldn't come down and be done properly. Looks like a hole in the roof too...is this a renovation job?1 point
-
That’s what happens when you employ 3 year old brickies1 point
-
Terrible brick / block work and somebody has tried to fill in the gaps with expanding foam. Worst chimney stack I've ever seen. Context? Own / buying / viewing? How old is it and is that an external wall or a party wall? If that is indicative of the quality of the rest of the work in the build, I'd run a mile.1 point
-
I have a similar set-up. A few comments: We completed our self build in 2020 and have a home with a good level of insulation. I did'nt need the cylinder to do space heating for us. We have three extract points, en-suite, bathroom and utility room. As a way to provide domestic hot water heating for a family of four, the capital cost is cheap compared to getting an external heat pump fitted. Our tank and system is a Joule Aero, with stainless steel cylinder, no need for anode changes. I believe they have now released a new model. I live in soft water area. The system also has a dual immersion electric heating, but never used it and rely entirely on the mini heat pump. All in we are about 10-12kWh of electricity each day, but not sure how much of that relates to the heat pump. I'm not sure why the system is not popular here, when I posted a few years back, one member suggested that I would hear whistling through our trickle vents when the system was running which was nonsense. After living with the system for coming up to two years, I'm so glad we fitted this system rather than external air source heat pump, as it fits our circumstances well.1 point
-
A notice on thie website states they've gone into voluntary liquidation. Does anyone know anything? They have my money and I've spent a small fortune trying to get building regs completed with their system. Very bad day......!0 points
-
Yeah I know that but we didn’t pay by card it was bank transfer hence we won’t get anything back0 points
-
Just had a customer who lives very near you. I have set the traps, and leaving the till empty tonight.0 points
-
Big finders, smoll screan. I hearbuy alogopise for this anf past and fewchur occcurunces.0 points
-
More so than Which I think is a type of onion.0 points
-
Catch thin, unclamped metal with a big toothed blade and it can go horribly wrong. Ask me how I know, nearly lost a finger. I've known worse happen.0 points