Leaderboard


Popular Content
Showing content with the highest reputation on 04/01/23 in all areas
-
For information....we were advised and can confirm, that our 900 long porcelain tiles all have a curve in the length. Adds to the challenge. Fortunately laying them to 300 staggers reduces this 3mm difference. I hadn't heard of this characteristic. The team are taking to tiling. Superb for the first time. We are also impressed to find 19 different patterns, reversed makes 38, so it won't have visible repeats.
 2 points
 -
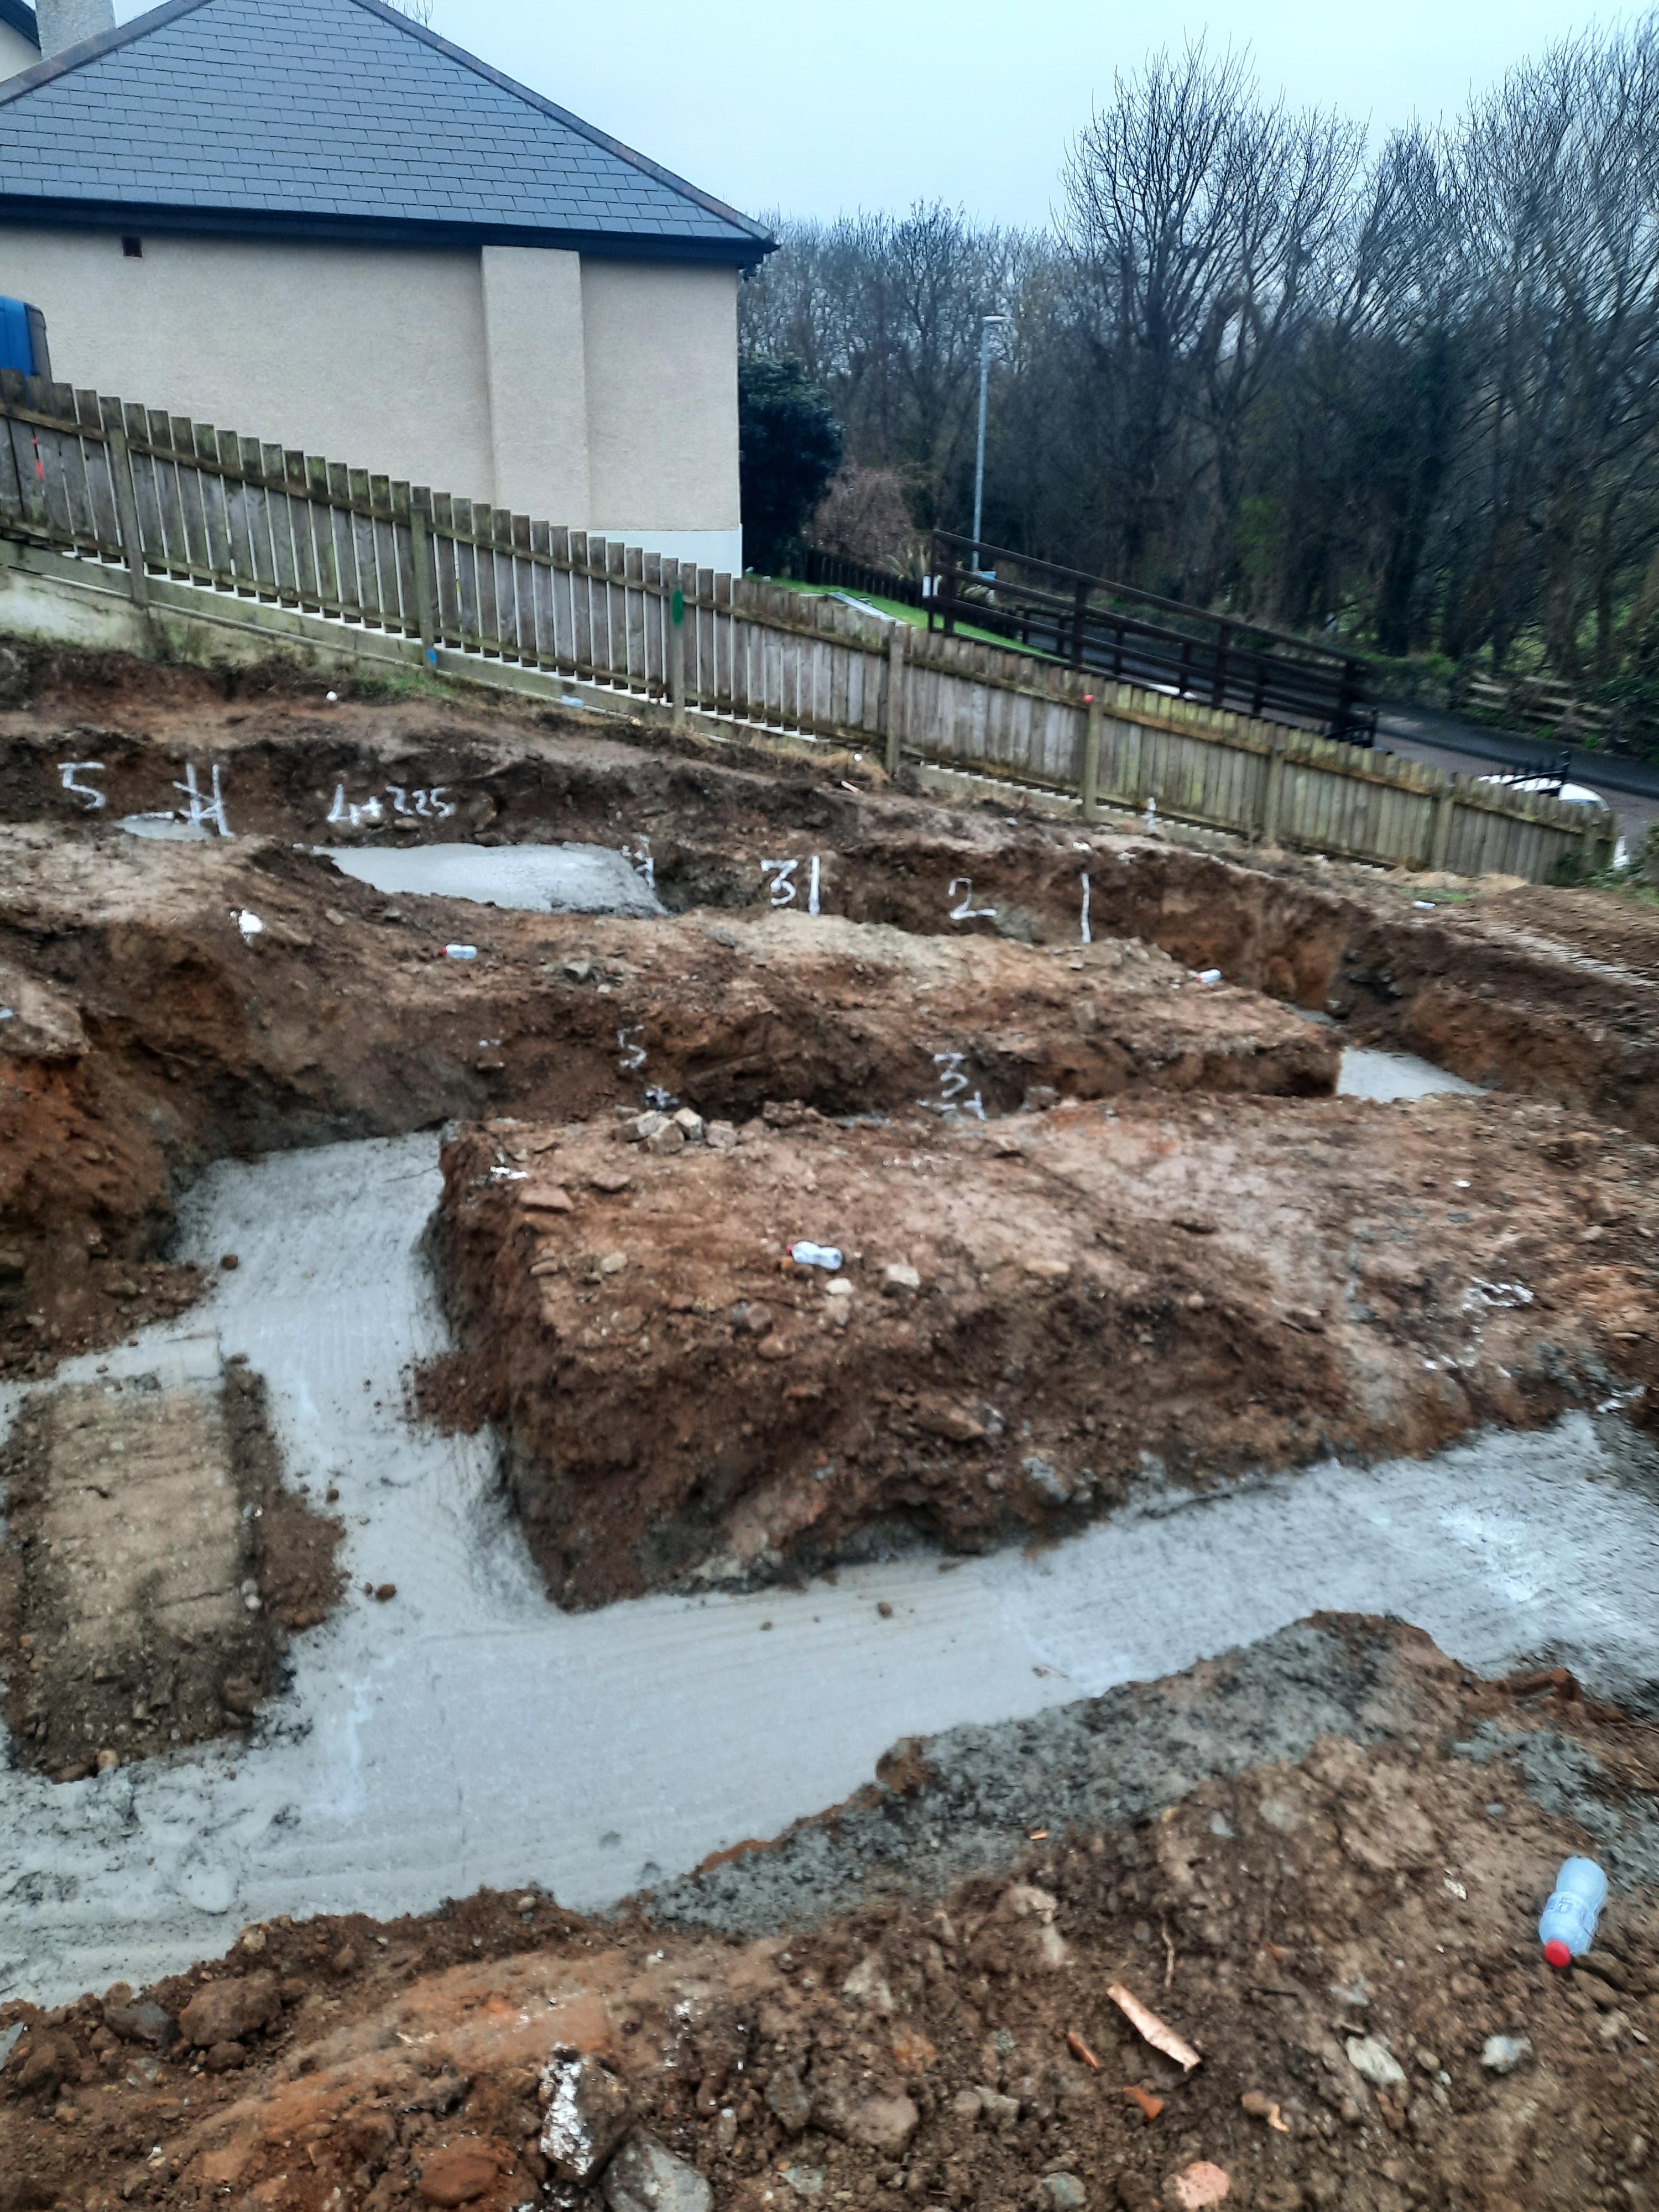
Site tidied up too, don't ask how many lorry loads had to go. Got brickies lined up for Tuesday.
 2 points
 -
It can mean that water is present there. It looks like the gutter might be overflowing at the end (in the corner). Just under the soffit should be dryer than the rest of the wall but that bit looks like it's getting wetter: If it's not the fault of the gutter, it might be the flashing or possibly the vertical expansion gap. I'd be investigating it if it were mine.
 1 point
 -
Efflorescence. And that’s very mild. I’ve seen some shockers in my life.1 point
-
I have been wondering about this. ATM I am charging to ~50% at night rate and the sun does the rest most days and there is enough left over for the HW. I don't think when I install the HP I will put it downstream of the battery system, as in a power cut it would exhaust the battery very rapidly leaving nothing for lights or cooking. If I tee it in before the battery CT then the battery will have priority but the HP will still have the benefit of any residual PV before it is exported. Like @SteamyTea I have a timer so the immersion heater can come on to top up the HW temp after the HP has done most of the heavy lifting with the benefit of the CoP. Currently I do the reverse, the immersion stat is set higher than the tank stat so the oil heating only comes on at the end of the day if the PV was insufficient.1 point
-
They were from topps, inverness. The staff were very good altogether in talking prices, openess about the repeats issue and delivery. I was just surprised that the displays didn't do justice to the mix of the tiles. At first visit they gave a good offer based on a large quantity. Anything they describe as a pallett gets a good price. It turned out that didn't mean a whole pallett of one type, just ' a lot' (more than a boot full?)1 point
-
They may not be that bad and some adjustment might stop the drafts for now. I would be wary of buying any windows unless you really have the final design sorted visualised. They're two expensive to buy twice.1 point
-
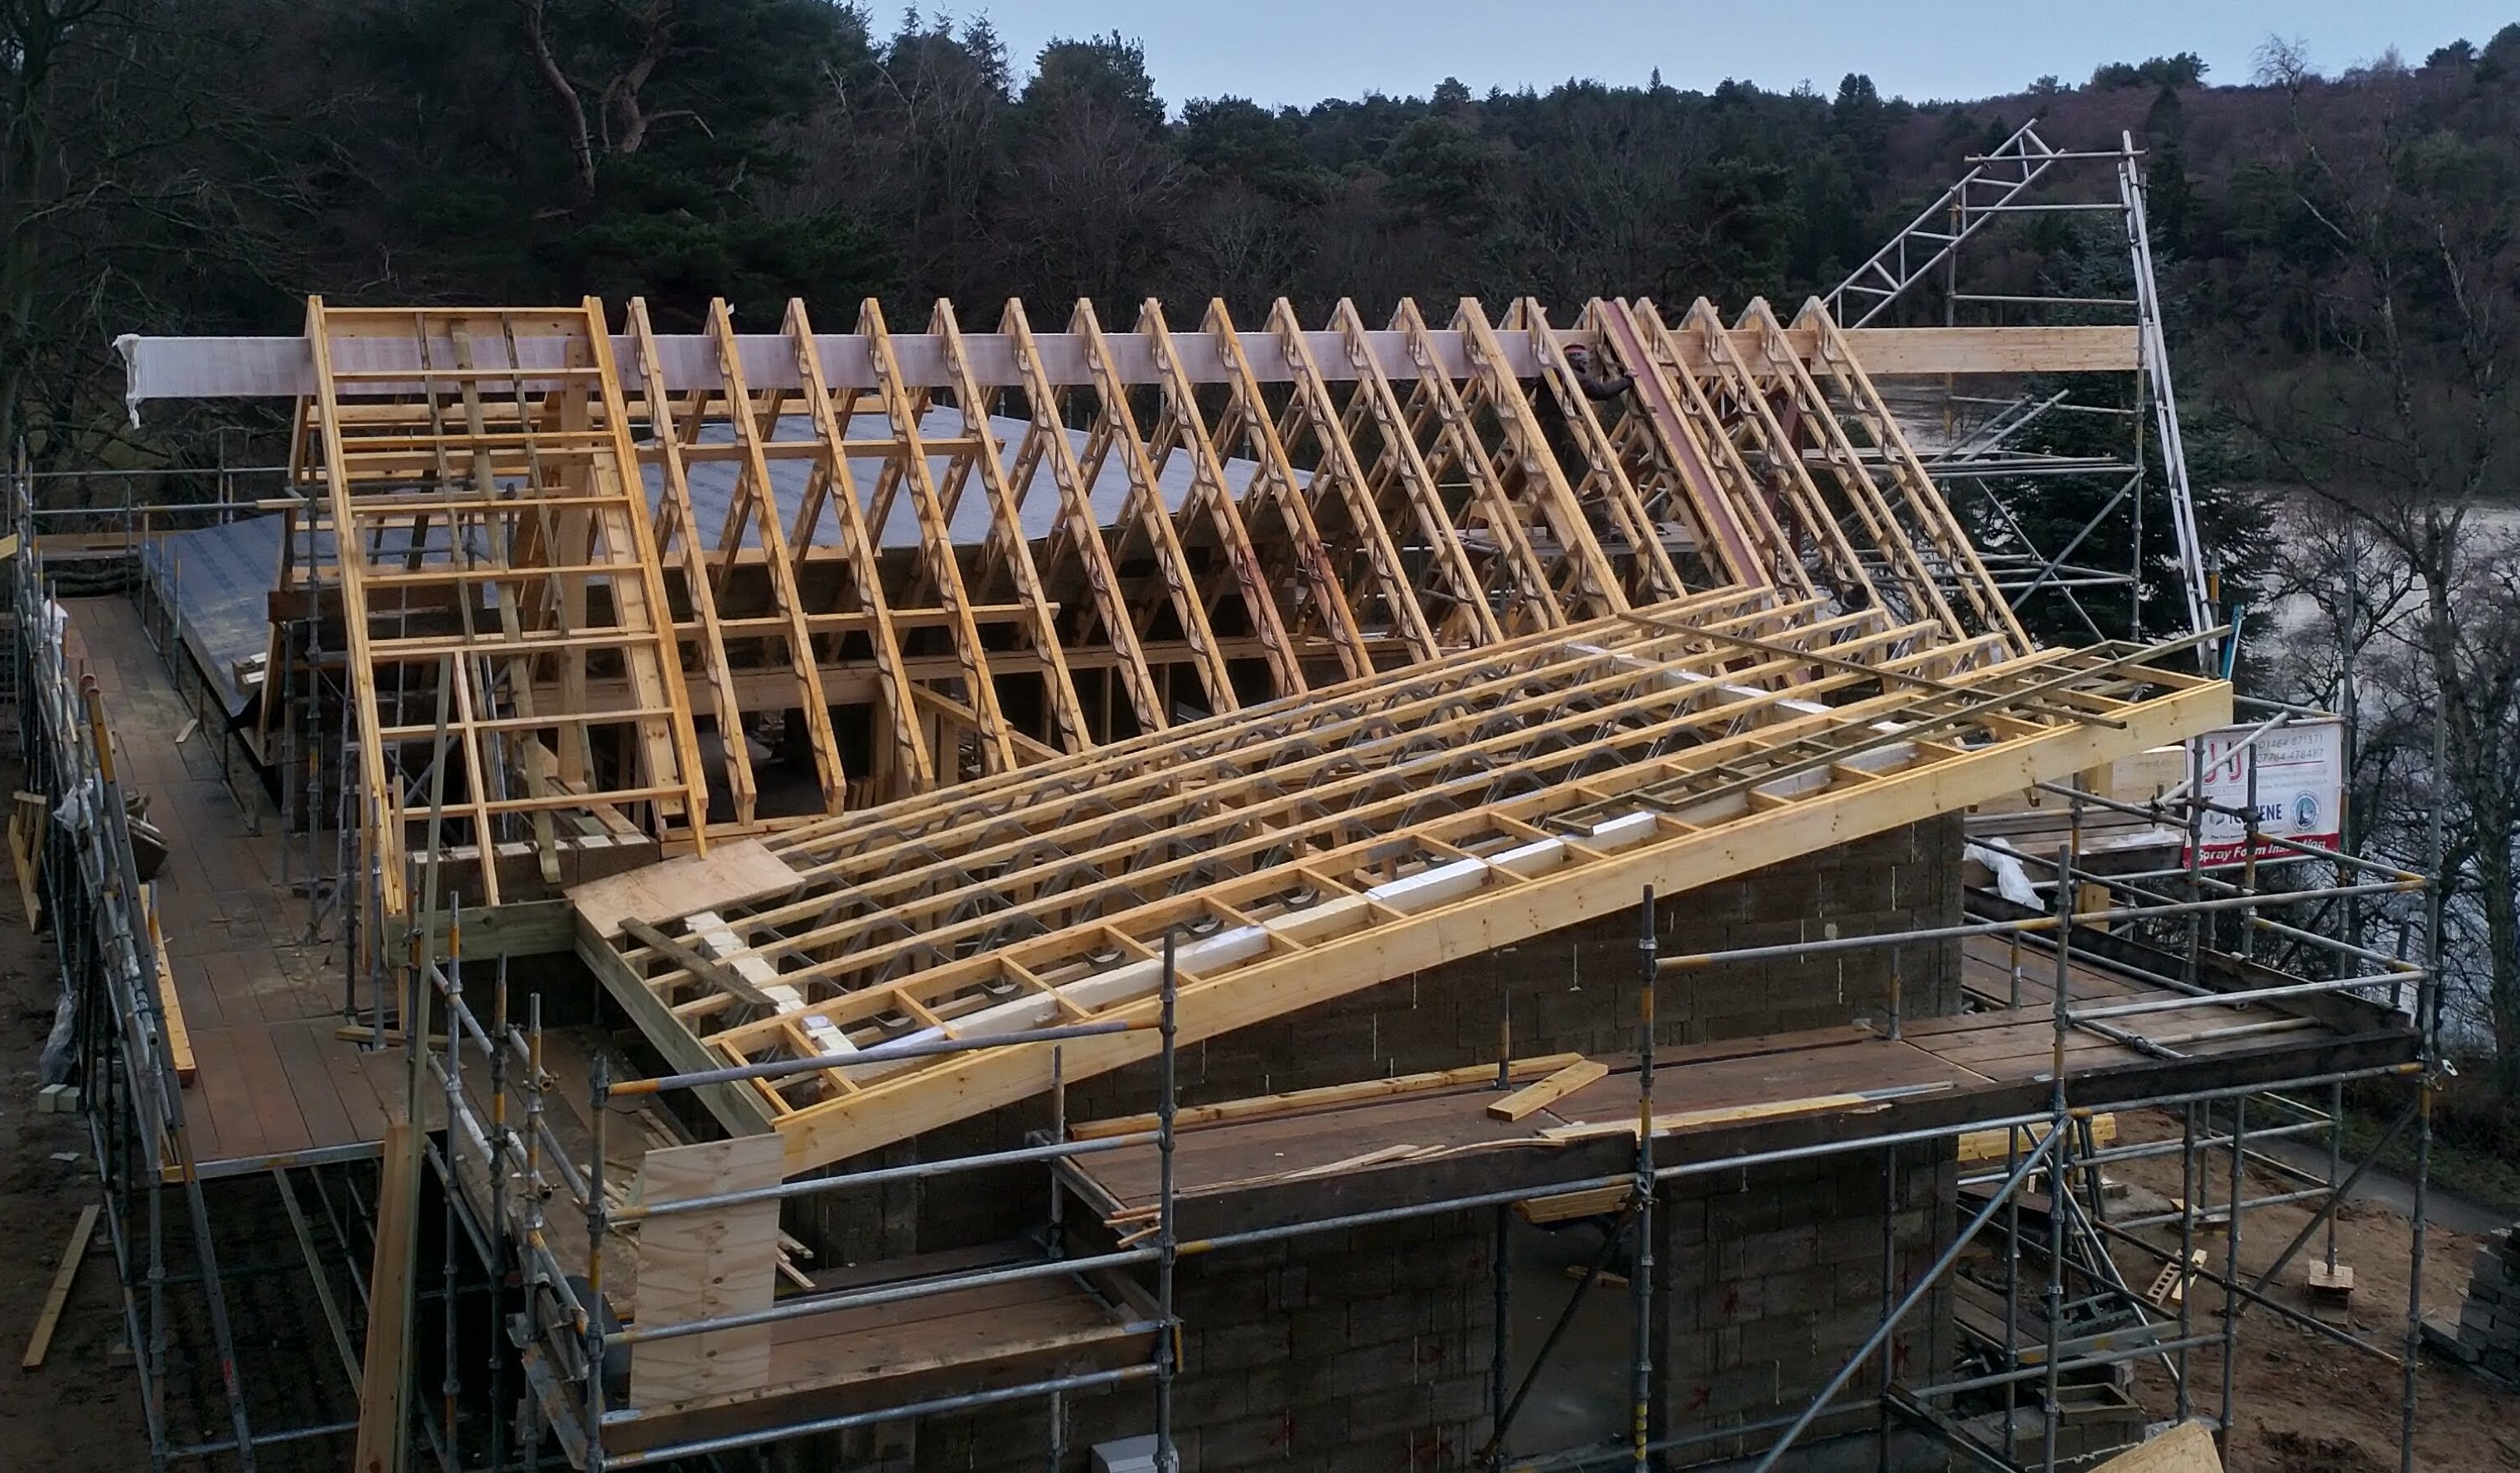
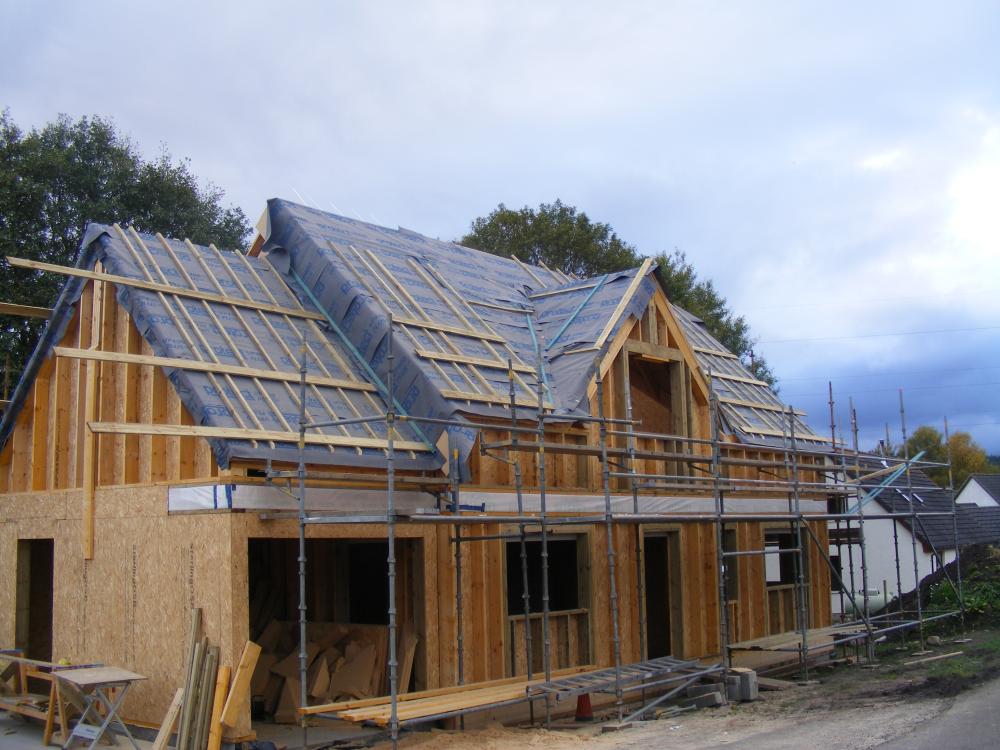
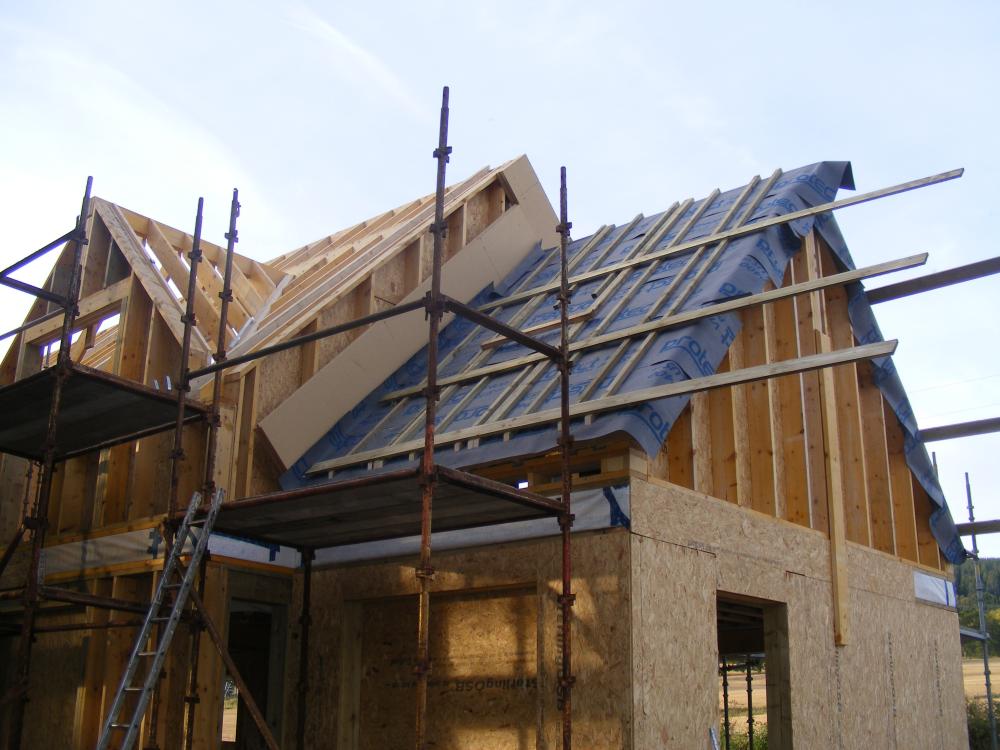
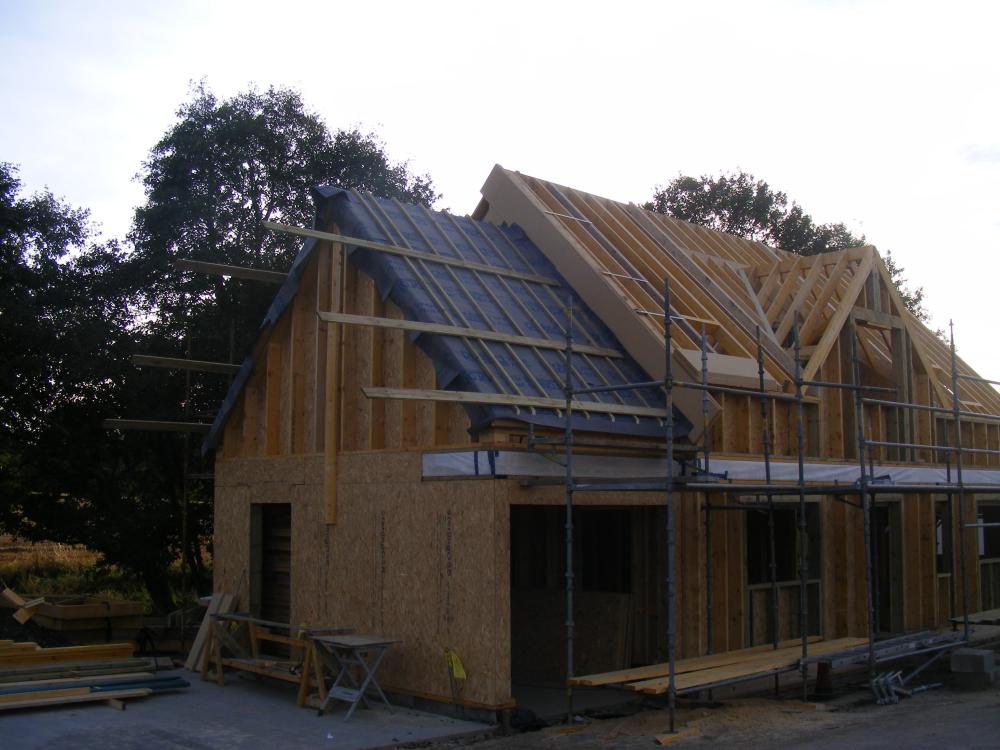
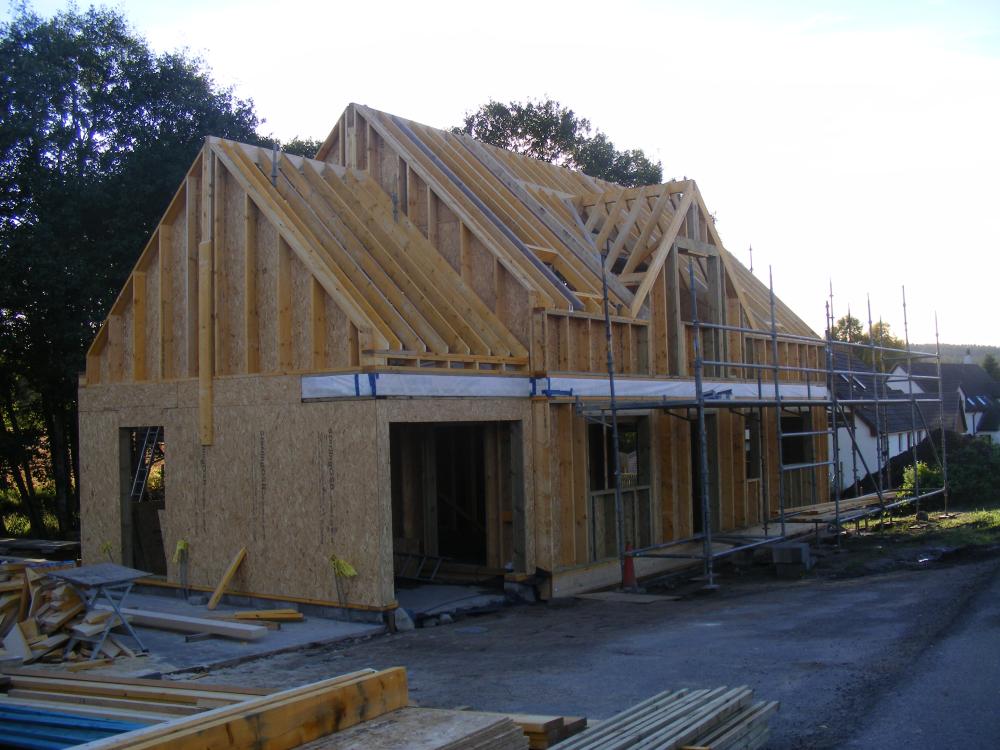
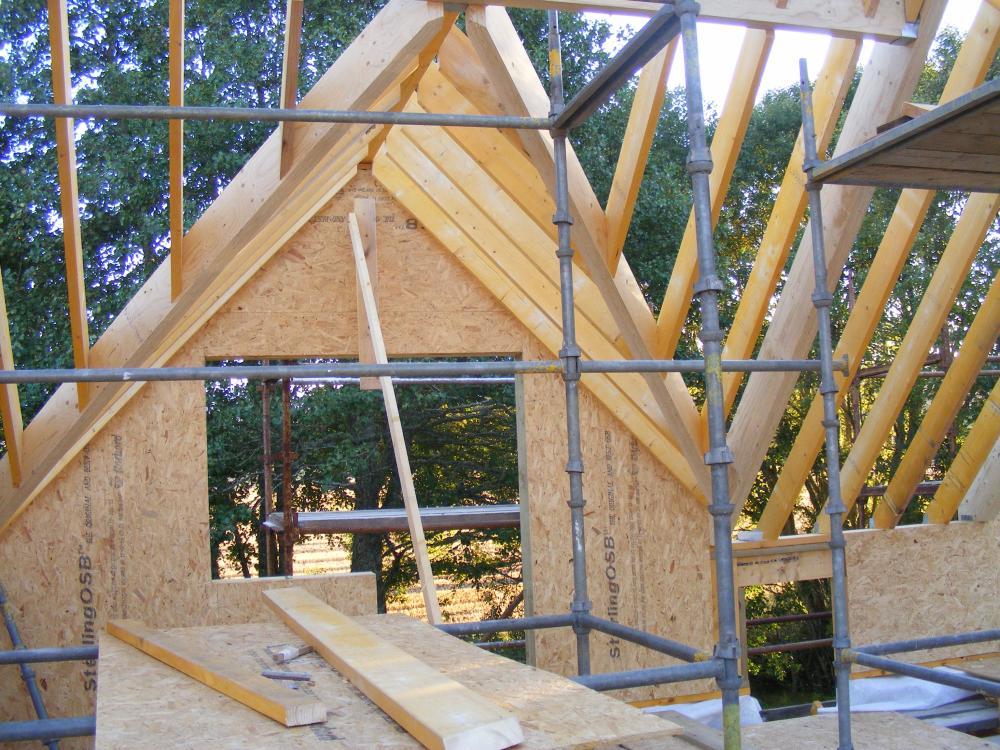
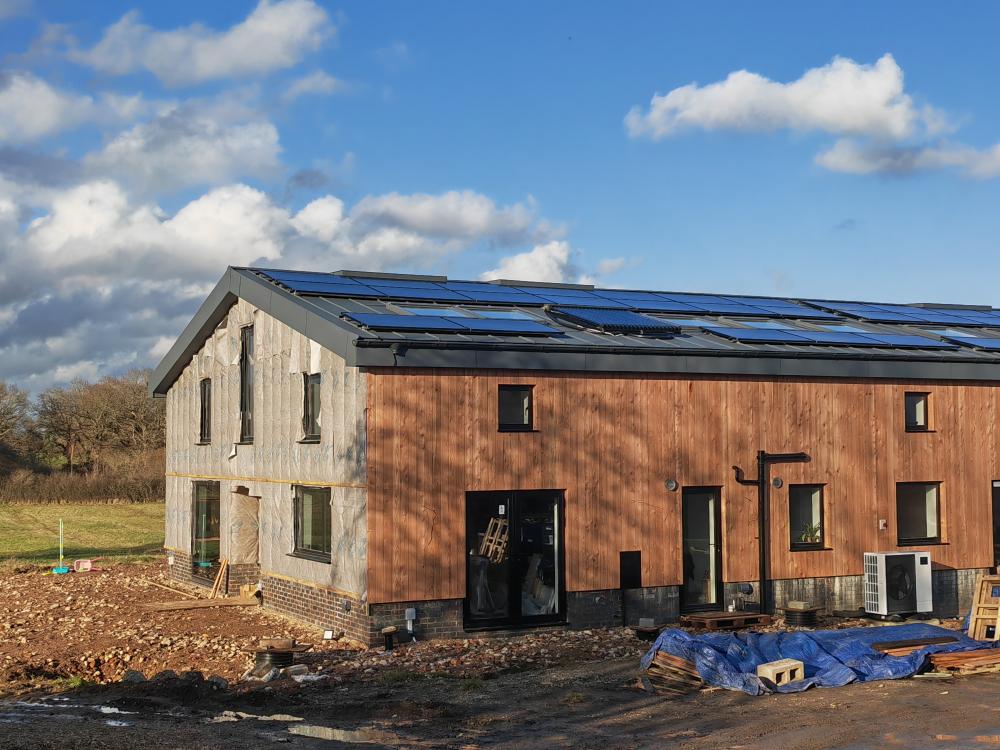
We basically did insulation between rafters, our pozi rafter are 256mm deep and we counter battened below 100mm and then spray foamed. Pozi joist come precut to size, and are a doddle to construct. Big ridge beam, wall plates and just assemble. Pozi joist company designs the whole thing, structural engineer approved and includes within the structural engineering certificate (for Scottish building warrant). From this To this 250m2 of roof ready to slate about 3 to 4 weeks, team of 3 guys.


 1 point
 -
I would suggest the OP do as @ProDave has suggested with a cut roof. having been through the process of filling our attic trusses with 195mm glass wool and adding 100mm PIR underneath I can tell you it is a pain on attic trusses! in our vaulted ceiling entrance hall we had a cut roof and it was a doddle not having to cut around trusses. but might I also add the suggestion of using very deep trusses as filling will blown cellulose instead of mineral wool and rigid insulation combo. if I had my time again I would do a cut roof with blown cellulose for sure!1 point
-
Yes thanks.1 point
-
A breathable membrane is normally used to stop actual water getting through but allow water vapour out. And you should do a proper condensation analysis.1 point
-
It’s taken me all day to baton and counter this small pike Very slow with screws
 1 point
 -
Pretty misleading a warm roof is sealed on the cold side to make it vapour tight. You also have to seal the warm side to stop it filling with water and rotting. Not many do this correctly. cold roof which is what your after , insulation between and below the trusses with the top open to air , a gap and then the roof tiles .1 point
-
Have you got a little confused there? My alterations in bold.1 point
-
Thanks @gaz_moose and @Spreadsheetman. My situation turns out to be identical to yours @Spreadsheetman. Some kind of contamination on/in the wall and yes I tried bullseye123+ first and it still bubbled. Zinsser cover-stain has sorted it - save I missed two areas and have to redo them! I ended up thinning it by 30-50% with white spirit as it was impossible to spread smoothly otherwise; at a guess because the wall is porous and absorbing liquid.1 point
-
Drawings please if you have them and I'll try to do a sketch. Include any height restrictions too. A cut roof is probably better for a warm loft but not always. You can have a WARM LOFT with 1. A COLD ROOF. ( Insulation between and below rafter. ) 2. A HYBIRD ROOF. (insulation between and below rafters. ) 3 A WARM ROOF ( insulation only below the rafters)1 point
-
to be in a safe zone it must be within 150mm of the corner of the room. http://wiki.diyfaq.org.uk/index.php/Safe_zones_for_electric_cables1 point
-
That is my point. It matters not whether you put the insulation on the outside, warm roof, or put the insulation on the inside, cold roof. The thickness of the total roof buildup will be the same. So as long as you design it correct, both give you exactly the same finished roof height and internal head height. A fact some people seem unable to grasp. Roof trusses are the architects cop out. They stop working when you get to the hips so that part would need to be cut, and they have restrictions on the internal space. But are equally suitable for a warm roof, you just build them a little lower so that when the external insulation is on the finished roof height is correct. You don't lose head room inside because no need to put insulation inside like a cold roof. Steel could do the ridge beam and the 2 steel legs to support the hip end of the ridge beam.1 point
-
Talk.1 point
-
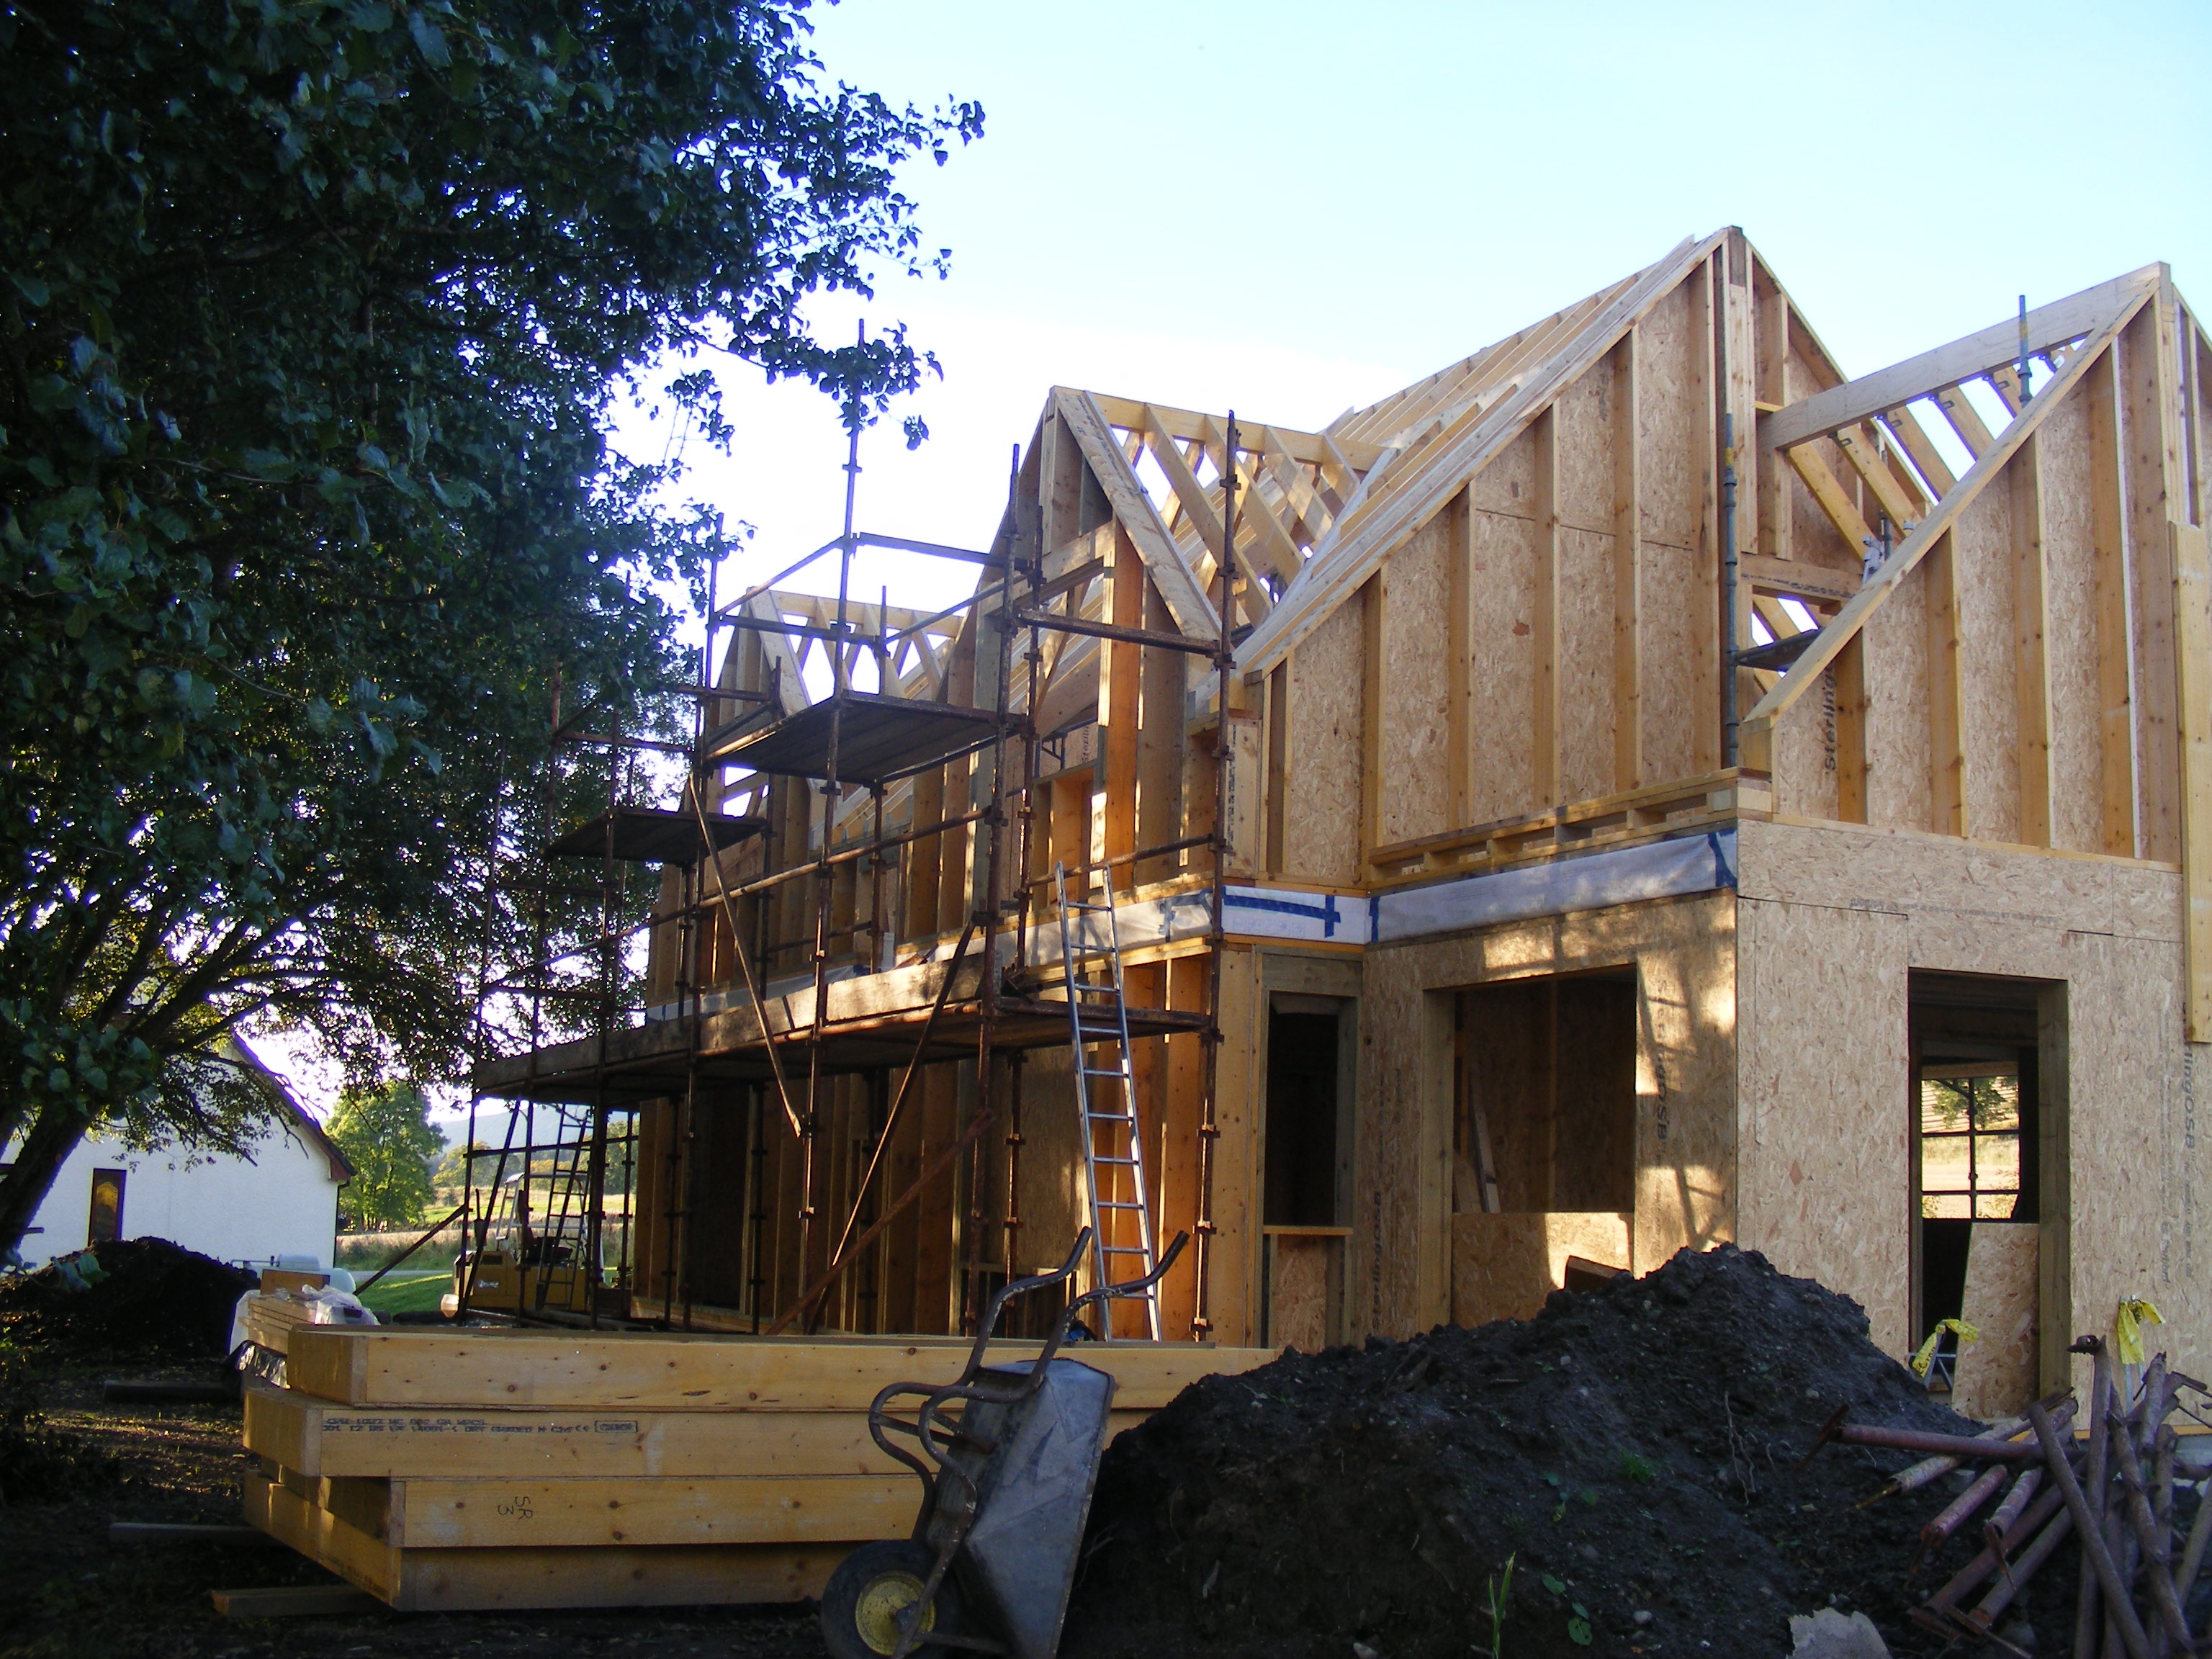
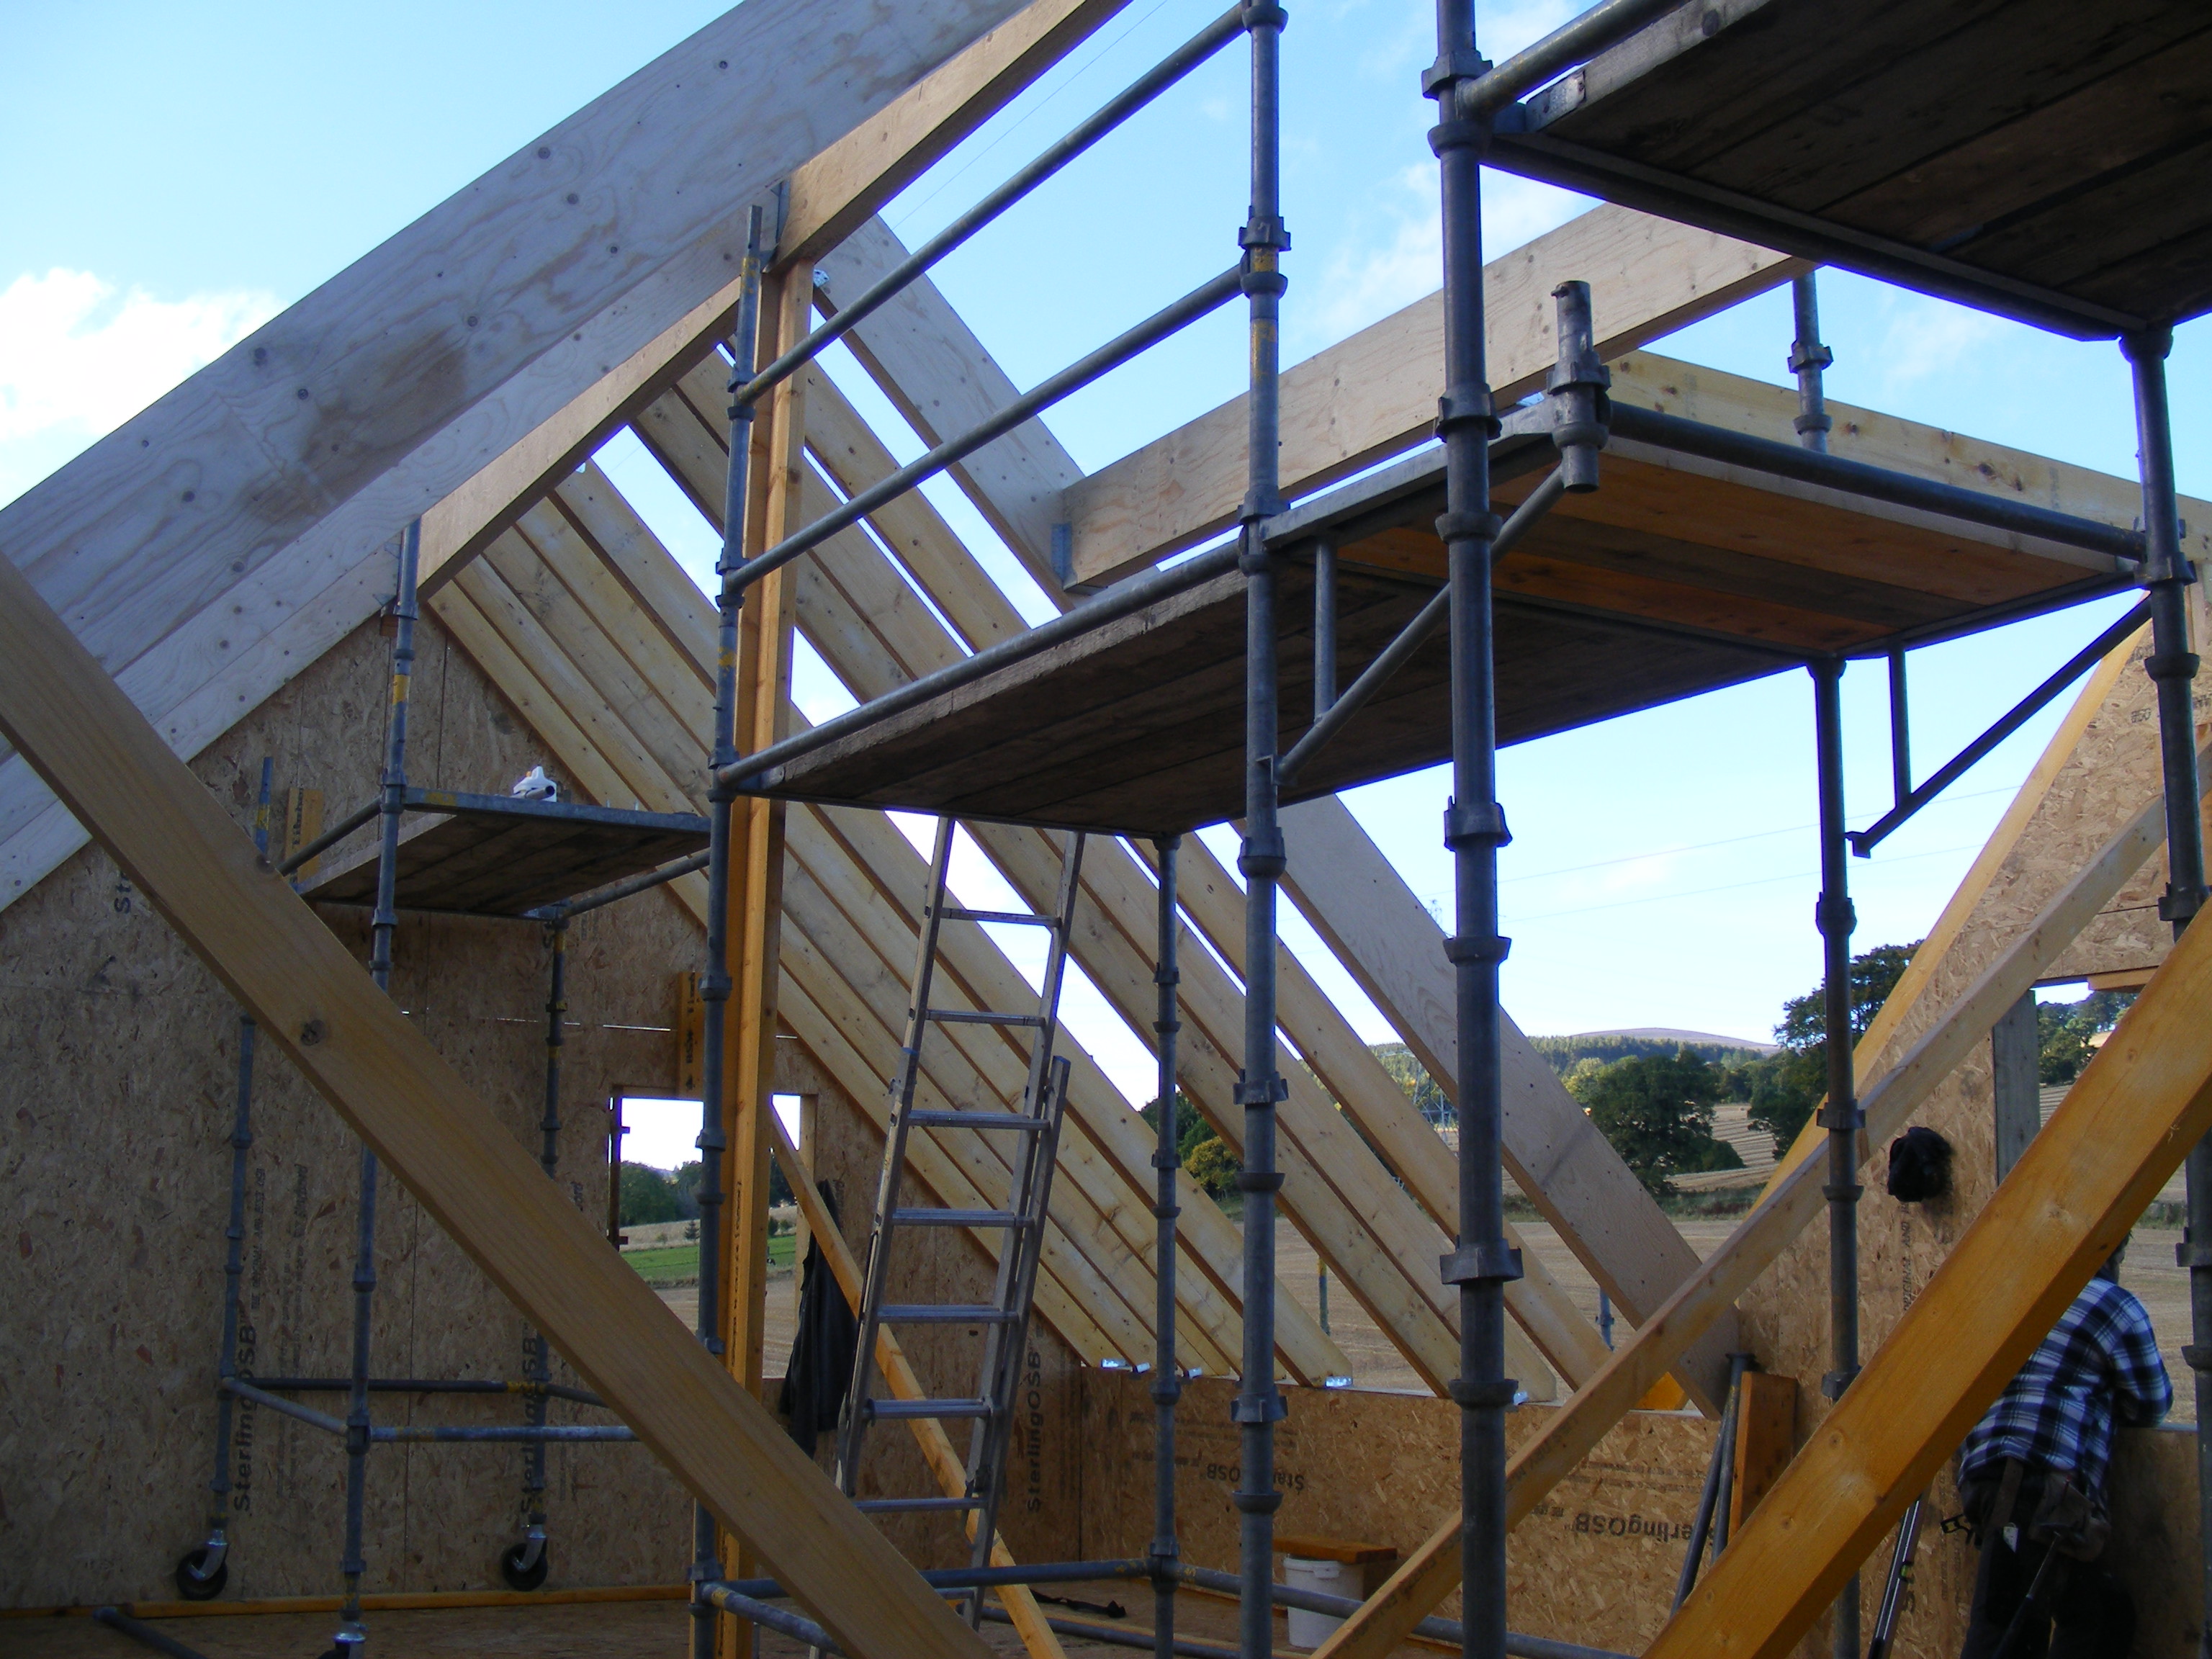
Is it room in roof? the velux windows suggest it will be. I thoroughly recommend what we did, and it is not difficult. Make it a cut roof supported on a big ridge beam. (the ridge beam will probably need intermediate support from internal walls) Then all the rafters span from the ridge beam to the wall plate, putting no outward load on the walls and giving unhindered use of all the roof space with no need for collar ties etc. You simply design the height of the ridge beam and rafters to allow for fitting insulation over the top of the rafters so by the time it is then battened and counter battened and tiled, your finished roof height matches what the planning drawings say. We used 100mm wood fibre above the rafters, and then 200mm Frametherm in between the rafters making it a hybrid roof. the air tight layer is immediately inside the rafters before plasterboarding (with or without a service void) Very easy, very simple, and performs very well, and very easy to get the air tightness detail done well. I will edit in a minute to add some photos.........


 1 point
 -
All materials basically exist of nothing, the gaps between the electrons and the nucleus. It is the electron forces that stop the screwdriver just falling though the screw. I did see Prof Brian Cox explain that given enough time, though quantum effects, any object can move from one place to another. So rather than getting screws from a supplier, just wait long enough, and everything will be screwed. Got to be easier and quicker than self builder's pontification. This is worth a read. https://www.khanacademy.org/science/physics/quantum-physics/quantum-numbers-and-orbitals/a/the-quantum-mechanical-model-of-the-atom1 point
-
If you're on UFH only, load compensation is of no use to you. So not really an essential feature.1 point
-
Generally there is a load of rubbish and generalisation spoken with respect plumbing and heat pumps. For given house heat load a heat pump will be delivering lower flow temperature than a boiler for a radiator system, although this may not be true for UFH. The lower flow temp requires more flow rate to give the kW output from the heating system. Hence this generalisation you need big pipes. But A circulation pump will give a set output flow based on flow resistance; for a given pipe size say 22mm, the longer the pipe the higher the flow resistance for a set flow rate and if you increase flow rate for a given length the higher the resistance. So to allow the circulation pump to run at the required flow rate could require bigger pipes. But it all depends on the configuration of the pipes and lengths. In each case the system pressure drops need to be calculated and suitable pipe sizes chosen.1 point
-
Octopus have a tiny share of the ASHP market. While this will increase it will remain a tiny share. Most ASHP installs are by smaller independent companies and that isn’t going to change. They don’t insist on connecting the ASHP directly to the meter cupboard. It just sounds like a conspiracy theory to me. I really can’t see Octopus switching off power to your ASHP willy nilly when it suits them. Octopus seem to be one of the better companies.1 point
-
Visited Normandy couple years ago and visited many of the fortification made with slave labour. I'd dare say they had better conc then we do now. Some of the fortifications had 1000's of cube all hand done and was pass BCO today. Some even had little plaques on them with the name of the local builder and the cubeage.1 point
-
Pay £300 for somebody to do the math and advise? (heat geek will do it off visits or plans) You'll not need larger than 35 mm on a unit < 16 kW. You'll not need larger than 28 mm on a unit <8 kW. 22 mm plastic is marginal. splitting 28 copper into 2x 22 mm plastic or 3x 22 mm plastic then running to a 22>15 plastic manifold arrangement fine. Running a single 22 mm pipe for flow/return is unlikely to be ok unless <6kW.1 point
-
Beers, cheers, smiles, sleep.1 point
-
Overthinking seems to be the bane of self building...1 point
-
Thanks for your reply. Here's a pic from a few weeks ago. It's still a bit of a mess.
 1 point
 -
There are white pens, intended for re-whitening grout. a bit like tippex correction pens. I think that would stick to terracota.1 point
-
My current favourites. The head holds the screw whatever angle, including downwards, and they cut in and grip well too. Saves a lot of time finding and picking up, esp if working at arms length.1 point
-
And obviously uncontrolled and in the hands of opportunists. When / if people eventually understand the value of good insulation, then perhaps this will become regulated.1 point
-
The guy that did ours was in the house for no more than 15 minutes. I think it was/is pointless but a legal requirement.1 point
-
if your doing a big project needing lots of different sizes get case full like TurboGold PZ Double-Countersunk Woodscrews Expert Trade Case 2800 Pcs - Screwfix And fill up when you're short. Single boxes have a habit of hiding, and only show their face when you have bought a replacement, just like tape measures.1 point
-
Top hat capping is not to provide any protection against people drilling into it. It is just something to hold it in place to make it easier to plaster over. You must route the cable in safe zones, so in theory at least people know a cable might be there and avoid drilling into it. You talk of running it horizontally (along the wall) hints that you are not aware of safe zones. A much better route up to a loft is up through a cupboard or built in wardrobe where it can be run in conduit like @SteamyTea post above without being an eyesore.1 point
-
Do you mean this stuff https://www.screwfix.com/p/tower-upvc-white-mini-trunking-25mm-x-16mm-x-2m/819741 point
-
Hi @four_candles Sounds interesting. In my humble opinion: You should start with client requirements. Before you go looking at what someone else thinks you want, draw up a list of the items you typically find in a 4 bed house and divide between what you do want and what you don't want. If this is your forever home you'd better be thinking about level access from the street, through the house and out into the garden, a little bit wider internal doors and a down stairs loo and shower. If this is your forever home you should spend more money installing insulation than on installing heating. Lots of help on BH. Good luck. Marvin1 point
-
If the other end is a standard wood screw thread - double-ended screw / hanger bolt / dowel screw / twin thread screw.1 point
-
i bought a load of screws for fitting my PIR and battens from https://screwshop.co.uk/ .1 point
-
I now use ForgeFast torx screws by default. Readily available from Toolstation at a good price and in large trade tubs.1 point
-
Q = m * c * ΔT = 300 kg * 4.184 J/g°C * 42°C = 52,718.4 kJ 52,718.4 kJ/3600=14.644kW=3Hours1 point
-
Less restrictions due to less need for elbows etc means the difference is negligible. On a pair of supply backbones upstairs and downstairs in a 5 bed house you won’t see a difference between the two other than time and cost to install.1 point
-
I use these on all the extract ducts https://www.epicair.co.uk/products/extract-air-valve-filter-for-8960-125mm-valve-10-pieces1 point
-
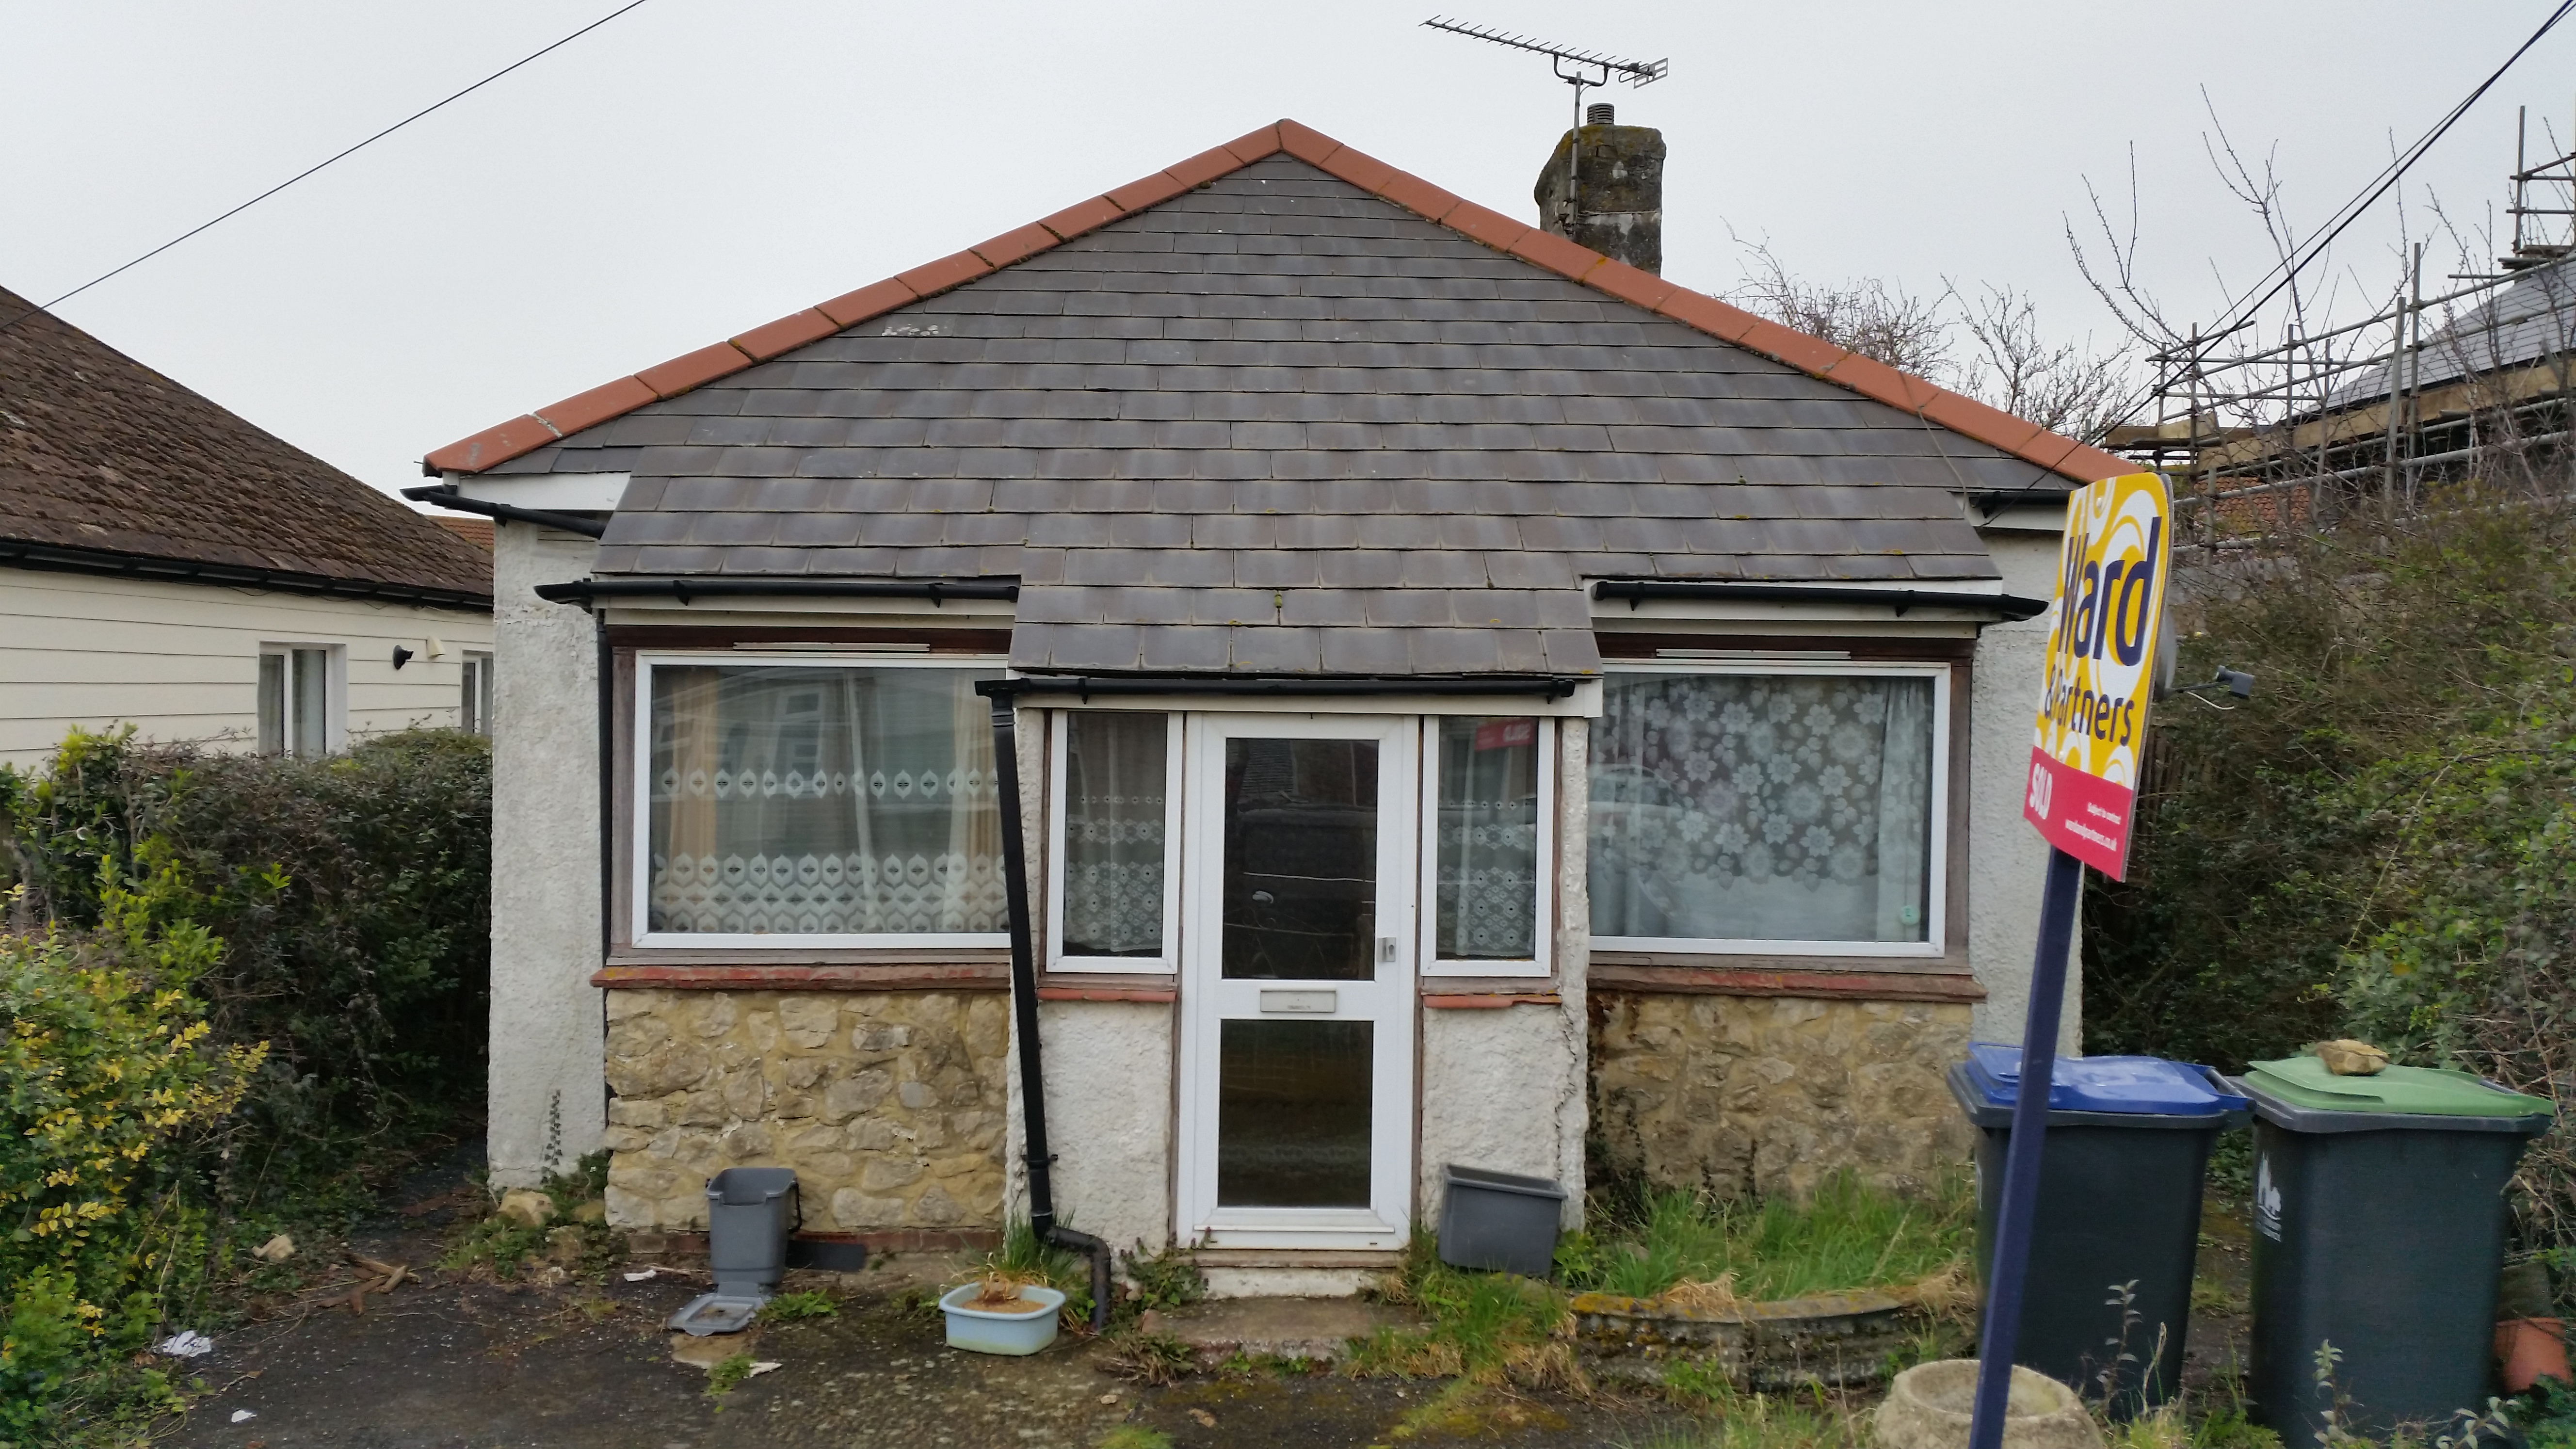
Despite watching lots of Grand Designs, building a house wasn’t something I’d ever considered until about 18 months ago. Fast forward to today and we’ve bought a plot, instructed an architect, and I’ve traded my evening telly time for browsing the Buildhub forum. So how did we get here? My partner and I want to start a family but agreed that we wanted to move into something larger first. We drew up a list of what we wanted and started our search. After months of searching / viewing we began to realise that we were going to be spending a huge amount of money just to buy something that was ‘kind of’ what we wanted. Still, what else could we do? Then I stumbled across Danwood – the polish prefab house firm – and had my eyes opened to the world of self-building. I paused the depressing Rightmove search and started reading in earnest. We went to some self-build shows, read huge amounts online, and eventually decided to swap Rightmove for Plotfinder. Our hope was to build near where we live currently (to be near family / friends and have easy access to London for work) but had no luck finding anything suitable or affordable. Funnily enough, it was Rightmove that came to the rescue. One night my partner sent me a link to a bungalow. It was small, in a sorry state, and well over our plot budget… But it sat on a good-sized plot and was in a great location for us. We called the estate agent to arrange a viewing and were politely told to eff-off as they’d accepted an offer from a developer. Back to square one. 2 weeks later I got a phone call from the estate agent asking if we were still interested in a viewing. The developer’s financing fell through in the wake of the Kamikwasi ‘mini’ budget and the bungalow was back on the market. We went for a viewing that evening, put in an offer, and a few months later the bungalow was ours! We completed at the end of 2022 and have since appointed an architect but I’ll cover that, and other bits, in a separate post. Thanks for reading - I look forward to sharing our inevitable ups and downs as we move along.1 point
-
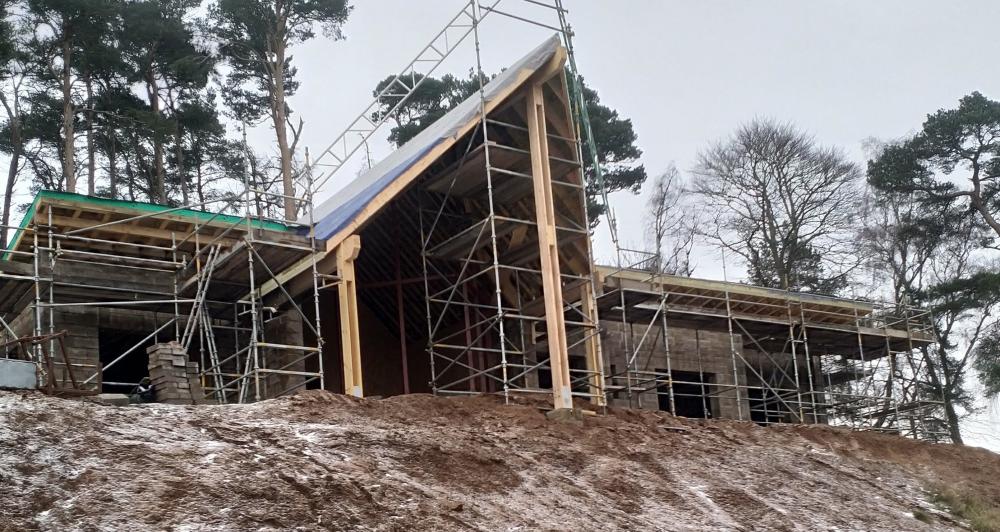
Looks like a great project - here is how we started:
 1 point
 -
We just had a similar-ish problem where the previous owners had slapped a coat of blue satin kitchen paint over original satin paint. Anything we did over the top (including a coat of Zinsser bullseye123+) caused bubbling when further coats were added as the blue wasn’t properly stuck and moisture penetrated through it and made it lift. The only solution was to manually wet and scrape as much of the blue satin off as would come and then coat it all with Zinsser cover-stain which is solvent based. This worked and we could then paint normally over the top.1 point
-
The EPC assessment is very general We use a chap that charges £30 per property1 point
-
I'm having a go at this myself in conjunction with my electrician. with the knowledge and assistance of those that have done it on here I'm feeling pretty confident about doing an all-right job! do a search on here and you'll find many examples of cabinets. @joth has a particularly good thread: I started a thread about my Loxone project as well which has loads of great information in it:1 point
-
So, a bit of an update: The Building Control guy came round and had a good look on 23rd. Unfortunately, he wasn't able to pass it because the basement hadn't been tacked, so represented a fire hazard (from quite what, I don't know, but anyway) which was a bit of a blow. I then contacted the warranty company to beg for an extension. I got through not to my usual warranty surveyor but to his boss, who told me that (a) they didn't need building control sign off since we were building the property for ourselves rather than as a commercial developer and (b) the basement wasn't covered by the warranty anyway! He asked that I send him the gas and part P certs and, pending one visit from my normal surveyor, they would complete the paperwork. The visit went OK and, though I've no paperwork yet from LABC, I have at least emails from the surveyors a few days prior to 30th stating that all has been satisfactorily completed. I don't feel I'm out of the woods yet, until I get a completion cert from them but I can at least concentrate on a few other things now. Thanks everyone for your help, encouragement and great advice!1 point
-
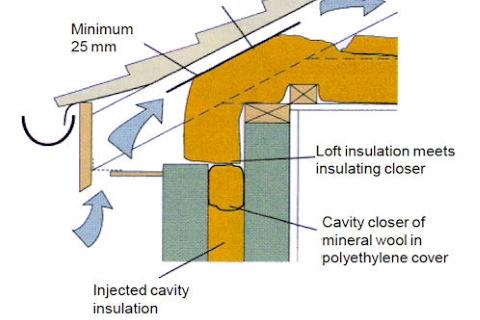
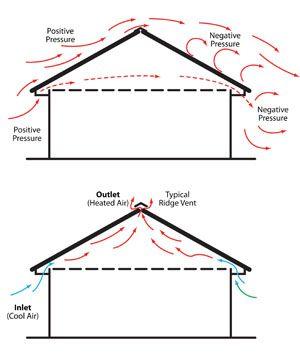
In that case it's far better to insulate the loft floor. Just don't put any under the water tank. You can drape plastic sheet over the tank then put insulation on top and sides. Let the insulation over pipes where possible and lag them well where it isn't. If you want storage build a platform above the insulation. But check the floor joists are strong enough. Sometimes they are only designed to support the ceiling. You should preserve ventilation at the eaves. Air should flow in one side of the house, across above the insulation and out the other side. There are special ventilation tunnels designed to stop insulation blocking air flow when you push it down into the eaves.. https://www.roofgiant.com/fascia-vents/refurbishment-eaves-panels-pack-of-50/
.jpg.76de3bc81e80f2178ed08245275712f9.jpg)
 1 point