Leaderboard


Popular Content
Showing content with the highest reputation on 11/20/22 in all areas
-
What seems to be aeons ago I started my self build - a bungaloid conversation which pretty much ended up as a full newbuild with a few remaining old walls because we couldn't change the planning for newbuild when we found out how bad things really were. We're weather and water tight and this summer finally moved out of the caravan into the house which still needs lots of work. We're still on temp electrics with extension leads everywhere! Athough we've had hot water for a while, I'm installing rads this weekend to give us some heating. The last couple of days has just brought the house down to a little chilly and my wifes wants some comfort. Anyway, to the moral of the story.. I had no building experience before taking this project on and I've done everything myself so far. When it came to the heating system I applied what I've now learned is a common self-builder trades scepticism and decided to do that myself, especially when I saw the prices involved. Our budget had already been hit because it was set for a 126m2 conversion and then had to now cover 196m2 so the truth is we ran out of money especially due to recent material price inflation. Mid Covid lockdown I decided to embark on a Gas Safe training course and after 18 months passed my ACS and installed our gas boiler, following which I've registered with Gas Safe and started up a small one man band to earn money to complete the build. I'd never even dreamed of going in this direction in my life so it's all down to doing the self-build. Surprisingly I've been run ragged by work, almost from the off and I've recently done 2 fairly major installation jobs, at least for a newbie. Doing this work has meant I've had to learn a completely different mentality which has beena bit of struggle. For example, trying to source materials and products at the best price is just too time consuming. Trying to make everything up myself instead of buying packaged/complete products has gone out the window because when customers are paying for my time, it actually ends up more expensive, both for them and for me - for example, making up my own ch or water distribution manifolds versus buying ready made manifolds. Buying for convenience has become so much more the order of the day. It's also incredibly difficult to balance quality and cost for the customer - I'm torn between trying to be perfect in the work I do and the associated costs to the customer. It's difficult not to drop standards in the rush to finish a job when the customer wants it done and when seeing the poor standards of so much work out there, even in such a regulated area like gas.. This has given me such a different perspective which is also changing the way I continue to build my house. Maybe I won't try to get everything so perfect and actually appreciate more convenience even if there's a minor financial cost to it. I might even get some trades in to help me finally finish the house off!8 points
-
Agree it may just be a mouse. They're so small they can get in through the tiniest of holes. Think the size of a hole you could get your little finger in. Consequently there's not much you can do to keep mice out but poisoning them inside the house is just awful if they crawl away and rot. A humane trap baited with peanut butter or Nutella will round them up (check daily) then a drive a few miles to a supermarket car-park or similar to let them out. We always go to the one that has an Owl sanctuary on route.2 points
-
Make sure the brickies do NOT build up the end walls (the walls the joists are not resting on) You will need the ends clear to slide the strong backs into the joists. Only when those are in can the brickies build up higher.2 points
-
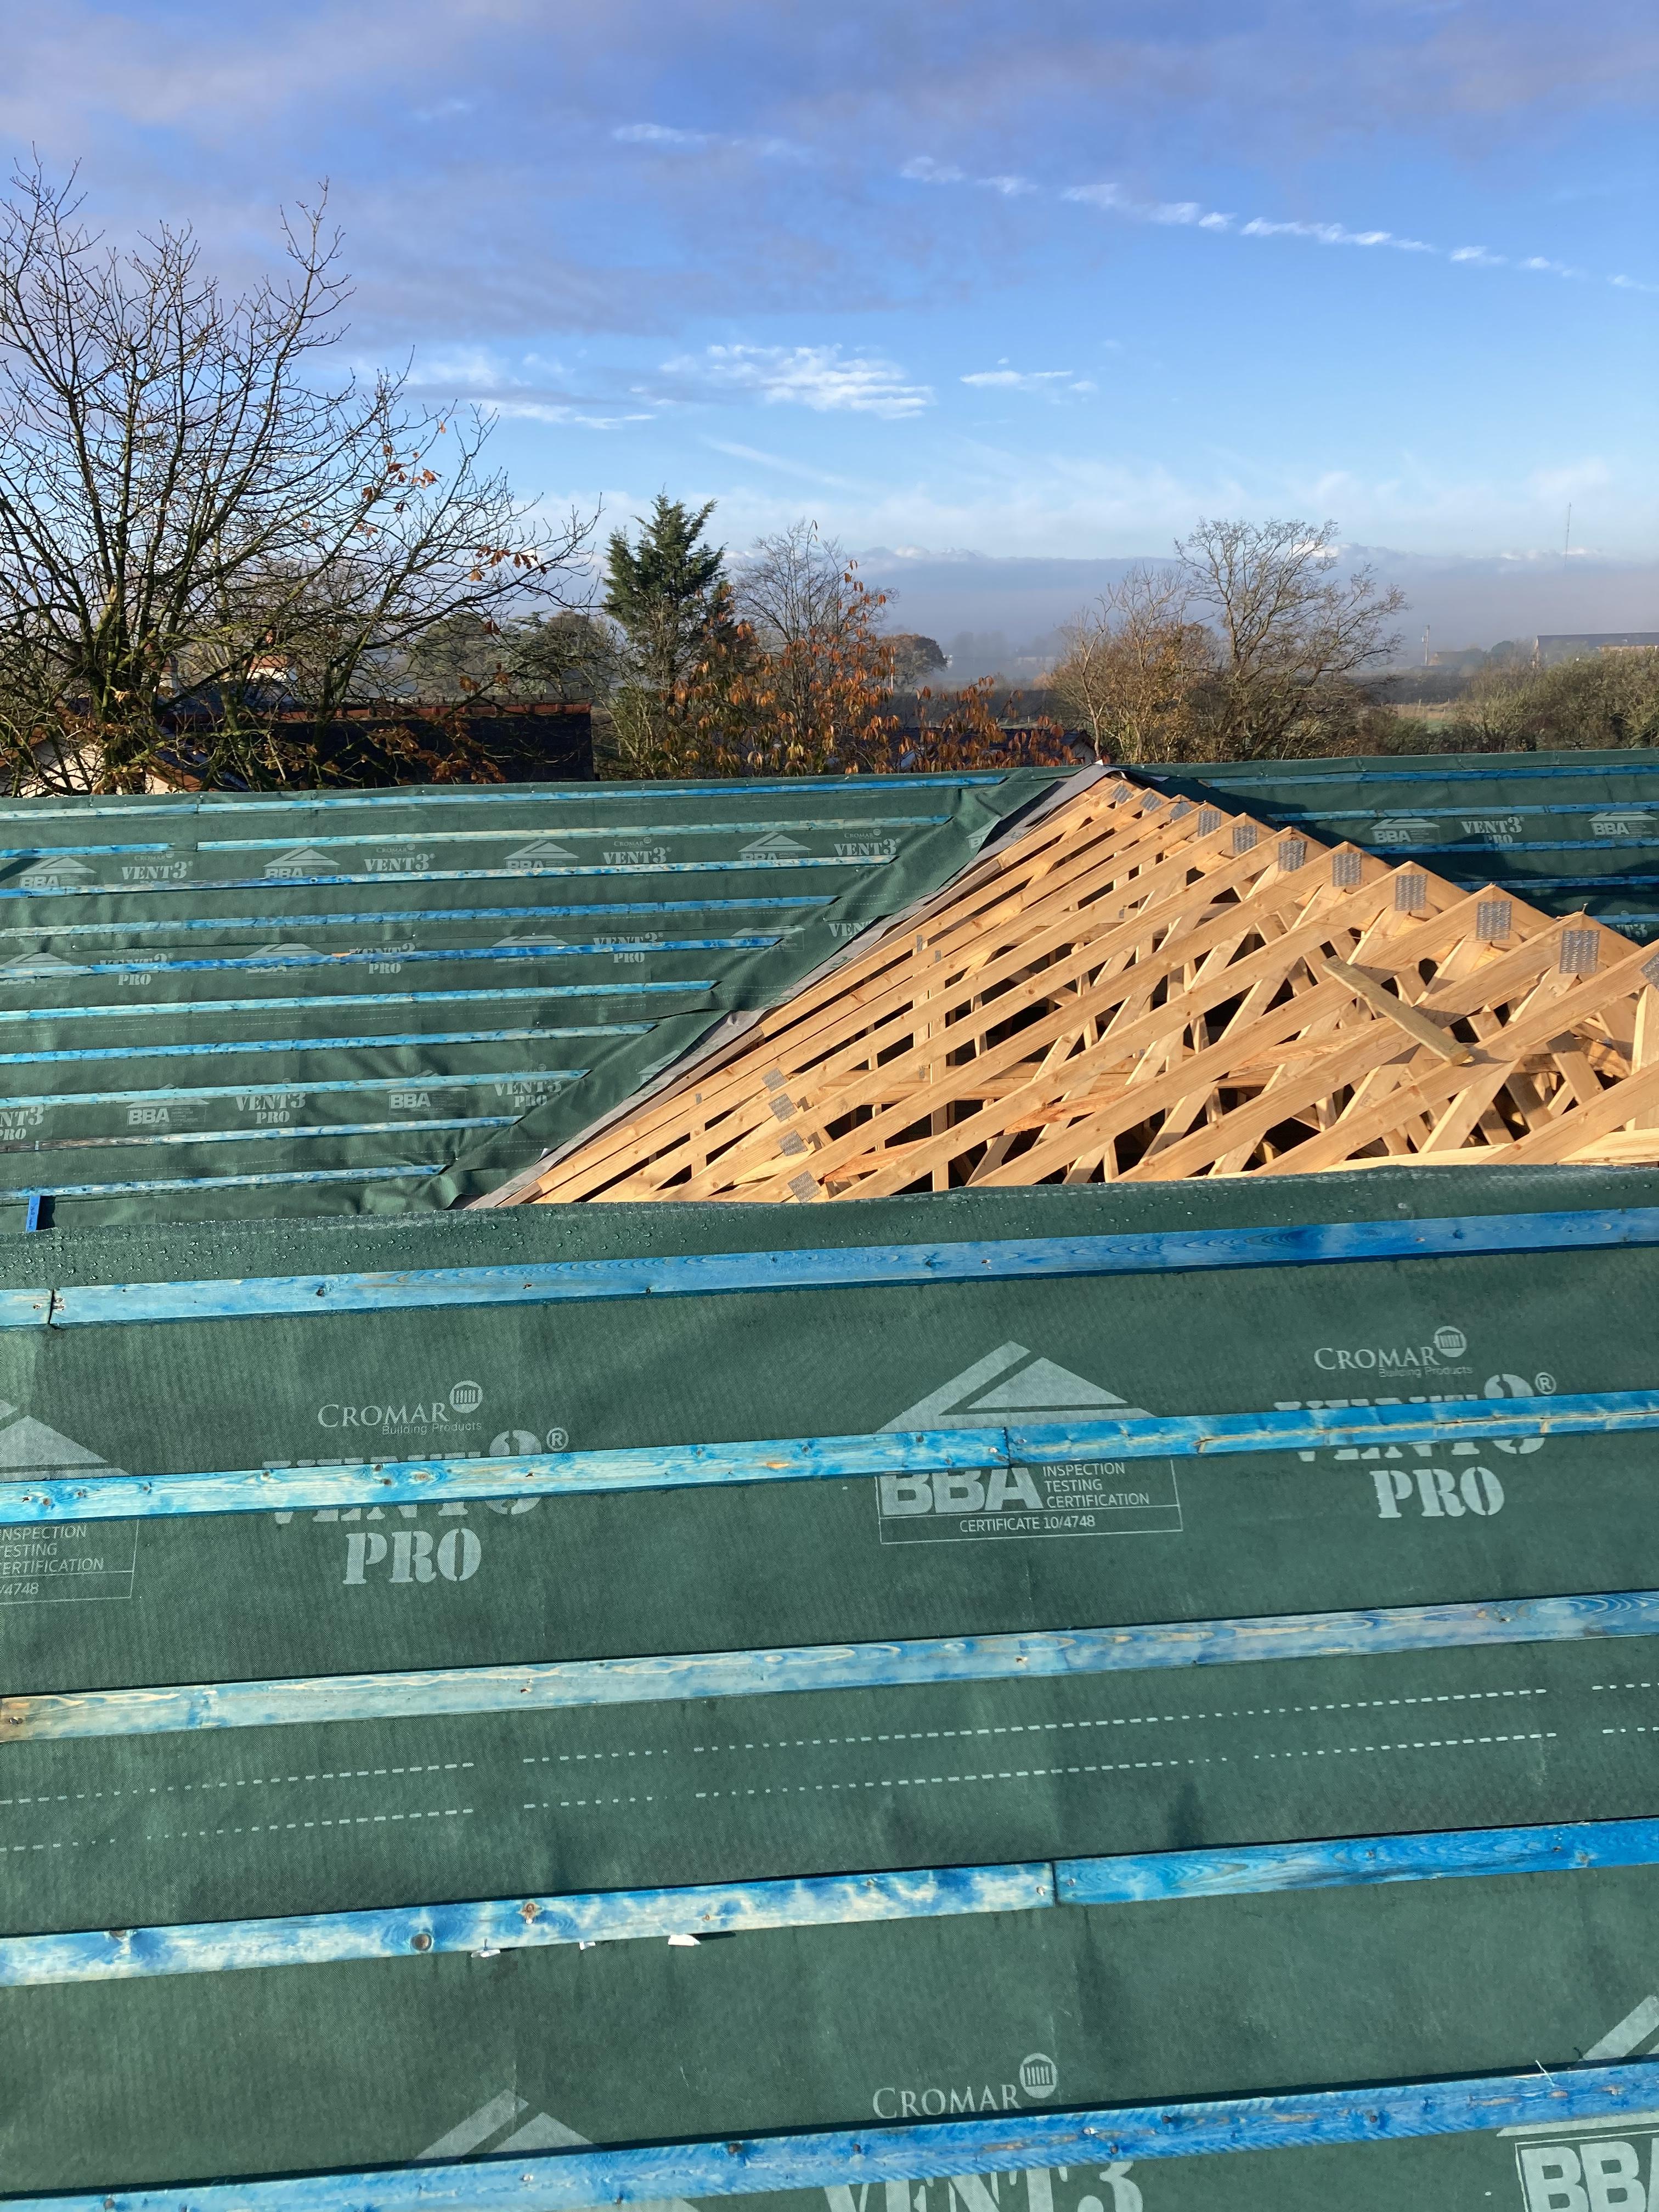
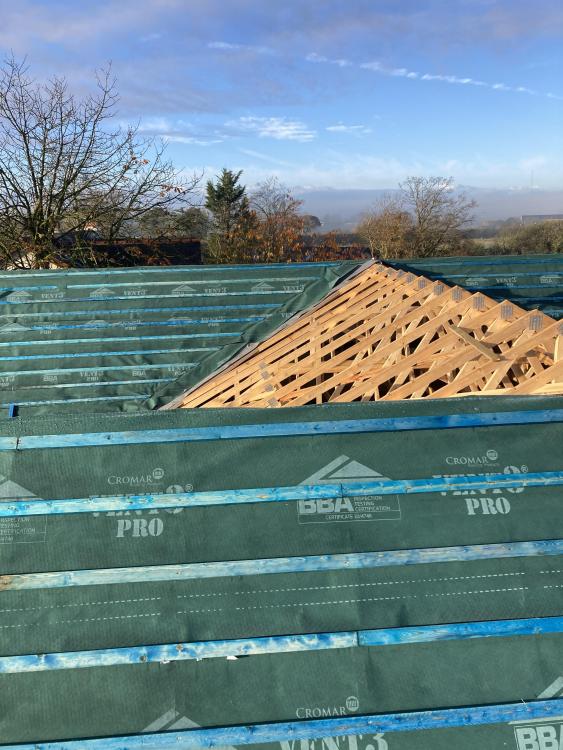
The main house roof is taking me far longer than I expected Partly due to weather Mostly design issues We have 50 meters of valleys Whilst the floorboards haven’t taken that long The endless support noggings have Now the design issues are sorted with the middle section of roof I will be able to get it covered in and start fitting the lead work Then on to the slates
 2 points
 -
We are building a four-bed detached house in the south of England and for a whole host of reasons (well mainly privacy!) I thought I’d try a blog in a slightly different way. I’ve been making notes of “lessons” we’ve learnt along the way and I thought I’d try and write them up whilst we progress before hindsight has the chance to alter them too much! Some of them are things I wish I’d known or realised beforehand, others are just little things that have worked well for us, but hopefully they might be useful for others at a similar stage and I’d be interested to hear how they compare to your own. The first chunk are my notes from finding land through to gaining planning permission… There’s no doubt luck is required to find a good plot, but you can give yourself the best chance to be lucky. Research planning applications, look for areas of land on Google Earth, use Land Registry, write letters. Don’t just wait for Rightmove. We paid a lot of money for a site without planning permission – many people told us we were breaking the biggest self-build golden rule. We were clear with ourselves about the risk we were taking, understood exactly why the current owners didn’t want to put planning in place and, importantly, we made sure the price we paid reflected the risk. Neighbourly relations are hugely important and you likely need to be prepared for people to object to your development no matter what you design. Disruption, noise, loss of green space, loss of privacy, and just change in general are all very real worries for people. We wrote letters to everyone in the immediate area outlining our plans and kept them up-to-date with our progress. We worked really hard to always be polite and courteous, even when we weren’t always getting that in return. We can now happily meet any neighbour know we’ve always done our best. Everything takes longer than you think! During the design process the weeks seemed to tick by very quickly – every iteration needed our architect to re-work something, and then come back to us a week or two later. Be open to your architects ideas and suggestions, think things through and question your own presumptions, but also don’t be afraid to push the design in the direction you think best. Our plot is in a conservation area so our plans were always going to come under a lot of scrutiny. Read up on planning applications in your local area and follow the applications as they progress, in particular read the statutory consultees responses (highways, trees, conservation). You can learn a lot by seeing what amendments or information they’re requesting and how that might translate to your own application. We used our local authority’s planning pre-application advice services with a fairly mature set of plans. This cost as much as a full planning application, and took longer, but was invaluable for letting us get feedback from the conservation/planning officer away from any neighbour scrutiny. We’d agreed at the start a fixed price with our architect through to full planning submission, this proved very worthwhile as significant re-design was needed on the basis of the pre-app feedback. We listened to our neighbour objections, and tried to mitigate their concerns where practical, but at the end of the day we knew we’d be submitting plans with things they wouldn’t like. We made sure we explained the rationale for why alternates weren’t possible, but otherwise pushed ahead with the design we wanted that stood us in the best stead for planning. Despite all our neighbourly relation work our application attracted objections (as expected!) but went through smoothly as we’d addressed all the material considerations from our pre-app. Importantly we remained on good terms. If the shoe’s on the other foot - and you’re objecting to a neighbouring application - make sure you focus on the material considerations. One neighbour picked up on the aspect of our design we were least confident would get through but then buried their remarks on it in the middle of long-winded list of other non-material objections. Had they clearly presented their case and focussed on the material considerations they likely stood a much better chance of influencing the planning officer.1 point
-
Is the shower in the second bathroom actually needed in there or could it relocate to the ensuite? I can see why you'd want to have the second loo and wash basin for visitors but it could give up some useful space if the shower wasn't located in that room.1 point
-
So I finally completed this today, with no drama. We did spend 2 hours pulling the sawdust and some small rubble out of the joints, as they were full in some areas. Then vacuumed the area, and then again with a narrow nozzle over the joints. Filled 3 vacuum bags. Used a mix of sharp sand and building sand, and probably somewhere between 3:1 and 4:1 with cement, and a little plasticiser. First batch was too sloppy, no consistency at all - half of it is likely on the subfloor. The rest went a lot better, got it to the consistency of loose muffin mixture, and then with a hard brushing it all went and filled the gaps. Lessons: - When you've wet the floor on an area, wet it again (Even when the ambient temperature is about 12 degrees). - If it seems a bit too hard to go in, spray a bit of water on the grout to go in, and brush it a bit more. - Going over it again with the broom about 20 minutes after filling seems to clear any excess from the top surface, but it is bloody hard work! All together, it took 2 of us about 90 minutes to do 60 square metres. I did all the mixing and wetting, and my dad did most of the sweeping. Sweeping it everywhere took longer than I had imagined. Thanks for all the guidance... another job ticked off!1 point
-
My initial attempt.
 1 point
 -
I think you need to have a quiet word with these cats; they seem to be a complicating factor. Can you move the litter tray to the sunlounge or the family bathroom?1 point
-
If you really want a large sun lounge, then keep it as it is, but otherwise I would take some space from that. It’s not insurmountable to raise the floor level 50cm and knock down and erect a new wall. Others will be able to advise, but maybe £2.5k in material costs and labour.1 point
-
Pencil size. We had pet mice that the cage contained, but wild mice got through and.......no I don't want to remember the rest.1 point
-
They can get through the holes in a standard air brick.1 point
-
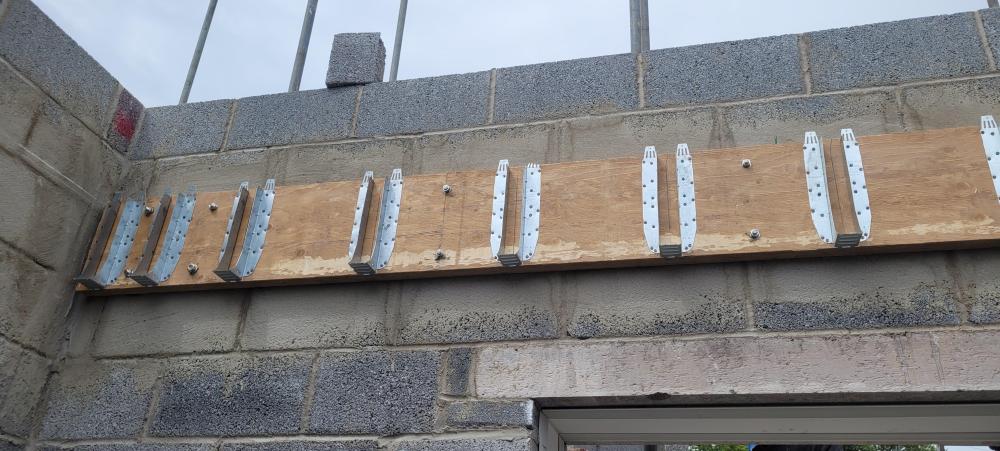
Pocketing the joists Into the wall is bad for airtightness. A Tony tray works. Or resin fix a ledger to the walls (after parging) and hang joists on hangers
 1 point
 -
Bait blocks through a few downlights and then look for the entry. The kitchen vent would be a start but would also check any eaves vents too1 point
-
More likely just cute little mice. They can sound a lot larger scurrying over a plasterboard ceiling. It is almost impossible to keep them out of anything other than an air tight passive house. * If you have a standard cooker hood vented through the wall and it has been installed with plastic flexible vent pipe, they have probably entered the vent, chewed through the flimsy plastic pipe and entered the cavity and got in from there. If not already, that should be more substantial flexible aluminium pipe. Just put some rat poison down if you can find somewhere from above where you can drop it down into the ceiling void, or pop a downlight fitting out and put some in through there. * We have one in the house right now. Only the second time in 5 years and the point of entry has again been a slightly open velux roof window. SWMBO did not believe that is how he got in until I showed her the mouse droppings on the vanity unit under the window.1 point
-
You will put one on at some stage I imagine, so might as well be now. Can you contrive one with an outwards flap?1 point
-
I'm not sure what you mean by 150mm battens - do you mean running joists perpendicular to the rafters so support the floor? This would indeed be expensive not to mention heavy. You will need to add at least 50mm for an air-gap over the insulation or it will turn into a mouldy mess without decent airflow over it. Now you're flying your floor at least 200mm up! I'm afraid to say it's not as simple as you might think. Do you really need this space? If so, it might be more practical to move the insulation up to the rafters and make this a semi-warm store. Or at least for a specific zone in the loft. You're still going to need to insulate for the whole house so at least 150mm of rigid insulation to make up for 300mm of cellulose in this area. All the usual ventilation issues need addressing - like a 50mm air gap between insulation and roof membrane and vapor barriers. The advantage would be having a safer environment for the items you're storing, and improving the house's ability to reject heat in the summer.1 point
-
Well done for keeping going and getting the gas safe. Being in one of the building trades is handy as you get to know a lot of other trades working with them, and you get to know the ones you would be happy working in your own house, and the ones you would not let in the front door. So when you do want to employ someone, you know who to choose. And yes one of the things I hate most about being self employed is ordering all the materials for a job, not always as easy as it should be.1 point
-
I really like Tado, though I might be the only fan on this forum.1 point
-
No, I just hack into @pocster's (if that's what you meant) and use it remotely. I did write a UNIX like OS to run on small systems. Should have called it MINUX. Might have caught on.1 point
-
What about the rotating vents you sometimes see on conventional chimneys ? the sort that rotate so the open pipe always faces downwind. Would one work on a gas appliance? Someone else would have to advise if it was even legal to fit one to gas heater. Or a wind break fitted on the 'van roof to shield from the prevailing wind, but that would not work when the wind comes from the wrong direction.1 point
-
If you have pipes going UP and then back down again to a radiator, the high up pipes will just collect any air in the system and form an air lock. If you must have pipes like that, you NEED an automatic air bleed valve on each one at the highest point. Any photos of these high pipes along the vaulted ceiling? If no bleed valve was fitted time to get your plumber back and give him a telling off. I hope there is access to them?1 point
-
Isn't that part of the problem to uptake. Way too much choice just paralyses potential customers. You only have to look to the different 'flavours' of Linux to see why it is struggling in the marketplace. All the talk at the moment is about Rust. I do t have a clue what the (expletive deleted) it is, or why I might need it. Computer aided design packages have the same problem.1 point
-
Only if you run the pumps and check operation in a regular basis. Register for flood alerts from your environmental agency, that’s helpful. pumps controller with sms autodiallers that text you when you get high levels/ trips etc. Temp pump, and never use lay flat hoses they are rubbish..1 point
-
Turn off all the other radiators on the TRV and get that radiator on fully open on the TRV. put the heating to max/30 deg to make sure it’s pumping out max and try again1 point
-
Probably had one too many Martini's.1 point
-
I believe our colleague @pocster has these as his preference.1 point
-
the ultimate backup
 1 point
 -
The switch uses Tuya as the control app and that has IFTTT integration: https://support.tuya.com/en/help/_detail/K9t5tqp8132gg It should be accessible as a regular smart socket but I've not used this particular product. Tuya devices are also hackable using Tuya-convert to load an alternative open-source firmware. This provides another means to control the switch using a Raspberry Pi or other computer running an MQTT broker. It would basically cut out the Chinese cloud (Tuya) and the (now paid for) IFTTT cloud and give someone who enjoys tinkering with code hours of fun. 😀1 point
-
Hi @Andrea C Not sure what you mean by PV switch but anyway. Our Solic box is connected along the cable supplying power to the immersion. The CT clamp that is used to monitor the PV supply is clamped to the positive cable going from the main meter to our our consumer unit. No cable is required to connect to any of the PV system. When installed in this way, as soon as excess power is produced, rather than delivering it to the main grid (if the hot water requires heating) the Solic will divert, whatever amount it is, to the immersion. We use a similar system to charge the EV (Electric Vehicle). The main difference being that the EV charger requires an inductive load and must have the full wattage to operate. This means we have set up a CT relay on the PV positive cable which only switches when a certain power level is reached; from 2kW during winter to 3kW in the summer. Whereas the immersion heater uses a resistive load and the diverter will divert only excess power be it 3000 watts or 20 watts, but only excess unless you over-ride it. Our car charging system supplies about 80-90% power from the PV unless overridden. The immersion diverter supplies 100% PV excess power to the immersion unless overridden. Today was quite bright and our hot water tank reads 72.5C all from PV. We have only heated the hot water tank using mains power once since about June. I assume other diverter makes work the same way as the Solic. Good luck Marvin.1 point
-
Those look like clay pipes of a type typically used from the 18th century onwards. Are they about 3" diameter? Normally laid loose, horizontally, to drain across fields. I wonder if there was a particularly persistent wet patch and someone used these vertically to drain down to a deeper stratum? They might have been filled with stone for that purpose.1 point
-
This is what I sent them though I changed the overhang from 15mm to 10mm.
 1 point
 -
I have always been very sceptical about any form of cloud based service whether that is just for storing your pictures and music or controlling your house. Sooner or later, some or even eventually all of these are going to stop any free service and expect you to pay up.1 point
-
Fekkers. Name them.1 point
-
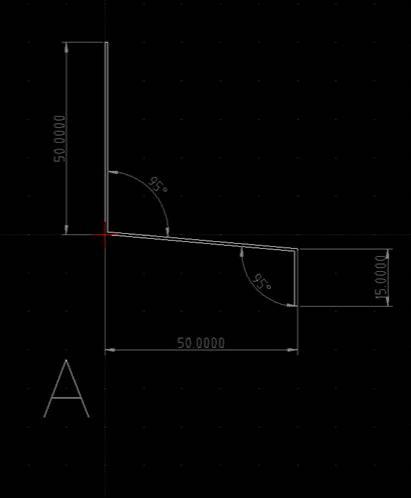
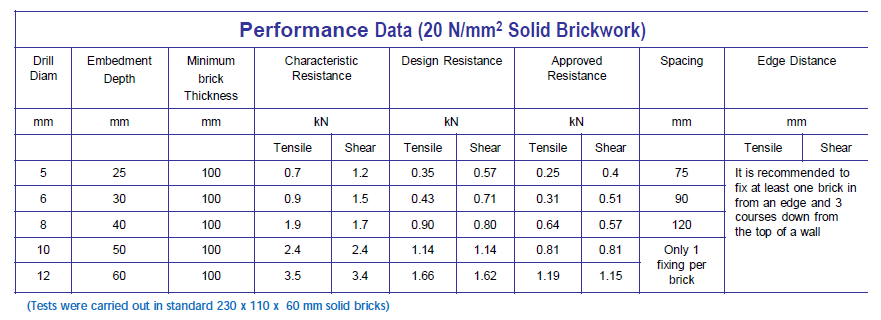
Wow! You have put a lot of thinking into this.. Bit late here but will try and answer some of your points. I'll put my "BC /checking Engineer's" hat on to be pedantic.. the following is a bit of an outline on how I may do it and some of the things I look for. Well done on picking up on the snow and access load. You also have a snow drift load and "snow dumping coming off the higher roof, but due to the pitch and size of canopy that can be effectively ignored especially as it is what we call and "accidental" snow load case. You do also have wind load but on something this size it I think this can be neglected as you have good heavy tiles mitigating roof uplift. If this was a big commercial building, lightweight roof covering with the roof sitting just below the window cills I would check it to make sure it does not lift the cills.. could be embarrasing! Oh.. please excuse any typos. Have repeated your calcs in a slightly different way but made an allowance for the rafter self weight just to let you see how I may do it. I use kg as it's pretty close to kN that we use as normally units. Your tiles look pretty heavy, normal Marley concrete tiles are about 50 kg/ m ^2.. you must be using some nice clay ones, jealous here.. like a nice tile. I'm going to use Eurocode Design here as later this is compatible with the fixings then jump back to using the permissible stress codes of BS 5268.. as it's easier. I'll explain as I go along. Tile load on slope = 77 kg/ m^2.. for all this is the declared weight by the manufacture of the tiles.. it varies depending on how much head lap and that changes depending on the weather exposure and roof pitch.. who said life was a breeze? On plan load for @MortarThePoint= 77 / cos(46) = 110 kg/m^2 on plan. Add 10% for timber rafters, sarking etc. 1.1 * 110 = 121 kg... this is the "Permenant" load, using the BS codes this is called the Dead load. Now we have a roof access load. In both codes this is ~60 kg / m^2 for domestic applications but this is a load that is applied on plan. A slope load is the load running up the rafter.. like tiles. A plan load is more easily understood if you think about snow falling straight down or a few folk standing on a stair or a roof. You can only fit so many folk standing vertically and only so much snow can lie on a roof. This 60 kg/m^2 is the imposed load. Now we have two figures for the plan load. Permenant load = 110 kg.. lets convert now to kN roughly divide by 10 thus 10 / 10 = 1.1 kN Imposed load = 60 kg/m^2 lets convert now to kN roughly divide by 10 thus 60 / 10 = 0.6 kN Now we apply safety factors to these loads, the different kinds of loads get different safety factors. Using the simplistic Eurocode formula safety factors are 1.35 (Permenant loads) and 1.5 ( Imposed loads) the calculation follows. 1.35 * 1.1 + 1.5 *0.6 = 2.39 kN/m^2 on plan. Now as above take the effective span on plan of the rafter as being 1.375m (conservative) and as the rafter is simply supported at the ends the loads at the supports are calculated as follows: 2.39 * 1.375 / 2 = 1.64 kN/m. In other words the "DESIGN" load on the ledger is 1.64 kN per metre run of the ledger. The design load at the bottom of the rafter is the same neglecting the slight overhang. If you were checking this you would check the rafters, the hangers before checking the ledger. Just like you follow the money you follow the loads and check each bit as you go. That is really pedantic. To make it fly take the rafter span on slope in feet divide by two m and add one inch.. that will probably be fine as it is a canopy. Thus 2.4m = about 8 feet.. 8 / 2 = 4 + 1 = 5 inches. I would adopt a 120 x 45 C16 rafter @ 600 centres max for the rafters. Standard Simpson joist hangers will do fine at the top end of the rafter.. can show they will work but it will take all night to finish this post if I do. ----------------------------------------- Lets now look at the capacity of the fixings and work out how many we need. If you follow the method I have used above to calculate the loading. I start with the loads (characteristic loads) and apply safety factors to get the design load. We now check to make sure that the DESIGN load is less the design RESISTANCE. Not normally a shouty bloke (use of capitals) but for all it is really important so please forgive. Things like masonry fixings are very tempremental not least as we are often fixing into masonry that is variable.. brickies can have off days and so on. In the table that @MortarThePointhas uploaded you can see two columns. One characteristic and one design. Take the M12 fixing.. the number we are looking for is the design resistance of 1.62 kN in shear. Now here it can get really complicated as we are using the Eurocodes. You'll see there is also a figure for the approved resistance. This is the value that you would use if you did not use the safety factors on the loading calculation... permissible stress design codes. Lastly always take note of spacing and edge distances. Lets now work out how many fixings we need per metre based on an M12 bolt and see if we can practically install these. Design load is 1.64 kN/m. Design resistance is 1.62 kN per fixing. Suddenly you can see the loads are pretty small and that you only need one roughly one fixing per metre run of ledger. To be exact we would need: 1.62 / 1.64 = one fixing per 987 mm which is a funny number to deal with on site. Practically I would say one M12 fixing per rafter bay if they are at 600 centres. Now all looks great above but lots of BH folk start using the same idea for 3 - 4 m spanning floors and ledgers for trussed rafters.. you can quickly see how these fixing will stop working! --------------------- The ceiling tie serves to restrain the top of the posts. Just use the same fixings and spacing as the rafter ledger.. line them up so they look good. 70 x 45 C16 may be what you want.. if hanging plant pots / growing a vine of something go for 95 x 45 C16 / maybe C24 as it has generally less knows and looks less cheep. You coaul calculate the wind load in the roof but using the same fixing as for the ledger will be fine. ---------------------- The transfer beam along the top of the posts. Have run out of gas here a bit and it takes a bit of explanation.. you use the design loads to check the strength and the unfactored loads to check the deflection. With timber you need to calculate both the bending and hear deflection.. bit more work. Suffice to say that on that roof you could I think show that a 200 x 45 C24 timber would work or two 170 x 45 C16's. The single timber may look a bit "weedy" and not sturdy to the eye.. it's also about it looking balanced and visually pleasing. ----------- A 100 x 100 post around 2.4 m long will take a lot of vertical load, again can show another day how you check it. ------------- Simpson post bases.. they are good, last a while, just a little more expensive. -------------
 1 point
 -
@Susie Have you looked at Joule? I have been using their aero system for over 2 and half years for our domestic hot water. I I heat our house with a centrally placed wood stove.1 point
-
I've recently had a couple of these mini-splits (FTXJ35A2V1BW) installed and while I'm blown away by how efficient and effective they are, the UI seems a bit odd to say the least. The Operation Manual doesn't strike me as the best efforts of a professional technical author, which doesn't help. Hopefully this thread will attract other owners (I can't be the only one) and might aid a better understanding all round. Just finding a relevant manual online is a bit of a challenge. The online copy of the paper manual it came with (dated 2021.12) only seems to be available from the daikin.ch website with links elsewhere being dead or leading to earlier versions of Emura. This is the 3rd generation. Quirks Armed with the published info and the Daikin 'wireless remote control' (IR) and the Conecta app on my smartphone, I've been trying to get my head around a few quirks. For starters, the IR remote is one-way so its internal state can differ from the indoor unit if also controlled from the app. This has the potential for a bit of confusion as some functions on the remote control are disabled when it thinks it's in a particular mode, but isn't, due to changes having since been made using the app. At least the app sync's with the remote - albeit with an unpredicatble delay. Speaking of the app, regrettably, the system is entirely cloud based. Previous versions of the WiFi interfaces used by Daikin appear to have had both local and remote access to the settings but this has changed now so everything has to go through the cloud. I'm not entirely happy about this, and neither are the people trying to integrate the latest Daikin models into Home Assistant. Another thing I'm not happy about is the bizarre design decision they made to keep the built-in WiFi Access Point (Daikin originated SSID that's used by the app for onboarding to the customer's LAN) permanently active. In every other smart device I've encountered or developed myself, such AP's only persist for as long as it takes to make a connection and transfer credentials to access the customer's LAN. Time-outs in the order of minutes at most are common to prevent the SSID of AP's loitering and providing visibility to all and sundry in the vicinity. WiFi is not as secure as most people imagine and a permanent but totally unnecessary advertisement that a Daikin A/C is in the vicinity can only serve to add to the attack surface. Other operational quirks exist mostly through necessity - once you understand the inevitable limitations of an ASHP capable of both heating and cooling. The trouble is that much of what goes on has been abstracted away from the UI presumably to make it simpler to operate. An example of this would be the way that selecting comfort mode overrides the fan speed setting - forcing it to auto. On the handheld remote this puts a little cross next to the fan icon but in the app, other fan settings can be selected, only to bounce back to auto a few seconds (or minutes) later. And if the app is used to disable comfort mode, the remote may still think it's selected and bar you from adjusting the fan speed. So that's my opening post on the topic. My next question will be what the small green part of the LED status ring actually signifies. It goes on and off at seemingly random times but the manual only describes it being lit during the on-boarding process (I do hope it isn't related to the AP remaining up, because this might imply a bug rather than a feature).
 1 point
 -
Hi @Chaos its a bit catch 22, if you buy a plot with detailed planning approval you know exactly what you can build without having to deal with the local planning authority, of course you can put in to change this, minor changes will be waved through major changes could be a battle , an extreme example would be planning approval for a 3 bed bungalow and you want a 5 bed house. Plots sold with outline planning permission normally will state what the outline is for ,eg, detached family home and will have a site plan showing roughly the footprint of the build on the plot, at this point it is then find an architect and get your design through planning.1 point
-
Welcome. Not sure where to start with explaining this. Heat is not temperature. Heat is the old word for energy. So don't worry, at this point about temperature differences too much. As your whole house is new, there will be a lot of mass that will absorb energy, without changing temperature significantly. There will also be a lot of moisture being evaporated, and this, by the very nature of physics, takes more energy than just heating up liquid water (air pressure and humidity levels make a difference as well). If you can, check that the ASHP is not short cycling. This may be a bit hard to establish from indoors if the circulation pumps are constantly running. As a general rule, energy transmission is most efficient at the median temperature. So if the flow is at 29⁰C, the return at 20⁰C, the slab should be, on average, at 24.5⁰C. This does not translate into the room air being at the same temperature as there are losses through the building fabric. Inside the heat pump there is a heat exchanger that takes the hot side of the heat pump and 'passes' the energy to the colder side, the flow to the slab. Generally, you do not have much control over how hot, or cold, the hot side of the heat pump is, that is a function of the refrigerant gas and the fraction of the Carnot cycle used. But as a general rule, you want the flow and return median temperature to be significantly higher than the highest flow temperature going to your space heating and hot water.1 point
-
I had exactly the same ! use decoupling mat flexible adhesive flexible grout expansion strips in doorways ?1 point
-
It isn’t a problem But you must have an expansion joint in every doorway if you are tiling mans matting under the tiles1 point
-
In a word, yes. But it’s your house. i wouldn’t do it in mine. Think about the smell after your fella does a poo. Would you want to walk through that to get to your bedroom.0 points
-
I have indeed...and my research tells me it wouldn't be the world's first 😁 I omitted one of the key points and that is that my cats are incredibly stupid. Hole in the door they might just about manage, eventually. Flappy thing embedded in door = impenetrable barrier = howl until door is opened. Maybe I need outdoor cats.0 points
-
From the local rag. Retiring Visit Cornwall boss Malcolm Bell says the future of tourism is to attract 'friends' not 'effing emmets'0 points
-
My favourite chuckle about this is that he is moving along to reduce the flooding evenly. I am reminded that my young grandson was 'helping' me fill a water feature with a hose, and thoughtfully and carefully spreading the water around. I decided that was clever enough, and puddles always being level is for another day.0 points
-
We had an old house and when we converted, our doors needed to be FD30, building control said and approved a incemesant paint and smoke seals around the door/door frame and self closure mechanism. The paint had to be applied by certified person, they would not accept me doing it.0 points
-
Very much the illusion, hense the tidying, when anyone comes to visit, family or otherwise.0 points