
Leaderboard


Popular Content
Showing content with the highest reputation on 03/22/22 in all areas
-
I stick built and have enclosed my wall build up. Hand drawn! The t&g Pavatherm is a great product. Air tightness, insulation and attention to detail most essential. Minimal heating required. Floor, Wall, Roof Build up Jan 2018..pdf3 points
-
I'm not sure I'd use a twin stud, unless I was benefiting from its ability to allow a simpler foundation/raft detail, while removing all thermal bridges at this junction. Using a larger 89 x 37 section, at least for the inner stud, allows all loads to run down through the inner stud to the foundation, so that the outer stud can sit over the perimeter insulation of a slab and remove any thermal bridges to the floor and sole plate. If you are going to use smaller sections, that require both sections to take the vertical loads, the an I-Joist seems simpler to me. There's not much to choose between twin stud or I-Joist build up. I-Joist is easier to stick-build on site and has a slightly lower timber fraction, but requires a slightly more complex raft detail to eliminate all thermal bridges. I've never seen it done on a twin stud structure, perhaps because the outer studs are often not load bearing, but an I-Joist structure can allow a very simple build up, combining the racking strength and air tight layer in the outer sheathing, using T&G Egger DHF board, and then a foil-backed plasterboard on the inside as the vapour barrier, with the blown cellulose in between. No membranes required for air-tightness or vapour, although a breather membrane externally for protection. To get very high air-tightness though, a non-curing butyl adhesive is required in the T&G joints. The T&G DHF board and blown cellulose insulation can achieve sub 0.2 ACH, without membranes, if the detailing is done well. Sub 0.1 ACH on mine. This simple build up does mean no plumbing in the external walls (cabling is OK), unless you add a service void. But, that means no OSB, other than where you want plumbing. I'm not sure structural performance should lead the choice of framing type. While it needs to be considered, I would prioritise thermal performance (energy loss) v. cost of the whole envelope: walls, roof and floor. Structural performance leads in to cost, as does the labour required for an over-complicated build up. Ah, but as a Chartered Engineer, once you have all the required data, you will re-calibrate your view. There is a better way... Edited to add: If you are looking at JJ I-Joists, James Jones & Sons will pre-cut all the holes for MVHR ducts etc., if you plan ahead.2 points
-
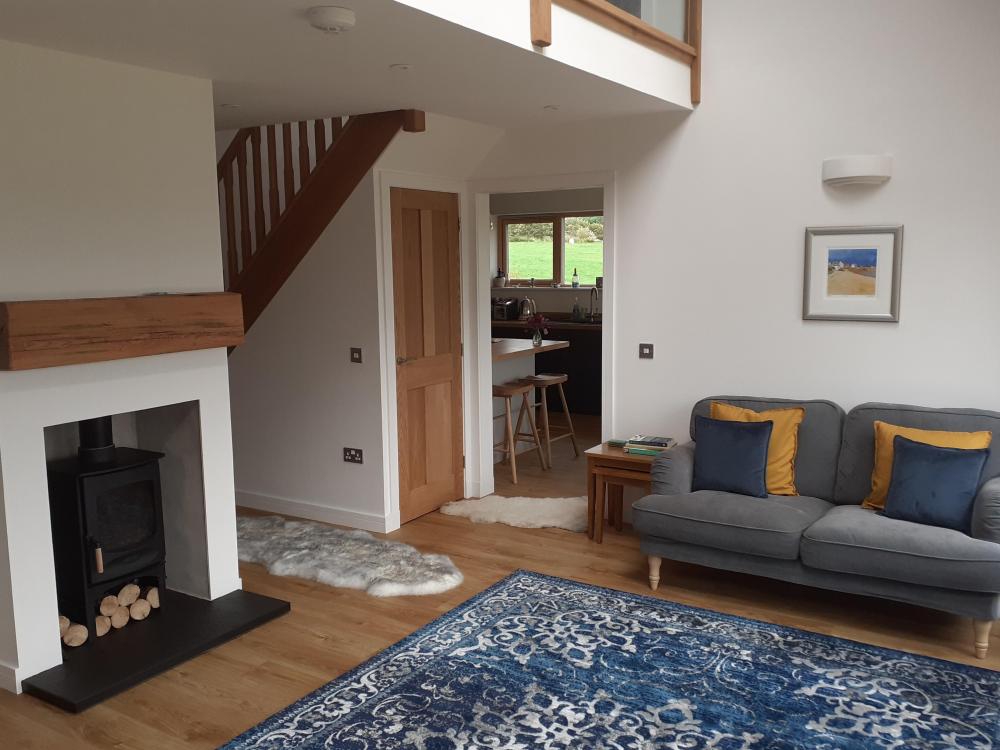
We have a semi vaulted living room. Three large velux windows and oak staircase/balustrade add to the cost. The basic structural costs were included in the stick build cost I mentioned in an earlier thread.

 1 point
 -
Speak to Wandsworth - they have every option imaginable ..! And they will do custom if you can’t decide..! https://www.wandsworthelectrical.com/collections/infinity/1 point
-
I used the Floorspan Efloor Plus - similar approach I think with EPS blocks and a 150mm EPS sheet over the top. Good system.1 point
-
Beamshield requires void underneath, as it is beam&block system, just EPS block. The greatest drawback is need for protection from damage during further stages of the build. From other practical issues it may be the supply: finding local casting company that collaborates with them (though there are similar alternative systems), volume required (whole house is more likely to succeed, my extension failed to fill an artic) and competition from volume builders if present around (one of the companies I talked with at some stage pulled out, as their whole output was sucked by major developer). But in principle yes, it's a no brainer. Though so is single skin externally insulated wall as used throughout Europe, yet cavity rules1 point
-
The less they know, the more they think they know it all. Anything they don't know is wrong, or 'science' which is not true otherwise they, being experts, would know it already.1 point
-
fire needs oxygen, and presumably none would reach the PIR1 point
-
Great, that will be useful for your SE also. Get a few quotes, you may be surprised. There are often economies of scale in groundworks. You may also save by simplifying other aspects of the design. Also, if you create extra space, you don't need to fit it out initially. Standard ceiling height is 2400mm (conveniently the size of a plasterboard sheet) our ground floor is just a smidge under this at 2350mm and it feels fine. First floor is 2300, also feels fine so 2575mm should feel spacious. Yes, works well for them as they don't do any concrete work other than the slab. However you can should get a quote for your own passive style slab & 3/4 basement wall from a groundworker - it's really just a concrete wall/slab with appropriate EPS underneath and to the sides. We did our basement like this and it was straightforward for MBC to drop their frame on the top. They waited until it was in place and came to do final measurements before putting frame into production so no surprises. You could have suspended timber floor for the dining / kitchen level also (would need some steel to support) and if you go for a low energy design then the UFH only needs to be in the ground slab - also that heating is in the slab itself, not on top, so you save on screed and on slab insulation.1 point
-
1 point
-
Is that the external dimensions of the unit? Not heard of this rule. Only the concealment could be considered art. You must already have a lot of data, get your old bills out and see what you have been using.1 point
-
Planning? Some of the recent monobloc systems are over the 0.6m3 allowed under permitted development, so add extra hurdles to the process.1 point
-
Maybe in a urban environment, but in a sparsely populated rural location I would continue to burn and so would everybody else. 😁 If you drove twenty minutes from my house in all directions, I would say 95%+ all burn from a stove or a fireplace. It just so happens that my approach is probably the most efficient from having the wood on site and my stove set-up.1 point
-
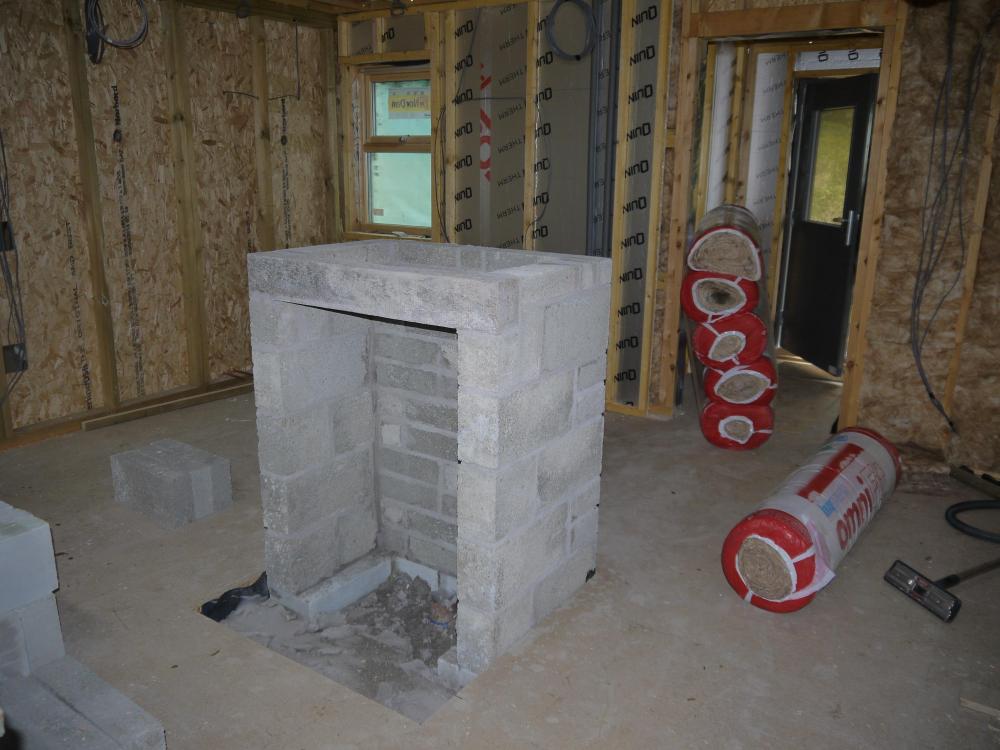
Above the stove. I wanted the builder to go further to ceiling height but he didn't, instead stud and plasterboard after that. No queries from Building control, quantity surveyor, or HETAS stove installer regarding the duct.
 1 point
 -
The stove blockwork is the small square in the middle. The pipe just ends at that point under that section of the timber floor. I have heavy concrete blocks that surround my stove hence the reason for it's own foundation. All I can say is that the approach works well for our home, another winter done and electricity heating bill is less than a fiver. My floor has PIR insulation (this would be flammable!) but then a layer of glasswool and chipboard less flamable. I guess in the event of fire I would have smoke coming out of my airbricks. 🙂
 1 point
 -
Combine all the above nuggets, add my own, and we have: Yes it is sensible but make sure the floor is non-combustible, that there is a grille on the underside (with allowance for the air blockage of the grillage) that it can be inspected in case of dust/spiders blocking the intake, and that the air bricks, or other details allow plenty of air at all times. There is more risk of this going wrong in the long term, with change of ownership and lack of maintenance / understanding of air-movement.1 point
-
Your choice is really to use a tape suitable for the materials, Siga do sell a couple of options here, or use a paint on membrane like Soudatight LQ on its own or with a geotextile when it needs to bridge a larger gap. Your choice will also depend on whether you are using an internal airtightness membrane or relying plaster for airtightness.1 point
-
£10k and more? If they ever take another supply off it they should recompense you for that share of the infrastructure.1 point
-
No problem, this is the stage where you can get real world advice and costs from contractors etc which is useful to counterbalance the ideas of the architect which sometimes can be complicated to realise before you commit to any course of action. Also, super important, never feel pressurised continuing down a path that you're not comfortable with just because you find yourself on it. It's not the end of the world to tweak an approved planning app - we did it twice after our initial PP, one full app and one NMA. I think you're ideally set up to be honest, being on site is a massive advantage as you can see what's going on and are there to be consulted on a 'how do you want this done' conversation. Most trades will take care of sourcing their own materials, inherent in a supply and fit arrangement, but you will want to be involved when it's something higher value or aesthetic - sanitary ware for example. Don't expect trades to spend all evening on the web finding the best price for a nice Hans Grohe rainforest shower for example. All you're doing really is taking the responsibility to co-ordinate, plan ahead and find trades that a general contractor would do on your behalf and charge you 20% overhead for. Most decent subs are self contained businesses and will come, quote, give you some free advice maybe and then want to be booked in with reasonable notice. Payment by invoice and make sure you're not charged VAT for anything - if you buy materials in your name then you pay VAT and claim it back at end of project. Keep the questions coming, we've all been there and are only knowledgable by standing on the shoulders of others and our own experiences (and mistakes)!1 point
-
The cables aren't an issue, nor is the water feeds. The issue will be the waste pipe. Having fitted them about 4 months ago the electrical cable was the longest (2.5 meters at a guess ), then the water feed with the waste pipe the shortest. It's fairly easy to extend the electrical and water feed. Edit: I've just checked the booklet for our washing machine. Cable is 2.0m. Water hose inlet 1.6m, Drain hose 1.5m. It also states for the drain hose "If required, the hose can be extended to a length of up to 5 m. Accessories are available from Miele or from your Miele dealer." Wasn't aware until now you could extend the drain hose that easily.1 point
-
Blowing the dust off this one. Would anyone NOT go for Beamshield instead of a traditional block and beam solution? The Beamshield just seems an utter no-brainer from where I'm sitting. The thought of a constant cold ventilated setup just doesn't bode well with me, particularly when the time you're heating it is when the cold air will be in abundance AND Baltic cold to boot. Any Nay-sayers out there? And if so, why?1 point
-
Ha, that’s different then, had not come across this before, yes EPS is flammable (Grenfell!) so yes I would duct to outside.1 point
-
Mores the pity 🤷♂️1 point
-
Why the hell not, I would have done this if I had a vented floor void with block and beam. I could understand a timber floor (risk of fire). Mine is vented to an outside wall under an insulated slab.1 point
-
When I did our first build 19 years ago, I specifically checked with BC could the duct just come from under the ventilated timber floor and they said yes. that one just came to a floor vent behind the stove cast into the hearth. This time I didn't bother asking the question, I just did it. BC noted the ducted air into the stove bud did not ask where exactly it connected to.1 point
-
Don't believe so. You can do a sideways offset and that's about it.1 point
-
1 point
-
System chimney is another option- I went down that route as it takes wind direction out of the equation.1 point
-
That's good to hear1 point
-
There is a reason it’s being banned (I like wildlife and have a dog!!!)1 point
-
Unfortunately I won't be using that. Nematodes maybe?1 point
-
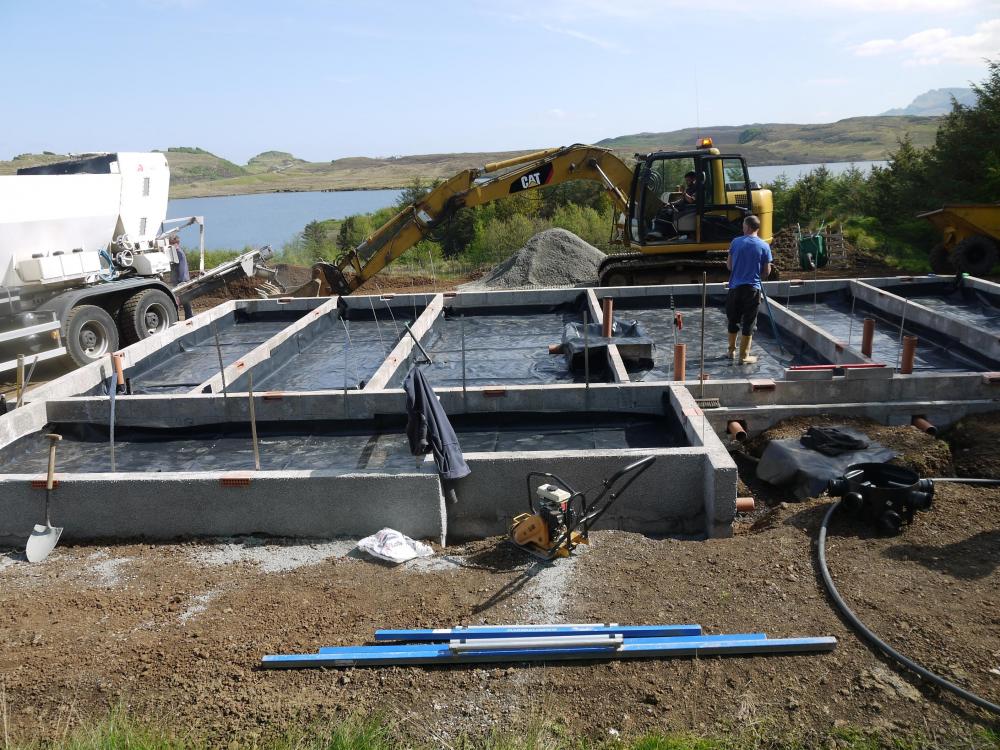
Pretty much any system can work with any shape / size. When you have below ground elements then timber is out for that part but IFC would be appropriate, or even a block or cast concrete system, with appropriate waterproofing (SE specced) for your ground conditions. The MBC passive slab is not that complex and we replicated it for our basement and ensured that when we got to ground level, the profile matched what their timber frame would have required with their own system - i.e. an EPS insulated perimeter of sufficient thickness to meet the outer leaf (we used 200mm) and a 300mm thick concrete wall (they needed less) to take the soleplate for the load bearing inner leaf - plus structural support for other point loads inside the envelope. Best way to figure that out was to get MBC to design the frame sans slab and hand that design to a SE (or use theirs) to design the sub ground structure. Few home truths here - whatever you think, you will be very involved in the build. Unless you have very deep pockets and very, very detailed drawings speccing the location of every switch, socket etc, you won't just be handing off to a MC and coming back 9 month later to a completed house. There will be a multitude of decisions to be made, some time critical, and some way ahead of when you think (i.e. what's your flooring finish - needed to set ffl through etc.) Many of these will need you on site to make a final call and many won't be obvious until the structure is up around you and you finally see what you're building. There will be alterations, deviations and mistakes (yours and theirs) to deal with. We project managed with all of your constraints above and it's not that hard. 1) you know what you want (mostly) or will know when you see it. 2) you know what you can and can't afford. Your contractors will deliver the build but as PM you select them (and you may well use very few in the end) and you tell them what you want. You will likely want to source specific items (sanitary ware, tiles, kitchen, doors, handles, stairs etc) and get the quality / cost you want. I doubt you will just leave it to the GC to use bog standard off the shelf items - you just need to be able to use the internet and pick up the phone now and again. You will not be ordering general building materials - most contractors are supply and fit anyway which is good for your cashflow, VAT reclaim and their sanity). You'll be doing the VAT reclaim at the end as it's inevitable that you'll be buying some bits and pieces. Adding all that up, you're effectively already the PM. Add a bit of tidying up and prep at the weekends and you're there. More or less what we did but we just used subs rather than a GC for post frame - what we did was this... 1) arrange site toilet, water & power for trades - latter will require an electrician and maybe your DNO if you need to move meter to a temps supply ahead of pulling down bungalow. Are you planning to live on site in a van (or the bungalow) we did the van and it saved a fortune and kept us close to the action, which helps. 2) one contract to prepare site (demolish existing) excavate and build basement, in ground services (water, power, gas, rainwater) and leave site ready for MBC 3) arrange scaffolding & skips to MBC spec. 4) MBC come and erect frame on prepared site - on a standard build they would do the slab also, maybe be a bit of a hybrid approach for you if some is sub ground and other areas at ground level. 5) Roofer, window supplier & installer and external facade (render in our case) come and do their bit. Guttering / soffit / fascia firm did their bit next and scaff came down (in our case while guttering man was still on roof but that's another story). From the outside it looks like a finished house but internally just a shell. 6) Electrician & plumber get us to first fix. I do the MVHR as no-one will ever see it and it saves a few £k, but maybe you do supply & fit for this also. 7) Joiner comes to box out around services and put in door linings etc 8)) Plastering firm comes to insulate the stud walls and ceilings, 'tack ' (i.e. apply plasterboard) and skim (3mm cost of wet finish plaster to board). 9) Tiler tiles bathrooms and other areas, painters paint, flooring goes down. 10) plumber and electrician come back for second fix (sockets, switches & sanitary ware) 11) joiner returns to hang doors and fix skirting & architrave etc 12) last thing we did was install stairs (used temp MDF ones provided by MBC up to this point) to avoid damage. 13) external landscaping, this tends to be the bare minimum to get BR sign off as funds tend to be low at this point but probably grading organic areas, laying turf and dressing the driveway etc You may well get a contractor to take everything post shell on as a package but you don't need to. They will only do the flat slab but their SE can spec adjacent works for others and ensure it all ties together. We did 400m2 solo, tbh it's not that much more effort just bigger quotes1 point
-
I'd sort this out: Loft and cavity wall insulation is not only a "no-brainer", but also prepares the property for an ASHP heating system where reduced energy losses better support a lower energy input into the property over a longer period of day. Next I'd look at improving the output of the emitters, either by increasing their size or swapping for fan assisted radiators, to allow a lower flow temp for improved ASHP efficiency.1 point
-
Divorce may be easier …1 point
-
Our roof makeup is 0.15 and has been specified as 150mm PIR boards between rafters (600mm) and 37.5mm insulated Plasterboard. This is for a second floor which is in the roof. Unventilated roof.1 point
-
So to answer your questions - get quotes, decide on which company you are going to use. Be ready to tell company to go ahead with application ASAP. Plan on what if anything you need to do to improve EPC. Get quotes/DIY, be ready to implement. Hanging around, you may miss the boat.1 point
-
Same as us then! Yes, you are wrong - it needs to be designed in from day one but does not necessarily add much cost, when's all's said and done the structure of your home is about 20% of the overall build cost and making that closer to passive may add on 10-20% to that cost (maybe less). Really it's just more insulation, more focus on airtightness and consideration to over heating etc. If anyone tries to present it as some hair shirt wearing lifestyle strategy then show them the door. We leave doors and windows open year round when we feel like it but our house is warm in winter, cool in summer and we have relatively low energy bills - that's what it's all about. Take a look at MBC Timberframe as an example of the package approach - we used them as did many others here but there are lots of alternative contractors and build systems to get the same result. Lots of ICF builds here and well insulated block also.1 point
-
Why just the present situation. People and governments have been banging in about energy efficiency since the mid 1970s. Or, to save any mental arithmetic, almost 50 years. Makes me wonder why the only message that gets through us that energy efficiency is too expensive and difficult. 50 (expletive deleted)ing years. We should just tell people that fail to add the best technology that is currently available that they are (expletive deleted).1 point
-
I'd also educate your tenants, or prevent them changing the controls. Example, they go away for a long weekend in January and decide to save money by switching the heating off. Over the 3 days the house temperature drops quite low. When they're heading home they use their app to switch the heating back on. Firstly the house won't be warm when they get home because the system can't raise the temperature as quickly as a gas boiler. Secondly, to try to heat the house the heat pump will run at a higher temperature than normal (depending on how the controls are set up) which reduces the efficiency and uses lots of electricity. We did this early on with our heat pump, before we learned how to use it efficiently.1 point
-
If you want to do it for environmental reasons then I'd read up on the best way to set up and control heat pumps. As you won't be there to play around with the settings you want to get it right first time. There are good arguments for not using an internal thermostat so you want to make an informed decision. You should also find a reliable company to do your system design. It isn't as simple as removing the boiler and putting in a heat pump. The company should do heat loss calculations to work out radiator sizes and heat pump size. They will also tell you if any of your pipework will need changing. As I said, I like our heat pump but it isn't a simple task to replace a gas boiler with one.1 point
-
To echo what @Iceverge says… you need to look quickly at that design as it is barely building regs for insulation ..! What is the purpose of this 140mm block with another skin for the render ..? The mix of TF and blockwork doesn’t make sense, and the blockwork insulation is definitely not enough. Airtightness in this will be a real challenge and there are gaps in the VCL (vapour control layer) that are visible in the plans above. Roof design makes no sense either - they have specced Kingspan NilVent (clue in the name here ….. ) which is a breather membrane requiring no air space below, and then spec a minimum 50mm air gap. I would hazard a guess that they also had lunch with the Kingspan rep last week as I’ve never seen it specced so much on a set of plans ….1 point
-
Hi, would agree to add later, even later in the design process will cost you. Once wall and roof thickness is set so is the installation depth to a large degree. Don't think of passivhaus a distant unachievable thing, a normal build can't do. Some aspects you may not do, but it worth reading up on, as most things make really good sense and can be added to a design for little or no cost at the design stage. Building regulations insulation is far from ideal and so is their airtightness. Would look to have a minimum of a 0.15 u value, for walls floor and roof. If you have UFH go to about 0.1, to save too much downwards heat loss. From your design be wary of overheating from your glazed gable ends. Extending your roof and walls out similar to the rear, could give some shading, when the sun is low in the west can be as much of a problem as midday sun. The architect should be able to model it, you need to know what spring, autumn and summer will do to your internal temperature.1 point
-
Thanks . Our budget needs to be trimmed as we can’t spend more than the house can be worth and markets are tetchy . I’m going to talk to 3 estate agents who could advise on realised value on completion. im off for the sun now ..1 point
-
Biggest general mistake is not trusting my gut. When you think someone is full of crap or outright lying you are probably right and you should act on it. I found it too easy to trust people to do the right thing and just hope.1 point
-
I’m in the same boat. Pp to knockdown a semi detached house to rebuild a detached house. Just working on the details around tidying up the neighbours exposed gable and other boundary work as our house is built as part of a garden boundary wall. Look forward to hearing your progress.1 point
-
Google search is even better - just add "site:buildhub.org.uk" to your search term. It's more flexible than the site search engine.1 point
-
Greetings @S2D2 I have to ask... what was meant by the phrase "plasterboard tenting" As for air-tightness of an older building, well little things can add up to alot of improvement. Here are my cost effective suggestions: With airtightness I always look at every hole in the outside of the building. Many times services passing through the external walls are not sealed properly. A bit of external sealant will do the trick. Old pipe holes through the external wall not mortared need to be filled. Check around windows outside and under all external window cills for gaps. Again frame sealant will do the trick. Cavity walled buildings have air passing between the 2 layers of external wall so if a pipe is not sealed on the inside the air from the cavity will enter the building. Check all possible pipes internally for gaps and seal where required. Bathrooms can be a nightmare - from holes in walls where pipes pass through to no floorboards under the bath. Pipes boxed often have hidden holes or bits of floor missing. Check for poor sealing external openings. Sometimes draft excluder will do the trick. Internal soil stacks often have the round pipes going through square holes. If you can get to them, seal them up. Internal joists are supported by the internal layer of the cavity wall. When installed they should be sealed around otherwise the air from the cavity will get in. Any time your doing work which exposes these joists Check to see if they are sealed. If not, a big hole a bit of mortar or a small hole a bit of mastic will do the trick. On suspended floors air can flow between through the join between walls and floors. ( This sometimes makes the edges of carpets next to the skirting dirtier than the rest of the carpet. On light carpets often a grey edge to the carpet). If you get the chance seal between the floorboards and the bottom of the skirting with mastic. If you have other floor finishes you can seal between the top of the finish and the skirting but use a suitable sealant as it will show. ( A white Dow corning 785 for water areas with vinyl perhaps, and a suitably coloured sealant for wood floors. In cupboards with tanks or pipes in check the floors and ceilings for holes and fill where required. Check the front door letterbox shuts properly and either mend or replace. The same goes for cat flaps. Check that your loft hatch seals correctly. Use draft excluder where required. External overflow pipes to old toilets allow air to blow back up the pipe and into the room. Next loo installed needs to have an internal overflow. When all this is done, you may find humidity becomes a problem. The moisture was originally blown out of your home with all your heat. If so invest in fans for wet areas. Fans are usually best when they have humidity controls and mechanical shutters built in. This will mean they only come on when damp and stop drafts when not in use. Boilers that are not room sealed require a supply of outside air to run and so somewhere there should be an air brick. Next replacement make a room sealed one. Open fires or, log burners that are not room sealed, also require air as above. Using open fireplaces can be comforting but when not in use the air is soon replaced. NOTE: Take into consideration that if you manage to seal your home up tight you need to have a way of refreshing the air that your breathing! The 3 main ways to do this is leave a window/door open, have trickle vents or mechanical ventilation installed. Good luck with staying cosy. Marvin.1 point
-
I really like this take.1 point
-
Remember you will need an asbestos survey before any reputable contractor will touch your demolition job and if any is found, it needs to be removed by a specialist before the general demo work starts. You may get lucky and have some material that is salvageable or even sellable but decide quick and just bin if no interest or immediate use. Don't be tempted to story stuff on site 'just incase' as it will inevitably get in the way of the build and just get damaged. We had 1500 unused imperial bricks from the original 1950's build but we could not get anyone to take them, even for free. Kept getting moved around site and each time the pile would diminish as they got lost, broken etc. Still have a few left in a pile at the back. I did manage to salvage some 5m joists from the single story garage and they came in handy for a few jobs, now forming raised beds in the back garden.1 point


.jpg.c21f3ac78c9b7efd90cbdcb312744dc5.thumb.jpg.7adcad4c0e384f5ecd7d56b0618df6e5.jpg)