
Leaderboard


Popular Content
Showing content with the highest reputation on 10/18/18 in all areas
-
Can't believe you don't!4 points
-
No, I haven't managed to sneakily bury the wayleave officer somewhere on site! This post is for the other electricity cable on my site, namely the one that directly supplied the previous building and will supply the new one. This comes onto the site via an overhead cable and a post and stay that are very close to the new building. Entirely safe but very ugly and certainly won't fit in with the lovely garden that we're planning. So, from the outset, we've planned to bury this supply as much as possible and today was the day. Burying the supply has involved putting in a new post right on the boundary with my neighbour's garden, through which the cable runs from the nearby transformer. The existing cable was then attached to this one and the supply cable runs down it, through a trench and eventually reaches the garage. The trench was dug last week and blinding sand laid along its length. Simple enough, but it's a really long trench, something in the order of 50 metres all told, and we got through the best part of 4 tonnes of sand to line the base of the trench. In digging out the trench, an old land drain got smashed up as it ran directly parallel to the long run of the trench, and at right angles to where the trench turns in to the garage. I'm really glad that it was dug last week and not this as it was lovely and dry last week. This week, I'm well on my way to having a moat as a result of the broken land drain. This is looking back towards my neighbours' cottages and where the new pole will go in, against the fence. The pole to the right of the cottage on the right is where the supply runs in from. And this is around the corner, looking towards my garage. At the end of the trench, there is a duct that MBC put in (there are a few others, too) that allows the cable to come into the garage from under the slab. There will be a whole bunch of kit going into the garage, including my sunamps, so this seemed like a good place to run the supply in. Because it's such a distance between the new pole and the garage, the first 30m of the supply cable had to be a very heavy duty one. About 3/4 of the way along the long trench, there's a fancy looking connector that links the heavy duty cable with a normal one, which continues on into the garage. As well as running the new cable into the garage, whilst my back was turned, the meter fairy arrived and my electricity meter that was previously located on the old pole near the building magically re-appeared on the wall in the garage. Useful things, these meter fairies. When I rang my electricity supplier a couple of weeks back and asked when they might be able to move the meter, the earliest date they had available was mid December, which would have been disastrous. Thankfully, the forces of good prevailed and the meter is now where it needs to be. My site seems to have a natural affinity for augurs and drills. Back at the start of the build, a rig was on site taking soil samples. This was followed in due course by another rig drilling holes for all the piles and now we've had another one, this time to drill a hole to put the new pole and stay into. As usual, the augur came up caked in clay but the soil was still dry at depth and it came away nicely. Here's the augur going in for the pole. And here's what it drags up. I really should consider a pottery business. Just a final pic of the pole on the van: The guys from SSEPD made the job look very easy, but a reasonable amount went on and there was a fair bit of equipment on site including the cherry picker, drilling rig and the ubiquitous land rover, with 4 guys in total. They finished just before 1pm and worked efficiently and were a very nice bunch of guys. A couple of them will be back in due course to do whatever is deemed necessary to the poles carrying the oversailing wires, but that may be a little while off yet. I have an electrician coming onto site tomorrow to put some connections into the house. I wasn't planning to get this done until at least another week's time but it needs to be done this week as MBC and Norrsken (windows) are back on site next week for remedial work and they will need to get plugged in for all that. Once the snagging work is done, the next big push is to get the various roofing jobs finished off so that the building will finally be watertight; my parapet walls may look lovely, but they are leaking like mad right now, so I shall be relieved to get finished there and let everything start to dry out. I'll also get the trench back-filled as I don't really want a moat and certainly not that close to the building. It does serve to illustrate very well why a soakaway wouldn't work, though.2 points
-
So lots and lots of primer and nice neat cuts of tape. Easy!! Not having a dig but yours doesn't look like what's on the video.2 points
-
Honestly I think take it all back to the top of the concrete and break around each window and continue to remove the upstands as you have been doing. Get your architect to do proper drawings and then do as it's on these for test window 1. Create a dam with sand and fill the hole with water around the test window and observe. Let it sit for a day and if it's good then proceed with the rest. If it leaks and it's done as is on the drawing then it's up to your architect to come up with plan B. Repeat as above.2 points
-
the one I'd add to the list is to learn to haggle and haggle over absolutely everything. It amazing how much some people will move on price, both for contracted works and suppliers of materials and fittings. This is one benefit of self managed builds where you are dealing with multiple sub-contractors and often sourcing materials yourself, if you are prepared to be really business like you can save a great deal. I have a column on my build cost sheet with quote price and discounted price for every single line of spend and the saving is now very large, paid for a hand made kitchen. You need to be fair and sensible with contractors, having an idea of the market trade rates for their services will help but I found most would usually give something back if they liked the look of the job. Suppliers are different, your goal is to find their very bottom price and it's amazing how much margin they have on many products. And watch out for what I called "Grand Designs Tax" - contractors who look at your project and think your fancy self build means you have a bottomless budget. My favourite was a largely competitive ground works quote which had a nice breakdown of works and line items, at the end of the list were lines for "setting out" £1000 and the rather ambiguous item "on and off site" £750. The quote otherwise already contained all the major elements of the work in detail, this was very obvious fluff. A site meeting took place where I asked what on earth two blokes and digger might need to do to generate this £1750 of additional mystery cost for these works, contractor gives a cheeky grin, "oh right, yeah, that's a bit salty, must have been someone in the office, we can drop those" the setting out took a couple of hours, two blokes and a ball of twine, some stakes and a can of paint. On and off site I assume was a proposed levy for regular trips to and from a local cafe. Neither of which, I'm glad to say, I paid for!2 points
-
It's getting there ,One day at a time.2 points
-
Yes, but be aware of the impact on the electrical supply if doing this with electrically driven compressors. Most compressors have a pretty high starting current, which is OK when you're only looking at one starting and drawing a high current for a short time, but may be an issue with a couple of compressors trying to start at the same time, which will probably happen with compressors in parallel, as they will all tend to want to start and stop at the same pressure. A 13 A outlet is OK for 3hp, but not really for 4hp, as 4hp = 3.056 kW = 13.28 A at 230 VAC, with a starting current that may well be over 20 A.1 point
-
Hi Since finding a potential plot of land, I've been a bit of a lurker on here for the past few months trying to work out whether a self-build journey is something my husband and I are brave and crazy enough to embark upon..... We are in the middle of the legals on the plot as I type and we have received draft plans from our architect. All going well we hope to commence our build, a 2 storey (potential to do a third floor in the future) 4 bedroom, modern timber frame house of around 300sqm (based on draft plans) in Spring 2019. Feeling crazy, excited and entirely overwhelmed and we are only just getting started! I know we will have millions of questions along the journey which is why i'm so happy to have stumbled across this forum. Hopefully my ability to answer other people's questions and chip-in bits of advice will grow as our project progresses!1 point
-
Couple of things, that b and q window will be utter crap,go and have a look. As for standard sizeing i completly get where get where you are coming from, backwards Britain strikes again our last house we built in Australia, I went to see a window company and was handed a brochure, many styles to choose from size wise hundreds to choose from as long as you stuck to the set metric sizes. Width. 300 600 900 1200 1500 1800 2100 height. 300 600 900 1200 can you see where this is going, brilliantly simple, the brochure had all the rough openings in it to show your frame builder and when your house is finished you go and buy blinds, well bugger me, they are available to fit the same metric sizes so you go and buy off the peg blinds no dork coming around to measure up for your bespoke £10,000 blinds as i said backwards Britain something so obvious, pay you deposit and 3 weeks later your windows arrive1 point
-
Is it worth looking around for Corian offcuts? Corian can be cut with a router or circular saw without any real problems, and is one step up from laminate, I think. Not sure I'd use it in a kitchen, as experience with it in an office kitchen environment was that it stains badly, but it should be fine in a cloakroom (does anyone still wear cloaks, I wonder, let alone leave them in a cloakroom?).1 point
-
Yeah. What I thought. The water hasn't even been turned on yet but that is easier to sort. It's the gas safe part of it that is the big issue to get someone else to take on. I will have to wait until next week but I have my suspicions they will not come next week either but - I know I don't really have a choice.1 point
-
could be anywhere! apart from the west coast of scotland, we've at least got scenery when looking out to sea. That view is bang tidy!!!1 point
-
If you don't need to get out of the old house why not stay there a while longer even when new house heating on, give the new place chance to dry out properly.1 point
-
Christ I did that for weeks last winter when I couldn’t get someone out ?. It’s doable. Wear a jumper and warm socks, plus you can pop to the old house to shower lol.1 point
-
Too late to rock the boat imho. You need to keep on good terms and retain labour / integrity warranties so just keep your head down and find something else to distract you as the days tick away. Theres always something to do. Worst case just get some cheap electric fan heaters and boil the kettle ?1 point
-
I would wait for them to come back. At least they have let you know that they were not turning up today. I do wish you the best of luck that they turn up next week.1 point
-
Where? Hopefully you unpacked it and stored it properly to acclimatise with the house environment. As to assembly, the most important thing is to make sure that you understand the assembly process start to finish before you begin, both in terms of the staircase flights and how you will fix them into position. There are lots of useful step-by-step guides and YouTube videos. so watch them through and dry rehearse it all before you start -- especially if you are doing upper storey fittings. I just googled tk stairs installation instructions and got a lot of hits. Make sure that you have the fixings and tools to hand and in position before you start. Validate dimensions carefully before you assemble anything: for example if your staircase is 5mm too wide for the plaster to plaster surface then it is a lot easier to use a table saw to remove the excess off the stairs and risers before you assemble than to start pulling plasterboard off the walls. You also need to think about how you will safely lift and position the flights whilst you fit them, because the last thing you want is an "oh shit" moment with a bloody heavy staircase over your head that is dangling unsafely. Also if you are painting the stairs or the stringers you might think of applying the base and primer coats before you fit the staircases and this is a lot easier to do when the stairs are sat on a couple of saw horses.1 point
-
I think you are just going to have to go with it tbh. Getting anyone else will likely come with an overhead of cost as most trades don’t want to pick up a job halfway through. It’ll be a case of ringing round and finding out if you do want to go down that route but I doubt anyone will agree a fixed price for something that is an unknown quantity. Annoying I know but you’ll either have to go with the flow and move in without hot water, or heating in some places (think you have electric UFH in some places), or just sit tight.1 point
-
I am with Utility Point since June and very happy. However, I have just received a weekly update from Money Saving Expert (MSE) strongly recommending the latest BG 1Year FIXED Tariff. Check their website online1 point
-
We have been happy with Utility Warehouse.1 point
-
We've been with Bulb since July. No problems so far. From what I remember they've only got one tariff and it's variable, and we're soon to get a price increase. If you like the look of them I think I have a cashback link which would get you more than switching by a comparison web site. This would also get me something, though!1 point
-
Gosh Yes - that's extortionate - like my electricity though - that was £13K1 point
-
Why was grp discounted? Remember it being discussed.1 point
-
^that's a thermostatic power shower, Nick. Not electric...1 point
-
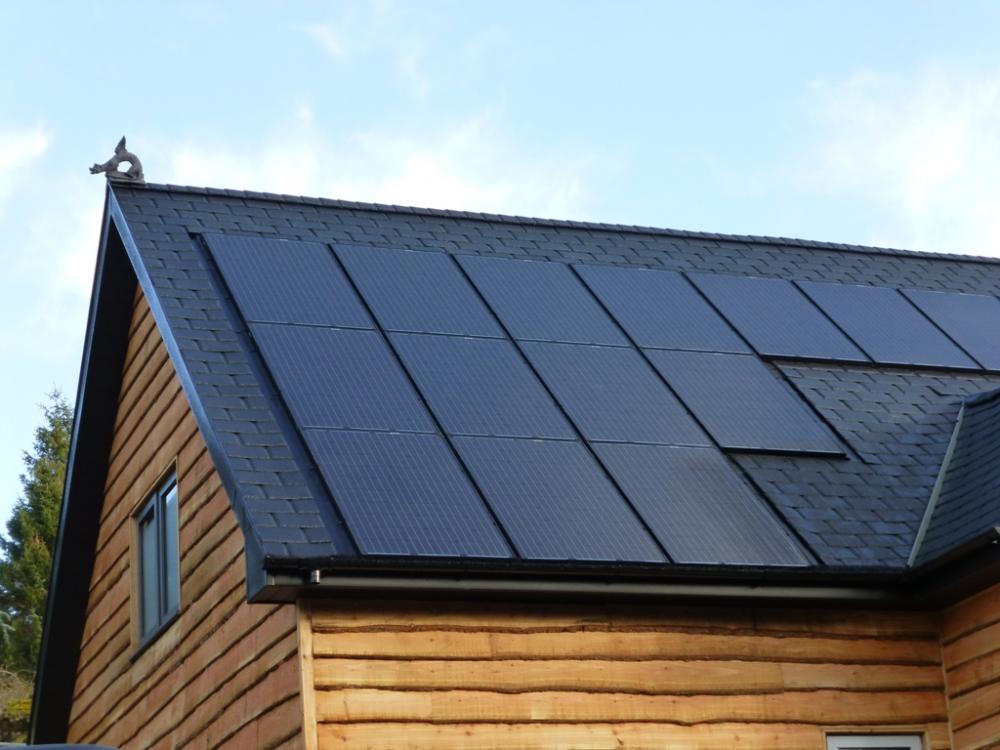
We opted for black uPVC, which went a bit against my view that we shouldn't use plastics, but the desire for minimal maintenance won out. I think the combination of dark slate, black aluminium dry verge and the black uPVC looks OK. We used the thick structural uPVC facias and barge boards, with tongue and grooved uPVC soffits.
 1 point
 -
I have just been watching the Impey Waterguard Wetroom tankingvideo which looks great and with care, is something I could do. I assume it would be installed onto the plastered walls. But I also have seen Aquaseal wet room system recommended on this site. Is one better than the other? I can see the Aquaseal is about £45 and have not priced up the Impey system but it looks more expensive. The Aquaseal also looks easier for me to use. If OnOff can use it, I am sure I'll be able to do it.!!? I am working my way through the rest of his bathroom post - I may be busy for a few days......1 point
-
Depends what you want to do and what was agreed. Have you got down to specific detail in the PP that says stuff such as “timber windows painted white with glazing bars” as changing those to an anthracite alu clad in pale green is going to be a problem. Materials are usually a reserved item anyway where the council will want samples - that’s something that will need you to go back and unfortunately it’s the time to approve (up to 8 weeks) that will cause you the issue. Sounds like your PP needs to be detailed enough to get through, but loose enough for variation ..!1 point
-
We asked a couple of alu-clad window suppliers whether using standard sizes would reduce cost, and both said there are no standard sizes. Even trying to keep multiple windows the same size makes no difference, as all windows are bespoke, and the minor gains potentially made by having a few windows the same size are completely swamped by the cost of materials and labour.1 point
-
and this weeks numpties, need a ceiling finish ventilated into the rafters, personally designed lighting, personally designed kitchens, (running out of money), ground concrete floors (though they did grind these themselves), 9m ceilings with echoes. oh, and don't forget a lot of what looked like 2g glazing, a cool area to sit next to in the winter. blockwork looks nice but too much concrete and steel for me, too industrial and not homely.1 point
-
The house looks very handsome. Compared to the flint work the rest of the job will feel easy - unless you plan on making your own clay tiles.1 point
-
Maybe they could skip the 20 pages on the motorised shower head to speed things up a bit1 point
-
Murdocks have a few yards in Dublin. I guess if you intend to buy a lot from one supplier and are happy to pay a premium to deliver to you then they might. Costs nothing to ask.1 point
-
The alternative is as many of us have done, make the meter box a permanent feature on or close to the plot boundary, then you only have to get connected once. Then your electrician connects your cable from there to the house. All legal and safe.1 point
-
A very interesting insight. Good to know. I have not started my build yet but I am a convert to the simplicity and speed of SIPs. I will be looking out for this issue. Am reading your blog and finding that to be very informative too.1 point


.jpg.c21f3ac78c9b7efd90cbdcb312744dc5.thumb.jpg.7adcad4c0e384f5ecd7d56b0618df6e5.jpg)
.thumb.jpg.bac90f3bbf6868cf2118d010d936c99d.jpg)

