
Leaderboard


Popular Content
Showing content with the highest reputation on 01/25/21 in all areas
-
@zoothorn , can I respectfully suggest you go back through this thread and collate the advice given as a set of simple statements. List them in order one below the other. Just imagine you were trying to show someone everything that you have learned : bit like this measure the size of the radiators find out their designation (type) measure the surface temperature of each radiator list the time the measurment was taken list the rooms and their volumes repeat the measurements every hour for 4 hours and so on. This would have several significant benefits, among others; You would reassure your readers that you had taken note of and acted on their advice It would allow readers to identify mismatches between what they had advised and what you did It would help you internalise the advice But most of all, it would show that you respect the effort made on your behalf by contributors to this thread3 points
-
Welcome .! if the user name indicates your locality then our resident troglodyte @pocster has built an underground lair around that area.2 points
-
Sitrep on the oven guys. Finally had a look over the w/e and decided to try disconnecting the earth ( I have a fair bit of elec knowledge @ProDaveso I knew what I was doing)and try heating the elements one by one to see if it was moisture that was causing the problem. Well it worked even though the oven had been in the new kitchen for over 12 months I still find it hard to understand how there was still moisture in the elements. Great news though as these appliance repair engineers can charge and guess who is flavour of the month with SWMBO!!2 points
-
If they ever have an Oscar for forum threads, this one will get it2 points
-
Well we are on the way now and no going back. The groundworks guy started last week, he is putting in the road and hardstanding and will do the insulated foundation under my guidance and I will assist. It's a good relationship and he comes when its not raining and is well experienced in groundworks. He is actually building his own home just now too (we are similar ages). The night before he came on site...I was hurriedly arranging site insurance (horrific cost of over £2k - but it is for 24 months) that was sorted, then in the dark I went up and attached the cursory health and safety signs at the entrance. I also put a sign facing out into the surrounding fields (see pic below) as we have people who walk by and I haven't heras fenced the site hence if someone crosses the fence they should be aware there might be big holes in the ground. The digger came the next morning and we have nearly finished the access going in to the house, around 400 Tonne of 3" crusher run has got us up to the house location. Which is pretty damn close to what I calculated, we were put off my rain somewhat this week which suited us both as I was stowed with my normal job, I did have holidays booked but couldnt get off as I had too much on. However come Monday..I will be off for a week.... I 've been busy at night over thinking, over engineering and done far too much detailed planning around drainage and ducts. But I'm nearly ready. The Kore Insulated foundation system came in December....I can tell you how glad I was that i brought it in before Brexit. I'm hearing stories that it is completely problematic now. I was missing some EPS for a thermal break between man slab and integral garage but steven from Kore sorted it and should be here next week just in time. I'm spending my night tonight comparing prices of drainage which I'll bring on site on Tuesday. The groundworkers will be back Monday and we expect a big week full speed ahead, we will scrape the foundation out (the footprint top soil is removed) get it level, then fill with Type 1. Then surveyor here on Wednesday to set out profile boards with, I done all the ACAD drawings for him to place it all and do the ducts and drains and insulated foundation corners etc, He's also been really helpful and proactive. The final UFH design is done, I'll order the pipe on Wednesday too and they can get it next day, so that's fine. Next week is a big week and I'm excited...I've planned some bits to death, but in reality we will just see how it goes. Some pictures attached because that's what a blog is all about Jude was thoroughly enjoying the water and mud!....wish us luck! 20210115_154740.mp41 point
-
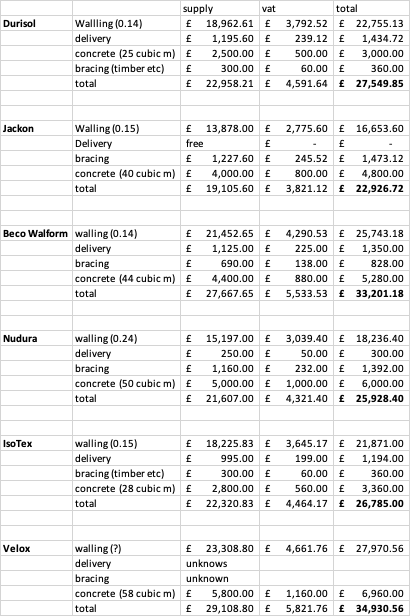
So all of the ICF quotes are in. I've tried to standardise them as much as possible, but some have interesting notes which I'll detail below. Putting this up for others who might find it useful in deciding their supplier or working out costs, but also for any feedback or thoughts from the more experienced (that's all of you!). Our build is approx 220sqm footprint and 260sqm of wall. Durisol includes a 22% discount that they put on without negotiation Beco Walform have quoted for the 375 but say the 313 would save around £8K (inc vat) and only increase the U value to 0.165 (though the published value is 0.18) so much better value Nudura say that a U value of 0.24 is plenty and anything more gets really expensive Velox includes the steel that goes inside the wall. I've included a price of concrete at £100+vat/cbm. This is a little on the high side, but it gives comparison. None of the quotes include rebar (if required [except Velox]) - would have to wait for SE calcs. Can anyone suggest an amount (in £ or quantity) that they used on their build? I know that we'll be able to reclaim the VAT on a new build but were costing things as a worst case scenario. Labor to construct I'm guessing at 9 days for 1+1+me: 2 days build, 1 day pour (lower ground). 3 days build 1 day pour (upper ground). 1 day build, 1 day pour (gables, finishing off etc). Hope that helps someone and thanks for your thoughts!
 1 point
 -
SWMBO would like the latest sink taps included in the plans - anyone know where these can be sourced?
 1 point
 -
Thanks everyone, @pocster that would be amazing mate, would love to see it once this damn lockdown ends.1 point
-
Plain white EPS in this sort of application is likely to have a thermal conductivity of 0.04W/m.K and graphite EPS a conductivity of 0.032W/m.K. In more understandable terms every 32mm of graphite EPS has the same insulating effect as 40mm of standard EPS. The difference between 0.227 and 0.24 U-values is trivial1 point
-
I have indeed ! Happy to share any info you need or you can come and visit ! ?1 point
-
All the best Guy. Post some drawings, any info you have on ground conditions and so on and you'll get a few good tips on BH to mull over.1 point
-
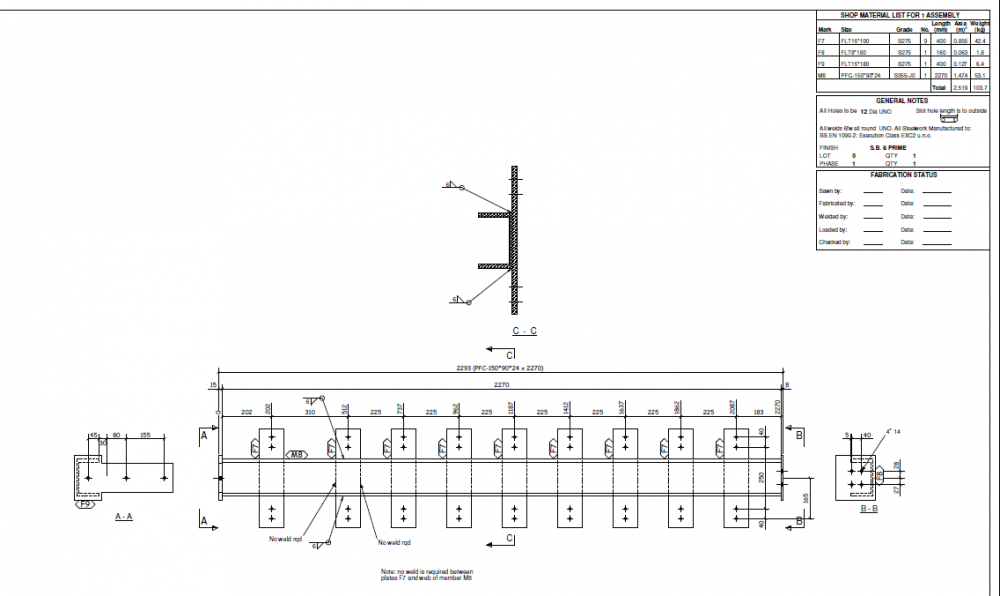
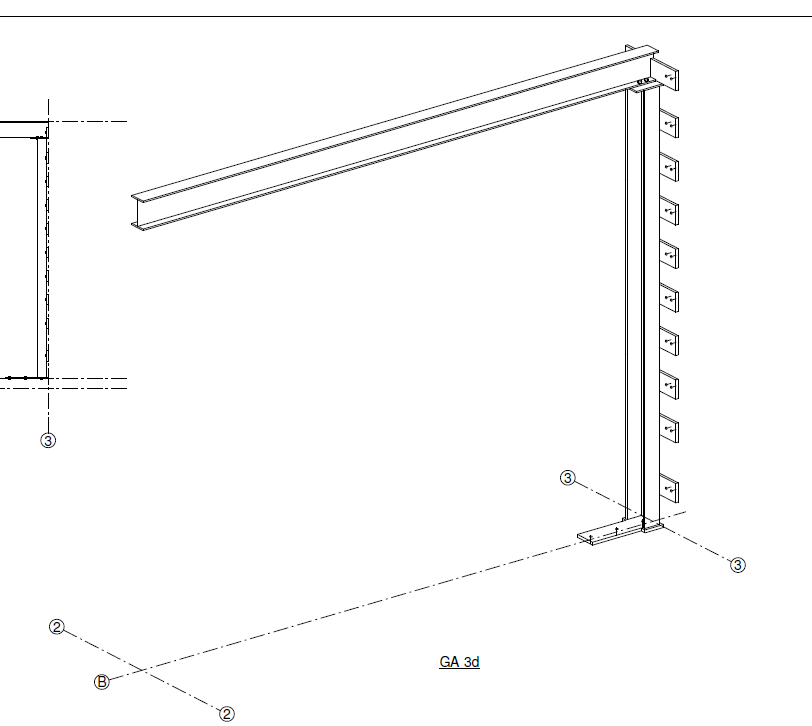
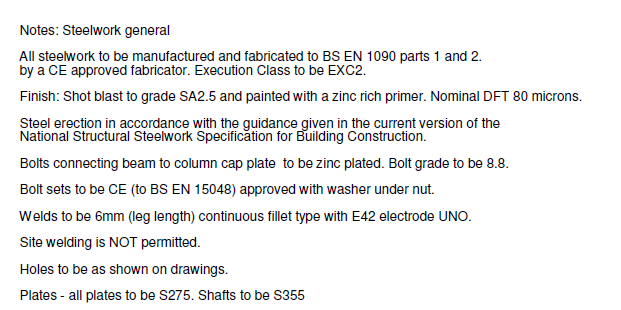
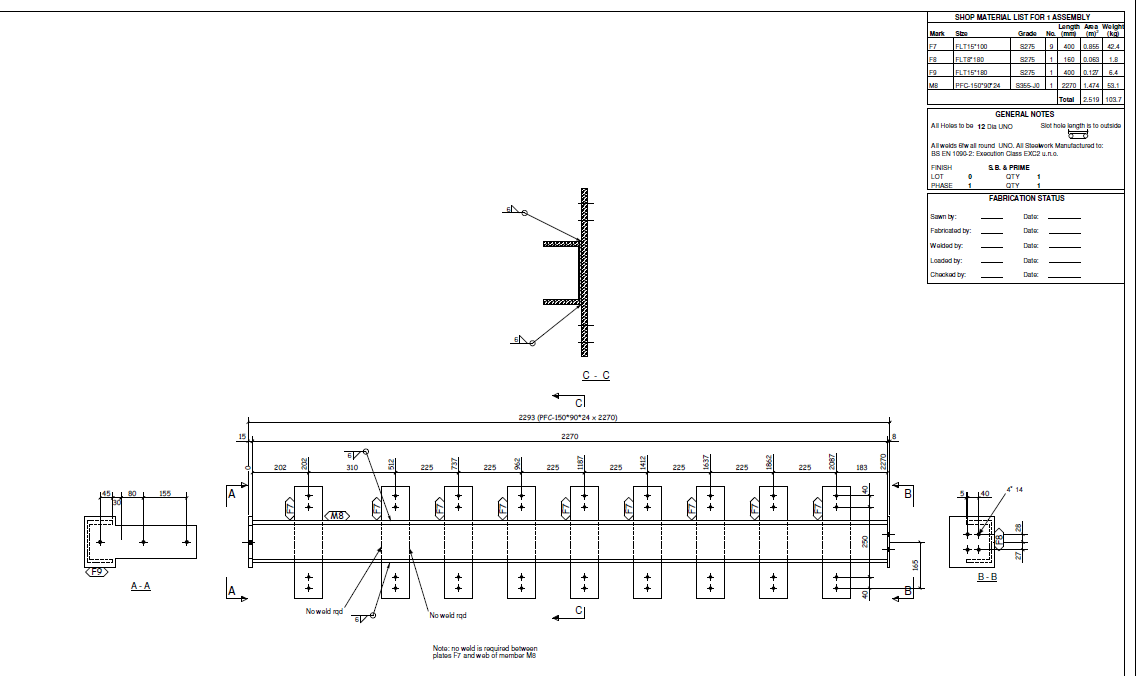
Hope this extra info helps. On larger jobs the SE will often contract to produce the steel schemework / call this a general arrangement. They calculate the various forces, size the members and provide drawings that show the beam/ columns, their sizes, grades etc and finish, paint or otherwise. They also provide a list or show the forces @SteveMackon the connections and what type of connection is required, "simple", "moment".. "wind moment connection"... there are others too. This allows each fabricator who is tendering to design the connection that is most economic for them to produce. The connection design is often passed back the SE to ensure that it meets say the overall stability requirements of the structure. What is advisable to do if you are an SE is to make sure that the fabricator can actually design and practically fabricate the connection as if not it can be embarrassing. The SE may just rough something out or take an educated guess and make some notes which you may not see. The key here is that you (SE) need to make this clear to the Client in your letter of engagement / brief that this is what you only are providing. This is particularly important when dealing with less experienced Clients. Fabricators come in all shapes and sizes. Some have their own in house structural designers, some don't. It's quite common that the fabricator will come back to the SE and ask "can you do the connection design" and we will pay you for it as part of our package. We sometimes call this getting novated to the contractor. Essentially, you go and work for the contractor for a while. There are pro's and cons to this. There can be quite a lot of work in designing well balanced and cost effective connections. Once you have done this there can be significant amount more work to be done if you then go on to produce the fabrication drawings that go to the shop floor. Often for example each component plate / beam has its own drawing often called a shaft and plate drawing. You then have what are called assembly drawings. If you have a beam with a plate welded to each end this is an "assembly". All the assemblies are then bolted together to form the frame and you have GA (general arrangement) drawings for this. On bigger jobs and even small ones that big fabricators slip in as filler jobs you may also give them what is called an NC file, (numerical control file) this is actually a normal text file .txt that they can plug pretty much into their drilling and cutting line and so on. But the approach I favour for small domestic works, say knocking down a wall with a beam and columns is to produce all the steel info that a small builder needs to price (tender) easily. They can see what they need to do and not have to worry too much other than check the site dimensions once things are opened up.. before fabrication. You may think this can delay the job but what you do is to book your production slot at the chosen fabricator and thus can deal with last minute minor changes, say a few mm in beam length etc. The steel info is wrapped up in a package, zipped up in a zip file and all they need to do is send the zip file to the fabricators for pricing etc. Below is a GA for a small job.. knocking down a wall with a wind post. Important notes are added so they don't get missed. I have screen shotted parts of the drawing. The fabrication package for this beam and column contains 8 drawings. Often the smaller fabricators buy in the plates / shafts so if you make it easy for them the price comes down and this offsets the SE cost. All they need to do here is send the plate drawings to the plate supplier, shaft to another, get the components in, weld them up and paint or send to galvaniser. Here is part of the assembly drawing for the column And here is part of a plate drawing. The title boxes and a little info has been removed to try and avoid identification and so on.

 1 point
 -
If red from each tap would there be a two port valve underneath?1 point
-
With my build I knew the cable was coming from a nearby pole, so on that corner of the house, under the eaves, I installed a length of overflow pipe (22mm I think) through into the loft space where I had prewired several rooms, pipe was sealed into the brickwork/blockwork with silicone and after the cable was installed used the same silicone to make it airtight both ends.1 point
-
When you took the picture, was the red light on the meter on all the time, or was it flashing and you just happened to get the picture when it was on? and is it still reading zero?1 point
-
@zoothorn, just a thought,( can’t be bothered to go back over 64 pages) does your ASHP supply your DHW? Is that warm enough?1 point
-
Yes. That reminds me, I need to squirt some foam down the pipe: that job's slipped off the bottom of the list....?1 point
-
It is because it is not turned on for long.1 point
-
Short version: Another member had a free ASHP heating system fitted for free by some grant scheme and it has failed to work properly, failing to heat his old cottage to a sensible temperature. The manufacturers and installer have failed to resolve the issue and the forum has been trying to understand why it does not work. Ongoing..........1 point
-
I would hope not ..! Has it been serviced annually ..? If so, the Megaflo has a 10 year warranty from memory so I would be claiming. Even so, the tank is change of £800 at that size so someone has seen you coming. ASHP tank needs to be min 250 litres and preferably 300 litres, the lower temperature and slower recovery time are a major factor in sizing. I would want a heat pump at probably 12kW based on a 2000 BRegs spec build - wouldn’t be taking a chance on the lower spec.1 point
-
Thanks for the idea, building a small garden office out of SIPs panels could work out quite cheap and would provide great insulation. I will have to search around the internet for examples of people who have done it already, I'm certain many people will have.1 point
-
Govt are funding the trial direct. OVO are just doing the leg work alongside a number of named manufacturers (Mitsubishi, Sunamp, Daikin etc.). Google OVO Heat Trial and you will see the rub. Good blog site by the way - I grew up near Ash (my friend lived there) so know it very well1 point
-
Not sure I would have the time!!!1 point
-
It does kind of depend what the engineer has been employed to do - was the engineer employed to show compliance with the building regulations or were they employed to provide construction details? I'd expect the SE to do steelwork connection drawings but not really at Building Regs stage - in the same way as I don't do construction drawings for a building regs application either, I would do a construction set after tender stage and only give critical details at regs/tender stage On most projects we'd also have the fabricators produce drawings of what they are fabricating to be checked before fabrication1 point
-
You do, you keep me sane. In years to come, historians will rewrite this, remember the victors rewrite history.1 point
-
I don't actually like them myself, it's more a case of what I grew up on. Go through a Hell of a lot of slim ones at work but that might be just sheer numbers. I prefer "proper" downlights but I'd go with slim ones in future as long as they're easy enough to access and replace. The benefits outweigh anything else in this instance. The slim, flat panel ones do give a superior spread of light / beam angle generally. Tell him back of the queue! I like One Gel, again habit I guess: https://www.tlc-direct.co.uk/Products/WKONEGEL.html1 point
-
even cheaper type --http://www.supersips.uk.com/structural-insulated-panels-prices.htm1 point
-
It is the latter. The rad is only rated at 12000 BTU at deltaT 50°C, and you have to de-rate them by the factor relating to the flow temperature. So in this instance it is 0.345 from memory, so 12000 BTU becomes 4140BTU which is only just in line with the 4121BTU calculated.1 point
-
would it really be that expensive to build a small office like from SIPS panels ,floor ,walls +roof all insulation done just window and a door to work into it if one slope flat roof dead easy to sue sips an example https://www.ebay.co.uk/itm/SIPs-Panel-3-0m-x-1-2m-Structural-Insulated-Panel-Garden-offices-Studios-Garage/184528578995?hash=item2af6c2a9b3:g:nugAAOSwH2Ja3xX3 you can get MGO board types that have mgo on outside and osb on inside --you could just quick render outside or simple corrugated tin sheathing for either type not hard if you going to build a house --a week end job-if not too big1 point
-
but the installer or Vailant engineers should have checked all that. So various engineers have visited multiple times and none has got it so it will heat the house properly. I think it is time for a different tack. This was installed by a grant scheme who then sent an installer to fit a system. It does not work as expected and it appears the installers have washed their hands of it, after all, they have been paid. I think what is needed now is forget the installers or the manufacturers, go higher up the chain. Go the the company / organisation that you first dealt with. They are the people your "contract" is with. Tell them that the system that they organised to be installed is not fit for purpose, and you need it sorted out so it works. Point out that the installers or designers of the system appear not to have done the job properly because after multiple visits they have failed to make the system work properly. Point out that it is your opinion the grant money they provided has been miss spent paying an incompetent installer to install an inadequate system and then fail to make it work.1 point
-
Can't be bothered, so maybe @zoothorn can confirm for us? And maybe take some nice piccies of how all the kit is sited in the room???1 point
-
As someome else is fond of saying, I can't remember that or be arsed looking back. If someone could do that for me please....1 point
-
At the risk of sounding like a stuck gramophone record, if we had the result of the "only 1 radiator on" test we would know which of those it was.1 point
-
This is twin wall isn’t it ..? Is the liquid clear and does it have any smell at all..?? Points to a potential issue where the cap of the flue may not have been installed correctly and the insulation layer is getting wet or has previously got wet and frozen / thawed and this is running down the inside of the insulation jacket. It would be very unlikely that this is flue leakage and more likely outer skin leakage if the liquid is clean looking.1 point
-
What are you burning? This is a problem I have seen with stoves with back boilers running cool with wet wood - the walls of the firebox and flue never get that hot, the result is all the steam from the wood condensates on the cool surfaces and runs down the stove wall, I was once met with a stream of black water running out a stove door at a friends farmhouse when he was using a lot of damp wood. I have also seen black streaks running out of flue/chimney connections where the same is happening in the flue. If you are burning the sort of fuel you ought to be you shouldn't have an issue. On first ignition a little moisture will be seen on metal and glass surfaces inside the firebox, that is even with bone dry kindling, however the temp will come up and soon disappear as the temp comes up. I might be way off the mark, but did you burn a lot of damp or wet wood and perhaps not let it rip properly? This can also be caused if you have too high an output stove in too small a room, people then try and underrun them and the never get up to temp, killing the stove and flue early as the gasses are always a bit damp. The next point is that the flue should be constructed in such a way that the higher part always sleeves into the lower, this is to stop moisture or rain managing to run down and escape from the flue, except from into the stove itself.1 point
-
It will be condensation running down the inside of the pipe. Get your installer back, one of the joints is not right.1 point
-
Doesn’t get you round the import issue which kicks in at £135 for personal items imported. Agree - I know someone bringing in a lot of stuff from Germany, and the issue seems to be around the paperwork and what is required rather than the process itself. DHL have got it sorted - I get the waybill and the tax invoices emailed as soon as things are picked up and as long as they are paid before it reaches the UK hub then the process doesn’t slow down. 4PX have built two huge hubs in the UK to manage the China to UK parcels and they are pretty efficient. As entirely expected though, anything arriving via UPS into the UK Royal Mail system is painfully slow ..!!1 point
-
I would have counter battened as Onoff suggested. the number of fixings from the batten into the VCL would be less than if screwing plasterboard to it. slimine down lights are also available but these generally have a led driver elsewhere to locate. https://www.cablejoints.co.uk/sub-product-details/cable-jacks/rise-rapid-cable-duct-seals I’ve used this in areas where gas is present, it’s I suppose the quick version of a cable transit, where cables used to be individually passed through a penetration in a wall, surrounded by rubber block and squished to make a seal.1 point
-
No problems at all importing from Europe, costing us around £46.00 to customs clear an artic loaded with around £400K of machines. Truck just has to drive through the customs yard and hand over the declaration paperwork. The drivers have said its now much quicker and easier than it was last year. we use UK hauliers to bring our machines in. The couriers based in Europe have not got their act together tho, loads of delays and they just cant seem to get to grips with the requirements.1 point
-
No - just tend to tighten it up to nip the olive then back it off so you can rotate the pipes perfectly level. Then screw the backplate on and tighten up the elbow.1 point
-
There's enough dumbing down of the English language already. Slang and text speak dilutes who we are, or at least who I want to be. You should take pride in your posting and even correct any spelling mistakes when you can. Just my humble opinion. I mean seriously, your phone didn't do this. It's punctuation but not of this planet: "So innevitably -I- get annoyed at -your-"1 point
-
Hi, I thought I'd share a significant insulation improvement I've made in my bungalow... It's a 1970's split level bungalow, with the living accomodation upstairs. Having thoroughly draughtpoofed, installed modern double glazing, new energy efficient doors, underfloor insulation, cavity wall insulation, removed all window reveal cold brdges and insulated them, 400mm of loft insulation and MVHR, I expected the place to be really warm. But I always detected a sort of cold downdraught from the ceiling. Very strange. I recently had the roof tiles and membrane replaced. Whilst the old roof was off, the likely culprit became visible. As its a pitched roof, the inner wall is of course taller than the outer, this taking the weight of the roof trusses. So the top 400mm of inner wall leaf comprises effectively a single skin, uninsulated block wall, in what must be the worst position possible, all around the top of every external wall, where the internal temperature will be highest, therefore leading to max heat loss. So, while the roof was off, I insulaed this vertical section with rockwool, leaving room for ventilation between the new membrane and insulation. The result? An incredible difference. The cool downdraught has completely gone, no more feeling of cold feet. All for the cost of two rolls of 200mm rockwool....1 point
-
Shelly 1 could do it - bypass the live to the feed (unless it’s a Nv switch ..?) and can do by pressing a button or phone / app etc. Cheap and easy for about £10. You could go all the way and replace the whole of the system with a Shelly with a thermostatic head, you can programme them and they will also communicate with other MQTT devices.1 point
-
I've finally got around to starting this blog. I'm hoping that it'll be easily updated and I'll provide lots of good pictures and info...we'll see how that goes. I'm at the point now where we have just taken our first big delivery, which is our insulated foundation system from Kore, this morning. So albeit, this process of building a house has been ongoing for some time, it has just become real that we are at the beginning of the build phase, which is very exciting. Some light background info - I've always wanted to build a house for the last 5-10 years, but it was a distant dream and wasn't quite sure how feasible it would be. I grew up in a rural house, my parents bought in 1983, modernised and updated over the years. It was a great childhood and spent many hours in the fields and in our garden, even just cutting the grass was fun (1 acre and a ride on mower). We sold that when I was 21 and ever since I've wanted to return to that life. I have two young kids of my own now and hence the want to return to the countryside to give them what I had was strong. I was always keen on building, swmbo, wasn't as such. So we searched and searched, but mostly the houses we could find that suited our needs were out of league (price!) and even if they were to be in our league there were things we would change or in the end it would be expensive to run. And hence that search helped my other half make the realisation that self build was our only option. My dad died in 2017 after a long illness with Dementia, a relief for him and for everyone else involved. We were very close and I took care of him day in and out, until he was in care. He was an engineer and had owned his own business since I was a child, albeit he lived a pretty simple life and was happy being at home in the garden he made and house he had renovated. Riding around on the ride on mower enjoying a quiet life...and now I guess that's exactly where I want to be. His passing left us with a little inheritance which has allowed this dream of self building to become a reality, I'm very thankful for this. I know it is something he would have been very excited to be part of and watch us do. So after messing around since 2017 and not being able to negotiate a plot or find one that was suitable (there's a lengthy thread on this!) I'd finally identified 4 acres in July 2019. It took a bit of time ( I had to confirm services and remove an Agricultural tie) but completed purchase in Jan 2020. I'll not cover the planning process in detail, but the plot had legacy planning permission which was 24 years old, but at that time the development had commenced and hence it was a straightforward change and submission of our designs. Building warrant was granted a week ago, with very little hassle really. I joined Buildhub in September 2019 or thereabouts. It's been a wealth of information that has helped me shape the design of the house and provided no end of guidance which I am very thankful for. It has allowed me to validate my opinions and approaches and learn from others to ensure i am following the right path. I started out prior to buildhub wanting a SIPS house, in fact googling that may have made me find my way here. Quickly I decided I wanted an insulated foundation too, I went around in circles a little bit with both of these decisions and reading others opinions on here. I even thought at one point they would both be too expensive for me , however I sit here writing this first post having taken delivery of my insulated foundation today and my SIPS kit is on order and due sometime in February. I don't actually need the insulated foundation till mid-late January but made a decision to get it in the country before Brexit issues occur and tariffs are possibly applied in January (rumoured at 6%). I'm very glad I made that decision as today our new strain of COVID has caused everyone to close the doors to us here in the UK, another couple of days and god knows when I would have gotten it. There is lots of other decisions and stuff has gone on in the background with planning and mortgages and budgets to get here, but that is mostly done and hence I feel this is the end of the beginning and now we can enter the start of the middle.... I'm very pleased and excited for the road ahead. I like pictures in blogs....here's a few of the Insulated foundation delivery today. Stored at a friends farm for the time being. It's being stored outside, has a few tractor tyres on it now to stop it blowing away and the main pallets are all strapped down. That's me standing on top.......1 point
-
@Mako you should read this....1 point
-
Doesn't really work like that - there's a very long thread with lots of formulae and arguments about this subject. The wall should be considered as a single thermal element, where the concrete is in the profile, doesn't really matter. It's an order of magnitude cheaper to put a 40mm sheet of PIR on the inside vs a 100mm sheet of EWI grade EPS on the outside.1 point
-
A 15mm (ish) plastic pipe for the wire, filled post hoc with airtightness foam. (Daughter works for Open Reach)1 point
-
As far as tools are concerned, a nibbler was invaluable. Other than that, tin snips and a wooden mallet and block did most of the other bits, I did end up using a pair of bolt cutters to trim assembled seam ends. Contact @patrick to get more information as he's now an agent for the roofing company. Please excuse the very slow response.1 point
-
I just used Aquacell drainage crates (see here: http://aquacell.wavin.co.uk/ ). I used 20 of the blue Aquacell Core crates, tied together with the Aquacell connector tubes and clips into a big rectangular block, with the block being wrapped in terram and buried in a big hole under the drive. Runs of 110mm soil pipe connect from the top of this surge tank to the house and garage drain pipes. The top of the crates was covered with compacted Type 3, so that water run-off from the drive can permeate down into them. The only snag with this system is the cost of the crates, they are not cheap. I was lucky, in that I found a load for sale on eBay, and it's worth keeping an eye on there, as when I was looking I found quite a few surplus crates being offered for sale. Mine came from a ground works chap who had them "left over" from a motorway job (they use these for motorway soakaways). Funny thing is the the seller's name was Dell, and he delivered them to us, for cash...1 point
-
Yes, spot on, just glue the EPS sheet together with low expansion PU foam, from a gun. Pretty easy, just squirt the foam, wait for it to expand (maybe 30 seconds or so) then push the parts together. A mist spray of water on one side of the parts to be joined speeds up the cure, but the low expansion stuff cures in a few minutes anyway.1 point


This leaderboard is set to London/GMT+01:00