
Leaderboard


Popular Content
Showing content with the highest reputation on 05/25/19 in all areas
-
now would be good - you've opened up the sward with raking then mowing - as long as you get rain / can water it then go for it. Fescue is normally used for lawns - find a local agric merchant - farmers don't pay VAT on grass seed (agric grass is part of the food chain whereas amenity isn't so VAT is charged on it) - try your luck. You could put a bit of P&K on it - they help with cell division & root growth but don't put any N on. Keep mowing it to keep down competition from the existing lawn.2 points
-
Yeah as I have already mentioned we did have one specd in, visited multiple builds with one, felt the difference as soon as we walked in and then still removed it from our plans. Its just not for us im afraid.2 points
-
If you haven't already checked out the blog section, there is a real range of projects here. @Christine Walker kept a great blog for her last build. Often they help me to visualise the build process. @Redoctober completed a lovely build in Scotland last year, as an example we had the same choice of slates so it was useful to see his entry before mine went on.2 points
-
Did they ask for help? Looked like a general introduction to me. Fabric first and having a generally efficient property is a good choice for all. But we all have different motivators for self building, some folk are prepared to spend a bit more on energy bills etc. As example we spent a bit more money on a longer access so we would have views and privacy. We could have saved this money building closer to the road and invested in MVHR and looked onto other property. Ultimately a self build is an individual project cover the core costs, then it's up to you to decide where to make the investment, no point comprising on some think if you will be unhappy at the end. Sounds as if the original poster has done some research on MVHR systems.2 points
-
my bordeaux mixture comes in a 75cl bottle and i wouldn't wash a wall in it.2 points
-
The last entry was back in February when we put down some much needed flooring and we have made some progress on both the interior and exterior of the build. The first job was insulating the first floor. Two layers of 80mm quinn therm was then fitted between the rafters leaving a ventilation gap to the sarking/breathe membrane. A final layer of 25mm quinn therm layer on top with a service void. For the flat ceiling we used a couple of layers of frametherm 35 with an airtightness membrane and Quinn therm 25mm layer. We still have some work to do around the windows. Downstairs was a lot quicker. This already had frametherm fitted between the studs so the Quinn therm 25mm went on top. Now for the outside. We had been waiting for good weather for rendering the blockwork. The first step was rendering beads and mesh. Then a scratch coat coat was added. Then finally the rough casting. The rough casting will now be left and painted in July. The next step is getting the electrician and plumber to do first fix.1 point
-
@ultramodsNo, if any of the above text refers to 'we' that's me getting a man in to do it. ? I'm not really a practical chap. Better with numbers.1 point
-
Ours got mowed today. Its turned brown the last few days but rain is promised tomorrow. The other day I visited a friend at her new (new to her, house is Georgian) place and it has a fabulous garden been very nicely and professionally done for previous owners. 3 dogs happily scampering about on....yes you guessed it.... artificial grass! My friend loves it, says its brilliant, she has gone from acres to this and says the low maintenance lawn is a huge and unexpected bonus. I have to say in the context it did look very good.1 point
-
just get some sheep on there - temp elec fencing and water is pretty straightforward. Get hold of a local sheep farmer he / she will either have a few barren ewes or tups hanging about. No need for any fertiliser at this time of year - Nitrogen will just bring more grass, P&K is OK but you aren't after yield. Sheep grazing will get the grass to tiller out & the little black pellets soon disappear. Sorted at no cost.1 point
-
Hello everyone!! New to the page so thought I would introduce myself and our project. My husband and I have purchased a plot in Aberdeenshire, full planning passed Feb 19 and currently awaiting building warrant. Currently in the fun stages of tender and mortgage applications!! Our home will be a 4 bed detached approx 190m2 internally with a detached double garage. Timber kit (Val u therm) with full timber cladding on the outside, slate roof on the main sections but also a large sarnafil rubber flat roof. We will have an air source heat pump, triple glazing and aiming for EPC A with the house being south/ southwest facing. Hope you folks will be a wealth of information as this is our first self build project although we have renovated properties before. Have found everyone in the self build community so welcoming and helpful up until this point. Its lovely to be in a place with like minded people! So hi everyone ? looking forward to reading about all your projects! Chris and Anita1 point
-
Ruffling feathers is good.1 point
-
It's not really a minefield although it can seem that way if you don't know the rules. Don't expect all builders to know them either! Amazing how many VAT registered builders will charge you VAT when they shouldn't, or order things in their name for you to pay for that results in you not being able to claim the VAT back. Understanding how it should work can pay dividends later. There are at least a couple of things that I didn't realise that I could do personally that meant that I overpaid VAT.1 point
-
Sorry it was a cash trade account, no credit. We also use this set up at the build merchants who also accept amex, lots of air miles have been earned. We have found a few suppliers happy to set up these accounts with very little questions.1 point
-
For a post that wasn't even about MVHR or asking any advice I feel I have ruffled a few feathers... How did you go about getting your trade account if you dont mind me asking?1 point
-
I used the electric lawn raker yesterday and it got out a ton of thatch and moss. I then mowed it and now it's raining and I guess that's good as it may encourage the good grass to grow hopefully. Is there any merit in sowing seed into the existing lawn to try to get some better grass coming through? If so how should I do that and what seed would be best? I did try sow some seed last year but none seemed to germinate despite me watering the lawn every day for a couple of weeks.1 point
-
Just attacked the lawn with the aerator - now have a series of holes about two inches deep by 1/2 inch wide every 4 inches on the lawn. Machine (looked brand new) made a sound like a bag of hammers hitting a bucket but was easy enough to use. Apparently best practice is to leave the cores on the lawn and to feed & weed immediately - doing that tomorrow. Then will let the rain later this week wash everything in. Best part was the hire co screwed up with the Weds delivery so dropped it off yesterday and will get it Tuesday, so been round a mates garden already and will probably do a couple more before it goes back1 point
-
You think mvhr is controversial, you wait until you start discussing a wood burning stove.1 point
-
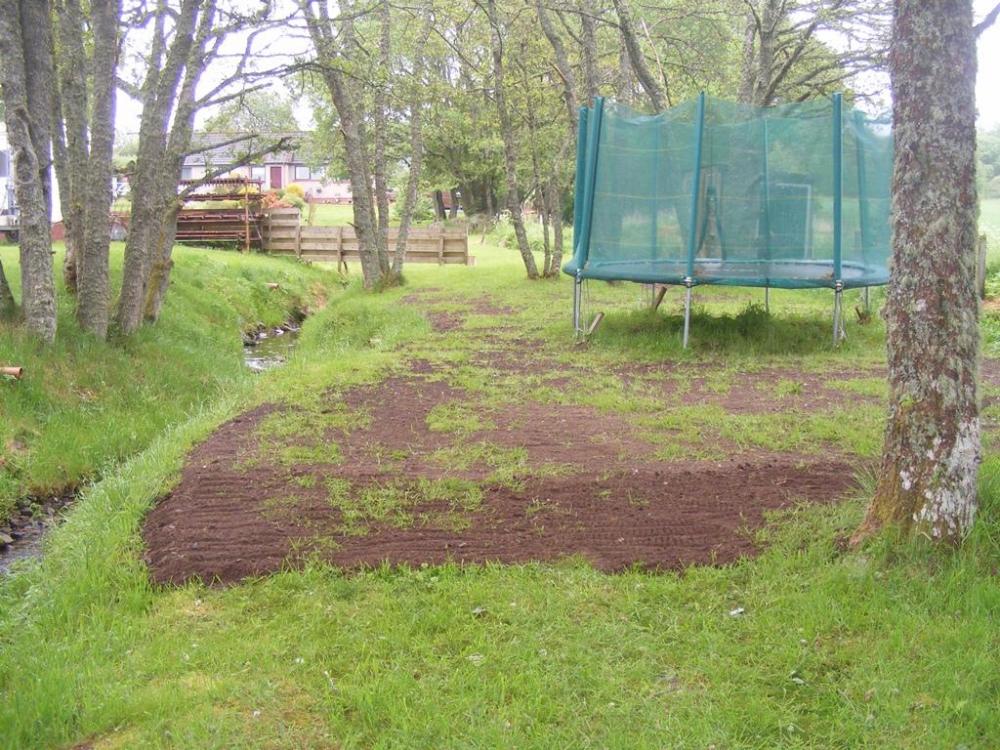
This is topical perhaps. Our south garden was the ground just as we found it. We cleared it. Strimmered it, and them mowed it into submission. It resembled a lawn from a distance but it was very lumpy with lots of dips and bumps. Well now, as a fill in job (pun intended) I have been using up some off the last pile of spare soil to level it out a bit. Nothing fancy just spreading soil over what is there to fill in all the low spots. I hope because the infill is not thick the grass will just grow through but anywhere it doesn't will just get re seeded.
 1 point
 -
Thats exactly it, everyone's priorities/needs/wishes are different Is that not the reason we all self build after all1 point
-
+1 to the above, if you only have a 2 core and earth cable then you first need to change that for a 3 core & earth cable back to either the light fitting or light switch, wherever you can pick up a neutral, permanent live and switched live. Where you connect to depends how your lights are wired.1 point
-
Your house looks like he same general style and shape as ours very good taste indeed!1 point
-
Thank you for your lovely message @Christine Walker We have put off having family for so long in order to try and set ourselves up right. Everyone builds for different reasons with different priories but this is certainly ours. Bonus is my husband also works away so all the fun is left to me!1 point
-
I have great admiration for you self building at your age, we were 32 when we built our first one and the reason for doing it was to provide a good home for our children who were 6 and 10 at the time and we had moved around quite a bit in rental property. We could never have afforded to buy anything like what we built and we kept it for 14 years until the family had grown up, I don’t know where the idea came from originally but I am so glad we did it and have done it twice more, my own family now in their 30s would never attempt what we did!1 point
-
The wiring's wrong, as the earth should never, ever be connected to a live terminal (neutral is classed as being a live terminal). The earth conductor should be parked in the terminal marked "C" on the right hand diagram. I say parked, as I believe that it's not used, as this fan is probably double insulated (most are). The wiring needs two line connections and a single neutral connection. The two line connections are a permanently on line (via an appropriate isolator switch) and a switched line from the lighting circuit. The neutral needs to be common to both the switched line and the permanently on line, so the permanently on line needs to come from the lighting circuit, but before the switch. With this type of fan it's normal to install an isolating switch that can isolate both line connections and the neutral, for safety reasons. This is the normal type of fan isolator: https://www.screwfix.com/p/mk-logic-plus-1-gang-10a-3-pole-fan-isolator-switch-white/12319 or this one: https://www.screwfix.com/p/british-general-1-gang-10a-3-pole-fan-isolator-switch-white/69862 Your wiring looks to be the old colour codes, so red is line, black is neutral and the bare wire (which must be sleeved) is earth. The permanently on line goes to L, the switched line from the lighting switch goes to L1 and the neutral goes to N.1 point
-
I think a lot of people on here have used BPC. You can send them your plans and they will design the system for you for about £100 (which is refundable if you buy the system), they will provide updated plans of where everything should be installed.1 point
-
My plot came with a 1 acre paddock. Had to hire a power scythe to cut it the first time. Currently it takes me about an hour to cut it with a Toro DH220 ride on which I think is a 40" but can't remember. If I let it get too long that can go up to 1.5 hours as the mower clogs regularly and boy is that frustrating. Wouldn't want to have to cut 4 acres with a small ride on regularly. The good news is it won't be long before it stops growing for the summer (or at least slows down dramatically). Be a bit wary about putting cars on _dry_ grass. I've seen two cars (and a tractor) set fire to the grass and end up burnt out, it doesn't need a fuel leak or anything the exhaust can just be hot enough. Edit: I also think you should just mow what you have. It's rather too late to reseed and I very much doubt you can supply enough water for that much turf. We nearly lost the new turf on our lawn as two sprinklers weren't enough.1 point
-
Hi @selfbuildaberdeen welcome to the forum. Lenders can be limited in Scotland, I went with the Scottish Building Society. It was a struggle to get a self build mortgage, but got there in the end. I'm building a house out of necessity as the property prices are to expensive here on Skye. We are in our early thirties so don't have a huge budget and not fitting a MVHR and won't have a high air tight property but like you our heating bills will not be comparable to the old solid stone croft house we used to rent!1 point
-
Project managing a build usually means doing planning / resourcing work in the evenings, chasing people (suppliers & trades) during the day and being able to visit the site to keep an eye on progress each day if possible. Also being available (in person / phone) at short notice to make a quick decision if needs be. You don't need to pick up as much as a brush if you don't want to, but small jobs such as tidying up etc will save time & money and help you keep an eye on whats going on - which is key to success. Leaving trades unattended for days at a time is a guarantee that you will not get things the way you want and at worst will mean shoddy work and cut corners. Some things like MVHR are DIYable (and are something of a rite of passage for the self builder). Decorating is another job that you can do if you have the time. If you really can only entertain a fully managed, completely hands off build then you need to be prepared to pay a significant premium for that. The more 'management' responsibility you can take on, the more you can control the cost, but you need to sacrifice your time to do so.1 point
-
Tame what you have otherwise you run the risk that your immature seedling grass will not cope with an August thunder storm and all that foot traffic. How about cultivating a 10m x 6m section of the field with seedling grass for photo's, orientated for the sun at the time of the photoshoot. If it fails to take you can drop in some strawbails, plant pots plus astro turf and do the photo's elsewhere. I would create a smokers zone free of dry grass thatch to remove the risk of a grass fire spreading to the marquee. I would also throw down 10 to 20 tons of 1" limestone at the vehicle entrance to the field as a precaution against 1/2" of rain the day before. When I arranged a similar event the factor I overlooked was external lighting.1 point
-
So if you want green then you need some nitrogen and potassium fert on it. Has the farmer got a spreader..? I would offer to pay for a couple of tonnes of general purpose NPK across it and then start mowing every week.1 point
-
@newhomewe will end up once the drive is done at £1000m2 but this is not including the plot which we were lucky to get for very little being part of the land belonging the cottage, we could have come in at less if I had not insisted on an expensive kitchen and if we hadn’t gone with the pellet stove but we wanted these things, we could also have cut costs on lighting but decided it may as well be done at the time of building rather than go back to it somewhere down the line1 point
-
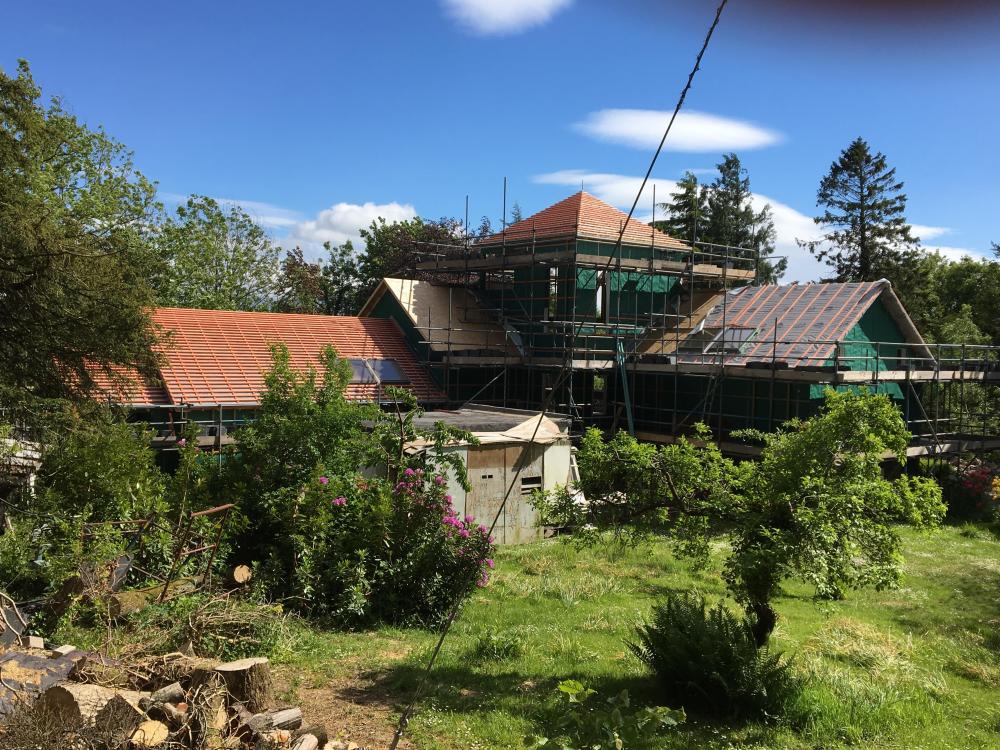
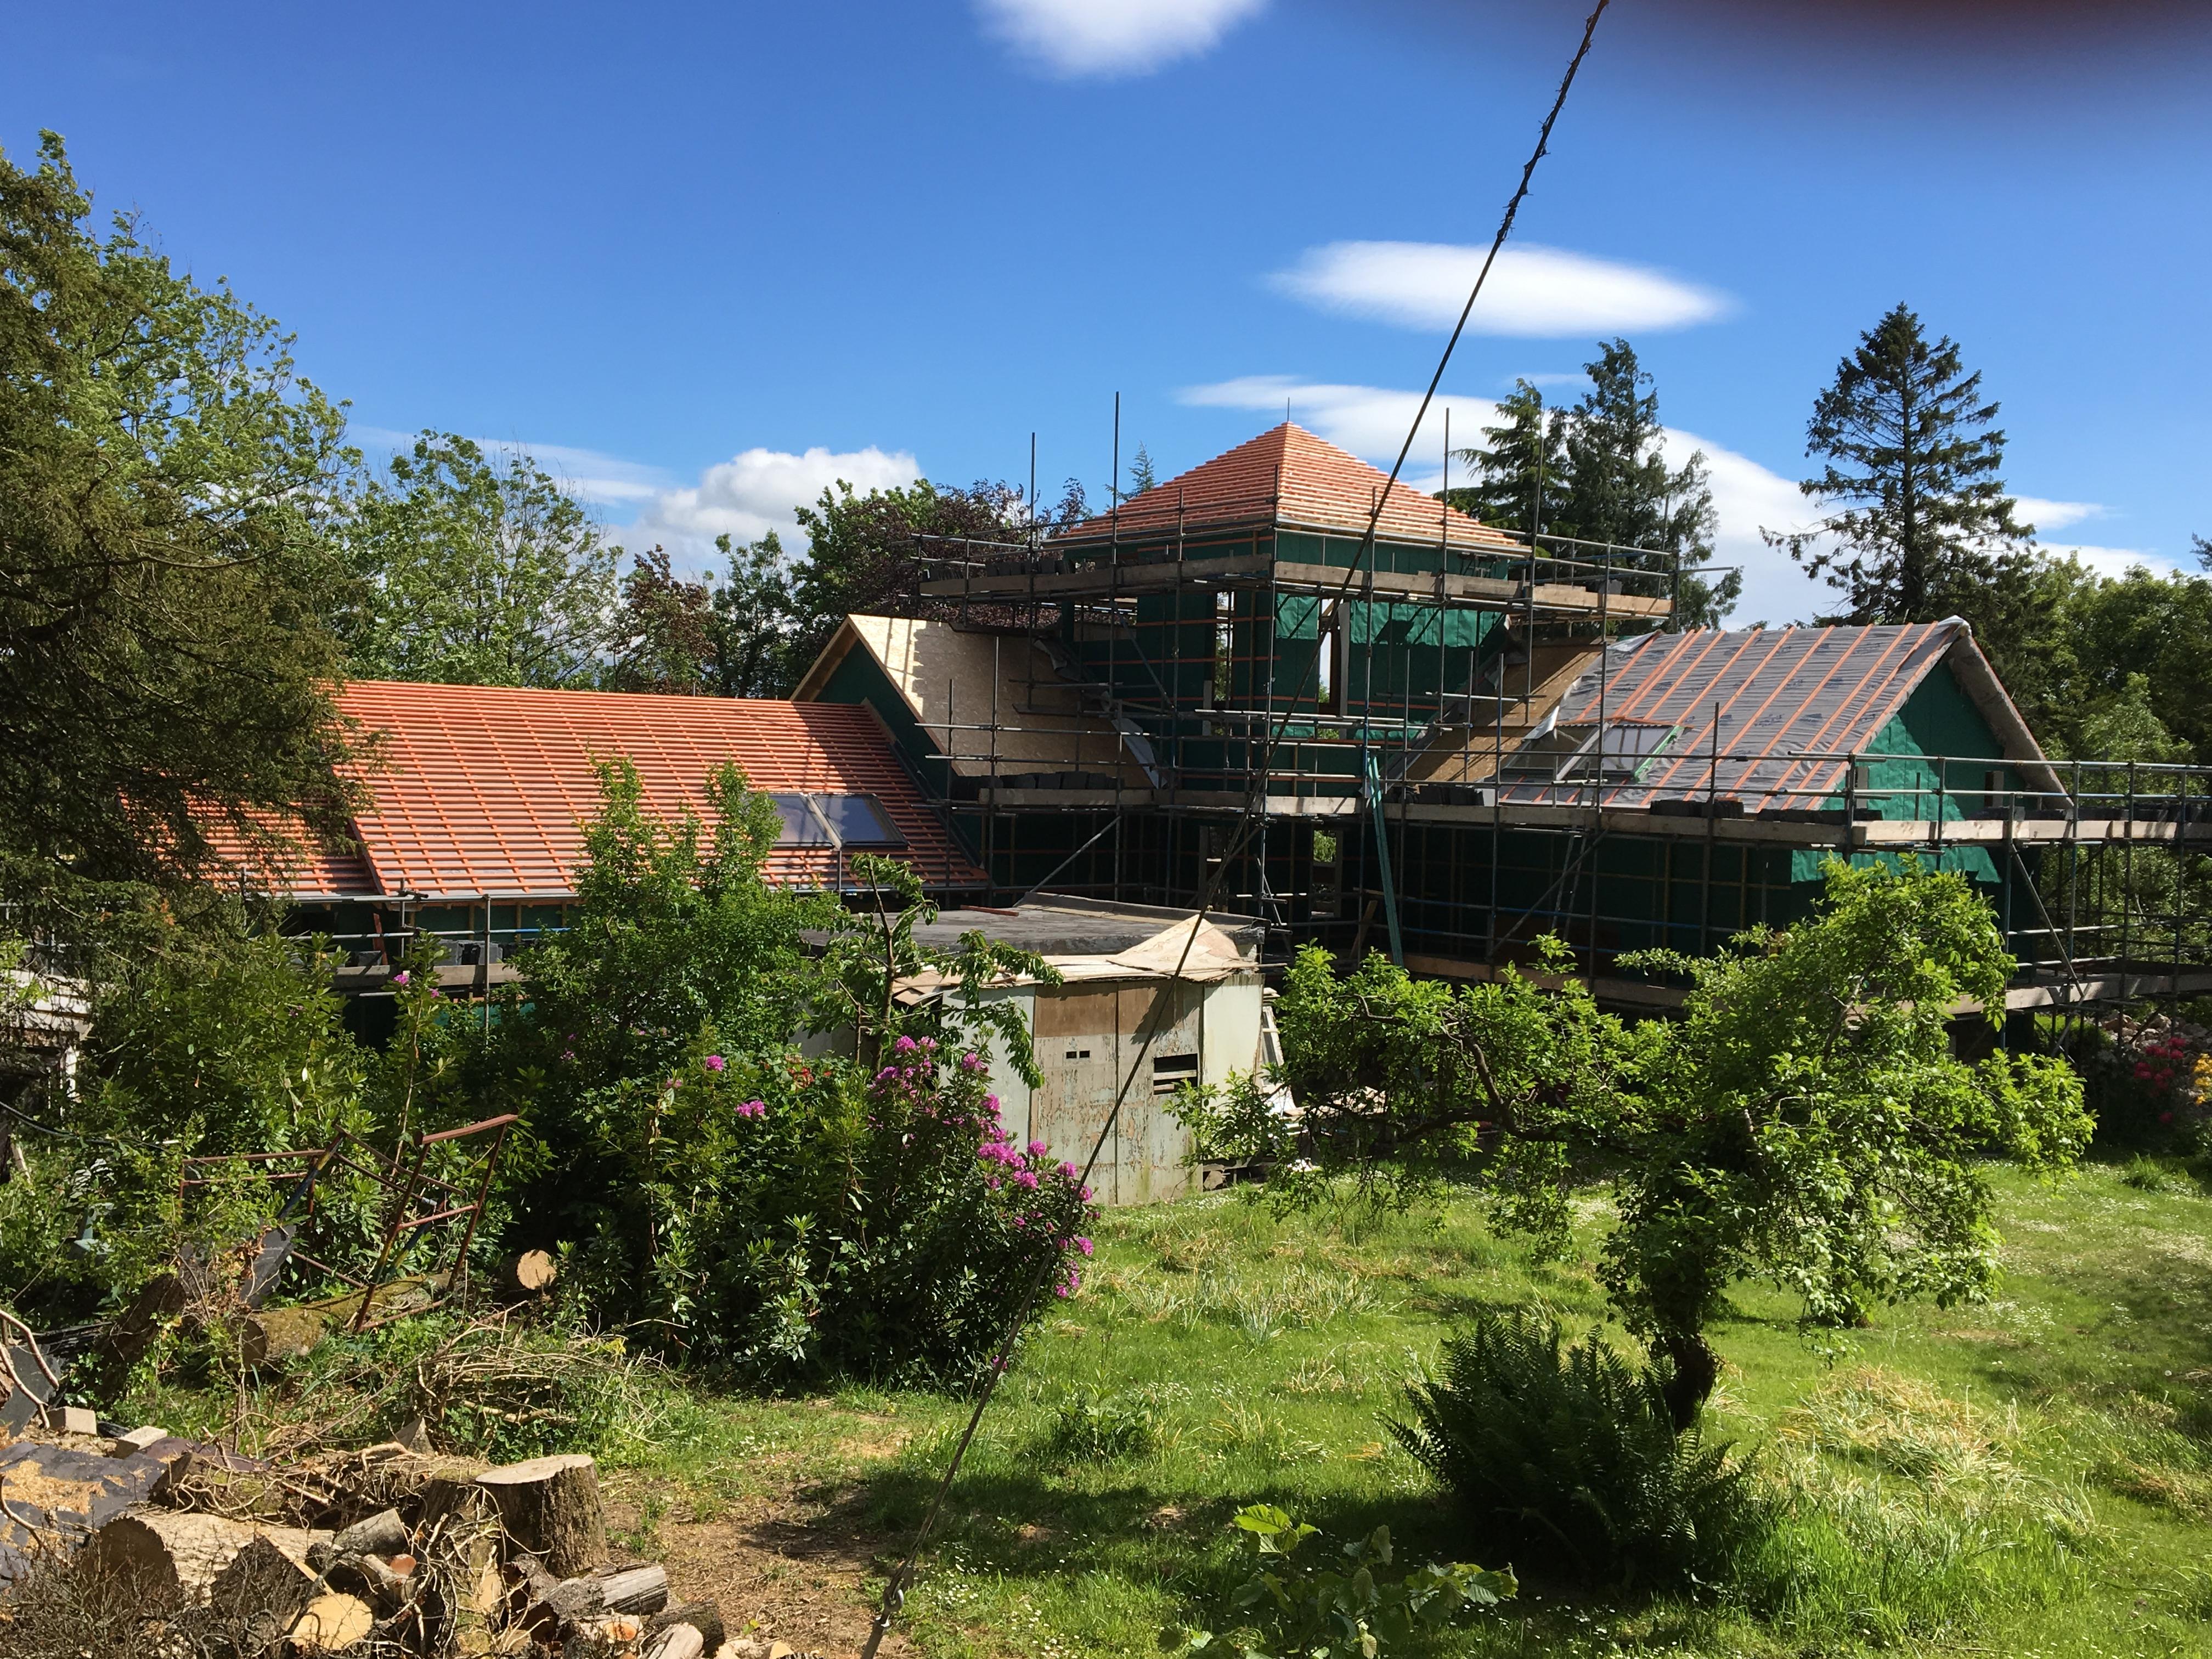
Thanks Lizzie. This is it today, I will post a pic up a few days before the wedding hopefully looking a lot greener and level!1 point
-
1 point
-
Spoken like a building contractor Lizzie I wish people would realise even with a fixed price There are always some unforeseen extras A healthy contingency 10% of spend1 point
-
Here's a time-lapse video of my timber frame going up this week. Team of 3 from PYC arrived on Monday and did the sole plates. Started erecting the frame on Tuesday, which is when the video starts. Lorry arrived each morning between Tuesday and Thursday with the panels and was unloaded and offsite in less than an hour, so minimum disruption to neighbours. Three and a half days to complete and I now have a fully insulated timber frame, with all internal stud walls and intermediate floors, up all bar a couple of small dormers. They'll be back next week to finish off and install the windows and doors. Very pleased with what PYC have done so far. Apologies for the wavy branch in front of the camera - didn't notice it when I was halfway up a tree setting this up ? Camera was a Brinno TLC200 Pro. PYC Timber Frame.mp41 point
-
Not a full basement, just a (very expensive) metre deep hole in the ground. We had a planning restriction on the ridge height, so decided to dig down to give us the ability to get two floors into this space They put a ledger board up at the end of day 1 and then dropped the floor cassettes on to the ledger board the next morning, before putting the dwarf walls up for the second floor The roof panels are the same basic construction as the wall panels, just a different thickness - from out to in they are membrane -> wood fibre board -> iJoist + Warmcel -> SmartPly Propassive airtight board. Both walls and roof were pre-insulated.1 point
-
Have you tried Trello? I find it very effective once you get a hang of all the tips/tricks as you can customise to your preference - create tasks ("lists"), sub-tasks ("cards"), checklists, tags, colour codes, due dates, etc. Available on both web and mobile app.1 point
-
Architect said we could do it for a lot less than our budget ...we ended up going down a route I would not recommend to anyone and spending far in excess of what had been a healthy budget at the start. We were lucky, we were able to fund it without huge difficulty but it is not what we planned. If money is already tight and you have compromised your house design I would ask yourselves seriously is it going to be worth it, will you end up with something you want at the end of it all.....and it will cost more whatever ‘fixed’ price is agreed with a builder, if they price too low there will be ‘extras’.1 point
-
The front of the house The back of the house
 1 point
 -
I'm Neil, a Plumbing & Heating lecturer from Kent and myself and my wife are looking to do a self-build within the next year or two! We have rebuilt/refurbished our current and previous family homes and now that all the kids have left home we think it's time to do what we've always wanted to do and self-build our next home. We are ideally looking for a plot in Kent/Sussex but tomorrow we are going to look at Graven Hill to see what's going on there and see if it's suitable for us. I am particularly interested in a timber frame, pre-insulated/SIPS type that can be erected and weatherproofed and then I would complete all the interiors and services. Although I worked for many years on construction sites, like so many I'm very keen to keep the cost down so any tips are greatly appreciated.1 point
-
I've been playing with this plan, and it could imo be greatly improved by questioning a couple of the more fundamental design decisions. How constrained are you to 6m on width? Is that a genuine hard constraint (eg is your plot 7m wide?)? Let me try and explain. I know what I mean, but we think in different styles. Your plan is 6m x 12m inside, and that is a sod of a slightly awkward shape to work with for a modern design without getting quirky. That is the classic proportions for a small play-school house - a door and 4 windows, entered from the middle of the long side, with a hall in the middle and room each side, with a kitchen and staircase and other bits where they fit round that. But, you are trying to get a modern "wide at the back" style layout into it sideways. So you have ended up with service rooms that feel relatively large, and a lounge-diner that you are concerned may be cramped. And the symptom is that it feels too tight for a island, and you are here for a reassurance check. (It is good to be checking.) It is all made more difficult because you have divided your plan into 2 even narrower spaces by having a de facto corridor 1.2m wide all the way down the middle - so *all* of your spaces, except for one, are automatically limited to being 2.4m (8 feet) deep. And that is a heck of a limitation, and imposes a grid feel, from the start. That is why, I suggest, your utility feels long and narrow, rather than square. The long and narrow feel of the whole plan is exasperated by the lengthways island. Not, I think, the impression it needs in the current layout. Classically in garden design, for example, you would divide a long, thin garden into garden-rooms across the plot - not put a straight path down the middle. Same issue. You feel as if you can't fit an island in, because it won't fit without heavily compromising everything else ! But the underlying issue is not the size of the island or lounge; imo it is the limitations imposed on those by the basic size and layout of the floorplan. Essentially as I see you are trying to get a Oliver Hardy into Stan Laurel’s trousers, and the best solution is either to change the trousers, or change the person. Or something will chafe. For a specific example, 6m (lounge) is not wide enough for 2 equal activity zones; it is one space. And if there are 2 people you will always need the possibility (otherwise you will end up with a repurposed spare bedroom or a garden room or lose your upstairs snug to an office/hobby). eg If you have a TV end or a study end, that will need at least 2m (eg small Ikea 2 seat sofa), and your other half of the room then becomes cramped as a relaxing area. How to get around it? If it is a genuine hard constraint, then it can be worked with, but I think the easiest way to improve the liveability of the plan would be to make it say 7m or 8m x 10m, rather than 6m x 12m , or perhaps wider in part. Everything would then become a bit more relaxed to plan. And you would have more space for an island and a more generous (and flexible) lounge. Can you, for example, make it wider (if only in part) by building up to a boundary? Otherwise we are imo into playing with disrupting that central corridor to give you more practical spaces, and thinking carefully about the lounge. Which can all be done, but I needed to ask the fundamental questions first. And finding ways to create spaces deeper than 2.4m. hat is normal for a refurbed house, but new ones are better with the constraint designed out. Sorry. Around here questions often turn into cans of worms . They sometimes even turn out to be useful cans of worms. (If you confirm that 6m x 12m is a hard constraint, I will add a few notes later). Ferdinand1 point
-
Good point, time to break out sketch up again. Well I do the cooking at the moment but once the new house is built someone is going to turn into a regular Mary Berry apparently.1 point
-
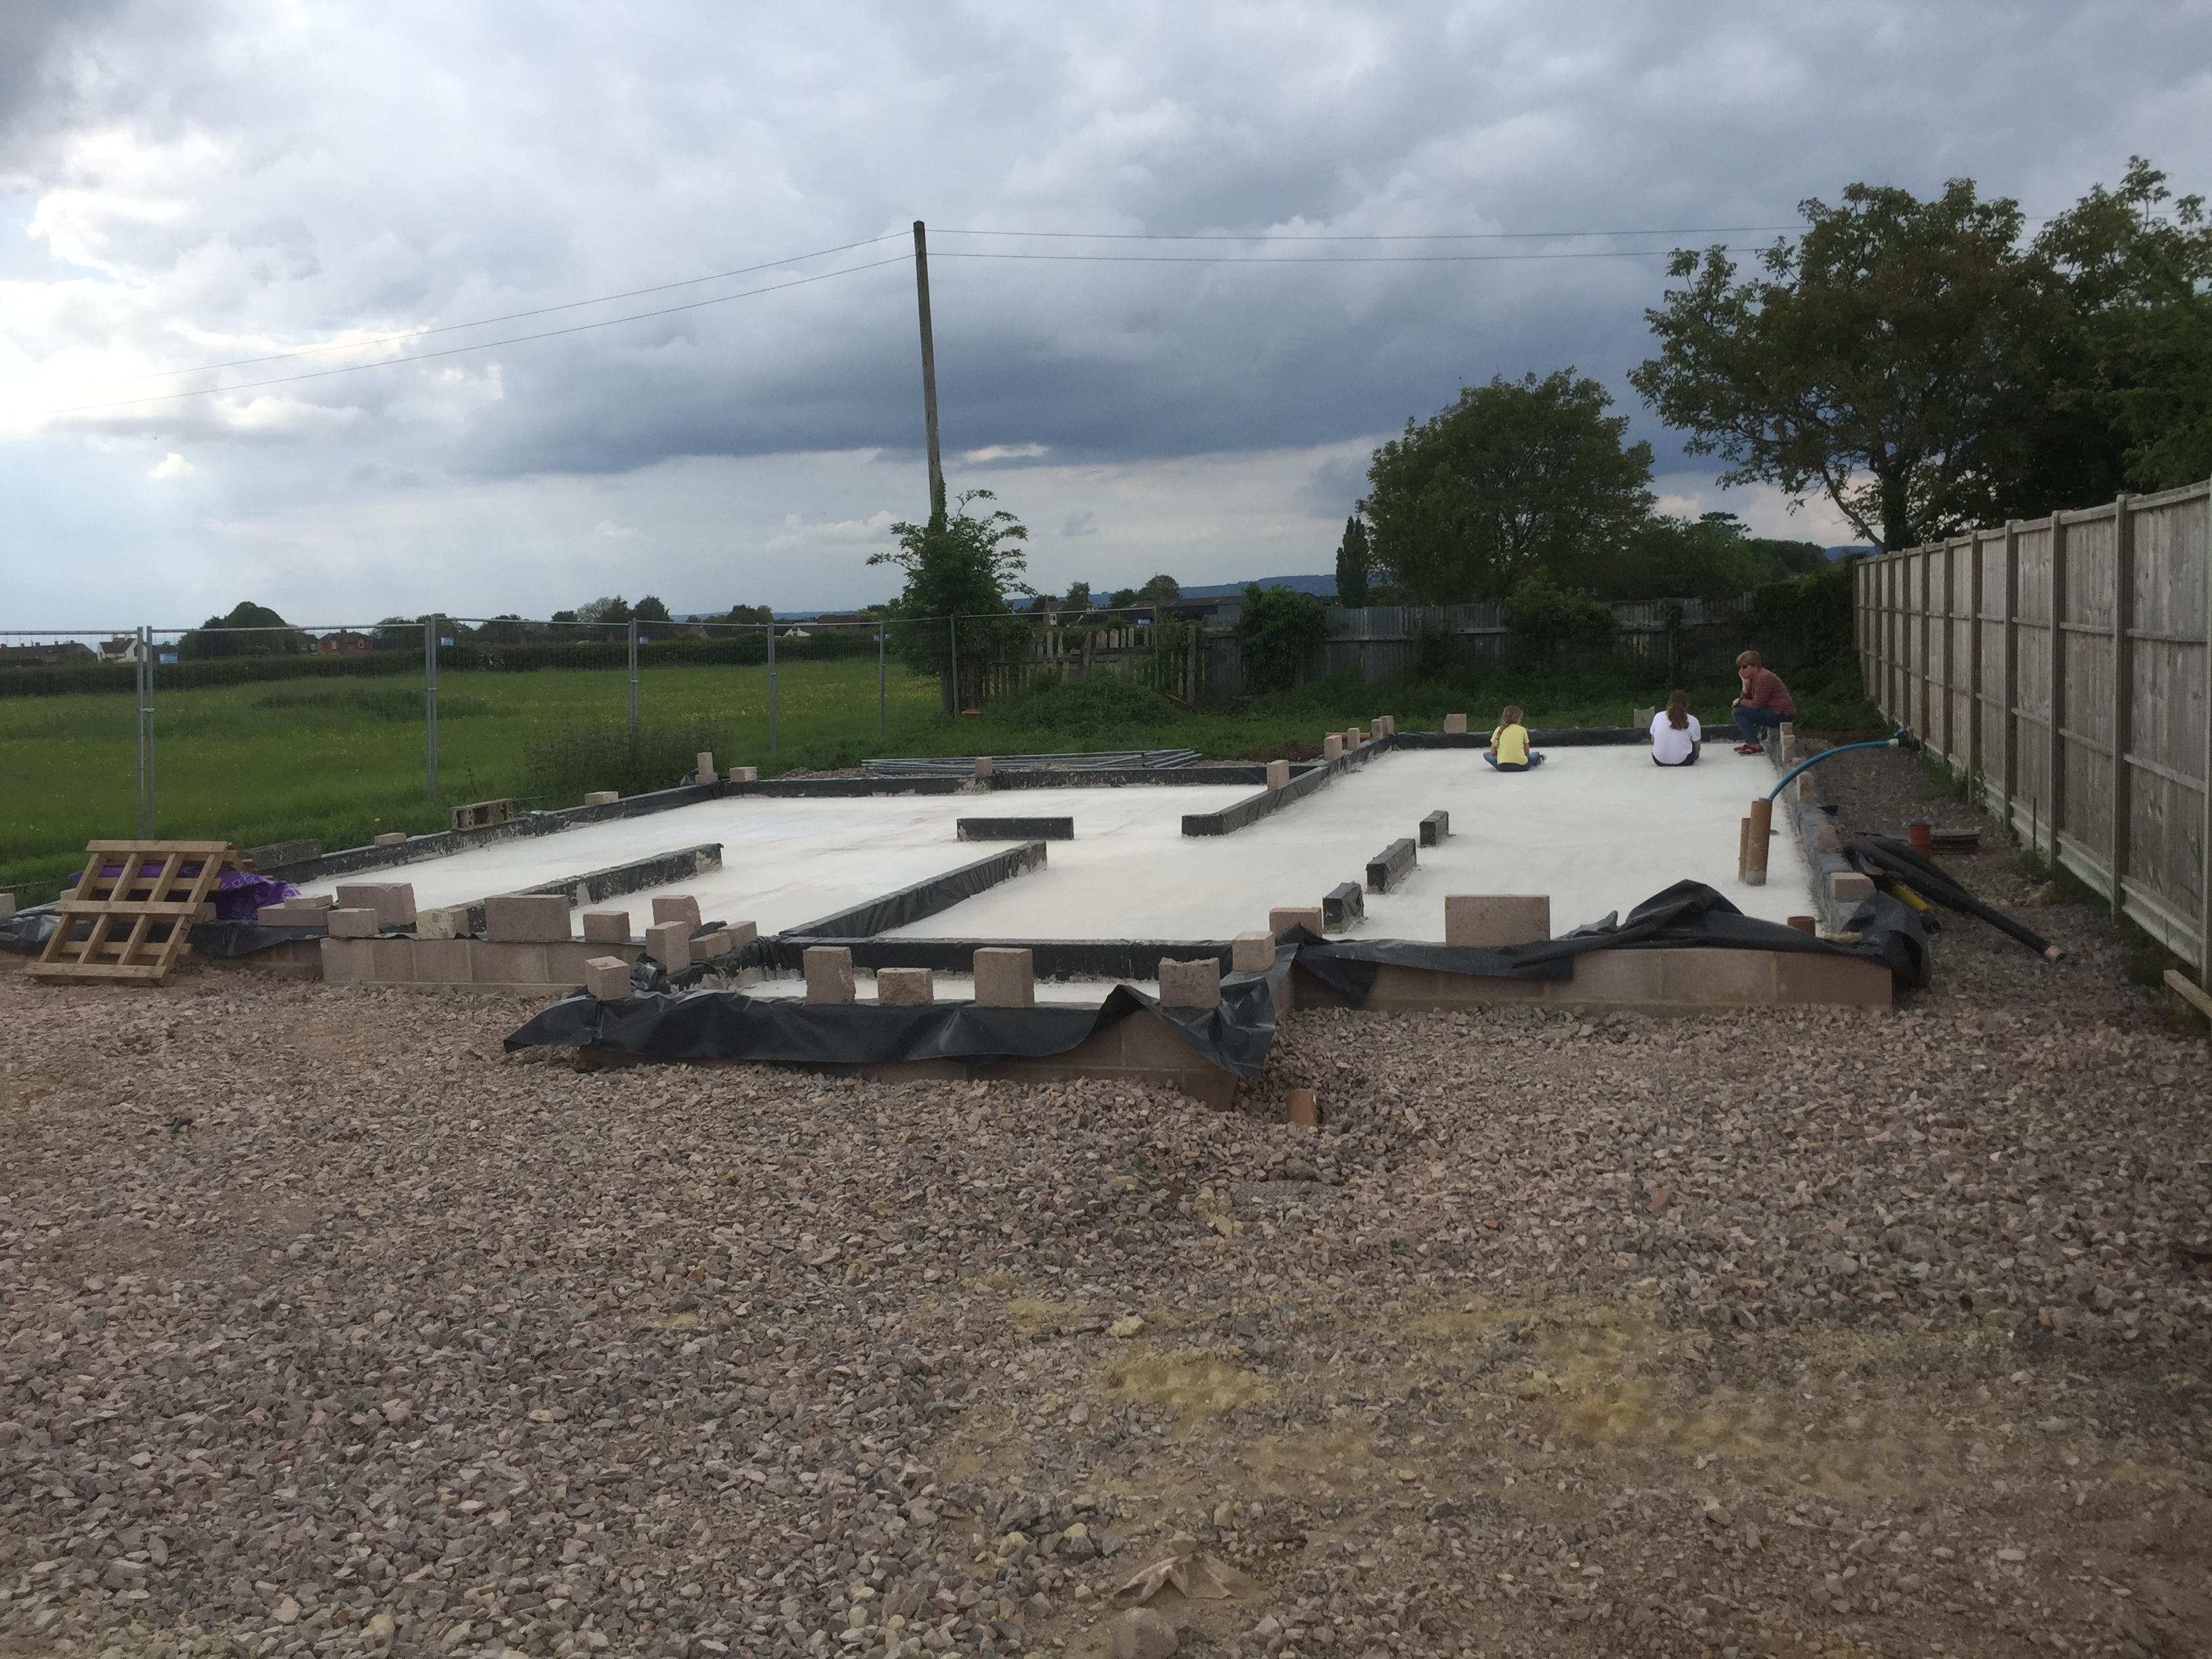
Hi all, we we are embarking... well embarked... on our build. This is a cottage style house (due to planning requirements!) in Cambridge Gloucestershire. We have had fun and games getting planning, which we ended up having to split into multiple applications on the advice of our planning consultant. And then further fun obtaining the mortgage. I am 56 and my wife change jobs with her new role initially a 1 year contract, which meant our initial lender, who we had spent 3 months working with, immediately withdrew! We managed to obtain a new lender and funds should be available next week. We have got the foundations finished and as soon as we have funds and tie up a few ends plan to order our frame from MBC Timberframe. we are hoping to get in by Christmas ( I said that 2 years ago too when we bought the land!) ELEVATIONS-2269796.pdf GROUND_FLOOR_PLAN-2269794.pdf FIRST_FLOOR_PLAN-2269795.pdf
 1 point
 -
A whiteboard screwed to the wall outside my workshop.1 point
-
Or a series of very small holes. We had to spend £5-6k on ground investigation to be confident of what was under our feet and to allow the SE to design the basement. We were prepared to walk away from the idea if it fell outside of our budget - which it almost did when there was a fear of made ground (requiring piling) On upside Our basement was roughly 11x10m (so excavation about 1m wider all round) and we did not fall foul of party wall as neighbours were >6m away. Clay/gravel/chalk strata with no water until 6m down. Large open site with plenty of vehicle access so we could accommodate 3x20t trucks at a time during excavation which sped things up. Most of excavate was gravel so easy to dig and it did not bulk up (clay bulks up 2x and chalk 3x when out of ground). Did basement works in fine August / September weather also. Did not require any sheet piling for the hole, was able to batter back sides. Warrantied waterproof concrete was sufficient, no membranes or sumps & pumps. On downside potential for chalk solution features (i.e. holes) meant that slab was 300mm thick and had lots of rebar. Walls also 300mm thick as they were cantilevered from slab - our choice to have an 'open top' box vs closed box (which would have been more structurally rigid and potentially needed thinner walls off setting extra concrete on lid. Spent £120k to get a 108m2 open box which included demolition of original house and all services or ducts aid (drainage, water & power/gas from existing). So you could say that £100k was basement itself. Saved whatever traditional foundations / raft would have cost. I don't think you could have had better variables than this and we had some good economies of scale.1 point
-
Welcome to the forum. I would recommend a visit to some of the workshops at the Swindon NSBRC. They do free sessions on passive houses - there are also some chargeable courses but we haven’t been on those. Do the sums carefully regarding a basement - I suspect you will be shocked at the cost and better to realise now that you can’t afford it than after you have met your new neighbours and scared them to death unnecessarily.1 point
-
The guys who fitted my under mounted sink to my quartz worktop used stixall extreme. Hasn't budged in 3 years.1 point
-
Our house has oak flooring, and oak kitchen worktop. I have just bought oak doors throughout, they were expensive enough as SWMBO saw some nice ones. So it stands to reason, nice oak doors will go into nice oak door liners won't they? The issue is compounded by the fact most of the doors will be fitting into 180mm wide walls (load bearing internal walls) So the plan was to make the door liners on site, using 20*70 and 20* 120 planed white oak butted together with the door stop covering the joint. Obviously planed to exact size on site. Then I started getting prices. For 10 doors, mostly single, but 2 double pairs, I will need 21 2.1 metre lengths of each, plus a much smaller section for the door stop. Jewaons £602 plus VAT TP can't get any "up here" Wood Stock £633 plus VAT I have tried a number of on line suppliers including Brisish Hardwoods, and they are all coming out even higher. To put this into perspective, this is going to cost about half the price of expensive doors, just to make the frames for them to go in. Or put it another way I could have bought cheap oak doors for less than the cost of making the frames. What am I doing wrong? What alternatives are there? Now thinking if you can get oak veneered wood in similar sizes? For each length only 2 "good" faces are needed, one face and 1 edge, and perhaps still solid oak for the door stop? The only issue is where the hinges and door locks are cut in would have to be done very well. Any thoughts please? I have to get this cost down, it is just silly at the moment.0 points
.thumb.jpg.bac90f3bbf6868cf2118d010d936c99d.jpg)


This leaderboard is set to London/GMT+01:00