Leaderboard
Popular Content
Showing content with the highest reputation on 06/20/24 in all areas
-
Ours are formed from Jakoboard. It was hard trying to find formed alcoves to fit the space. They are taped, tanked, sealed then tiled and sealed again.3 points
-
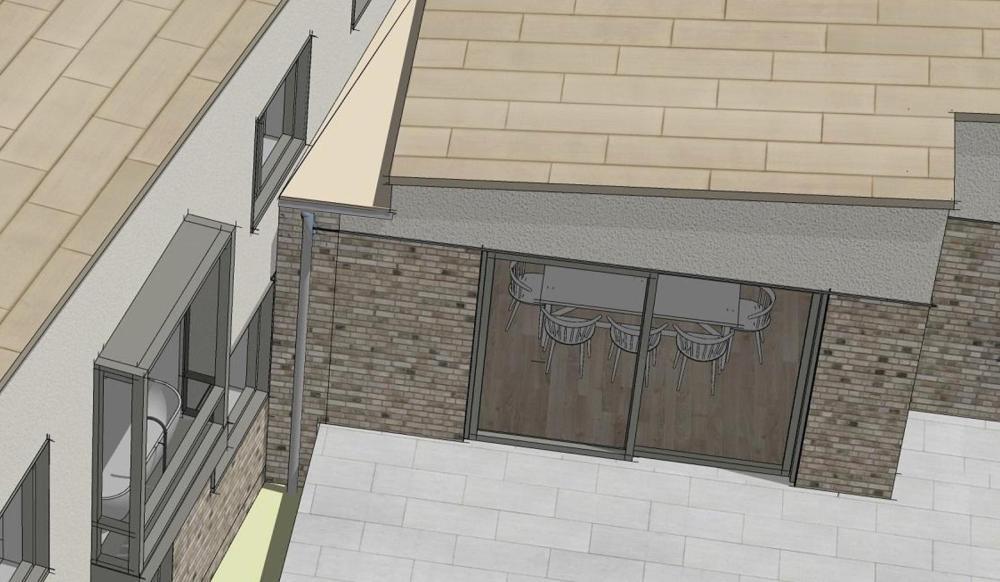
Not an architect and slightly facetious, but: Your main entrance is on the other side of the house This runoff is in a corner next to a patio A climber or large potted plant will hide a short gutter from the patio As a bonus, without a parapet your grandchild gets a better view from the window It's not what you planned for, but it sounds like the easiest compromise at this stage. Plus it's easy to maintain.2 points
-
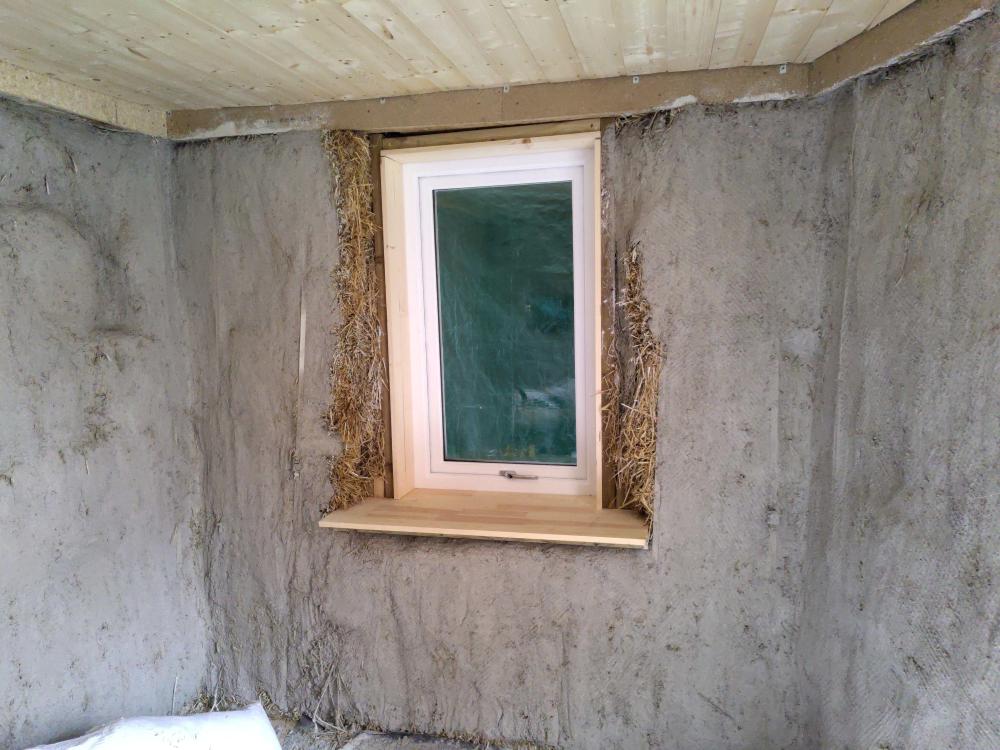
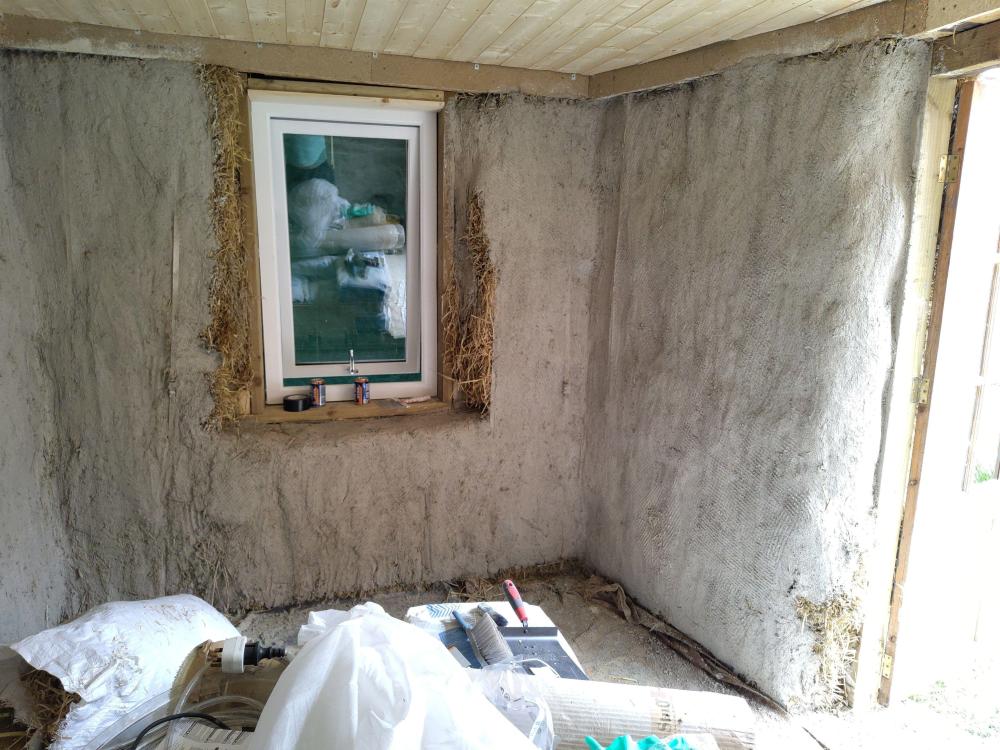
OK, basecoat mostly on inside - it's just a few little bits around the windows now. Bag number six ran out slightly before I was finished. Onto the outside next :D. Also got the window board on for the square window, and clad the subframe There's a 20mm lip so the render can come up flush to it, and some butyl tape around the perimeter of the window for airtightness. Also a very slight bit of wedge-shaped gapping because nothing I do seems to be quite square ^^. I'll just fill that, I suppose. The windowboard got a bit involved. There's about 60mm between it and the straw bales underneath - it's level with the inside of the window subframe. It's also quite flimsy 18mm furnitureboard, and really wouldn't have been happy with the bales flexing underneath it. The top of the bales needed rendering anyway, for fireproofing, but I wasn't convinced that'd be enough to support it either. I ended up putting 5x hazel stakes down through the bales and cutting them off at ~50mm below the level of the windowboard, then putting a basecoat of render down on top of the bales to be more-or-less flush with the stakes. Then I put some 2x2 and 2x6 down on top of that, screwed to the subframe, to each other, and also to the hazel. I'd run out of 2x8 ^^. There's a small gap between the render and the wood; I guess I can squash another coat into there once the existing has dried. Windowboard on top of the subframe, 2x2, and 2x6, glued and nailed to all three. It's feeling pretty sturdy; final job will be to go round it with the router(?) to get a nice curved form instead of the current baby-lethal corners. I plan on doing that after I've finished all the plastering, so I don't accidentally make it too short ^^. 14 bags of lime left. The cement mixer was absolutely worth the money.2 points
-
I always think of these things from the finished article backwards. what is your wall finish, will you end up with a slither of tile in that corner or are you hoping the tile from the other wall floats into the niche, I personally think further from the corner would look better.2 points
-
I think you need to shift your focus from maximising a few mm of floor space to the best wall build up for moisture mgt, air tightness, and insulation. Those are the three most important factors.2 points
-
2 points
-
Hi All, I'm a serial renovator currently taking on my first new build project. I'm based in Hertforshire just outside Knebworth, building a U shape barn style single story house using timber frame. Looking forward to lots of interesting discussions.2 points
-
Exactly. In fact the compromises have forced us to make decisions that have resulted in a better outcome. Necessity being the mother of invention.1 point
-
We had lots of compromises and at the time it feels like a really big deal. But after a while you just move on and then it’s like it always was supposed to be and you wonder why it seemed such a big deal at the time! I know I’m not the only one on here to experience that either.1 point
-
Nice idea. Could potentially look at a rain chain running in to said potted plant?1 point
-
@Mulberry View Have you thought of making up a cardboard model, then you can play around with ideas in read 3D.1 point
-
I started tiling first and made the Niche fit between whole tiles, used Hardie backer board and some tanking. Takes some planning but no cut tiles. Should work with your Metro tile size.1 point
-
Hi @Omnibuswoman Recesses or niches in shower areas (especially with strong / power showers) are prone to leaks. If you considering tiling the niche, then, as @Kelvin shows its best with whole tiles. If I was using brick tiles and brick tile pattern I personally would look for some bigger tiles of the same colour, using one to cover each on the three sides and top and bottom surfaces. Personally, after grouting, I would seal the join between the tile and the tile edging and the internal corners with clear sealant and make the bottom slope towards the shower tray. Good luck Marvin1 point
-
No….no…..and no again. How many times do I have to say no do not build like this. You will get problems with interstitial condensation if you build like this.1 point
-
You'll need to tape it prior to tanking so it should be fine. How are you creating the niche? There are some pre-formed ones you can buy that sometimes pop up for reasonable cost on ebay...1 point
-
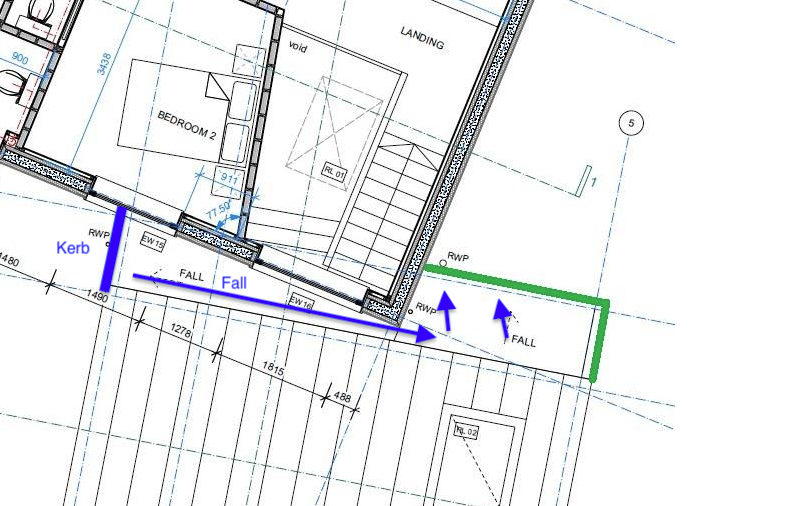
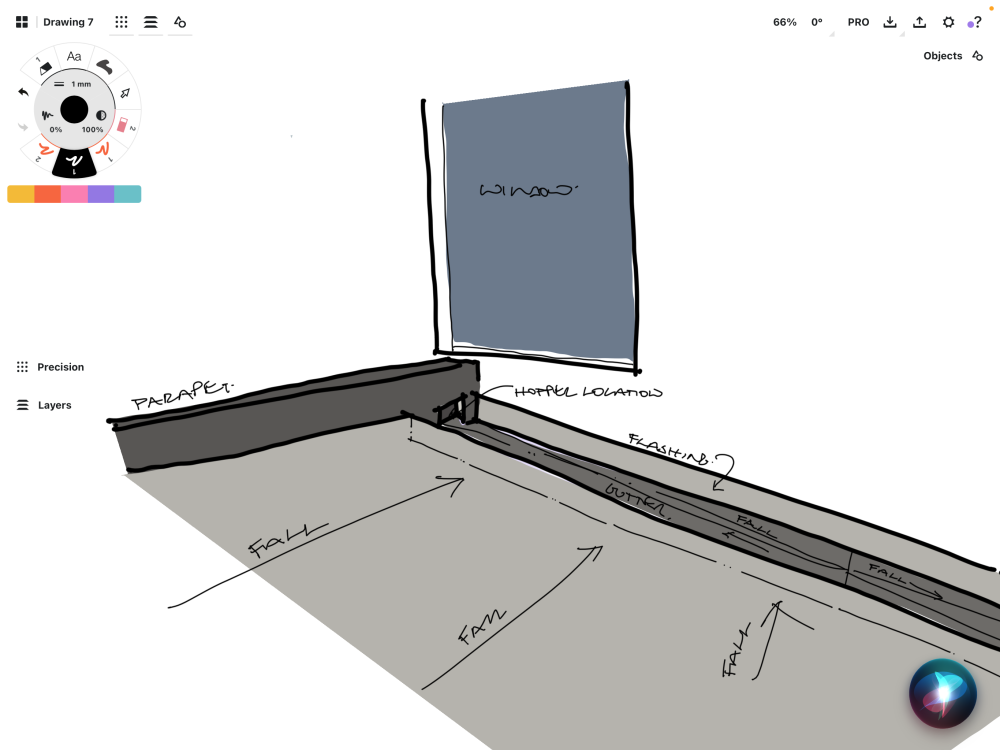
Won't you also need some additional height for flashing where the parapet meets the main wall? Maybe look at alternatives to a parapet if it's too tight - could you create a fall from front to back so that all the water drains to the rear (see pic) or fall towards the front into a hidden gutter without a parapet. (Not an architect by the way!)1 point
-
Demolition will probably be treated as commencement (google "demolition is commencement for cil" for examples) particularly if mentioned in any conditions, so tread carefully and as @Alan Ambrose says, double check with the local CIL team and get something in writing before you consider going that far.1 point
-
I see downsides. Big stones will be isolated on either side of this mesh, reducing the interlink, thus reducing the strength. How would you support it? Why not give it away? If it was useful for concrete I'd expect it to be advertised for it.1 point
-
Seems to me your installer has been negligent in not advising you of the correct process. They've also broken the national rules by connecting to the grid without consent. I'd be looking for them to fit a G98 inverter for you FOC. If they are members of any trade bodies you probably want to make a complaint. Once you've got a G98 inverter fitted, if the DNO decide to do reinforcement works to handle your 3.6kw export, then once those works are done you can reapply for G99 with a 3.6kw G100 export limit. Shouldn't be any reinforcement cost for you1 point
-
Can't answer that one! For everything else, start here https://www.pavingexpert.com/blocks1 point
-
Paint the roller doors white and leave the brick as is for now. That will tie it to the house. Something like this but check with the supplier/manufacturer https://www.rawlinspaints.com/products/5158-tikkurila-panssari-akva.html1 point
-
Wouldn’t rendering the brickwork, painting that to match the house render colour and paint the garage doors to match the house window colour link it for very little outlay?1 point
-
To go to a proper waste plant, the dirt would need to be tested if there’s any amount of it. (A single wheelbarrow full probably gets through the system unscathed.) There’s restrictions on knotweed etc. Look up ‘WAC testing’ (not some kind of sanity test). If it’s going to be left in a layby somewhere you won’t need any certs. Check he’s not being an idiot over one wheelbarrow worth, but suggest the answer is ‘yes’.1 point
-
1 point
-
Indeedy, and the fact that I am facing this problem doesn't write the whole design off. As someone who is not a 'tradie', this has been an ambitious build and far harder than a straight-forward square/rectangle building would have been, but that doesn't take away from how pleased we are with how it is turning out.1 point
-
Have you spoken with your electrician to make sure they are happy putting the oven on the ring main. While some electric ovens can go on the ring a lot of manufacturers state in the specs they need their own protected circuit. What else will be on the ring main?1 point
-
1 point
-
@Jilly's recipe is - from direct personal experience - excellent. Especially the thick curtains. If there an enormous fireplace, put curtains up on the lintel and sit inside the fireplace. Train children to fetch and carry stuff. Pre-heat your night clothes and put hot stones in the bed from late afternoon. Ice makes beautiful patterns on the inside of windows.1 point
-
Excellent question, and the simple answer is I don’t yet know Could you move to behind the 50mm PIR in the 140mm studs. PIR between studs, all need to be perfectly cut, foamed in place with zero gaps. Frametherm is really easy can you get your cooker cables and clips in the space. What are the electricians clipping cables to? As there is nothing for horizontal runs to clip to.1 point
-
1 point
-
Don’t know about 150mm but we used the 140mm soap bar blocks for our CLS timbers. https://www.dwnye.co.uk/shop/stowells-concrete-soap-bar-blocks-140-x-100-x-440mm-132-blocks-per-pack probably not much use for 150mm timber though unless your ok with a 5mm overhang each side.1 point
-
1 point
-
Not much. Probably fencing, hedging, tree planting, grass cutting, vegetation clearing. Soil investigation, percolation tests etc. Demo maybe. I email my LPA’s CIL people to check before I do anything much.1 point
-
This is how I did mine,up to a point. You can get eaves trays, lap vents and a dry ridge kit which will allow the passage of air and consequently allow moisture to vent away. You have essentially two roof types in one, a cold roof in your eaves and a warm roof in your loft space. As long as your eave aren't rammed to the soffits and you ridge has vents you'll probably be fine. The gap above the foil, below the tiles/membrane does have to be continuous to the ridge on each rafter bay though. So if your loft insulation doesn't have air flow to the ridge your going to want some vented tiles to provide an exit for the flow of air.1 point
-
Under Planning and if you have PD rights, it would need to meet the rules for (Class A) extensions… https://www.planningportal.co.uk/permission/common-projects/extensions/planning-permission Under Building Regulations and to be exempt, the internal floor area should not exceed 30sq.m.1 point
-
@saveasteading It may be relevant to fire safety in general, but not necessarily to the OP’s question. I’m all for seeing explanations of why things are done in certain ways and that is what I thought @Gus Potter was going to finalise with. The second post is now a little clearer and is probably of more use to the OP. There is always more to the story than meets the eye and this is a prime example.1 point
-
Bedtime reading fir you….. https://www.gov.uk/government/publications/permitted-development-rights-for-householders-technical-guidance1 point
-
1 point
-
It bugged me that despite the handy rubbish bags I had tied up in useful places, including on the skip, they still chucked crisp packets and all sorts of recyclable rubbish directly into the skip, ready to blow away…1 point
-
Hi, you need to look at www.planningportal.co.uk to check whether it’s covered under ‘Permitted Development’ (PD) (see Gov website) which is a Planning issue. If it is PD and you don’t need Planning Permission, it may be wise to get a Certificate of Lawfulness, to confirm it, if you are a worrier or have grumpy neighbours. Building Regulations are separate issue, concerned only with construction, so you need to check if the dimensions you propose need it or not. Ring them if unsure.1 point
-
Will be building a garden office and decided on a concrete insulated raft. There’s some interesting posts and wanted to ask a couple of questions regarding detailing with bifolds… so will head over to the threads and see what people have done.1 point
-
@Dave Jones With respect Dave, can you ease up on tearing holes in our design. I hate our Architect with a passion, but we're generally very happy with the overall design. I could do without anything else to feel negative about right now.1 point
-
cranked ceilings are a massive pain, if you remove the insulation at the corner to allow airflow you will have a cold spot and black mould. could allways fit a single room MVHR unit to take care of the humidity.1 point
-
1 point
-
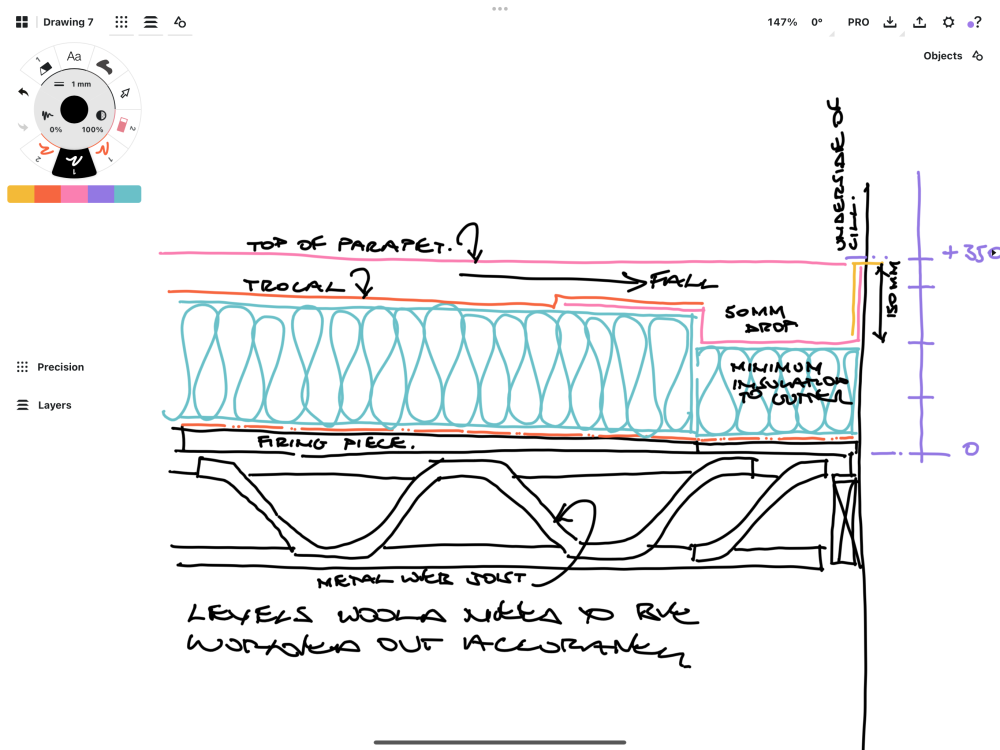
I am not sure if this will work - the levels and falls would need to be fully worked out. You’d need to start from the bottom of the window cill and work out your levels from there. The gutter insulation could be reduced to the absolute minimum - I suspect 150mm could probably get your U-value but this would need to be checked.1 point
-
To OP: Using the Quality/Time/Cost triumvirate, we are letting time run away with us to keep quality and cost in control. We are doing as much of the build ourselves. So far, I have forked out for the following work to be carried out - groundworks, steel frame (one wall of house, one part of roof and balcony), concrete pours, windows, GRP roof, and electrics. So far, it's taken 4.5 years on a part time (weekends and holidays basis). We are weathertight and in first fix phase. I'm about to start working on it more full time having been made redundant and realistically we think about another 9-12 months. Just been catching up on finances and the current "already spent + forecast future costs" show a per square metre cost of approx £1200. (£1900 if you include cost of plot) So, it can be done.1 point
-
love the panelling effect it always looks so good, let me know how you get on with doing it would like to do some of this in my own house1 point
-
But it does matter - a lot! It was this forum that saved us £4500 in SDLT as our solicitor had filled in the forms for us and told us it would be £4500. One assumes they know what they are about. I then read a post on here which set me thinking and doing more research. Because our plot was originally agricultural, the tax bands were different and the actual SDLT was zero. After filling in the appropriate forms ourselves, HMRC refunded the lot plus interest.1 point
-
If you're replacing the slates with new artificial ones, you should follow the manufacturer's advice on nails. I re-roofed a house with Redland clay tiles and they recommended aluminium nails. I suppose they're thinking about the roof being there for the next 100 years and galvanised ones won't last that long, especially as they'll get scratched as they're driven in. Here's the Redland guidance.1 point


