
Leaderboard


Popular Content
Showing content with the highest reputation on 04/30/24 in all areas
-
Well it's the second day on week 4. The ground floor screeding is being done as I type this. To date all the walls are up (they come fully glazed, partially rendered and plasterboarded). The roof has been tiled and guttering fixed, the first fix electrics are done, the first fix plumbing is done (wastes and supplies for basins, wc's etc come ready installed in the panels), the underfloor heating is in and the MVHR ducting in place. In the service room is the cylinder, expansion vessel etc for the ASHP and the external unit is here wrapped, sitting on it's pallet. They started on the 8th April and expect to hand over at the end of May. We elected to use Dan Wood as a "half way house" - it's our original design (although with a nod to that sort of style). We didn't go extreme, much as we would like as I wanted a smooth planning experience, which we got. So, some of the standard Dan Wood bits we omitted. They can finish right up to carpets; handing over complete, save for the kitchen (too many choices apparently). We wanted a UK stair with closed risers so it could be carpeted. DW use bare wood, open riser and being aimed at the German market, the pitch is lower so the going messed up our internals too much. We also left out the doors (odd looking with the leaf rebated and closing against the face of the frame) and floor finishes save for the bathrooms. Those are now down to us. We had to provide the foundation (insulated raft for us) and drainage/service connections. However, it's been a dream not having to organise anything once they sign off the slab as ok. Men turn up at 7.00am sharp and work to between 5 and 6. Saturdays 8 till 1 ish. All materials are either brought with them or turn up on time. Electricians, plumbers, and scaffolders are woven into the work and are here at the correct point. The electrician was here until 11pm finishing off first fix because the next trade needed it done. Every single day it progresses. It probably isn't the cheapest way of doing it ( about £1730/m2 ex foundations) but the joy of not having any arguements with individual contractors makes up for it and there is no doubt the polish crew working on this house work damm hard and do a good job. You have to credit their attention to detail too. They obviously do this all the time as all the membranes are properly taped and sealed, the windows being inserted in the factory are done properly, etc etc. It's clear they have designed out issues over the years and have come up with solutions that work - hence the 20 year guarantee. We could buy the plot but needed to sell our house to fund the build. We are in a static caravan at present on site. Having reached retirement the certainty of getting the build done in a sensible timescale so we could get on with enjoying life was a big driver for this approach. Hopefully it'll be a family Christmas settled into a house this year instead of renting a cottage to escape the cold and damp of a 32ft static!6 points
-
Just another picture of the shed. Not finished yet but done the cladding, just need to finish of some bits and pieces.
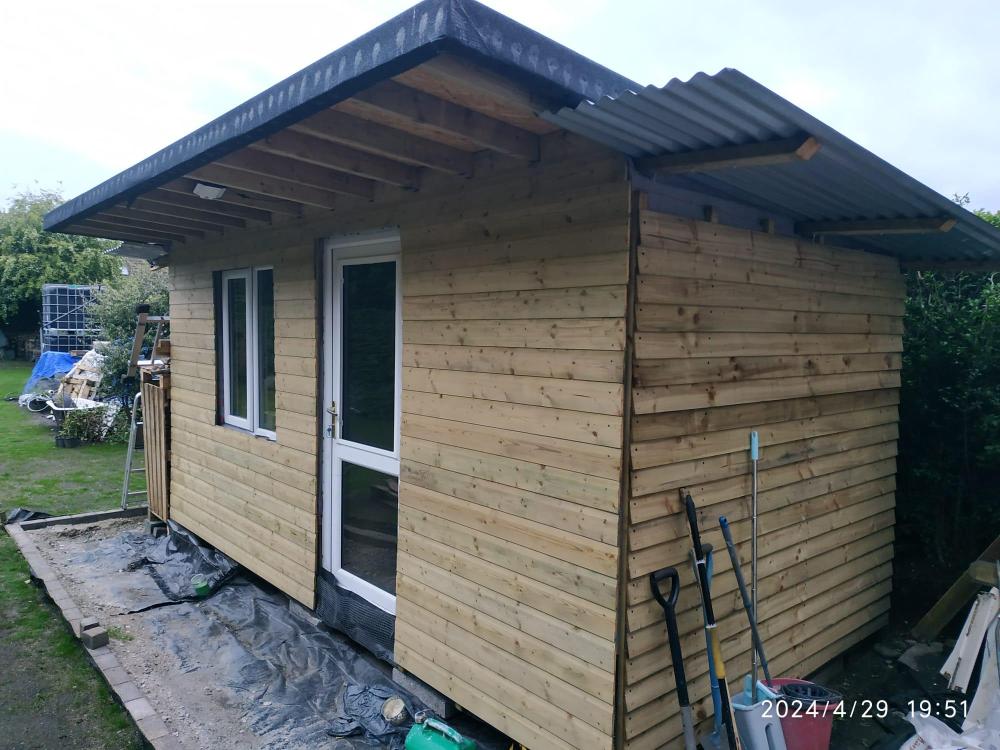 4 points
 -
I’m busy for the next two weekends tiling the four bathrooms My wife helped me with the matting on the last one and decided to do a couple of rooms today Nice neat job I’ll have to show the tilers that work for me I can’t remember them sponging all the joints She’s used 90 m2 yesterday and today Another 110 m2 for her to do next weekend 😁
 1 point
 -
I would ring up the twat that did this and ask him what he is going to do to put it right!!!. , oh and he will have to pay the DNO to disconn/reconn the cable. 🤷♂️ Otherwise you could pop rivet some hinges on the fibreglass.1 point
-
Spoke to one of the BCO’s colleagues and he will accept a paddle/alternating tread stair. So that part is sorted (for now).1 point
-
Confused. First picture is walls being built, without their facing stone? Last picture in post above is finished walls, with the stone front, and filled in and grass growing. So some time later? It's a bit late to ask if they are okay then?1 point
-
Nope that'll fall over in a couple years. The mortar looks rather sandy. For below ground it needs to be 3:1.1 point
-
It should have a drainiage ditch against it filled with stones wrapped in geotextile with a drain at the bottom. The geotextile will stop the drain clogging up. I agree with comments above block flat, wider at the bottom. Single skin without any drain is not good I think. For extra points paint the back of the blocks with bitumin paint and/or seal with a membrane to keep out moisture and protect any finish on the blocks.1 point
-
Looking at what they are holding back, blocks on the flat amd some drainage holes would of been better1 point
-
Yup. One of those.1 point
-
What I was referring to as well.1 point
-
The sauna has a vent that extracts into the bathroom pretty much next to the mvhr extract, nothing in the steam room - just leave the door open once done and the moisture dissappears in short order with the MVHR on boost. There is a floor drain in there too.1 point
-
There is something called the Post Office Address File (PAF) that companies can license/subscribe to. That's the most up-to-date version of address information. Obviously it's up to individual companies how frequently they update their own data, or whether they subscribe to PAF or similar. First step would be to check that you are on the PAF in the first place - see https://www.royalmail.com/find-a-postcode If you are, then it's down to individual companies how quickly/frequently they update their data from the PAF master.1 point
-
Colour match aside , the work looks poor from the photos1 point
-
The BC side is not too much of an issue. The foundation stuff is dealt with as normal and we did that so it didn't move as quick anyway. As for the superstructure technically it's a dpc inspection but DW cover the whole slab and a photograph did the job there. The rest is factory manufacture and BC seem very happy. DW do the pressure test and provide all the certificates for MHVR etc. Hopefully the final sign off will be smooth after we've done our bits. We had seen an Adelia made by Scandi Huis, they have one on their factory site near East Grinstead. It was too big (and too dear). We had looked at DW but couldn't find a design we liked although some of the features we thought were interesting. So we came up with something along that scandinavian look which would not be out of keeping in the streetscene. MBC quoted and whilst we were considering where else we could go for an alternative quote, we spoke to DW just on a whim and they said they could get close. We had to drop a few bits, partly due to their system and partly due to cost so there was a compromise to be made but we're not far off. Just couldn't face several years of pain at our age just to get the fully glazed gable that you can't curtain anyway!1 point
-
With any self build, unless you can afford an Architect/Builder to oversee the whole project, you're going to be chasing people, materials, answering questions and more. My own project is up to roof stage, timber frame is finished, roof finished but outer brick/block leaf is next, then soffit, fascia, gutters, then porch, then windows & doors. Each have their own challenges. On top of my day job! I've a delivery of lintels tomorrow and I only thought to ask what size rigid truck is it to find out it's a full Articulated Truck with a moffet (look that up in goggle!!). Won't fit in my housing estate!! cue plan B, C and D !! We're going to offload it to a footpath outside my house on the other side of a council wall and I'll use a hand truck to get them one by one into the site through a gap some teen made wider last year and it was never fixed by the council! I'm sure each self builder has a raft of such stories. My house needs 2500 bricks and 1280 blocks. The brick supplier I'd booked and paid for in full, was meant to deliver this Friday along with the block supplier providing all the blocks, sand, cement etc. They gave away the bricks to another (assume larger) customer and it's 2 weeks to get a new order in from Belgium. I tried the other supplier I found in google for the same bricks and got through to the same woman I'd been dealing with, same company, one's a shell I'd say. Tried the supplier and they only supply to this one company in Ireland. Anyway, as a one off house they can bump you down the list so I tend to like to get things onsite a week or two early to avoid this added hassle. I've very tight for storage but if you have a brick layer onsite and no bricks you'll be forced to buy something, anything and have to live with it forever. Time management - getting answers to questions is one thing, learning on the job is another. I want to nail in about 200 nails by hand but after realizing my initial attempts were leaning tower of Pisa'esque, I purchased a first fix nail gun, my first! Wow! 200 nails in 3 hours, all batons attached to the window openings. I can sell it later but the right tool for the job for sure! I've to install my first express nails tonight after learning about them from a neighbour - fixes wood to concrete. The roofers left 6 Velux boxes behind with BBX on them. What are they for? An extra? Do I need them? I think they are to act as a vapour barrier and possibly air tightness according to initial google searches. Something else I've to figure out later on. The roof has turned out well hasn't it! They had to finished the Oriel Window Metal / Trocal flashing before they finished roof tiling. It has a ventilated ridge and those plastic covers at the edges all the way along the roof line instead of cement they used to use. I've about 40 spare tiles stored away! The outer brick/blockwork is my next major hurdle. There's a few items I need to buy, figure out and get onsite: 100mm DPC for above 1st course of blockwork above foundation 18" DPC for around windows Expansion ties - Ancon PPS200 ebonded Safety Tie - box of 250, at least I have spares! I can return the unused ones. Wall vents - using Timloc Cavity Wall Drill Vents - you drill a 25mm hold angling upwards and then plug this into it. This absolves the brick layer from having to install them as they go Wall ties - the timberframe supplier provides 4 boxes of these and marked up where the studs are to get good purchase Stop Bead and Drip Bead (plastic) for render, Weber OCR, Weber paint (I'm doing this job once the blockwork is finished), Mitre bond glue (2 part glue) Gutter Brushes for later Expansion Joints - I've two 10 meter gables, each require two expansion joints. There's an awkward window and ESB box on one end of one side so thankfully we're putting the expansion joint past both of these even though you should have one every 6 meters and within 1/2 of this distance from the corner, ours will be 3.8m from the corner. the timberframe amazing team marked up the best positions for expansion joints and identified this one before the Structural Engineer signed off on it. I've taped up all the Solitex on the outside of the Timber Frame, plugged the side door up with timber, OSB and more Frontex WA. We're still installing a lintel in the blockwork but will ignore it otherwise for the block course and if someone wants to open it later they can with an angle grinder! It saves wasting a lot of space in the utility room having a door there with no purpose. There's no sink = reason to not make it a boot room really. I'm lining all the window openings with insulation over the next week or so and adding batons to take the window straps. They want a strap within 100-150mm of any corner and no more than 700mm apart. The Straps are 1mm thick and come inside the window about 100mm. I've sourced wood to exactly match the insulation thickness which can be hard but avoids trying to plane / table saw wood onsite. This Friday I've to hope everything fits onsite as it's delivered and we've room for a telehandler afterwards for when the brickie's start! That's a snapshot of my week! I'll do a post about powering electrical devices onsite without a generator using an Electric car & Anker 2kW battery soon I think, some lesson learnt there!1 point
-
Good insulation and 100mm plus of concrete in the floor can make energy use and storage can easy task - but you have to embrace it. I currently have next to no need to heat the house, but the garden room still needs heat, so just use the floor of the house as a buffer. Heat pump puts out 30 Deg water for 15 to 20 an hour to garden room fan coil, house UFH runs at the same time. It's cheap, it's there, zero additional plumbing no energy goes to waste. Currently should be getting CoP of 4+, so between E7 and battery the heat energy is being produced at 4p (or less) per kWh.1 point
-
Yup. We are of an age where we are facing that. It's what life does.1 point
-
This is all a lot easier if you are doing a new build that is optimised for heat storage. In our case we have a warm slab -- that is a concrete raft foundation where the insulation is on the outside of the raft so we have ~70 tonnes of concrete inside our thermal envelope and we have 30cm cellulosic filler in our twin-wall timber frame. Whilst this doesn't have as good an R-value as PIR, it has a far higher specific heat and so a high decrement-delay time constant. What this means is that we can dump the heat into the slab pretty much anytime the energy is cheapest. The house cools about 1°C / day in the winter without any heating. We use a 2.88 kW heater to heat our UFH and no other fixed heating. We seem to be be paying about 4-10p / kWh this month for our heat on the Octopus Agile tariff because we only draw this down when the price is cheap. It was even cheaper in Feb / Mar and we had a few days where we were paid to heat the house. We don't have an ASHP, because I can't make an investment case for installing one. Our system has no expensive moving parts; no ASHP to maintain or replace. Just the electricity running costs.1 point
-
Water logged spots don't rot, oxygen is needed, so they'll rot just above the ground. If you replace the soil with stones, they'll rot here instead as there will be air there. All the water is coming from below the retaining wall. It's a spring effect. The wall acts like a dam, water is forced under, then up out at the other side.1 point
-
yes, I am in the process of digging a dungeon1 point
-
I am not sure that you can 2nd guess future buyers potential thoughts, especially if you have no plans to sell your house. In our case we have no rads, no gas, no ASHP; just one 2.88 kW Willis -- plus 6+ years of logged temperature data and daily electricity use and costs. Our current electricity bill thanks to the Agile Tariff and spot electricity prices is the lowest it's ever been.1 point
-
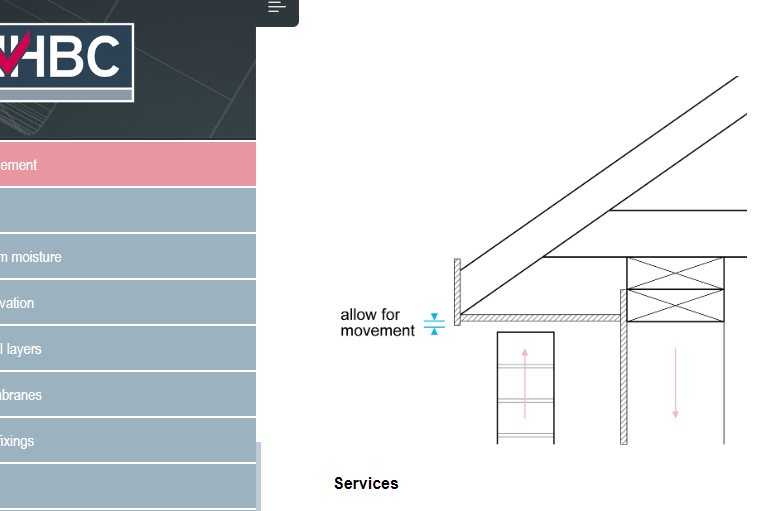
The timber frame will shrink downwards by about 30mm relative to the brickwork.
 1 point
 -
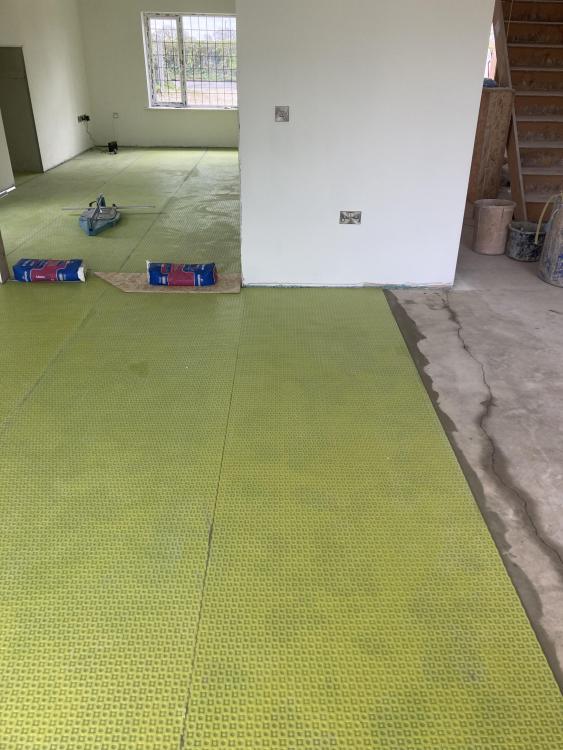
It’s Dura mat I normally use Ditra But my wife found this at £800 for seven rolls Which is nearly twice what pay for Ditra There a 5 mil build up once fixed
 1 point
 -
Very well, I know others here have put radiators in upstairs but never use them but future buyers might be frightened off by not having them.1 point
-
Yes almost certainly the capacitor, the question is how easy is it to access. Is it a submirsible pump?1 point
-
likely capacitor, yes.1 point
-
Thank you very much for your reply, this is a big help1 point
-
Morning, for your 6 or 8 holes I would be hiring the cutter. If it’s new then won’t be distorted or side worn so excess wear isn’t going to be an issue. concrete especially war time era around steel producing industries can contain a lot of slag which is very abrasive and a PITA to cut through. Keep the water flowing to flush the cut and let the cutter go at its own pace. And yes cores can look amazing, I used to have one we took from a bridge pier - it was more steel than concrete!1 point
-
I would turn it off, then if there is a problem on your return, you know for next time.1 point
-
The DPC should be level with the bottom of the render, I have often seen bricks painted like that but never understood it, surely the bricks being below the DPC would be better letting any damp evaporate which Bitumen paint would stop 🤷♂️.1 point
-
Cart before the horse. You can't have a soakaway design until you have a percolation test result.1 point
-
I would leave it on - why faff about over a few pence a day.1 point
-
What for, is this to fix them in position, if so do as John said and concrete them in. if they are fixed to the wall and you just want drainage around them, then cut them off at ground level, they don’t need to be in the ground if the wall is holding them up.1 point
-
Should be hardly any wear at all doing those holes, mesh doesn’t cause much heat or wear. Measure the bit before you take it and when you get back with a signature. They always put down 2 or 3mm of wear and impossible to argue when the invoice comes in.1 point
-
Concrete or postcrete, mix it well as you add to make sure no water pockets. Level just about ground and slope top away from post so any water naturally runs away.1 point
-
Well it's all clear, you shouldn't put it inside. And you shouldn't put it outside. What's the problem?1 point
-
If you can only install internal wall insulation, then you will probably want to install a vapour control layer on the room side. This VCL stops the water vapour condensing as it hits the colder structure if the house. "Insulation" or to use the proper term, thermal conductivity has 3 measures. The intrinsic material properties, the k-Value. This is measured in W.m-1.K-1. When the thickness is taken to to account, it becomes resistivity, thickness (length) in meters divided by the k-Value. R-Value = length / k-Value. The size nits become m².K.W-1. To get to the more useful U-Value, W.m-2.K-1, the reciprocal of R-Value is used. U-Value = 1/R-Value. It is generally easy enough to get the k-Valueb of a material, but realistically you need to be looking a foamed phenolic sheet. There is no reason why you cannot mix and match insulation types, as long as moisture transmission is thought about and catered for. So you can put IWI (internal) on the front, and EWI (external) on parts that the public don't see. The biggest problem with EWI is size of roof overhangs and around window and door openings.1 point
-
Generally most of your services on the slab will be no more than a 50mm duct. You then use 50mm PIR floor insulation to cover the floor with tracks cut out where ever the ducts are going. A weak mix of sand and cement fills the gaps of the ducts and where you have cut the insulation and then whatever you have left goes on top, 100,150,200mm of PIR floor insulation. Unless your parking tanks on your living room floor then there is no chance PIR floor insulation will sink. I have 150mm of PIR then a membrane then my ufh pipes and 75mm of sand cement screed. Takes around 90 mins to you feel heat but once you turn your heating off it will take hours to cool down.1 point
-
My experience with this type of trady is to cut your losses and get someone better to finish the job. You'll only end up with more bad work if he's the one left to put his own work right.1 point
-
Ask him for the pressure drop calc, get the facts, instead of assuming the world going end.1 point
-
We have a conventional build, 100mm block 150mm cavity and 100mm block. Insulation to be pumped with EPS beads, and I have a lot of questions I'm a novice when it comes to insulation, is there different types/mixes to specify? If I have to drill a hole in blockwork in the future will the beads come gushing out? How do I ensure the contractor hasn't left any voids and cold spots? Any recommended companies from NI?1 point
-
not necessarily in a block/cavity/block construction, but I agree it will not flow out of holes. At best make sure you get a contractor who can provide a CIGA guarantee (Cavity Insulation Guarantee Agency). If trouble after the event voids can be identified by thermal imaging. Try the NI branch of the Energy Saving Trust for CIGA companies, you might even get a grant - 0800 142 28651 point
-
You have energy store in Lisburn, homeseal ni in magherafelt, alpha insulation and pcdynes insulation both in Dungannon. There are a few more as well. Get them all out to price it up and that will give you a chance to talk to them and compare what they are offering.1 point
-
I have a passive spec house with a tiled ground floor slab. I would say definately have ufh having lived in the house through the winter. It is not that you couldn't heat the house with another heat source, but that it is not comfortable walking round the house without shoes on with a cold unheated slab. I found that with the slab at 20 degrees or cooler the floor felt quite cold to the touch, whereas if it is only a couple of degrees warmer it is fine to walk on bare foot. I found it only took having a heat input once or twice a week over the winter for a few hours to keep the slab topped up to a comfortable level. Our slab is slightly thicker than most at 200mm and with ufh about 100mm down. This was due to the amount of steel but seems to even out temperature fluctuations really well. If you heat the air rather than slab you may also find it dries it out and may well be unpleasant to live with. With the cold dry snap of the beast from the east our relative humidity in the house dropped to 35% and normally runs at about 45%. We put electric ufh in bathrooms and used it all winter for an hour a day, the tiles felt cold to the touch without it. Also have wet heated towel rads in bathrooms which I ran for an hour a day over winter to boost the upstairs temp. We have no other heating upstairs but this worked really well.1 point
-
All you can do now is wait and hope. If it does start moving now, you know why.0 points
-
You selling yourself ?0 points
-
Yeah it does look like a shed …. But ! Inside …..
 0 points
 -
going off topic i guess but most of my build was "ok from the outside", but look closely and its been like a shoot-out at the OK Corral with a nail gun.0 points
-
Bugger....he's chasing me for that pint0 points


This leaderboard is set to London/GMT+01:00