Leaderboard


Popular Content
Showing content with the highest reputation on 02/15/24 in all areas
-
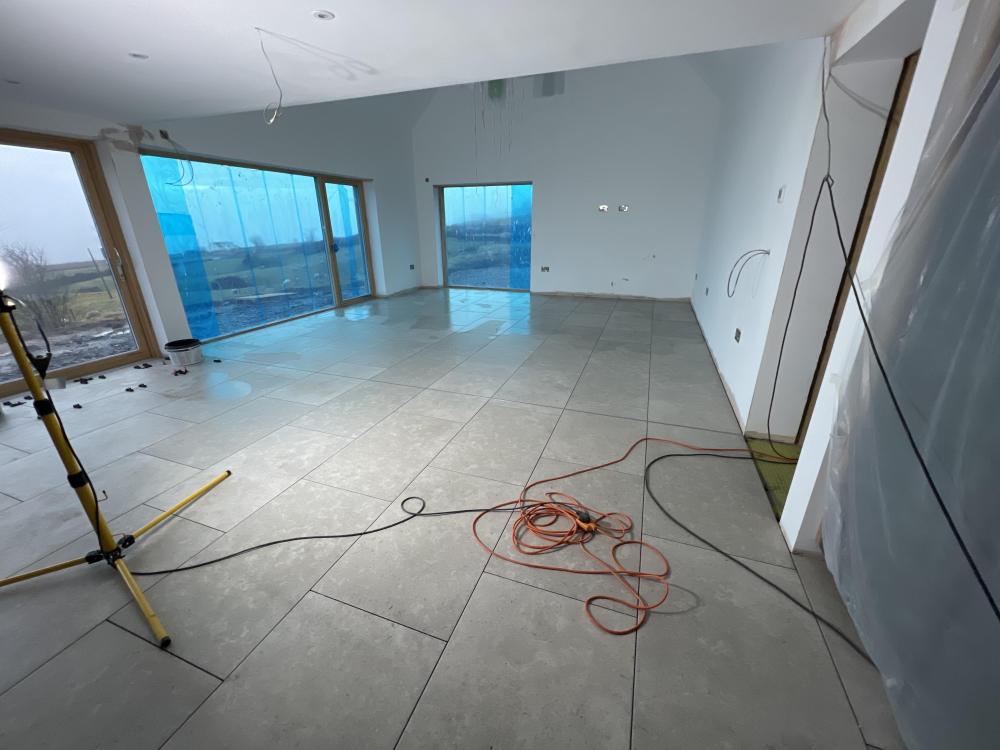
Open plan kitchen area tiling done. Started on Monday which was us mostly planning to have as few narrow cuts as possible. Very pleased that we were spot on with our door thresholds given all the last minute changes we had with the floor.
 4 points
 -
I had the luxury of 300mm depth of insulation, so opted for 300mm EPS equivalent to 150PIR . I used some EPS 150 for the top layer and EPS70 for the layers below, staggering the sheets as I went. (this was a cost based decision) Ultimately your injecting heat into the concrete and this insulation is the only thing stopping you heating the earth, or conversely the earth cooling your slab. 150mm PIR will give you good results, but if you have space it cant hurt, other than financially, to put more insulation in there. Note: if you are doing 150mm, don't be tempted to just buy the 150 sheets, they are PITA to cut neatly and you wont be able to stagger the joints. Thinner sheets will cut accurately (but messily) on a table saw. @Mulberry View keep the faith its looking good 👍. I say Mandy and I, built our house on our own, with very little external help, but the reality is, it was Mandy, Me and Build hub. Hours spent on here reading blogs, questions and asking for clarification on bits your not sure of will save you lots of headaches down the line and then end product, IMHO will outshine many homes.2 points
-
Thermal engineering of a house is pretty basic. Stop warm air leaving, stop cold air getting in. All that means is the outside of the house has to stop air movement, not the inside as that can allow the insulation to be cold. Don't let anything that conducts heat better than the insulation go from inside to outside i.e. beams and joists. Control the internal humidity, this is usually done mechanically l.e. a fan and ducts. Any humidity that does manage to get past the vapour control layers (basically a sheet of polystyrene in the inside walls) must be allowed to migrate to the outside. This is why walls are constructed so that the more vapour tight layers are inside, and the more vapour open layers are outside. Vapour movement and air movement are not the same thing. Sealing around window and door frames is a matter of taping either side ideally. Window and door frames are also thermal bridges, i.e. they conduct heat better than the walks, which is a bad thing. The better the frame U-Value the better, but be conscious that large windows have poor thermal performance anyway, so the frame may only be a small part of the overall heat loss. You can swap around U-Values i.e. thicker insulation on a north and east facing wall, these are climatically colder in the UK, and still get a well performing house. Your most likely to have overheating problems than under heating problems these days, even sticking to minimum building regulations. Do so thermal modelling i.e. solar angles, intensity at different times of the day and year. This only needs to be basic, split the day up into 18 hours, 9 either dude if noon, split the year up unto 26 weeks, then go to PVGIS and download the TMA hourly data for your location.2 points
-
Around 11 months ago, we started from a stripped site, the treatment plant was in and running the cabins / static so drainage just required connecting up. we had to wait for the warrant to be amended (change to the certificate of deign) this held us back ma month or so until the BCO just said "get on with it, we can sort that later"- top guy!! If we had waited for the amended certificate of design we would still be building, it took him 5 months to get it to us. I've documented most of the build in blogs on here, partly to have a refence to remember the process, partly as pay back to Buildhub for the inspiration and pointers in the planning / design stage. I'm so glad I spent hours looking at and reading others blogs that we made the switch to ICF. I'm convinced there is no way I would have achieved the efficiency I have for the money spent. Budget was always tight, so some decisions have been made due to Hobson's choice, leading to triple glazed UPVC windows and composite doors. The front door, south facing GRP Composite with low threshold and a slim glass panel leaks with 40mph winds, this leaks through the gazing cassette, and the low threshold. as I know we wont use this door much, we went for a slam lock, another mistake, it blows a gale through. To be fair the company are re making, I'm just not sure if there re-making the panel or the full door, I did ask, if they were remaking the full door to change to standard handle and lock, so it can be adjusted to minimise the drafts. we will see what happens, a full door replacement will mean taking off the reveals in side so a complete PITA, but worth it for no drafts. We had the airtightness test carried out, and they used the front door for the blower door to mitigate any issues with that door. I had put caps in the MVHR. so he just cracked on, the back door is not perfect again due to the low threshold. He didn't seal the blower door to the frame, not sure what the procedure is but seemed a little frustrating. We achieved 0.88 Air permeability, which I'm very happy with, budget wise we didn't spend hundreds on airtightness tape, just designed good solutions, and the doors leak a bit . Our As built EPC came back at A103 , with a possibility of A128.. the report say A105 if we install Thermal Solar EST saving of £40 pa , and A128 with a wind turbine EST saving of £1100 pa, so pretty much the best we could hit. To finish we need to sort out some paths outside, ramp, and the rain water pond, but other than the second bedroom need decorating the house is done. Next week we will hopefully get building control around to see what he 'needs' to get a completion cert. I'm hoping for some flexibility on the ramp and pond, . We need the VAT refund to pay for this stuff. We are working our way through the invoices, but we built for less the 90K and we still need the VAT refund. I've enjoyed it all, and we both agree we have a home. Good luck to all of you with your current builds.1 point
-
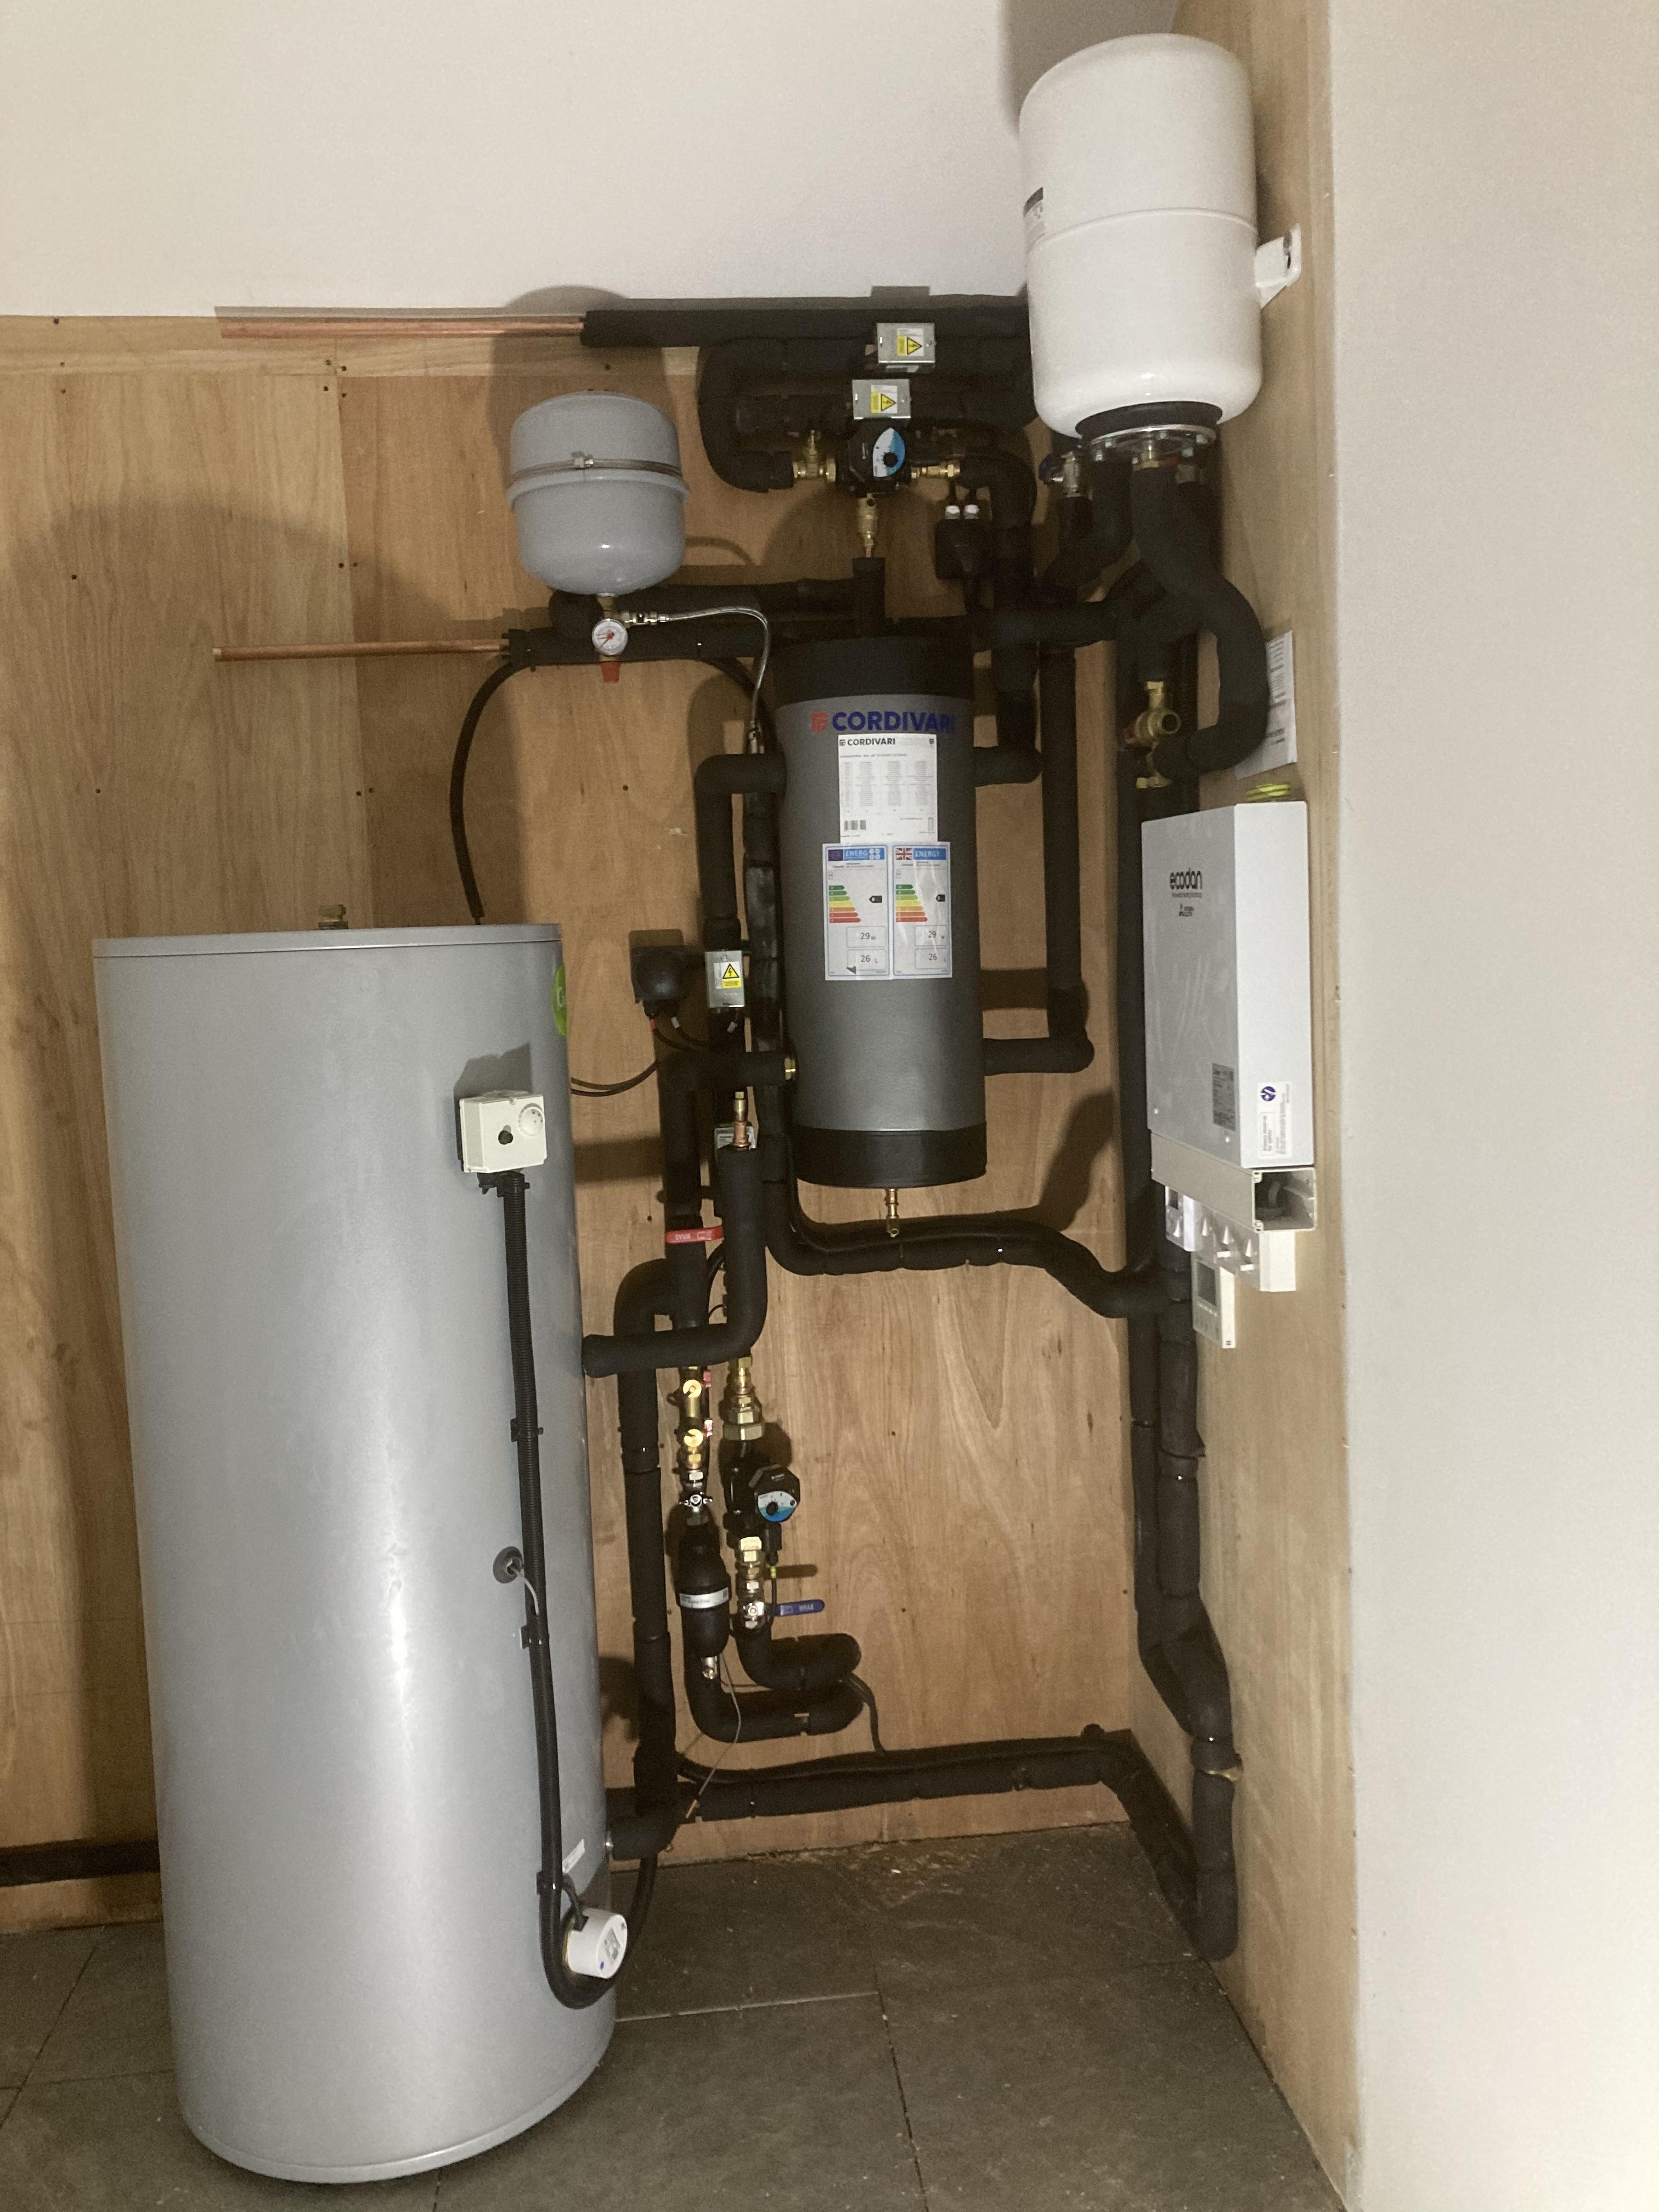
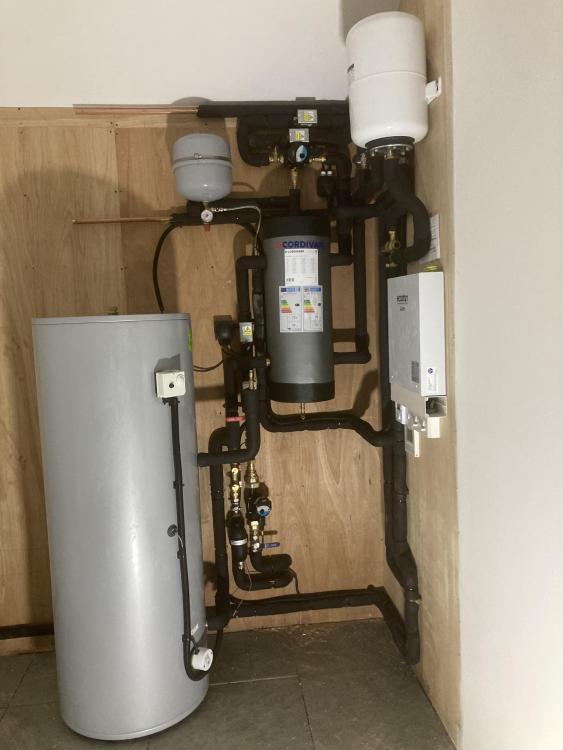
Just a very short blog to show the windy roost ( not fully finished, is a self build ever?) plant room. I'm quite chuffed I got it all to fit, and I think it's quite neat. It's full DIY and house's the UVC and combined buffer, UFH manifold, MVHR unit, inverter, consumer unit, network hub. All in 4M³. Plus storage to come. Yes, the printer doesn't fit, but it's coming to its end of life so that's all it's getting for now. Jobs to do: Ceiling Insulate MVHR ducting / box in Shelves on the left hand side Clothes Airer ( a Scottish requirement to have one)1 point
-
I've just had another price for the two fan units, £1300.00 inc VAT plus delivery. Hopefully they should be standard bearings which are freely available. I use simply bearings that offer a next day service and have top notch makes. It will be mid to end March before I can strip the unit too many other jobs now im retired. Will document the process to help others.1 point
-
I fitted 200mm PIR in the floor under the UFH and 205mm in the roof You could also add insulation to the Nudura if the U values are not great. What are the U values for your blocks1 point
-
Excellent reply, thank you. I'll get into those topics soon. I'd love you see your build, I'll drop you a message.1 point
-
Are you talking of doing this at the source end, or the destination end? It is not clear. If at the source end then where you gland the SWA you would also have to run an appropriate size earth cable along with the inner cores to the consumer unit so the SWA is bonded at the source end. Remember no armour on that internal section would mean the cable routing method would have to be appropriate for whether there is RCD protection or not. which would probably preclude it being buried in a wall. It is common to feed an SWA without RCD protection and provide that at the destination end.1 point
-
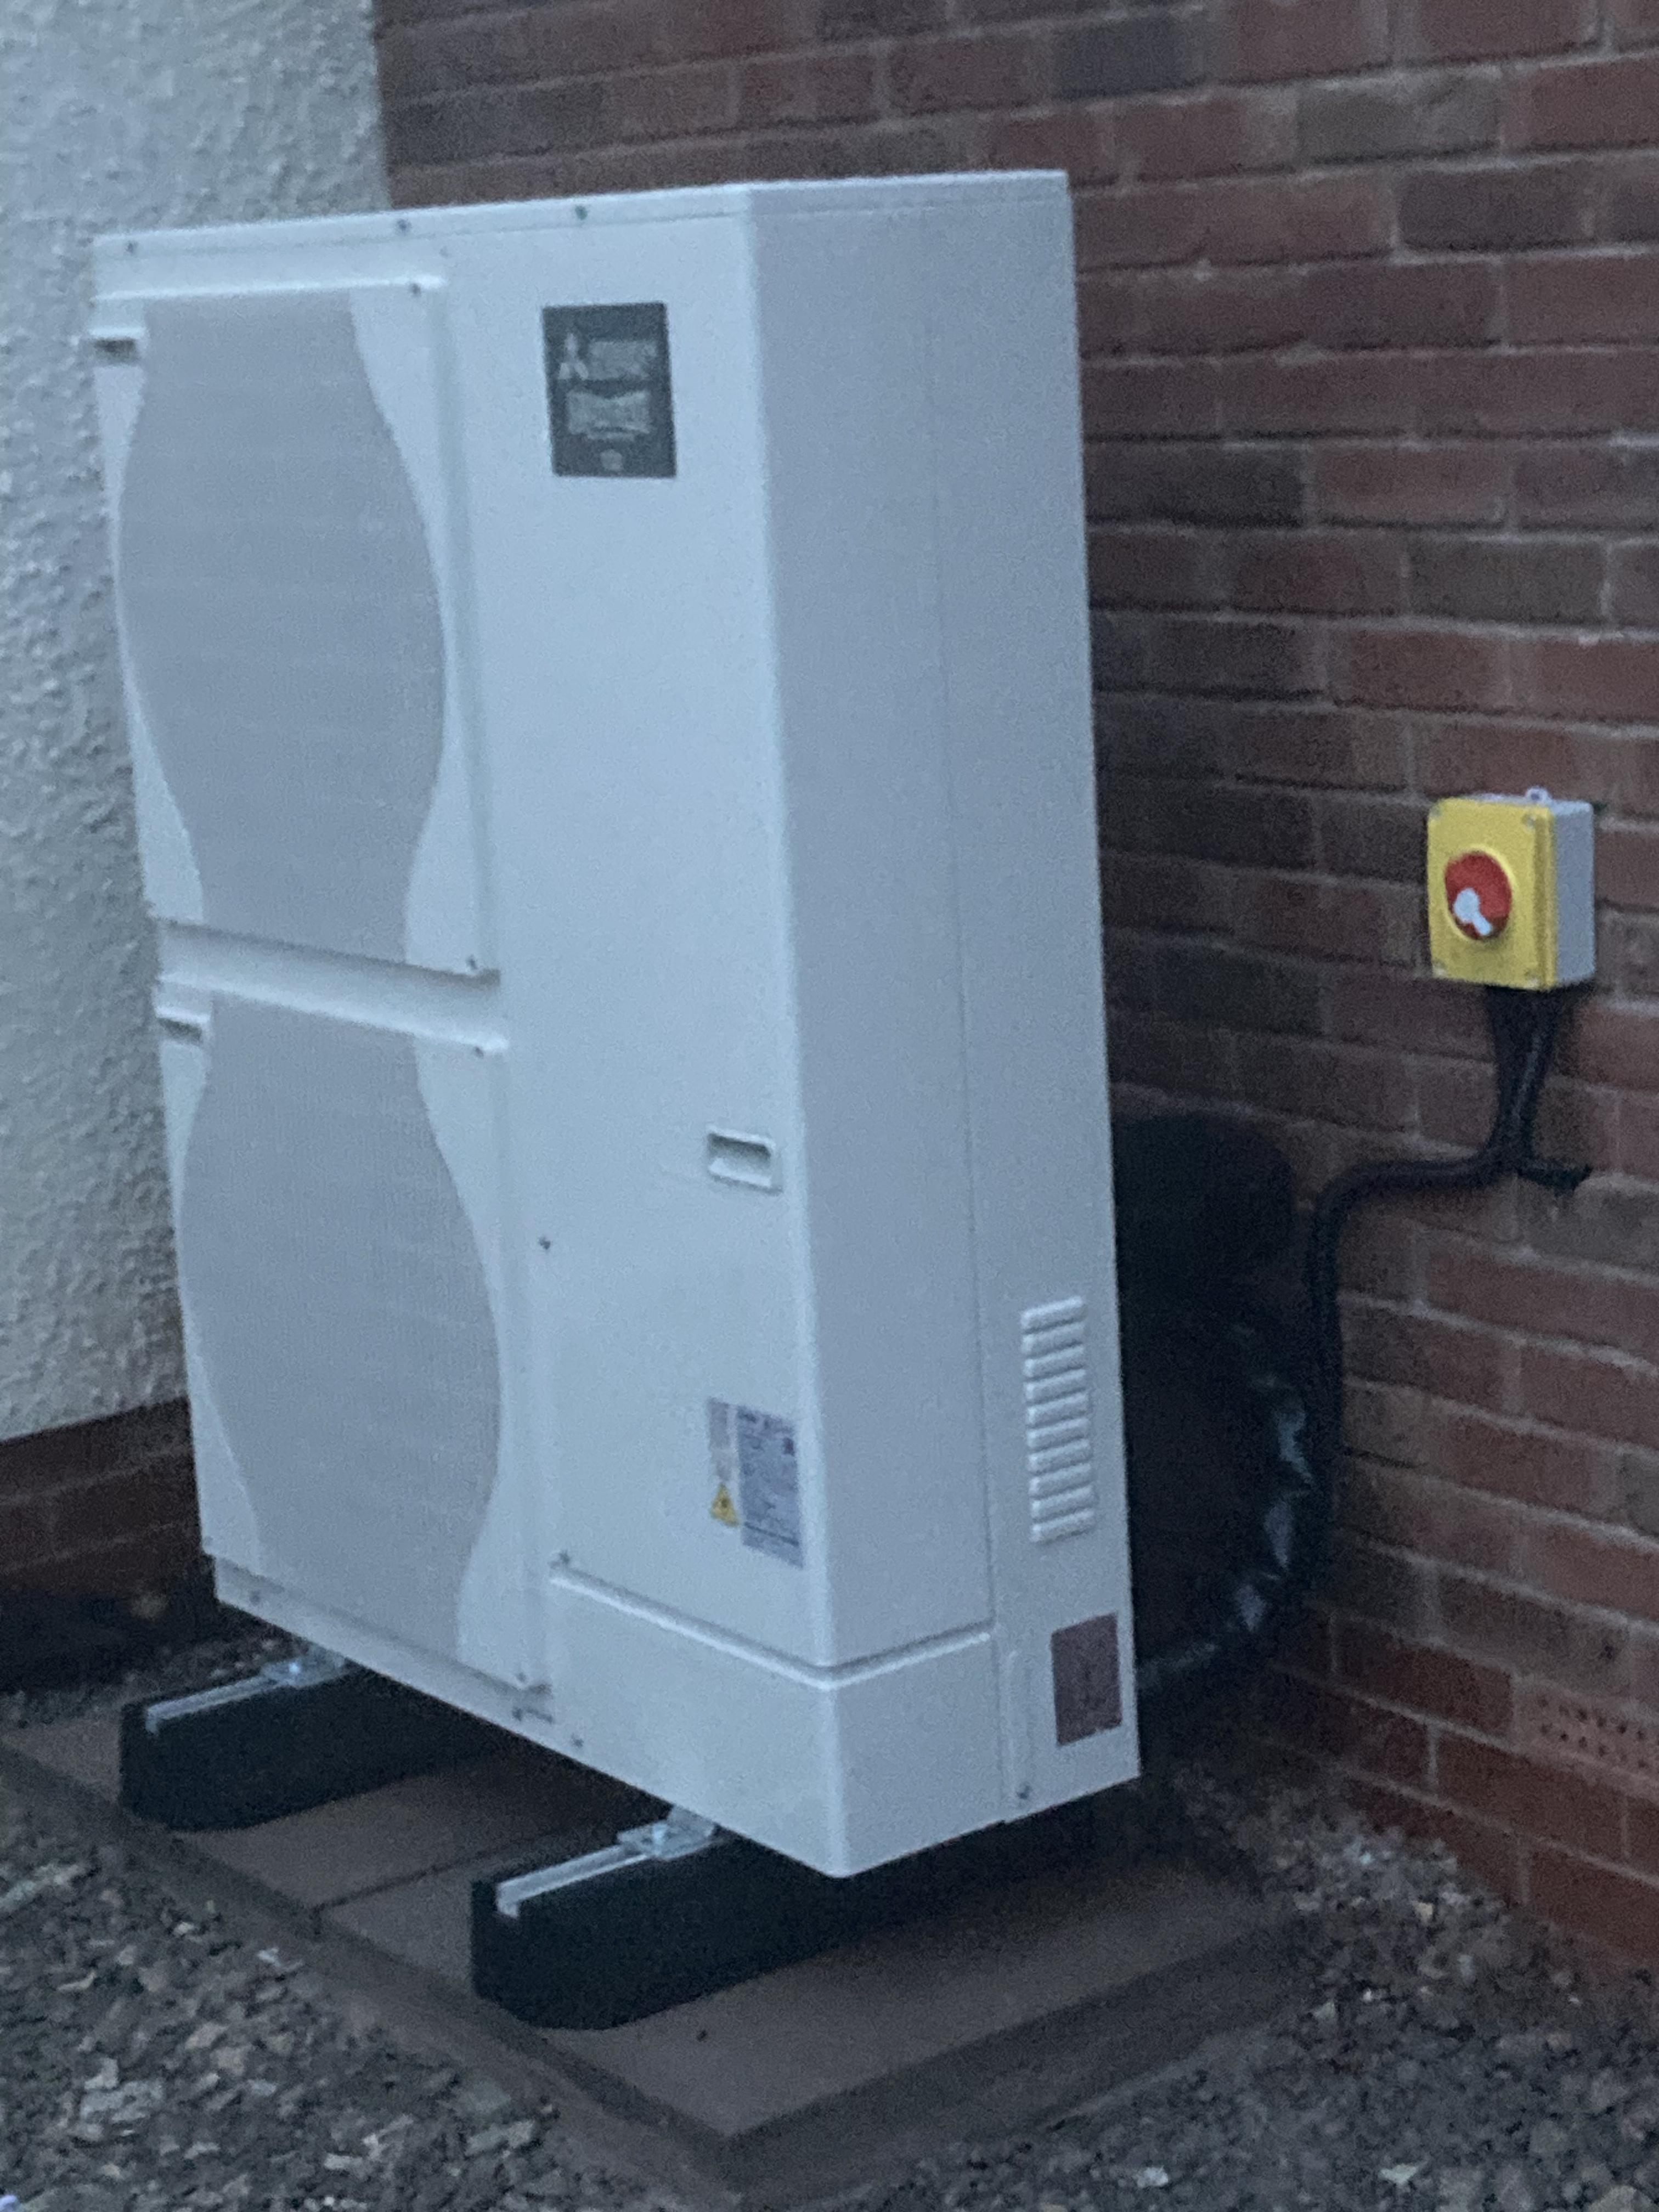
We finally an electrical Connection after waiting four months for a road closure So the HP can be started and can think about tiling the downstairs floors
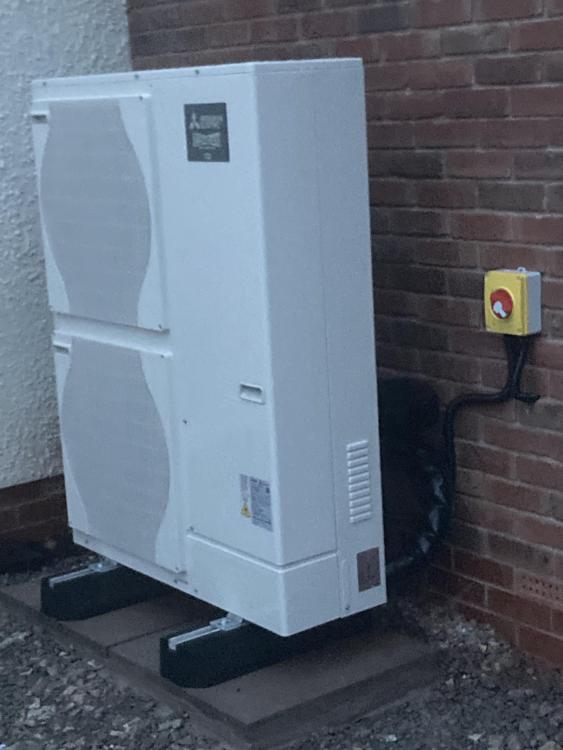 1 point
 -
It does the question is how quickly/slowly. That’s what you need to determine.1 point
-
You can buy external AAVs. https://www.floplast.co.uk/product/external-air-admittance-valve1 point
-
My advice is to try find a similar planning application and see what they provided. The condition says you need to provide a "Construction Ecological Management Plan (CEcMP)" so I would try and find a document with that title on the portal and read it. If there is anything irrelevant to your site edit it out. Make sure you aren't committing yourself to anything expensive etc. I'm pretty sure that a CEcMP will be all about protecting wild life during construction, whereas a "Biodiversity net gain (BNG)" is more about ensuring your planning application as a whole improves Biodiversity. I would stick with the former until they insist on the latter.1 point
-
There should be no "after the soakaway" (except in special cases of a partial soakaway) The idea is the soakaway is made big enough that it can absorb all the water you are likely to feed into it. If it fails to do that then it needs to be bigger. I am not familliar with the English regs but in Scotland a soakaway can't be within 5 metres of a boundary, so with your 15M wide field that would limit you to a 10M wide soakaway, made as long as required to give the calculated area.1 point
-
The amount of water coming out of the digester isn't huge. You flush a 5 litre toilet and that dribbles out simultaneously. How is the ground for porosity?1 point
-
that sounds like they want you to check ( if you didn’t already do it ) that there are no newts door mice rare flowers etc in the overgrown’ area . Think this is becoming more common and normally done as part of the planning to ensure nothing is harmed or disturbed1 point
-
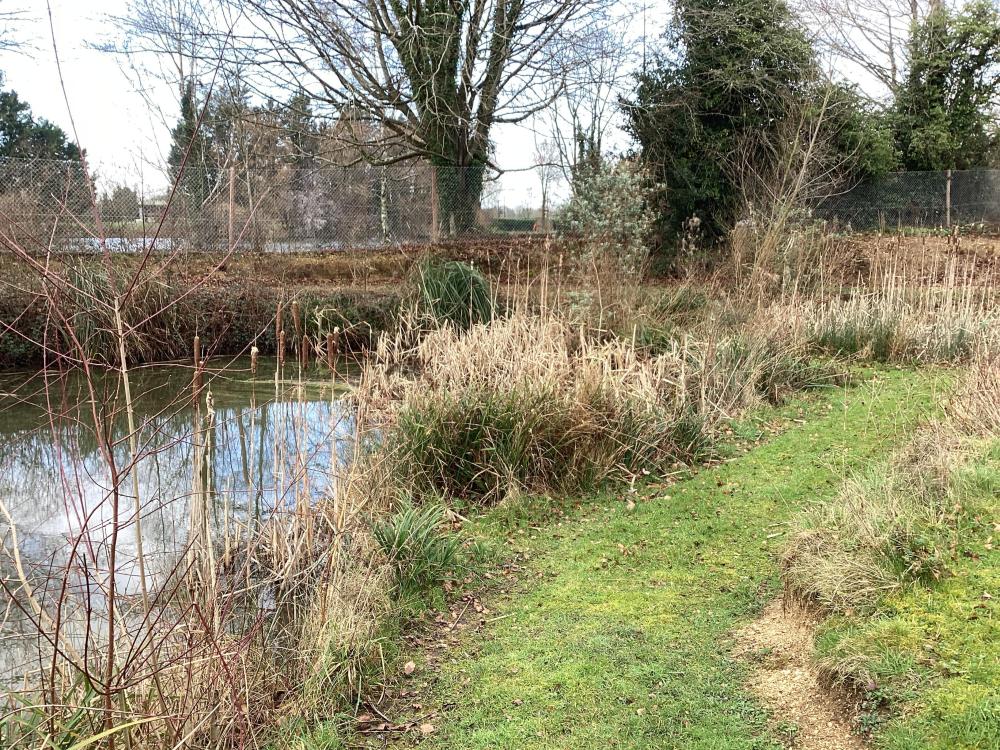
The pond in my picture is exactly that, a pre pond, before it gets to the pond/lake. I did this just for the chance that someone puts something nasty in the drains it will be evident first in the small pond before it gets to the larger one.1 point
-
Here's a reading list for you.... If you follow the links in the posts you will get an overview of what's needed https://forum.buildhub.org.uk/search/?q=SUDS&quick=11 point
-
The real simple basics are drainage from the house leads to the treatment plant. Topography will dictate where best to sit it so drains can all run downhill to the TP and end up with it at a sensible depth. Outflow from the TP will have to flow somewhere, if land drainage it will be a buried soakaway of perforated pipe on stone, the size of which is determined by a percolation test and a standard formula based on the number of occupants and the percolation rate. Building regs set the minimum distances from buildings, boundaries, roads and watercourses to the TP and soakaway. they are different in different countries, i.e. Scotland different to England. I don't think anywhere allows you do drain "on" to your field. If the soakaway is on land higher than the TP then a pumped outflow will be needed, some models of TP are available with a pumping system build in.1 point
-
In case of any temporary problem I think I would have a soakaway before a pond., even if the ground technically can't take it. Or a 'pre-pond' extra pond with reeds and lilies. 10 years ago they were saying you could, but shouldn’t, drink the outfall. That was silly but indicates that it's almost clean. But if somebody left a bath running, the same amount would go into the pond, perhaps not very clean Yes. Use a recognised digester system, using air turbulence rather than the mechanical ones. Then to a soakaway or recognised watercourse. In Scotland the outfall rules are stricter. There's lots of previous on the subject. Use Google "buildhub sewage digester"1 point
-
Can you put in a pond or reed bed to take stp and rainwater. Mine goes to this, I added rainwater as well to keep it diluted.
 1 point
 -
Someone may correct me if I am wrong but I believe you can only make one claim for the whole project covered by the planning permission. Not sure then if you can apply different rates to parts of the project. Normally VAT reclaim is quite straightforward but in this case I agree with @joe90, it is worth engaging a specialist1 point
-
I had 16 conditions to be discharged. I was a little daunted by this but when i spoke to planning recently they explained that only the ones that contain the line ' written permission from planning' needed to be satisfied before works could start. I too have some that relate to planting, Bats, Newts, Unicorns but none of these stop me from starting work. They just have to be done before anyone moves in. Hope this helps.1 point
-
You don't need planning permission to tidy your garden, tidying your land is no different. I had all my soak aways done etc before planning came through. As long as you do6start or be seen to start the house foundations all good. But get any ecology stuff done now, before breading season starts, otherwise you may forced into a 6 month waiting period. Do not hang about.1 point
-
I would be very happy with that level of accuracy. But that is wishful thinking if my recent experience is anything to go by. Example: Groundworks for my 200 sq metre project. I have accepted in principle a figure of £42k. All the usual risk mitigations rolled in. Trying to be thorough and as a sanity check on the above figure i have looked at another company. After a long delay they provided a very detailed, itemised breakdown. At £92k + VAT I have no doubt, looking at the way their figures are laid out that they used some software package to prepare the response. What does that tell us? Just to add insult to injury their brickworks figure was also about £100k. For 10000 bricks. Thats £10/brick. The other 3 figures i have been given are £10k, £16.4k and £19.5k I have settled on the middle figure largely becuase the guy is very used to working on the brand of house i have chosen and has experience of loads of them.1 point
-
Having a look over the topic, need to ascertain what the problem is and the end question and will come back to it later today.1 point
-
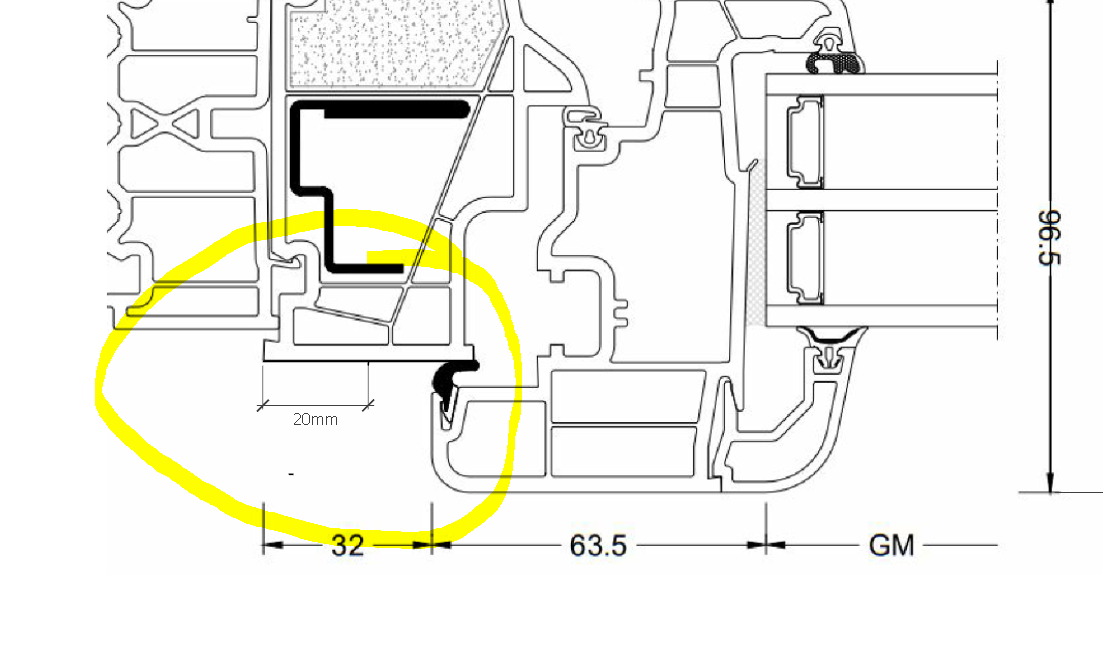
Ok bear with me here's my suggested steps. Based on Larry O'Donougue's blog which has since disappeared. Step1. Draw an accurate line 20mm in from the edge of the window frame with a pencil. Tis will mark the edge of your tape and bead later. Below is a vertical cross section of your window. Step 2 Fit some Split back A/T tape to the line and the other side to an appropriate length of airtight membrane to reach into your inner leaf. Here's a zoom in of the corner. Step 3: Using SELF-DRILLING LOW PROFILE HEAD SCREWS 5.5MM X 19MM Screw a 12.5mm plasterboard metal end bead to the windows so that it lines up with the edge of the airtightness tape. The screw hole through the tape will seal ok. Your may need to predrill or at least centre punch the beads for accuracy. Step 4. Add mineral wool to fill the space behind the A/T membrane. Return the A/T membrane to the inner leaf and tape with fleece backed tape suitable for plastering over. The airtight membrane will sail over the straps, sealing them outside the A/T envelope. Step 5. Add plasterboard. Packing as required with dabs of adhesive to get it to the correct angle. Here's a zoomed out view.

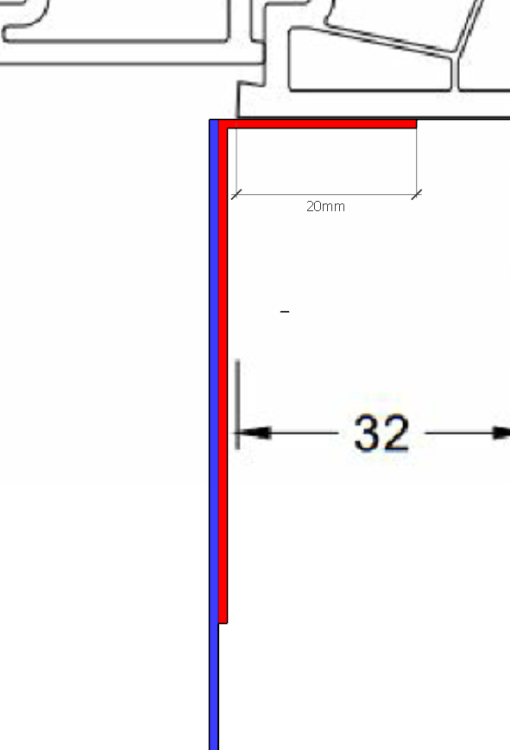
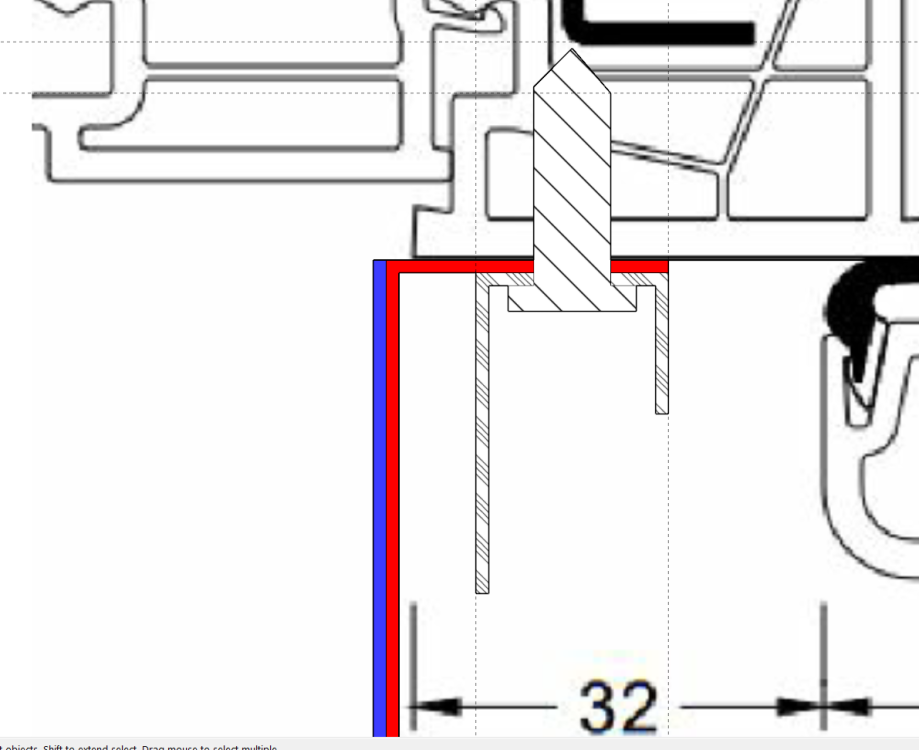
 1 point
 -
Thank you. Just sent them an email: Sending emails back and forward are obviously not getting us anywhere. I want to sort this out in person and if you, your surveyor and the carpenter can meet on site preferably this week, please come. I have given you evidences to back up what we’re saying and obviously you’re not having it. I have been waiting for you to resolve this issue amicably but pride seems to be in the way. If I don’t hear from you by Monday on how you will rectify this issue, I will have to take this matter to court. I don’t want to waste judge’s time as much as possible but if that’s the only way to get this sorted then I have no choice. Thank you all so much for giving me courage. I feel like I’m not the only one in this battle.1 point
-
I think you all need to meet on site to sort it out - the boss man, his surveyor, your builder and you. Going backwards and forwards over email clearly isn't going to go anywhere and sometimes you just need to do these things in person. If they refuse then at least that's an additional point in your favour if it does go to law.1 point
-
Nothing unsalvageable. Any wider view of the windows, including an opening sash? Those straps won't be touching the outer leaf so I wouldn't fret too much about it. In any case point thermal bridges make minimal difference.1 point
-
ICF superstructure built by our supplier, Internorm windows also fitted by them. I've been in charge of local trades since structural shell completion (apart from the windows). Lots of windows, high ceilings. Didn't trust others to do airtight tape and with 3 kids we'd never have managed it in time. I used Aerobarrier in Jan (just before plasterboard) who do an airtight spray (and foam up any big holes). They got us from 4.29 ACH to 1.33 with a temp front door and big sliders missing silicon (taped only). This was also pre plaster and pre render. The spray plugged gaps in areas I wasn't expecting e.g between the glass and frame of some of our Internorm fixed windows!! They can do you a quote with plans/elevations and then compare that cost to the airtight tape. For the shell stage it was pretty similar!1 point
-
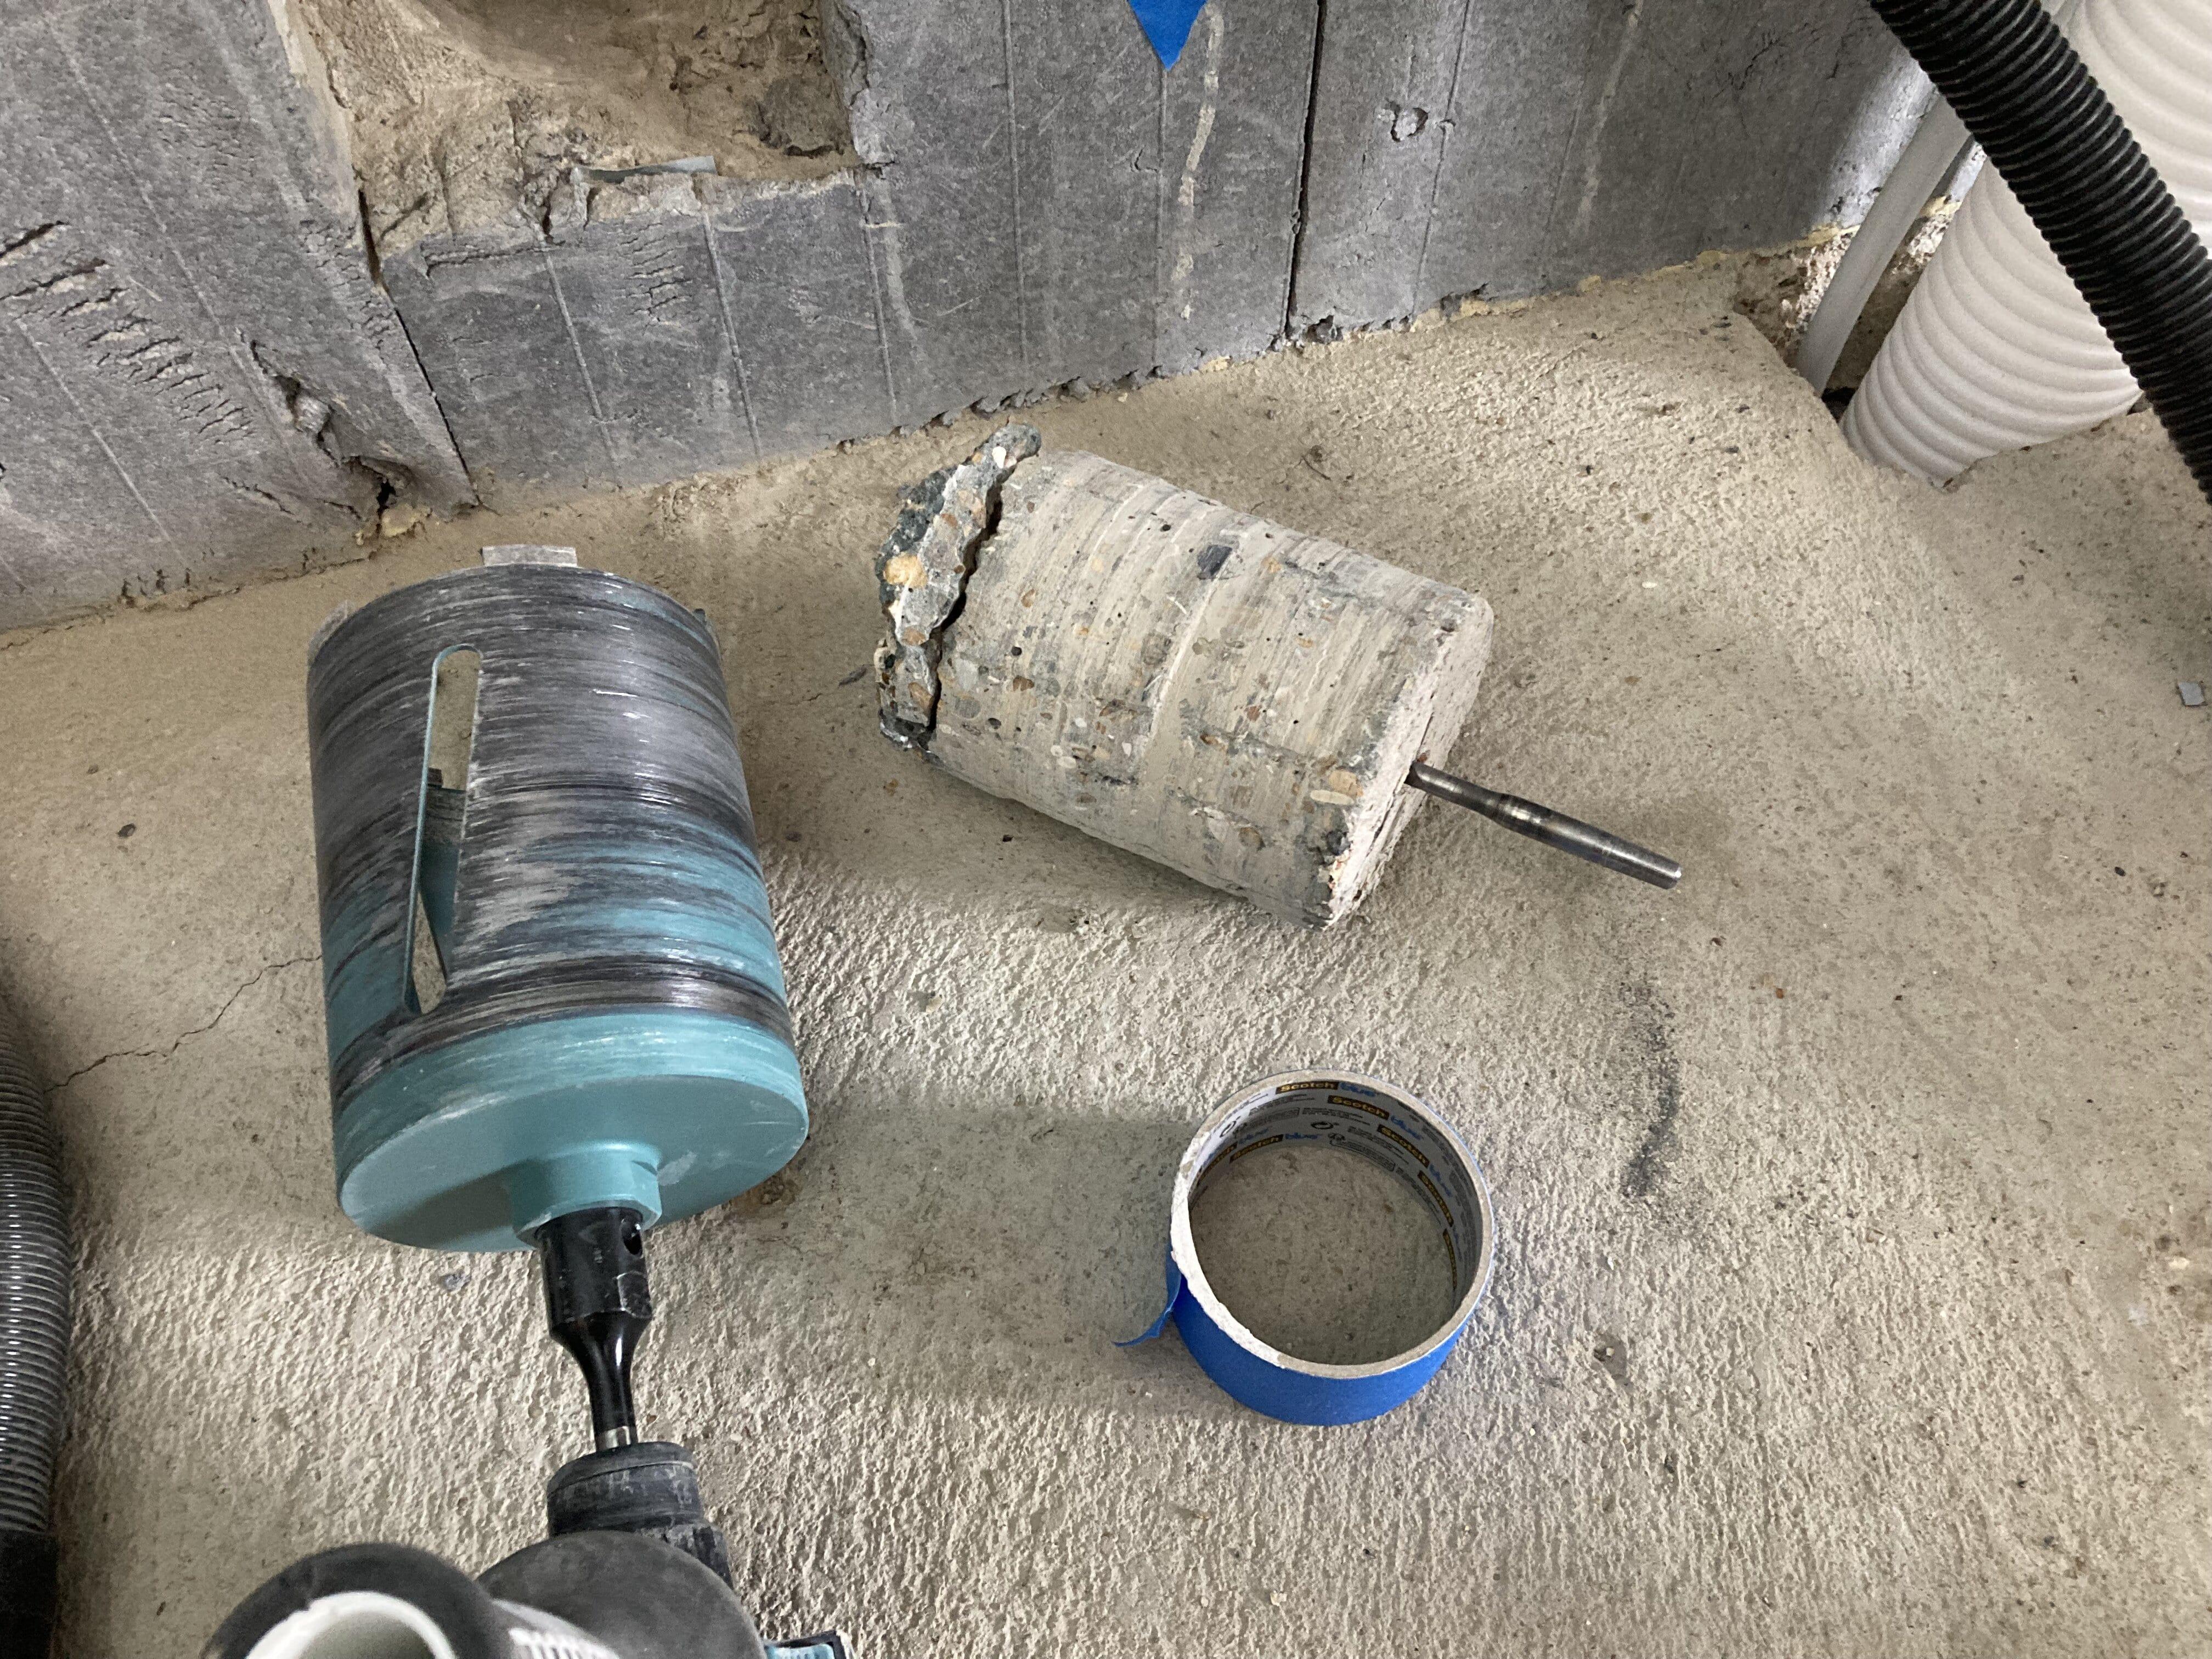
I was lucky, I was able to have most of the penetrations in place before the concrete pour. I did however have to drill one 110mm SVP hole through 150mm ICF concrete wall and two 50mm waste pipe holes through the same wall. I used my Makita SDS drill with the Erbauer diamond tripped core drill bit from Screwfix. https://www.screwfix.com/p/erbauer-diamond-core-drill-kit-3-cores/96229 The one hole killed the core bit. If you can, I would pay someone to do it for you.
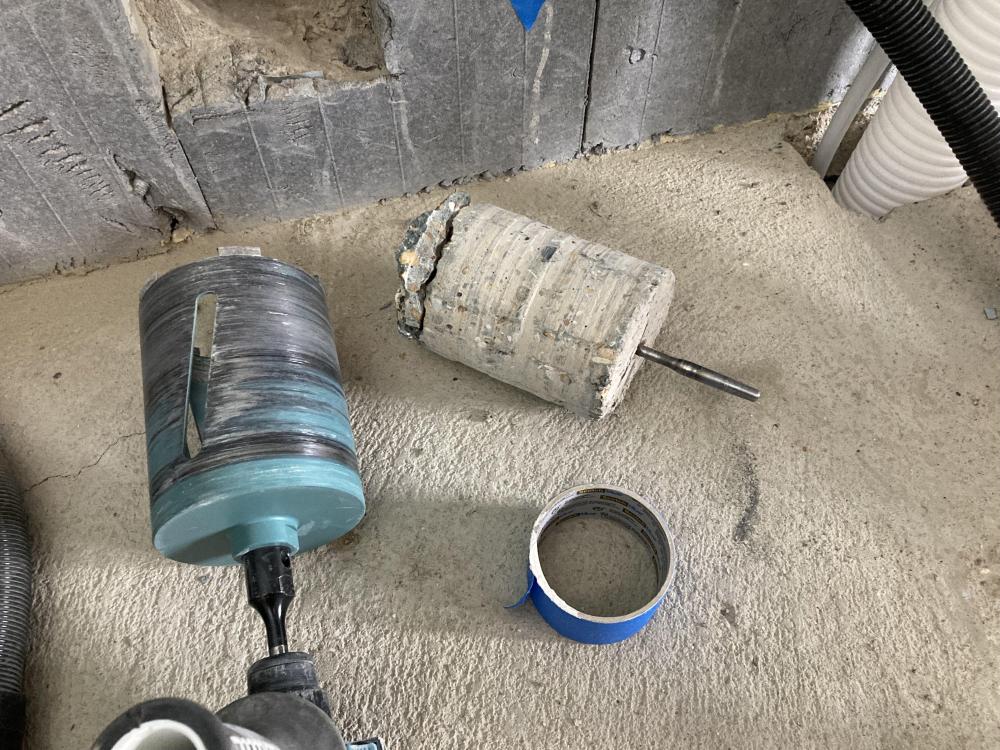 1 point
 -
I'm assuming underfloor heating! Hence slab insulation is more effective than the other locations.1 point
-
There are diminishing returns with insulation thickness. The building regulations and manufacturers don't acknowledge it though. But it is the case, especially with varying heating patterns. So I'd maybe put 50mm of eps on the bottom as it's half the price of PIR. Half as good in theory too but i think it is the pragmatic solution, especially as the outside is never far away with your layout. But air-tightness is crucial, and just needs attention to detail. so I'd take up that offer of tuition.1 point
-
Here are some useful threads, that you might have already seen. This is the one where Russell talks about using Triton TT Vapour membrane paint for prepping his window reveals. You have already seen this one about ICF and windows. There is a link in this thread to another thread about ICF windows. My ICF build is 9 miles from Diss, you’re welcome to come and visit for chat. Just send me a private message1 point
-
@Russell griffiths has built with Nudura and knows his onions.1 point
-
We are currently living in a static and I was prepared to fall back on this part of the permitted development rights PART 4 Temporary buildings and uses Class A – temporary buildings and structures Permitted development A. The provision on land of buildings, moveable structures, works, plant or machinery required temporarily in connection with and for the duration of operations being or to be carried out on, in, under or over that land or on land adjoining that land. Development not permitted A.1 Development is not permitted by Class A if— (a)the operations referred to are mining operations, or (b)planning permission is required for those operations but is not granted or deemed to be granted. Conditions A.2 Development is permitted by Class A subject to the conditions that, when the operations have been carried out— (a)any building, structure, works, plant or machinery permitted by Class A is removed, and (b)any adjoining land on which development permitted by Class A has been carried out is, as soon as reasonably practicable, reinstated to its condition before that development was carried out. However, the Council have been fine. We got an address registered, pay Council Tax with the account listed as Caravan at...... , our bins get emptied and no-one has raised an eyebrow. This is within Part 4 of the GDPO, however in your case they appear to have removed Part 1 rights (the normal PD for dwellings) so would still be available.1 point
-
Unless you're planning to purchase the expensive structural screws I would just use 90mm nails in my nail gun to secure the joists down. a little trick it to also use a dap of GripFill or even spray foam between the joist and the ledger, this will help prevent any potential squeaks as the floor will flex and move slightly. May not be a big issue with wood on wood, but if you had joist hangers it makes a huge difference, lets put it this way for the few pence it costs I'd be doing it, same with your filler piece (47x50) that will be used as solid blocking for a fully nailed diaphragm of the floor, don't forget to use GripFill or spray foam when you place your sheathing down either - makes the floor a bit more solid and prevents squeaks1 point
-
sorry. that's not a photo of our setup. we used a sticky fast flash product on ours.
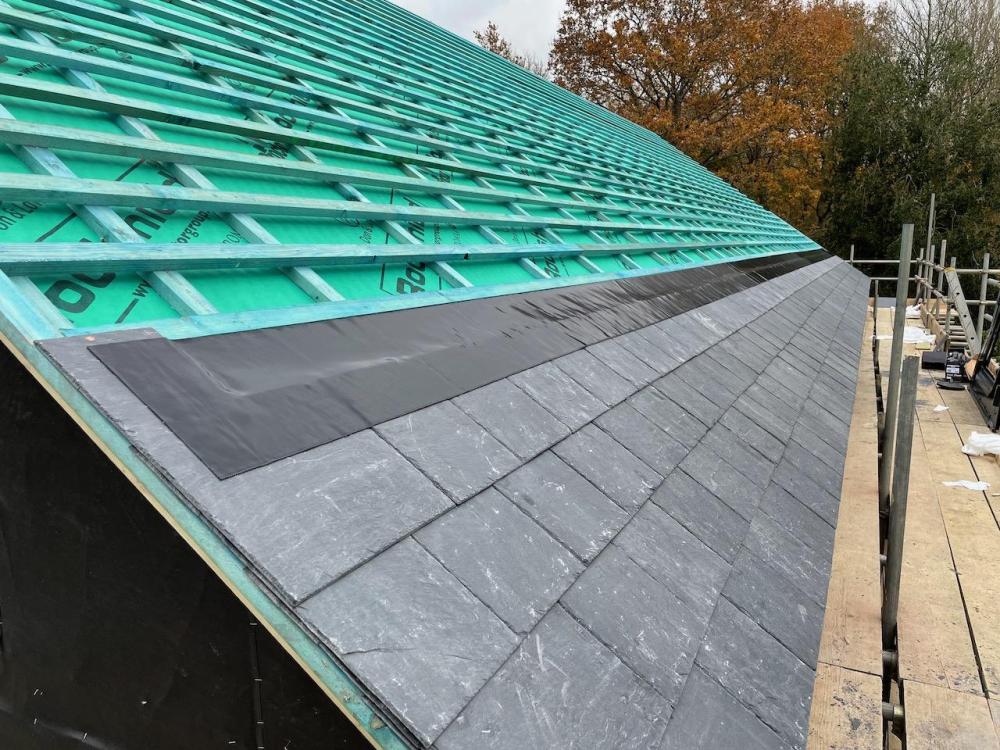 1 point
 -
dont add double felt, you want the roof to breath. There is no possibility of water ingress with a GSE tray unless the panel is physically removed. depending on what tiles you have I found lead much neater than the galv metal flashing kits as it made our tile sit too high and looked bad. Lead soakers worked perfect.1 point
-
@Nic - err that was a joke, the clue is in the word 'unicorns' A couple of examples here: http://planning.highpeak.gov.uk/portal/servlets/AttachmentShowServlet?ImageName=397554 http://publicaccess.staffsmoorlands.gov.uk/portal/servlets/AttachmentShowServlet?ImageName=1612660 points
-
It's an easy thing to test. Officially you dig 1m deep but for a quick check, do it at ground level. Dig a 300 x 300 x300 hole below the topsoil. Pour water in. Does it go away and how quickly? Then we can discuss doing it more formally, but it's just a bigger hole and a watch to hand. Sand and loam is good. You are going to be in luck.0 points