Leaderboard


Popular Content
Showing content with the highest reputation on 08/23/23 in all areas
-
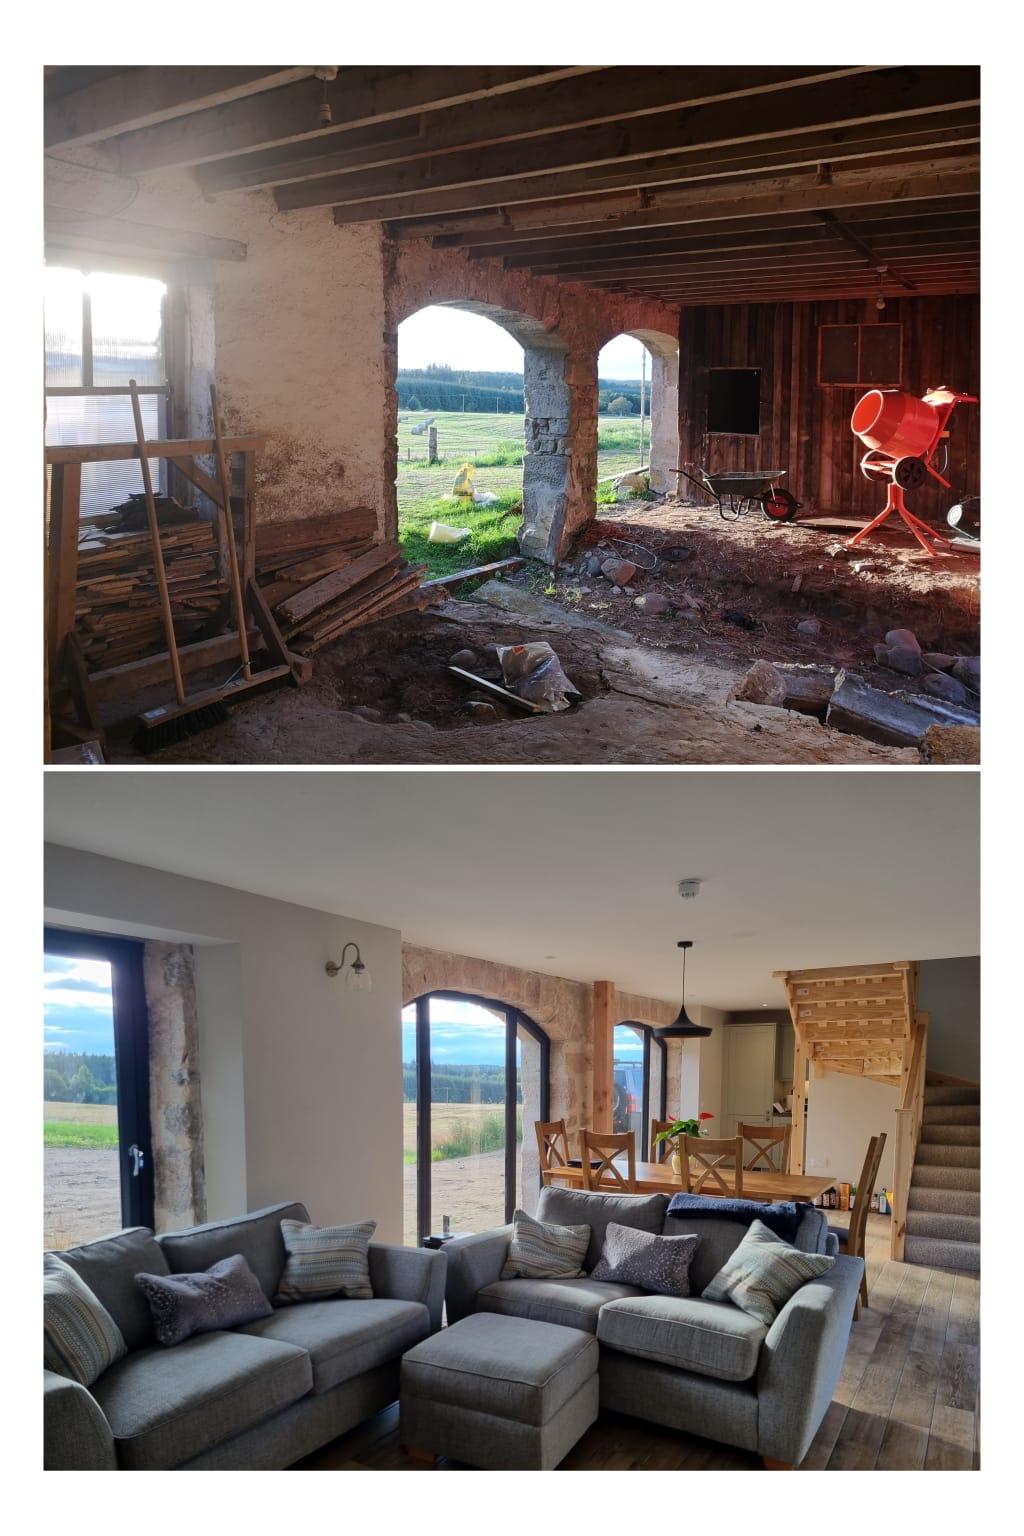
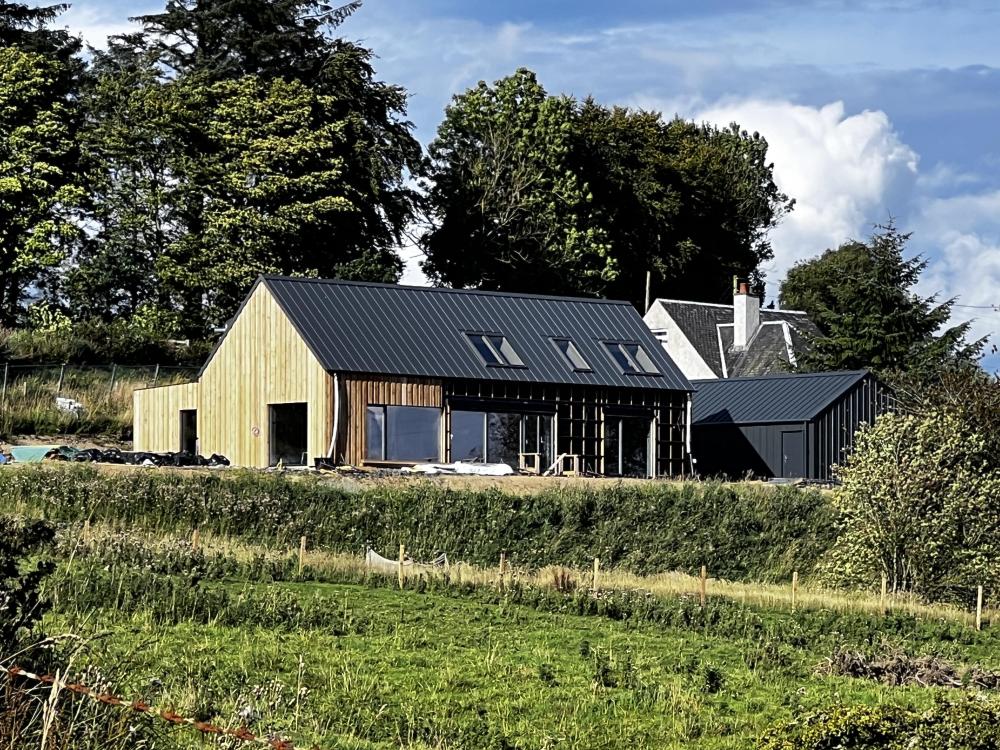
Perhaps this can inspire anyone in the process of renovation/ transformation. This has taken 2 years from purchase, and the rest of the building is still a shell being fitted out. But, yes it's a liveable space, and the caravan is almost redundant.
 2 points
 -
None of these comments are being very helpful. He’s already decided he’s putting in Loxone home automation. You wanted HA but decided against it. This isn’t a question about whether to do it or not. It’s a question about how to control it once the decision has been made to install it. First thing to consider is to reduce the total number of switches. I had far too many to start with. You then buy the dearer switches where they are in visible circulating parts of the house. The cheaper touch switches in the other rooms where you want to control multiple devices but are less used. Retractive switches elsewhere. The fact they are different matters less if they aren’t beside each other.2 points
-
I would get hold of a cheap wildlife cam, and get your car covered by that. If you catch them, pass it on to the police. As far as neighbours complaining, i wrote to the council via my solicitor advising them that, as they had found out all the calls were false. If they continued to contact me without doing due diligence first, they would be in court for harassment, causing stress, and wasting my time. Not heard from the council since.2 points
-
Ours is similar, basically slightly sloping away from door and then carries on downwards to our parking area. Slabs laid on wet sand cement mix.
 2 points
 -
Sharp putty knife or wallpaper scraper and it will peel off as fast as you can crawl2 points
-
Agreed. The PLX looks stunning to me on our roof. Very little oil canning.
 2 points
 -
My new garage has a vaulted ceiling 🤣🤣🤣🤣 in all seriousness tho I like them as a stairwell
 2 points
 -
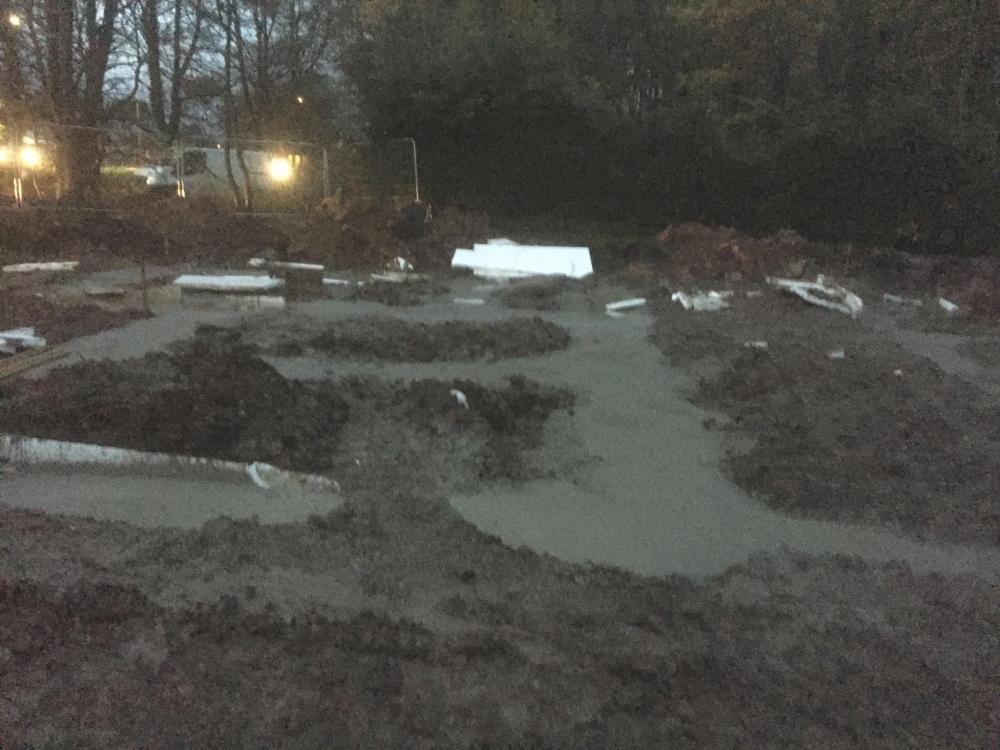
So to recap: we bought an old house with a bit of land at the back. We tried to get permission to knock it down and do a new build passiv house in the backland. The council said no no no, we lost an appeal, then put in ridiculous plans for a massive extension with basement on the existing old house, plus a large stable block on the back land where we wanted the new build. Council said yes yes yes, thats fine, please go ahead.... Having never built anything major before, we hired a 9 ton digger and a small tipper truck and set about digging a hole. The basement would start over 4m back from the existing rear wall of the old house and as long as we graded the excavation where possible and used plenty of sheet pilings, it would work out fine. To get rid of the clay soil, we just spread it out on the land at the back saving quite a bit on grab lorries. We originally planned for a four week hire of the plant, but we ended up taking about six weeks. Prior to digging I made a few test trenches to check the soil and water level. We also found an in depth soil survey from a major development next door. Once we had the hole dug in the right place, and sorted some temporary drainage, we set about levelling and pouring the basement slab. This was designed to be 300mm concrete on top of a tanking membrane, with tons of rebar. We just followed the drawings and building control came a few times to check it all. The waterproofing was overseen at each stage so we could get the warranty as well. We poured the slab in winter of 2022 and had a few cancellations due to frost. In the end we made an insulated temporary roof over the basement and used gas heaters the night before the pour just to be safe. The concrete went in very well, i think it was two loads of waterproof concrete, then we could start on the nudura walls. The hardest part of this section was wiring all the rebar together and getting the 20mm OD L bars in place which connected the slab to the nudura walls. These were doubled up all around the perimeter every 8" and a pig to get in amongst all the rebar mesh. Assembling the nudura walls was very straight forward, once i got my head around the idea of a common seam - where due to the plan measurements, the nudura blocks needed cutting and joining together. We had done the nudura course and the rep was very helpful with all my questions. Once built up, building control came out again and we ordered another three loads of water proof concrete for the walls. Where the walls joined the slab, we used an expanding waterbar and kept it dry until we poured the walls. We hired a concrete pump for the pour and because it was a basement we just used the nudura walkways and scaffolding to allow the pump hose to get round the whole perimeter. I was concerned about blow outs- especially on the first load dropping down into the bottom of the wall so I over did the shuttering on the outside of the nudura - including 220mm x 50mm floor joists screwed all around the perimeter outer edge, plus lots of OSB shuttering at all the weak points. It all worked well and it was a major relief to get the walls filled up.1 point
-
Make sure you have claimed the CIL exemption if that's a thing in your area. That's the only thing that "starting" can really mess up for you. Keep the BCO happy with a letter apologising and explaining that you are aware someone is trying to stir up trouble but that you fully intend to submit a Building Control Application and will obviously be seeking his approval in the normal way before starting the development. BCO have some discretionary powers to bend the rules (Approved Documents) if you make a mistake but are more likely to do this if you have been making an effort to comply and help make his job easier. For example we discovered an issue with the opening width of a window. BCO said he would allow it if we uprated the door on that room. It would have cost a fortune to replace the window due to some oak framing.1 point
-
Hi, Assuming you're not commercial premises or driven by some sort of regulation. 3-4 strategically placed Vapona stickers do surprisingly well & last years. Touch wood after year 1 in the house and turning the heating up that first spring, triggering a hatching a deluge, haven't suffered from flys since. https://www.ebay.co.uk/itm/2256125012131 point
-
thanks everybody, UM35 it is then! Although in my head I still can't get round the fact that 20 years ago they wouldn't have had any membranes and people have been tiling onto slabs for god knows how long. So what's changed? Why can't you just tile on something like a lime mortar which inherently is very soft/flexible, and worst case is a tile goes loose (rather than cracks) and you just re-lay it on some fresh lime mortar...1 point
-
reverse the ASHP to cool the UFH slab, fancoil units dotted about to help as well.1 point
-
Yeah, I've left a 15mm gap between the frame and the paving. Our build is a bit different as it's ICF with a basement so we're tanked up to ground level then DPC lapped over to about 200mm above FFL. Tanking also goes right up and over the door block. Also north facing and sheltered so no real worries.1 point
-
Correct if they were windows! The reveals do not need anything more than the normal insulated closers to pass regs as the doors are a decent U value already. We will be dabbing 25mm insulated plasterboard on every reveal anyway because why not.1 point
-
They might. The wording of the FO request needs to be carefully considered. A thick skin is cheaper and less effort. 8 years in to our build and the guy a couple of doors down still holds on to the anger he expresses at me not selling him the plot on which we built Salamander Cottage. Last week, by accident, he waved as he drove past the build. Nearly had a quick Scotch on the basis of a scintilla of recognition after 8 years.1 point
-
As if it wasn't hard enough to get all this stuff moving. You have our sympathies. Sometimes par for the course it seems. Maybe a polite round robin letter to the local neighbours informing them of progress etc but also mentioning the damage and asking them to contact you directly if they have any problems. There's nothing like bright light to make little buggy things crawl back under their stone. I have one neighbour who's already tried a couple of tricks and we have not even finished planning yet.1 point
-
Why don't they stop it? Thermolite thermal conductivity is 0.14 and they are 215mm high while Marmox is 0.05W/mK, but 65mm high. So resulting U valve is lower for the Thermolite block - 0.65 compared to 0.77 for the downward direction. I think sideways they are similar, but any insulation in the cavity will stop sideways anyway.1 point
-
Shuttered it all and put a layer of mesh in it. Directly on top of the backfill stones. Then layer pavers on with 30mm cement bed. We'll put some sort of facing brick or kerb on it when we finalise the driveway. Landing is 1200mm deep and path is 900 + 10pmm stone channel. Slopes down to the final drive level. There's more paving to be done plus a canopy porch at the front door.
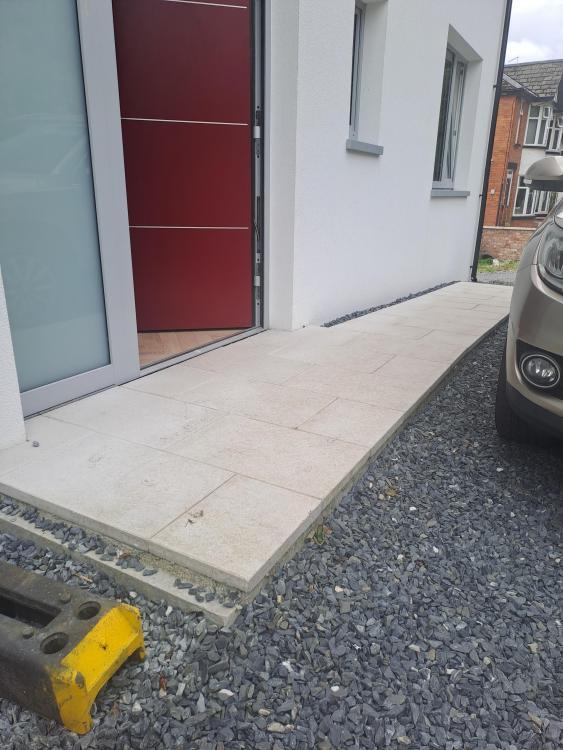 1 point
 -
yes will be fine, they will be compacted before laying the pavers. insist on a full bed not spot laying.1 point
-
something about building brings out the hate in people. Just ignore them, BCO certianly will. They have seen it all before nimby neighbours moaning about every little thing, noise, deliveries, etc etc you have to develop a thick skin and just be polite and firm to the moaners. get a body cam if it gets really bad so you can capture evidence.1 point
-
We have two double height spaces, one above the living area, one in the entrance hall. So far, pros: The sense of space in our otherwise fairly small living room area (4.5mx4.5m, part of a 4.5m x 7m open plan kitchen/living room) Adds a bit of drama to a small, simple house Makes both spaces feel very light and airy Cons Noise travels very well through the house via the entrance hall Overheating in the living space as the velux windows in the roof are south facing and too high for us to open for venting (we installed remote controlled solar blinds and these have mitigated some of the solar gain) On reflection I wouldn't change it. I've seen similar builds to ours by the same kit company where people have opted to get rid of the double height space and in pictures the same spaces appear very poky and quite dark. I can't say they're practical though! But life isn't all about practicality.1 point
-
Quite. Which is why I stress (above) '... in our particular situation...' Even though we are 'light-and-airy' we still need MVHR. But I now realise that for 5 to 6 months of the year the system will be switched off. If I can't take a joke, I should not have started this build should I ? Keep smiling and get on with the next job.1 point
-
Do what we did, come out level with the house more than you need to to make a nice big level entrance. Then slope the path down from that level platform. The reason for the bigger than need be level platform is it then puts the path a bit further from the house wall so your idea of sloped grassy sides will work.1 point
-
Having stayed in a few houses with MVHR the first thing you notice is how pleasant the atmosphere is. Cool and fresh. We are still building our house obviously but as I’ve been going around sealing the house up I’ve noticed how stuffy it’s quickly become. Cross ventilation is easy in our house given the way it’s laid out however if I were to rely solely on opening windows I’d spend my days running around opening and closing them due to the rain unless you automated that. If you go out for the day and shut the house up doesn’t it become a bit stuffy again? Ours does but it is still drying out.1 point
-
It should have read 150mm hardcore, 50mm sand, DPC, 100mm concrete sub floor, insulation 150mm, 65mm screed.1 point
-
I have just excavated 1m below ground level and filled it to 600 mm below ground so 400 mm of concrete and LABC and the warranty inspector were happy with that, then had 375mm to the underside of insulated beam and block then 300 mm of beam and insulated block leaving 75 mm for cemfloor screed over the top to DPC. Like Dave says work from the top down.1 point
-
You could borrow mine for a couple of weeks. It would help me with procrastination points on the house not finished thread... I will need it back because the house is really bad for co2 and heat build up when we work in there and there isn't a good through draft.1 point
-
MVHR first fit already in place. As I write this post the large slider is open, and both suicide doors upstairs are on tilt. There's no apparent draft, (but there is one I'm sure). And I'm sure that as I get (even) older, I'll feel that more. Just about to have a shower in the wet room : window wide open, door shut - yes there's a draft under the door . Floor dries itself in a few minutes. My point is that there's an obvious advantage to the application of MVHR systems. But the cost - for us i.e. not in general - is effectively double what it is for many ; that is those people who need to use MVHR because of local characteristics. The accident of not being able to afford MVHR (yet) has been an excellent opportunity to see how the house performs WITHOUT MVHR. And I'm saying that in our case, the house performs very well without it. So I'm hinting that others might like consider delaying the second-fit of their MVHR system until they see how their house performs without it. In recognition of @SteamyTea's consistent reference to data-based and evidence - based design, I've now got a couple of years of temperature and RH data. (Using 5 Sensor Push data recorders) . Time to have a look at that data soon, I suspect.1 point
-
If no DPM between hardcore and slab then no need for a sand blinding layer1 point
-
If I am sinking my doors into the floor. I usually do like the picture. Because of the depth of cills available, I usually find that door frames end up sitting forward of the cavity regardless of size. I also try and improve the head and reveals. Providing everything is nice and tight, I have never had my screed cracking.
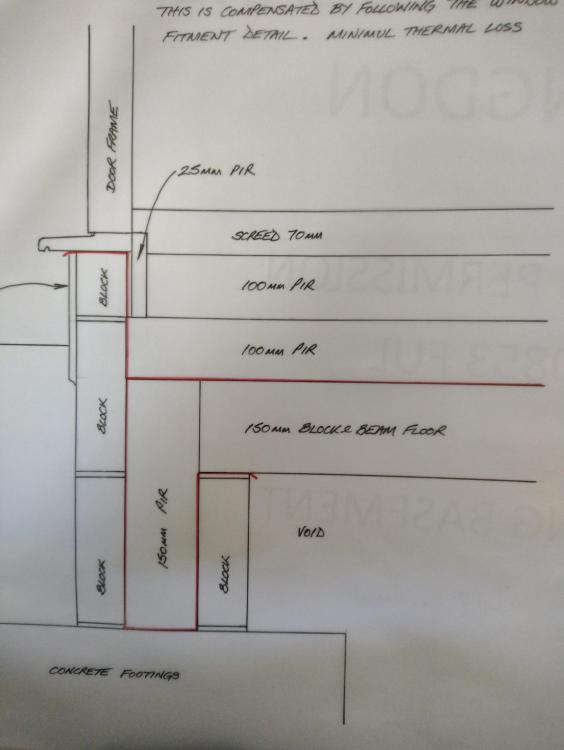 1 point
 -
Just reading this thread. Mine is similar to the image also. I filled my cavity with PIR. The area circled and blocks directly below, I used Thermolite blocks and doing the calculations (sideways and downwards) I found there was less of a cold bridge when I compared to Marmox. I also used Thermolite at the thresholds for the same reason.1 point
-
There is a lot I like about humidity controlled MEV system. One fan on extract only, but only when required in the area required. Humidity controlled inlets and extract points, fan speed increasing only when required. Way cheaper to install and run when compared to MVHR, but offset by slightly increased heating costs.1 point
-
It's good to see that it was put down with plenty of glue. Will clean up using a wide chisel. It will take you about an hour a room. If you are watertight it might be worth asking your builder if he is planning on doing it.1 point
-
more too it than that. You need to set your finished floor level and work down from there. This will largely dictate what you use. For example, if you are on roughly level ground your FFL/DPC would be around 150mm above that. working down: screed - 75mm insulation - 300mm EPS Beam - 150/225 depending on spec brick to sit beam on 75mm trench block to give 150mm clear space below the beam 225 so as a bare minimum you are into the ground 675mm already and this assumes your drains work with this. So a 1m footing would only give you 325mm of conc which wouldn't be much, BCO like a min of 600 which now puts you at 1300 into the ground etc. It's a cost equation between muckaway vs conc cost etc1 point
-
Been drinking Lidl version of redbull, called Kong, should keep me up for a while. I always open a tin at Swindon, keeps me alert till past Bristol. Would hate to have an accident there and wake up to @Pocster bringing me grapes. Or gropes in his case.1 point
-
We are the opposite, windows and doord shut all day, if the sun's out underfloor cooling on (powered by PV). Basically keep the heat out and don't let it in. Once the temps drop outside or the inside exceeds the outside due to the oversized glazing, then a couple windows at front are opened and rear door opened for a blow through. MVHR on all the time.1 point
-
You don't get hayfever then. Or live in a noisy place.1 point
-
They are really the same thing Full fill More money on concrete less on bricklayers I full filled on our first build Largely due to wet conditions 1800 mil of concrete It made building the foundations for the BB quick and easy This time Mainly due to drainage I partially filled
 1 point
 -
I would say Luton van should suffice.1 point
-
Just undercut the door, Uber simple, no cost, next to zero noise transfer. Making something costly, complex for no good reason. Spend your money on good design so the noise transfer from the MVHR unit is minimised. Big ducts for low velocity, oversized MVHR unit for low running speed and decent plenum.1 point
-
My default is 5mm for anything doing something substantial (shelves, weight bearing structures) and 3.5mm for lighter applications.1 point
-
1 point
-
8x40 means it’s 8mm drill and plug is 40mm long. screws will be 5mm and length depends on what the wall build up is. If dot and dab plasterboard then plug and screw need burying into the block or brick behind. More info on wall build up will help1 point
-
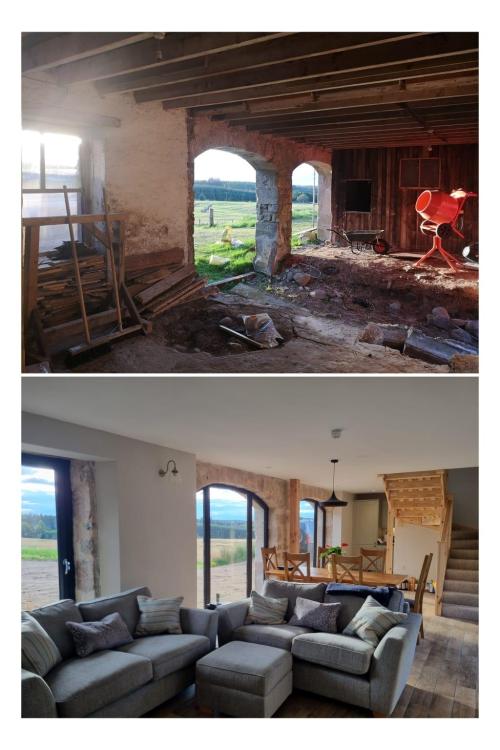
Yes. builder developers only want to demolish and build new, and it is obvious why. We saw similar buildings being allowed, perhaps encouraged, to fail, to permit demolition. Back to nerdy stuff. This photo is a good example of how much internal space is lost with the inner stud construction. The exposed stone is with the bco's blessing. Makes a change from all the white boxes he sees every day. Of course we will lose energy through that stone, but there is a complex formula trading off thermal efficiency with historic interest and character. In any case the thermal efficiency of a 600 thick stone wall in 3 skins is not hopeless.1 point
-
It is astounding. Barley fields then north. Aurora borealis or sunsets.1 point
-
thanks for this. I've been thinking about my double pump setup and whether I have 2 pumps at the same level so they 'share' the load or if I have them at different heights for a redundant solution? I think we were simply really unlucky on this one. an old cheap pump combined with many deluges of rain and no safety precautions in place. but, in saying that, I might opt for a double pump at the same level AND one at a higher level (our sump is about 2m deep so can accommodate this I think). then we'll need to have 3 pumps fail and be a LONG way from home for it to be an issue ever again. ps. will check out the Zoellar pumps. thanks for the tip.1 point
-
To add My rainwater Zoellar pumps are at 2 different heights in a pit I.e lower than my basement floor . I have a HA sensor on the higher one - that informs me if it comes on . As it’s higher it should *never* come on as the lower one should trigger first . So if it gets activated I know the primary pump has an issue . You need a proper approach to this - with multiple fail safes .1 point
-
Right ! This was always my fear ! I have 2 sumps with high water alarm for grey / sewage water . Hi water alarm is audible but also linked to my HA . I also have 2 on Zoellar pumps for rainwater . I tested lots of pumps ! They all failed for various reasons . Zoellar are easily the best . Not cheap . Flooding is the thing that cannot happen. . I bought from https://www.sumpsandpumpsdirect.co.uk Don’t cut corners on this - bolts ‘n’ braces and then some . My configuration would require 4 pumps to fail before any flooding would occur .1 point
-
Ebara (Italian) are good pumps, we use one in the sewage pumping station at our previous house https://www.tradepumps.com/manufacturers/ebara-pumps/ebara-submersible-pumps1 point
-
I bet they look pretty when are set to operate 2 blinds, and 4 light circuits all off one single switch plate?0 points