Leaderboard
Popular Content
Showing content with the highest reputation on 11/09/22 in all areas
-
3 points
-
I have twice successfully challenged a Valuation Office banding. The first time I was prepared to go to appeal and then received a letter, few days before the appeal date, agreeing my banding request. The second time I wanted a banding two below their decision, and we compromised on one below.3 points
-
No, and now I have finished the house my wife announced she wanted a divorce, lovely judge decided she gets a big chunk despite me funding nearly all of it , and neither of us can live here 🤯 (sorry fir the rant but I am very pi##ed off), oh, and thanks fir the offer 👍2 points
-
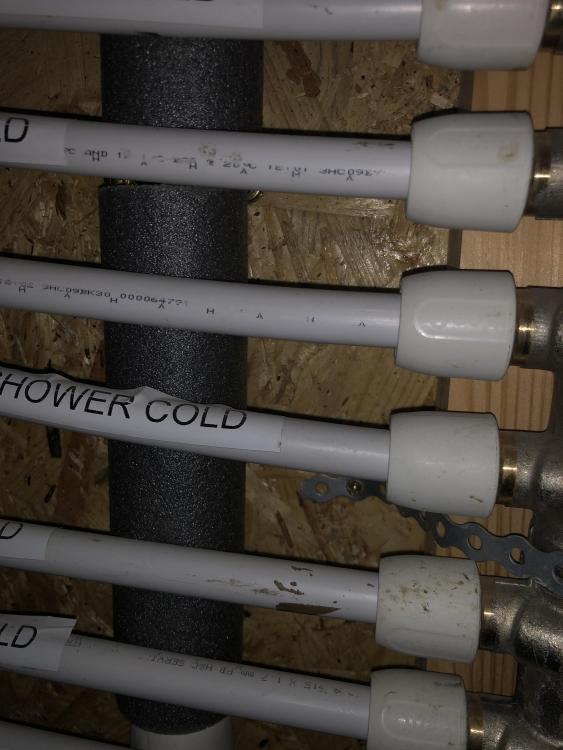
Fewer thermostats (perhaps only one), no need for per-loop actuators, no need to worry about changing flow rates as different numbers of zones are calling for heat, possibility to avoid a buffer tank (because you're always using the whole volume of the UFH loops). It works fine in a well-insulated house. We've been running ours like this for 7 years without any issues. If you really prefer having a zone a bit warmer/cooler than the rest, you can just manually adjust the flow rates on the manifold. I just run all of ours flat out though.2 points
-
Yes I currently have one of those, and also a noisy as heck cheapo 1kW supply for LEDs that I only fire up when actually needed. The meanwell you link had very low standby current so probably no need to power them off even if unloaded (all lights out). But it also has negligible power on time and very quiet, and fits a future automation cabinet well. Just will take up a couple rows as you say If doing it again, I'd either do the Loxone battery PSU for one stop simplicity, or roll my own using AGM batteries and 24V regulator, and perhaps drive LEDs direct from the batteries (esp any constant current fixtures) to avoid the overhead of regulating them... Possibly with some logic to trim their brightness dynamically based on the battery level if necessary.1 point
-
Of course, it's like having 7 separate PSUs to subdivide as you like. E.g maybe keep one for audio, one for everything else in the cabinet, and the others for external devices. Split them up so if a fuse pops you don't loose an entire floor of lighting. Keep things critical away from nice to haves. Etc It will provide up to 1440W for 10s, and is on the tree bus so will tell you live loading and if it's overloaded so you could even program logic to respond and cull the least important accent lighting on the very unlikely chance everything is on at once. Unconventional but actually quite cute https://www.loxone.com/enen/kb/power-supply-backup-block/1 point
-
@Thorfun Other option for control via DMX could be these: http://whitewing.co.uk/rgbdim48.html (there is even a 96 channel one too!). This might be a good option if you wanted to centralize everything and run (correctly-sized) 5-core to RGBW strips and (correctly-sized) 2-core to white strips. This article talks about the Locone RGBW Compact, it's PWM frequency, and DMX alterantives from AliExpress. https://smarthome.exposed/24v-dmx-dimmers/ I'm using the EldoLED LinearDrive product which my LED tape supplier recommended and supplied. Mine are DALI, but looks like they do 1 and 4-channel DMX ones too.1 point
-
1 point
-
You’ll find that many brick layers in NI will use check reveals if only by 15-25mm. Many tend to use check reveals so that they can close the cavity with calcium silicate board before the windows are fitted.1 point
-
PIR or similar was never an option anyway because of the lack of DPC in the walls, though yes, you could be right. Though the back half of the house is modern and that didnt float away! The issue before i started was concrete slab over DPM creating wet walls with gypsum plaster over. Creating the same again wasnt happening. The arrangement is basically the same as this: https://www.lime.org.uk/products/sylfaenr-foundation-system.html The walls are lime plastered both to allow the wall to breate, and also to allow it to dry if it gets wet in a flood. I know there are wildly differing opinions on this, but removing the concrete/dpm and gypsum plater fixed all the damp issues in my house. quickly. I know what i see. But ultimately, keeping things damp free, and not not having to strip off plaster post flood meant that the thermal performance came a poor second. No idea what the power loss is. Didnt worry about it as theres nothing i can do about it. Just concentrated on the detaling to make as draught free as poss. For reference its a 9 inch wall with lime plaster on the inside and unknown render on the outside.1 point
-
Assuming the place is watertight and it is now just a case drying out, then a tiny bit of basic physics may help. Relative humidity is not the amount of actual H2O in a mass of air, rather it is a ratio of the amount of H2O that is in the air to the total amount it could potentially contain. This is why it varies with temperature. Think of it as a sponge that can hold 100g of water, but is only holding 75g of water, still feels wet. There are three main ways to get rid of liquid H2O, physically remove it i.e. find something to mop it up. Heat it until it evaporates i.e. blow hot air on it. Change the ratio of dry air to wet solids i.e. dispersion/diffusion. Usually we do the latter two in one cycle, so we heat which lowers the RH, then we disperse it into heated air, that is at an even lower RH. Now if you cannot easily run a fan off electricity, some sort of natural ventilation will be needed, careful design can increase this. One way to increase the input of outside air is to have a hole in the wall downstairs, and another hole in the wall upstairs, then add heat near the hole downstairs. This will reduce the RH of the air in the building, which improves the evaporation rate: evaporation takes place at all temperatures, not just above 0°C. By allowing the hot air to rise though the building, while being replaced with air from outside (which will almost certainly have a lower amount of H2O in it), drying will slowly take place. This is why forced ventilation is used, because if you are only taking out a few grams of H2O every hour with natural ventilation, it will take a very long time. If you are on site, or the site is very secure, you could use a portable generator and a gas heater to heat and force the wetter air out. If the structure of the building is very wet, then it will take a long time, and a lot of energy. You may be better off making up some clear windows on the sunny side, and let the sun help (wait till March). Also removing all plaster and getting back to the minimum structure will reduce the amount of trapped H2O that has to be removed. If it is a single skin brick building, make sure the wall 'facing the weather' usually the SW side, has good pointing and maybe a waterproof treatment. Purely as an experiment, it would be interesting to put a sheet of clear acrylic over the outside sunny wall to act as a greenhouse. This could help heat the wall from the outside, while also keeping it dry. Small vent holes at the top would be necessary.1 point
-
I asked for one at my local hss hire shop - they told me to (expletive deleted) off1 point
-
OVO man here as we speak fitting a 3 phase meter.1 point
-
Yes I did check reveals and love the results, I fixed to the outer leaf with stainless brackets and screws. As ours was a brick build I got the brick layer to use whole or half bricks and sized the windows to match overlapping by 20mm each side.1 point
-
1 point
-
I'd had a similar idea, but unfortunately the shed supplier I'm using doesn't offer rooflights. It's a wooden roof with an acrylic felt. Probably a bit tricky to cut into without compromising the waterproofing.1 point
-
1 point
-
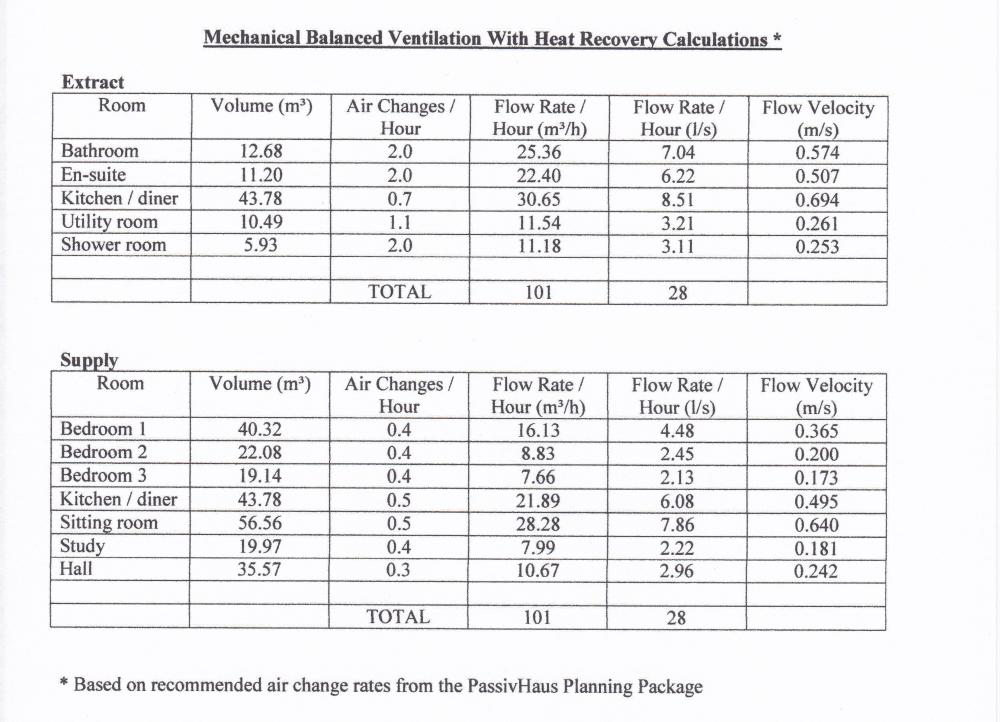
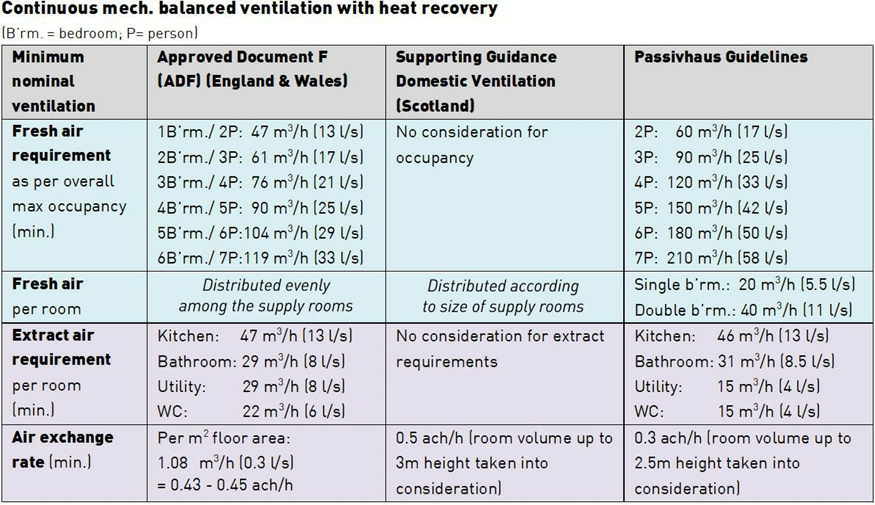
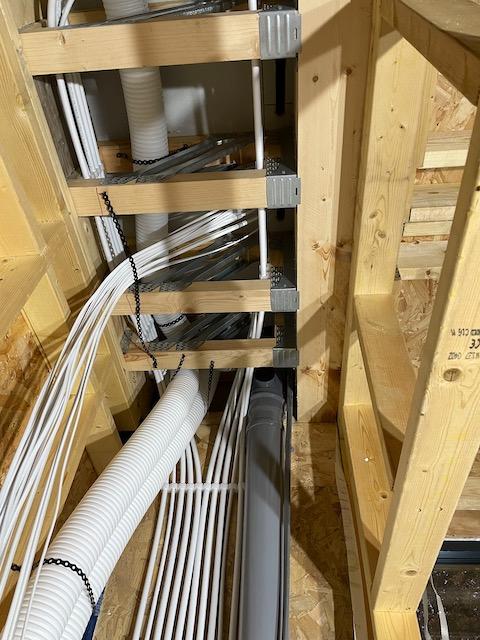
The mechanical side of our MVHR installation was one of the very few things we entirely did ourselves. It was extremely easy. We had a layout from the supplier, but when we went to do the installation we realised that the open-web joists allowed much shorter routing in some places, by going on the diagonal. In terms of tips, I'd suggest making sure that there are no "closed" routes. We had a minor scare when we realised all supporting joists around our stairwell were solid, even though half of them were shown as open-web on the plans. Thankfully, the savings we made pulling some of the runs on the diagonal left us with more than enough to take a slightly longer route around the stairs to reach the affected room. For pulling through the ducts, you really need two people, as they tend to catch on edges of joist webbing. Where your ducts join the manifold, you should ideally have a reasonable length of straight run beforehand. That is, don't have a duct bending right before the manifold. It makes them harder to join to the manifold, and can really obstruct the paths of adjacent ducts. Think carefully about whether manifold position can reduce your runs. In our case, moving the manifolds by a few couple of metres saved us multiples of that distance in ducts, because nearly all of the runs went in the direction we moved the manifolds. For example, if you have 10 ducts coming out of a manifold and they're all going in the same direction, moving the manifold 1m in that direction saves you 10m of duct. You might not have the option to do that, but we had the space and it worked well. Think about how you're going to support the ducts, as they shouldn't have significant dips along their length. It can be as simple as some offcuts of wood bridging wider gaps, and/or using something like leftover breather membrane screwed to something above to provide support.1 point
-
Can’t you send the drawings to some local contractors to get a feel for the price and availability?1 point
-
Better to price by day rate, it's about £200 a day here for most trades.1 point
-
I let WUNDA do the design and then I just installed it to how they drew it - easy enough.1 point
-
1 point
-
outbuildings do count as does amenity land which is a vague description of in my case a field I can use for exercise or growing produce etc as opposed to general gardens. you are assed on internal useable sq feet so yes thickness of walls should be taken into account. Comparing with similar properties is useful but beware it is difficult for example a house with a large extension should only be reassessed when sold, not when the extension is completed hence why estate agents don’t all say the council tax band or put a caveat in the wording. some use full links below. https://www.gov.uk/challenge-council-tax-band https://www.n-kesteven.gov.uk/_resources/assets/attachment/full/0/4717.pdf1 point
-
Like that. Often I'll do the same as just like to do a good job in the round. Look at this another way... last man on the job gets the blame. No point in doing a great SE job on the house if the garden / retaining wall falls down.. even if you had no hand in it!1 point
-
Yes there may have been a water leak from the old kitchen, that said it doesn't look like it has impacted on the floor joists structurally. With my SE hat on I need to say that screeds are heavy so you should check this out in terms of the main floor joists being able to carry the extra load from the screed. Have put this caveat in as have seen some floors that run off level by 75mm say on old tenement flats.. thus a 75mm thick levelling screed is going to add a fair weight! In terms of moving forward (SE view accepted) I would also put some noggings (dwangs) in under the weak spots in the floor boards with D4 expanding Pu glue to make sure you don't get a squeeky floor later on. What you are aiming to do is to just support the edges of the floor boards where they could rub together later on. Fifteen minutes work and less than a tenner to avoid that annoying squeek.1 point
-
Plus one to that. Much will depend on the type of soil you have. You'll often be surprised at how much load a wall like that needs to resist. What you are doing is interesting to us "soily / foundation" types on BH so if you want post more info folk will hopefully be able to help a bit. Things I would like to know as a starting point Where is the boundary. What kind of soil do you have How far is the neighbour's house from the wall Where is your house in relation to the wall What are the ground levels in front of the wall.. do they carry on sloping down or flat? How long is the wall. How are you wanting to do the returns on the wall? Are these close to the boundary? Good drawing by the way.1 point
-
1 point
-
1 point
-
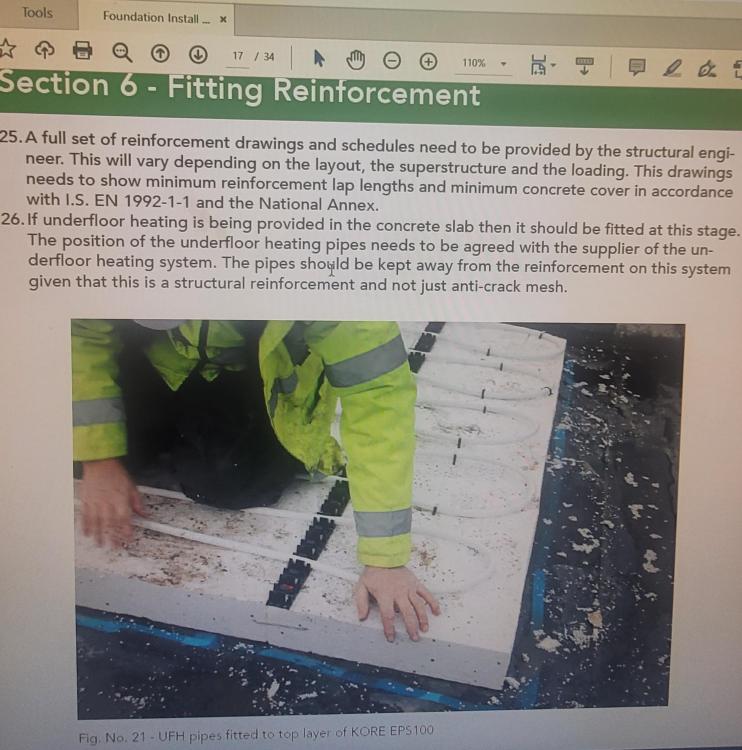
I purchased all my UFH kit from Outsourced energy. Just buy what you need. The floor would be quicker to heat in a thin screed, but only if the insulation is directly below the screed, if it has to heat up the concrete below also it will be no quicker than in the concrete. UFH isn't a radiators system it is slow, suits a heat pump as it can used at very low temperature for a long period. Many on here have directly attached to the mesh. Not really understanding Kore's statement on the mesh being structural as that has nothing to do with the UFH pipes. UFH seems complicated when you first look at it. But is quite simple when you actually get into the nuts and bolts of it. Download a free copy of loopcad. That will develop a plan for you to give to the plumber. Your piping centers can be just about anything you like, I did 300mm, most do 150-200mm. Do loops no more than 100m long. Once you have a plan, you will have piping quantity, number of loops for you manifold etc. Get a low temp mixer/pump such as an Ivar.1 point
-
I have used a hole saw on steel beams, but only 40mm or so. You may get up to 60mm with a mag drill but I don't think it will fit. I would be pretty pissed off with your so-called professionals leaving you with such a ball-ache of a job. Lazy bastards.1 point
-
RED are trying to compensate for misguided desire to some a system / general inability to design / balance a space heating circuit by using a very American style pumped zone setup then speed controlling the pumps to set the deltaT. You can do pretty much exactly the same thing with any other heat pump if you swap the inbuilt pump for a spool piece and ensure that your minimum zone flow exceeds that of the heat pump. Pointless though. Just do the pipes and valves right on the space heating circuit...1 point
-
Oh, that might be your problem. The buffer tank is probably too small IMO. Your ASHP's output goes to the buffer tank and returns. As the water mass is too small it can't transfer enough heat to the "secondary" circuit so there is no temperature drop. edit: why is the consumption so high, that I don't know...1 point
-
There is a guy on here, from Wales, that refused point blank to try that. He gets upset that his ASHP is useless. Glad you got it sorted.1 point
-
0 points
-
0 points
-
To (expletive deleted)ing neat for me . Of course you are only showing us the best bits .0 points
-
@MikeSharp01 I've always thought that Mike talks a lot of sense. And it would seem I now have proof positive. Courtesy of Geberit. We have Toulouse, one upstairs, the other down : 2 Geberit Tuma Classics : Botticelli-spraying dervishes they are, bit of a shock first time, but you soon get used to it. Brilliant for lower back injuries. Wish we'd bought the bum-drying version now. But you live and learn. They need to to be descaled every so often. And of course, I forgot. The mechanism refused to work. Being Swiss, it dug its heels in and simply refused. Rang Tech assistance. Very nice man. Very nice Tecchie indeed. Would I please download the App. What? An app for an arse-spraying dervish? Yep Did so. First job(by) : update the firmware (on the toilet itself 😶) Click here. Job done. Next job : initiate descaling. Job done You might like to have a look through the rest of the app says the Tecchie Lad. And what do I find on the app? You can use your phone as a the remote control for the spraying arm. Thats right, you finally have an excuse to take your phone into the loo with you. Just to prove it, here's a screenshot I took when I was ---- Yes, you can have cold water or warm water...... an idea starts to germinate, you make the spray really strong or soft ... tick tick tick 👹 It works by Bluetooth .... the signal is really strong.... With me yet? My mate comes round and blags a couple of beers. You're ahead of me now aren't ya? Yes. I did. But I'd made a mistake in my logic. @MikeSharp01 is exactly right. The IoT was - in this case - an opportunity for a Ne'er-do-well. He was standing up for a tinkle. Not sitting down. Duuhhhhhhhh. The sprayer came out and sprayed when it was told to. And the sprayer jet made him look like he'd peed his trousers. Ne'er-do-well is too kind a term. Forty Hail Marys and sit on the Naughty Step for a while.0 points
-
And for a brief moment I was actually trying to work out how 'magnetic iron composite printer filament' could absorb moisture and almost had a theory in mind that I was comfortable with!0 points
-
0 points




.jpg.c21f3ac78c9b7efd90cbdcb312744dc5.thumb.jpg.7adcad4c0e384f5ecd7d56b0618df6e5.jpg)


