Leaderboard
Popular Content
Showing content with the highest reputation on 06/15/22 in all areas
-
Have you allowed for the restriction of the outlet that each pipe terminated into? VS what will come out of the end of the pipe? All completely academic imho, as larger pipes / higher dynamic flow rates etc are all arrested by the outlet and its governed output rate as set by the European standards for the max typical flow rates ( in line with water consumption regs ). The gross variables involved make this nigh-on incalculable afaic. The flow rates will all shift the second another outlet is opened elsewhere too, so further reducing the dynamic flow rates. For actual real world experiences, I have done multiple 10mm and 15mm radial whole of house installations, with pipe runs up to and beyond 30m, and there are no real world issues at all. Either install a HRC or just wait. As for filling a basin, you simply start shaving BEFORE the basin is full Simples!! Too much maths here, and I genuinely fear you're worry over nothing.3 points
-
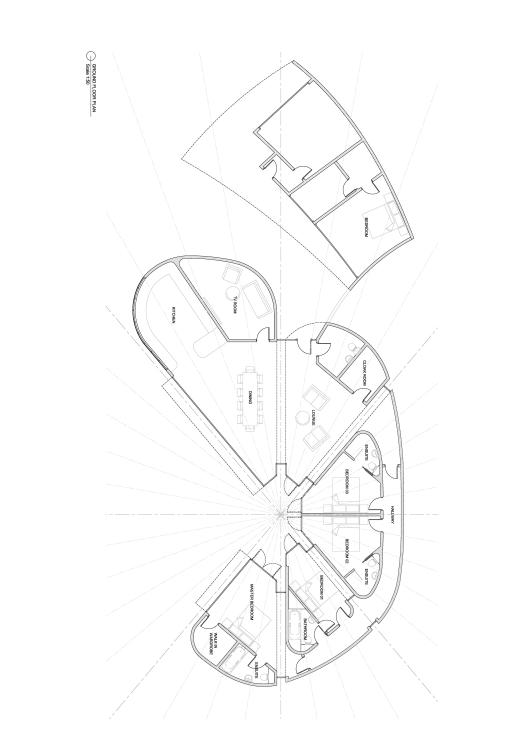
Your bedrooms seem awfully constrained given the total wallspace. Curves and none right-angles might look graceful on paper but are a total PITA when it comes to adding furniture / wardrobes / hanging space, etc. Heating must be UFH (which is the best choice anyway) as you will have no available wallspace for rads. Why not space out BR1 & 2 with a separating double wall (only one side will need to be load bearing) and split this into 2 walk-in wardrobes for the two bedrooms? OK, I see that you have a decent walk-in for the MBR, but nothing for BR 1-3 and this is especially the case given that you've got opposing doors creating round-bed access corridors. This type of layout could work if you are only two occupants with three guestrooms for short stay visitors. I see in another post that you are future proofing for a family. However no modern child, teenager or adult would be happy with this type of bedroom layout. Where could they fit a desk / home office / hang a TV / bookcase? What about privacy if their private space is accessible from both sides? Yes, the BRs could be used as offices, but dual use (that is also usable for overnighting occasional guests) wouldn't work with this layout. I strongly suggest that you get your architect to do a decent 3D realisation, dressed complete with a sensible selection of wardrobes, dressing tables etc, and you and your partner do a virtual in-room walkaround to see it it works in practice. Also the thermal design is going to be bad; really bad. I take it from the drawings that pretty much the entire south facing aspect is glass. (I say this because these clearly aren't solid walls.) Even with modern triple glazed glass the U-values are going to be 0.8 W/m²K or worse in practice if you are going for bi-folds, so the house if going to be expensive to heat in the winter and you need to double-check UFH design limits. In the the other seasons the house will turn into a hot-house. Airtightness is also going to be a real issue. So I feel that you are going to find it difficult to achieve current SAP requirements, let alone anything like passive class. I also can't understand the rationale for the S facing hub layout. It looks more like a circular bargraph than a clean arc. What's with the glass rebates? The rooms and the outside space and connexion to inside would work a lot better if the polygon formed at the meet of the room was more like a fit to a graceful circular arch. The extra floor-space in the formed in these reentrants isn't really usable anyway, and will add significant to the construction costs. What is the roof design and pitching? What are your ridge lines going to look like? I know this might seem harsh, but this plan looks to me like a concept that an inexperienced architect might come up without decent senior partner review. I think that you are going to be horrified at the build cost. If you want to go with this design, then I would suggest that you pay the extra $K or 2 to get a decent independent QS to give you an estimated low/medium/high total build cost before you go any further. You will also need to be really careful selection your builder and main suppliers. This is an unusual design and will require truly experienced builders.2 points
-
Do you know the trick to see if the glass is coated? You shine a light (smartphone LED good for this) and look at the colour of reflections from each glass surface (four for double glazing, 6 for triple). The coated one will look a slightly different colour... This shows the coating is on the outer surface of the inner pane of my coated double glazing.2 points
-
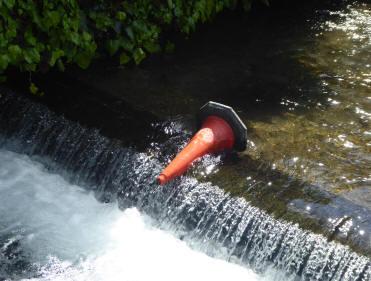
Brushless is best. A Stepper Motor salvaged from a laser printer perhaps? They generate useable AC power at far lower rpm than brushed motors (I've got a pile of those as often you can buy a new printer with a full set of toner carts for little more than the cost of a refill. Hopelessly wasteful unless you turn them into parts!). Still think a traffic cone would be good to funnel the water in...1 point
-
@ProDave I dunno if that servo motor is the best choice tbh, they can be very delicate. What's the I reckon you've got enough power for something a bit meatier- a 380 RC motor or a pillaged small cordless tool motor maybe?1 point
-
I also am on clay and BCO said “where are going to put your soakaway” I replied “you mean pond, we are on clay and it will not soakaway”, I explained that any rain falling on the plot would eventually run to the ditch along the bottom of the plot , so I piped it there. I would get your BCO out and see what he suggests. ( no two BCO,s read the regs the same, I was lucky).1 point
-
Thinking about @joe90 suggestion, A quick rummage amongst my various bits,. cobbled together a quick set of different size pipes of reducing size to gauge the effect. Hydro_experiment.mp4 The final bit of "pipe" in that contraption is a bit of flexible conduit with a bore of about 20mm It definitely increases the velocity (measured by how far will the jet of water reach) and I lose about half a second on the time to fill the bucket test. So next experiment is try and cobble together a mini turbine to see if this has any merit.1 point
-
I think that is certainly true if you are trying to increase the pressure to get a small high pressure jet to drive a turbine or pelton wheel type device. For an overshot wheel that I am experimenting with I don't think it would make any difference.1 point
-
Due to the orientation those straps won't work, I need some which bend 90 deg the other way (these joists fix to the face of a wall). I have however now found some Cullen masonry hangers which are rated to 2kN short term uplift if all nail holes are filled into the joist, so that could work. The dilemma now is it's an extra £50 for the joist hangers, £50 which could go towards the angle grinder.... I'm leaning towards the latter Thanks all!1 point
-
Having all those stats is pointless. The temperature will be more or less the same in every room. Particularly if you have MVHR. Remember Wunda are a sales company so happy to sell you additional expensive stats you don't need.1 point
-
Without checking just now, I understood that the EU only amounts to circa 40% of our trade, so non EU trade is a bigger market. There was a load of hot air over additional paperwork which caused delays a while back but Im not sure theres still significant problems, attributable to Brexit.1 point
-
So all that government aid used, in part, didn't happen. A major part to the arguement about leaving the EU was to allow the UK to trade nimbly and quickly to a changing commercial environment. We are not exactly seeing that happen. What we have seen is Sterling loose value against major currencies, delays in goods being delivered, reduced workforce in some areas of construction, etc etc. What we have not seen, nor did we see in the run up to fully leaving was a boost to the economy. That reduction in economic power, and the associated drop in business confidence, lays firmly at the feet of BREXIT. Blame other issues as much as you like, but deep down you know that being commercially isolated from our biggest market is hurting, and will hurt for the rest of our lives. End of.1 point
-
@graham1 if you need to test can you not drain down your DHW tank and pressurise the heating system and see if the pressure falls (it will fall faster if no water in the DHW tank).1 point
-
1 point
-
Thank you, tried a load of baking powder, used the rods, did the video thing where you put a hose in and cover it with cloths and plastic to build up pressure and da da, it worked.1 point
-
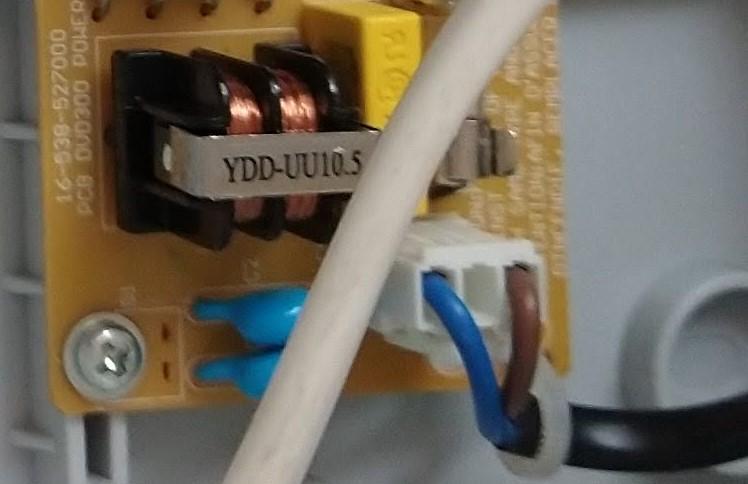
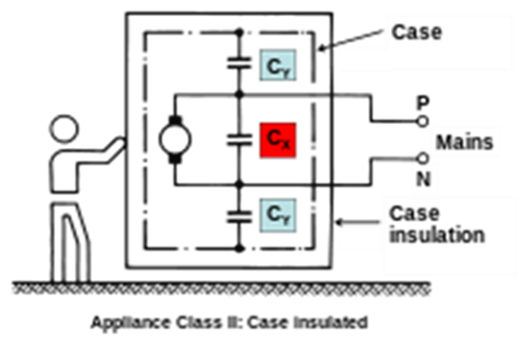
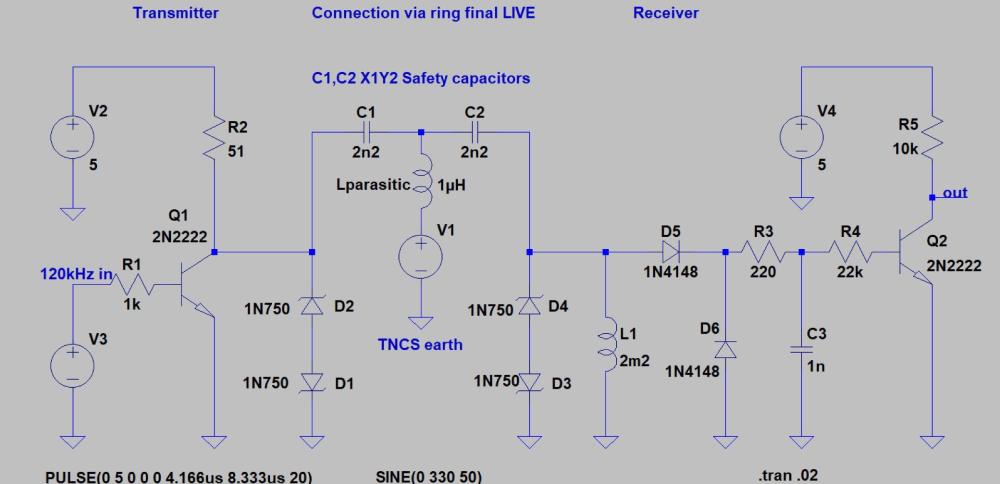
Reviewing the design of the 120kHz modulating signal that I use to tag mains cycles for diversion I've come to realise that there's a perfectly harmless way to couple the microcontroller to the AC without a a transformer. The inspiration is the typical front-end of a SMPSU like the one I have providing 5V for the circuit in the Triac box shown previously: The two blue capacitors are Class Y EMI supression capacitors wired between L & N to Earth. They are low capacitance (2.2nF) high voltage withstand (4kV) and being class Y are designed to fail open-circuit. Hence this PSU was originally in a small DVD player, with no Earth wire, and that screw coupled the common end of the capacitors to the unearthed metal case. All pretty standard: So at 50Hz the reactance of the 2.2nF capacitors (Cy) is approx. 1.5 mega Ohm therefore a tiny 160uA leakage current normally flows to earth. Higher frequency noise especially RF noise, however, sees a lot lower impedance shunting it to ground. But at 120kHz the reactance is around 600 Ohm. Intercepting the path of the capacitor to ground with an inductor (to bypass the 50Hz) in parallel with a circuit to detect the 120kHz signal results in an extremely simple receiver: Likewise the transmitter AC couples via a Y class capacitor. The microcontroller circuit and everything on the "earthy" side of the capacitors remains referenced to earth (along with any attached PCs or test gear) and so long as adequate separation (creepage) is observed where the 240VAC joins the fun - handling the low voltage side is no more hazardous than handling a typical CD/DVD player in a metal case. The back-to-back Zeners are there to clamp transients caused by mechanical switches that can interrupt the mains and produce short lived spikes that get through the capacitors. This limits the voltage to keep well within the breakdown maximums for the surrounding components. I just thought I'd write this up here for anyone that might be interested.1 point
-
There are not many boilers that modulatevas low as the Viessman. We fitted a W200, the big advantage is all the controls inc Wi-Fi are built into the boiler as std. it has a colour touchscreen and an app on a phone. Just the outside temp sensor, cylinder temp sensor and low loss header sensor to connect. Plus the Divicons if you go that route. If you do, you can buy indentical units to the Viessman Divicons for substantially less, they are very common in Europe so a lot cheaper. Join/ have a look at ‘heating system design’ a Facebook group, lots of info on people using Divicons etc. I really struggled to find anyone that even knew what weather comp and Divicons are, let alone the knowledge to install them. I used a guy from Southport, defo not the cheapest but very good install, and a 12 year warranty on the boiler, subject to a yearly service. Which over 13 yrs would buy a new boiler. We installed the ufh ourselves @150mm centres. Highest temp I have seen going in was 29deg c when it was -2 outside. Boiler is always condensing unless heating the tank. We have very small rads upstairs but never been turned on other to commission them. Have dual towel rails in each bedroom, electric side controlled by a Heatmiser switch, they are only 300w but work well.1 point
-
So the technical analysis. The wheel is rotating at 32 rpm, so with the 17:1 gearing my motor / generator is doing 544 rpm. At that speed it is generating a disappointingly low 3 volts. I didn't attempt a proper load to measure what power it would produce as I know it would be tiny. If I short circuit the motor, the wheel does slow down slightly, but not as much as I would have thought. I think (certainly for this speed) the motor I have is a poor candidate as a generator, but it was the only one I had. My flow rate looked poor to me, so I re measured it. I am getting barely 1 litre per second. But it's not a pipe blockage or lack of water, that is all it will deliver at that height. Drop the pipe down to the bed of the burn and it's back to 2 litres per second. Baked bean tins are poor "buckets" for this application. Roughly 50% of the time the delivered water hits the side of the tin rather than go in it, which will add nothing to the rotation of the wheel. conventional square buckets are what's needed with any overspill just dropping down onto the bucket below. I am unsure if I will take this further, it does at the moment seem like it's never going to be a source of useful power. I might look at turbine ideas instead?1 point
-
Insulate the hell out of the house and just have UFH on the ground floor. Forget about upstairs - maybe electric towel rads in bathrooms.1 point
-
I really would specify everything suitable for a heat pump, it will all give advantages to a gas boiler. UVC, with a heat pump coil, will accept lower flow temps, which will in turn keep you inside condensing mode of the boiler. You can heat to circa 50 instead of 60 plus. The heat exchanger coil is huge compared a gas boiler, which will have a better approach temperature and quicker reheat time. Radiators, use double panel rads to get twice the area, or half the size. I would and do have electric only towel rails, use them any time of the year without have to fire up the heating. Just 400W elements in them, have UFH in the bathroom and en-suites. Operate in weather compensation flow temps are low, boiler are super efficient, running costs low whole house an even temperature, although with suitable balancing you can get cooler rooms if you want. Read heat geek website for some good info.1 point
-
It may be simpler to fix a pole plate to the face of the wall with resin studs, then use hangers for the joists. At that height you could maybe get some trestles and scaffold planks to get to them.1 point
-
Make sure your ground floor is well insulated, 150 to 200mm PIR. After that you need a 6/7/8 port manifold, pump and mixer, the UFH pipe, wiring centre and a set of actuators. Pricing as above I did mine £1100 most my bits came from Outsourced Energy. Treat the whole ground floor as a single zone, operated from a single thermostat, something like a wired Salus SQ610. Try to go clever with phone app control and loads of zones, you will rack up costs and they are pointless as the time to switch on and have a warm house can be 6 or so hours. Keep it simple the boiler or heat pump will be happy and so will your pocket now and in the future. If you try to split the UFH heating you will need a buffer. Do the floor at 150 to 200mm pipe centres. Download LoopCad and have a play and design yourself.1 point
-
9 days off six years since we voted to leave the EU, weren't we promised that things would be cheaper and more plentiful. £350m a week should buy a lot of PV.1 point
-
I bought mine from segen who say there the largest wholesale supplier in UK, they have a system design tool that works out what you need.1 point
-
Like the above but I am going to have to suggest a slide for the kids …. Just build a decent landing zone ..!!!1 point
-
Really best not to. If you have cleared it a bit and it is running then chemicals will run away. Once you have breached the blockage it should now all go away. There is either another problem (the drain may be damaged or have roots in it), or more rodding, and even flushing should be better. Have you been able to rod from both ends?1 point
-
1 point
-
I doubt you'll have an issue. We had all sorts of copies downloaded from, eg, Screwfix, till receipts with no name, even a couple of invoices in the wrong name (one was in the name of our tiler, the other was in some random name due to an error by the supplier). We explained any oddities in the covering letter and not a single invoice was queried.1 point
-
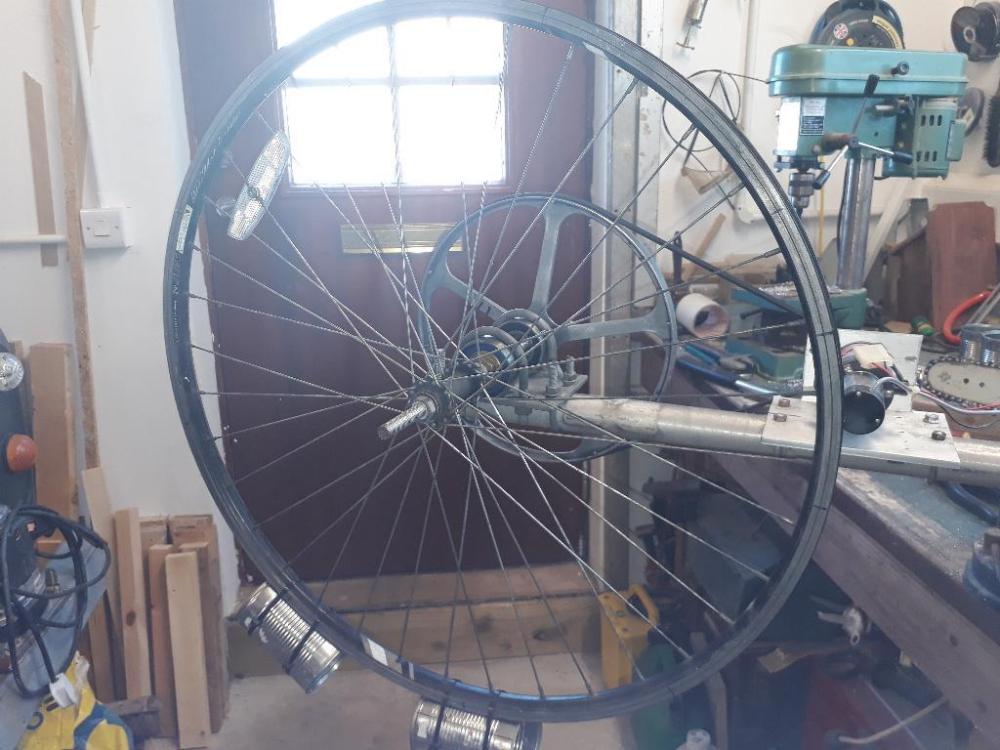
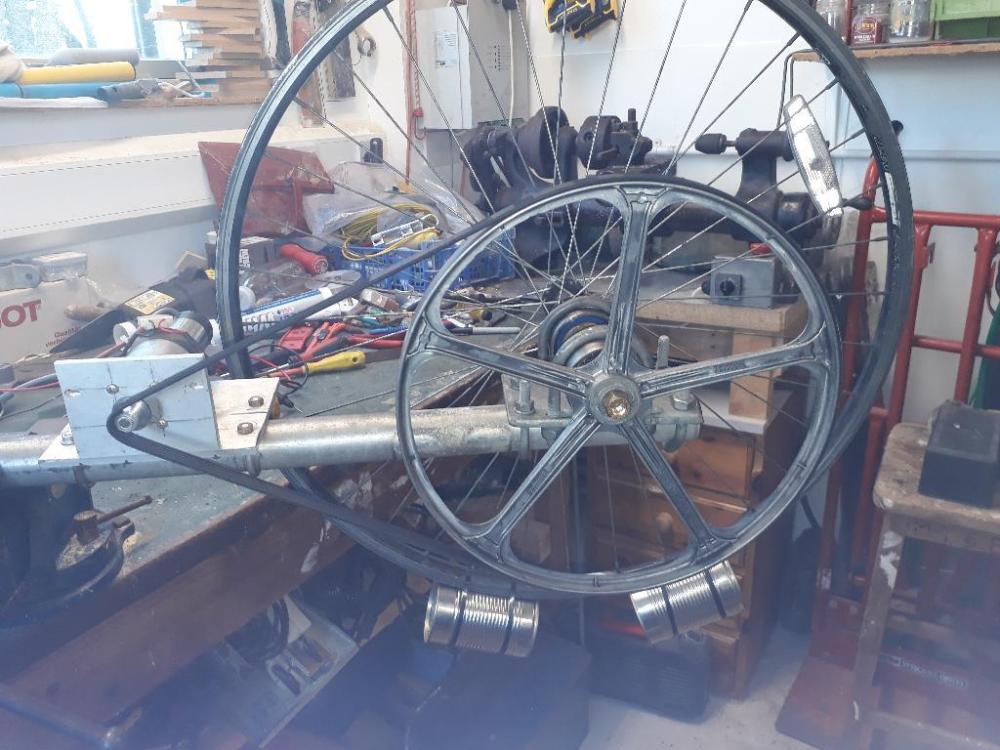
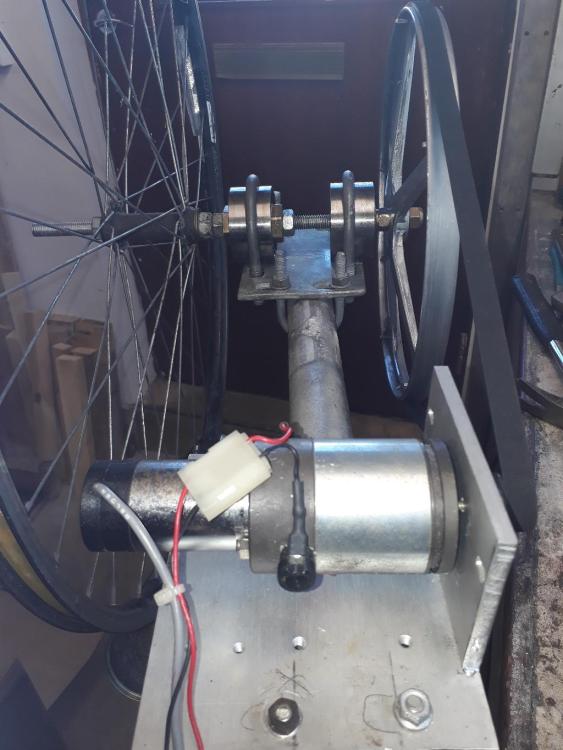
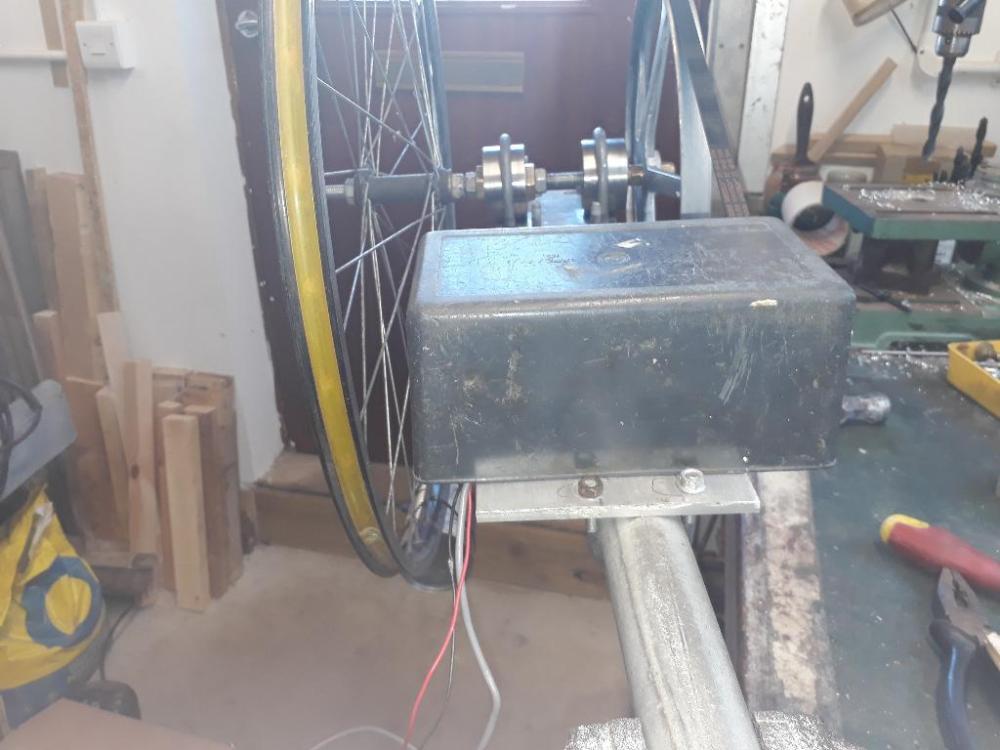
So I have been tinkering with my collection of "stuff that will come in handy one day" Anyone reading beyond this point has to make a promise not to laugh, at least not out load. So put together a test water wheel entirely from bits you have to hand: The business side, that will collect the water. Yes that is a bicycle wheel, and the trial set of "buckets" that will go around the outside to collect the water and so cause it to rotate, are indeed baked bean cans. Looking at the other side, that is the pulley and belt from a dead washing machine. It is driving a little DC servo motor as my trial generator candidate. Initially I tried the pulley from the washing machine motor, but that only gave a 9:1 ratio, I felt it wanted more, so I made a very much smaller pulley for the servo motor and I have got to about a 17:1 ratio. The whole lot is mounted to the end of a length of aerial pole. The shaft is a length of M12 threaded rod and the bearings are old idler bearings left over from a previous cam belt change on my car. They mount to the aerial pole with a heavy duty aerial pole clamp set. The proposal is to mount the aerial pole pivoted about it's mid position giving somewhere for a counter weight and easy height adjustment. And since the motor is right in the "splash zone" it will have a plastic cover to keep it a bit dry A similar one will will also be fitted over the bearings We need to eat some more baked beans before there are enough cans to give it a water trial.1 point
-
The next stage of the setup of the site took place over the last 3 weeks. with some good progress. The trip up North, 433mile from our current rental in the NW of England. I set off on Wednesday morning in the 7.5T truck, and the 2 dogs for company. I took some materials with me, and had a gut feeling I was overloaded. I had worked out the approx. weight of what I was taking, but was unsure of the TARE weight of the truck. so I didn't take all I was planning. Luckily the nice guys from VOSA, At Carlisle (Todhills check site), confirmed my suspicions when the invited me in for a check. I was over weight, but the truck and my paperwork were all in good order, and they give the truck a thorough looking at. The upshot of this was me renting another 7.5T truck for storage, offloading the excess weight, driving the remaining 333 miles, unloading, returning the next day with the empty truck, re loading and driving back to site. 1100 miles in 38 hours. not what was planned, but you live and learn.... I arrived back on site on early Friday morning, 02.30am. and slept in the cab of the truck, until I was woke up at 05.10, by the guy delivering the Static, he was at the end of the road... Here's a screen grab of our new home arriving to site, this was 05.25 am... I hired a contractor to carry out the highway works for the site entrance, basically as he had the correct insurance and RAMS it was easier to get this stage subbed out. The idea was he would open up the site, with a 5 T digger, start the initial road and stone this up with around 60T of type 1. I would then meet on site and hire his man for a few days to assist with the pecking of the treatment plant. This didn't go to plan, they had to use a 13T machine, as it was available, so when I eventually get to site on the Thursday, due to the size of machine, the operator has completed the initial works, then pulled out approx. 60M of the road, and pecked the treatment plant hole, and I got this for free... 😁 Having a 13t machine on site, with operator for the Friday, I needed to make the most of it, as I was only paying for the rental of a 5T machine. Mikey the operator, made short work of pulling out the remainder of the road up to the location of the house, in total this road is around 90M. Next I had him strip the area for the house. The house is around 13M x 7M, so I wanted to strip back a working area around the house, my thought was we would hit the bed rock so this was the plan, we marked out a 16M x 11M rectangle, and he set to it, it took him about 2 hours to strip the land and scrape it clean. The above is the bedrock where the house will be, and the road coming up the side of the house. (I used a geotextile as a separation layer for the road, although in sections the road is on bedrock anyway,) You can make out that there is a fall from the top left falling to bottom right, this will be made up with type 1 stone, raising SW corner of the house around 700mm, I will raise the road in this section and use some of the top soil to level this out a bit and soften the impact. The last Job for Mikey was to dig me the trench for the services, he dug a 600mm wide trench about 8M short of the Treatment plant (to allow me access to move the spoil, and a similar distance short at the other end for me to connect to the water. just shy of 60M. Friday was a busy day on 3 hrs sleep. The treatment plant also arrived as can be seen above, I went for a Tricel unit, this was based on cost, treatment, dimensions and availability. Last job for the day was to move the caravan, Mikey helped me with this and we stripped a bit more land and located here temporarily for the night North / South. Saturday I decided to get the water connected to the caravan, for this I needed to complete the trench from the standpipe to the large service trench. I never dug this on the first trip as I was concerned about the electrical supply to my neighbours property. Cables seemed to run across my field at around 300/ 400 mm depth. I used my contact at SSE and he arrange to get the cable moved / deepened. This was carried out a few weeks prior and we discussed the position of the new road, and he made a site visit and we talked about me extending the water pipe trench in both directions so that I could also lay a utilities duct to the road for broadband. So to say I was a bit surprised, and p***ed off when I cut through the neighbours supply cable. The cable was as I was worried about 400mm deep, and the marker tape was next to the cable.... How to upset your new neighbours by having their electricity supply stopped two times (1 for the initial connection, 1 for the remedial works), only for me to cut the cable for a third time.... At least they were very prompt, they arrived after about 40mins, and it took him around an hour to re-joint the cable. I then removed the water standpipe and ran my new water main up to the caravan. It will tee off for the pods at some point, and then continue up to the house. SO now I had running water in the van, and gas for the water heater and hob / oven. Sunday was glorious, so I caught up on my sleep, and had a restful day. Scottish Power were due to fit the meter on the Wednesday, so I needed to get my service cables from the meter box into the service trench and up to the caravan and to the pods. I dug a trench across the road and through to the service trench. I used a 125mm Duct, and inside here I ran some 6mm SWA to supply the pods and some 50mm Duct to run a service cable to the caravan and ultimately up to the house. I pulled the cables through, and I have put a caravan hook up point next to the static. Tuesday / Wednesday, I had 80T of Type 1 MOT delivered in stages, I spread this out using the Back hoe, and vibrating roller. so by the end of Wednesday I have the base in for the road. which will give me good access for deliveries. Scottish power were a no show..... Discussing the caravan with the neighbour they advised turning the caravan 90deg, so it was end on East / West as the stronger winter winds tend to blow from the West, and being side on would ultimately be unstable. I dug out another section of land next to the caravan with the idea of swinging the van around at weekend when Mandy Joined me for the last week. It took me and Mandy all Saturday to move the van, using the backhoe to pull it around. and most of Sunday to get it jacked up off the ground and levelled. We dug 4 pits later on in the week and concreted some anchors in to chain the van down. The van in position with Mandy getting the best job of the week to squeeze under the van and start to insulate the water pipes... Scottish Power let us down again with a missed appointment on the Tuesday with a promise of Friday.... They actually turned up late Thursday and fitted the meter, so we had power on the Thursday night. We spent a couple of days moving spoil around the site to create a mound of earth to shelter and soften the impact of the pods, this was also a planning requirement for the neighbours amenity. Still work in progress and there's 10's of tonnes more to move. Last job before packing up on the Friday was to level the base of the treatment tank pit. At this point we were still waiting for the building warrant. so couldn't actually install the plant. We end the week by getting the Building warrant approved, and the certificate for discharge for the treatment plant both on Friday. Thanks for reading..1 point
-
Below as received! Hello Customer, As a valued member of our community, we would like to invite you to participate in a quick survey. {Let the contact know why they have been chosen to participate in your survey} Your responses will help us better serve your needs and improve our products for all our users. {Explain the purpose of the survey and how you will use the results. Keep in mind you don't want to bias the results so try not to cue the respondent with any language about what you are trying to prove.} Take the survey now; it is only open for a week. {Create a sense of urgency by mentioning a deadline, if it is appropriate} Typically, it only takes 5 minutes to complete. {Mention a realistic estimate of how long the survey will take (and always try to reduce the length of your survey.)} And, all completed surveys are placed into a raffle for a free widget! {If you are offering an incentive, now is the time to mention it} Click here to start survey (Link removed) {Give the link. Always use the link merge code, only the merge code will make sure your contact tracking will work} Thank you for your time and feedback. You are helping make us better. {Thank them for their time and reiterate again how the survey will help you} Howdens Insight Team {If possible send from a real person as it fosters trust and adds personality.}0 points
-
0 points
-
0 points
-
SUDs can be bollocks also . The BCO wanted the soakaway to be 10metres from any boundary or building ( including our build ! ) . That made it impossible. So they took my cash for this but ‘agreed ‘ I hadn’t meet the SUDs obligation. So that aspect would never be signed off - yet I carry on anyway 🤣 Reality is if I sold a solicitor would pick on this and you just take out insurance to cover this ‘ situation ‘ . So it depends how hard you kick your BCO - I kick mine with a metal boot .0 points
-
Yep, certainly has that warm, personal touch about it. Please bear in mind that it's only the opening offer. It will take another three quotes and a threat to go to Benchmarx to get to the real survey.0 points
-
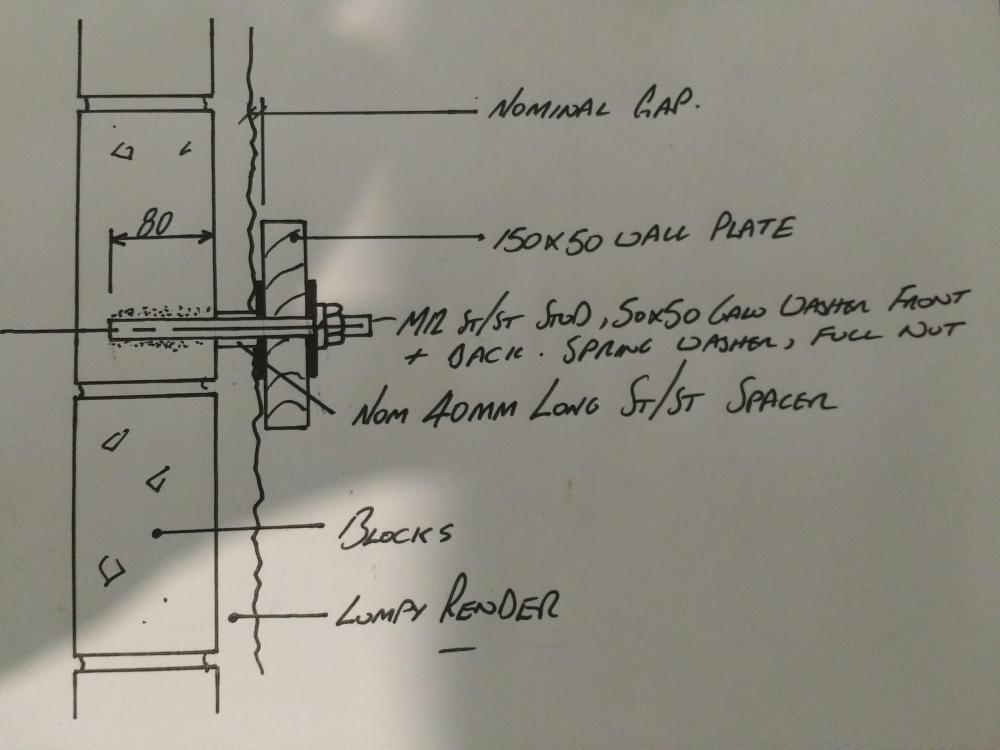
No, just several kinds of special! Once again, same drawing as before: The spacer projects slightly beyond the highest peak in the render. Not drawn too clearly but I assumed you'd grasp the idea. I'm doing these fag packet sketches on the fly with a Sharpie. A big square washer sits over the M12 stud and against the end of the stainless spacer. Ideally both spacer, stud and washer are stainless steel as you won't get to them again. The ledger plate sits over the stud against the square washer. Another big square washer, spring washer (to lock the nut) and nut secure the ledger. The square washers spread the point load over the timber faces - normal, little round washers would dig in to the timber face. They also help stop "rocking" a bit. The loads are thus transmitted to the blockwork not the render. You'll want to seal up where the spacers penetrate the render, with silicone. Same when you put the first square washer on. Squidge some silicone around where the stud comes out of the spacer then put the square washer on. I don't think I could work with special children and that's from a parent who has one 😂0 points
-
Theres trade advertisers on ebay still advertising kits at the same price as they were at the beginning of the year. Theres a number of sellers advertising various Renusol mounting parts. Midsummer have restrictions on Renusol parts but no restrictions on Fastensol mounting, if youre happy buying chinese. Clearly things are busy but I dont think its non functioning. Based on the fact that people didnt start buying PV until the sun came out, probably best to forget your PV for now and buy insulation. Once everyone starts buying insulation in the autumn, buy your PV0 points


.thumb.jpg.535263f783efc030d285c7f4f57e414e.jpg)



.jpg.c21f3ac78c9b7efd90cbdcb312744dc5.thumb.jpg.7adcad4c0e384f5ecd7d56b0618df6e5.jpg)
