Leaderboard


Popular Content
Showing content with the highest reputation on 05/12/22 in all areas
-
Similar to mine, oblong box with longest wall facing south, small windows to the North 👍

 3 points
 -
When the USA decided to put a man on the moon, they did not know, in detail, how they would achieve it. So they made the big decisions first i.e. man on moon and return. Then looked at the next big decision, getting to orbit, why they used a 3 stage rocket, was all that was realistic at the time. Then the journey between Earth and Moon. Easy, a large enough container to live in. And so forth. What they did not do was get stuck on details like the size of windows and the colour of the bog, all that flushes out later. So make those big decisions now, write them down, amend if necessary, get an orderly list, then start to go into detail. Much of the detail can be changed easily. So How large is the house--> 1 or 2 storeys-->Number of rooms Running Costs--> very low or ordinary--> renewables energy or traditional Build Type--> quick to watertight or quick to completely finish And so on.2 points
-
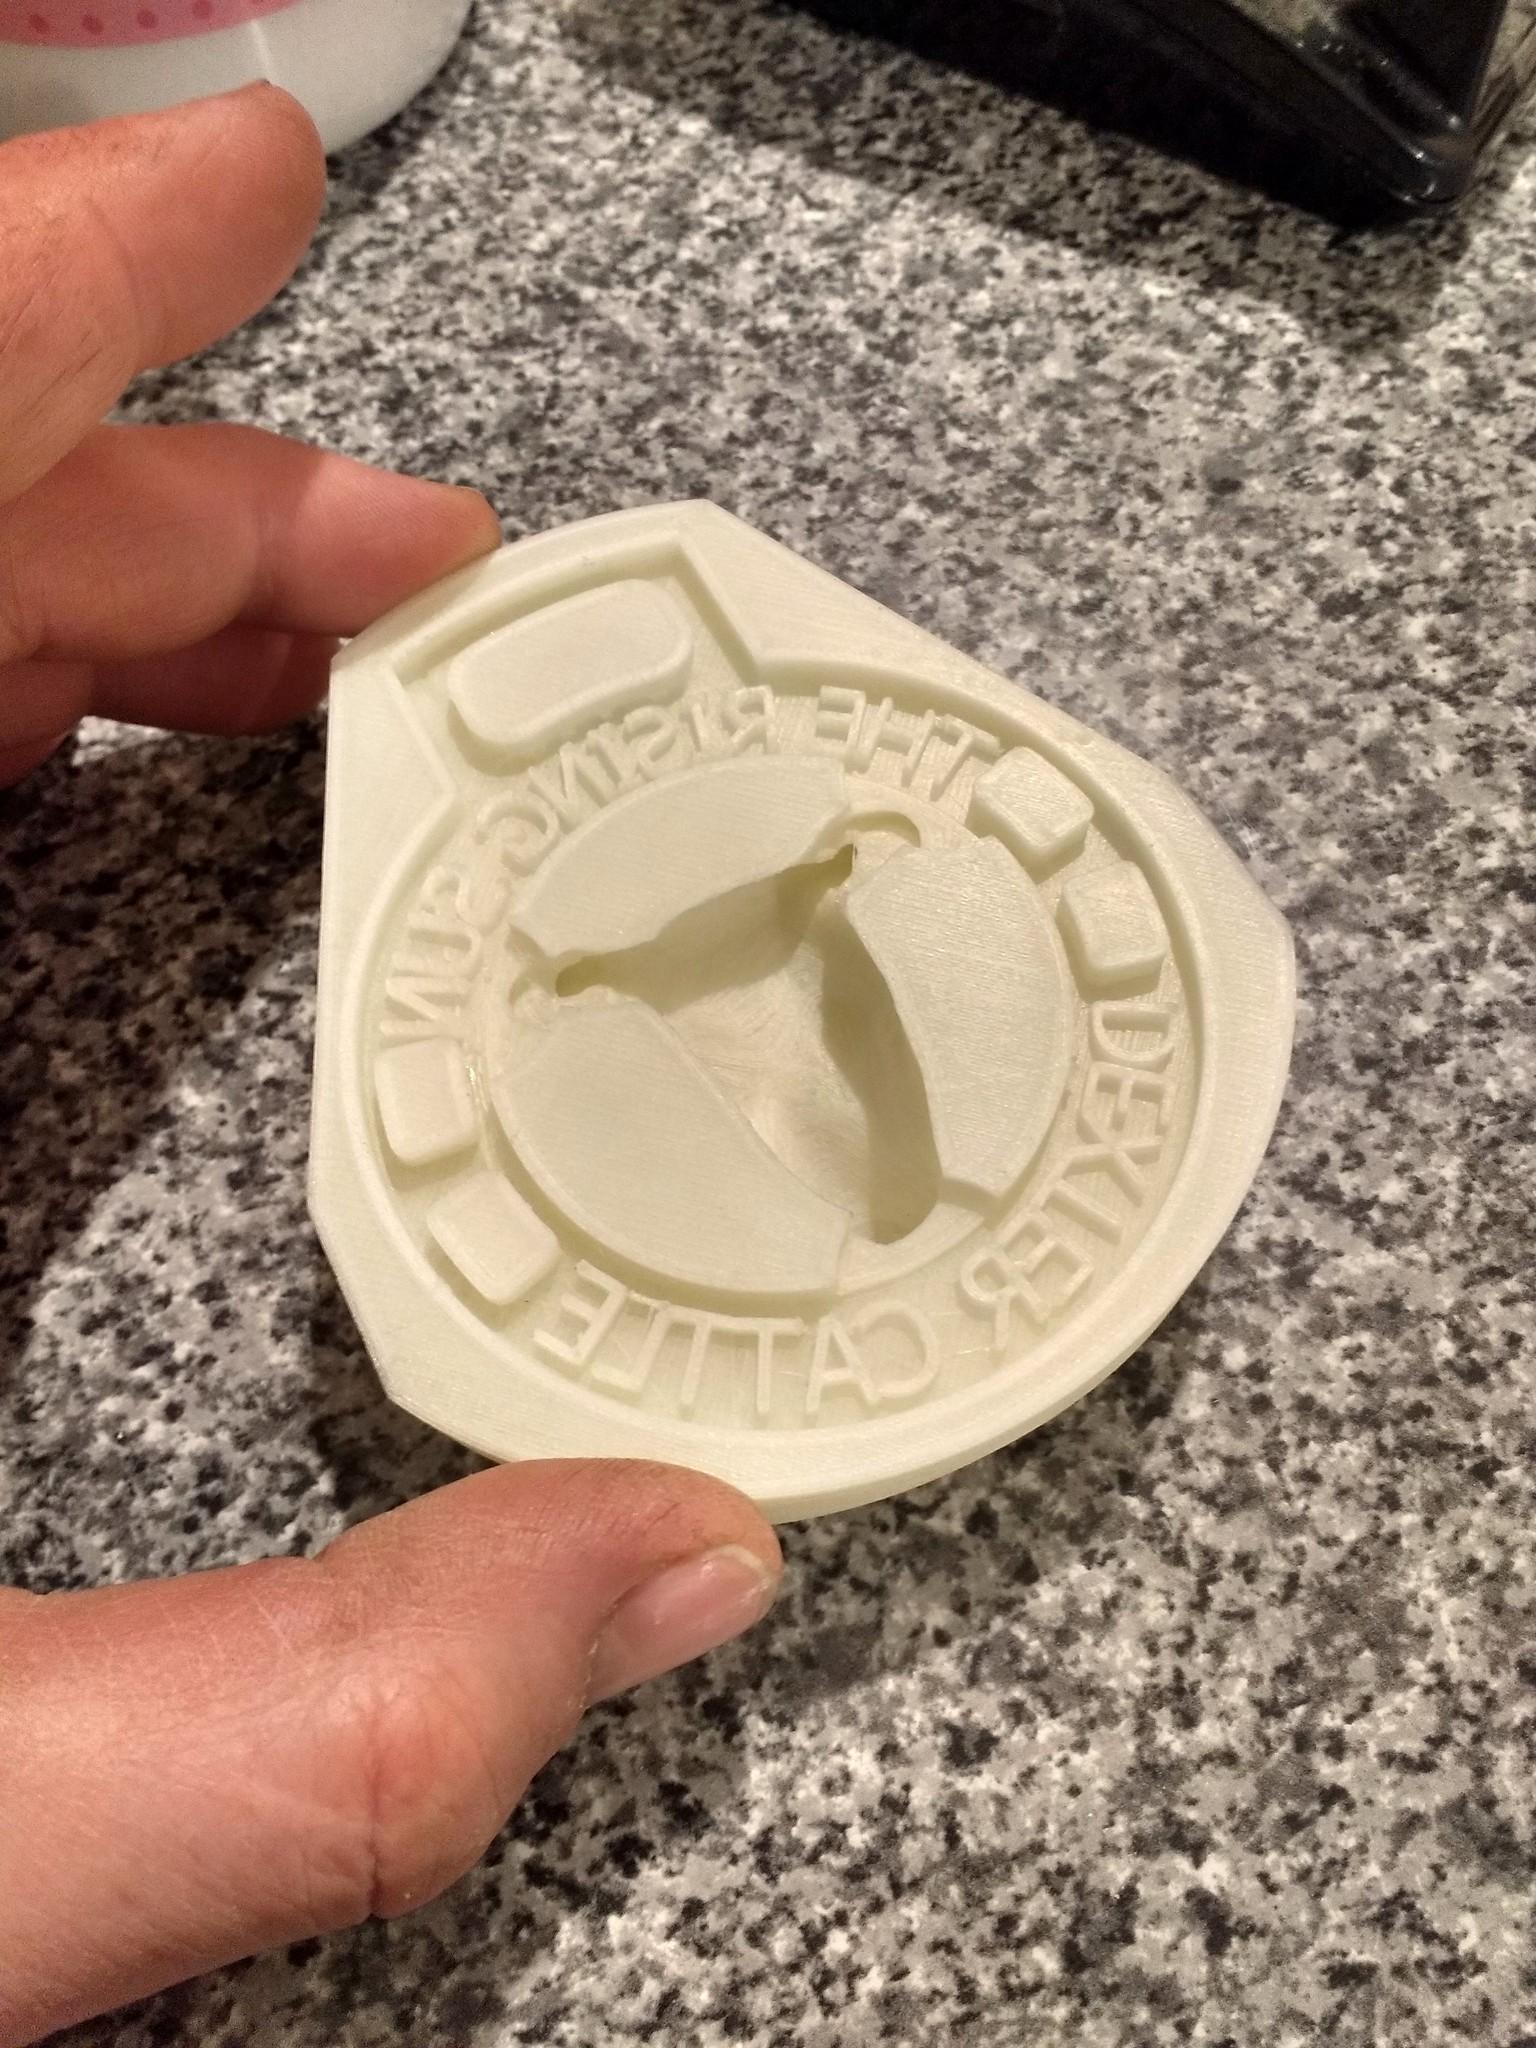
Could 3d print you a joiner? Into PVA cow moulds at the moment:
 1 point
 -
I would fill the hole with a paste of wood glue and sawdust. Then fix as originally.1 point
-
OP says water already switched to electric and implies the ASHP would only be for space heating. I assume this installer's 10kW guess is just for guideline pricing? If they do an MCS supply and install they're obliged to do the room by room calcs so would in theory find any shortfall and upsize the unit then. But I personally would not have any confidence in that 50W/m2 guess so would get some more quotes first!1 point
-
Have a read here:1 point
-
Do a test run and see if it butts together...?1 point
-
Drill it 12 mm and glue in a length of M12 threaded rod...as a permanent dowel?1 point
-
It's so much easier once you have each connection for the appliances installed and the ground opened up. We changed ours a fair bit and ended up saving a good 30m of pipe. Fyi building control only really care about the external drianage works and never asked to inspect out internal stuff. And I wouldn't worry about the depth. Keep it simple.1 point
-
Beat me to it Keep it simple planners arnt really that bothered Building Control is He or she is likely to change drainage plan1 point
-
You've too much detail. Mine was just dashed lines going in an indicative direction from each bathroom to the relevant stack. It's assumed that detailed levels, falls and bends will be worked out on site. I'm assuming it's a combined system? Why the bends between the gully at the bathroom and the soil pipe? That's the kind of thing to leave off the drawing and just show the pipes in a straight line.1 point
-
I think I just heard an arrow fly past my ear !!? Yup, I was dead set on a range cooker too but logic (and cost) beat me down. We ended up with big rooms and not much built in storage. We had a hot press with the water cylinder upstairs ( a hangover from an earlier design with a boiler stove) and there was no need for it. A walk in wardrobe would have been better use of the same space.1 point
-
I'm choosing underfloor heating as a distribution method because I have too many books, and radiators get in the way of bookshelves 🙂 . More seriously, it does sound as though an ASHP in a new build with underfloor pipes is an effective and cosy way of heating for me. And it may be different for other people. I think it is very easy to spend ages agonising over the choice, when each will have advantages and disadvantages, just different advantages and disadvantages, so there is no "right" choice. It can be easy to become paralysed by indecision, when sometimes just making a decision, and accepting that there will be some disadvantages associated with that decision can get a project moving.1 point
-
or drill and glue in M5 round connector nuts with a length of threaded rod.. https://www.ebay.co.uk/itm/111805113838?hash=item1a081aa5ee:g:sHwAAOSwTzVcms95 https://www.ebay.co.uk/itm/322308108964?hash=item4b0b0f72a4:g:5-oAAOSwcd9feIHO1 point
-
Noticed you posted in ventilation with heat recovery. The maths work against heat recovery with leaky houses as cost to install isn't proportional to the heat recovery when all other ventilation heat loss is considered Bottom line is if you are getting condensation, you need better ventilation. Condition based MEV or dMEV is worth looking into, way simpler and cheaper to install and will only ventilate when it's required. Some light reading on the merits or otherwise of different systems Atamate_SDAR+Paper+2019+(1).pdf1 point
-
We have life! Maybe they just needed more water. Poured yesterday and they were left out in it. Brought in last night and this morning. 4 out of 50 showing so far. One is growing out of the side of the cheap cardboard pot that's split. Might need to re pot I guess.

 1 point
 -
I’m a self builder and also the owner of a specialist blind manufacturer and installer. I have come across this question almost daily in my professional life and have spoken to HMRC many times on the subject. Manual blinds unfortunately are demountable from their brackets and are classed as soft furnishings therefore not VAT refundable. the same blinds with a motor that is hard wired to a power supply are classed as fixtures and are VAT refundable. likewise Lithium Ion powered battery blinds are both - confused? if the LI blinds are controlled by a hub that itself is connected to a hard wired supply (plug) that controls when the blinds operate the successful argument was made that this then became a ‘system” to regulate solar gain and heat loss in the home. Ergo vat refunded. if the LI blinds are operated just by a local remote the blinds are again classed as demountable and soft furnishings. No vat can be reclaimed. If you are spending a couple of £K or more on motorised blinds it would be worth looking at spending slightly more on the Somfy LI motors (as you have no wiring costs)and adding a Somfy hub, this makes your blinds a “Shading System” and VAT reclaimable. I often invoice self builders for Shading Systems rather than for blinds to assist in VAT claims. Note - this also covers recessed (in the plasterboard ceiling) curtain tracks but not surface mounted. Joe1 point
-
To clarify, the OP doesn't own a ASHP yet so this is not empirical data from measuring an installed system. The OP's method is to calculate the output heating energy demand per day (80kWh) then divide by the COP (assumed a hypothetical COP=4) to get the primary energy demand of 20kWh per day. This is the integral of voltage * current over the day. so it could be 10amps at 200V for 10 hours, or 1 amp at 20,000V for an hour, or any other mix. It would depend on the specific ASHP selected and installation environment. (obviously 20kV heat pump is ludicrous but the point is for this stage of the paper exercise, the specific current and voltage don't matter, so long as the integral of power over the day can meet the goal)1 point
-
Ok so I think I have answered my own question. Looks like my location plan doc is 1:1250, but my block plan needs to be 1:200 or 1:500.1 point
-
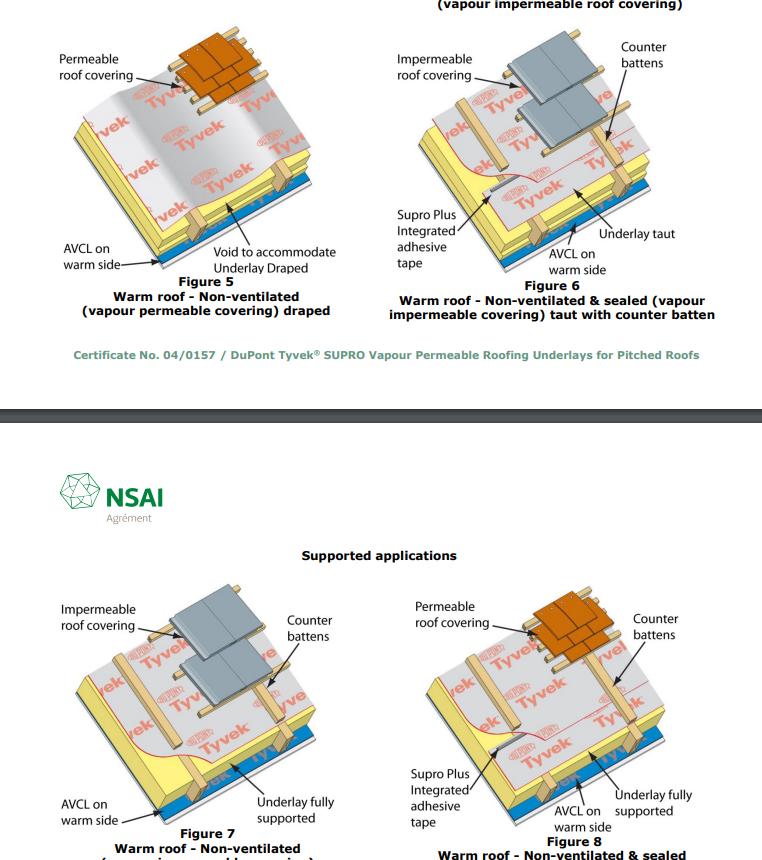
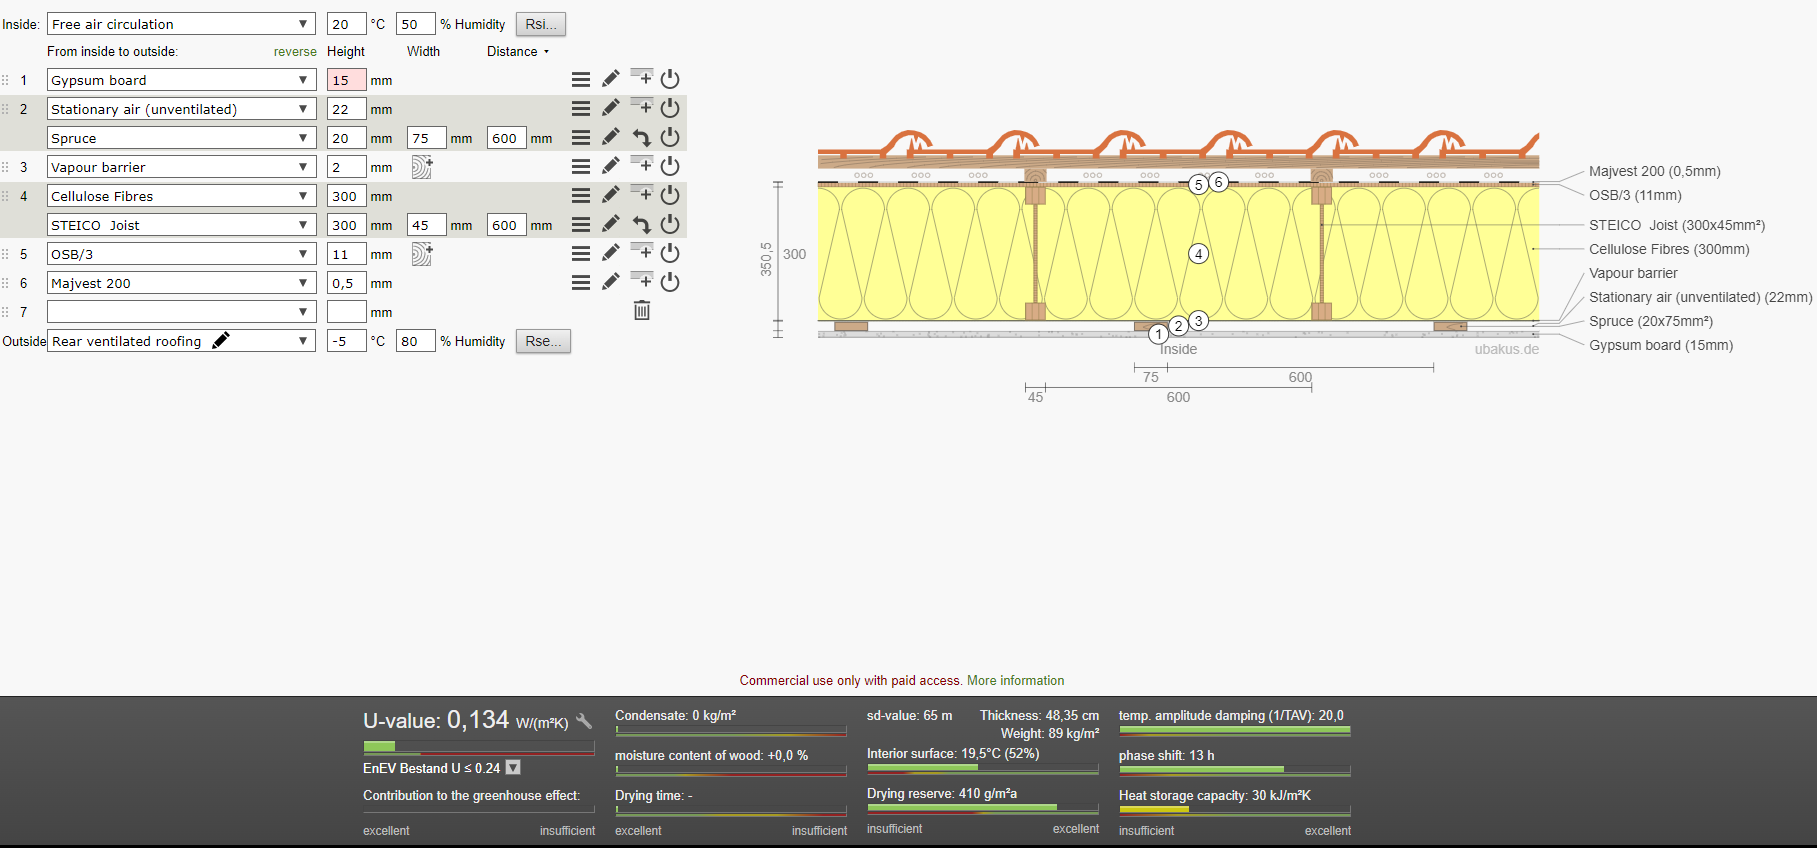
I can understand your builders concern but their thinking is based on old housing standards with no internal vapour control layer and impermeable membranes like bitumen felt. The moisture from the house would pass through the ceiling (almost entirely through air gaps not diffusion) and condense on the back of the felt. The way to resolve this was to allow the wind to blow behind the felt but this brings it's own problems. The wind also blows through the insulation making it perform poorly, think woolly jumper on a very windy day. With a plastic anorak and the zips open. Sweaty and cold. A better solution is a proper sealed vapour control layer internally (also airtight layer) and a sealed breathable windtight layer outboard like tyvek supro or protect vp400 or similar. Think a woolly jumper with a Gore-Tex anorak over the top on a windy day. Warm and dry. Here's a screenshot from the Tyvek Supro agrément cert. Note figures 6-8 have the insulation touching the membrane. You need to incude a counter batten to avoid any moisture pooling behind the tile battens however. That's not to onerous. If sticking with I joists this would be a nice buildup. I'd be tempted to move the OSB racking to the outside and replace with a airtight membrane/vapour control membrane inside. It'd be easier to lay the OSB outside and would provide more protection against any critters that fancied making their home in your roof! Alternatively as I joists are more expensive than plain timber this would be cheaper for materials (but dearer for labour) Stick build a 9x2 roof with OSB outboard. Counter batten inside initially with 2x2, (I can't show battens at 90deg on the calculator). This would give extra insulation depth and thermally break the rafter cold bridge. Then a vapour membrane creating a 45mm insulated service cavity with battens laid over the top of the initial counterbatten. This would pinch the membrane between the two battens making it more robust. I've used cellulose throughout as it's a fantastic product, guarantees a full fill and really boosts airtightness and decrement delay (phase shift) and hand fitting mineral wool is not pleasant.

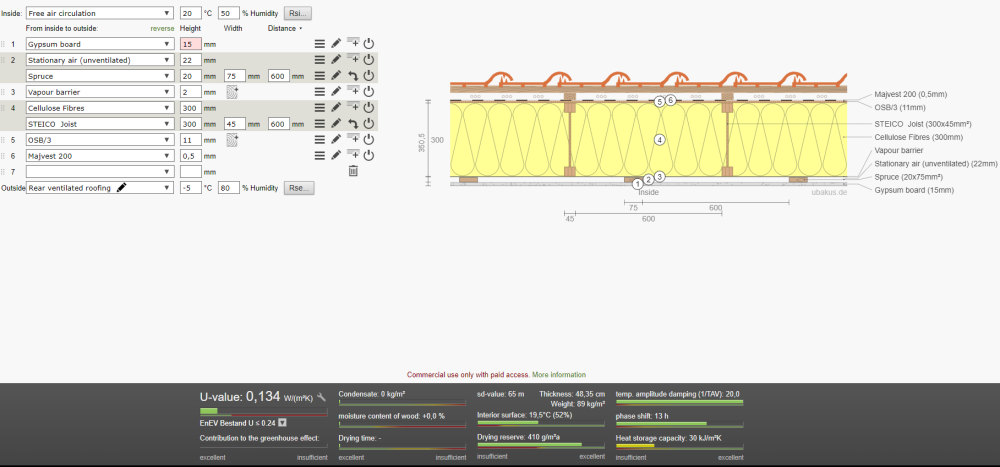
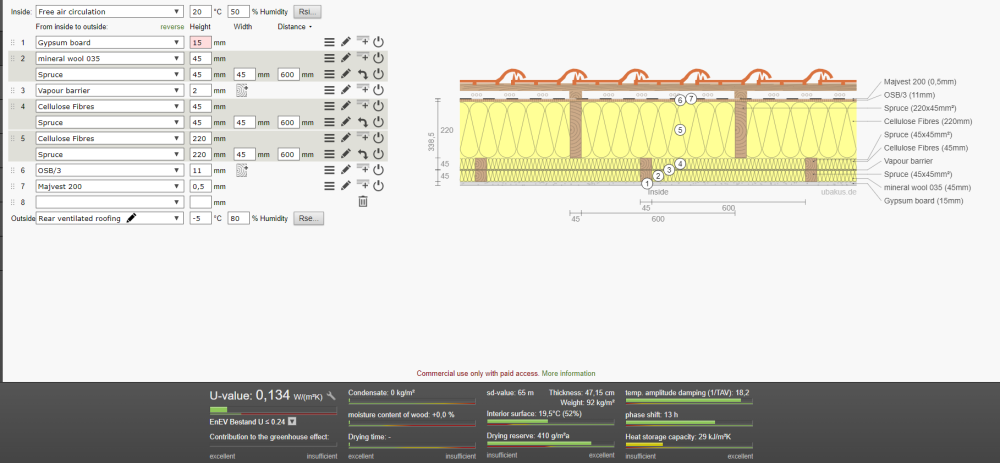 1 point
 -
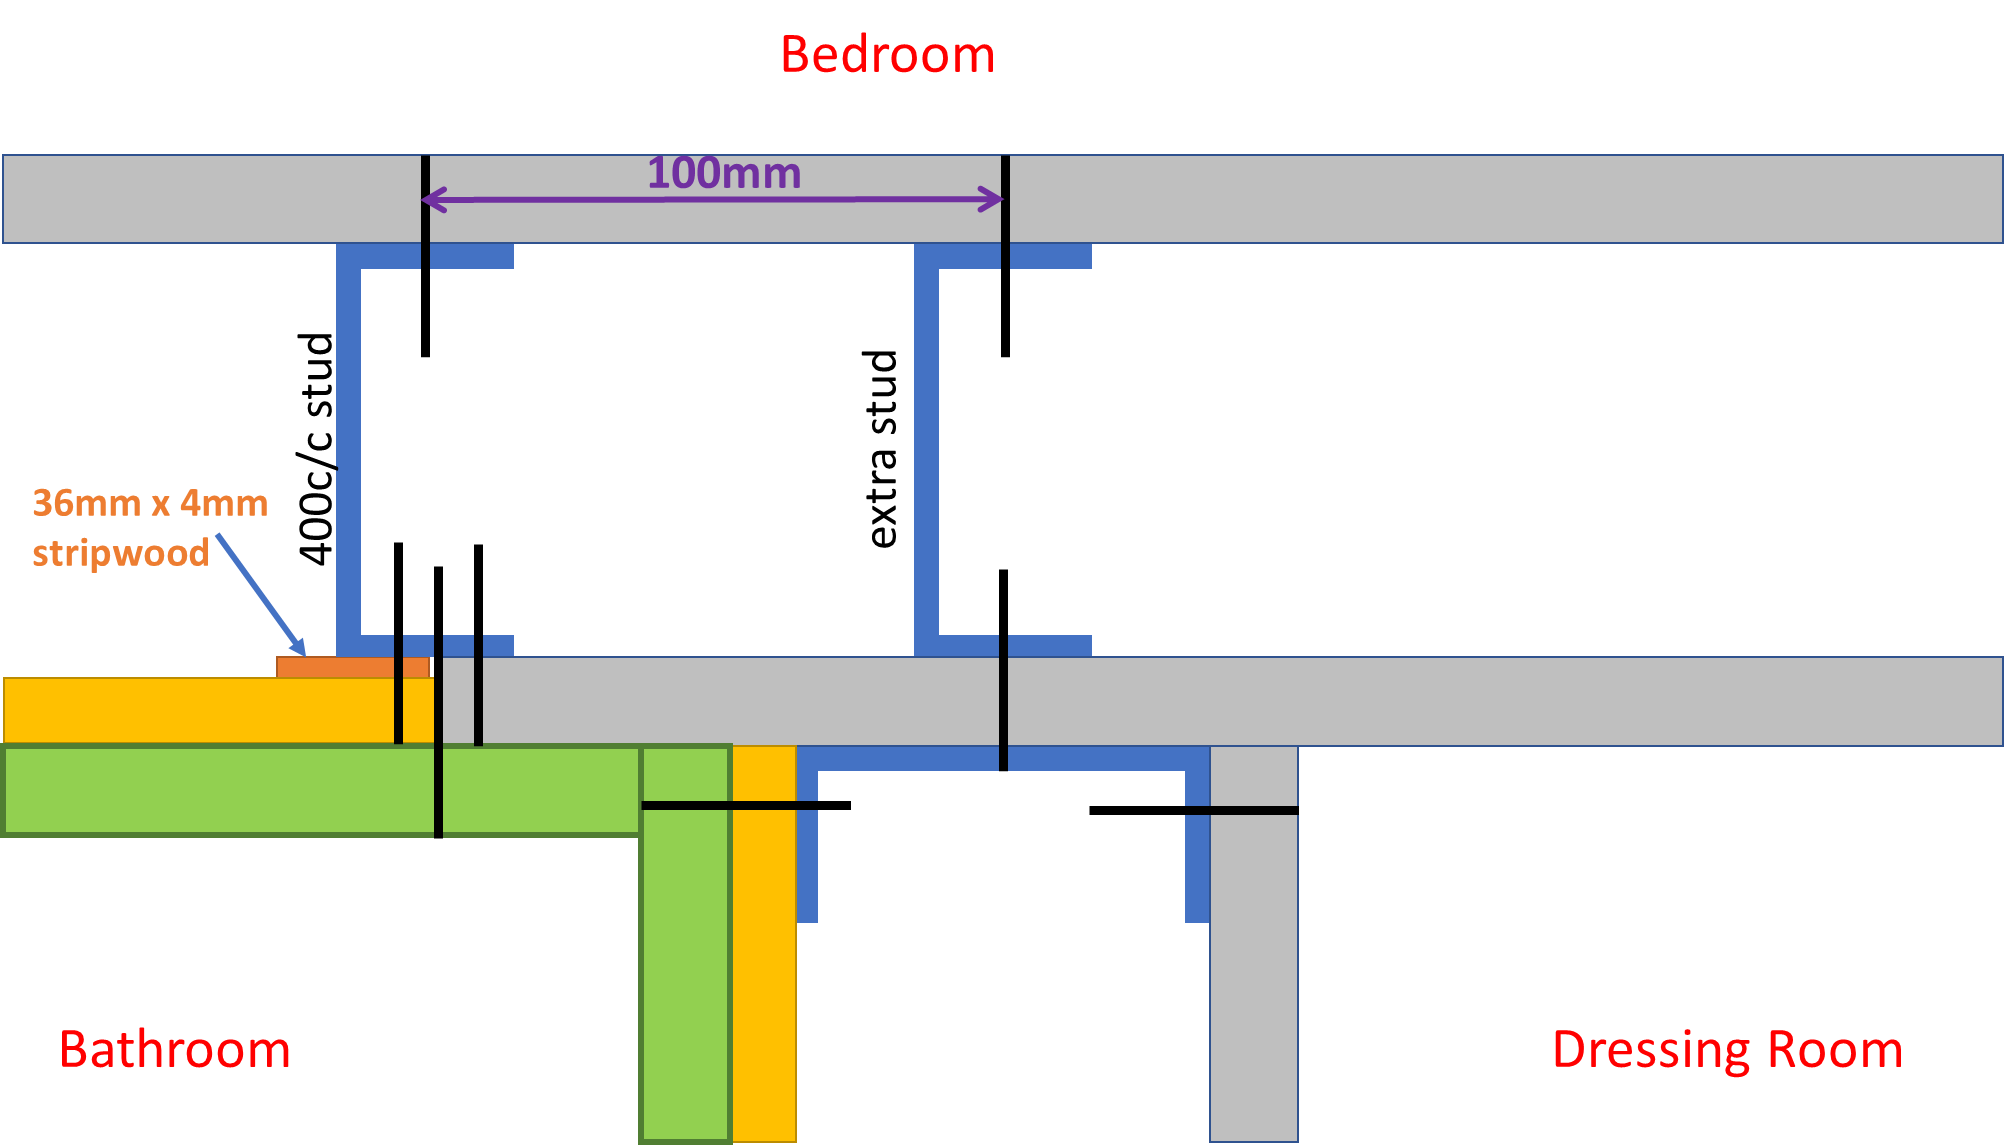
At that particular point we left a gap in the hollwocore slabs - about 150mm. Same at the other side of the house at the other bathroom. Didn't fill in around the pipes, just used a combo of pipe lagging and conduit. I concreted in the hole up to the edge of the stud and floored over. For holes in the concrete walls, I drilled 25mm holes and sleeved the pipe through with conduit. For bigger services, I use a 100mm core bit.1 point
-
Remove the existing screw with mole grips. Drill & put one of these in each face. These are M6 but M5 would be fine. Short bit of stud between the two. https://www.screwfix.com/p/insert-nuts-type-d-m6-x-13mm-50-pack/599371 point
-
Having originally planned then dropped the idea of Solar PV (a combination of budget constraints and drop in FiT rates) I recently acquired a number of Solar PV panels (a pallet bought in conjunction with @ProDave from Bimble Solar via Ebay). Having recently collected the panels, lengths of mounting rail and various other bits and bobs @ProDave had kindly sourced, I fitted the system over the last two Saturdays. First off was mounting the rails on my rear, SW facing garage wall. I decided to mount the panels vertically simply for ease - a ready made structure to fix the rails to, and easy access to a consumer unit for the grid connection. There is a penalty in terms of a reduction in annual generation compared to a sloped array, however simplicity won out. The following picture shows the garage wall with rails fixed; To start I nailed packers to the cladding to ensure I had a drainage gap behind the rails. I then fixed the rails (Unistrut - a tip from @Onoff) through the cladding, cladding battens into the timber frame of the garage using timber drive bolts I happened to have. As the lengths of Unistrut I had were offcuts (only way I could transport them) I used joiners secured to the channel with bolts/channel nuts. Finally, I added hanging brackets for each panels to help carry the weight of each panel / so I wasn't reliant purely on bolts clamping the panels in position. I fitted the panels, sitting them on the hanging bracket and bolting them around 300mm from top and bottom as pictured; The ends were secured using Z brackets I cut down using a grinder (thanks @JSHarris) so that they clamped only the frame and did not overhang the panel itself; Long M6 bolts with large washers were used to secure the panels into the rails where they met with each other; The channel nuts (also known as Zebedees) into which the long M6 bolts were secured; I used M8 bolts and channel nuts for the joiners, end and hanging brackets. My electrician connected the system up, wiring the panels to a DC isolator, into the Inverter which in turn is wired into the garage CU via a meter and AC isolator. 2 hours work for him. Switched on, the Inverter ran through all its self tests and everything okay. Sadly at that point it clouded over and the heavens opened so only a few watts being generated. Fortunately, today has been a bright and sunny day (albeit a bit hazy) and my 1.5 kWp system is as we speak, generating 1.2kW. The following shot was taken yesterday just before the rain came on, but all in all, I'm pleased with the way it looks (panels mounted so they read visually with house windows). Cost wise the system (1.5kWp plus a spare panel), mounting rails, nuts, bolts, brackets, isolators, meter and electrician (@Prodave was kind enough to give me the DC cable he had left over which was just enough for the job) total £550. I already had the inverter. Final job within the next 28 days is to notify the DNO of the installation.1 point
-
Sounds fine. Specific shape and size of handrails relates only to “Buildings other than dwellings”. Also TBH: “Flights in a private stair with a total rise of more than 600 mm and a common stair in a block of dwellings, should have a continuous handrail that gives firm support and a firm grip………”1 point
-
It is better to keep the outer leaf up to floor level, this gives the cladding something to meet up with that won't rot and gives the telescopic vent somewhere to sit.1 point
-
Impossible to be 100% certain but should be okay. I would use the wall to partially support the weight and make sure the floor load is distributed evenly across the footprint of the tank stand (no point loading).1 point
-
Unlike @joe90's home. Consider filling the roof with integrated PV. WIth careful choice of module sizes, and no hips, you can get a lot if kWs on. Then connect up as needed. It is expensive to do it afterwards. If you are having a room in the roof, consider not having any windows on the PV side. That way you have no shading, less overheating and enough natural light half the year. North facing windows give a nice light.1 point
-
It seems heating is a bit of a black art. That's really hard to accept when you've decided to plan and get things right and part with all your hard earned cash... It seems to me you can only be about 80% sure how a building will perform in real life. Keep reading until you reach a point you can accept you have protected the downsides for your situation as much as possible.1 point
-
Welcome welcome. Reading this and looking at your requirements my mind instantly turned to cooling not heating. If you require 16deg in the attic you'll need air conditioning! . Your design sound eminently sensible. Minimal outside wall makes a house better to heat and cheaper to build. Given your location passivhaus will be easily achievable with a good builder or a package build like MBC timberframe. Q1. Easily in a new house with good insulation. Plan on 300mm EPS in the floor. 300mm EPS/cellulose/mineral wool in the walls 3-400mm cellulose in the roof. Q2. Yes avoid gas. It is bad for internal air pollution and health. We cook on induction. Cooking is better than gas having lived with both. Cleaning the hob is simple. The only annoying bit is the touch controls are a pain at times. ASHP can generate plenty hot water. Size you tank as large as possible though 300l minimum. Bigger is better. This will allow you to store your water at 50deg meaning better ASHP efficiency. Q3. I don't know much about them but they're AGA style electric cookers AFAIK. The smallest one in the range does 1.5kW which on its own is lightly to exceed your house heating load for most of the year. Assuming it will take an age to heat up like cast iron cookers of yore you'll lightly not be able to get inside the kitchen with the heat by the time it's ready for use. I could be wrong and it might be ok in a large open plan room, but caution is required. Q4. If you share some sketches there's plenty of knowledge here, most of us have learned through getting it wrong! Q5. Pass. Other thoughts. Build a compact, airtight shape with due regard for overheating. ( Appropriate glazing, shading , blinds, ventilation, high decrement delay roof and wall buildups) Use an ASHP for UFH on the ground floor. Get one that can cool the slab too. Put a multi split A2A unit ( air-conditioning) upstairs on the 2nd and 3rd floor for cooling and maybe winter heating (you really won't need it) Best of look and looking forward to following your progress.1 point
-
Kim There are no easy answers to your question. But there is basic school physics. ASHPs and jumpers would be normal in any house. Why would you want, in a UK winter, to be dressed in Cornish National Dress (even in Devon). If people want a very hot house, then fit a larger heating system. The way you design, and orientate your house can have a large effect in the energy usage, it is all about surface area to volume ratio. PV on a roof will absorb about 20% of the energy hitting it, helps to keep the rise in temperature down. Cooling can be combined with MVHR. MVHR is usually designed for minimum requirements, but there is nothing to stop you oversizing so that a usable amount of heating and cooling can be delivered/dispersed. An ASHP can cheaply and reliably deliver DHW to 50⁰C. Plenty hot enough for a bath. Just a case of sizing the storage cylinder correctly. Really just a case of sitting down and working with the numbers. Dull and boring, but pays dividends.1 point
-
I could put 36mm x 4mm stripwood behind the OSB3 at all its studs to make it effectively 15mm:
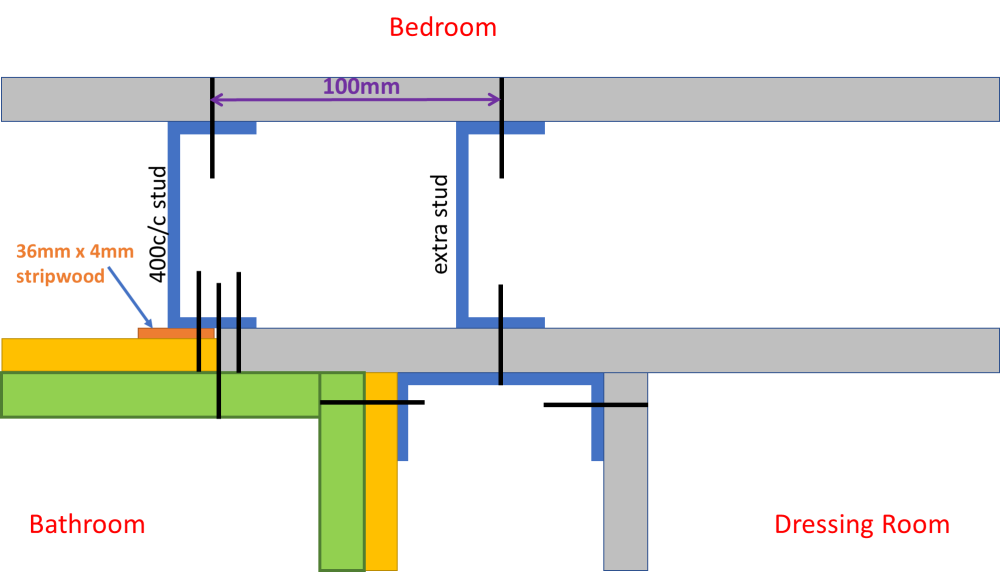
 1 point
 -
No 1, the immersion heater. Put the 3kW element back. Fit a PV diverter, These send excess power to the immersion heater and by pulsing the power ensure the power sent to the immersion heater exactly equals the surplus that would otherwise be exported . The tumble dryer. Good for getting a heat pump model. Now modify your usage. A TD does NOT need to "dry" the clothes. We use it sparingly for "fluffing" the things like socks and towels. A short time in the TD then finish the drying on the airer (or outside in summer) is all that is needed to ensure fluffy towels. The rest of self use is shift the use of the big appliances to the middle of the day, on a timer if you are not in. The other thing I do is have the timer for the ASHP set to start DHW heating at 11AM. By then there should be reasonable PV generation so some or possibly all it is using will be from the PV. Fit an export meter (if you don't have a smart meter) so you can see how much you are exporting to see how well you are doing. I am only exporting typically 100kWh per year.1 point
-
Interesting, will have to get blinds and add motors later!1 point
-
Wrap the joint in composite plastic. A vacuum bagged and autoclaved wrap of carbon fibre should outlast most of us.0 points
-
Strap a structural steel to it - sorted !0 points