Leaderboard


Popular Content
Showing content with the highest reputation on 11/20/21 in all areas
-
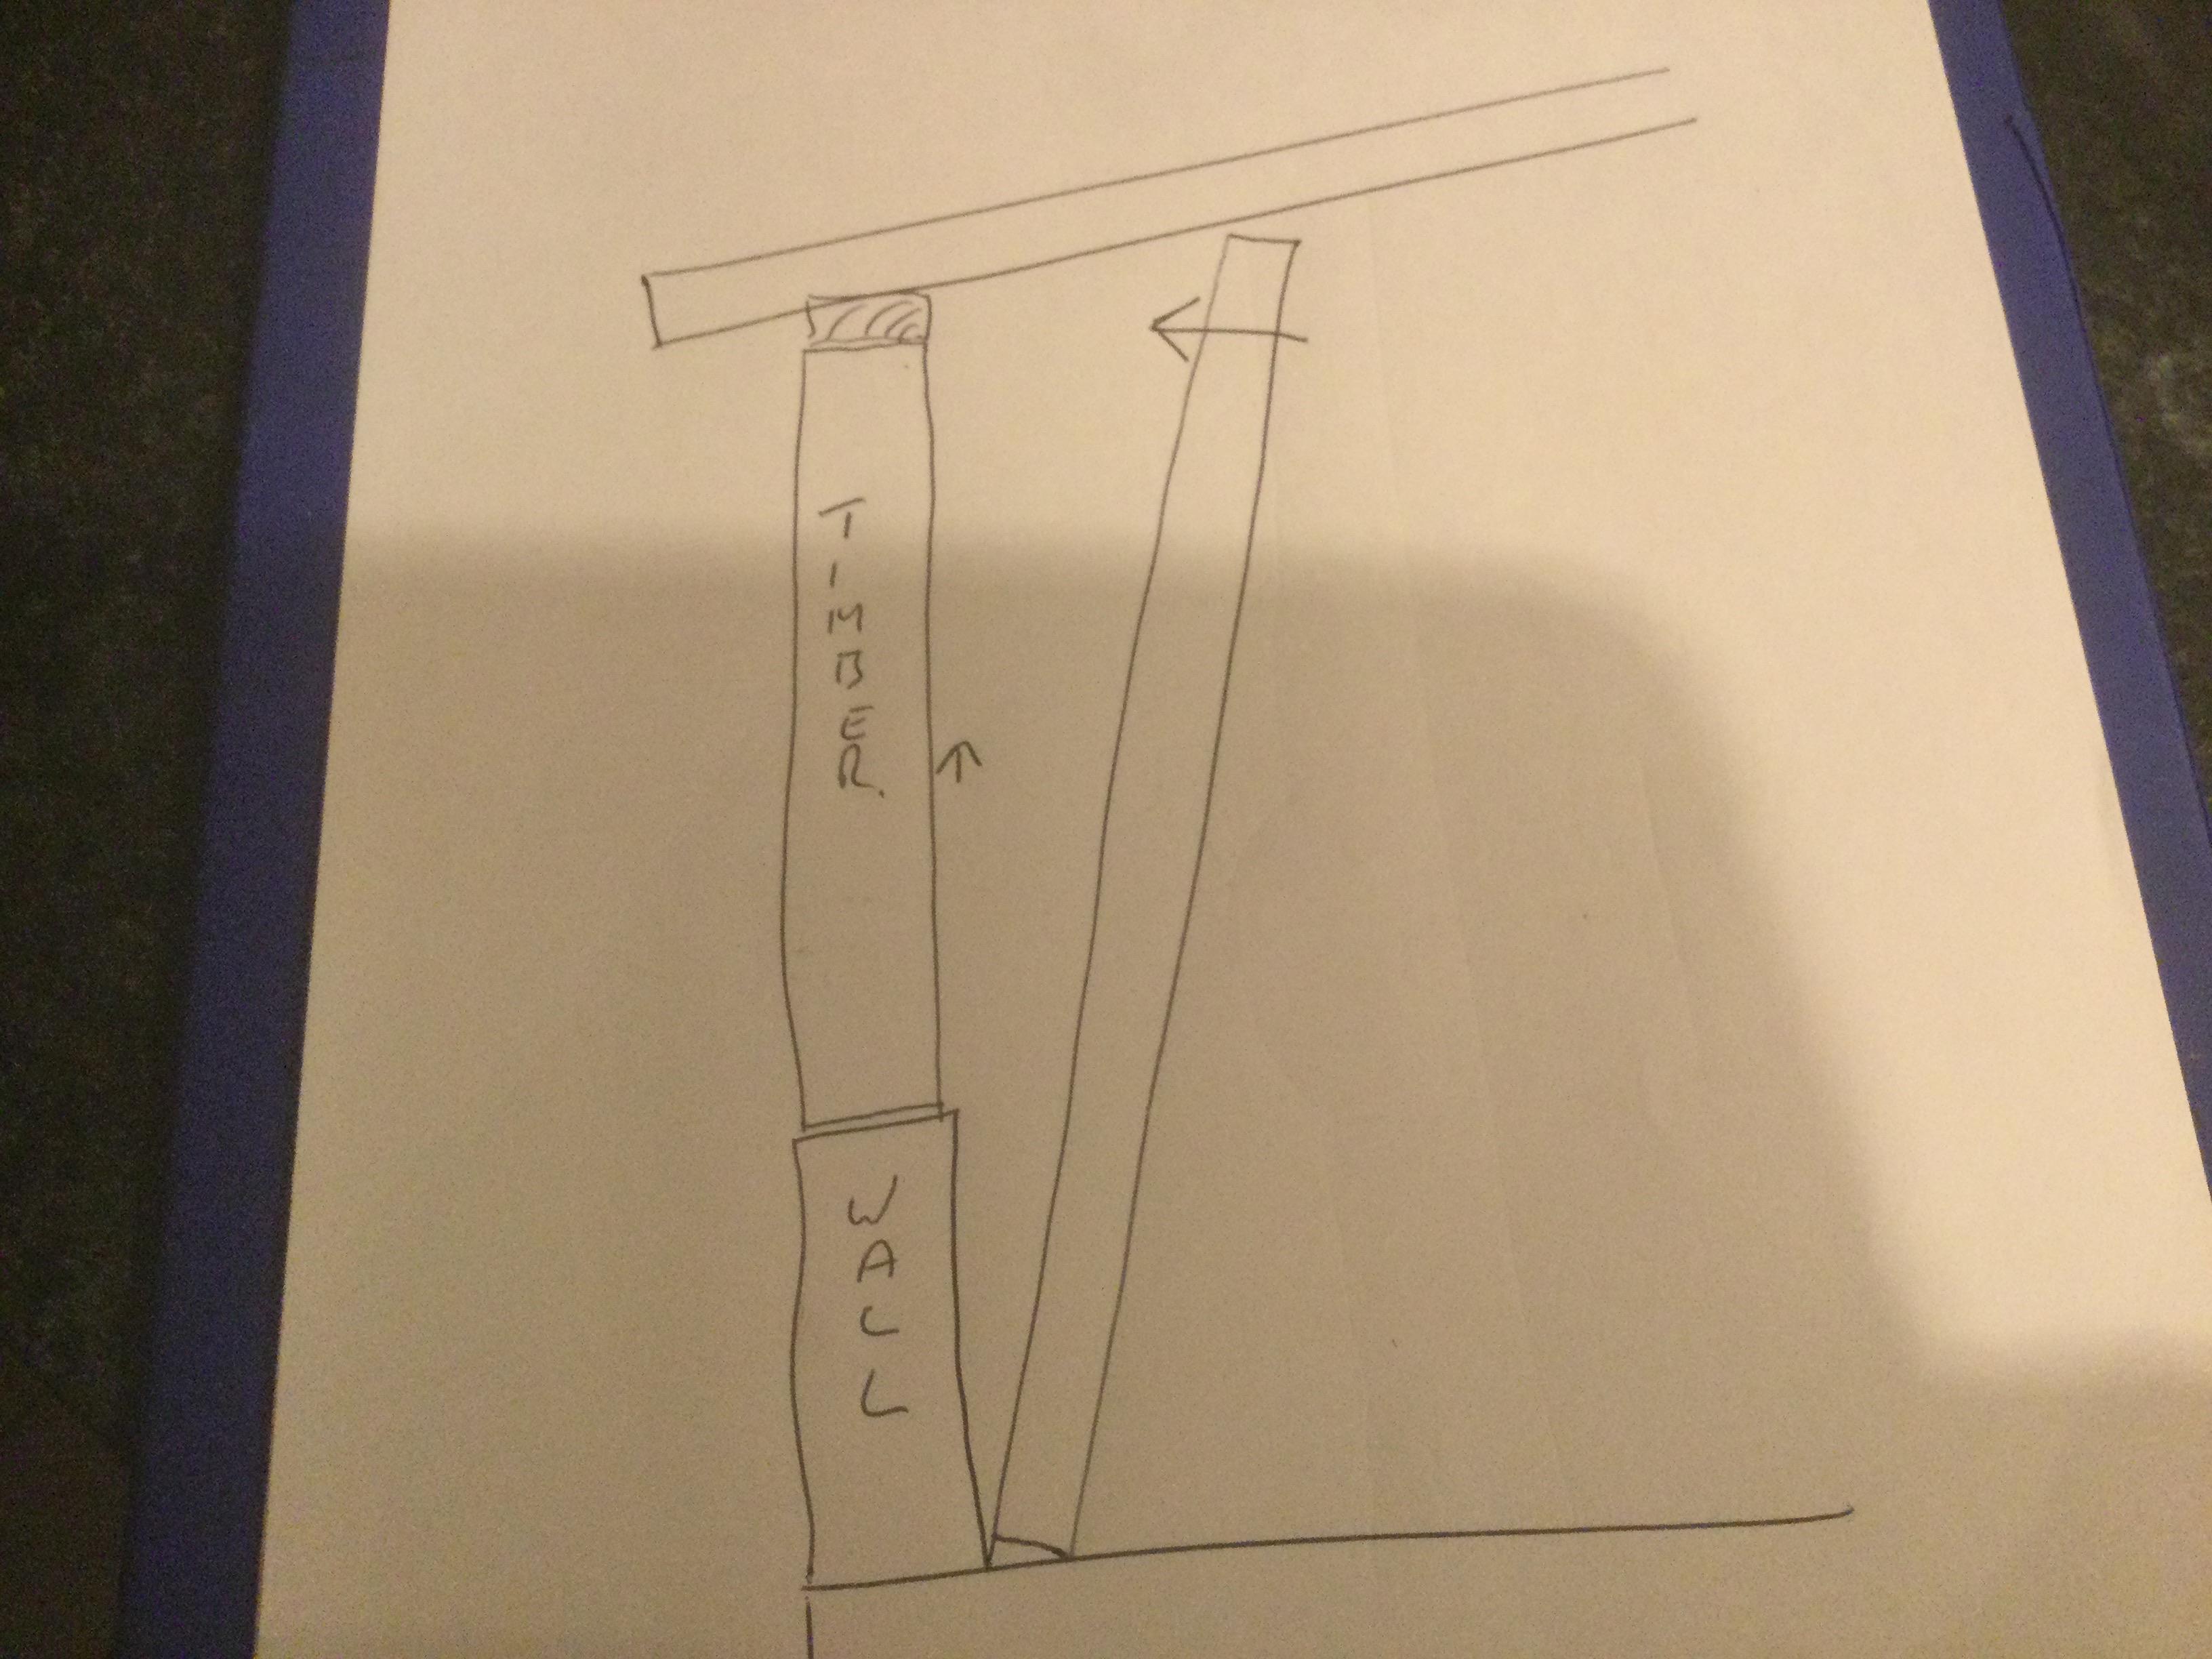
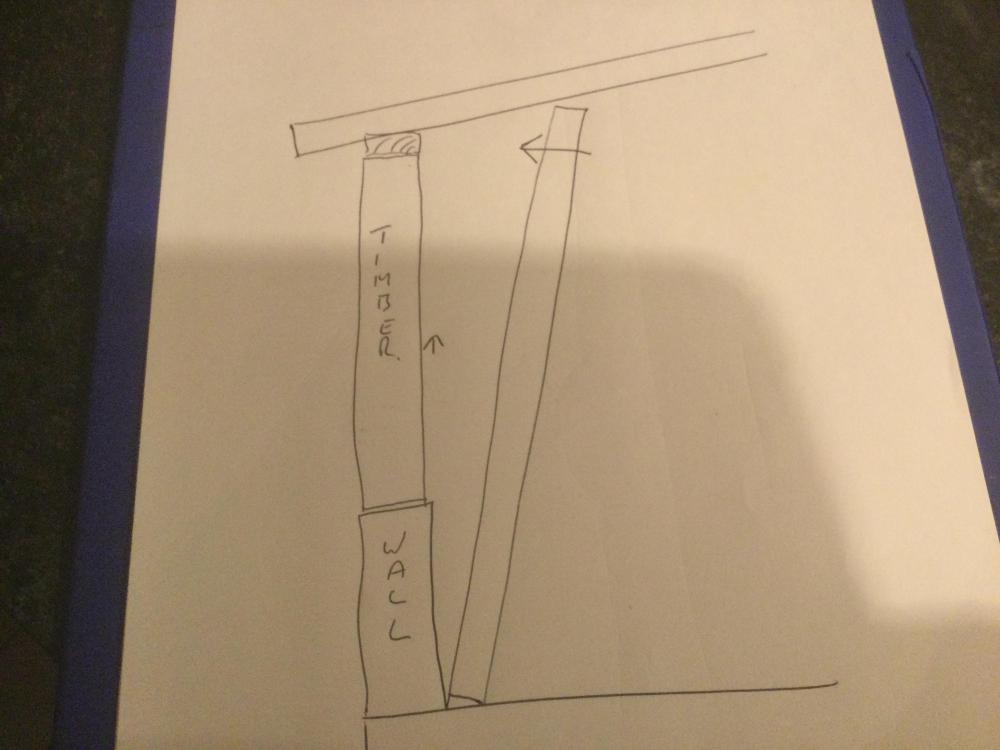
Is the ceiling In yet?, if not get some 4x2 a little longer than floor to ceiling joist height, against the wall at the bottom at an angle and slide (wollop) against the ceiling joists, this will lift it the small amount you need.
 2 points
 -
Here you go - Velux modular long lights. Will do what you want, out of the box design and can also be opened. https://velcdn.azureedge.net/-/media/marketing/master/velux modular skylights professional/pdfs/50405501v11953048010technicalhandbook31.pdf2 points
-
Hi everyone, just starting out on our first new build up in Caithness so joined the forum, hopefully will pick up some good tips and advice on here. Going for a kit from Haus in Inverness and will have the planning through shortly, then the fun begins..... Will add photos and updates as we go along, pretty daunting now it's all coming together. Regards Alan1 point
-
Bonding plaster cut with a little cement1 point
-
I don't know what CT1 is, ProDave, but the good news is that the bugger is finally sealed. Two fibre washers, a whole roll of PTFE and then the entire thing packed round with "Leak and Repair Mastic" from Homebase. Thanks for the help, All The Grey Sage1 point
-
Good that they are keeping production and jobs in UK going but good job i don't need those bricks!1 point
-
No but building regs requirement.1 point
-
brilliant! Thanks so much. We have plenty of timber, and no ceiling on as yet, so will have no problem doing this.1 point
-
Put a LOT of CT1 on the threads, both the internal thread and external thread and screw it together. Wait for it to set before filling with water. You will probably never get the heater out again, but that doesn't bother you. If that won't fix it, the leak is unfixable.1 point
-
Hi, depends on what car jack you have and where you can lift/support your structure. think of putting a fence post on top of the jack to make it much taller (assuming you will lift under a rafter or door header etc. Be careful to make sure it is vertical and jack is secure or the timber will want to push out …. With force. an acro prop is the safer and easiest way of supporting/lifting joists or a doorway etc.1 point
-
@Curtis you’re looking at over £2k/sqm so a decent budget and nothing non standard other than the roof in zinc. Can’t see why you can’t hit that number to be honest.1 point
-
Patination oil does work but make sure they also put some on the underside of the lead. TBH there is nothing stopping you changing the design now to a framed design with 3 or 4 panels and a back gutter - if you’ve not ordered the glazing, it could all be modified. Patination oil doesn’t fix your original issue here which is one of the unit design and the glazing type, both of which do need to be addressed before you finalize the order for the glass. I’m assuming that there is a timber fillet/bearer against the wall that is shaped for the glass to sit on ..? How has that been sealed against the wall ..?1 point
-
No, leave as you’ll create bigger problems. DPC should be bridging the cavity, some will attach to the side of the frame. Your wanting the foam to fill the void.1 point
-
I'm not convinced that you'll have much success with the single glazing unit so close to the wall. It looks very tricky to install and difficult to detail. Running a 3.9m roof window parallel to the existing house will no doubt create some issues with differential movement of the structures as they won't be tied together very well. This could well lead to leaks and drafts not to mention the nearer it is to the existing wall the more difficult it will be to keep clean with rain splashbacks etc. I would scrap the idea of a bespoke unit altogether. Detail the flat roof to wall junction as per a normal flat roof setup and opt for 3 900*1200 velux flat roof units placed at least 200mm away from the wall ensuring that there's plenty of clear area all around them for rainwater drainage. I haven't checked but I assume Velux (other brands available) have taken care of all the issues with breaking glass etc.1 point
-
It’s for exactly the reason mentioned, vertical DPC is “usually” installed and used to stop water travelling sideways. I’m not a fan of it, as that means if water is getting to the point the vertical DPC is stopping it travel sideways. Then it has to travel somewhere and just shifting the problem rather than preventing the problem (if a water issue exists).1 point
-
My conservatory roof has 12 panels approx 3m x 1m each, laminated inner and outer , guys installing them lay on them to fix (with a sheet of insulation to stop point loading. ) The lead flashing above was treated with oil (as it should be) and I have had no staining so far ?1 point
-
hi, Yes, said dot dab was normal and OK, stuck on and would NOT come down. ButI had to go with my gut and also all the good advice here. I think even if I asked him to screw it in, i would not feel the rest of the work would be up to standard - I'm paying for expertise, and for me to tell him to screw it in, does not constituent as expertise. The plasterboard he stuck on with the dot dabs have now been removed. Peace of mind restored for now.1 point
-
The 5mm gap is the gap to aid fitting. It MUST be filled otherwise it's just a route for the outside cold. The expanding foam has enough "give". You will need a proper foam gun and low expansion foam, gun cleaner etc. I'd also run some masking tape up the window before you do it. The absolute ideal, professional method is to use an expanding foam tape like Coompriband before the window goes in. Around the outside of the window and cill is a channel. You stick this tape on only when you know the window fits and you have to be quick about it. The tape then expands from say 5mm thick to 25mm thick and seals between window and wall. Those in the know here actually go to the lengths of, in effect, applying airtight tape around their windows to where they meet the walls. It's all very well btw, sealing everything up but you must consider ventilation to. Have your windows got trickle vents fitted?1 point
-
The way I understand it is that toughened glass can take a greater impact before failure, then the laminated catches the pieces.1 point
-
Were there wooden windows there before, that the uPVC windows replaced? Have you got cavity walls? Two brick / block skins separated by a cavity. The ideal when fitting a replacement window is a 5mm gap all round but perhaps had to achieve in practice unless you DIY, chip bits of wall out to measure the old wooden frame exactly etc. A firm you get in won't go to the nth degree and likely allow a bit more. Or as you and I know a LOT more to make fitting easier. They won't give a sh!t you're left with draughty gaps forever. The ones that did some of my windows didn't even use foam. Tbh I'm not sure what I'm looking at there ref that black DPC. Yes, that's what it is, judging by the diamond pattern in it. Comes in rolls 100 - 200mm or more wide. Traditionally, wooden frame windows would be wrapped in a damp proof membrane to stop the frames getting damp and transferring damp/cold, from the outer to inner wall leaf (assuming a cavity). Is it wrapped around the uPVC frames and just tucked over inside? I've seen folk wrap a uPVC i.e "plastic" window in more plastic before, insisting it "stops damp" ? @craig is our resident window expert and can probably best advise what you might have there and the history of fitting.1 point
-
My choice would also be a system boiler and 300-500L tank. Perhaps with the boiler mounted on wall over the tank. If that's really not possible... Storage combi are just regular combi with small tanks built in. They help boost flow rates but only as long as the tank allow. With three showers going that wouldn't be long. Think I'd try and find a high power combi or possibly two small ones. Let's say you are happy with the flow rate from a 10kW electric shower. Then a combi to power three would need an output of at least 30kW. So I'd look at something over 30KW and check what flow rate they say the DHW side can deliver. Or perhaps 2 showers on the combi and one electric? Or you can measure the flow rate from your favorite shower and work out what flow rate you need for two or three of those and check the boiler can deliver that and more. Then you also need to check that the cold mains supply to your house can deliver it. Then check the CH of the boiler is adequate for heating the house. I'd also look for a fully modulating boiler. I'm not a plumber or heating engineer.1 point
-
OK some figures... 8kW is about 35A 10kW is about 45A So 4 of those would be way over 100A single phase that many houses are limited to. In fact I think many houses only have an 80A fuse in their nominally 100A supply. I'd like to see the figures for a house with ASHP, Electric Shower and Car charger. Personally I like a better shower/ better flow rate than an 8kW can produce.1 point
-
I am in Cornwall, we don't have extreme heat, or cold. Just wind and rain. Get a proper thermal model done.1 point
-
Yep, I have used sub frames on my build, mainly so the window openings are fixed and hopefully the windows slot right in.1 point
-
My own opinion would be to brander the ceiling, with 2x1 timber as a minimum fix these 90 deg to the joists and then plasterboard.1 point
-
I'm going to use a similar process for retrofitting them to my window reveals, but fix them with something like this to solidly attach them to the masonry. Saves on using plugs.1 point
-
not that's its much help but subframes (pre built cavity closers) are much better as they are tied into the brickwork as its built up.1 point
-
I haven't seen silicone used for these. If external is render, will this go on after windows and just return into the window frame?1 point
-
I didnt use cavity closers, they cause too much air leakage and cracking - closed my own cavities without and cracking or air leakage and more cheaply too1 point
-
OMG this looks terrible…….1 point
-
Something I wrote in another thread. "Once the low expansion foam can is on the gun you leave it on until it is empty. You do not take the foam can off to clean in between uses unless you need to change foam types. You use the gun cleaner with the red nozzle on to clean excess, WET foam from around the nozzle (and anything you might get it on accidentally). You undo the knob screw at the back of the gun to adjust the foam flow rate and squeeze the trigger. When finished for the day you turn the knob to close the valve and clean the end. Put it aside and pick up the next day or next week, month etc. When the can is empty: Have an open plastic bag/bin liner ready. Have the gun cleaner at the ready with the red nozzle on. Unscrew the empty can quickly and put straight in the bin bag. Pick up the gun cleaner and use like an aerosol to spray up inside where the can screws on as some foam will be coming out there. Then screw the gun cleaner into the gun and give a blast thru pointing the nozzle into the bin liner. Remove the gun cleaner and screw on your new can of foam. After you have used the gun then yes you can leave it upright with the foam can still screwed on, with the base of the can on the floor for however long you want within reason. Cleaning these guns doesn't mean a quick squirt through. Pretty sure the instructions say to put the gun cleaner on and leave for X minutes before blasting through finally. This is more for if you want to thoroughly clean the gun and store without a can on".1 point
-
The 5mm gap you can see might widen across the width of the frame. Whatever, 5mm will be like draught city at the same time as losing heat. Some window foaming fun here:1 point
-
Leave foam to dry if poss, makes a mess trying to clean when wet.1 point
-
Fantastic sounding project. We are not far from the western borders of the Peak National Park in Cheshire. I walk into the park from here on a few more lengthy strolls. Good luck with build.1 point
-
Welcome, looks like a fantastic project, looking forward to seeing progress updates, pics and the obligatory problems …. Sorry, but they go hand in hand with interesting builds.1 point
-
A warm roof is insulated at rafter level (like mine), yes the volume of the house is larger so will affect the overall u value but I wanted a usable loft storage space and find it works fine as long as your insulation is adequate.1 point
-
Then he has probably bodged the whole thing. I had assumed this was a long-fitted toilet. The smell of blocked drains is distinctive and sort of sickening. Doesn't smell of poo but of swamps and festering stuff. My tongue is tingling with displeasure as I write this, so that may be a clue from the depths of my instincts.1 point
-
I'd swap bedroom 2 and the office - less chance of hearing your guests snore.1 point
-
0 points
-
Exactly. Could I just nudge the argument a little further ? Anyone can be a scientist: I would encourage that person to apply scientific method appropriate to their age. Sound application of scientific method, coupled with an enquiring mind makes everyone a scientist. And thats especially relevant to the building sector: tell me - what's Thermal mass then??0 points