Leaderboard
Popular Content
Showing content with the highest reputation on 05/14/21 in all areas
-
I'll save my UFH pipe laying for the ground floor when I will have lots of time. thanks all for the advice and I'm 99.99999999% sure we've made the right decision. ?2 points
-
Well done, you've saved yourself a lot of stress as laying UFH pipe is not as easy as you think, especially when you're on a deadline and doing it first time. I had planned to do my alu spreader plates on GF joists and lay pipe as a DIY job over a weekend. The TF crew just stepped in and took over the pipe laying as I was too slow - they'd done it dozens of times before and did a great job. Cost me a few bacon sandwiches but that was it!2 points
-
Sorry i missed your post above. That paperwork suggests you have a decent size combi (32kW) so yes the suggestions we made above still stand. If you have ever had an electric shower they are typically 8-10kW so your 32kW combi should give you good results.2 points
-
2 points
-
above 5 properties you would be expected as a minimum to provide 4.8m plus footpath along full length. Most highways would push for 5.5m plus 2m foot path as you need access for a Bin lorry/ Fire engine and provide a turning point.2 points
-
1 point
-
1 point
-
@SteamyTea posts do that sometimes but you would struggle to argue with the basic analysis even if it has roamed a bit from the thread - interesting all the same.1 point
-
Who would know , it would look identical to the plans made public from the road , the only way anyone other than you would know was if they physically measured it.1 point
-
Just do it!!! Nobody is ever going to notice that a house is a few mm wider than planned. Unless you are in a really tight spot and say, a metre from a boundary. We did exactly that by changing ICF suppliers and having a block that's 50mm wider once we got the extra insulation on.1 point
-
1 point
-
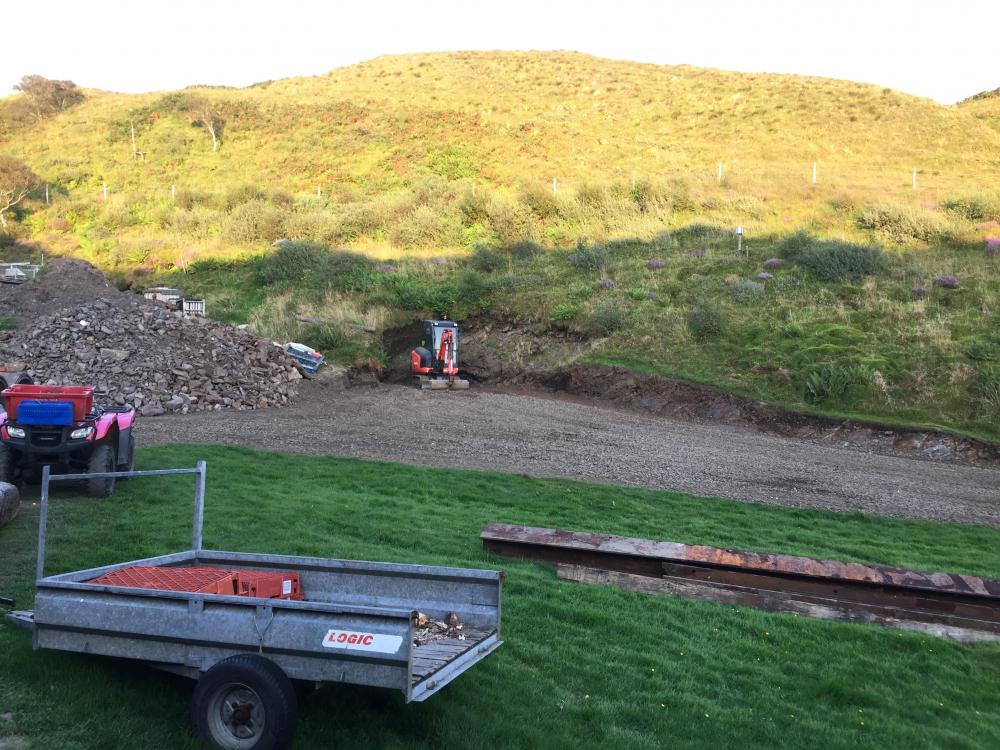
this is what I do and am fortunate to have hillsides of good shale to excavate as required. I did this area last year and it extends 50m to the right (out of photo) where the road goes, all the materials were won from where the digger is and the small cutting to the right of it. took me about 5 days with a dumper and digger but it’s super solid and only cost me the £400 in hire fees plus the fuel and my time.1 point
-
Yikes, that's expensive! But yes, OSB supply is a problem. Is the pine plywood you've been offered definitely a structural grade? Probably Elliottis pine if it is, I'd guess. The pine plywood should be fine for sheathing, it's been used for donkeys for sheathing. The only times you need to worry about mould is if the moisture content in the wood becomes too high, but then you're likely to get problems with the osb too. If your shed is built right, it'll be dry enough and ventilated enough so no need to worry. Don't whatever you do put that vapour barrier you linked to above on the outside. You need a breather membrane. Your builders merchant should have something on the shelf that'll do the job. I'd recommend you go for 100mm insulation at least. HTH.1 point
-
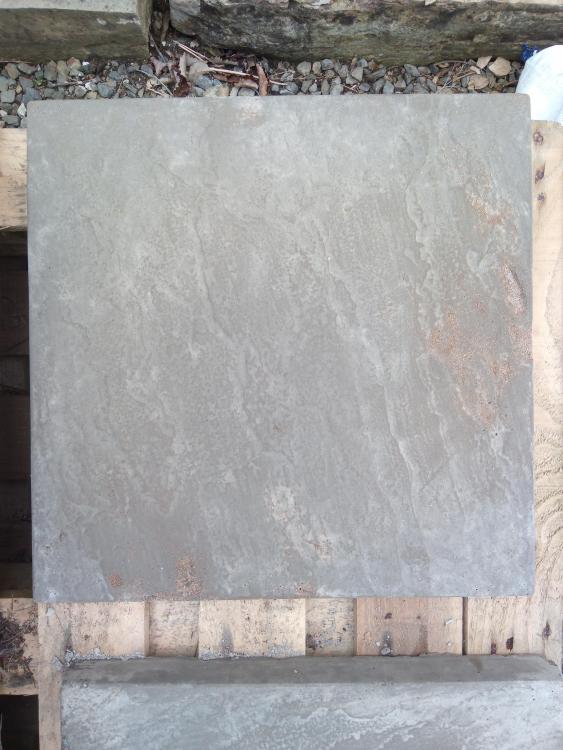
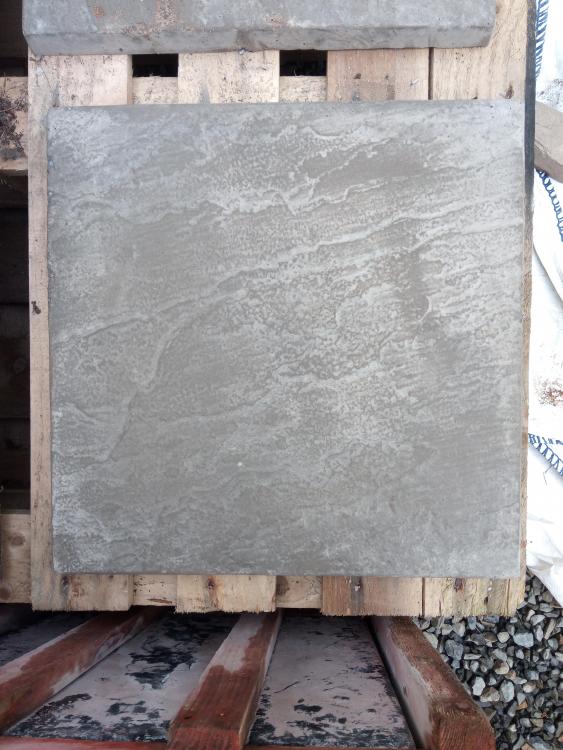
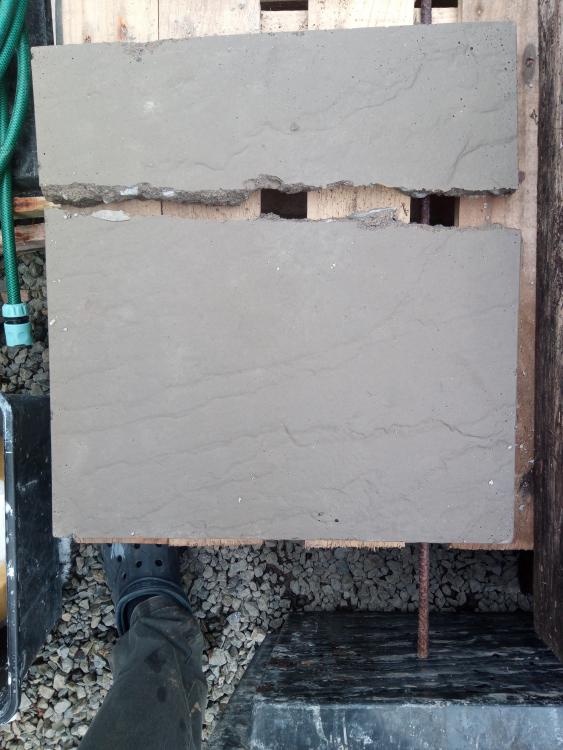
Trial slabs. Concrete 3:2:1 mix by hand in barrow. Slab 1, Veg oil used as release agent Clearly I didn't get it all fully mixed. Slab 2, veg oil used as release agent. Slab 3, silicone spray used as release agent. This slab was made with quarry dust as the aggregate, whereas 1 and 2 used Type 1 MOT. It was also a wetter mix which I think is why it broke. Lessons learned: Veg oil as release agent works, as does silicone spray. Concrete mix shouldn't be overly wet. 72 hours in mould to cure may be better than the 48 I gave them. Use a concrete mixer to ensure consistency of mix. I'm reasonably happy with first slabs cast. My neighbour is kindly lending me his mixer, and I'm hopefully getting a loan of a vibrating table to speed up production.1 point
-
1 point
-
Hardcore, tons and tons and tons of hardcore - at a guess, about 141tons if you are just about 3m wide and the existing ground is not bad, that would give a nice layer. That sounds bad, but to be honest you should be able to get that for about 2K if you do a deal with Tarmac or similar. I was offered a tipper truck full for my build for I think about £12 a ton plus haulage, MoT is cheap, just not when you buy it by the ton bag. Where can you put the top soil? If you scrape away say 200mm of soil that is about 105cubic meters you need to lose, if good top soil you could sell it or use it. Then you need to start trucking in the hardcore, layer it, compact it etc. Last 40m can be topped off with a decorative gravel or block or whatever, but to be honest, a good hardcore road isn't unsightly especially if the verges look smart and what no, so even just the last 10-15 might work for you.1 point
-
I have not read this thread so excuse me if I have this wrong - rushing out of door - I would not use pine ply anywhere as it really attracts mould in my experience - got to go.....1 point
-
anyway, I've made the decision now. we're not having UFH in the basement for now. we'll see how it all goes and can always add something later if at all required but we don't think it will be going on the levels of insulation we have and other member's experiences. means my original Saturday plans are now back on! woo-hoo! ?1 point
-
Given that is the core component in a combo boiler and it’s less than 6 months old, it kind of puts it firmly on the “do not specify” list.1 point
-
What is the XFLo adding here if this is first floor..?? I would - assuming joists can support - use 18mm battens at 400 centres with the pipes in between, and fill with a pug mix of 6:1 sand cement. Cap this with 11mm OSB, then your parquet. That build up of 29mm is less than your Cellecta and it’s rubber flooring and the pug mix adds a decent amount of dampening mass. @ProDave has something similar so can comment on the sound issues.1 point
-
My sister used Wiltshire building control for a project and it was fine, no problems there.1 point
-
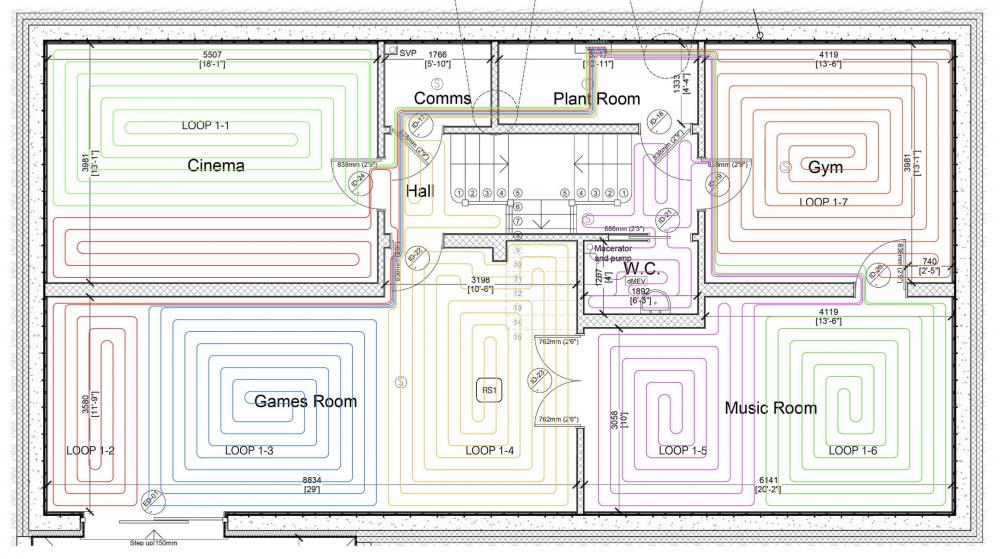
It's exactly what I did. Insulated raft foundation will be one heating zone, so no point piping the UFH loops to exactly match the rooms above.1 point
-
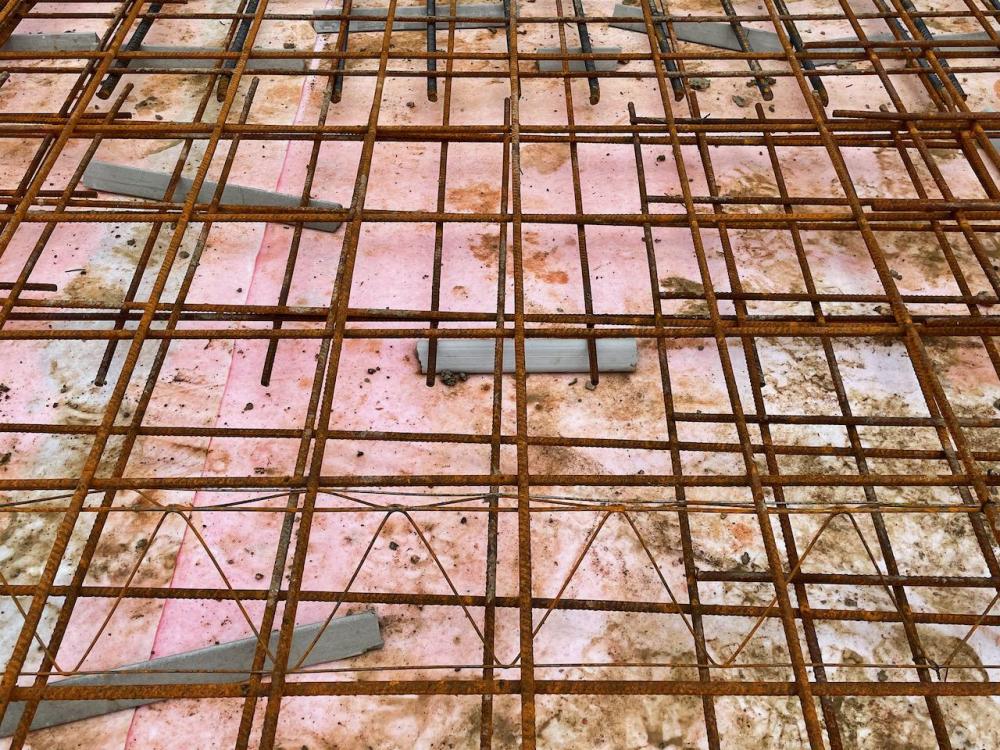
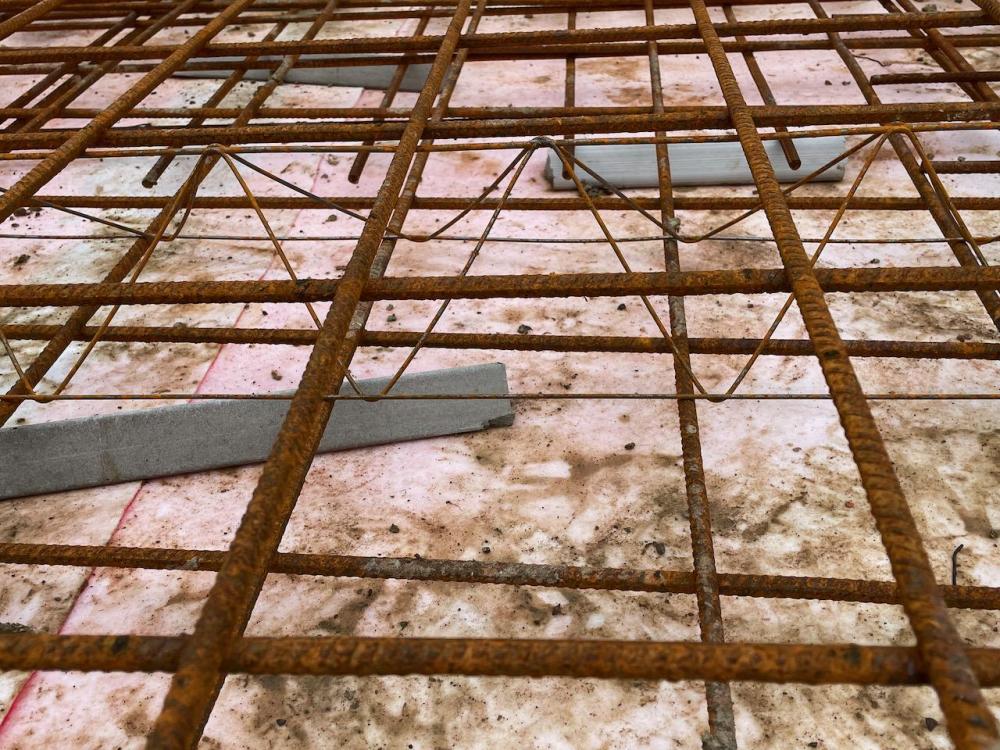
No issues but you won’t be able to thread pipe under the mesh. You will have to lay the bottom mesh and the chairs, lay the pipes then lay the top mesh and cable tie the pipe up to the top.1 point
-
Rather than route pipes through crowded doorways I drilled holes through block walls, lined with slightly bigger pipe 300mm long. I don’t see the point In all pipes being through doorways, no point loading will be on the pipes.1 point
-
Timber frame sole plate to concrete slab sealed with this primer on concrete: https://www.greenbuildingstore.co.uk/products/pro-clima-tescon-primer-rp/ And then taped all the way around a very long permiter with this: https://www.greenbuildingstore.co.uk/products/pro-clima-tescon-vana/ Sticks like no-ones business, it's contact activated so make sure you use the blue scraper it comes with to press it down. I then had a levelling screed go down, so that tape ain't moving, ever! If you want a flexible airtight seal e.g. around soil pipe penetrations you can also use this (and tape if you want to go mad!): https://www.greenbuildingstore.co.uk/products/pro-clima-orcon-f/1 point
-
Dependant on your consumption of hot water, a 180L UVC ( un-vented cylinder ) will give balanced high-flow hot and cold water supplies to all mixer outlets. Relatively cheap to buy, requires a G3 registered fitter to install, and ongoing annual G3 inspections, but will be very efficient, quiet, and will require no bulky, noisy cold water storage tanks which you need if you go for a "cheaper" vented cylinder. With vented you may also need a pump to get a decent shower /fill the bath quickly. If you change to Octopus Go! tariff then you can heat the cylinder once a day, overnight, at 5p/kWh. You may need an occasional midday top-up depending on your bathing / hot water patterns. An UVC is simple, efficient and reliable, with few moving parts. If you go for a stainless cylinder, and keep the G3 up to date, you will get a lifetime warranty from Telford. Speak to Trevor@cylinders2go and mention the forum for favourable prices. Instantaneous water heaters are the anti-christ. You can go for a decent electric shower, but the bigger the kW rating, the more dependant they become on the cold supply being dedicated solely to the shower times. Flush a loo whilst using these and watch the thing shut down. The most reliable / least erratic electric showers are around 7.5-8.5kW but will never ever come close to the showering performance of a balanced hot water feed from an UVC. You would still need an electric multi-point heater to service sinks / basins even if you go for an electric shower, so cost will soon start to spiral, as well as that becoming a more expensive install, and far more points of faliure. With stored hot water you can choose to cherry pick low cost pockets of electricity, but with instantaneous, you're Donald Ducked.1 point
-
In that case you might as well get UKPN to put in the 3 phase head whatever, if it doesn't cost much more. All my research (talking to UKPn in particular) was that you can definitely get any supplier to put a single phase meter in on it, but having the 3ph head now will give you future flexibility should you ever need it.1 point
-
Thanks for that very informative reply @Nickfromwales, He was worried if He laid them brick bond they’d all fall off. He's only laying 10 boxes and none are on the floor, just doing the shower area and side of bath with a niche. He’s been looking at the levelling systems so will probably be getting them, I’ll tell him to test them for kick and see how bad it might be and think he’s looking at the mapei keraflex for the adhesive. Ill get him to take some pics if he ever finishes it. Regards. James1 point
-
Indeed, CIL exception applied for and commencement notice issued to the council today (with a written confirmation back from them that everything is in order for the exception). Looks like all is set for commencement for Thursday, woohoo.1 point
-
The BuildHub forum was founded by the Forum Foundation Group (FFG) in 2016, following the closure of a large UK-based self-build forum. The forum has continued to grow significantly and we currently have over 8000 registered users, and that number continues to rise daily. To date, BuildHub has been managed on a private and voluntary basis by a small group of members known as the Forum Management Group (FMG). The FMG looks after BuildHub's day-to-day running, including hosting and maintaining the forum software, moderating member posts, and managing membership applications. The FMG was originally constituted as a Members Association for the purpose of forum governance and ownership. While this was the quickest and easiest way to get the forum up and running, it has the disadvantage of not having an associated legal entity. The absence of a legal entity means that many suppliers will not contract directly with Buildhub. The result is that BuildHub contracts and assets such as forum software licences, server space, and URL ownership remain in the names of FMG members, which places a large legal burden on those members, and also involves risk to BuildHub. To address this ongoing issue, the FMG recently approved motions to: Form a Private Company Limited by Guarantee; and On an agreed date, dissolve the Members Association known as the Forum Management Group, and transfer its assets, including ownership of the forum, to the new company. To this end, Buildhub Forum Management Limited has been formed as a not-for-profit company, limited by guarantee. The company will operate the BuildHub forum website, provide a limited liability structure to own and operate the forum, and ensure that the forum software licences, server space and URL ownership are no longer subject to a single point of failure or irrecoverable circumstances. The company directors are not remunerated, and the costs for operating the forum and its support will be kept to those essential to run and operate the service. The date of handover was 30th April 2021, and this is the formal notification that it has been completed. BuildHub has always operated on a strictly non-commercial basis and will continue to do so. Advertising is not allowed and members may not offer services to other members via the public forum. This policy will remain under the new structure. Similarly, BuildHub intends to continue with its periodic donation funding model. Day-to-day operations will continue to be run by volunteers giving freely of their time and expertise in much the same way as it is now. This group will be known as the Operational Management Committee (OMC). Information about how you can get involved in the running of the forum will be posted shortly. In practice, your experience of using the BuildHub forum should be unchanged. As chair, and on behalf of the members of the now-dissolved Forum Management Group, I would like to express my thanks for your support of BuildHub since its creation. We look forward to the continued growth and improvement of BuildHub under this new and long-term sustainable structure.1 point
-
I'm in exactly the same position. Architect suggested extended door sill all the way out... But I don't think the EPS will take the abuse. I'm thinking of losing 100mm of the EPS and filling with concrete down. It's not a major cold bridge...1 point
-
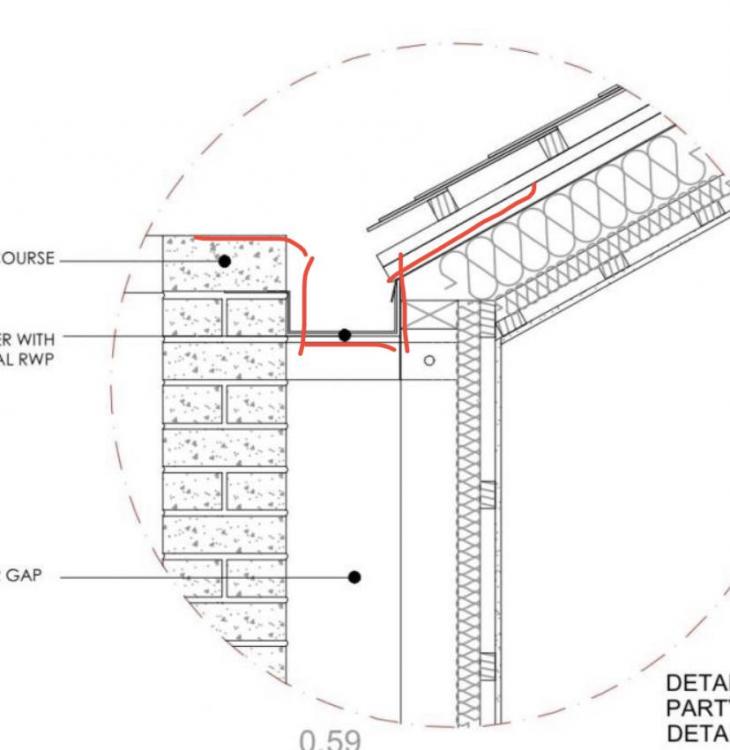
Very poor design .. Water shedding at speed will hit the bricks on the top not the gutter. That also looks a very large roof - I think you will need to check volume carefully as your gutter isn’t very deep. Over 10m, even at 1:80 drop you will lose 80mm or more than a course of bricks. I would create a very deep gutter all formed in GRP. It would be minimum 150mm deep, and lap both sides of the gutter up and under the tiles / slates until level. Ideally then add a coping stone on top of the wall or make an aluminum capping to go over the lot. Very rough picture below ..!! You will also need to insulate that corner properly under the edge of the tiles as that’s a horrendous cold bridge if you’re not careful.1 point
-
1 point
-
0 points
-
0 points
-
Ok I just wonder how far in the frame goes then.. this is the problem. I've got one loose thick 9x9 tile put down as a test for height. which I keep tripping over. Not -quite- finished yet Joe no.0 points
-
@joe90 and @PeterW I've taken another look and lifting up the top mat is never going to happen. here's a couple of photos of the mesh and chairs. if you both think it'll be a complete nightmare to run the UFH pipe as per the Wunda plan... then I think we're leaning towards just scrapping the UFH in the basement. I know that @Bitpipe doesn't have heating in his basement and says it's a comfortable temperature all year round so it is a possibility just to scrap it. I guess this is a dilemma all first time self-builders go through as I have never lived in a well insulated and air tight house so trying to get my head around the concept of not needing heating is a challenge!0 points
-
I'm pretty sure the basement guys have already tied all the steels together so would be a nightmare to undo it all and then re-tie it. (I'll just pop out and take a look) bugger.0 points
-
Ignore @jack - use my method instead. 1) Get a big shoebox - I used one that my rigger boots came in. 2) Put everything that looks like a receipt, including delivery notes and the odd instruction booklet, in the shoebox. 3) Do not print out email invoices, just leave them on email. 4) Now and again plan to sort through the box. Do not sort through the box. 5) Keep the box in a safe place. Occasionally forget where the safe place is and have a massive panic attack. Find shoebox and consider step 4) above. 6) Finish your build, get BCO sign off and feel smug. Realise that you now have 3 months left to deal with the shoebox. 7) Open box, riffle thought it, close box. 8 Open box, and sort into invoices and non receipt chaff. Feel a bit queasy that the invoice pile is smaller than you imagined. 9) Realise that most of your receipts are on email and spend the next month tracking them down. Using a hypnotherapist to aid recall is not mandatory but will help. 10) Wake up at 4am remembering a purchase that you have not found - get up and search email for it before you forget. Go back to bed at 6am happy that you've found another £3.75 11) Find the BH VAT thread, download the forms and start to fill out the spreadsheet. Realise that the two months you have left will not be long enough. 12) Familiarise yourself with the scanner you last used eight months ago. Allow at least 1 day to find and update scanner s/w on your computer. 13) Start scanning, printing and typing. Repeat for an eternity. 14) Realise you don't have a hole punch, card sleeves or treasury ties - spend £15 acquiring and debate of you can claim the VAT for these. 15) With about a week to go, finish the whole lot and feel smug at the neat bundle of filed receipts. Last time you felt this good about paperwork was a school project on volcanoes in yr 6. 16) Discover the back up shoe box with more invoices. Panic. 17) Take your VAT reclaim baby to the post office. Hope that the claim amount is enough to cover the postage. 18) Wait. 19) Panic again. 20) Get confirmation of claim success and receive funds. Entertain momentary fantasy about what you could spend it on before reality bites. Easy...0 points


